Herunterladen Inhalt Inhalt Diese Seite drucken
Velleman DVM9912 Bedienungsanleitung

Velleman DVM9912 Bedienungsanleitung

Digitalmultimeter mit automatischer bereichswahl

Werbung

Verfügbare Sprachen
  • DE

Verfügbare Sprachen

DVM9912
AUTORANGING MULTIMETER
MULTIMETER MET AUTOMATISCHE BEREIKINSTELLING
MULTIMÈTRE AVEC INSTAURATION DE GAMME AUTOMATIQUE
MULTÍMETRO CON AJUSTE AUTOMÁTICO DEL RANGO
DIGITALMULTIMETER MIT AUTOMATISCHER BEREICHSWAHL
USER MANUAL
GEBRUIKERSHANDLEIDING
NOTICE D'EMPLOI
MANUAL DEL USUARIO
BEDIENUNGSHANDLEITUNG

Werbung

Inhaltsverzeichnis
loading

Inhaltszusammenfassung für Velleman DVM9912

  • Seite 1 DVM9912 AUTORANGING MULTIMETER MULTIMETER MET AUTOMATISCHE BEREIKINSTELLING MULTIMÈTRE AVEC INSTAURATION DE GAMME AUTOMATIQUE MULTÍMETRO CON AJUSTE AUTOMÁTICO DEL RANGO DIGITALMULTIMETER MIT AUTOMATISCHER BEREICHSWAHL USER MANUAL GEBRUIKERSHANDLEIDING NOTICE D’EMPLOI MANUAL DEL USUARIO BEDIENUNGSHANDLEITUNG...
  • Seite 2 DVM9912 VELLEMAN...
  • Seite 3: Safety Information

    If in doubt, contact your local waste disposal authorities. Thank you for buying the DVM9912! Please read the manual thoroughly before bringing this device into service. If the device was damaged in transit, don't install or use it and contact your dealer.
  • Seite 4: Safety Symbols

    1. ALWAYS turn the function switch to the OFF position when the meter is not in use. This meter has an auto OFF function that automatically switches the meter OFF after 15 minutes of inactivity. 2. If “OL” appears on the display during a measurement, the value exceeds the range you have selected. Change to a higher range. DVM9912 VELLEMAN...
  • Seite 5 4. Press the RELATIVE button to return to normal operation. 7. Measurements DC VOLTAGE MEASUREMENTS CAUTION: Do not measure DC voltages if a motor on the circuit is being switched ON or OFF. Large voltage surges may occur that can damage the meter. DVM9912 VELLEMAN...
  • Seite 6: Ac Voltage Measurements

    7. Touch the black test probe tip to the negative side of the circuit. Touch the red test probe tip to the positive side of the circuit. 8. Apply power to the circuit. 9. Read the current on the display. The display will indicate the proper decimal point, value and symbol. DVM9912 VELLEMAN...
  • Seite 7: Ac Current Measurements

    4. Touch the test probe tips to the circuit or wire you wish to check. If the resistance is less than approximately 30 , the audible signal will sound. The display will also show the actual resistance. DVM9912 VELLEMAN...
  • Seite 8: Frequency Measurement

    3. Touch the temperature probe head to the part of which you wish to measure the temperature. Keep touching the part under test until the reading stabilises (about 30 seconds). Read the temperature on the display. The digital reading will indicate the proper decimal point and value. DVM9912 VELLEMAN...
  • Seite 9: Battery Replacement

    10A range). Put the fuse door back in place. Insert the screw and tighten it securely. WARNING: To avoid electric shock, do not operate your meter until the fuse door is in place and fastened securely. DVM9912 VELLEMAN...
  • Seite 10: Specifications

    +1.2% of rdg + 3 dgts 40.00V 10mV +1.5% of rdg + 3 dgts 400.0V 100mV 600V +2.0% of rdg + 4 dgts Input Impedance: 7.8M Frequency Range: 50 to 400Hz Maximum Input: 600V DC or 600V ac rms. DVM9912 VELLEMAN...
  • Seite 11 4.000nF +5.0% of rdg+50 dgts 40.00nF 10pF +5.0% of rdg + 7 dgts 400.0nF 0.1nF +3.0% of rdg + 5 dgts 4.000uF 40.00uF 10nF 200.0uF 0.1uF +5.0% of rdg + 5 dgts Input Protection: 250VDC or 250VAC rms. DVM9912 VELLEMAN...
  • Seite 12 Audible threshold: Less than 150 Test current: <0.3mA Overload protection: 250V DC or AC rms. For more info concerning this product, please visit our website www.velleman.eu. The information in this manual is subject to change without prior notice. DVM9912 VELLEMAN...
  • Seite 13 DVM9912 –MULTIMETER MET AUTOMATISCHE BEREIKINSTELLING 1. Inleiding Aan alle ingezetenen van de Europese Unie Belangrijke milieu-informatie betreffende dit product Dit symbool op het toestel of de verpakking geeft aan dat, als het na zijn levenscyclus wordt weggeworpen, dit toestel schade kan toebrengen aan het milieu.
  • Seite 14: Symbolen En Aanduidingen

    1. Plaats de draaischakelaar ALTIJD op OFF wanneer het toestel niet wordt gebruikt. Deze meter is uitgerust met een automatische uitschakeling na 15 minuten. 2. Wanneer “OL” tijdens een meting op de display verschijnt, dan overschrijdt u het gekozen bereik. Kies een hoger bereik. DVM9912 VELLEMAN...
  • Seite 15 3. De LCD geeft nu het verschil tussen de opgeslagen referentiewaarde en de gemeten waarde. 4. Druk op RELATIVE om naar de normale gebruikersmodus terug te keren. 7. Metingen METEN VAN GELIJKSPANNINGEN OPGELET: Verricht geen gelijkspanningsmetingen terwijl u de motor van een circuit in- of uitschakelt. Hoge spanningspieken kunnen de meter beschadigen. DVM9912 VELLEMAN...
  • Seite 16 7. Raak de negatieve zijde van het circuit met het zwarte meetsnoer. Raak de positieve zijde met het rode meetsnoer. 8. Schakel de voeding in. 9. Lees de weergegeven waarde. De LCD geeft het decimale punt, de waarde en het symbool weer. DVM9912 VELLEMAN...
  • Seite 17: Doorverbindingstest

    ( ). 3. Druk op MODE tot op de LCD verschijnt. 4. Raak het circuit met de sondes. 5. Is de gemeten weerstand 30 , dan zult u een signaal horen. De LCD geeft eveneens de werkelijke weerstandswaarde. DVM9912 VELLEMAN...
  • Seite 18: Meten Van De Temperatuur

    2. Koppel de thermokoppel type K met de negatieve COM–bus en het rode meetsnoer met de positieve TEMP–bus. 3. Raak het te meten voorwerp met de temperatuursonde tot de weergegeven waarde stabiel wordt (ongeveer 30 seconden). Lees de waargegeven waarde. De LCD geeft het decimale punt en de waarde weer. DVM9912 VELLEMAN...
  • Seite 19: De Batterij Vervangen

    400mA-bereik, 10A/250V snelle zekering voor het 10A-bereik). 6. Sluit het zekeringvak en maak vast met de twee schroeven. WAARSCHUWING: Om elektroshocks te vermijden, gebruik de meter niet zolang het vak niet is gesloten en vastgemaakt. DVM9912 VELLEMAN...
  • Seite 20 400.0mV 0.1mV +1.5% + 15 dgts 4.000V +1.2% + 3 dgts 40.00V 10mV +1.5% + 3 dgts 400.0V 100mV 600V +2.0% + 4 dgts Ingangsimpedantie: 7.8M Frequentiebereik: 50 tot 400Hz Max ingang: 600V DC of 600V AC rms. DVM9912 VELLEMAN...
  • Seite 21 Ingangsbeveiliging: 250VDC of 250VAC rms. Capaciteit (automatische uitschakeling) Bereik Resolutie Nauwkeurigheid 4.000nF +5.0% +50 dgts 40.00nF 10pF +5.0% + 7 dgts 400.0nF 0.1nF +3.0% + 5 dgts 4.000uF 40.00uF 10nF 200.0uF 0.1uF +5.0% + 5 dgts Ingangsbeveiliging: 250VDC of 250VAC rms. DVM9912 VELLEMAN...
  • Seite 22 Bescherming tegen overbelasting: 250V DC of AC rms. Continuïteit Hoorbare drempel: < 150 Stroom: <0.3mA Bescherming tegen overbelasting: 250V DC of AC rms. Voor meer informatie omtrent dit product, zie www.velleman.eu. De informatie in deze handleiding kan te allen tijde worden gewijzigd zonder voorafgaande kennisgeving. DVM9912 VELLEMAN...
  • Seite 23 DVM9912 –MULTIMÈTRE AVEC INSTAURATION DE GAMME AUTOMATIQUE 1. Introduction Aux résidents de l'Union européenne Des informations environnementales importantes concernant ce produit Ce symbole sur l'appareil ou l'emballage indique que l’élimination d’un appareil en fin de vie peut polluer l'environnement. Ne pas jeter un appareil électrique ou électronique (et des piles éventuelles) parmi les déchets municipaux non sujets au tri sélectif ;...
  • Seite 24: Symboles Et Indications

    1. TOUJOURS placer le sélecteur en position OFF quand le multimètre n’est pas utilisé. Cet appareil est équipé d’une mise hors tension automatique après 15 minutes d’inactivité. 2. Lorsque « OL » s’affiche lors d’un mesurage, la valeur dépasse la gamme sélectionnée. Sélectionner une gamme supérieure. DVM9912 VELLEMAN...
  • Seite 25 4. Enfoncer RELATIVE pour revenir au mode normal. 7. Les mesurages MESURAGE DE TENSIONS CC ATTRENTION : Ne pas mettre sous / hors tension un moteur lors de mesurages de tensions CC. Les pics de tension peuvent endommager le multimètre. DVM9912 VELLEMAN...
  • Seite 26 7. Connecter la pointe du fil de mesure noir au côté négatif du circuit. Connecter la pointe du fil de mesure rouge au côté positif du circuit. 8. Mettre le circuit sous tension. 9. Lire la valeur affichée. L’écran affiche la valeur, le point décimal et le symbole. DVM9912 VELLEMAN...
  • Seite 27 3. Enfoncer MODE jusqu’à ce que s’affiche à l’écran. 4. Connecter les pointes des fils de mesure au circuit. 5. Si la valeur affichée est inférieure à 30 , le multimètre émettra un signal sonore. L’écran affichera également la résistance actuelle. DVM9912 VELLEMAN...
  • Seite 28 2. Insérer le thermocouple type K dans l’entrée COM et le fil de mesure rouge dans l’entrée positive TEMP. 3. Pour relever la température, porter la sonde du thermocouple à même l’objet pendant environ 30 secondes. Lire la valeur affichée. L’écran affiche la valeur et le point décimal. DVM9912 VELLEMAN...
  • Seite 29: Remplacement De La Pile

    5. Remplacer un fusible usagé avec un fusible du même type (0.5A/250V rapide pour la gamme 400mA, 10A/250V rapide pour la gamme 10A). Refermer le compartiment et fixer avec les vis. AVERTISSEMENT : Pour éviter tout risque de choc, ne jamais opérer un multimètre ouvert. Refermer le compartiment. DVM9912 VELLEMAN...
  • Seite 30 +1.5% + 15 chiffres 4.000V +1.2% + 3 chiffres 40.00V 10mV +1.5% + 3 chiffres 400.0V 100mV 600V +2.0% + 4 chiffres Impédance d’entrée : 7.8M Gamme de fréquence : 50 à 400Hz Entrée max. : 600VCC ou 600VCA rms. DVM9912 VELLEMAN...
  • Seite 31 Capacité (sélection automatique de la gamme) Gamme Résolution Précision 4.000nF +5.0% + 50 chiffres 40.00nF 10pF +5.0% + 7 chiffres 400.0nF 0.1nF +3.0% + 5 chiffres 4.000uF 40.00uF 10nF 200.0uF 0.1uF +5.0% + 5 chiffres Protection entrée : 250VCC ou 250VCA rms. DVM9912 VELLEMAN...
  • Seite 32 Seuil audible : < 150 Courant : <0.3mA Protection surtension : 250V CC ou CA rms. Pour plus d’information concernant cet article, visitez notre site web www.velleman.com. Toutes les informations présentées dans cette notice peuvent être modifiées sans notification préalable. DVM9912...
  • Seite 33: Instrucciones De Seguridad

    Si tiene dudas, contacte con las autoridades locales para residuos. ¡Gracias por haber comprado el DVM9912! Lea atentamente las instrucciones del manual antes de usar el aparato. Si el aparato ha sufrido algún daño en el transporte no lo instale y póngase en contacto con su distribuido.
  • Seite 34: Símbolos De Seguridad

    1. Ponga SIEMPRE el selector en la posición OFF si no utiliza el multímetro. Este aparato está equipado con una desactivación automática después de 15 minutos de inactividad. 2. Si la indicación sobre rango « OL » aparece en la pantalla, el valor sobrepasa el rango seleccionado. Seleccione un rango superior. DVM9912 VELLEMAN...
  • Seite 35 3. La pantalla visualizará la diferencia entre la referencia y el valor medido. 4. Pulse RELATIVE para volver al modo normal. 7. Las mediciones MEDIR TENSIONES CC ¡OJO!: No active/desactive un motor al medir tensiones CC. Los picos de tensión podrían dañar el multímetro. DVM9912 VELLEMAN...
  • Seite 36 7. Conecte la punta de prueba negra al lado negativo del circuito. Conecte la punta de prueba roja al lado positivo del circuito. 8. Ponga el circuito bajo tensión. 9. La pantalla visualiza el valor, el punto decimal exacto y el símbolo. DVM9912 VELLEMAN...
  • Seite 37: Prueba De Continuidad

    3. Pulse MODE hasta que se visualice en la pantalla. 4. Conecte las puntas de prueba al circuito. 5. Si el valor visualizado es inferior a 30 , el multímetro emitirá una señal sonora. La pantalla visualizará también la resistencia actual. DVM9912 VELLEMAN...
  • Seite 38: Prueba De Diodos

    2. Conecte la sonda tipo K a la entrada COM y la punta de prueba roja a la entrada positiva TEMP. 3. Para ver la temperatura, toque la superficie con la sonda durante 30 segundos. 4. La pantalla visualiza el valor y el punto decimal. DVM9912 VELLEMAN...
  • Seite 39: Instalar Las Pilas

    5. Reemplace un fusible fundido por un fusible del mismo tipo (0.5A/250V rápido para la gama 400mA, 10A/250V rápido para la gama 10A). Vuelva a cerrar el compartimiento y fíjelo con los tornillos. ¡OJO!: Para evitar cualquier riesgo de descarga eléctrica, nunca maneje un multímetro abierto. Cierre el compartimiento. DVM9912 VELLEMAN...
  • Seite 40 4.000V +1.2% lectura ± 3 dígitos 40.00V 10mV +1.5% lectura ± 3 dígitos 400.0V 100mV 600V +2.0% lectura ± 4 dígitos Impedancia de entrada: 7.8M Rango de frecuencia: de 50 a 400Hz Entrada máx.: 600VCC o 600VCA rms. DVM9912 VELLEMAN...
  • Seite 41 Resolución Precisión 4.000nF +5.0% lectura ± 50 dígitos 40.00nF 10pF +5.0% lectura ± 7 dígitos 400.0nF 0.1nF +3.0% lectura ± 5 dígitos 4.000uF 40.00uF 10nF 200.0uF 0.1uF +5.0% lectura ± 5 dígitos Protección entrada: 250VCC o 250VCA rms. DVM9912 VELLEMAN...
  • Seite 42 Umbral acústico: < 150 Corriente: <0.3mA Protección de sobrecarga: 250V CC o CA rms. Para más información sobre este producto, visite nuestra página web www.velleman.eu. Se pueden modificar las especificaciones y el contenido de este manual sin previo aviso. DVM9912...
  • Seite 43: Dvm9912 - Digitalmultimeter Mit Automatischer Bereichswahl

    Falls Zweifel bestehen, wenden Sie sich für Entsorgungsrichtlinien an Ihre örtliche Behörde. Danke für den Kauf des DVM9912! Bitte lesen Sie diese Bedienungsanleitung vor Inbetriebnahme sorgfältig durch. Überprüfen Sie, ob Transportschäden vorliegen. Sollte dies der Fall sein, verwenden Sie das Gerät nicht und wenden Sie sich an Ihren Händler.
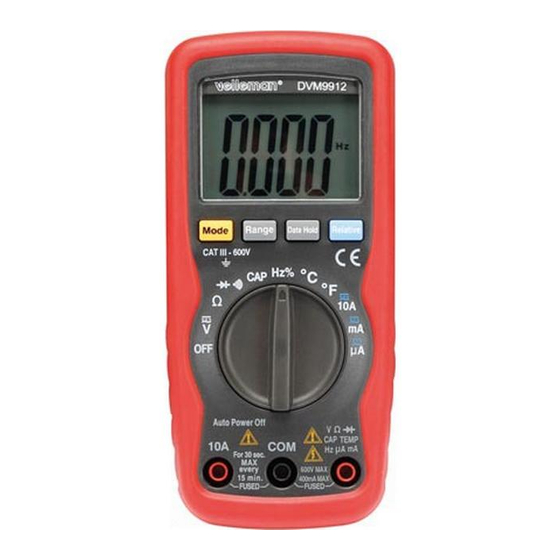
  • Seite 44: Sicherheitssymbole

    1. Stellen Sie den Schalter IMMER in die OFF Position wenn Sie das Multimeter nicht verwenden. Dieses Multimeter hat eine automatische Ausschaltfunktion. Diese schaltet das Multimeter nach 15 Minuten Untätigkeit aus. 2. Wenn “OL” während einer Messung erscheint, überschreitet der Wert den selektierten Bereich. Wählen Sie DVM9912 VELLEMAN...
  • Seite 45 Bereich. DVM9912 VELLEMAN...
  • Seite 46 3. Drücken Sie die RELATIVE Taste um zum normalen Betrieb zurückzukehren. 7. Messungen GLEICHSPANNUNG MESSEN VORSICHT: Messen Sie keine Gleichspannungen wenn ein Motor in einer Schaltung ON (EIN) oder OFF (AUS) geschaltet wird. Es können große Stromstöße, die das Gerät beschädigen können, auftreten. DVM9912 VELLEMAN...
  • Seite 47: Wechselspannung Messen

    7. Berühren Sie mit der schwarzen Prüfspitze die negative Seite der Schaltung. Berühren Sie mit der roten Prüfspitze die positive Seite der Schaltung. 8. Schalten Sie den wieder ein. 9. Lesen Sie den Strom vom Display ab. Das Display wird den korrekten Dezimalpunkt, Wert und Symbol anzeigen (DC, V, usw.). DVM9912 VELLEMAN...
  • Seite 48: Wechselstrom Messen

    3. Drücken Sie die MODE Taste bis das Symbol auf dem Schirm erscheint. 4. Berühren Sie mit den Prüfspitzen die zu prüfenden Schaltung. 5. Wenn der Widerstand weniger als 30 beträgt, wird ein Signal ertönen. Das Display wird den aktuellen Widerstand anzeigen. DVM9912 VELLEMAN...
  • Seite 49: Kapazitätsmessungen

    1. Wenn Sie die Temperatur in F messen wollen, stellen Sie den Funktionsschalter auf F. Wenn Sie in messen wollen, stellen Sie den Funktionsschalter auf den °C Bereich. 2. Schließen Sie das Typ K-Thermoelement (schwarzen Bananenstecker) an die negative COM-Buchse und DVM9912 VELLEMAN...
  • Seite 50: Batterie Wechseln

    5. Verwenden Sie immer eine Sicherung desselben Typs mit derselben Leistung (0.5A/250V flink für den 400mA Bereich, 10A/250V flink für den 10A Bereich). Bringen Sie den Deckel erneut an und schrauben Sie ihn fest. WARNUNG: Um Stromschläge zu vermeiden, verwenden Sie das Multimeter nicht wenn der Deckel nicht dicht und gesichert ist. DVM9912 VELLEMAN...
  • Seite 51: Technische Daten

    +1.5% des Messwertes + 15-stellig 4.000V +1.2% des Messwertes + 3-stellig 40.00V 10mV +1.5% des Messwertes + 3-stellig 400.0V 100mV 600V +2.0% des Messwertes + 4-stellig Eingangsimpedanz: 7.8M Frequenzbereich: 50 bis 400Hz Max. Eingangsleistung: 600V DC oder 600V AC rms. DVM9912 VELLEMAN...
  • Seite 52 Auflösung Genauigkeit 4.000nF +5.0% des Messwertes +5-stellig 40.00nF 10pF +5.0% des Messwertes + 7-stellig 400.0nF 0.1nF +3.0% des Messwertes + 5-stellig 4.000uF 40.00uF 10nF 200.0uF 0.1uF +5.0% des Messwertes + 5-stellig Eingangsleistungsschutz: 250V DC oder 250V AC rms. DVM9912 VELLEMAN...
  • Seite 53 +10% des Messwertes + 5-stellig Spannung offene Schaltung: 1.5V DC typisch Überlastschutz: 250V DC oder AC rms. Akustischer Durchgang Hörbarer Grenzwert: unter 150 Teststrom: <0.3mA Überlastschutz: 250V DC oder AC rms. Für mehr Informationen zu diesem Produkt, siehe www.velleman.eu. Alle Änderungen vorbehalten. DVM9912 VELLEMAN...

Inhaltsverzeichnis