
Verwandte Anleitungen für Eneo PTB-1008F-Serie


Inhaltszusammenfassung für Eneo PTB-1008F-Serie
- Seite 1 All manuals and user guides at all-guides.com Quick Installation Guide Thermal Imaging Network Camera PTB-1008FXX PTB-1108FXX PTB-1208FXX...
-
Seite 2: Inhaltsverzeichnis
All manuals and user guides at all-guides.com Inhalt Inhalt ..........................2 Sicherheitshinweise ....................3 Lieferumfang ......................3 Produktbeschreibung und Anschlüsse ..............4 Installation .........................6 Easy Bracket und Standard Bracket ..............6 Netzwerk Konfiguration ...................9 Zugriff auf die Kamera ..................9 Zuweisen einer IP Adresse ..................11 Administrator Passwort ..................12 Kamera Konfiguration .................. -
Seite 3: Sicherheitshinweise
All manuals and user guides at all-guides.com Sicherheitshinweise Bitte beachten Sie auch die beiliegenden Sicherheitshinweise und lesen Sie diese Anleitung vor Inbetriebnahme sorgfältig durch. Wichtige Hinweise sind mit einem Achtungsymbol gekennzeichnet. Lieferumfang • 1x Wärmebild Netzwerk Kamera • 1x Installations- und Betriebsan- leitung •... -
Seite 4: Produktbeschreibung Und Anschlüsse
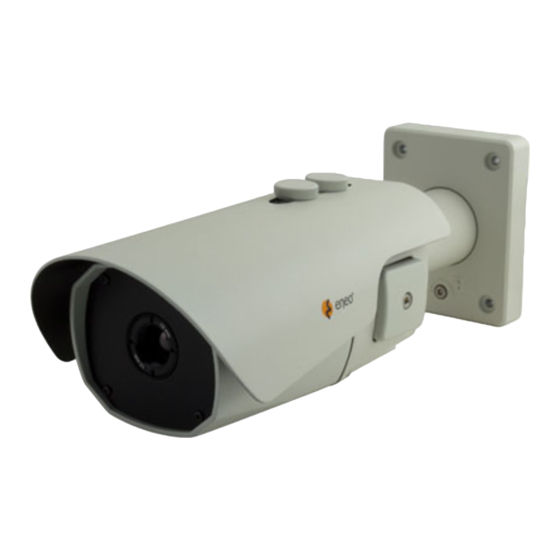
All manuals and user guides at all-guides.com Produktbeschreibung und Anschlüsse ⓐ Befestigungsschrauben für Son- ⓒ ⓓ ⓔ nenschutzdach (2x) ⓑ Objektiv ⓒ Wandmontagesockel ⓓ Bohrung im Wandmontagesockel (4x) ⓔ Wandarm ⓐ ⓕ Sonnenschutzdach ⓖ Verriegelung für ⓑ Wandmontagesockel ⓗ OSD Abdeckung ⓕ... - Seite 5 All manuals and user guides at all-guides.com AC24V/DC12V AC24V/GND TX+ (grau) TX- (weiß) RX+ (gelb) RX- (blau) LAN CABLE mit RJ-45 und Schutz- kappe IP Reset VIDEO SUB-OUT USB An- Anschluss schluss Technische Spezifikationen Schutzart (IP / IK): IP67 Temperaturbereich (Betrieb): -35°C ~ +50°C Leistungsaufnahme: 12W max.
-
Seite 6: Installation
All manuals and user guides at all-guides.com Installation Easy Bracket und Standard Bracket Die „Easy Bracket”-Halterung kann nicht an der Decke angebracht werden.Bei Installation an der Wand muss die Lasche für den „Easy Bracket”-Haken ⓚ nach oben zeigen. 1. Bohren Sie die Löcher mit der mitgelieferten Bohrschablone. 2. - Seite 7 All manuals and user guides at all-guides.com Es muss sorgfältig darauf geachtet werden, das Kabel NICHT zu beschädigen, zu knicken oder Gefahrenbereichen auszusetzen. Die Kamera kann entweder mit 12VDC oder 24VAC, doppelte Spannungs- versorgung und PoE (IEEE Std. 802.3af) betrieben werden. Bei Verwen- dung einer 12VDC oder 24VAC Spannungsversorgung gehen Sie bitte wie folgt vor: •...
- Seite 8 All manuals and user guides at all-guides.com Der Schwenkwinkel ist auf +/- 90° begrenzt. Die Neigung ist bei Wand (bzw. Decken)-Installation auf 0°(2°) min. bis 90° max. begrenzt, wobei vorausgesetzt wird, dass die Neigung des Kameramoduls in Bezug auf die Decke 0° ist, d. h., dass das Bild horizontal ausgerichtet ist.
-
Seite 9: Netzwerk Konfiguration
All manuals and user guides at all-guides.com Netzwerk Konfiguration Zugriff auf die Kamera Die werkseitig eingestellte IP-Adresse der Kamera ist: 192.168.1.10. Um zum ersten Mal Zugriff auf die Kamera zu haben, setzen Sie dafür die IP-Adresse Ihres PCs auf: 192.168.1.XXX; zum Beispiel: IP Adresse: 192.168.1.20 Subnet Maske: 255.255.255.0 •... - Seite 10 All manuals and user guides at all-guides.com Falls die Benachrichtigung auf Grund eines Fehlers nicht erscheint, können Sie die Installation auch manuell starten. Klicken Sie auf „Install ActiveX Control“ und ein Pop-up Fenster wird ange- zeigt. Nach der erfolgreichen Installation wird das Smart Viewer Fenster angezeigt...
-
Seite 11: Zuweisen Einer Ip Adresse
All manuals and user guides at all-guides.com Zuweisen einer IP Adresse Um eine IP Adresse zu zuweisen, gehen Sie wie folgt vor: Klicken Sie auf Network Confi guration im Network Confi guration Menü. Abhängig von Ihrem Service Typ sind Static IP, DHCP Client oder PPPoE verfügbar. -
Seite 12: Administrator Passwort
Wählen Sie DHCP Client unter Network Confi guration und klicken Sie auf Apply. PPPoE wird verwendet um eneo Produkte mit einem Modem zu verbinden. Da für PPPoE eine Identifi zierung erfordert, benötigen Sie ID und Passwort um auf das Netzwerk zugreifen zu können. Geben Sie Ihre ID und Passwort ein. -
Seite 13: Kamera Konfiguration
All manuals and user guides at all-guides.com Die Standard ID für den Administrator Account ist auf „root“ festgelegt und kann nicht geändert werden. Geben Sie im „Old Password“ Feld das aktu- elle Passwort ein. In den Feldern „New Password“ und „Confi rm Password“ geben Sie das neue Passwort ein. - Seite 14 All manuals and user guides at all-guides.com Wählen Sie den Modus „LWIR“. Beim ersten Start des Programms wird am linken unteren Rand „Not Connected“ angezeigt. Stellen Sie zunächst die Verbindung zur Kamera her. Klicken Sie dazu auf den Menüpunkt „Tools“ und anschließend auf „Connection“.
- Seite 15 All manuals and user guides at all-guides.com Wählen Sie „Serial (RS-232)“ sowie „921600“ (für USB) oder „57600“ (für RS-422) als Wert für „Baud Rate“ und klicken Sie auf „Next“. Wenn Ihr PC lediglich über einen seriellen COM Port verfügt wird die Schaltfläche mit „Finish“...
-
Seite 16: Weitere Informationen
All manuals and user guides at all-guides.com Weitere Informationen Das Benutzerhandbuch ist auf der eneo Website unter www.eneo-security.com oder auf der mitgelieferten CD verfügbar. -
Seite 17: Contents
All manuals and user guides at all-guides.com Contents Contents ......................... 17 Notes on safety ..................... 18 Scope of delivery ....................18 Product description and connections ............... 19 Installation ......................21 Easy Bracket and Standard Bracket ..............21 Network setup ......................23 Accessing the camera ..................23 Assigning an IP address ..................25 Administrator password ..................27... -
Seite 18: Notes On Safety
All manuals and user guides at all-guides.com Notes on safety Please also pay attention to the enclosed safety instructions, and carefully read through this instruction guide before initial operation. Important points of advice are marked with a caution symbol. Scope of delivery •... -
Seite 19: Product Description And Connections
All manuals and user guides at all-guides.com Product description and connections ⓐ Fixing screw for sunshield (2x) ⓑ Lens ⓒ ⓓ ⓔ ⓒ Bracket foot ⓓ Foot mount hole (4x) ⓔ Arm assembly ⓕ Sunshield panel ⓖ Bracket lock ⓐ ⓗ... - Seite 20 All manuals and user guides at all-guides.com AC24V/DC12V AC24V/GND TX+ (gray) TX- (white) RX+ (yellow) RX- (blue) LAN CABLE with RJ-45 and PRO- TECTION CAP IP Reset VIDEO SUB-OUT connector connector Technical specifications Protection rating (IP / IK): IP67 Temperature range (operation): -35°C ~ +50°C Power consumption: 12W max.
-
Seite 21: Installation
All manuals and user guides at all-guides.com Installation Easy Bracket and Standard Bracket CAUTION: Easy Bracket can not be installed on the ceiling. When it is installed on the wall, peg for Easy bracket Hook ⓚ must be placed upwardly. 1) Drill the holes on wall using a supplied template. - Seite 22 All manuals and user guides at all-guides.com PoE (IEEE Std. 802.3af). When using a 12VDC or 24VAC power supply please proceed as follows: • Make sure the power is removed before the installation. • Follow the order for applying power. First, connect the low voltage (AC24V or DC12V), then plug the AC adapter to AC outlets to avoid an improper reset from power jitter and a damage from the surge voltage when no load.
-
Seite 23: Network Setup
All manuals and user guides at all-guides.com Inclination limited to +/-90° max. Network setup Accessing the camera The camera’s default IP address is: 192.168.1.10. Therefore, to access the camera for the first time, set the PC’s IP address as: 192.168.1.XXX; for example: IP Address: 192.168.1.20 Subnet Mask: 255.255.255.0... - Seite 24 All manuals and user guides at all-guides.com ActiveX will be automatically downloaded and installed after the login-in and a confirmation. If you‘re using Windows XP Service Pack 2 or later, the Information mes- sage will show up just as below. Click the Information message. If the Information message doesn‘t come out due to the problems like net- work failure, you can start the manual installation.
-
Seite 25: Assigning An Ip Address
All manuals and user guides at all-guides.com After the installation is successfully completed, Smart Viewer window will be displayed. Assigning an IP address To assign an IP address to the camera proceed as follows: Click Network Confi guration on the Network Confi guration menu. Depending on the service type, the network confi guration can be in any of Static IP, DHCP Client, or PPPoE. - Seite 26 All manuals and user guides at all-guides.com For static IP, select static IP and input values for IP address, NetMask, Gate- way, DNS1, DNS2 and click apply for saving settings. After apply, program will ask closing web brower for updates, which will take 20~30 seconds. For DHCP, DHCP server must exist in the network environment.
-
Seite 27: Administrator Password
All manuals and user guides at all-guides.com PPPoE is used to connect eneo products to PPPoE modem provided by ISP. Since PPPoE needs verifi cation, ID and password are necessary to access network. Type in ID and password. Administrator password To change the password for the administrator, click Admin Password on System Confi guration menu. -
Seite 28: Camera Setup
All manuals and user guides at all-guides.com Camera setup Accessing the setup menu The setup menu can be accessed and controlled either by using the USB connector or by using the RS-422 interface. To access the setup menu please install the „Camera Controller GUI“ soft- ware from the enclosed CD-ROM. - Seite 29 All manuals and user guides at all-guides.com Select „Serial (RS-232)“, select „921600“ (for USB) or „57600“ (for RS- 422) as the Baud Rate, and click „Next“. If you only have one serial com- munication port on your computer, the button will say „Finish“. Select the appropriate COM port and click „Finish“.
-
Seite 30: Further Information
When the Camera Controller GUI successfully links to the camera, you will see the window shown below. The GUI provides six tabs on the left allowing for camera control. Further information The Full Manual is available from the eneo web site at www.eneo-security.com or from the CD supplied with this product. -
Seite 31: Contenu
All manuals and user guides at all-guides.com Contenu Contenu ........................31 Consignes de sécurité ..................32 Contenu de la livraison ..................32 Description et raccordement du produit............33 Installation ......................35 Support Easy Bracket et support standard ............35 Configuration réseau .................... 37 Accès à... -
Seite 32: Consignes De Sécurité
All manuals and user guides at all-guides.com Consignes de sécurité Respectez les consignes de sécurité ci-après et lisez attentivement cette notice avant toute utilisation. Les remarques importantes sont identifiées par le symbole « Attention ». Contenu de la livraison • 1x caméra réseau thermique •... -
Seite 33: Description Et Raccordement Du Produit
All manuals and user guides at all-guides.com Description et raccordement du produit ⓐ Vis de clé pour pare-soleil (2x) ⓑ Objectif ⓒ ⓓ ⓔ ⓒ Support du pied ⓓ Orifice de montage du pied (4x) ⓔ Assemblage du bras ⓕ Pare-soleil ⓖ... - Seite 34 All manuals and user guides at all-guides.com AC24V/DC12V AC24V/GND TX+ (gris) TX- (blanc) RX+ (jaune) RX- (bleu) CÂBLE LAN RJ-45 avec CAPUCHON DE PROTECTION SD Card Slot IP Reset Connecteur VI- Con- DEO SUB-OUT necteur Spécifications techniques Indice de protection (IP / IK): IP67 Gamme de température (fonctionnement):...
-
Seite 35: Installation
All manuals and user guides at all-guides.com Installation Support Easy Bracket et support standard Le support Easy Bracket ne peut pas être fixé au plafond. Une fois fixé au mur, l’attache pour le support de fixation Easy Bracket ⓚ doit être positionnée vers le haut. 1. - Seite 36 All manuals and user guides at all-guides.com La caméra peut fonctionner en 24AC ou en 12VDC ainsi qu’avec une alimentation bitension et par PoE (IEEE Std. 802.3af). En cas d’utilisation d’une alimentation électrique 12VDC ou 24VAC, veuillez procéder comme suit : •...
-
Seite 37: Configuration Réseau
All manuals and user guides at all-guides.com rapport au plafond lorsque l’inclinaison du module caméra est à 0°, c’est-à- dire lorsque l’image est alignée horizontalement. L’inclinaison est limitée à +/-90° max. Configuration réseau Accès à la caméra L’adresse IP par défaut de la caméra est : 192.168.1.10. Pour un premier accès à... - Seite 38 All manuals and user guides at all-guides.com Il est également possible de réinitialiser les paramètres IP originaux par défaut en appuyant pendant 10 secondes sur le commutateur de réinitiali- sation de l’IP situé à côté du connecteur de sous-sortie vidéo. ActiveX sera automatiquement téléchargé...
-
Seite 39: Attribution D'une Adresse Ip
All manuals and user guides at all-guides.com Si le message d’information n’apparaît pas en raison notamment d’une défaillance du réseau, vous pouvez procéder à l’installation manuelle. Cliquez sur « Install ActiveX Control », et la fenêtre contextuelle apparaîtra. Une fois l’installation terminée, la fenêtre du Smart Viewer sera affi chée à l’écran. - Seite 40 All manuals and user guides at all-guides.com En fonction du type de service, la confi guration réseau peut être soit « Sta- tic IP » (IP statique), « DHCP Client » (Client DHCP), ou PPPoE. Vous devez confi gurer la caméra réseau en fonction de votre type de réseau. En cas d’utilisation d’une adresse IP statique, sélectionnez «...
-
Seite 41: Mot De Passe Administrateur
All manuals and user guides at all-guides.com Le PPPoE sert à connecter les produits eneo à un modem PPPoE fourni par le fournisseur d’accès à Internet. Le PPPoE exigeant une authentifi ca- tion, il est nécessaire de saisir un identifi ant (ID) et un mot de passe pour accéder au réseau. -
Seite 42: Configuration De La Caméra
All manuals and user guides at all-guides.com L’identifiant par défaut du compte administrateur est « root » (racine) et ne peut être modifié. Dans le champ « Old Password » (ancien mot de passe), saisissez le mot de passe actuel. Dans les champs « New Password » (Nouveau mot de passe) et «... - Seite 43 All manuals and user guides at all-guides.com Pour établir une connexion à la caméra, sélectionnez le menu « Tools » et ensuite « Connection ». Choisissez « Serial (RS-232) », et précisez ensuite le débit en baud - « 921600 » (USB) ou « 57600 » (RS-422). Cliquez enfin sur « Next ». Si votre ordinateur ne dispose que d’un port de communication série, le bouton indiquera «...
- Seite 44 All manuals and user guides at all-guides.com Sélectionnez le port COM adéquat et cliquez sur « Finish ». Vous pouvez préciser le port COM utilisé pour les pilotes Silicon Labs dans la fenêtre « Device Manager » (Gestionnaire de périphériques) sous la catégorie Ports (COM&LPT).
-
Seite 45: Complément D'information
All manuals and user guides at all-guides.com Complément d’information Le manuel complet est proposé sur le site Web d’eneo - www.eneo-security.com - ou sur le CD accompagnant ce produit. -
Seite 46: Spis Treści
All manuals and user guides at all-guides.com Spis treści Spis treści ....................... 46 Wskazówki dotyczące bezpieczeństwa ............47 Elementy wchodzące w skład dostawy ............47 Opis produktu i podłączenia ................48 Instrukcja instalacji ....................50 wygodnego wspornika montażowego i standard wspornika ........50 Konfiguracja sieci .................... -
Seite 47: Wskazówki Dotyczące Bezpieczeństwa
All manuals and user guides at all-guides.com Wskazówki dotyczące bezpieczeństwa Prosimy przestrzegać także załączonych wskazówek dotyczących bezpieczeństwa i dokładnie przeczytać niniejszą instrukcję obsługi przed uruchomieniem urządzenia. Ważne wskazówki są oznaczone symbolem UWAGA. Elementy wchodzące w skład dostawy • 1x Termograficzna kamera inter- netowa •... -
Seite 48: Opis Produktu I Podłączenia
All manuals and user guides at all-guides.com Opis produktu i podłączenia ⓐ śruba montażowa dla panelu ⓒ ⓓ ⓔ przeciwsłonecznego (2x) ⓑ Obiektyw ⓒ Stopka wspornika ⓓ Otwór montażowy stopki (4x) ⓔ Zespół montażowy ramienia ⓕ Panel przeciwsłoneczny ⓖ Blokada wspornika ⓗ... - Seite 49 All manuals and user guides at all-guides.com Złącze BNC 12 V prądu stałego lub 24 V prądu przemiennego 24 V prądu przemiennego/ masa TX+ (szary) TX- (biały) RX+ (żółty) RX- (niebieski) KABEL SIECIOWY ZE ZŁĄCZEM RJ- 45 I ZAŚLEPKĄ ZABEZPIECZAJĄCĄ SD Card Slot IP Reset Złącze VIDEO...
-
Seite 50: Instrukcja Instalacji
All manuals and user guides at all-guides.com Instrukcja instalacji wygodnego wspornika montażowego i standard wspornika PRZESTROGA: Wygodnego wspornika montażowego nie można montować na ścianie. W przypadku instalacji ściennej, kołek dla haka do wygodnego wspornika montażowego ⓚ musi zostać skierowany w górę. 1. - Seite 51 All manuals and user guides at all-guides.com Należy zwrócić szczególną uwagę, aby NIE uszkodzić, nie załamać przewodów ani nie umieścić ich w strefach zagrożenia. Kamera może być zasilana prądem przemiennym 24 V lub stałym 12 V, a także pracować w standardzie PoE (Power over Ethernet, IEEE 802.3af). Korzystając z zasilania prądem stałym 12 V lub przemiennym 24 V, należy wykonać...
-
Seite 52: Konfiguracja Sieci
All manuals and user guides at all-guides.com Panorama jest ograniczona do +/-90°. Pochylenie jest ograniczone do 0°(2°) min. ~ 90° maks. odpowiednio dla instalacji ściennej i sufitowej w odniesieniu do sufitu, kiedy nachylenie modułu kamery wynosi 0°, czyli obraz jest wyregulowany w poziomie. Nachylenie jest ograniczone maks. - Seite 53 All manuals and user guides at all-guides.com adres IP komputera w postaci: 192.168.1.XXX; na przykład: Adres IP: 192.168.1.20 Maska podsieci: 255.255.255.0 • W pasku adresu znajdującym się w oknie przeglądarki internetowej należy wprowadzić adres IP kamery i nacisnąć klawisz „Enter”. •...
- Seite 54 All manuals and user guides at all-guides.com Jeśli komunikat informacyjny nie zostanie wyświetlony, np. z powodu proble- mu z siecią, można rozpocząć instalację ręcznie. Kliknij polecenie Zainstaluj formant ActiveX, aby wyświetlić wyskakujące okienko. Po pomyślnym zakończeniu instalacji zostanie wyświetlone okno przeglądarki Smart Viewer.
-
Seite 55: Przypisywanie Adresu Ip
All manuals and user guides at all-guides.com Przypisywanie adresu IP Aby przypisać adres IP do kamery, należy wykonać następujące czynności: Kliknij Network Confi guration (Konfi guracja sieci) w menu Network Confi gu- ration (Konfi guracja sieci). W zależności od typu usługi istnieją różne konfi guracje sieci: statyczny adres IP, klient DHCP lub PPPoE. -
Seite 56: Hasło Administratora
Network Confi guration (Konfi guracja sieci), a następnie kliknij przycisk Apply (Zastosuj). Protokół PPPoE jest używany do łączenia produktów fi rmy eneo z mode- mem PPPoE dostarczanym przez dostawcę usług internetowych. Jako że protokół PPPoE wymaga weryfi kacji, dostęp do sieci wymaga podania identyfi katora i hasła. -
Seite 57: Konfiguracja Kamery
All manuals and user guides at all-guides.com Domyślny identyfi kator konta administratora „root” jest stały i nie można go zmienić. W polu Old Password (Stare hasło) wprowadź bieżące hasło. W po- lach New Password (Nowe hasło) i Confi rm Password (Potwierdź hasło) wprowadź... - Seite 58 All manuals and user guides at all-guides.com Wybierz tryb „LWIR”. Po pierwszym uruchomieniu interfejsu GUI w lewym dolnym rogu zostanie wyświetlony komunikat „Not Connected” (Niepodłączony). Nawiąż połączenie z kamerą, wybierając opcję „Tools” (Narzędzia), a następnie „Connection” (Połączenie).
- Seite 59 All manuals and user guides at all-guides.com Wybierz opcję „Serial (RS-232)” (Szeregowe (RS-232)), wybierz ustawi- enie „921600” (dla USB) lub „57600” (dla RS-422) dla opcji Baud Rate (Szybkość transmisji) i kliknij przycisk „Next” (Dalej). Jeśli komputer posi- ada tylko jeden port komunikacji szeregowej, przycisk będzie nosić nazwę „Finish”...
-
Seite 60: Informacje Dodatkowe
Controller GUI zostanie wyświetlone okno przedstawione poniżej. Po lewej stronie interfejsu GUI znajduje się sześć kart umożliwiających sterowa- nie kamerą. Informacje dodatkowe Pełna instrukcja obsługi jest dostępna na stronie internetowej eneo pod adresem www.eneo-security.com lub na płycie CD dostarczonej w zestawie z tym urządzeniem. -
Seite 61: Содержание
All manuals and user guides at all-guides.com Содержание Содержание ......................61 Замечания по безопасности ................62 Объем поставки ....................62 Описание изделия и присоединения ............. 63 Монтаж ........................65 Легкосъемный кронштейн и стандартный кронштейн ........65 Сетевая настройка ..................... 67 Доступ к камере ....................67 Получение... -
Seite 62: Замечания По Безопасности
All manuals and user guides at all-guides.com Замечания по безопасности Обратите, пожалуйста, внимание на прилагаемые указания по безопасности и внимательно прочитайте это руководство перед началом работы. Важные рекомендации отмечены символом предостережения. Объем поставки • 1x Сетевой тепловизор • 1x инструкция по монтажу и эксплуатации... -
Seite 63: Описание Изделия И Присоединения
All manuals and user guides at all-guides.com Описание изделия и присоединения ⓐ Винты крепления ⓒ ⓓ ⓔ солнцезащитного щитка (2x)) ⓑ Объектив ⓒ опоры кронштейна ⓓ Отверстия крепления опоры ⓐ (4x) ⓔ Рычаг в сборе ⓕ Солнцезащитный щиток ⓖ Замок кронштейна ⓗ... - Seite 64 All manuals and user guides at all-guides.com BNC (коаксиальный, байонетный) ~24 В/=12 В ~24 В/GND (общий провод) TX+ (серый) TX- (белый) RX+ (желтый) RX- (синий) КАБЕЛЬ LAN с разъемом RJ-45 и ЗАЩИТНЫМ КОЛПАЧКОМ Слот для карты памяти SD Перезапуск Разъем ВЫВОДА ВИДЕОКАБЕЛЯ...
-
Seite 65: Монтаж
All manuals and user guides at all-guides.com Монтаж Легкосъемный кронштейн и стандартный кронштейн ПРЕДОСТЕРЕЖЕНИЕ - Легкосъемный кронштейн нельзя устанавливать на потолке. При установке на стене проушина легкосъемного кронштейна ⓚ должна располагаться вверху. 1. Просверлите в стене отверстия, используя прилагаемый шаблон. 2. - Seite 66 All manuals and user guides at all-guides.com 2. Проложите кабели к месту установки и подключите кабели аудио, питания, сигнализации и LAN, по мере необходимости. Следует обратить внимание, чтобы кабели НЕ были повреждены, перекручены или проложены в опасной зоне. Камера может работать с напряжением 24 В AC или 12 В DC, с питанием...
-
Seite 67: Сетевая Настройка
All manuals and user guides at all-guides.com Наклон ограничивается от 0°(2°) мин. до 90° макс. для настенной (потолочной) установки, соответственно, что касается потолочной установки, то поворот камеры составляет 0°, то есть, изображение ориентировано горизонтально. Поворот ограничивается +/-90° макс. Сетевая настройка Доступ... - Seite 68 All manuals and user guides at all-guides.com • Введите IP-адрес камеры в строку URL окна веб-браузера и нажмите “Enter.” • Введите имя пользователя по умолчанию (root) и пароль (root) в диалоговом окне запроса. Возможно также настроить IP-параметры в соответствии с заводскими...
- Seite 69 All manuals and user guides at all-guides.com Если информационное сообщение не появляется вследствие проблем с отказом сети, вы можете приступить к ручной инсталляции. Щелкните Install ActiveX Control, и отобразится всплывающее окно. После успешного завершения инсталляции отображается окно Smart Viewer.
-
Seite 70: Получение Ip-Адреса
All manuals and user guides at all-guides.com Получение IP-адреса Для получения IP-адреса камеры действуйте следующим образом: Щелкните по Network Confi guration в меню Network Confi guration. В зависимости от типа сервиса, сетевой конфигурацией может быть любой статический IP-адрес, клиент DHCP или PPPoE. Вам нужно настроить... -
Seite 71: Пароль Администратора
Для клиента DHCP, в сетевом окружении должен существовать сервер DHCP. Щелкните DHCP Client в Network Confi guration, щелкните Apply. PPPoE используется для соединения изделий компании «eneo» с модемом PPPoE, предоставляемым провайдером услуг Internet (ISP). Поскольку PPPoE требует верификации, для доступа к сети необходим... -
Seite 72: Камера Настройка
All manuals and user guides at all-guides.com ID учетной записи администратора зафиксирован как “root” и не подлежит изменению. В поле Old Password, введите существующий пароль. В оба окна New Password и Confi rm Password, введите один и тот же новый пароль. Пароль... - Seite 73 All manuals and user guides at all-guides.com Подключите камеру, выбрав пункт «Tools» (инструменты), а затем «Con- nection» (подключение). Выберите пункт «Serial (RS-232)» (последовательный интерфейс RS- 232), выберите значение скорости информационного обмена в бит/с «921600» (для USB) или «57600» (для RS-422), затем щелкните по кнопке...
- Seite 74 All manuals and user guides at all-guides.com Выберите соответствующий СОМ-порт и щелкните по кнопке «Finish» (завершить). Допускается указывать СОМ-порт, используемый для Silicon Labs в системном разделе «Устройства» ОС Windows в группе «Порты». Теперь GUI автоматически подключится к камере и обновит информацию...
-
Seite 75: Дополнительная Информация
All manuals and user guides at all-guides.com Дополнительная информация Полное руководство доступно на веб-сайте компании «eneo» www.eneo- security.com или на CD, поставляемым с этим изделием. - Seite 76 All manuals and user guides at all-guides.com eneo® is a registered trademark of Videor E. Hartig GmbH Exclusive distribution through spe- cialised trade channels only. Videor E. Hartig GmbH Carl-Zeiss-Straße 8 · 63322 Röder- mark/Germany Tel. +49 (0) 6074 / 888-0 · Fax +49...