Herunterladen Inhalt Inhalt Diese Seite drucken

Werbung

Verfügbare Sprachen
  • DE

Verfügbare Sprachen

  • DEUTSCH, seite 1
Hero360 SL
ECE R129/03, 40–105 cm
DE
EN
FR
IT
NL
ES
CZ
PL
SK

Werbung

Inhaltsverzeichnis
loading

Inhaltszusammenfassung für osann Hero360 SL

  • Seite 1 Hero360 SL ECE R129/03, 40–105 cm...
  • Seite 2: Anwendung

    - 2 - Vielen Dank, dass Sie sich für unseren Kinderautositz Hero360 SL entschieden haben. Wenn Sie Hilfe zu diesem Produkt benötigen, wenden Sie sich bitte an unseren Kundendienst. ANWENDUNG • Dieses Produkt ist geeignet für Kinder mit einer Körpergröße von 40 bis 105 cm.
  • Seite 3 - 3 - Im Zweifelsfall wenden Sie sich bitte an den Autositzhersteller oder den Händler. 1. Nur, wenn der Airbag deaktiviert werden kann, Iso- fi x-Konnektoren vorhanden sind und der Sitzplatz im Pkw-Handbuch als i-Size kompatibel anerkannt ist. 2. Nur, wenn Isofi x-Konnektoren vorhanden sind und der Sitzplatz im Pkw-Handbuch als i-Size kompatibel an- erkannt ist.
  • Seite 4 - 4 - WARNUNG • Bitte lesen Sie diese Anleitung vor der Verwendung sorgfältig durch, um die Sicherheit Ihres Kindes zu gewährleisten. Bewahren Sie die Anleitung auf. Die Nichtbeachtung der Anweisungen in diesem Handbuch kann zu schweren Verletzungen Ihres Kindes führen. •...
  • Seite 5: Vorderansicht

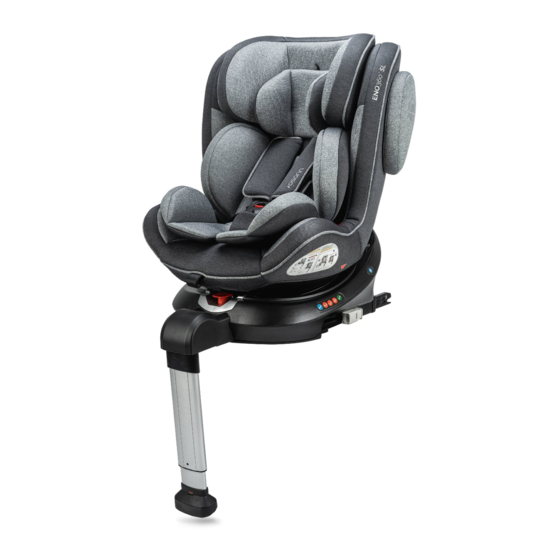
    - 5 - SITZTEILE Vorderansicht Kopfstütze Isofi x-Ein- führhilfen Kopfpolster Sitzschale Schulterpolster Gurtschloss Schultergurt Gurtschloss- Komforteinlage polster Zentrale Gurteinstellung Standfuß Rotationshebel & Positionshebel Rückansicht Seitenauf- Kopfstützen- prallschutz- einstellung Protektor Isofi x- Isofi x- Konnektor Konnektor- erweiterung...
  • Seite 6: Verwendung Des Kinderautositzes

    - 6 - VERWENDUNG DES KINDERAUTOSITZES Einstellen des Neigungswinkels des Kinderautositzes • Betätigen einer Hand Positionshebel an der unteren Vorderseite der Sitzschale. • Halten Sie mit der anderen Hand die Sitzschale und stellen Sie den Winkel ein. Folgende Sitzpositionen sind möglich: (Bitte Label am Kindersitz beachten) Rückwärtsgerichtet, Körpergröße 40–105 cm: 1 Position (R)
  • Seite 7: Einstellung Des Gurts

    - 7 - Einstellung des Gurts • Um den Gurt zu lösen, drücken Sie mit einer Hand den Knopf zur Gurtverstellung im Sitzbe- reich. Halten Sie das Gurtschloss mit der an- deren Hand und lockern Sie die angebrachten Gurte vorsichtig. •...
  • Seite 8: Einstellung Der Kopfstütze

    - 8 - Einstellung der Kopfstütze • Lösen Sie den Gurt und ziehen Sie den Hebel zur Einstellung der Kopfstütze auf der Rück- seite des Kinderautositzes. Bewegen Sie die Kopfstütze, bis sie in der richtigen Höhe ein- rastet. • Achten Sie darauf, dass die Schultergurte knapp über den Schultern Ihres Kindes aus dem Kin- derautositz geführt werden.
  • Seite 9: Standfuß Für Größenklasse 40-105 Cm

    - 9 - Standfuß für Größenklasse 40–105 • Klappen Sie den Standfuß unterhalb des Kin- derautositzes heraus. Für Kinder bis zu einer Körpergröße von 105 cm darf der Kinderau- tositz ausschließlich mit ausgeklapptem Iso- fi x-Standfuß zusammen mit den Isofi x-Kon- nektoren genutzt werden.
  • Seite 10: Einbau Des Kinderautositzes

    - 10 - EINBAU DES KINDERAUTOSITZES 1) Größenklasse 40–105 cm, max. 18 kg, rückwärtsgerichtet...
  • Seite 11 - 11 - 1 . Stellen Sie den Kinderautositz auf die maximale Liegeposition ein und drehen Sie ihn, sodass er in rückwärtsgerichteter Ausrichtung auf die Sitzposition R zeigt. 2 . Stellen Sie am RotationControl Knopf das Alter Ihres Kindes ein. 3 .
  • Seite 12 - 12 - EINBAU DES KINDERAUTOSITZES 2) Größenklasse 76–105 cm, mind. 15 Monate, max. 18 kg, vorwärtsgerichtet WICHTIG: VERWENDEN SIE DEN KINDERAUTOSITZ NICHT IN FAHRTRICHTUNG, BEVOR DAS ALTER DES KINDES 15 MONATE NICHT ÜBERSCHRITTEN HAT.
  • Seite 13 - 13 - 1 . Stellen Sie am RotationControl Knopf das Alter Ihres Kindes ein. 2 . Drücken Sie beide seitlichen Isofi x-Konnektorknöpfe, um die Isofi x-Konnektoren in der Länge auszufahren. 3 . Klappen Sie den Standfuß wie zuvorgehend beschrieben heraus. 4 .
  • Seite 14: Reinigung

    Überprüfen Sie regelmäßig den Zustand des Produkts auf mögliche Schäden. Im Schadensfall darf der Kinderautositz nicht mehr verwendet werden und ist außerhalb der Reichweite von Kindern auf- zubewahren. Bei Fragen und Problemen wenden Sie sich bitte an den Osann Kundendienst unter +49 (0)7731 970077.
  • Seite 15 - 15 -...
  • Seite 16 - 16 - Thank you for choosing our Hero360 SL child car seat. If you need help with this product, please contact our customer service. • This product is suitable for children 40 to 105 cm in height. • Rear-facing installation for children between 40 to 105 cm in height takes place with the help of the Isofi...
  • Seite 17: Installation Direction

    - 17 - If you have any doubts, please contact the car seat manufacturer or the dealer. 1. This only applies if the airbag can be deactivated, Isofi x anchor points are available, and the seat is recognised as i-Size-compatible in the vehicle manual. 2.
  • Seite 18 - 18 - WARNING • Please read through these instructions carefully before use in order to guarantee the safety of your child. Retain the instructions. Non-compliance with the instructions in this manual may result in serious injuries to your child. •...
  • Seite 19: Front View

    - 19 - SEAT PARTS Front view Headrest Isofi x inser- tion aid Head cushion Seat bucket Shoulder pad Belt lock Shoulder belt Seatbelt Comfort insert buckle pads Central belt adjustment Support leg Rotation lever & position lever Rear view Side impact Headrest protector...
  • Seite 20 - 20 - USING THE CHILD CAR SEAT Setting the child car seat tilt angle • Operate the position lever on the lower front of the seat bucket with one hand. • Hold the seat bucket with the other hand and adjust the angle.
  • Seite 21: Adjusting The Belt

    - 21 - Adjusting the belt • To loosen the belt, press the belt adjustment button in the seat area with one hand. Hold the belt buckle with the other hand and carefully loosen the attached straps. • Pull the front adjustment strap to tighten the belts.
  • Seite 22: Rotationcontrol

    - 22 - Adjusting the head support • Release the belt and pull the lever to adjust the headrest on the back of the child car seat. Move the headrest until it engages at the cor- rect height. • Make sure the shoulder straps are positioned just above your child’s shoulders when they come out of the child car seat.
  • Seite 23 - 23 - Support leg for size class 40 - 105 cm • Fold out the support leg underneath the child car seat. For children under 105  cm in height, the child car seat may only be used with the Isofi...
  • Seite 24 - 24 - INSTALLATION OF THE CHILD CAR SEAT 1) Height range 40–105 cm, max. 18 kg, rear-facing...
  • Seite 25 - 25 - 1 . Set the child car seat to the maximum reclining position and turn it until it is in rear-facing seat position R. 2 . Set the age of your child on the RotationControl knob. 3 . Press the two side Isofi x connector buttons to extend the length of the Isofi x connectors. 4 .
  • Seite 26 - 26 - INSTALLATION OF THE CHILD CAR SEAT 2) Height range 76–105 cm, min. 15 months, max. 18 kg, forward-facing IMPORTANT: DO NOT USE THE CHILD CAR SEAT FACING IN THE DIRECTION OF TRAVEL UNTIL THE CHILD HAS REACHED THE AGE OF 15 MONTHS.
  • Seite 27 - 27 - 1 . Set the age of your child on the RotationControl knob. 2 . Press the two side Isofi x connector buttons to extend the length of the Isofi x connectors. 3 . Fold out the support leg as described above. 4 .
  • Seite 28 Check the condition of the product for possible damage at regular intervals. In the event of damage, the child car seat must no longer be used and must be stored out of the reach of children. In case of any issues, please contact Osann customer service on +49 (0)7731 970077.
  • Seite 29 - 29 -...
  • Seite 30 - 30 - Merci d’avoir choisi notre siège auto pour enfant Hero360 SL. Si vous avez besoin d’aide pour ce produit, veuillez contacter notre service clientèle. UTILISATION • Ce produit convient aux enfants dont la taille est de 40 à 105 cm.
  • Seite 31 - 31 - En cas de doute, veuillez vous adresser au fabricant du siège auto ou au revendeur. 1. Uniquement si l’airbag peut être désactivé, si des connecteurs ISOFIX sont présents et si le siège est re- connu comme compatible « i-Size » dans le manuel de la voiture.
  • Seite 32 - 32 - AVERTISSEMENT • Veuillez lire attentivement ces instructions avant utilisation afi n de garantir la sécurité de votre enfant. Conservez les instructions. Le non-respect des instructions de ce manuel peut entraî- ner des blessures graves pour votre enfant. •...
  • Seite 33: Vue De Face

    - 33 - ÉLÉMENTS DU SIÈGE Vue de face Appuie-tête Guides d’insertion Coussin pour la tête Isofi x Coque du siège Coussin d’épaule Boucle de ceinture Sangle d'épaule Coussin pour boucle Insert de confort de ceinture Réglage central de la sangle Béquille Levier de rotation &...
  • Seite 34 - 34 - UTILISATION DU SIÈGE AUTO POUR ENFANT Réglage de l’angle d’inclinaison du siège auto pour enfant • Actionnez d’une main le levier de position si- tué sur la partie inférieure avant de la coque du siège. • Tenez la coque du siège de l’autre main et ajustez l’angle.
  • Seite 35 - 35 - Réglage de la ceinture • Pour détacher la ceinture, appuyez d’une main sur le bouton de réglage de la ceinture situé au niveau du siège. Tenez la boucle de ceinture de l’autre main et détachez soigneusement les sangles qui y sont attachées.
  • Seite 36: Réglage De L'appuie-Tête

    - 36 - Réglage de l’appuie-tête • Desserrez la ceinture et tirez sur le levier de réglage de l’appuie-tête situé à l’arrière du siège auto pour enfant. Déplacez l’appuie-tête jusqu’à ce qu’il se verrouille à la bonne hauteur. • Assurez-vous que les sangles d'épaule sortent du siège auto juste au-dessus des épaules de votre enfant.
  • Seite 37 - 37 - Béquille pour catégorie taille 40 – 105 cm • Dépliez la béquille sous le siège auto pour en- fant. Pour les enfants d’une taille maximale de 105 cm, le siège auto pour enfant ne peut être utilisé avec les connecteurs Isofi x que si la bé- quille Isofi...
  • Seite 38 - 38 - INSTALLATION DU SIÈGE AUTO POUR ENFANT 1) Catégorie de taille 40 – 105 cm, max. 18 kg, dos à la route...
  • Seite 39 - 39 - 1 . Réglez le siège auto pour enfant à la position d’inclinaison maximale et tournez-le de façon à ce qu’il pointe vers la position assise R en orientation vers l’arrière. 2 . Réglez l’âge de votre enfant à l’aide du bouton RotationControl. 3 .
  • Seite 40 - 40 - INSTALLATION DU SIÈGE AUTO POUR ENFANT 2) Catégorie de taille 76 – 105 cm, min. 15 mois, max. 18 kg, face à la route IMPORTANT : N’UTILISEZ PAS LE SIÈGE AUTO POUR ENFANT DANS LA POSITION FACE À LA ROUTE SI L’ENFANT N’A PAS ENCORE ATTEINT L’ÂGE DE 15 MOIS RÉVOLUS.
  • Seite 41 - 41 - 1 . Réglez l’âge de votre enfant à l’aide du bouton RotationControl. 2 . Appuyez sur les deux boutons latéraux des connecteurs Isofi x pour étendre les connecteurs Isofi x dans le sens de la longueur. 3 . Déployez la béquille comme décrit ci-dessus. 4 .
  • Seite 42 Vérifi ez régulièrement l’état du produit pour déceler d’éventuels dommages. En cas de dommage, le siège auto pour enfant ne peut plus être utilisé et doit être placé hors de la portée des enfants. En cas de questions ou de problèmes, veuillez vous adresser au Service client Osann au +49 (0)7731 970077.
  • Seite 43 - 43 -...
  • Seite 44 - 44 - Grazie per aver scelto il nostro seggiolino auto per bambini Hero360 SL. In caso di domande riguar- do al prodotto, rivolgersi al nostro servizio clienti. UTILIZZO • Questo prodotto è adatto a bambini di altezza compresa tra 40 e 105 cm.
  • Seite 45 - 45 - Nel dubbio rivolgersi al costruttore del seggiolino auto o al rivenditore. 1. Solo se l’airbag può essere disattivato, i connettori Iso- fi x sono presenti e il sedile è riconosciuto come com- patibile con “i-Size” nel manuale del veicolo. 2.
  • Seite 46 - 46 - AVVERTENZA • Si prega di leggere attentamente il presente manuale prima dell’uso al fi ne di garantire la sicu- rezza del bambino. Conservare il presente manuale. L’inosservanza delle istruzioni contenute nel presente manuale può causare gravi lesioni al bambino. •...
  • Seite 47: Vista Anteriore

    - 47 - PARTI DEL SEGGIOLINO Vista anteriore Poggiatesta Ausili di inserimento Isofi x Imbottitura per la testa Guscio del seggiolino Spallina Fibbia Cintura di ritenuta spalle Imbottitura Inserto comfort della fi bbia Centrale Regolazione della cintura Base di sostegno Leva di rotazione e leva di posiziona- mento...
  • Seite 48 - 48 - UTILIZZO DEL SEGGIOLINO AUTO Impostazione dell’angolo di inclina- zione del seggiolino auto • Azionare con una mano la leva di posiziona- mento posta nella parte anteriore inferiore del guscio del seggiolino. • Tenere il guscio del seggiolino con l'altra mano e regolare l'angolazione.
  • Seite 49 - 49 - Regolazione della cintura • Per slacciare la cintura, premere con una mano il pulsante per la regolazione della cintura nella zona del sedile. Tenere la fi bbia con l’altra mano e slacciare con cautela le cinture allacciate. •...
  • Seite 50: Regolazione Del Poggiatesta

    - 50 - Regolazione del poggiatesta • Slacciare la cintura e tirare la leva per la rego- lazione del poggiatesta sul retro del seggiolino auto. Muovere il poggiatesta fi no ad innestarlo all’altezza desiderata. • Assicurarsi che le cinture di ritenuta spalle fuo- riescano dal seggiolino auto appena sopra le spalle del bambino.
  • Seite 51 - 51 - Base di sostegno per la classe di al- tezza 40–105 cm • Estrarre la base di sostegno posta sotto il seg- giolino auto per bambini. Per i bambini fi no a un’altezza di 105 cm, utilizzare il seggiolino auto per bambini esclusivamente con la base di so- stegno Isofi...
  • Seite 52 - 52 - INSTALLAZIONE DEL SEGGIOLINO AUTO PER BAMBINI 1) Classe di altezza 40–105 cm, max. 18 kg, orientato all’indietro...
  • Seite 53 - 53 - 1 . Posizionare il seggiolino auto per bambini nella posizione reclinata massima e ruotarlo in modo che si trovi orientato all’indietro e nella posizione R. 2 . Regolare l’età del bambino sul pulsante RotationControl. 3 . Premere entrambi i pulsanti laterali dei connettori Isofi x per estendere in lunghezza i connet- tori Isofi...
  • Seite 54 - 54 - INSTALLAZIONE DEL SEGGIOLINO AUTO PER BAMBINI 2) Classe di altezza 76–105 cm, min. 15 mesi, max. 18 kg, orientato in avanti IMPORTANTE: NON UTILIZZARE IL SEGGIOLINO AUTO PER BAMBINI NELLA DIREZIONE DI MARCIA FINO A QUANDO IL BAMBINO NON ABBIA RAGGIUNTO I 15 MESI DI ETÀ.
  • Seite 55 - 55 - 1 . Regolare l’età del bambino sul pulsante RotationControl. 2 . Premere entrambi i pulsanti laterali dei connettori Isofi x per estendere in lunghezza i connet- tori Isofi x. 3 . Estrarre la base di sostegno come descritto precedentemente. 4 .
  • Seite 56 Controllare regolarmente le condizioni del prodotto per individuare eventuali danni. In caso di danni, il seggiolino auto per bambini non deve più essere utilizzato e deve essere conservato fuori dalla portata dei bambini. In caso di domande o problemi, si prega di contattare il servizio clienti Osann al numero +49 (0)7731 970077.
  • Seite 57 - 57 -...
  • Seite 58 - 58 - Dank u voor het kiezen van ons Hero360 SL kinderautostoeltje. Als u hulp nodig heeft bij dit product, kunt u contact opnemen met onze klantenservice. GEBRUIK • Dit product is geschikt voor kinderen met een lengte van 40 tot 105 cm.
  • Seite 59 - 59 - Neem bij twijfel contact op met de fabrikant van het autostoeltje of de dealer. 1. Alleen als de airbag kan worden gedeactiveerd, Iso- fi x-connectoren aanwezig zijn en de autostoel in de handleiding van de auto als i-Size-compatibel goed- gekeurd is.
  • Seite 60 - 60 - WAARSCHUWING • Lees deze handleiding voor gebruik zorgvuldig door om de veiligheid van uw kind te waarbor- gen. Bewaar deze handleiding. Het niet naleven van de aanwijzingen in deze handleiding kan leiden tot ernstig letsel bij uw kind. •...
  • Seite 61: Vooraanzicht

    - 61 - ONDERDELEN AUTOSTOELTJE Vooraanzicht Hoofdsteun Isofi x-gelei- dehuls Hoofdkussen Zitschaal Schouderkussen Gordelsluiting Schoudergordel Kussen gor- Comfort-inlegstuk delsluiting Centrale gordelinstelling Steunpoot Draaihendel & posi- tiehendel Achteraanzicht Zijdelingse Hoofdsteun- botsings- instelling protector Isofi x- Isofi x- connec- connector- uitbreiding...
  • Seite 62 - 62 - GEBRUIK VAN HET AUTOSTOELTJE Hellingshoek van het autostoeltje instellen • Bedien de positiehendel onderaan de voorzijde van de zitschaal met één hand. • Houd met de andere hand de zitschaal vast en stel de hoek in. De volgende zitposities zijn mogelijk: (Neem het label op het autostoeltje in acht) Achterwaarts gericht, lichaamslengte 40-105 cm: 1 positie (R)
  • Seite 63 - 63 - Gordel instellen • Om de gordel los te maken, drukt u met één hand op de knop voor de gordelverstelling in het zitgedeelte. Houd het gordelslot met de andere hand vast en maak de aangebrachte gordels voorzichtig iets losser. •...
  • Seite 64: Hoofdsteun Instellen

    - 64 - Hoofdsteun instellen • Maak de gordel los en trek aan de hendel voor het instellen van de hoofdsteun aan de achter- zijde van het autostoeltje. Beweeg de hoofd- steun tot deze op de juiste hoogte vastklikt. • Let erop dat de schoudergordels precies over de schouders van uw kind uit het autostoeltje worden geleid.
  • Seite 65 - 65 - Steunpoot voor lengteklasse 40-105 • Klap de steunpoot onder het autostoeltje uit. Voor kinderen tot een lichaamslengte van 105 cm mag het autostoeltje uitsluitend worden ge- bruikt met een uitgeklapte Isofi x-steunpoot in combinatie met de Isofi x-connectoren. •...
  • Seite 66 - 66 - MONTAGE VAN HET AUTOSTOELTJE 1) Lengteklasse 40-105 cm, max. 18 kg, achterwaarts gericht...
  • Seite 67 - 67 - 1 . Stel het autostoeltje in op de maximale ligpositie en draai het zo, dat het achterwaarts gericht staat in zitpositie R. 2 . Stel bij de knop RotationControl de leeftijd van uw kind in. 3 . Druk de Isofi x-connectorknoppen aan beide kanten in om de Isofi x-connectoren in de lengte uit te schuiven.
  • Seite 68 - 68 - MONTAGE VAN HET AUTOSTOELTJE 2) Lengteklasse 76-105 cm, min. 15 maanden, max. 18 kg, voorwaarts gericht BELANGRIJK: GEBRUIK HET AUTOSTOELTJE NIET IN DE RIJRICHTING ALS HET KIND JONGER IS DAN 15 MAANDEN.
  • Seite 69 - 69 - 1 . Stel bij de knop RotationControl de leeftijd van uw kind in. 2 . Druk de Isofi x-connectorknoppen aan beide kanten in om de Isofi x-connectoren in de lengte uit te schuiven. 3 . Klap de steunpoot uit op de eerder beschreven wijze. 4 .
  • Seite 70 Controleer het product regelmatig op mogelijke schade. In geval van schade mag het autostoeltje niet meer worden gebruikt en moet deze buiten het bereik van kinderen worden opgeborgen. Neem bij vragen en problemen contact op met de Osann klantenservice op +49 (0)7731 970077.
  • Seite 71 - 71 -...
  • Seite 72 - 72 - Gracias por elegir nuestro asiento infantil para automóvil Hero360 SL. Si necesita ayuda con este producto, diríjase a nuestro servicio de atención al cliente. • Este producto es adecuado para niños con una estatura de 40 a 105 cm.
  • Seite 73 - 73 - En caso de duda, póngase en contacto con el fabricante del asiento para automóvil o con el distribuidor. 1. Solo si el airbag puede desactivarse, si los conectores Isofi x están presentes y el asiento es reconocido como compatible con i-Sizeen en el manual del vehículo.
  • Seite 74 - 74 - ADVERTENCIA • Lea atentamente estas instrucciones antes de utilizarlo para garantizar la seguridad de su hijo. Conserve estas instrucciones. El incumplimiento de las instrucciones de este manual puede resultar en lesiones graves para su hijo. • El asiento infantil puede utilizarse con el sistema propio de cinturones de 5 puntos solo para niños de menos de 18 kg de peso y 105 cm de altura.
  • Seite 75: Vista Frontal

    - 75 - PIEZAS DEL ASIENTO Vista frontal Reposacabezas Ayudas de inserción Isofi x Acolchado para la cabeza Carcasa del asiento Almohadilla para hombro Hebilla del cinturón Correa para el hombro Almohadilla de cierre Inserto de confort del cinturón Ajuste central del cinturón Pie de apoyo Palanca de rotación...
  • Seite 76 - 76 - USO DEL ASIENTO INFANTIL PARA AUTOMÓVIL Ajuste del ángulo de inclinación del asiento infantil para automóvil • Utilice mano para accionar palanca de posición en la parte delantera infe- rior de la carcasa del asiento. • Con la otra mano, sostenga la carcasa del asiento y ajuste el ángulo.
  • Seite 77 - 77 - Ajustar el cinturón • Para soltar el cinturón, presione el botón de ajuste del cinturón de la zona del asiento con una mano. Sujete la hebilla del cinturón con la otra mano y afl oje con cuidado las correas que lo sujetan.
  • Seite 78: Ajustar El Reposacabezas

    - 78 - Ajustar el reposacabezas • Afl oje el cinturón y tire de la palanca de ajuste del reposacabezas situada en el respaldo del asiento infantil. Mueva el reposacabezas hasta que encaje a la altura correcta. • Asegúrese de que las correas de los hombros salgan del asiento infantil justo por encima de los hombros de su hijo.
  • Seite 79 - 79 - Pie de apoyo para la serie de alturas 40–105 cm • Despliegue el pie de apoyo debajo del asiento infantil. Para niños con una estatura de has- ta 105 cm, el asiento infantil para el automóvil puede utilizarse solo con el pie de apoyo Isofi x extendido junto con los conectores Isofi...
  • Seite 80: Instalación Del Asiento Infantil

    - 80 - INSTALACIÓN DEL ASIENTO INFANTIL 1) Clase de estatura 40–105 cm, máx. 18 kg, a contramarcha...
  • Seite 81 - 81 - 1 . Coloque el asiento infantil en la posición de reclinación máxima y gírelo de modo que apunte a la posición R de asiento a contramarcha. 2 . Ajuste la edad de su hijo en el botón RotationControl. 3 .
  • Seite 82 - 82 - INSTALACIÓN DEL ASIENTO INFANTIL 2) Clase de estatura 76–105 cm, mín. 15 meses, máx. 18 kg, en el sentido de la marcha IMPORTANTE: NO UTILICE EL ASIENTO INFANTIL PARA AUTOMÓVIL EN EL SENTIDO DE LA MARCHA HASTA QUE EL NIÑO CUMPLA 15 MESES.
  • Seite 83 - 83 - 1 . Ajuste la edad de su hijo en el botón RotationControl. 2 . Pulse los dos botones laterales del conector Isofi x para ampliar la longitud de los conectores Isofi x. 3 . Despliegue el pie de apoyo como se ha descrito anteriormente. 4 .
  • Seite 84 Compruebe regularmente el estado del producto para detectar posibles daños. En caso de daños, el asiento infantil no debe seguir utilizándose y debe guardarse fuera del alcance de los niños. Si tiene alguna duda o problema, póngase en contacto con el Servicio de atención al cliente de Osann: +49 (0)7731 970077.
  • Seite 85 - 85 -...
  • Seite 86 - 86 - Děkujeme, že jste se rozhodli pro naši dětskou autosedačku Hero360 SL. Potřebujete-li s výrobkem pomoci, obraťte se prosím na náš zákaznický servis. POUŽITÍ • Tento výrobek je vhodný pro děti s tělesnou výškou od 40 do 105 cm.
  • Seite 87 - 87 - V případě pochybností kontaktujte prosím výrobce autosedačky nebo prodejce. 1. Pouze pokud lze airbag deaktivovat, jsou k dispozici konektory Isofi x a sedadlo je v příručce k automobilu uvedeno jako kompatibilní s řadou i-Size. 2. Pouze pokud jsou k dispozici konektory Isofi x a sedadlo je v příručce k automobilu uvedeno jako kompatibilní...
  • Seite 88 - 88 - VAROVÁNÍ • Pro zajištění bezpečnosti svého dítěte si před použitím pečlivě přečtěte tento návod. Návod si uschovejte. Nedodržení pokynů uvedených v této příručce může způsobit vážná zranění va- šeho dítěte. • Dětská sedačka se může používat s vlastním pětibodovým pásovým systémem jen pro děti s hmotností...
  • Seite 89: Čelní Pohled

    - 89 - ČÁSTI SEDAČKY Čelní pohled Opěrka hlavy Zasouvací pomůcky pro Isofi x Hlavový polštářek Skořepina sedačky Ramenní polštářek Zámek pásu Ramenní popruh Polštářek Komfortní vložka zámku pásu Centrální nastavení pásů Opěrná patka Rotační páka a polohovací páka Pohled zezadu Chránič...
  • Seite 90 - 90 - POUŽITÍ DĚTSKÉ AUTOSEDAČKY Nastavení úhlu sklonu dětské auto- sedačky • Jednou rukou aktivujte polohovací páku na spodní přední straně skořepiny sedačky. • Druhou rukou uchopte skořepinu sedačky a nastavte požadovaný úhel. Možné jsou následující polohy sedačky: (podívejte se prosím na štítek na dětské sedač- Orientace proti směru jízdy, tělesná...
  • Seite 91 - 91 - Nastavení pásu • Chcete-li pás uvolnit, jednou rukou stiskněte tlačítko pro seřízení pásu v sedačce. Druhou rukou držte a opatrně uvolněte upevněné pásy. • Pro utažení pásů zatáhněte za přední seřizovací pásek. Dbejte na to, aby popruhy nebyly pře- kroucené.
  • Seite 92: Nastavení Opěrky Hlavy

    - 92 - Nastavení opěrky hlavy • Uvolněte pás a zatáhněte za páčku pro nasta- vení opěrky hlavy na zadní straně dětské auto- sedačky. Posuňte opěrku hlavy do požadované výšky, v níž zacvakne. • Dbejte na to, aby byly ramenní pásy vedeny z dětské...
  • Seite 93 - 93 - Opěrná patka pro velikostní kategorii 40–105 cm • Vyklopte opěrnou patku pod dětskou auto- sedačku. Pro děti s výškou do 105 cm se smí dětská autosedačka používat výhradně s vy- klopenou opěrnou patkou Isofi x společně s konektory Isofi x. •...
  • Seite 94 - 94 - MONTÁŽ DĚTSKÉ AUTOSEDAČKY 1) Velikostní kategorie 40–105 cm, max. 18 kg, proti směru jízdy...
  • Seite 95 - 95 - 1 . Nastavte dětskou autosedačku do maximální polohy pro ležení a otočte ji tak, aby směřovala proti směru jízdy do polohy sedačky R. 2 . Na knofl íku RotationControl nastavte věk dítěte. 3 . Stiskněte obě boční tlačítka konektorů Isofi x, aby se konektory Isofi x podélně vysunuly. 4 .
  • Seite 96 - 96 - MONTÁŽ DĚTSKÉ AUTOSEDAČKY 2) Velikostní kategorie 76–105 cm, min. 15 měsíců, max. 18 kg, po směru jízdy DŮLEŽITÉ: NEPOUŽÍVEJTE DĚTSKOU AUTOSEDAČKU PO SMĚRU JÍZDY, POKUD JE DÍTĚ MLADŠÍ 15 MĚSÍCŮ.
  • Seite 97 - 97 - 1 . Na knofl íku RotationControl nastavte věk dítěte. 2 . Stiskněte obě boční tlačítka konektorů Isofi x, aby se konektory Isofi x podélně vysunuly. 3 . Vyklopte opěrnou patku dle popisu uvedeného výše. 4 . Zaveďte konektory Isofi x k držákům Isofi x v sedadle vozidla a zacvakněte je. 5 .
  • Seite 98 ÚDRŽBA Pravidelně kontrolujte stav výrobku, zda není poškozen. V případě poškození se dětská autosedačka již nesmí používat a musí být uložena mimo dosah dětí. V případě dotazů a problémů kontaktujte prosím zákaznický servis Osann na tel. č. +49 (0)7731 970077.
  • Seite 99 - 99 -...
  • Seite 100 - 100 - Dziękujemy za wybranie naszego fotelika samochodowego Hero360 SL. Aby uzyskać pomoc w związku z niniejszym produktem, należy zwrócić się do naszego działu obsługi klienta. ZASTOSOWANIE • Produkt jest przeznaczony dla dzieci o wzroście od 40 do 105 cm. • Montaż tyłem do kierunku jazdy na wysokości od 40 do 105 cm odbywa się za pomocą łącz- ników Isofi...
  • Seite 101 - 101 - Ewentualne wątpliwości należy kierować do producenta fotelika samochodowego lub jego sprzedawcy. 1. Tylko wtedy, gdy można dezaktywować poduszkę po- wietrzną, dostępne są łączniki Isofi x, a miejsce siedzące jest określone w instrukcji obsługi pojazdu jako kompa- tybilne z systemem i-Size. 2.
  • Seite 102 - 102 - OSTRZEŻENIE • Aby zapewnić dziecku bezpieczeństwo, prosimy o uważne zapoznanie się z niniejszą instrukcją przed użyciem produktu. Instrukcję należy zachować. Nieprzestrzeganie poleceń zawartych w niniejszej instrukcji może spowodować poważne obrażenia ciała dziecka. • Fotelik może być używany z własnym 5-punktowym systemem pasów bezpieczeństwa tylko na potrzeby dzieci o masie ciała poniżej 18 kg oraz wzroście do 105 cm.
  • Seite 103: Widok Z Przodu

    - 103 - ELEMENTY FOTELIKA Widok z przodu Zagłówek Prowadnice ISOFIX Pokrowiec zagłówka Korpus fotelika Poduszka naramienna Klamra zapię- cia pasów Pasek na ramię Osłona klamry Wkładka komfortowa zapięcia pasów Centralny regulator pasów Podpórka Dźwignia obrotowa i dźwignia do ustawiania pozycji Widok z tyłu Ochrona przed uderze-...
  • Seite 104 - 104 - STOSOWANIE SAMOCHODOWEGO FOTELIKA DZIECIĘCEGO Regulacja kąta nachylenia samocho- dowego fotelika dziecięcego • Jedną ręką przesunąć dźwignię pozycyjną w dolnej przedniej części korpusu fotelika. • Drugą ręką przytrzymać korpus fotelika i usta- wić kąt. Możliwe są następujące pozycje fotelika: (zwrócić...
  • Seite 105 - 105 - Regulacja pasa • Aby poluzować pas, należy nacisnąć jedną ręką przycisk do regulacji pasa w obszarze siedziska. Drugą ręką chwycić zamek do zapinania pasów i ostrożnie poluzować zapięte pasy. • Pociągnąć za przedni pas regulacyjny, aby na- piąć pasy. Upewnić się, że pasy nie są skręcone. Otwieranie/zamykanie pasa •...
  • Seite 106: Regulacja Zagłówka

    - 106 - Regulacja zagłówka • Poluzować pasy i pociągnąć za dźwignię regu- lacji zagłówka z tyłu samochodowego fotelika dziecięcego. Poruszyć zagłówkiem, aż zatrza- śnie się na odpowiedniej wysokości. • Upewnić się, że paski naramienne są wyprowa- dzone z  fotelika samochodowego tuż nad ra- mionami dziecka.
  • Seite 107 - 107 - Podpórka dla przedziału wzrostowe- go 40-105 cm • Rozłożyć podpórkę pod fotelikiem dziecię- cym. W przypadku dzieci o wzroście do 105 cm fotelik samochodowy może być używany tylko z rozłożoną podpórką Isofi x z zastosowa- niem łączników Isofi x. •...
  • Seite 108 - 108 - MONTAŻ FOTELIKA DZIECIĘCEGO 1) Przedział wzrostowy 40-105 cm, maks. 18 kg, tyłem do kierunku jazdy...
  • Seite 109 - 109 - 1 . Ustawić fotelik samochodowy w maksymalnie rozłożonej pozycji i obrócić go tak, aby był usta- wiony tyłem do kierunku jazdy wskazując pozycję siedzącą R. 2 . Ustawić wiek dziecka na przycisku RotationControl. 3 . Aby przedłużyć łączniki Isofi x, wcisnąć obydwa boczne przyciski łączników Isofi x. 4 .
  • Seite 110 - 110 - MONTAŻ FOTELIKA DZIECIĘCEGO 2) Przedział wzrostowy 76-105 cm, min. 15 miesięcy, maks. 18 kg, przodem do kierunku jazdy WAŻNA INFORMACJA: FOTELIKA DZIECIĘCEGO NIE NALEŻY UŻYWAĆ W POZYCJI PRZODEM DO KIE- RUNKU JAZDY, DOPÓKI DZIECKO NIE UKOŃCZY WIEKU 15 MIESIĘCY.
  • Seite 111 - 111 - 1 . Ustawić wiek dziecka na przycisku RotationControl. 2 . Aby przedłużyć łączniki Isofi x, wcisnąć obydwa boczne przyciski łączników Isofi x. 3 . Rozłożyć podpórkę zgodnie z powyższym opisem. 4 . Wprowadzić łączniki Isofi x do uchwytów Isofi x w fotelu samochodu i zablokować. 5 .
  • Seite 112 Regularnie sprawdzać stan produktu pod kątem ewentualnych uszkodzeń. W przypadku uszkodzenia, fotelika samochodowego nie wolno używać i należy go przechowywać w miejscu niedostępnym dla dzieci. W przypadku jakichkolwiek pytań lub problemów prosimy o kontakt z Działem obsługi klienta Osann, tel. +49 (0) 7731/970077.
  • Seite 113 - 113 -...
  • Seite 114 - 114 - Ďakujeme, že ste sa rozhodli pre našu detskú autosedačku Hero360 SL. Ak potrebujete s  týmto produktom pomôcť, obráťte sa, prosím, na náš servis pre zákazníkov. POUŽITIE • Tento produkt je vhodný pre deti s telesnou výškou od 40 do 105 cm.
  • Seite 115 - 115 - V prípade pochybností kontaktujte výrobcu autosedačky alebo predajcu. 1. Len ak je možné airbag deaktivovať, sú prítomné konek- tory Isofi x a sedadlo je v príručke pre osobné vozidlo uznané ako kompatibilné s i-Size. 2. Len ak sú prítomné konektory Isofi x a sedadlo je v prí- ručke pre osobné...
  • Seite 116 - 116 - VAROVANIE • Pred použitím si starostlivo prečítajte tento návod, aby ste zaistili bezpečnosť svojho dieťaťa. Uschovajte si návod. Nedodržanie pokynov z tejto príručky môže viesť k závažným poraneniam vášho dieťaťa. • Detskú sedačku možno používať s vlastným 5-bodovým pásovým systémom iba pre deti s telesnou hmotnosťou pod 18 kg a výškou do 105 cm.
  • Seite 117: Pohľad Spredu

    - 117 - DIELY SEDAČKY Pohľad spredu Opierka hlavy Zasúvacie pomôcky Isofi x Podhlavník Sedacie vajíčko Čalúnenie oblasti pliec Zámok pásu Ramenný pás Čalúnenie Komfortná vložka zámku pásu Centrálne Nastavenie pásu Oporná noha Rotačná páka a polohovacia páka Pohľad zozadu Protektor ochrany Nastavenie pred...
  • Seite 118 - 118 - POUŽITIE DETSKEJ AUTOSEDAČKY Nastavenie uhla sklonu detskej auto- sedačky • Pohnite jednou rukou polohovaciu páku na spodnej prednej strane sedacieho vajíčka. • Druhou rukou pridržte sedacie vajíčko a na- stavte uhol. Možné sú nasledujúce pozície sedačky: (Všímajte si štítok na detskej sedačke) Orientácia dozadu, telesná...
  • Seite 119 - 119 - Nastavenie pásu • Ak chcete pás uvoľniť, stlačte jednou rukou tla- čidlo prestavenia pásu v sedacej časti. Druhou rukou držte zámok pásu a opatrne uvoľnite pri- pevnené pásy. • Zatiahnite za prednú nastavovaciu sponu, aby ste pásy napli. Dbajte na to, aby sa remene ne- pretočili.
  • Seite 120: Nastavenie Opierky Hlavy

    - 120 - Nastavenie opierky hlavy • Uvoľnite pás a potiahnite páku na nastavenie opierky hlavy na zadnej strane detskej autose- dačky. Posúvajte opierku hlavy, pokým neza- padne v správnej výške. • Dbajte na to, aby ramenné pásy viedli z detskej autosedačky tesne ponad plecia dieťaťa.
  • Seite 121 - 121 - Oporná noha pre výškovú kategóriu 40 – 105 cm • Vyklopte opornú nohu spod detskej autose- dačky. Pre deti do výšky 105 cm sa smie detská autosedačka používať výlučne s vyklopenou opornou nohou Isofi x spolu s konektormi Isofi x. •...
  • Seite 122 - 122 - MONTÁŽ DETSKEJ AUTOSEDAČKY 1) Výšková kategória 40 – 105 cm, max 18 kg, s orientáciou dozadu...
  • Seite 123 - 123 - 1 . Nastavte detskú autosedačku do maximálnej pozície ležania a otočte ju tak, aby pri orientácii dozadu ukazovala na pozíciu sedenia R. 2 . Na tlačidle RotationControl nastavte vek dieťaťa. 3 . Stlačte oba postranné gombíky príchytiek Isofi x, aby ste príchytky Isofi x vysunuli v dĺžke. 4 .
  • Seite 124 - 124 - MONTÁŽ DETSKEJ AUTOSEDAČKY 2) Výšková kategória 76 – 105 cm, min. 15 mesiacov, max. 18 kg, orientácia dopredu DÔLEŽITÉ: NEPOUŽÍVAJTE DETSKÚ AUTOSEDAČKU V  SMERE JAZDY, POKIAĽ VEK DIEŤAŤA NE- PREKROČIL 15 MESIACOV.
  • Seite 125 - 125 - 1 . Na tlačidle RotationControl nastavte vek dieťaťa. 2 . Stlačte oba postranné gombíky príchytiek Isofi x, aby ste príchytky Isofi x vysunuli v dĺžke. 3 . Vyklopte opornú nohu podľa predchádzajúceho opisu. 4 . Veďte konektory Isofi x k držiakom Isofi x na sedadle osobného vozidla a zaklapnite ich. 5 .
  • Seite 126 Pravidelne kontrolujte stav výrobku v súvislosti s možným poškodením. V prípade poškodenia sa detská autosedačka už nesmie používať a musí sa uschovať mimo dosahu detí. V prípade otázok a problémov sa, prosím, obráťte na Zákaznícky servis spoločnosti Osann na čísle +49 (0)7731 970077.
  • Seite 127 - 127 -...
  • Seite 128 Osann GmbH Gewerbestr. 22 D-78244 Gottmadingen Tel.: +49 (0)7731 970077 Fax: +49 (0)7731 970055 E-Mail: info@osann.de...

Inhaltsverzeichnis