Herunterladen Inhalt Inhalt Diese Seite drucken

Werbung

Verfügbare Sprachen

Verfügbare Sprachen

Operation Manual
E
Manuale d'uso
I
Bedienungsanleitung
D
Mode d'emploi
F
Rev. 15-05-2017

Werbung

Inhaltsverzeichnis
loading

Inhaltszusammenfassung für Studiologic numacompact 2

  • Seite 1 Operation Manual Manuale d‘uso Bedienungsanleitung Mode d’emploi Rev. 15-05-2017...
  • Seite 2: Important Safety Instructions

    Important safety instructions Please read the entire manual. It contains all the informations you need to use this unit. Please follow the instructions in the manual. The warranty will be void if unauthorized work is carried out on the Numa Compact 2. Only accessories that are specified by the manufacturer should be used with this unit.
  • Seite 3 ENGLISH Operation Manual Numa Compact 2 by Studiologic®...
  • Seite 4: Inhaltsverzeichnis

    Factory reset Firmware version and update Programs send/receive Program edit Program name Split point Mixer Part edit Volume Split assign Transpose Octave Rev send Pedal 1 - Pedal 2 Stick 1 - Stick 2 Aftertouch Numa Compact 2 by Studiologic®...
  • Seite 5 MIDI (Zone edit) Program Change LSB - MSB MIDI channel Volume Split assign Transpose Octave Pedal 1 - Pedal 2 Stick 1 - Stick 2 Aftertouch Declarations Appendix Sound map MIDI Implementation chart Specifications Dimensions Numa Compact 2 by Studiologic®...
  • Seite 6: Key Features

    Strings Resonance (Damper model) on acoustic Piano sounds (programmable) Global-Program-Part EDIT Bass, Treble, Mastering (3D+Compressor) post processing controls MIDI module with 2 independent programmable Zones Connections: Usb, MIDI In/Out, Audio L/R, Headphones, Ped1-Ped2 USB power Numa Compact 2 by Studiologic®...
  • Seite 7: Example Of Use

    PED1 PED2 Operation diagram UPPER Rev send Stereo reverb LOWER Rev send Sound engine UPPER Strings resonance LOWER AUX out Bass Treble Stereo reverb AUDIO out Mastering Volume Digital Suggested setting ampli er BUILT-IN SPEAKERS Numa Compact 2 by Studiologic®...
  • Seite 8 As well as the stereo L/R audio output and built in amplifi- cation system, the Numa Compact 2 has an additional head- phone plug, ideal for late-night jam sessions without distur- bing the neighbours. This connection can also be used as an auxiliary audio output. Numa Compact 2 by Studiologic®...
  • Seite 9 Please note that the internal amplification system is automa- tically switched off when the instrument is powered by USB, to avoid excessive power consumption or power drops. Delivery includes Numa Compact 2 Power Adapter CD Manual Numa Compact 2 by Studiologic®...
  • Seite 10: Expression / Universal Pedals

    Connect the (optional) pedal or pedals to the related sockets, labelled Ped1 and Ped2; at the socket labelled Ped 1 you can plug in the Studiologic VP pedal, typically for volume-expres- sion controls. To the Ped2 socket you can plug either a single swicth pedal, a volume-expression pedal or the custom triple pedal SLP3-D, as explained in the related chapter.
  • Seite 11: Headphones

    USB cable. The first time you switch the Numa Compact 2 on, it will be recognised by your compu- ter automatically and the appropriate driver will be installed by the OS (cross compliant). Numa Compact 2 by Studiologic®...
  • Seite 12 When the MIDI button is selected and lighted, the display will show the status of the MIDI Zones A and B and the user can access to all available parameters, edit functions and values. Numa Compact 2 by Studiologic®...
  • Seite 13: Split

    VOLUME, BASS, TREBLE and MASTERING, since they are pure real-time controls, not related to a particular Program. All Programs can be sent and received via USB, as explained in the related paragraph of this manual, in the GLOBAL EDIT section. Numa Compact 2 by Studiologic®...
  • Seite 14 Sound, to make the sound selection easier and faster. Thanks to this function, you will have an automatic setting of your preferred sounds for each Bank. A-PIANO [1/2] P01-JAZZ DUET Concert Stage Ac-Bass Concert V: 127 V: 127 Vintage Studio SOUND A-PIANO A0 - B3 C4 - C8 Numa Compact 2 by Studiologic®...
  • Seite 15 SynBrass FunKlav Square Cembalo Cluster ReedOrg GloKeys ORCHESTRA Strings1 BASS/GUITAR Strings2 Ac-Bass Horns El-Bass Brass Slap Baroque Plucked BigBand Ny-Guitar BrassFall El-Guitar SaxBand Ac-Guitar TenorSax Jz-Guitar JazzFlute 2 Guitars Trumpet 12 Strings Oboe BassRide1 BassRide2 Numa Compact 2 by Studiologic®...
  • Seite 16 (programmable send in Edit) Amount: the 2 potentiometers control the Amount of the selected effect, like the dry/wet ratio (for modulating effects like the Chorus) or other parameters, like the distortion level of the DRIVE effects. Numa Compact 2 by Studiologic®...
  • Seite 17: Strings Resonance (Damper Model

    GLOBAL EDIT. This effect, created using the experience of the Numa STAGE and CONCERT renowned Studiologic instru- ments, adds an even more realistic effect to the piano sounds, reproducing the resonances of the real strings and sound boards of the acoustic instrument.
  • Seite 18: Velocity Curve

    He- adphones plug; this will allow to use the headphones out as an extra auxiliary output, for recording or to connect it to an ac- tive-amplified subwoofer, in addition to the internal speakers. Numa Compact 2 by Studiologic®...
  • Seite 19: Pedal,

    OFF and select the function of the STICK 2 in the related PART EDIT; storing the desired setting in a PRO- GRAM. Numa Compact 2 by Studiologic®...
  • Seite 20: Factory Reset

    Numa Compact 2 as output device; - In the main window press the play button and wait for the complete procedure; - When the Numa Compact 2 display shows “UPLOAD FINISHED”, restart the instrument (off and on). Numa Compact 2 by Studiologic®...
  • Seite 21: Programs Send/Receive

    Destination. Click it and choose the MIDI port that you want to send to. - In SysEx Librarian select the right file from the list of Sysex files and press “Play” button to transfer it. Numa Compact 2 by Studiologic®...
  • Seite 22: Mixer

    The Mixer allows to control all four parts and zones (LOWER/ MIXER UPPER/ZONEA/ZONEB) at once, in a single organized page. MIXER This function can also be accessed with a shortcut, keeping 127 U pressed the SPLIT button also marked MIXER with brackets. 64 B Numa Compact 2 by Studiologic®...
  • Seite 23 Even with one SPLIT point (programmable for each PROGRAM) the possible settings are almost one hundred, considering the status and combinations of LOWER+UPPER+ZONEA+ZONEB and the SPLIT settings made possible by this function. Numa Compact 2 by Studiologic®...
  • Seite 24: Transpose

    ON in the GLOBAL EDIT area. To control the Stick 2 as- signment manually, you can set to OFF the FX-AUTOSET and the function can be switched ON or OFF and stored in the Pro- grams. Numa Compact 2 by Studiologic®...
  • Seite 25: Aftertouch

    Normally you will set the Aftertouch ON for the UPPER part, that is commonly used for the main musical part or solo performances, while the LOWER part is normally as- sociated to accompaniments or bass lines, if the SPLIT is active. Numa Compact 2 by Studiologic®...
  • Seite 26: Midi Channel

    MIDI data to select and control it. MIDI CHANNEL You can select the MIDI channel (value 1-16) for each Zone, to control 2 different external devices or sound generators. ZONE EDIT [4/13] MIDI CH MIDI CH Numa Compact 2 by Studiologic®...
  • Seite 27: Volume

    STICK 1 STICK 1 GLOBAL EDIT area. To control the Stick 2 assignment manually, you can set to OFF the FX-AUTOSET and the function can be switched ON or OFF and stored in the Programs. Numa Compact 2 by Studiologic®...
  • Seite 28 ON for the UPPER zone, that is commonly used for the main musical zone or solo performances, while the LOWER zone is normally associated to accompaniments or bass lines, if the SPLIT is active, however the setting is totally under your con- trol and choice. Numa Compact 2 by Studiologic®...
  • Seite 29 Please help to keep our environment clean. State of the art To ensure maximum quality all Studiologic by Fatar devices are al- ways engineered to be state-of-the-art products, therefore updates, modifications and improvements are made without prior notice.
  • Seite 30: Importanti Informazioni Di Sicurezza

    Importanti informazioni di sicurezza Si prega di leggere l‘intero manuale. Esso contiene tutte le informazioni di cui si ha bisogno per usare questa unità. Si prega di seguire le istruzioni riportate nel manuale. La garanzia sarà annullata se operazioni non autorizzate verranno svolte sulla Numa Compact 2.
  • Seite 31 ITALIANO Manuale d‘uso Numa Compact 2 by Studiologic®...
  • Seite 32 Factory reset Firmware version and update Programs send/receive Program edit Program name Split point Mixer Part edit Volume Split assign Transpose Octave Rev send Pedal 1 - Pedal 2 Stick 1 - Stick 2 Aftertouch Numa Compact 2 by Studiologic®...
  • Seite 33 MIDI (Zone edit) Program Change LSB - MSB MIDI channel Volume Split assign Transpose Octave Pedal 1 - Pedal 2 Stick 1 - Stick 2 Aftertouch Dichiarazioni Appendix Sound map MIDI Implementation chart Specifiche Dimensioni Numa Compact 2 by Studiologic®...
  • Seite 34: Caratteristiche Principali

    Strings Resonance (modello Damper) nei suoni di Piano acustico programmabile Global-Program-Part EDIT Controlli di Bassi, Acuti e Mastering (3D+Compressor) Modulo MIDI con 2 Zone indipendenti programmabili Connessioni: Usb, MIDI In/Out, Audio L/R, Cuffie, Pedale1-Pedale2 Alimentabile via USB Numa Compact 2 by Studiologic®...
  • Seite 35: Schema Di Funzionamento

    PED2 Schema di funzionamento UPPER Rev send Stereo reverb LOWER Rev send Sound engine UPPER Strings resonance LOWER AUX out Bass Treble Stereo reverb AUDIO out Mastering Volume Digital Suggested setting ampli er BUILT-IN SPEAKERS Numa Compact 2 by Studiologic®...
  • Seite 36 Numa Compact 2 senza dover toccare gli altri strumenti. Connessioni audio Oltre alle uscite audio stereo e al sistema di amplificazione integrata, Numa Compact 2 ha l‘uscita per cuffia, ideale per suonare a qualsiasi ora senza arrecare disturbo agli altri. Numa Compact 2 by Studiologic®...
  • Seite 37 USB. Lo strumento sarà riconosciuto automaticamente dal tuo computer appena acceso e il driver sarà installato dal sistena operativo (cross compliant). Numa Compact 2 La confezione include Alimentatore esterno Manuale CD Numa Compact 2 by Studiologic®...
  • Seite 38 Connetti il pedale (opzionale) o i pedali ai due relativi ingres- si (Ped1 e Ped2). Nell‘ingresso con l‘etichetta Ped1, puoi col- legare il pedale Studiologic VP, usato per i controlli di Volu- me-Expression. All‘ingresso etichettato Ped2 puoi collegare un pedale switch singolo, un pedale Volume-Expression o il triplo pedale custom SLP3-D, come spiegato nel capitolo di questa guida relativo ai pedali.
  • Seite 39 Per la trasmissione dei dati USB, collega il Numa Compact 2 al tuo computer con un cavo USB. La prima volta che accendi il Numa Compact 2, esso verrà riconosciuto dal tuo computer automaticamente e i driver dedicati saranno installati dal si- stema operativo (cross compilant). Numa Compact 2 by Studiologic®...
  • Seite 40 SOUND. Quando è selezionato e illuminato il pulsante MIDI, il display mostrerà la stato delle Zone MIDI A e B e l‘utente potrà acce- dere a tutti i parametri disponibili, funzioni di edit e valori. Numa Compact 2 by Studiologic®...
  • Seite 41 MIDI ZONES, con un nme programmabile per ciascun Program. Le uniche funzioni non memorizzabili sono: VOLUME, BASS, TREBLE e MASTERING, dato che sono controlli puramente real-time non legati ad un Program particolare. Numa Compact 2 by Studiologic®...
  • Seite 42 Grazie a questa funzione, avrai un‘impostazione automatica dei tuoi suoni preferiti per ogni Bank. A-PIANO [1/2] P01-JAZZ DUET Concert Stage Ac-Bass Concert V: 127 V: 127 Vintage Studio SOUND A-PIANO A0 - B3 C4 - C8 Numa Compact 2 by Studiologic®...
  • Seite 43 SynBrass FunKlav Square Cembalo Cluster ReedOrg GloKeys ORCHESTRA Strings1 BASS/GUITAR Strings2 Ac-Bass Horns El-Bass Brass Slap Baroque Plucked BigBand Ny-Guitar BrassFall El-Guitar SaxBand Ac-Guitar TenorSax Jz-Guitar JazzFlute 2 Guitars Trumpet 12 Strings Oboe BassRide1 BassRide2 Numa Compact 2 by Studiologic®...
  • Seite 44 (mandata programmabile in Edit) Amount: i due potenziometri controllano la quantità dell‘effetto selezionato, come il rapporto dry/wet (per gli ef- fetti di modulazione come il Chorus) o altri parametri, come il livello di distorsione dell‘effetto Drive. Numa Compact 2 by Studiologic®...
  • Seite 45 GLOBAL EDIT. Questo effetto, creato sulla base dell‘esperienza maturata sul Numa Stage e Concert, aggiunge un carattere di grande realismo ai suoni di piano, riproducendo la risonanza delle corde vere e della tavola armonica dello strumento acustico. Numa Compact 2 by Studiologic®...
  • Seite 46 Numa Compact 2 by Studiologic®...
  • Seite 47 OFF e selezionare la funzione dello STICK 2 nella relativa PART EDIT, memorizzando poi l’impostazione desiderata in un PROGRAM. Numa Compact 2 by Studiologic®...
  • Seite 48 Numa Compact 2 come dispositivo in output; - Nella finestra principale premere il tasto play ed attendere la fine della procedura - Quando il display del Numa Compact 2 mostra il messaggio “UPLOAD FINISHED”, riavviare lo strumento (off e on). Numa Compact 2 by Studiologic®...
  • Seite 49 “Destinatione” e selezionare la porta MIDI da cui ricevere i dati; - Nel programma “SysEx Librarian” seleziona il file Sysex dalla lista posta nella finestra e premi il pulsante “Play” per iniziare la trasmissione. Numa Compact 2 by Studiologic®...
  • Seite 50: Program Name

    Il MIXER consente di controllare tutte le quattro parti e zone (LOWER/UPPER/ZONEA/ZONEB) inuna singola pagi- MIXER na. Questa funzione è accessibile tramite una sscorciato- 127 U ia, tenendo premuti i pulsanti SPLIT e MIXER. 64 B Numa Compact 2 by Studiologic®...
  • Seite 51 ORGAN in tutta la tastiera (TO ALL) e CHOIR solo nella parte destra Anche con un solo punto di SPLIT (programmabile per ogni PROGRAM) le possibili combinazioni sono qua- si un centinaio, considerando le varie combinazioni tra LOWER+UPPER+ZONEA+ZONEB. Numa Compact 2 by Studiologic®...
  • Seite 52 AUTOSET è impostata su ON nell’area GLOBAL EDIT. Per con- trollare manualmente lo STICK 2, puoi impostare su OFF l’FX- AUTOSET e la funzione potrà essere impostata su ON o OFF e memorizzata nei Program. Numa Compact 2 by Studiologic®...
  • Seite 53: Aftertouch

    ON per la parte UPPER, usata co- munemente per la parte musicale principale o per i soli, mentre la parte LOWER è normalmente associata ad ac- compagnamenti o a parti di basso, se lo SPLIT è attivo. Numa Compact 2 by Studiologic®...
  • Seite 54: Program Change

    MIDI data to select and control it. MIDI CHANNEL You can select the MIDI channel (value 1-16) for each Zone, to control 2 different external devices or sound generators. ZONE EDIT [4/13] MIDI CH MIDI CH Numa Compact 2 by Studiologic®...
  • Seite 55 STICK 1 STICK 1 GLOBAL EDIT area. To control the Stick 2 assignment manually, you can set to OFF the FX-AUTOSET and the function can be switched ON or OFF and stored in the Programs. Numa Compact 2 by Studiologic®...
  • Seite 56 ON for the UPPER zone, that is commonly used for the main musical zone or solo performances, while the LOWER zone is normally associated to accompaniments or bass lines, if the SPLIT is active, however the setting is totally under your con- trol and choice. Numa Compact 2 by Studiologic®...
  • Seite 57 (WEEE). Aiutaci a mantenere il mondo pulito. Stato dell‘arte Per garantire il massimo della qualità, i prodotti Studiologic sono sempre progettati allo stato dell‘arte, per questo sono consentite, senza preavviso: modifiche, migliorie variazioni. Specifiche tecniche e di aspetto possono essere diverse da quanto indicato in questo ma- nuale.
  • Seite 58: Wichtige Sicherheitshinweise

    Wichtige Sicherheitshinweise Bitte lesen Sie die Bedienugsanleitung vollständig durch. Sie enthält alle Informationen die Sie benötigen, um dieses Gerät zu verwenden. Bitte folgen Sie den Anweisungen in dieser Bedienugsanleitung. Bei Fremdeingriff am NUMA Compact 2 erlischt die Garantie. Es wird empfohlen nur das vom Hersteller vorgesehene Zubehör zu verwenden.
  • Seite 59 DEUTSCH Bedienungsanleitung Numa Compact 2 by Studiologic®...
  • Seite 60 Pedal 2 FX Autoset Werkseinstellung Firmware Version und Update Programme Senden/Empfangen Programmeinstellungen Programm Name Splitpunkt Mixer Menüeinstellungen Lautstärke Splitpunkt setzen Transponieren Octave Rev send Pedal 1 - Pedal 2 Stick 1 - Stick 2 Aftertouch Numa Compact 2 by Studiologic®...
  • Seite 61 Index MIDI (Zonen-Edit) Programmwechsel LSB - MSB MIDI Kanäle Volume Split assign Transpose Octave Pedal 1 - Pedal 2 Stick 1 - Stick 2 Aftertouch Anmerkungen Anhang Sound Map MIDI Implementation Chart Spezikifationen Maße/Gewichte Numa Compact 2 by Studiologic®...
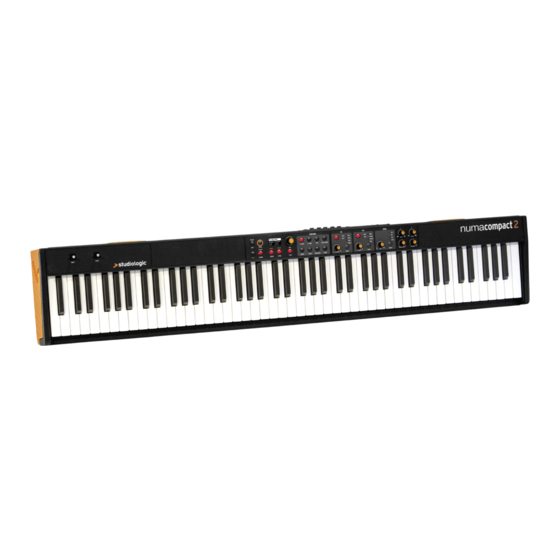
  • Seite 62: Produktübersicht

    Saitenresonanz (Damper Modell) auf akustischen Piano Sounds (programmierbar) Allgemein-, Programm- und Menüeinstellungen Bass, Treble, Mastering (3D+Compressor) Regelöglichkeiten zur Nachbearbeitung MIDI Modul mit 2 unabhängig programmierbaren Zonen Anschlüsse: USB, MIDI In/Out, Audio L/R, Kopfhöreranschluss, Pedal 1+2, Netzanschluss Numa Compact 2 by Studiologic®...
  • Seite 63 MIDI OUT PED1 PED2 Funktionsdiagramm UPPER Rev send Stereo reverb LOWER Rev send Sound engine UPPER Strings resonance LOWER AUX out Bass Treble Stereo reverb AUDIO out Mastering Volume Digital Suggested setting ampli er BUILT-IN SPEAKERS Numa Compact 2 by Studiologic®...
  • Seite 64 Neben dem Stereo- (L/R) Audioausgang und dem einge- bauten Verstärkersystem verfügt der NUMA Compact 2 über einen zusätzlichen Kopfhöreranschluss. Ideal für Late-Night- Jam-Sessions, ohne die Nachbarn zu stören. Diese Verbin- dung kann auch als Zweit-Audio-Ausgang verwendet wer- den. Numa Compact 2 by Studiologic®...
  • Seite 65: Lieferumfang

    Soundbibliothek über USB zugänglich. Bitte beachten Sie, dass das interne Verstärkersystem automatisch ausgeschal- tet ist, wenn das Gerät über USB mit Strom versorgt wird, um übermäßigen Stromverbrauch oder einen Leistungsabfall zu vermeiden. Numa Compact 2 Lieferumfang Netzteil CD Bedienungsanleitung Numa Compact 2 by Studiologic®...
  • Seite 66 Anschlussbuchsen mit der Bezeichnung Ped1 und Ped2. An der Buchse mit der Bezeichnung Ped 1 können Sie ein Studiologic VP Pedal (VP25 oder VP27) anschließen, ty- pischerweise für die Lautstärkeregelung. An die Ped2-Buchse können Sie entweder ein einzelnes Fußtaster-Pedal, ein Vo- lume-Expression-Pedal oder das Custom Triple Pedal SLP3-D anschließen, wie im entsprechenden Kapitel erläutert.
  • Seite 67: Lautstärkeregelung

    Compact 2 mit einem USB-Kabel mit Ihrem Computer. Wenn Sie das Numa Compact 2 zum ersten Mal anschließen, wird es von Ihrem Computer automatisch erkannt und der entspre- chende Treiber wird vom Betriebssystem installiert (class com- pliant). Numa Compact 2 by Studiologic®...
  • Seite 68 Parametereinstellungen bearbeiten. Sobald die MIDI-Taste gedrückt und beleuchtet ist, zeigt das Display den Status der MIDI-Zonen A und B an und der Benut- zer kann auf alle verfügbaren Parameter zugreifen, die Funk- tionen und Werte bearbeiten. Numa Compact 2 by Studiologic®...
  • Seite 69 BLE und MASTERING, da es sich um reine Echtzeit-Kontrollen handelt, die nicht mit einem bestimmten Programm zusam- menhängen. Alle Programme können per USB gesendet und empfangen werden, wie im entsprechenden Abschnitt dieses Handbuchs beschrieben, im Abschnitt GLOBAL EDIT. Numa Compact 2 by Studiologic®...
  • Seite 70 Dank dieser Funktion haben Sie eine automatische Ein- stellung Ihrer bevorzugten Sounds für jede Bank. A-PIANO [1/2] P01-JAZZ DUET Stage Concert Ac-Bass Concert V: 127 V: 127 Vintage Studio SOUND A-PIANO A0 - B3 C4 - C8 Numa Compact 2 by Studiologic®...
  • Seite 71 SynBrass FunKlav Square Cembalo Cluster ReedOrg GloKeys ORCHESTRA Strings1 BASS/GUITAR Strings2 Ac-Bass Horns El-Bass Brass Slap Baroque Plucked BigBand Ny-Guitar BrassFall El-Guitar SaxBand Ac-Guitar TenorSax Jz-Guitar JazzFlute 2 Guitars Trumpet 12 Strings Oboe BassRide1 BassRide2 Numa Compact 2 by Studiologic®...
  • Seite 72 > FX2 (einer der vier Effekte) > Reverb (send ist programmier- bar in EDIT) Amount-Regler: Die 2 Potentiometer steuern den Anteil des ausgewählten Effekts, wie das “Wet” / “Dry”-Verhältnis (für Modulationseffekte wie der Chorus) oder andere Parameter, wie die Verzerrung des DRIVE-Effekts. Numa Compact 2 by Studiologic®...
  • Seite 73 Dieser Effekt, der mit den Erfahrungen der NUMA STAGE und CONCERT-Instrumente entwickelt wurde, fügte den Klavier- klängen einen noch realistischeren Effekt hinzu und reprodu- ziert die Resonanzen der echten Saiten und des Resonanzbo- dens des akustischen Instruments. Numa Compact 2 by Studiologic®...
  • Seite 74 Verstärkersystem auch dann aktiv, wenn eine Buchse in den Kopfhörer gesteckt ist. Dadurch kann die Kopfhörerbuchse als zusätzlicher Hilfsausgang, zur Aufzeichnung oder zum Anschluss an einen aktivverstärkten Subwoofer zusätzlich zu den internen Lautsprechern verwen- det werden. Numa Compact 2 by Studiologic®...
  • Seite 75 PED2 Anschluss so programmiert werden, dass fast alle Pedaltypen angeschlossen werden kön- nen: • Sustain-Pedal Öffner • Sustain-Pedal Schließer • Expression-Pedal (Volume Funktion, Pedale mit Potentiometer und Stereo-Klinkenstecker) • SLP3-D Dreifachpedal Soft/Sostenuto/Sustain mit Halbdämpfer-Funktion Numa Compact 2 by Studiologic®...
  • Seite 76 Möchte man alle Parameter direkt und manuell steuern, kann die Funktion auf OFF gestellt werden und die Funktion des STICK 2 im zugehörigen EDIT Bereich ausgewählt werden und die gewünschte Einstellung in einem PROGRAM (Speicher- platz) abgespeichert werden. Numa Compact 2 by Studiologic®...
  • Seite 77 - Im drücken Sie im Hauptfenster die Play-Taste und warten Sie bis zum Ende des Vorganges. - Wenn das Numa Compact 2 Display “UPLOAD FINISHED” anzeigt, starten Sie das Gerät neu (aus und wieder einschalten). Numa Compact 2 by Studiologic®...
  • Seite 78 - Klicken Sie auf den Encoder, sobald die GLOBAL-Funktion SEND aktiv ist, bestätigen Sie mit YES (JA) und warten Sie, bis der Vorgang abgeschlossen ist. - Sobald die Übertragung erfolgt ist, drücken Sie die Taste “Done” im Programm SysEx-Librarian. Numa Compact 2 by Studiologic®...
  • Seite 79 - Klicken Sie darauf und wählen Sie den MIDI-Port, über den Sie senden möchten. - Wählen Sie auf dem Numa Compact 2 die Funktion RECEIVE (Empfangen) aus. - Im Programm SysEx Librarian drücken Sie die “Play” -Taste und warten, bis die Übertragung abgeschlossen ist. Numa Compact 2 by Studiologic®...
  • Seite 80: Program Edit (Programmbearbeitung)

    UPPER / ZONE A / ZONE B) sofort auf einer einzigen Seite zu MIXER steuern. Diese Funktion kann auch mit einer Taste aufgerufen 127 U werden, wobei die SPLIT [Mix]- Taste gedrückt gehalten wird. 64 B Numa Compact 2 by Studiologic®...
  • Seite 81 Selbst mit einem SPLIT-Punkt (programmierbar für jedes PRO- GRAM) gibt es fast hundert mögliche Einstellungen unter Berücksichtigung des Status und der Kombination von LOWER + UPPER + ZONE A + ZONE B und den SPLIT-Einstellungen, die durch diese Funktion ermöglicht werden. Numa Compact 2 by Studiologic®...
  • Seite 82 PEDAL 1 - PEDAL 2 Hier können Sie entscheiden, ob die Pedale für jeden Absch- nitt aktiviert sind (UPPER / LOWER oder ZONEA und ZONE B, PART EDIT [6/10] sobald die MIDI-Taste aktiviert ist). PEDAL 1 PEDAL 1 Numa Compact 2 by Studiologic®...
  • Seite 83: Aftertouch

    Bereich (UPPER), der üblicherweise für die meisten Musikstücke oder das Solo verwendet wird, während der un- tere Bereich (LOWER) normalerweise mit Begleitungen oder Basslinien verbunden ist, wenn die SPLIT – Funktion aktiv ist. Numa Compact 2 by Studiologic®...
  • Seite 84 MIDI-Standards definiert sind. Um die korrekten Werte einzu- geben, müssen Sie sich auf das Implementierungsdiagramm (MIDI implementation chart) des zu steuernden Gerätes be- ziehen. In diesem wird jeder Sound mit den MIDI-Daten defi- niert, um ihn auszuwählen und zu regeln. Numa Compact 2 by Studiologic®...
  • Seite 85 Tonlage zu spielen. Auf der anderen Seite klingt es manchmal besser, wenn man die Obere (UPPER) - Zone um ein oder zwei Oktaven absenkt. Einfach die gewünschte Einstellung ausprobieren und dann im aktuellen PROGRAM(M) abspeichern. Numa Compact 2 by Studiologic®...
  • Seite 86 Zone, die üblicherweise als die Hauptmusikzone oder bei So- loaufführungen verwendet wird, während die untere (LOWER) Zone normalerweise mit Begleitungen oder Basslinien verbun- den ist, wenn der SPLIT aktiv ist, aber die Einstellung ist völlig unter Ihrer Kontrolle und nach Ihrer Wahl. Numa Compact 2 by Studiologic®...
  • Seite 87 Anmerkungen Jedes Gerät von Studiologic von Fatar wird einzeln geprüft und ei- Garantle ner vollständigen Funktionskontrolle unterzogen. Die Verwendung ausschließlich hochwertigster Bauteile erlaubt die Gewährung von zwei Jahren Garantie. Als Garantienachweis dient der Kaufbeleg / Quittung. Schäden, die durch unsachgemäßen Einbau oder unsac gemäße Behandlung entstanden sind, unterliegen nicht der Garantie...
  • Seite 88: Consignes De Sécurité Importantes

    Consignes de sécurité importantes Veuillez lire la totalité du mode d'emploi. Il contient toutes les informa- tions dont vous avez besoin pour utiliser cette unité. Veuillez suivre les instructions du mode d'emploi. La garantie sera caduque si des interventions non autorisées sont effectuées sur le Numa Compact 2.
  • Seite 89 FRANÇAIS Mode d’emploi Numa Compact 2 by Studiologic®...
  • Seite 90 Firmware version and update Programs send/receive Édition de programme Program name Split point Mixer Édition de partie Volume Split Assign Transpose Octave Rev send Pedal 1 - Pedal 2 Stick 1 - Stick 2 A. Touch Numa Compact 2 by Studiologic®...
  • Seite 91 Prg Chg BANK LSB - MSB MIDI Ch Volume Split Assign Transpose Octave Pedal 1 - Pedal 2 Stick 1 - Stick 2 A.Touch Déclarations Annexe Tableau des sons Tableau d'équipement MIDI Caractéristiques techniques Dimensions Numa Compact 2 by Studiologic®...
  • Seite 92 (programmable) Édition globale/de programme/de partie Commandes de post-traitement de graves, aigus, mastering (3D + compresseur) Module MIDI avec 2 zones programmables indépendantes Branchements : USB, MIDI In/Out, audio G/D, casque, pédale 1-pédale 2 Alimentation par USB Numa Compact 2 by Studiologic®...
  • Seite 93: Exemple D'utilisation

    PED2 Schéma de fonctionnement UPPER Rev send Stereo reverb LOWER Rev send Sound engine UPPER Strings resonance LOWER AUX out Bass Treble Stereo reverb AUDIO out Mastering Volume Digital Suggested setting ampli er BUILT-IN SPEAKERS Numa Compact 2 by Studiologic®...
  • Seite 94 En plus de la sortie audio stéréo G/D et du système d'amplifi- cation intégré, le Numa Compact 2 possède une prise casque supplémentaire, idéale pour jouer tard la nuit sans déranger les voisins. Cette prise peut également servir de sortie audio auxiliaire. Numa Compact 2 by Studiologic®...
  • Seite 95 Veuillez noter que le système d'amplification interne est automatiquement désactivé quand l'instrument est alimenté par USB afin d'éviter une consommation d'énergie excessive ou des variations d'alimentation. L'emballage comprend Numa Compact 2 Adaptateur secteur Mode d'emploi sur CD Numa Compact 2 by Studiologic®...
  • Seite 96 Branchez la ou les pédales (en option) aux prises correspon- universelles dantes marquées P1 et P2 ; à la prise P1, vous pouvez brancher la pédale Studiologic VP, typiquement destinée à contrôler l'ex- pression/volume. À la prise P2, vous pouvez brancher soit une pédale commutateur simple, soit une pédale d'expression/vo- lume, soit la triple pédale spécifique SLP3-D, comme expliqué...
  • Seite 97 2 à votre ordinateur par un câble USB. La première fois que vous allumez le Numa Compact 2, il est automatiquement reconnu par votre ordinateur et le pilote approprié est installé par le système d'exploitation (compatibilité native dite « class compliant »). Numa Compact 2 by Studiologic®...
  • Seite 98 Quand la touche MIDI est sélectionnée et allumée, l'écran af- fiche le statut des Zones MIDI A et B et l'utilisateur peut accéder à tous les paramètres, fonctions d'édition et valeurs disponibles. Numa Compact 2 by Studiologic®...
  • Seite 99 TREBLE et MASTERING, puisque ce sont de pures commandes en temps réel, non liées à un Programme particulier. Tous les Programmes peuvent être envoyés et reçus par USB, comme expliqué dans le paragraphe correspondant de ce mode d'emploi, dans la section Édition globale. Numa Compact 2 by Studiologic®...
  • Seite 100 à la fois plus rapide et plus facile. Grâce à cette fonction, vous disposez d'une sélection automa- tique de vos sons préférés pour les différentes banques. A-PIANO [1/2] P01-JAZZ DUET Concert Stage Ac-Bass Concert V: 127 V: 127 Vintage Studio SOUND A-PIANO A0 - B3 C4 - C8 Numa Compact 2 by Studiologic®...
  • Seite 101 SynBrass FunKlav Square Cembalo Cluster ReedOrg GloKeys ORCHESTRA Strings1 BASS/GUITAR Strings2 Ac-Bass Horns El-Bass Brass Slap Baroque Plucked BigBand Ny-Guitar BrassFall El-Guitar SaxBand Ac-Guitar TenorSax Jz-Guitar JazzFlute 2 Guitars Trumpet 12 Strings Oboe BassRide1 BassRide2 Numa Compact 2 by Studiologic®...
  • Seite 102 Amount  : les 2 potentiomètres Amount contrôlent l'ampleur de l'effet sélectionné, comme le rapport son sec/son d'effet (pour les effets de modulation comme le chorus) ou d'autres paramètres, comme le niveau de distorsion des effets DRIVE. Numa Compact 2 by Studiologic®...
  • Seite 103 Cet effet, issu de l'expérience des célèbres instruments Studio- logic Numa STAGE et CONCERT, ajoute un effet encore plus ré- aliste aux sons de piano puisqu'il reproduit les résonances des cordes et de la table d'harmonie de l'instrument acoustique. Numa Compact 2 by Studiologic®...
  • Seite 104 à un caisson de graves actif amplifié, en plus des haut-parleurs internes. Numa Compact 2 by Studiologic®...
  • Seite 105 (la régler sur OFF) et choisir l'action du Stick2 dans Numa Compact 2 by Studiologic®...
  • Seite 106: Factory Reset

    - Dans la fenêtre principale, pressez le bouton PLAY et atten- dez que la procédure se termine ; - Quand l'écran du Numa Compact 2 affiche « UPLOAD FI- NISHED  » (réception terminée), faites redémarrer l'instru- ment (éteignez-le et rallumez-le). Numa Compact 2 by Studiologic®...
  • Seite 107 Destination. Cliquez dessus et choisissez le port MIDI par lequel vous souhaitez faire l'envoi. - Dans SysEx Librarian, sélectionnez le bon fichier dans la liste des fichiers Sysex et pressez le bouton « Play » pour le transférer. Numa Compact 2 by Studiologic®...
  • Seite 108 Le Mixer vous permet de contrôler les quatre parties et zones MIXER (LOWER/UPPER/ZONEA/ZONEB)sur une même page. Cette MIXER fonction est également accessible par un raccourci qui consiste 127 U à maintenir pressée la touche SPLIT, également marquée [MIX]. 64 B Numa Compact 2 by Studiologic®...
  • Seite 109 Même avec un seul point de partage (réglable pour chaque Programme), il y a près de 100 réglages possibles, en considé- rant les statuts et combinaisons de LOWER + UPPER + ZONEA + ZONEB et les réglages de partage rendus possibles par cette fonction. Numa Compact 2 by Studiologic®...
  • Seite 110 PART EDIT [8/10] que le Stick 2 sera automatiquement réglé sur AUTO si la fonc- STICK 1 STICK 1 tion FX AUTOSET correspondante est réglée sur ON dans la zone d'édition globale. Pour contrôler manuellement l'assignation du Numa Compact 2 by Studiologic®...
  • Seite 111 UPPER, qui est habituellement utilisée pour la partie musicale principale ou le jeu en solo, tandis que la partie LOWER est normalement associée aux accom- pagnements ou lignes de basse, si le partage du clavier (SPLIT) est activé. Numa Compact 2 by Studiologic®...
  • Seite 112 Vous pouvez sélectionner le canal MIDI (MIDI CH pour MIDI Channel, d'une valeur de 1 à 16) pour chaque zone, afin de ZONE EDIT [4/13] contrôler 2 appareils externes ou générateurs de sons diffé- MIDI CH MIDI CH rents. Numa Compact 2 by Studiologic®...
  • Seite 113 ZONE EDIT [11/13] 2 sera automatiquement réglé sur AUTO si la fonction FX AU- STICK 1 STICK 1 TOSET correspondante est réglée sur ON dans la zone d'édition globale. Pour contrôler manuellement l'assignation du Stick 2, Numa Compact 2 by Studiologic®...
  • Seite 114 LOWER est normalement associée aux accom- pagnements ou lignes de basse, si le partage du clavier (SPLIT) est activé, toutefois vous êtes totalement libre de choisir le ré- glage qui vous convient. Numa Compact 2 by Studiologic®...
  • Seite 115 Déclarations Chaque produit Studiologic de Fatar a été soigneusement fabriqué, éta- Garantie lonné et testé, et bénéficie d'une garantie. Les dommages causés par un transport, une fixation ou une manipulation incorrects ne sont pas couverts par cette garantie. Toute indemnisation dépassant le prix de l'appareil est exclue.
  • Seite 117 Appendix Appendix Numa Compact 2 by Studiologic®...
  • Seite 118 Trumpet Plucked Oboe Ny-Guitar Cassotto El-Guitar Accordition Ac-Guitar Musette Jz-Guitar Harmonica 2 Guitars ChoirAh 12 Strings ChoirOh BassRide1 ChoirUh BassRide2 ChoirSint JazzOrg1 Bouzouki JazzOrg2 Kanoun DrawbVib AllDrawb Cawala 888-Pure Mizmar 888-Scan MildSet StndKit AllEven WorldKit Numa Compact 2 by Studiologic®...
  • Seite 119: Midi Implementation Chart

    Appendix MIDI Implementation Chart Studiologic Numa Compact, Version 1.00 Basic information Transmitted Recognized MIDI channels 1 - 16 1, 2, 16 (common ch.) Note numbers 0 - 127 0 - 127 Program change 0 -127 ch 1,2: 0, 1, 2, 4, 5, 7,...
  • Seite 120: Specifications

    4” Design and Specifications are subject to change without notice. Il design e le specifiche tecniche sono soggette a modifica senza preavviso. Design et caractéristiques techniques sont sujets à changement sans préavis. Technische Änderungen vorbehalten. Numa Compact 2 by Studiologic®...

Inhaltsverzeichnis