Herunterladen Inhalt Inhalt Diese Seite drucken
Inhaltsverzeichnis

Werbung

Verfügbare Sprachen

Verfügbare Sprachen

Betriebsanleitung
Operating instruction
Mode d'emploi
KERN DLB-A
Version 1.2
05/2016
KERN & Sohn GmbH
Ziegelei 1
D-72336 Balingen
E-Mail: info@kern-sohn.com
Tel: +49-[0]7433- 9933-0
Fax: +49-[0]7433-9933-149
Internet: www.kern-sohn.com
DLB_A-BA-def-1612

Werbung

Inhaltsverzeichnis
loading

Inhaltszusammenfassung für KERN DLB-A

  • Seite 1 KERN & Sohn GmbH Ziegelei 1 Tel: +49-[0]7433- 9933-0 D-72336 Balingen Fax: +49-[0]7433-9933-149 E-Mail: info@kern-sohn.com Internet: www.kern-sohn.com Betriebsanleitung Operating instruction Mode d’emploi KERN DLB-A Version 1.2 05/2016 DLB_A-BA-def-1612...
  • Seite 2 Weitere Sprachversionen finden Sie online unter www.kern-sohn.com/manuals Další jazykové verze najdete na webu pod adresou www.kern-sohn.com/manuals Más versiones de idiomas se encuentran online bajo www.kern-sohn.com/manuals Vous trouverez d’autres versions de langue online sous www.kern-sohn.com/manuals Muut kieliversiot löytyvät osoitteesta www.kern-sohn.com/manuals Further language versions you will find online under www.kern-sohn.com/manuals Trovate altre versioni di lingue online in www.kern-sohn.com/manuals...
  • Seite 3: Inhaltsverzeichnis

    KERN DLB_A Version 1.2 05/2016 Betriebsanleitung Elektronischer Feuchtebestimmer Inhaltsverzeichnis T ec hnis c he Daten ....................4 K onformitäts erklärung ..................5 G eräteübers ic ht ....................6 Tastatur- und Anzeigenübersicht....................9 G rundlegende Hinweis e (Allgemeines ) ............10 Bestimmungsgemäße Verwendung ...................
  • Seite 4 Trocknungsprogramme PrG1, PrG2, PrG3, PrG4, PrG5 speichern .........46 R S 232C S c hnitts telle ..................48 12.1 Technische Daten .........................48 12.2 Pinbelegung des Ausgangssteckers ..................48 12.3 Ausdruckbeispiele (KERN YKB-01N) ..................49 Allgemeines zur F euc htebes timmung ............50 13.1 Anwendung ...........................50 13.2 Grundlagen ...........................50 13.3 Abgleich auf bestehendes Messverfahren .................50...
  • Seite 5: Technische Daten

    1 Technische Daten Daten DLB 160-3A Strahlerart Halogen (1 x 400 W) 35°C - 160°C Temperaturbereich 1°C Schritte wählbar Höchstlast (Max) 160 g Anwärmzeit 120 min Minimum für Trocknung 0.5 g Wägemodus 0.001g Ablesbarkeit (d) Feuchtebestimmungsmodus 0.01 % Wägemodus 0.001g Reproduzierbarkeit Bei Einwaage 10 g: Feuchtebestimmungsmodus...
  • Seite 6: Konformitätserklärung

    RS 232 Abmessungen Gehäuse 210 x 340 x 225 mm Verfügbarer Ø 100 mm, 12 mm hoch Trocknungsraum Nettogewicht 4.2 kg Stromversorgung 230V AC 50Hz Netzadapter 9V AC, 1000mA 2 Konformitätserklärung Die aktuelle EG/EU-Konformitätserklärung finden Sie online unter: www.kern-sohn.com/ce DLB_A-BA-d-1612...
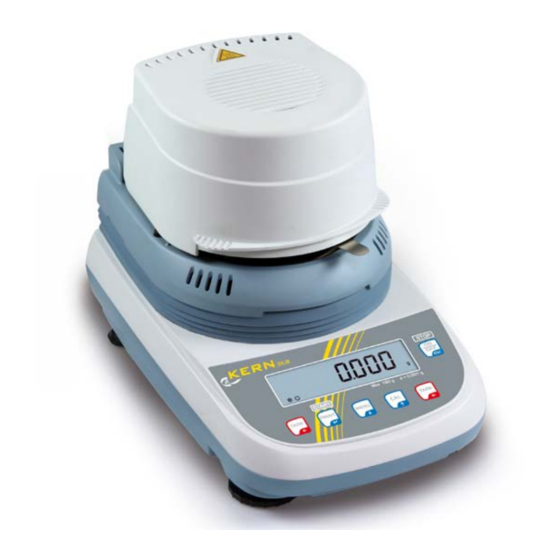
  • Seite 7: Geräteübersicht

    3 Geräteübersicht Pos. Bezeichnung Heizhaube Temperatursensor Probenschale Heizaufsatz Waage Anzeige Tastatur Fußschraube DLB_A-BA-d-1612...
  • Seite 8 1. Anschluss Verbindungskabel „Waage / Heizaufsatz“ 2. Anschuss Netzadapter „Waage“. 3. Stromversorgung „Heizaufsatz“. 4. RS 232 Schnittstelle 5. Anschluss Verbindungskabel „Waage / Heizaufsatz“ 6. Hauptschalter „Heizaufsatz“ 7. Verstellbare Fußschrauben DLB_A-BA-d-1612...
  • Seite 9 8. Gehäuseschrauben 9. Gehäuseschrauben (zum Zugang Fußschrauben entfernen) 10. Verstellbare Fußschrauben 11. Starre Fußschraube DLB_A-BA-d-1612...
  • Seite 10: Tastatur- Und Anzeigenübersicht

    3.1 Tastatur- und Anzeigenübersicht Anzeige Beschreibung Nullanzeige  Stabilitätsanzeige Prozentanzeige Status „Einwaage Probe“  Trocknungsprozess aktiv Grammanzeige Taste Bezeichnung Beschreibung langer Tastendruck kurzer Tastendruck bis das akustische Signal verstummt MENU-Taste/ • Anwendermenü aufrufen • Konfigurations- menü aufrufen / • Ergebnisanzeige umschal- verlassen Navigationstaste ...
  • Seite 11: Grundlegende Hinweise (Allgemeines)

    Intervall sowie die Art und den Umfang dieser Prüfung zu definieren. Informationen be- züglich der Prüfmittelüberwachung von Waagen sowie die hierfür notwendigen Prüfge- wichte sind auf der KERN- Homepage (www.kern-sohn.com) verfügbar. In seinem ak- kreditierten DKD- Kalibrierlaboratorium können bei KERN schnell und kostengünstig Prüfgewichte und Waagen kalibriert werden (Rückführung auf das nationale Normal).
  • Seite 12: Gefahrenhinweise

    Achten Sie darauf, dass keine Flüssigkeit ins Innere des Gerä- tes bzw. in Anschlüsse auf der Geräterückseite gelangt. Nach Verschütten von Flüssigkeit auf das Gerät muss es un- verzüglich vom Stromnetz getrennt werden. Das Gerät darf erst nach Überprüfung durch einen kompetenten KERN- Fachhändler wieder betrieben werden. DLB_A-BA-d-1612...
  • Seite 13: Grundlegende Sicherheitshinweise

    5.1 Hinweise in der Betriebsanleitung beachten Diese Betriebsanleitung vor der Aufstellung und Inbetriebnah- me sorgfältig durchlesen, selbst dann, wenn Sie bereits über Erfahrungen mit KERN-Geräten verfügen. 5.2 Ausbildung des Personals Das Gerät darf nur von geschulten Mitarbeitern bedient und gepflegt werden 6 Transport und Lagerung 6.1 Kontrolle bei Übernahme...
  • Seite 14 Am Aufstellort folgendes beachten: 1. Extreme Wärme sowie Temperaturschwankungen z.B. durch Aufstellen neben der Heizung oder direkte Sonnen- einstrahlung vermeiden 2. Explosionsgefährdete, leicht entzündbare Materialien in unmittelbarer Umgebung entfernen. Austretende Dämpfe, Probenschale und alle Teile des Probenraumes sind heiß. 3. Gerät auf eine stabile, gerade Fläche stellen. 4.
  • Seite 15: Auspacken Und Aufstellen

    7.2 Auspacken und Aufstellen Das Gerät vorsichtig aus der Verpackung nehmen, Plastikhülle entfernen und am vorgesehenen Arbeitsplatz aufstellen. Das Gerät wird in teilzerlegtem Zustand geliefert. Sofort nach dem Auspacken alle Teile kontrollieren, ob die Lieferung vollständig ist. Die einzelnen Bauteile der Rei- henfolge nach montieren.
  • Seite 16: Lieferumfang

    1. Die Stromversorgung der Waage erfolgt über das externe Netzgerät. Der aufge- druckte Spannungswert muss mit der örtlichen Spannung übereinstimmen. Ver- wenden Sie nur KERN- Originalnetzgeräte. Die Verwendung anderer Fabrikate bedarf der Zustimmung von KERN. Nach Anschluss an die Stromversorgung führt die Waage einen Selbsttest durch.
  • Seite 17: Anschluss Von Peripheriegeräten

    7.4 Anschluss von Peripheriegeräten Vor Anschluss oder Trennen von Zusatzgeräten (Drucker, PC) an die Datenschnittstelle muss der Feuchtebestimmers unbedingt vom Netz getrennt werden. Zubehör und Peripheriegeräte ausschließlich von KERN verwenden, diese sind optimal auf das Gerät abgestimmt. 7.5 Erstinbetriebnahme Um bei elektronischen Waagen genaue Wägeergebnisse zu erhalten, müssen die Waagen ihre Betriebstemperatur (siehe Anwärmzeit Kap.
  • Seite 18: Wägen

    8 Wägen 1. Im Stand-by Modus.(siehe Kap.7.3 ) ON/OFF-Taste drü- Einschalten cken. Sobald die Gewichtsanzeige erscheint, ist die Waage wägebereit. 2. ON/OFF-Taste drücken, die Waage kehrt in den Stand-by Ausschalten Modus zurück. 3. Wägegut auflegen Einfaches Wägen 4. Warten, bis Stabilitätsanzeige [ ] erscheint 5.
  • Seite 19: Justierung

    9 Justierung 9.1 Waage justieren Da der Wert der Erdbeschleunigung nicht an jedem Ort der Erde gleich ist, muss jede Waage – gemäß dem zugrundeliegenden physikalischen Wägeprinzip – am Aufstellort auf die dort herrschende Erdbeschleunigung abgestimmt werden ( nur wenn die Waage nicht bereits im Werk auf den Aufstellort justiert wurde).
  • Seite 20: Temperatur Kalibrieren / Justieren

    9.2 Temperatur kalibrieren / justieren Wir empfehlen den Temperaturwert des Gerätes gelegentlich mit dem optionalen Temperatur-Kalibrierset DLB-A01N zu prüfen. Zuvor sollte sich das Gerät mindestens 3 Stunden nach der letzten Heizphase abgekühlt haben. Vorbereitung:  Temperatur-Kalibrierset lt. Abb. installieren.  ...
  • Seite 21 Servicefunktion aufrufen:  Im Wägemodus MENU -Taste drücken und gedrückt halten bis das akustische Signal verstummt. Taste loslassen, der Menüpunkt „unitS“ wird angezeigt.  MENU -Taste wiederholt drücken bis „Service“ angezeigt wird.  Mit PRINT-Taste bestätigen. Mit der MENU-Taste gewünschte Einstellung aus- wählen.
  • Seite 22: Temperaturwert Kalibrieren

    9.2.1 Temperaturwert kalibrieren Bei der Temperaturkalibrierung findet nur eine Überprüfung statt, d.h. es werden keine Werte verändert.  Servicefunktion „Tmp test“ aufrufen, s. Kap. 9.2  Mit PRINT-Taste bestätigen. Die aktuelle Einstellung wird angezeigt. Mit den Navigationstasten   Temperatur auswählen, bei der die Überprüfung statt fin- den soll, wählbar 35- 160°C, z.
  • Seite 23: Temperaturwert Justieren

    9.2.2 Temperaturwert justieren Die Temperatur wird an zwei wählbaren Punkten gemessen und kann an diesen korri- giert werden.  Servicefunktion „Tmp Adj“ aufrufen, s. Kap. 9.2  Mit PRINT-Taste bestätigen. Die aktuelle Einstellung für den ersten Temperatur- punkt wird angezeigt. Entweder auf Werkseinstellung 80°C lassen oder mit den Navigationstasten ...
  • Seite 24: Gerätekonfiguration

    10 Gerätekonfiguration Über das Konfigurationsmenü lässt sich das Gerät individuell an Ihre Wägebedürfnisse anpassen. Navigation im Menü: Im Wägemodus MENU-Taste drücken und gedrückt halten bis Einstieg ins Menü das akustische Signal verstummt. Taste loslassen, der erste Menüpunkt „unitS“ wird angezeigt. Mit der MENU-Taste lassen sich die einzelnen Menüpunkte Menüpunkte an- der Reihe nach anwählen.
  • Seite 25: Baudrate

    Baudrate bAud rt br 1200 (siehe Kap. 10.2) br 2400 br 4800 br 9600 Servicemenü Temperatur kalibrieren SErvicE tMP tESt (s. Kap. 9.2) Temperatur justieren tMP AdJ Halogenlampe einstellen HEAT SEL Servicemenü verlassen Automatische Nullpunkt- Auto Zero ausgeschaltet Auto 0 Au0 OFF korrektur (s.
  • Seite 26: Datenausgabetyp

    Beschreibung einzelner Menüpunkte: 10.1 Datenausgabetyp  Im Wägemodus MENU-Taste drücken und gedrückt halten bis das akustische Signal verstummt.  MENU-Taste drücken  Mit PRINT-Taste bestätigen, die aktuelle Einstellung wird angezeigt.  Mit den Navigationstasten   gewünschte Einstellung wählen. Manu Prt Nicht dokumentiert Auto Prt Nicht dokumentiert...
  • Seite 27 10.2 Baudrate  Im Wägemodus MENU-Taste drücken und gedrückt halten bis das akustische Signal verstummt.  MENU-Taste wiederholt drücken  Mit PRINT-Taste bestätigen, die aktuelle Einstellung wird angezeigt.  Mit den Pfeiltasten   gewünschte Einstellung auswählen. Vorwärts blättern mit MENU-Taste Rückwärts blättern mit CAL-Taste ...
  • Seite 28 10.3 Auto Zero Unter diesem Menüpunkt kann die automatische Nullpunktkorrektur ein- oder ausge- schaltet werden. Im eingeschalteten Zustand wird der Nullpunkt bei Drift oder bei Ver- schmutzungen automatisch korrigiert. Hinweis: Werden kleine Mengen vom Wägegut entnommen oder zugeführt, so können durch die in der Waage vorhandene „Stabilitätskompensation“...
  • Seite 29 Mit den Navigationstasten   gewünschte Einstellung auswählen. = Auto Zero ausgeschaltet Au0 OFF = Auto Zero-Bereich ± ½ Digit Au0 1 = Auto Zero-Bereich ± 3 Digits Au0 2 = Auto Zero-Bereich ± 7 Digits Au0 3 = Auto Zero-Bereich ± 7 Digits im ganzen Wägebereich Au0 3E ...
  • Seite 30: Filter

    10.4 Filter Unter diesem Menüpunkt kann die Waage an bestimmte Umgebungsbedingungen und Messzwecke angepasst werden.  Im Wägemodus MENU-Taste drücken und gedrückt halten bis das akustische Signal verstummt.  MENU-Taste wiederholt drücken  Mit PRINT-Taste bestätigen, die aktuelle Einstellung wird angezeigt. ...
  • Seite 31: Stabilitätsanzeige

    10.5 Stabilitätsanzeige  Im Wägemodus MENU-Taste drücken und gedrückt halten bis das akustische Signal verstummt.  MENU-Taste wiederholt drücken  Mit PRINT-Taste bestätigen, die aktuelle Einstellung wird angezeigt.  Mit den Navigationstasten   gewünschte Einstellung auswählen. Stab 1: Stillstandskontrolle schnell / sehr ruhiger Aufstellungsotr Stab 2: Stillstandskontrolle schnell + genau / ruhiger Aufstellungsort Stab 3: Stillstandskontrolle genau / sehr unruhiger Aufstellungsort.
  • Seite 32: Kontrast Der Anzeige Einstellen

    10.6 Kontrast der Anzeige einstellen Zum Einstellen des Kontrasts der Anzeige kann zwischen 15 Werten gewählt werden.  Im Wägemodus MENU-Taste drücken und gedrückt halten bis das akustische Signal verstummt.  MENU-Taste wiederholt drücken  Mit PRINT-Taste bestätigen, die aktuelle Einstellung wird angezeigt. ...
  • Seite 33: Hinterleuchtung Der Anzeige

    10.7 Hinterleuchtung der Anzeige  Im Wägemodus MENU-Taste drücken und gedrückt halten bis das akustische Signal verstummt.  MENU-Taste wiederholt drücken  Mit PRINT-Taste bestätigen, die aktuelle Einstellung wird angezeigt.  Mit den Navigationstasten   gewünschte Einstellung wählen. Hinterleuchtung eingeschaltet Hinterleuchtung ausgeschaltet Hinterleuchtung schaltet sich 3 Sekunden nach Erreichen eines stabilen Auto...
  • Seite 34: Anwendermenü - Feuchtebestimmung

    11 Anwendermenü – Feuchtebestimmung Menüauswahl: PrG 1 PrG 2 Das Gerät bietet die Möglichkeit 5 verschiedene Trocknungs- programme (Prg1, Prg2, Prg3, Prg4, Prg5) mit individuellen PrG 3 Trocknungsparametern zu belegen und zu speichern, die ein- fach bei Bedarf abgerufen und gestartet werden können. PrG 4 PrG 5 Time drying mode:...
  • Seite 35: Trocknung Durchführen

    11.1 Trocknung durchführen Entnahmehilfe mit einer leeren Probenschale auf den Probenschalenhalter legen. Da- rauf achten, dass die Probenschale flach auf den Probenschalenhalter zu liegen kommt. Immer mit dem Probenhalter arbeiten, er erlaubt ein sicheres Arbeiten und ver- hindert Verbrennungen. Vor Start der Feuchtebestimmung ein für die Probe geeignetes Trocknungsprogramm wählen.
  • Seite 36: Feuchtebestimmung Mit Trocknungsprogramm Prg1 - Prg5

    11.1.1 Feuchtebestimmung mit Trocknungsprogramm PrG1 – PrG5 Nach Aufruf eines im Vorfeld abgespeicherten Trocknungsprogramms PrG1, PrG2, PrG3, PrG4 oder PrG5 (s. Kap. 11.2) erfolgt die Abfrage, ob die Vorheizstufe „PrH“ zu- geschaltet werden soll. Bei zugeschalteter Vorheizstufe wird das Gerät vor dem Start der Trock- nung auf die eingestellte Temperatur vorgeheizt.
  • Seite 37 Start Feuchtebestimmung: Vorheizstufe zugeschaltet Vorheizstufe ausgeschaltet  Mit PRINT-Taste bestätigen, Proben- raum schließen und Aufwärmphase abwarten.  Nach Erreichen der eingestellten Temperatur wird „ready“ angezeigt.  Mit PRINT-Taste bestätigen. Die Ge-  Mit PRINT-Taste bestätigen. Die Ge- wichtsanzeige und der Indikator „“ wichtsanzeige und der Indikator „“...
  • Seite 38  Während der Trocknung kann die Anzeige durch wiederholtes Drücken der MENU -Taste umgeschaltet werden. Feuchte [%] = Gewichtsverlust (GV) vom Startgewicht (SG) 0 – 100%  Trockenmasse [%] = Restgewicht (RG) vom SG 100% - 0 %  ATRO [%] = SG : RG x 100% 100 –...
  • Seite 39  Bei Anschluss eines optionalen Druckers erfolgt der Ausdruck eines Messproto- kolls abhängig von der Einstellung im Menü, s. Kap. Fehler! Verweisquelle konnte nicht gefunden werden.  Für weitere Messungen ON/OFF-Taste drücken, das Gerät kehrt zurück ins Menü.  Zum Verlassen des Menüs ON/OFF-Taste erneut drücken, das Gerät kehrt zu- rück in den Wägemodus ...
  • Seite 40: Feuchtebestimmung Mit Trocknungsprogramm Prg Time

    11.1.2 Feuchtebestimmung mit Trocknungsprogramm PrG time Nach Einstellung der Trocknungszeit (wählbar 1 -99 Min) und Trocknungstemperatur (wählbar 35 – 160°C) erfolgt die anschließende Feuchtebestimmung mit diesen beiden Parametern.  Mit PRINT-Taste bestätigen. Die aktuell eingestellte Trocknungszeit wird ange- zeigt.  Mit den Navigationstasten   gewünschte Einstellung auswählen. ...
  • Seite 41 Start Feuchtebestimmung: Vorheizstufe zugeschaltet Vorheizstufe ausgeschaltet  Mit PRINT-Taste bestätigen, Proben- raum schließen und Aufwärmphase abwarten.  Nach Erreichen der eingestellten Temperatur wird „ready“ angezeigt.  Mit PRINT-Taste bestätigen. Die Ge-  Mit PRINT-Taste bestätigen. Die Ge- wichtsanzeige und der Indikator „“ wichtsanzeige und der Indikator „“...
  • Seite 42  Während der Trocknung kann die Anzeige durch wiederholtes Drücken der MENU -Taste umgeschaltet werden. Feuchte [%] = Gewichtsverlust (GV) vom Startgewicht (SG) 0 – 100%  Trockenmasse [%] = Restgewicht (RG) vom SG 100% - 0 %  ATRO [%] = SG : RG x 100% 100 –...
  • Seite 43: Feuchtebestimmung Mit Trocknungsprogramm Prg Auto Mode

     Bei Anschluss eines optionalen Druckers erfolgt der Ausdruck eines Messproto- kolls abhängig von der Einstellung im Menü, s. Kap. 11,3  Für weitere Messungen ON/OFF-Taste drücken, das Gerät kehrt zurück ins Me- nü.  Zum Verlassen des Menüs ON/OFF-Taste erneut drücken, das Gerät kehrt zu- rück in den Wägemodus ...
  • Seite 44 Start Feuchtebestimmung: Vorheizstufe zugeschaltet Vorheizstufe ausgeschaltet  Mit PRINT-Taste bestätigen, Proben- raum schließen und Aufwärmphase abwarten.  Nach Erreichen der eingestellten Temperatur wird „ready“ angezeigt.  Mit PRINT-Taste bestätigen. Die Ge-  Mit PRINT-Taste bestätigen. Die Ge- wichtsanzeige und der Indikator „“ wichtsanzeige und der Indikator „“...
  • Seite 45  Während der Trocknung kann die Anzeige durch wiederholtes Drücken der MENU -Taste umgeschaltet werden. Feuchte [%] = Gewichtsverlust (GV) vom Startgewicht (SG) 0 – 100%  Trockenmasse [%] = Restgewicht (RG) vom SG 100% - 0 %  ATRO [%] = SG : RG x 100% 100 –...
  • Seite 46  Bei Anschluss eines optionalen Druckers erfolgt der Ausdruck eines Messproto- kolls, abhängig von der Einstellung im Menü, s. Kap. 12.3  Für weitere Messungen ON/OFF-Taste drücken, das Gerät kehrt zurück ins Me- nü.  Zum Verlassen des Menüs ON/OFF-Taste erneut drücken, das Gerät kehrt zu- rück in den Wägemodus ...
  • Seite 47: Trocknungsprogramme Prg1, Prg2, Prg3, Prg4, Prg5 Speichern

    11.2 Trocknungsprogramme PrG1, PrG2, PrG3, PrG4, PrG5 speichern Das Gerät verfügt über 5 Speicherplätze für oft benutzte Trocknungsprogramme. Für jedes Trocknungsprogramm werden die Trocknungsparameter abgespeichert, die einfach bei Bedarf abgerufen und gestartet werden können (s. Kap. 10.1.1)  Im Wägemodus MENU-Taste drücken, „Measure“ wird angezeigt. ...
  • Seite 48  Mit PRINT-Taste bestätigen, der aktuell eingestellte Trocknungsmodus wird an- gezeigt.   Mit den Navigationstasten   gewünschten Trocknungsmodus auswählen.  Mit PRINT-Taste bestätigen, die aktuelle Einstellung wird angezeigt. Trocknungs- parameter wie in Kap. 11.1.2 (PrG time) und Kap. 11.1.3 (PrG Auto) beschrieben eingeben.
  • Seite 49: Rs 232C Schnittstelle

    Für die Kommunikation zwischen Feuchtebestimmer und Drucker müssen folgende Bedingungen erfüllt sein: • Feuchtebestimmer mit einem geeigneten Kabel mit der Schnittstelle eines Dru- ckers verbinden. Der fehlerfreie Betrieb ist nur mit dem entsprechenden KERN- Schnittstellenkabel sichergestellt. • Kommunikationsparameter (Baudrate, Bits und Parität) von Feuchtebestimmer und Drucker müssen übereinstimmen.
  • Seite 50: Ausdruckbeispiele (Kern Ykb-01N)

    12.3 Ausdruckbeispiele (KERN YKB-01N) 1. Menü-Einstellung „Serial““Manu PC“ Der Ausdruck erfolgt nach beendeter Trocknung bei Drücken der PRINT-Taste. Temp. °C Trocknungstemperatur Time: Trocknungszeit W.Start 19.998 Startgewicht W-End: 19.994 Restgewicht Moist.: 0.02 Feuchte [%] 2. Menü-Einstellung „Serial““Auto PC“ Der 1. Teil des Ausdrucks erfolgt automatisch bei Start der Trocknung Temp.
  • Seite 51: Allgemeines Zur Feuchtebestimmung

    Methode die Messdauer um ein vielfaches länger ist. Bei der Trocken- schrankmethode wird die Probe durch einen heißen Luftstrom von außen nach innen erwärmt, um so die Feuchtigkeit zu entziehen. Die beim KERN DLB eingesetzte Strah- lung dringt überwiegend in die Probe ein um dort in Wärmeenergie umgewandelt zu werden, Erwärmung von innen nach außen.
  • Seite 52: Probenvorbereitung

    13.4 Probenvorbereitung Immer nur eine Probe für die Messung vorbereiten. Dadurch wird vermieden, dass die Probe Feuchtigkeit mit der Umgebung austauschen kann. Müssen mehrere Proben gleichzeitig entnommen werden, so sollten diese, in luftdichte Behälter verpackt wer- den, damit sie sich während der Lagerung nicht ändern. Die Probe gleichmäßig und dünn auf der Probenschale verteilen, um reproduzierbare Ergebnisse zu erhalten.
  • Seite 53: Probenmaterial

    13.5 Probenmaterial Gut bestimmen lassen sich in der Regel Proben mit folgenden Eigenschaften: Körnige bis pulvrige, rieselfähige Feststoffe Thermisch stabile Materialien, welche die zu bestimmende Feuchte leicht abge- ben, ohne dass sonstige Substanzen flüchtig werden Flüssigkeiten, die ohne Hautbildung bis zur Trockensubstanz verdampfen Schwierig kann die Bestimmung von Proben sein, die: zähflüssig/klebrig sind beim Trocknen leicht verkrusten oder zu Hautbildung neigen...
  • Seite 54: Trocknungstemperatur

    Probe gleichmäßig auf Glasfaserfilter auftragen und mit einem zweiten Glasfa- serfilter abdecken. Der Glasfaserfilter kann auch als Schutz bei spritzenden Materialien verwendet werden (jeder Spritzer verfälscht das Endergebnis). Beispiele aus der Praxis finden Sie in unserem Applikationshandbuch, ver- fügbar auf unserer KERN- Hompage (www.kern-sohn.com). DLB_A-BA-d-1612...
  • Seite 55: Fehlermeldungen

    14 Fehlermeldungen Gewichtswert instabil oder Nullstellen nicht möglich. ERR01 Umgebungsbedingungen überprüfen. Justierfehler z.B. instabile Umgebungsbedingungen ERR02 Justierfehler z.B. falsches Justiergewicht ERR03 Datenübertragung nicht möglich, da Gewichtswert instabil. ERR05 Umgebungsbedingungen überprüfen. Fehler beim Einlesen der Daten ERR07 Instabile Anzeige bei Start der Trocknung, Umgebungsbedin- ERR10 gungen überprüfen Probengewicht zu klein...
  • Seite 56: Wartung, Instandhaltung, Entsorgung

    Lose Probenreste/Pulver können vorsichtig mit einem Pinsel oder Handstaubsauger entfernt werden. Verschüttetes Wägegut sofort entfernen. 15.2 Wartung, Instandhaltung  Das Gerät darf nur von geschulten und von KERN autorisierten Servicetechnikern geöffnet werden.  Sicherstellen, dass die Waage regelmäßig kalibriert wird, s. Kap. Prüfmittelüber- wachung.
  • Seite 57: Kleine Pannenhilfe

    16 Kleine Pannenhilfe Störung Mögliche Ursache Die Anzeige leuchtet nicht. • Das Gerät ist nicht eingeschaltet. • Die Verbindung zum Netz ist unterbrochen (Netzkabel nicht eingesteckt/defekt). • Die Netzspannung ist ausgefallen. Die Messung dauert zu lange • Falsches Abschlusskriterium eingestellt Die Messung ist nicht •...
  • Seite 58 KERN DLB_A Version 1.2 05/2016 Operating instructions Electronic Moisture Analyser Contents T ec hnic al data ....................4 Applianc e overview .................... 6 Keyboard and display overview ....................9 B as ic Information (G eneral) ................10 Proper use ............................ 10 Improper Use ..........................
  • Seite 59 Applianc e c onfiguration ................... 23 10.1 Data output type ...........................25 10.2 Baud rate ............................26 10.3 Auto Zero ............................27 10.4 Filter ...............................29 10.5 Standstill control display ......................30 10.6 Setting the contrast of the display ....................31 10.7 Display background illumination ....................32 Operator menu –...
  • Seite 60: Technical Data

    1 Technical data Data DLB 160-3A Radiator Halogen (1 x 400 W) 35°C - 160°C Temperature range Choice of steps at 1°C Maximum load (Max) 160 g Warm-up time 120 min Minimum for drying 0.5 g Weighing mode 0.001g Readability (d) Moisture analysis mode 0.01 % Weighing mode...
  • Seite 61: Declaration Of Conformity

    Housing 210 x 340 x 225 mm Available Ø 100 mm, 20 mm high drying room Net weight 4.2 kg Electric Supply 230V AC 50Hz Mains adapter 9V AC, 1000mA 2 Declaration of Conformity To view the current EC/EU Declaration of Conformity go to: www.kern-sohn.com/ce DLB_A-BA-e-1612...
  • Seite 62: Appliance Overview

    3 Appliance overview Pos. Description Foldable hood Temperature sensor Sample dish Heating top Balance Display Keyboard Levelling screw DLB_A-BA-e-1612...
  • Seite 63 1. Plug-in connection cable „Balance / Heating top“ 2. Connection net adapter „Balance“. 3. Current supply „Heating top“. 4. RS 232 interface 5. Plug-in connection cable „Balance / Heating top“ 6. Main switch „Heating top“ 7. Adjustable foot screws DLB_A-BA-e-1612...
  • Seite 64 8. Housing screws 9. Housing screws (for access remove the foot screws) 10. Adjustable foot screws 11. Rigid foot screw DLB_A-BA-e-1612...
  • Seite 65: Keyboard And Display Overview

    3.1 Keyboard and display overview Display Description  Zero indicator Stability display Display of percentage  Status „Weighted in quantity sample“ Drying process active Gram display Description Description Long time pressed button Short key pressing until the acoustic signal gets mute MENU button/ •...
  • Seite 66: Basic Information (General)

    Information is available on KERN’s home page (www.kern-sohn.com) with regard to the monitoring of balance test substances and the test weights required for this. In KERN's accredited DKD calibration laboratory test weights and balances may be calibrated (return to the national standard) fast and at moderate cost.
  • Seite 67: Danger Information

    If you spill liquid on the device, disconnect it immediately. Afterwards do not operate the appliance and have it checked by a competent KERN stockist before any further use. DLB_A-BA-e-1612...
  • Seite 68: Basic Safety Precautions

    5 Basic Safety Precautions 5.1 Pay attention to the instructions in the Operation Manual Carefully read this operation manual before setup and commissioning, even if you are already familiar with KERN appliances. 5.2 Personnel training The appliance may only be operated and maintained by trained personnel.
  • Seite 69 On the installation site observe the following: Avoid extreme heat as well as temperature fluctuation caused by installing next to a radiator or in the direct sunlight; 2. Remove explosion prone, easily flammable material in the immediate vicinity. Emerging vapours, sample dish and all parts of the sample chamber are hot! 3.
  • Seite 70: Unpacking And Erection

    7.2 Unpacking and erection Take the appliance carefully out of its packaging, remove the plastic jacket and install it at the designated work space. The appliance is supplied part-assembled. Immediately after unpacking check if the delivered items are complete. Assemble the separate component parts according to their sequence.
  • Seite 71: Scope Of Delivery

    7.3 Mains connection 1. Power is supplied to the balance via the external power unit. The stated voltage value must be the same as the local voltage. Only use original KERN mains adapters. Using other makes requires consent by KERN.
  • Seite 72: Connection Of Peripheral Devices

    Before connecting or disconnecting of additional devices (printer, PC) to the data interface, always disconnect the moisture analyser from the power supply. Only use accessories and peripheral devices by KERN, as they are ideally tuned to the appliance. 7.5 Initial Commissioning In order to obtain exact results with the electronic balances, your balance must have reached the operating temperature (see warming up time chap.
  • Seite 73: Weighing

    8 Weighing 1. In stand-by mode press ON/OFF button. Start-up As soon as the weight display appears, the balance is ready for weighing. 2. Press the ON/OFF button, the balance returns into stand- Switching Off by mode. 3. Place goods to be weighed on balance. Simple weighing 4.
  • Seite 74: Adjustment

    9 Adjustment 9.1 Adjust balance As the acceleration value due to gravity is not the same at every location on earth, each balance must be coordinated - in compliance with the underlying physical weighing principle - to the existing acceleration due to gravity at its place of location (only if the balance has not already been adjusted to the location in the factory).
  • Seite 75: Calibrate / Adjust Temperature

    9.2 Calibrate / adjust temperature We recommend sometimes to check the temperature value of the device using the optional temperature calibrating set DLB-A01N. Before you do this, allow the device to cool down for at least 3 hours after the last heating phase. Preparation: ...
  • Seite 76 Invoke service function:  In weighing mode press the MENU button and keep it pressed until the acoustic signal gets mute. Release the button and the menu item “units“ will appear.  Press repeatedly the MENU button until „Service“ will be displayed. ...
  • Seite 77: Calibration Of Temperature Value

    9.2.1 Calibration of temperature value During temperature calibration only a check is carried out, i.e. no values are changed.  Invoke service function „Tmp test“, see chap.9.2  Confirm by pressing the PRINT button. The current setting will be displayed. Use the navigation buttons ...
  • Seite 78: Adjustment Of Temperature Value

    9.2.2 Adjustment of temperature value The temperature is measured at two selectable points and it is possible to correct it there.  Invoke service function „Tmp Adj“, see chap. 9.2  Confirm by pressing the PRINT button. The current setting for the first temperature point is displayed.
  • Seite 79: Appliance Configuration

    10 Appliance configuration Via the configuration menu the appliance can be individually adapted to your weighing needs. Navigation in the menu Access to menu In weighing mode press the MENU button and keep it pressed until the acoustic signal gets mute. Release the button, the first menu point „unitS“...
  • Seite 80: Baudrate

    Baudrate bAud rt br 1200 (see chap. 10.2) br 2400 br 4800 br 9600 Service menu SErvicE tMP tESt Calibration of temperature (see chap. 9.2) tMP AdJ Adjustment of temperature HEAT SEL Settings of lamp Exit service menu Automatic zero point Auto 0 Au0 OFF Auto Zero switched off...
  • Seite 81: Data Output Type

    Description of individual menu items: 10.1 Data output type  In weighing mode press the MENU button and keep it pressed until the acoustic signal gets mute.  Press MENU button  Acknowledge using PRINT button, the current setting is displayed. ...
  • Seite 82 10.2 Baud rate  In weighing mode press the MENU button and keep it pressed until the acoustic signal gets mute.  Press MENU button repeatedly  Acknowledge using PRINT button, the current setting is displayed.  Use the navigation buttons   to select the desired setting. ...
  • Seite 83: Auto Zero

    10.3 Auto Zero Under this menu item the automatic zero point correction can be switched on or off. In switched-on-state the zero point is automatically corrected at drift or when dirty. Note: In the event that small quantities are removed or added to the material to be weighed, incorrect weighing results can be displayed due to the “stability compensation“.
  • Seite 84 Use the navigation buttons   to select the desired setting. Au0 OFF = Auto Zero switched off Au0 1 = Auto Zero range ± ½ digit Au0 2 = Auto Zero range ± 3 digits Au0 3 = Auto Zero range ± 7 digits Au0 3E = Auto Zero range ±...
  • Seite 85: Filter

    10.4 Filter This menu item allows the balance to be set according to specific ambient conditions and measuring purposes.  In weighing mode press the MENU button and keep it pressed until the acoustic signal gets mute.  Press MENU button repeatedly ...
  • Seite 86: Standstill Control Display

    10.5 Standstill control display  In weighing mode press the MENU button and keep it pressed until the acoustic signal gets mute.  Press MENU button repeatedly  Acknowledge using PRINT button, the current setting is displayed.  Use the navigation buttons   to select the desired setting. Stab 1: Standstill control fast / very quiet set-up location Stab 2: Standstill control fast + exact / quiet set-up location Stab 3: Standstill control exact / very set-up location.
  • Seite 87: Setting The Contrast Of The Display

    10.6 Setting the contrast of the display To set the contrast of the display you can choose between 15 values.  In weighing mode press the MENU button and keep it pressed until the acoustic signal gets mute.  Press MENU button repeatedly ...
  • Seite 88: Display Background Illumination

    10.7 Display background illumination  In weighing mode press the MENU button and keep it pressed until the acoustic signal gets mute.  Press MENU button repeatedly  Acknowledge using PRINT button, the current setting is displayed.  Use the navigation buttons   to select the desired setting. Background illumination on Background illumination off Auto...
  • Seite 89: Operator Menu - Moisture Analysis

    11 Operator menu – moisture analysis Menu selection: PrG 1 PrG 2 The appliance offers the possibility to occupy and to save 5 PrG 3 different drying programs (Prg1, Prg2, Prg3, Prg4, Prg5) with individual drying parameters which may be invoked and started PrG 4 whenever necessary.
  • Seite 90: How To Implement Drying

    11.1 How to implement drying Place removal aid with empty sample dish on the sample dish retainer. Make sure that the sample dish is resting flat on the sample dish retainer. Use the sample retainer at all times as it allows safe working and prevents burns. Prior to start the moisture analysis select a suitable drying program.
  • Seite 91: Moisture Analysis With Drying Program Prg1 - Prg5

    11.1.1 Moisture analysis with drying program PrG1 – PrG5 After invoking a drying program PrG1, PrG2, PrG3, PrG4 or PrG5 previously stored (see chap. 10.2) you are queried whether the preheating stage „PrH“ shall be connected. If the preheating stage is added, the appliance will heat up to the set temperature before starting the drying.
  • Seite 92 Start of moisture analysis: Preheating stage enabled Preheating stage disabled  Confirm by the PRINT button, close the sample chamber and wait for the warm-up phase.  After reaching the set temperature „ready“ will be displayed.  Confirm by pressing the PRINT ...
  • Seite 93  During drying the display can be switched over by repeated pressing of the MENU button. Moisture [%] = loss of weight (GV) from start weight (SG) 0 – 100%  Dry mass [%] = residual weight (RG) of SG 100% - 0 % ...
  • Seite 94  When an optional printer is connected, the measurement log will be edited independently on the settings in the menu, see chap. 12.3  For further measurement press the ON/OFF button, the appliance returns into the menu.  For exiting the menu press anew the ON/OFF button, the appliance returns into weighing mode ...
  • Seite 95: Moisture Analysis With Drying Program Prg Time

    11.1.2 Moisture analysis with drying program PrG time After setting the drying time (available 1 -99 Min) and the drying temperature (available 35 – 160°C), moisture will be analyzed with the help of these two parameters.  Confirm by pressing the PRINT button. The currently set drying time is displayed. ...
  • Seite 96 Start of moisture analysis: Preheating stage enabled Preheating stage disabled  Confirm by the PRINT button, close the sample chamber and wait for the warm-up phase.  After reaching the set temperature „ready“ will be displayed.  Confirm by pressing the PRINT ...
  • Seite 97  During drying the display can be switched over by repeated pressing of the MENU button. Moisture [%] = loss of weight (GV) from start weight (SG) 0 – 100%  Dry mass [%] = residual weight (RG) of SG 100% - 0 % ...
  • Seite 98: Moisture Analysis With Drying Program Prg Auto Mode

     When an optional printer is connected, the measurement log will be edited independently on the settings in the menu, see chap. 12.3  For further measurement press the ON/OFF button, the appliance returns into the menu.  For exiting the menu press anew the ON/OFF button, the appliance returns into weighing mode ...
  • Seite 99 Start of moisture analysis: Preheating stage enabled Preheating stage disabled  Confirm by the PRINT button, close the sample chamber and wait for the warm-up phase.  After reaching the set temperature „ready“ will be displayed.  Confirm by pressing the PRINT ...
  • Seite 100  During drying the display can be switched over by repeated pressing of the MENU button. Moisture [%] = loss of weight (GV) from start weight (SG) 0 – 100%  Dry mass [%] = residual weight (RG) of SG 100% - 0 % ...
  • Seite 101  When an optional printer is connected, the measurement log will be edited independently on the settings in the menu, see chap. 12.3  For further measurement press the ON/OFF button, the appliance returns into the menu.  For exiting the menu press anew the ON/OFF button, the appliance returns into weighing mode ...
  • Seite 102: Save The Drying Programs Prg1, Prg2, Prg3, Prg4, Prg5

    11.2 Save the drying programs PrG1, PrG2, PrG3, PrG4, PrG5 The appliance has more than 5 memory locations for often used drying programs. For every drying program the respective drying parameters are stored, which may be invoked and started according to needs (see chap. 11.1.1) ...
  • Seite 103  Confirm with the PRINT button, the currently set drying mode will be displayed.   Use the navigation buttons   to select the desired drying mode.  Acknowledge using PRINT button, the current setting is displayed. Enter the drying parameters as specified in chap.
  • Seite 104: Rs 232C Interface

    • Use a suitable cable to connect the moisture analyser to the interface of the printer. Faultless operation requires an adequate KERN interface cable. • Communication parameters (baud rate, bits and parity) of moisture analyser and printer must match.
  • Seite 105: Printout Examples (Ykb-01N)

    12.3 Printout examples (YKB-01N) 1. Menu setting „Serial““Manu PC“ Printout occurs when drying is completed by pressing the PRINT button. Temp. °C Drying temperature Time: Drying time W.Start 19.998 Start weight W-End: 19.994 Residual weight Moist.: 0.02 Moisture [%] 2. Menu setting „Serial““Auto PC“ The first part of the printout occurs automatically when drying starts Temp.
  • Seite 106: General Information Concerning Moisture Analysis

    The radiation applied in the KERN DLB penetrates mainly the sample in order to be transformed inside it into heat energy that is, warming from the inside to the outside.
  • Seite 107: Preparing A Sample

    13.4 Preparing a sample Prepare one sample at a time for measuring. This prevents the sample from exchanging moisture with its surroundings. If several samples have to be taken at the same time, they should be packed in airtight boxes so that they do not undergo changes during storage.
  • Seite 108: Sample Material

    13.5 Sample material Easy to determine are usually samples with the following characteristics: Grainy to powdery, pourable solids Thermally stable materials, emitting the moisture to be determined easily without other substances evaporating at the same time Liquids that vaporize to leave a dry substance without developing a film Difficult to determine may be samples that are: Glutinous or sticky Become incrusted easily or tend to form a film...
  • Seite 109: Drying Temperature

    The glass fibre filter is also useful as a protection when splashing materials are dealt with (each splash falsifies the final result). You will find examples taken from actual use in our application manual, available from the KERN home page (www.kern-sohn.com). DLB_A-BA-e-1612...
  • Seite 110: Error Messages

    14 Error messages Weight value instable or zeroing not possible. ERR01 Check the environmental conditions. Adjustment error, e.g. instable environmental conditions ERR02 ERR03 Adjustment error e.g. incorrect adjustment weight} Data transfer not possible, as weighing value is instable. Check ERR05 the environmental conditions.
  • Seite 111: Service, Maintenance

    15.2 Service, maintenance  The appliance may only be opened by trained service technicians who are authorized by KERN.  Ensure that the balance is regularly calibrated, see chap. Testing instruments control. 15.3 Disposal  Disposal of packaging and appliance must be carried out by operator according to valid national or regional law of the location where the appliance is used.
  • Seite 112 KERN DLB_A Version 1.2 05/2016 Mode d’emploi Analyseur électronique d'humidité Sommaire Caractéristiques techniques ................4 Déclaration de conformité ................. 5 Aperçu de l’appareil ................... 6 Vue d’ensemble du clavier et des affichages ................9 Indications fondamentales (généralités) ............10 Utilisation conforme aux prescriptions ..................10 Utilisation inadéquate .........................
  • Seite 113 Configuration de l’appareil ................23 10.1 Type émission de données ......................26 10.2 Taux Baud .............................27 10.3 Auto Zero ............................28 10.4 Filtre ...............................30 10.5 Affichage du contrôle de l’arrêt....................31 10.6 Régler le contraste de l’affichage ....................32 10.7 Eclairage du fond de l’écran d’affichage ..................33 Menu opérateur –...
  • Seite 114: Caractéristiques Techniques

    1 Caractéristiques techniques Données DLB 160-3A Type de radiateur Halogène (1 x 400 W) 35°C - 160°C Gamme de températures démarches de 1°C au choix Charge maxi 160 g Temps de préchauffage 120 minutes Minimum pour séchage 0.5 g Mode de pesage 0.001g Lisibilité...
  • Seite 115: Déclaration De Conformité

    Ø 100 mm, 20 mm de haut disponible Poids net 4.2 kg Alimentation en courant 230V AC 50Hz Adaptateur réseau 9V AC, 1000mA 2 Déclaration de conformité Vous trouvez la déclaration de conformité CE- UE actuelle online sous: www.kern-sohn.com/ce DLB_A-BA-f-1612...
  • Seite 116: Aperçu De L'appareil

    3 Aperçu de l’appareil Pos. Description Capot pliant Capteur de température Cuvette porte-échantillon Rehausse chauffante Balance Afficheur Clavier Vis des pieds DLB_A-BA-f-1612...
  • Seite 117 1. Raccordement câble de liaison „balance / rehausse chauffante“ 2. Raccordement adaptateur du secteur „balance“. 3. Alimentation en courant „rehausse chauffante“. 4. Interface RS 232 5. Raccordement câble de liaison „balance / rehausse chauffante“ 6. Interrupteur principal „rehausse chauffante“ 7. Vis de nivellement réglables DLB_A-BA-f-1612...
  • Seite 118 8. Vis du boîtier 9. Vis du boîtier (retirer les vis de nivellement pour y accéder) 10. Vis de nivellement réglables 11. Vis de nivellement rigide DLB_A-BA-f-1612...
  • Seite 119: Vue D'ensemble Du Clavier Et Des Affichages

    3.1 Vue d’ensemble du clavier et des affichages Afficheur Description  Affichage du zéro Affichage de la stabilité Affichage du pourcentage  Etat „pesée échantillon“ Processus de séchage actif Affichage gramme Touche Description Description Appuyer sur la touche long Courte pression sur la touche temps jusqu’à...
  • Seite 120: Indications Fondamentales (Généralités)

    Des informations concernant la vérification des moyens de contrôle des balances ainsi que les poids de contrôle nécessaires à cette opération sont disponibles sur le site KERN (www.kern-sohn.com). Grâce à son laboratoire de calibrage accrédité DKD, KERN propose un calibrage rapide et économique pour les poids d´ajustage et les balances...
  • Seite 121: Avertissements De Dangers

    Si un liquide a été renversé sur l’appareil il faut le débrancher sur-le-champ du réseau électrique. L’appareil ne sera remis en œuvre qu’après avoir subi un contrôle par un concessionnaire KERN compétent. DLB_A-BA-f-1612...
  • Seite 122: Indications De Sécurité Générales

    Lisez attentivement la totalité de ce mode d´emploi avant l´installation et la mise en service de la balance, et ce même si vous avez déjà des expériences avec les appareils KERN. 5.2 Formation du personnel L´appareil ne doit être utilisé et entretenu que par des collaborateurs formés à cette fin.
  • Seite 123 Sur le lieu d’implantation observer le suivant: 1. Eviter d´exposer l’appareil à une chaleur extrême ainsi qu’une fluctuation de température, par exemple en la plaçant près d´un chauffage, ou de l´exposer directement aux rayons du soleil; 2. Les matières explosives et très inflammables dans l’entourage immédiat doivent être éloignées.
  • Seite 124: Déballage Et Installation

    7.2 Déballage et installation Sortez avec précaution l’appareil de l’emballage, retirez la housse en plastique et installez l’appareil de mesure de l’humidité au poste de travail prévu à cet effet. L’appareil est fourni à l’état décomposé en pièces détachées. Contrôler toutes les pièces immédiatement après déballage afin de vérifier si la livraison est complète.
  • Seite 125: Etendue De La Livraison

    1. L’alimentation en courant de la balance s’effectue via le bloc d’alimentation secteur externe. La valeur de tension imprimée sur l´appareil doit concorder avec la tension locale. N´utilisez que des blocs d´alimentation secteur livrés par KERN. L´utilisation d´autres marques n´est possible qu´avec l´autorisation de KERN.
  • Seite 126: Raccordement D'appareils Périphériques

    Avant le raccordement ou le débranchement d´appareils supplémentaires (imprimante, PC) à l´interface de données, le détecteur d’humidité doit impérativement être coupé du secteur. N’utiliser exclusivement que des accessoires et des appareils périphériques de KERN, car ils sont optimalement adaptés à l‘appareil. 7.5 Première mise en service Pour obtenir des résultats exacts de pesée avec les balances électroniques, les...
  • Seite 127: Pesage

    8 Pesage 1. En mode d’attente appuyer sur la touche ON/OFF. Mise en route Dès que l’affichage du poids apparaît la balance est prête à peser. 2. Appeler la touche ON/OFF, la balance retourne en mode Mettre à l’arrêt stand-by. 3.
  • Seite 128: Ajustage

    9 Ajustage 9.1 Ajuster la balance Etant donné que la valeur d´accélération de la pesanteur varie d´un lieu à l´autre sur la terre, il est nécessaire d´adapter chaque balance – conformément au principe physique fondamental de pesée – à l´accélération de la pesanteur du lieu d´installation (uniquement si la balance n´a pas déjà...
  • Seite 129: Calibrage / Ajustage De La Température

    9.2 Calibrage / ajustage de la température Nous recommandons de vérifier occasionnellement la valeur de température de l’appareil à l’aide du jeu de calibrage de la température en option DLB-A01N. Auparavant l’appareil devrait s'être refroidi au moins 3 heures après la dernière phase de chauffage.
  • Seite 130 Appel de la fonction du SAV:  Dans le mode de pesage appuyer longtemps sur la touche MENU jusqu’à ce que le signal acoustique s’éteigne. Relâcher la touche, le point de menu „Unités“ s'affiche.  Répéter la pression sur la touche MENU jusqu’à ce que „Service“ apparaisse. ...
  • Seite 131 9.2.1 Calibrage de la valeur de température Lors du calibrage de la température seul a lieu un contrôle, c’est-à-dire qu’aucune valeur n’est modifiée.  Appeler la fonction de SAV „Tmp test“, voir chap. 9.2  Confirmer sur la touche PRINT. Le réglage actuel est affiché. Sélectionner sur les touches de navigation ...
  • Seite 132 9.2.2 Ajustage de la valeur de température La température est relevée à deux endroits au choix et peut y être corrigée.  Appeler la fonction de SAV „Tmp Adj“, voir chap. 9.2  Confirmer sur la touche PRINT. Le réglage actuel est affiché pour le premier point de température.
  • Seite 133: Configuration De L'appareil

    10 Configuration de l’appareil L’appareil peut être individuellement adapté à vos besoins de pesée par le menu de configuration. Navigation dans le menu Dans le mode de pesage appuyer longtemps sur la touche Entrée au menu MENU jusqu’à ce que le signal acoustique s’éteigne. Relâcher la touche, le premier point du menu „unitS“...
  • Seite 134: Type Émission De Données

    Aperçu des menus : Point du menu Affiche Sélection Description units GrAM Unité de pesée non documenté SEriAL Manu Prt Non documenté Type émission de données (voir chap. Non documenté Auto Prt 10.1) Edition des données par appel Manu PC de la touche PRINT Édition automatique des Auto PC...
  • Seite 135 Fond de l’écran d’affichage Conter 01 - 15 Sélectionner le contraste (voir chap 10.6) Eclairage d'arrière-plan Eclairage du fond de l’écran activé de l’affichage (voir chap. Eclairage du fond de l’écran 10.7) désactivé L’éclairage d'arrière-plan se met automatiquement hors circuit 3 secondes après que la valeur de Auto pesée se soit stabilisée.
  • Seite 136: Type Émission De Données

    Description de quelques points de menu : 10.1 Type émission de données  Dans le mode de pesage appuyer longtemps sur la touche MENU jusqu’à ce que le signal acoustique s’éteigne.  Appuyer sur la touche MENU  Valider sur la touche PRINT, le réglage actuel est affiché. ...
  • Seite 137 10.2 Taux Baud  Dans le mode de pesage appuyer longtemps sur la touche MENU jusqu’à ce que le signal acoustique s’éteigne.  Appuyer plusieurs fois sur la touche MENU  Valider sur la touche PRINT le point de menu appelé, le réglage actuel est affiché.
  • Seite 138: Auto Zero

    10.3 Auto Zero Sous ce point de menu on peut activer ou désactiver la correction automatique du point zéro. En état activé le point zéro en cas de dérives et de saletés est corrigé automatiquement. Remarque: Dans le cas où de petites quantités des matières à peser sont retirées ou ajoutées, le dispositif de «...
  • Seite 139 Sélectionner sur les touches de navigation   le réglage voulu. Au0 OFF = Auto Zero à l’arrêt Au0 1 = gamme Auto Zero ± ½ digit Au0 2 = gamme Auto Zero ± 3 digits Au0 3 = gamme Auto Zero ± 7 digits Au0 3E = gamme Auto Zero ±...
  • Seite 140: Filtre

    10.4 Filtre Sous ce point du menu il est possible d’adapter la balance à certaines conditions environnementales et à certains objectifs de mesure.  Dans le mode de pesage appuyer longtemps sur la touche MENU jusqu’à ce que le signal acoustique s’éteigne. ...
  • Seite 141: Affichage Du Contrôle De L'arrêt

    10.5 Affichage du contrôle de l’arrêt  Dans le mode de pesage appuyer longtemps sur la touche MENU jusqu’à ce que le signal acoustique s’éteigne.  Appuyer plusieurs fois sur la touche MENU  Valider sur la touche PRINT le point de menu appelé, le réglage actuel est affiché.
  • Seite 142: Régler Le Contraste De L'affichage

    10.6 Régler le contraste de l’affichage Pour régler le contraste de l’affichage, on peut sélectionner entre 15 valeurs.  Dans le mode de pesage appuyer longtemps sur la touche MENU jusqu’à ce que le signal acoustique s’éteigne.  Appuyer plusieurs fois sur la touche MENU ...
  • Seite 143: Eclairage Du Fond De L'écran D'affichage

    10.7 Eclairage du fond de l’écran d’affichage  Dans le mode de pesage appuyer longtemps sur la touche MENU jusqu’à ce que le signal acoustique s’éteigne.  Appuyer plusieurs fois sur la touche MENU  Valider sur la touche PRINT le point de menu appelé, le réglage actuel est affiché.
  • Seite 144: Menu Opérateur - Détermination De L'humidité

    11 Menu opérateur – détermination de l’humidité Sélection du menu: PrG 1 PrG 2 L’appareil offre la possibilité d’attribuer à 5 différents PrG 3 programmes de séchage (Prg1, Prg2, Prg3, Prg4, Prg5) des paramètres de séchage individuels et de les mémoriser, qui PrG 4 peuvent être appelés et démarrés simplement en cas de besoin.
  • Seite 145: Effectuer La Déshydratation

    11.1 Effectuer la déshydratation Posez la prise d’échantillon avec une cuvette porte-échantillon vide sur le support de la cuvette porte-échantillon. Veillez à ce que la cuvette porte-échantillon soit bien à plat sur le support de la cuvette porte-échantillon. Mettez toujours en œuvre le support porte-échantillon, il permet de travailler en toute sécurité...
  • Seite 146: Détermination De L'humidité Avec Programme De Séchage Prg1 - Prg5

    11.1.1 Détermination de l’humidité avec programme de séchage PrG1 – PrG5 Après appel d’un programme de séchage mémorisé au préalable PrG1, PrG2, PrG3, PrG4 ou PrG5 (voir au chap. 11.2) intervient l’interrogation, si le palier de préchauffage „PrH“ doit être mis en circuit additionnellement. Lorsque le palier de préchauffage est mis en circuit additionnellement, l’appareil est préchauffé...
  • Seite 147 Démarrage de la détermination de l‘humidité: Palier de préchauffage activé Palier de préchauffage désactivé  Valider sur la touche PRINT, fermer l’enceinte porte-échantillon et attendre la phase de réchauffement.  Une fois la température réglée atteinte apparaît „ready“.  Confirmez sur la touche PRINT. ...
  • Seite 148  Pendant la déshydratation l’affichage peut être commuté en appuyant plusieurs fois sur la touche MENU. Humidité [%] = perte de poids (GV) du poids de démarrage (SG) 0 – 100%  Masse anhydre [%] = poids résiduel (RG) de SG 100% - 0 % ...
  • Seite 149  Lorsqu’une imprimante est raccordée a lieu l’édition d’un procès-verbal de mesure en fonction du réglage dans le menu, voir au chap. 12.3  Pour des mesures consécutives appuyer sur la touche ON/OFF, l’appareil retourne au menu.  Pour quitter le menu appuyer une nouvelle fois sur la touche ON/OFF, l’appareil retourne dans le menu de pesée ...
  • Seite 150: Détermination De L'humidité Avec Programme De Séchage Prg Time

    11.1.2 Détermination de l’humidité avec programme de séchage PrG time Après réglage du temps de séchage (sélectionnable entre 1 -99 min) et de la température de séchage sélectionnable entre 35 – 160°C) intervient la détermination de l’humidité avec ces deux paramètres. ...
  • Seite 151 Démarrage de la détermination de l‘humidité: Palier de préchauffage activé Palier de préchauffage désactivé  Valider sur la touche PRINT, fermer l’enceinte porte-échantillon et attendre la phase de réchauffement.  Une fois la température réglée atteinte apparaît „ready“.  Confirmez sur la touche PRINT. ...
  • Seite 152  Pendant la déshydratation l’affichage peut être commuté en appuyant plusieurs fois sur la touche MENU. Humidité [%] = perte de poids (GV) du poids de démarrage (SG) 0 – 100%  Masse anhydre [%] = poids résiduel (RG) de SG 100% - 0 % ...
  • Seite 153: Détermination De L'humidité Avec Programme De Séchage Prg Auto Mode

     Lorsqu’une imprimante est raccordée a lieu l’édition d’un procès-verbal de mesure en fonction du réglage dans le menu, voir au chap. 12.3  Pour des mesures consécutives appuyer sur la touche ON/OFF, l’appareil retourne au menu.  Pour quitter le menu appuyer une nouvelle fois sur la touche ON/OFF, l’appareil retourne dans le menu de pesée ...
  • Seite 154 Démarrage de la détermination de l‘humidité: Palier de préchauffage activé Palier de préchauffage désactivé  Valider sur la touche PRINT, fermer l’enceinte porte-échantillon et attendre la phase de réchauffement.  Une fois la température réglée atteinte apparaît „ready“.  Confirmez sur la touche PRINT. ...
  • Seite 155  Pendant la déshydratation l’affichage peut être commuté en appuyant plusieurs fois sur la touche MENU. Humidité [%] = perte de poids (GV) du poids de démarrage (SG) 0 – 100%  Masse anhydre [%] = poids résiduel (RG) de SG 100% - 0 % ...
  • Seite 156  Lorsqu’une imprimante est raccordée en option a lieu l’édition d’un procès-verbal de mesure en fonction du réglage dans le menu, voir au chap. 12.3  Pour des mesures consécutives appuyer sur la touche ON/OFF, l’appareil retourne au menu.  Pour quitter le menu appuyer une nouvelle fois sur la touche ON/OFF, l’appareil retourne dans le menu de pesée ...
  • Seite 157: Mémoriser Le Programmes De Séchage Prg1, Prg2, Prg3, Prg4, Prg5

    11.2 Mémoriser le programmes de séchage PrG1, PrG2, PrG3, PrG4, PrG5 L’appareil dispose de 5 espaces de mémoire pour les programmes de déshydratation souvent utilisés. Les paramètres de séchage sont mémorisés pour chaque programme de séchage, qui peuvent être appelés et démarrés simplement en cas de besoin (voir au chap. 11.1.1) ...
  • Seite 158  Valider sur la touche PRINT, le mode de séchage actuellement réglé est affiché.   Sélectionner sur les touches de navigation   le mode de séchage voulu.  Valider sur la touche PRINT le point de menu appelé, le réglage actuel est affiché.
  • Seite 159: Interface Rs 232C

     8 bits de donnée, 1 bit d’arrêt, pas de bit de parité  taux de baud au choix entre 1200 - 9600 bauds.  pour la mise en œuvre d’un interface seul le recours à un câble d’interface KERN respectif de max. 2 m permet un fonctionnement irréprochable 12.2 Attribution des pins de la fiche de sortie...
  • Seite 160: Exemples D'édition (Ykb-01N)

    12.3 Exemples d‘édition (YKB-01N) 1. Réglage du menu „Serial““Manu PC“ L’édition s’effectue après terminaison du séchage par appel de la touche PRINT. Temp. ° C Température de déshydratation Time: Temps de déshydratation W.Start 19.998 Poids de démarrage W-End: 19.994 Poids résiduel Moist.: 0.02 Humidité...
  • Seite 161: Généralités Sur La Détermination Du Taux D'humidité

    Avec la méthode en étuve, l’échantillon est réchauffé par un courant d’air chaud de l’extérieur vers l’intérieur pour en retirer l’humidité. Le rayonnement mis en œuvre par KERN DLB pénètre en majeure partie dans l’échantillon pour y être transformé en énergie calorifique, le réchauffement s’étend de l’intérieur vers l’extérieur.
  • Seite 162: Préparation De L'échantillon

    13.4 Préparation de l’échantillon Ne préparez toujours qu’un seul échantillon à la fois pour la mesure. Ceci évite que l’échantillon puisse échanger de l’humidité avec l’environnement. Si plusieurs échantillons doivent être tirés en même temps, ces échantillons devraient être emballés dans des boîtes hermétiques à...
  • Seite 163: Matériau De L'échantillon

    13.5 Matériau de l’échantillon Les échantillons ayant les caractéristiques suivantes peuvent être normalement testés facilement: Matières solides s’écoulant, en granules voire poudreuses Matériaux thermiquement stables, qui libèrent facilement l’humidité à déterminer, sans que toutefois d’autres substances se libèrent Les liquides qui se vaporisent jusqu’à obtention de la matière déshydratée, sans formation de peau La détermination des échantillons suivants peut s’avérer difficile: substances visqueuses / collantes...
  • Seite 164: Température De Déshydratation

    Le filtre è fibre de verre peut également être employé en guise de protection dans le cas de matériaux éclaboussants (chaque éclaboussure qui s’échappe fausse le résultat). Vous trouverez des exemples tirés de la pratique dans notre manuel d’application, disponible sur notre site internet KERN (www.kern-sohn.com). DLB_A-BA-f-1612...
  • Seite 165: Maintenance, Entretien, Élimination

    14.2 Maintenance, entretien  L´appareil ne doit être ouvert que par des dépanneurs formés à cette fin et ayant reçu l´autorisation de KERN.  Vous assurer que la balance subit un calibrage régulier, voir au chap. Maîtrise des équipements de contrôle.
  • Seite 166: Aide Succincte En Cas De Panne

    15 Aide succincte en cas de panne Panne Cause possible • L’appareil n’est pas en marche. L´affichage ne s´allume pas. • La connexion au secteur est coupée (câble de secteur pas branché/défectueux). • Panne de tension de secteur. La mesure dure trop •...

Inhaltsverzeichnis