Inhaltsverzeichnis
Werbung
Verfügbare Sprachen
Verfügbare Sprachen
Werbung
Kapitel
Inhaltsverzeichnis

Verwandte Anleitungen für KERN DE Serie


Inhaltszusammenfassung für KERN DE Serie
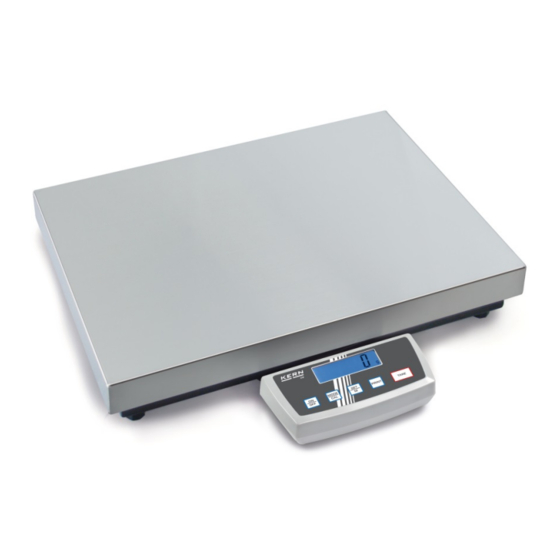
- Seite 1 KERN & Sohn GmbH Ziegelei 1 Tel: +49-[0]7433- 9933-0 D-72336 Balingen Fax: +49-[0]7433-9933-149 E-Mail: info@kern-sohn.com Internet: www.kern-sohn.com Betriebsanleitung Plattformwaage Operating instruction Platform scale Mode d’emploi Balance plate-forme KERN DE Version 5.8 2017-11 DE-BA-def-1758...
- Seite 2 Weitere Sprachversionen finden Sie online unter www.kern-sohn.com/manuals Další jazykové verze najdete na webu pod adresou www.kern-sohn.com/manuals Yderligere sprogversioner finder de online på www.kern-sohn.com/manuals Más versiones de idiomas se encuentran online bajo www.kern-sohn.com/manuals Vous trouverez d’autres versions de langue online sous www.kern-sohn.com/manuals Further language versions you will find online under www.kern-sohn.com/manuals...
-
Seite 3: Inhaltsverzeichnis
KERN DE Version 5.8 2017-11 Betriebsanleitung Plattformwaage Inhaltsverzeichnis Technische Daten ..................4 Grundlegende Hinweise (Allgemeines) ..........11 Bestimmungsgemäße Verwendung ................. 11 Sachwidrige Verwendung ....................11 Gewährleistung ........................11 Prüfmittelüberwachung ..................... 12 Grundlegende Sicherheitshinweise ............12 Hinweise in der Betriebsanleitung beachten ..............12 Ausbildung des Personals .................... - Seite 4 Einstellungen .................... 25 Menüstruktur aufrufen ....................... 25 Menüstruktur verlassen ..................... 26 Dosierung und Zero-tracking .................... 26 Auswahl des Justiergewichtes ..................27 Schnittstelle RS232C ......................28 7.5.1 Datenübertragungsmodus....................28 7.5.2 Baudrate ..........................29 Auswahl Druckausgabe ..................... 30 Zurücksetzen auf Werkseinstellung ................. 31 Datenausgang RS 232 C ................
-
Seite 5: Technische Daten
1 Technische Daten KERN DE6K0.5A DE6K1D DE12K1A Ablesbarkeit (d) 0,5 g 1 g / 2 g Wägebereich (Max) 6 kg 3 kg / 6 kg 12 kg Mindeststückgewicht Reproduzierbarkeit 0,5 g 1 g / 2 g Linearität ± 1,5 g ±... - Seite 6 KERN DE15K0.2D DE15K2D DE24K2A Ablesbarkeit (d) 0,2 g / 0,5 g 2 g / 5 g Wägebereich (Max) 6 kg / 15 kg 6 kg / 15 kg 24 kg Mindeststückgewicht 400 mg Reproduzierbarkeit 0,2 g / 0,5 g 2 g / 5g Linearität...
- Seite 7 KERN DE35K0.5D DE35K5D DE35K5DL Ablesbarkeit (d) 0,5 g / 1 g 5 g / 10 g Wägebereich (Max) 15 kg / 35 kg 15 kg / 35 kg Mindeststückgewicht 10 g Reproduzierbarkeit 0,5 g / 1g 5 g / 10 g Linearität...
- Seite 8 KERN DE60K1D DE60K1DL DE60K5A Ablesbarkeit (d) 1 g / 2 g Wägebereich (Max) 30 kg / 60 kg 60 kg Mindeststückgewicht 10 g Reproduzierbarkeit 1 g / 2 g Linearität ± 4 g / 8 g ± 15 g Anwärmzeit...
- Seite 9 KERN DE60K10D DE60K10DL DE120K10A Ablesbarkeit (d) 10 g / 20g 10 g Wägebereich (Max) 30 kg / 60 kg 120 kg Mindeststückgewicht 20 g 20 g Reproduzierbarkeit 10 g / 20 g 10 g Linearität ± 30 g / 60 g ±...
- Seite 10 DE150K2D DE150K2DL DE150K20D DE150K20DL KERN Ablesbarkeit (d) 2 g / 5g 20 g / 50 g 20 g / 50 g Wägebereich (Max) 60 kg / 150 kg Mindeststückgewicht 40 g 40 g Reproduzierbarkeit 2 g / 5 g 20 g / 50 g Linearität...
- Seite 11 DE150K20DXL DE300K5DL DE300K50D DE300K50DL KERN Ablesbarkeit (d) 20 g / 50 g 5 g / 10 g 50 g / 100 g Wägebereich (Max) 60 kg / 150 kg 150 kg / 300 kg Mindeststückgewicht 40 g 10 g 100 g...
-
Seite 12: Grundlegende Hinweise (Allgemeines)
Die Waage darf nicht konstruktiv verändert werden. Dies kann zu falschen Wägeer- gebnissen, sicherheitstechnischen Mängeln sowie der Zerstörung der Waage führen. Die Waage darf nur gemäß den beschriebenen Vorgaben eingesetzt werden. Abwei- chende Einsatzbereiche/Anwendungsgebiete sind von KERN schriftlich freizugeben. 2.3 Gewährleistung Gewährleistung erlischt bei •... -
Seite 13: Prüfmittelüberwachung
Art und den Umfang dieser Prüfung zu definieren. Informationen bezüglich der Prüfmittelüberwachung von Waagen sowie die hierfür notwendigen Prüfgewichte sind auf der KERN- Homepage (www.kern-sohn.com) verfügbar. In seinem akkredi- tiertem DKD- Kalibrierlaboratorium können bei KERN schnell und kostengünstig Prüfgewichte und Waagen kalibriert werden (Rückführung auf das nationale Normal). -
Seite 14: Auspacken, Aufstellung Und Inbetriebnahme
5 Auspacken, Aufstellung und Inbetriebnahme 5.1 Aufstellort, Einsatzort Die Waagen sind so konstruiert, dass unter den üblichen Einsatzbedingungen zuver- lässige Wägeergebnisse erzielt werden. Exakt und schnell arbeiten Sie, wenn Sie den richtigen Standort für Ihre Waage wäh- len. Beachten Sie deshalb am Aufstellort folgendes: •... -
Seite 15: Grundaufbau
5.3 Netzanschluss Die Stromversorgung erfolgt über das externe Netzgerät. Der aufgedruckte Span- nungswert muss mit der örtlichen Spannung übereinstimmen. Verwenden Sie nur KERN- Originalnetzgeräte. Die Verwendung anderer Fabrikate bedarf der Zustimmung von Kern. 5.4 Batteriebetrieb / Akkubetrieb ( optional ) Batteriedeckel an Waagenunterseite abnehmen. -
Seite 16: Anschluss Von Peripheriegeräten
Vor Anschluss oder Trennen von Zusatzgeräten (Drucker, PC) an die Datenschnitt- stelle muss die Waage unbedingt vom Netz getrennt werden. Verwenden Sie mit Ihrer Waage ausschließlich Zubehör und Peripheriegeräte von KERN, diese sind optimal auf Ihre Waage abgestimmt. 5.6 Erstinbetriebnahme Um bei elektronischen Waagen genaue Wägeergebnisse zu erhalten, muss die Waage ihre Betriebstemperatur ( siehe Anwärmzeit Kap.1 ) erreicht haben. - Seite 17 Vorgehen bei der Justierung: Stabile Umgebungsbedingungen beachten. Eine Anwärmzeit ( siehe Kap.1 ) zur Sta- bilisierung ist erforderlich. Waage mit Taste einschalten. -Taste drücken und gedrückt halten, nach dem akustischen Signal erscheint im Display für kurze Zeit „CAL“. Anschließend wird im Display blinkend die genaue Grö- ße des ausgewählten (Kap.7.4) Justiergewichtes angezeigt.
-
Seite 18: Betrieb
6 Betrieb 6.1 Anzeigenübersicht 6.2 Wägen Waage mit Taste einschalten. Waage zeigt für etwa 3 Sekunden „88888“ im Display und geht dann auf „0“. Nun ist sie betriebsbereit. Wichtig: Sollte die Anzeige blinken oder nicht auf „0“ stehen, - Taste drü- cken. -
Seite 19: Tarieren
Tarieren Waage mit Taste einschalten und „0“-Anzeige abwarten. Taragefäß auf die Wägeplatte stellen und Taste drücken. Waagenanzeige geht auf „0“. Das Gewicht des Gefäßes ist nun intern gespeichert. Drückt man nach Anschluß des Wägevorgangs wieder die Taste, erscheint er- neut „0“ im Display. Der Tariervorgang kann beliebige Male wiederholt werden, beispielsweise beim Ein- wiegen von mehreren Komponenten zu einer Mischung (Zuwiegen). -
Seite 20: Stückzählung
6.6 Stückzählung Waage mit Taste einschalten und „0“-Anzeige abwarten. Taste kurz drücken. Referenzstückzahl 5 erscheint. Durch Mehrfachbetätigung der Taste können weitere Referenzstückzahlen 10, 20, 25 und 50 aufgerufen werden. So viele Zählteile auf die Wägeplatte, wie die eingestellte Referenzstückzahl ver- langt. -
Seite 21: Prozent-Wägungen
6.8 Prozent-Wägungen Anzeigesymbol: Das Prozentwägen ermöglicht die Gewichtsanzeige in Prozent, bezogen auf ein Re- ferenzgewicht. Waage mit Taste einschalten und „0“-Anzeige abwarten. Taste mehrmals kurz betätigen. Sie durchlaufen die Referenzstückzahlen der Zählfunktion, anschließend erscheint „100%“ im Display. Legen Sie den Referenzkörper auf die Waagschale. Drücken Sie die Taste, das Gewicht des Körpers wird als Referenz (100%) über- nommen. -
Seite 22: Wägeeinheiten (Unit)
6.9 Wägeeinheiten (Unit) Waage mit Taste einschalten und „0“-Anzeige abwarten. Taste drücken und gedrückt halten, bis im Display „UNIT“ erscheint. kurz betätigen, die eingestellte Einheit erscheint im Display. Mit der Taste kann nun zwischen den verschiedenen Einheiten (siehe Tabelle) gewählt werden. Durch Drücken der Taste wird die eingestellte Wägeeinheit übernommen. - Seite 23 Die verschiedenen Waagenmodelle haben unterschiedliche Fremdwägeeinheiten integriert. Die Details können dieser Tabelle entnommen werden: Modell Einheiten Gramm Kilogramm Pound Unze Troy Unze Tael Hongkong Tael Taiwan Pennyweight Momme Tola Frei wählbarer Faktor Modell Einheiten Gramm Kilogramm Pound Unze Troy Unze Tael Hongkong Tael Taiwan Pennyweight...
-
Seite 24: Hinterleuchtung Der Anzeige
6.10 Hinterleuchtung der Anzeige Im Menü können sie die Funktion der Anzeigenhinterleuchtung ein- bzw. ausschal- ten. Gehen Sie hierzu wie folgt vor: Waage mit Taste einschalten und „0“-Anzeige abwarten. Taste drücken und gedrückt halten bis im Display „UNIT“ erscheint. Taste 7 mal betätigen, im Display erscheint „bl“. Mit der Taste bestätigen. - Seite 25 6.11 Tierwägefunktion Die Waage hat eine integrierte Tierwägefunktion (Mittelwertbildung). Mit dieser ist es möglich, Haustiere oder Kleintiere exakt zu verwiegen, obwohl diese nicht ruhig auf der Wägeplatte stehen. Bemerkung: Bei zu lebhafter Bewegung kann keine exakte Wägung erfolgen. Im Menü kann die Tierwägefunktion aus- bzw. eingeschaltet werden. Dazu ist wie folgt vorzugehen: Waage mit Taste einschalten und „0“-Anzeige abwarten.
-
Seite 26: Tierwägefunktion
7 Einstellungen 7.1 Menüstruktur aufrufen Waage mit Taste einschalten und „0“-Anzeige abwarten. Zum Einstieg in die Menüstruktur die Taste ca. 3 Sek. gedrückt halten bis „UNIT“ erscheint. Durch Betätigen der Taste werden die verschiedenen Menüpunkte aufgerufen. Mit der Taste wird ein Menüpunkt ausgewählt. Innerhalb dieses Menüpunktes erfolgt die Auswahl mit der -Taste. -
Seite 27: Menüstruktur Verlassen
7.2 Menüstruktur verlassen Überall im Menü ist es möglich, die Menüstruktur zu verlassen, und dabei die durch- geführten Änderungen zu speichern bzw. zu verwerfen. Nachdem die Taste gedrückt wurde, erscheint „Exit“ im Display. A: Mit der ( Ja ) - Taste bestätigen. Danach erscheint „store“ in der Anzeige. Wenn gespeichert werden soll, ist die Taste wiederholt zu drücken. -
Seite 28: Auswahl Des Justiergewichtes
7.4 Auswahl des Justiergewichtes Bei der Modellreihe KERN DE kann das Justiergewicht aus drei vorgegebenen Nennwerten (ca.1/3; 2/3; Max) gewählt werden (siehe auch Tabelle 1 unten, Werks- einstellung grau unterlegt). Um messtechnisch hochwertige Wägeergebnisse zu er- langen, ist die Auswahl eines möglichst hohen Nennwertes zu empfehlen. -
Seite 29: Schnittstelle Rs232C
7.5 Schnittstelle RS232C Datenausgabe über Schnittstelle RS 232 C Allgemeines Voraussetzung für die Datenübertragung zwischen Waage und einem Peripheriege- rät (z.B. Drucker, PC ...) ist, dass beide Geräte auf dieselben Schnittstellenparameter (z.B. Baudrate, Übertragungsmodus ...) eingestellt sind. 7.5.1 Datenübertragungsmodus Im Wägemodus PRINT-Taste gedrückt halten, bis [Unit] ange- zeigt wird. -
Seite 30: Baudrate
7.5.2 Baudrate Die Baudrate bestimmt die Geschwindigkeit der Übertragung über die Schnittstelle, 1 Baud = 1 Bit/Sekunde. Im Wägemodus PRINT-Taste gedrückt halten, bis [Unit] ange- zeigt wird. MODE-Taste wiederholt drücken bis „bAUd“ angezeigt wird. Mit SET-Taste bestätigen, die aktuelle Einstellung wird ange- zeigt. -
Seite 31: Auswahl Druckausgabe
7.6 Auswahl Druckausgabe Mit dieser Funktion wird selektiert, welche Daten über die RS232C gesendet werden (gilt nicht für der Datenübertragungsmodus BAPr ). Im Wägemodus PRINT-Taste gedrückt halten, bis [Unit] ange- zeigt wird. MODE-Taste wiederholt drücken bis „LAPr“ angezeigt wird. ... -
Seite 32: Zurücksetzen Auf Werkseinstellung
7.7 Zurücksetzen auf Werkseinstellung Mit dieser Funktion werden alle Waageneinstellungen auf Werks- einstellungen zurückgesetzt. Im Wägemodus PRINT-Taste gedrückt halten, bis [Unit] ange- zeigt wird. MODE-Taste wiederholt drücken bis „rSt“ angezeigt wird. Mit SET-Taste bestätigen, die aktuelle Einstellung wird ange- zeigt. -
Seite 33: Datenausgang Rs 232 C
Baudrate wählbar auf 1200, 2400, 4800, 9600 und 19200 Baud Miniatur-Stecker notwendig (9 pol D-Sub) Bei Betrieb mit Schnittstelle ist der fehlerfreie Betrieb nur mit dem entsprechen- den KERN- Schnittstellenkabel (max. 2m) sichergestellt 8.2 Pinbelegung der Waagenausgangsbuchse (Frontansicht) Pin 2:... -
Seite 34: Au Pr
8.3.2 AU Pr Sobald der Wägewert stabil ist, wird das Format aus LAPR automatisch übertragen. c. Format für stabile Werte für Gewicht/Stückzahl/Prozentangabe 10 11 12 13 14 15 16 17 CR LF d. Format im Fehlerfall 10 11 12 13 14 15 16 17 CR LF 8.3.3 AU PC Wägewerte werden automatisch und kontinuierlich gesendet, unabhängig davon, ob... -
Seite 35: Re Cr
8.3.4 rE Cr Fernsteuerkommandos s/w/t werden von der Fernsteuereinheit zu der Waage als ASCII-Code gesendet. Nachdem die Waage die s/w/t-Kommandos erhalten hat, sendet sie die nachfolgenden Daten. Dabei ist zu beachten, dass die folgenden Fernsteuerkommandos ohne nachfol- gendes CR LF gesendet werden müssen. Funktion: Stabiler Wägewert für das Gewicht wird über RS232- Schnittstelle gesendet... -
Seite 36: Ausgabe Auf Barcode-Drucker
Das Druckformat ist im Drucker gespeichert. D.h. bei einem Defekt kann der Drucker nicht gegen einen fabrikneuen ausgetauscht werden, sondern es muss bei KERN zuvor die entsprechende Software aufgespielt werden. Der Zebra-Drucker und die Waage sind im ausgeschaltet Zustand mit dem enthalte- nen Schnittstellenkabel zu verbinden. -
Seite 37: Reinigen
Verschüttetes Wägegut sofort entfernen. 9.2 Wartung, Instandhaltung Das Gerät darf nur von geschulten und von KERN autorisierten Servicetechnikern geöffnet werden. Vor dem Öffnen vom Netz trennen. 9.3 Entsorgung Die Entsorgung von Verpackung und Gerät ist vom Betreiber nach gültigem nationa- lem oder regionalem Recht des Benutzerortes durchzuführen. -
Seite 38: Kleine Pannenhilfe
10 Kleine Pannenhilfe Bei einer Störung im Programmablauf sollte die Waage kurz ausgeschaltet und vom Netz getrennt werden. Der Wägevorgang muss dann wieder von vorne begonnen werden. Hilfe: Störung Mögliche Ursache • Die Waage ist nicht eingeschaltet. Die Gewichtsanzeige leuchtet nicht. •... - Seite 39 Hinweis gemäß Batterieverordnung – BattV QYP 05 (Rev. 1.0) Nur gültig für Deutschland! Im Zusammenhang mit dem Vertrieb von Batterien und Akkus sind wir als Händler gemäß Batterieverordnung verpflichtet, Endverbraucher auf folgendes hinzuweisen: Endverbraucher sind zur Rückgabe gebrauchter Batterien/Akkus gesetzlich ver- pflichtet.
-
Seite 40: Konformitätserklärung
11 Konformitätserklärung Die aktuelle EG/EU-Konformitätserklärung finden Sie online unter: www.kern-sohn.com/ce DE-BA-d-1758... - Seite 42 KERN DE Version 5.8 2017-11 Operating instruction Platform scale Table of Contents Technical data .................... 4 Basic Information (General) ..............11 Proper use........................... 11 Improper Use ........................11 Warranty ..........................11 Monitoring of Test Resources ..................12 Basic Safety Precautions ................ 12 Pay attention to the instructions in the Operation Manual ..........
- Seite 43 Settings ..................... 25 Call-up menu structure ...................... 25 Leave menu structure ......................26 Dosing and Zero-tracking ....................26 Selection of the adjustment weight .................. 27 Interface RS232C ........................ 28 7.5.1 Data transfer mode ......................28 7.5.2 Baud rate ..........................29 Selection printed edition ....................
-
Seite 44: Technical Data
1 Technical data KERN DE6K0.5A DE6K1D DE12K1A Readability (d) 0.5 g 1 g / 2 g Weighing range (max) 6 kg 3 kg / 6 kg 12 kg Minimum piece weight Reproducibility 0,5 g 1 g / 2 g Linearity ±... - Seite 45 KERN DE15K0.2D DE15K2D DE24K2A Readability (d) 0.2 g / 0,5 g 2 g / 5 g Weighing range (max) 6 kg / 15 kg 6 kg / 15 kg 24 kg Minimum piece weight 400 mg Reproducibility 0.2 g / 0,5 g...
- Seite 46 KERN DE35K0.5D DE35K5D DE35K5DL Readability (d) 0.5 g / 1 g 5 g / 10 g Weighing range (max) 15 kg / 35 kg 15 kg / 35 kg Minimum piece weight 10 g Reproducibility 0,5 g / 1g 5 g / 10 g Linearity ±...
- Seite 47 KERN DE60K1D DE60K1DL DE60K5A Readability (d) 1 g / 2 g Weighing range (max) 30 kg / 60 kg 60 kg Minimum piece weight 10 g Reproducibility 1 g / 2 g Linearity ± 4 g / 8 g ± 15 g...
- Seite 48 KERN DE60K10D DE60K10DL DE120K10A Readability (d) 10 g / 20g 10 g Weighing range (max) 30 kg / 60 kg 120 kg Minimum piece weight 20 g 20 g Reproducibility 10 g / 20 g 10 g Linearity ± 30 g / 60 g ±...
- Seite 49 DE150K2D DE150K2DL DE150K20D DE150K20DL KERN Readability (d) 2 g / 5g 20 g / 50 g 20 g / 50 g Weighing range (max) 60 kg / 150 kg Minimum piece weight 40 g 40 g Reproducibility 2 g / 5 g...
- Seite 50 DE150K20DXL DE300K5DL DE300K50D DE300K50DL KERN Readability (d) 20 g / 50 g 5 g / 10 g 50 g / 100 g Weighing range (max) 60 kg / 150 kg 150 kg / 300 kg Minimum piece weight 40 g...
-
Seite 51: Basic Information (General)
The balance may only be used according to the described conditions. Other areas of use must be released by KERN in writing. 2.3 Warranty Warranty claims shall be voided in case •... -
Seite 52: Monitoring Of Test Resources
Information is available on KERN’s home page (www.kern-sohn.com) with regard to the monitoring of balance test substances and the test weights required for this. In KERN’s accredited DKD calibration laboratory test weights and balances may be... -
Seite 53: Unpacking, Setup And Commissioning
5 Unpacking, Setup and Commissioning 5.1 Installation Site, Location of Use The balances are designed in a way that reliable weighing results are achieved in common conditions of use. You will work accurately and fast, if you select the right location for your balance. Therefore, observe the following for the installation site: •... -
Seite 54: Basic Structure
Power is supplied via the external mains adapter. The stated voltage value must be the same as the local voltage. Only use original KERN mains adapters. Using other makes requires consent by KERN. 5.4 Operation using a (rechargeable) battery (optional) Lift-off the battery cover on the lower side of the balance. -
Seite 55: Connection Of Peripheral Devices
Before connecting or disconnecting of additional devices (printer, PC) to the data interface, always disconnect the balance from the power supply. With your balance, only use accessories and peripheral devices by KERN, as they are ideally tuned to your balance. - Seite 56 Procedure when adjusting: Observe stable environmental conditions. A warming up time (see chapter 1) is required for stabilization. Switch on the balance using the Press key and keep it pressed, after the acoustic signal appears in the display for short time „CAL“. After that the exact size appears flashing in the display (chapter.7.4) of the adjustment weight.
-
Seite 57: Operation
6 Operation 6.1 Overview of display 6.2 Weighing Switch on the balance using the The balance shows for approx. 3 seconds „88888“ in the display and then goes to „0“. Now it is ready for operation. Important: Should the display flash or not be on „0“, press the key. -
Seite 58: Taring
Taring Switch-on the balance using the key and wait for the „0“ display. Put the tare vessel on the weighing plate and press the key. The balance display goes to „0“. The weight of the container is now internally saved. If after finishing the weighing process the key, is pressed again, „0“... -
Seite 59: Parts Counting
6.6 Parts counting Switch-on the balance using the key and wait for the „0“ display. Press key shortly. Appears the reference unit number 5. By pressing the key several times, more reference quantities 10, 20, 25 and 50 can be called up. Place as many pieces to count on the weighing plate as the set reference quantity requires. -
Seite 60: Percent Weighings
6.8 Percent weighings Display symbol: Percent weighing allows to display weight in percent, in relation to a reference weight. Switch-on the balance using the key and wait for the „0“ display. Press the key several times shortly. The reference quantities of the counting function are passed through, after that „100%“... -
Seite 61: Weighing Units (Unit)
6.9 Weighing units (Unit) Switch-on the balance using the key and wait for the „0“ display. Press the key and keep it pressed until „UNIT“ appears on the display. Press shortly, the selected unit appears in the display. Use the key to select between the different units (see table). - Seite 62 The different weighing models have integrated different foreign weighing units. Details can be seen in this table: Model Units Gram Kilogram Pound Ounce Troy ounce Tael Hongkong Tael Taiwan Pennyweight Momme Tola Freely selectable Factor Model Units Gram Kilogram Pound Ounce Troy ounce Tael Hongkong...
-
Seite 63: Display Background Illumination
6.10 Display background illumination In the menu the functions of the background illumination can be switched on or off. Proceed as follows: Switch-on the balance using the key and wait for the „0“ display. Press the key and keep it pressed until „UNIT“ appears on the display. Press the key seven times, in the display appears „bl“. -
Seite 64: Animal Weighing Function
6.11 Animal weighing function The balance has an integrated animal weighing function (mean value calculation). With this function it is possible to weigh domestic or small animals exactly, although they do not stand quiet on the weighing plate. Note: If they move too much, an exact weighing will not be possible. In the menu the animal weighing function can be switched on or off. -
Seite 65: Settings
7 Settings 7.1 Call-up menu structure Switch-on the balance using the key and wait for the „0“ display. To enter into the menu structure keep the key pressed approx. 3 sec. until „UNIT“ appears. By pressing the key the different menu items are called up. Use the key to select a menu item. -
Seite 66: Leave Menu Structure
7.2 Leave menu structure Everywhere in the menu it is possible to leave the menu structure and thereby save or reject the changes made. After pressing the key „Exit“ is displayed. A: Use the (YES) key, to confirm. After that „store“ is displayed. If it shall be saved, press the key repeatedly. -
Seite 67: Selection Of The Adjustment Weight
7.4 Selection of the adjustment weight In the model series KERN DE, the adjustment weight can be selected from three pre- set nominal values (approx.1/3; 2/3; max) (refer also to table 1 below, factory setting with grey background). In order to achieve high-quality weighing results in the sense of the measuring technology, it is recommended to select the nominal value as high as possible. -
Seite 68: Interface Rs232C
7.5 Interface RS232C Data output via interface RS 232 C General Information The previous condition for the data transfer between balance and a peripheral device (e.g. printer, PC ...) is that the appliances are set to the same interface parameters (e.g. -
Seite 69: Baud Rate
7.5.2 Baud rate The baud rate defines the transfer speed vie the interface, 1 Baud = 1 Bit/second. In weighing mode keep the PRINT key pressed until [Unit] appears. Press the MODE key several times until „bAUd“ is displayed. ... -
Seite 70: Selection Printed Edition
7.6 Selection printed edition printout Using this function data are selected which are to be sent via the RS232C (not valid for data transfer mode BAPr ). In weighing mode keep the PRINT key pressed until [Unit] appears. Press the MODE key several times until „LAPr“ is displayed. ... -
Seite 71: Reset To Factory Setting
7.7 Reset to factory setting This function resets all balance settings to factory setting. In weighing mode keep the PRINT key pressed until [Unit] appears. Press the MODE button several times until „rSt“ is displayed. Acknowledge using SET key, the current setting is displayed. ... -
Seite 72: Data Output Rs 232 C
Baud rate selectable at 1200, 2400, 4800, 9600 and 19200 Baud Miniature plug-in necessary (9 pole D-Sub) For operation with interface faultless operation is only ensured with the correct KERN – interface cable (max. 2m) 8.2 Pin allocation of the balance output socket (front view) Pin 2:... -
Seite 73: Au Pr
8.3.2 AU Pr As soon as the weighing value is stable, the format is automatically transferred from LAPR. c. Format for stable values for weight/quantity/percentage 10 11 12 13 14 15 16 17 CR LF d. Format in case of fault 10 11 12 13 14 15 16 17 CR LF... -
Seite 74: Re Cr
8.3.4 rE Cr The remote control commands s/w/t are sent from the remote control unit to the balance as ASCII code. After the balance having received the s/w/t commands, it will send the following data. Take into account that the following remote control commands must be sent without a subsequent CR LF. -
Seite 75: Output On Bar Code Printer
The printer format is stored in the printer, i.e. in case of a failure the printer cannot be changed with a new one from factory, previously it is necessary that KERN installs the respective software. The Zebra printer and the balance must be connected to the delivered interface cable when they are switched off. -
Seite 76: Service, Maintenance, Disposal
Spilled weighing goods must be removed immediately. 9.2 Service, maintenance The appliance may only be opened by trained service technicians who are authorized by KERN. Before opening, disconnect from power supply. 9.3 Disposal Disposal of packaging and appliance must be carried out by operator according to valid national or regional law of the location where the appliance is used. -
Seite 77: Instant Help
10 Instant help In case of an error in the program process, briefly turn off the balance and disconnect from power supply. The weighing process must then be restarted from the beginning. Help: Fault Possible cause • The balance is not switched on. The displayed weight does not glow. -
Seite 78: Declaration Of Conformity
11 Declaration of Conformity To view the current EC/EU Declaration of Conformity go to: www.kern-sohn.com/ce DE-BA-e-1758... - Seite 80 KERN DE Version 5.8 2017-11 Mode d'emploi Balance plate-forme Sommaire Caractéristiques techniques ..............4 Indications fondamentales (généralités) ..........11 Utilisation conforme aux prescriptions ................11 Utilisation inadéquate ......................11 Garantie ..........................11 Vérification des moyens de contrôle ................12 Directives fondamentales de sécurité ............ 12 Observez les indications du mode d´emploi ..............
- Seite 81 Réglages ....................25 Appel de la structure du menu ..................25 Quitter la structure du menu ..................... 26 Dosage et mise au point du zéro ..................26 Sélection du poids d’ajustage ..................27 Interface RS232C ........................ 28 7.5.1 Mode de transfert des données ................... 28 7.5.2 Taux Baud ..........................
-
Seite 82: Caractéristiques Techniques
1 Caractéristiques techniques KERN DE6K0.5A DE6K1D DE12K1A Lisibilité (d) 0,5 g 1 g / 2 g Plage de pesée (max) 6 kg 3 kg / 6 kg 12 kg Poids minimal par pièce Reproductibilité 0,5 g 1 g / 2 g Linéarité... - Seite 83 KERN DE15K0.2D DE15K2D DE24K2A Lisibilité (d) 0,2 g / 0,5 g 2 g / 5 g Plage de pesée (max) 6 kg / 15 kg 6 kg / 15 kg 24 kg Poids minimal par pièce 400 mg Reproductibilité 0,2 g / 0,5 g 2 g / 5g Linéarité...
- Seite 84 KERN DE35K0.5D DE35K5D DE35K5DL Lisibilité (d) 0,5 g / 1 g 5 g / 10 g Plage de pesée (max) 15 kg / 35 kg 15 kg / 35 kg Poids minimal par pièce 10 g Reproductibilité 0,5 g / 1g 5 g / 10 g Linéarité...
- Seite 85 KERN DE60K1D DE60K1DL DE60K5A Lisibilité (d) 1 g / 2 g Plage de pesée (max) 30 kg / 60 kg 60 kg Poids minimal par pièce 10 g Reproductibilité 1 g / 2 g Linéarité ± 4 g / 8 g ±...
- Seite 86 KERN DE60K10D DE60K10DL DE120K10A Lisibilité (d) 10 g / 20g 10 g Plage de pesée (max) 30 kg / 60 kg 120 kg Poids minimal par pièce 20 g 20 g Reproductibilité 10 g / 20 g 10 g Linéarité...
- Seite 87 DE150K2D DE150K2DL DE150K20D DE150K20DL KERN Lisibilité (d) 2 g / 5g 20 g / 50 g 20 g / 50 g Plage de pesée (max) 60 kg / 150 kg Poids minimal par pièce 40 g 40 g Reproductibilité 2 g / 5 g 20 g / 50 g Linéarité...
- Seite 88 DE150K20DXL DE300K5DL DE300K50D DE300K50DL KERN Lisibilité (d) 20 g / 50 g 5 g / 10 g 50 g / 100 g Plage de pesée (max) 60 kg / 150 kg 150 kg / 300 kg Poids minimal par pièce...
-
Seite 89: Indications Fondamentales (Généralités)
La balance ne doit être utilisée que selon les prescriptions indiquées. Les domaines d´utilisation/d´application dérogeant à ces dernières doivent faire l´objet d´une autorisation écrite délivrée par KERN. 2.3 Garantie La garantie n´est plus valable en cas •... -
Seite 90: Vérification Des Moyens De Contrôle
à cette opération sont disponibles sur le site KERN (www.kern-sohn.com). Grâce à son laboratoire de calibrage accrédité DKD, KERN propose un calibrage rapide et économique pour les poids d´ajustage et les balances (sur la base du standard national). -
Seite 91: Déballage, Installation Et Mise En Service
5 Déballage, installation et mise en service 5.1 Lieu d´installation, lieu d´utilisation La balance a été construite de manière à pouvoir obtenir des résultats de pesée fiables dans les conditions d´utilisation d´usage. Vous pouvez travailler rapidement et avec précision à condition d´installer votre balance à un endroit approprié. A cette fin, tenez compte des points suivants concernant le lieu d´installation: •... -
Seite 92: Implantation
La valeur de tension imprimée sur l´appareil doit concorder avec la tension locale. N´utilisez que des blocs d´alimentation secteur livrés par KERN. L´utilisation d´autres marques n´est possible qu´avec l´autorisation de KERN. 5.4 Fonctionnement sur piles / sur accu (en option) Retirez le couvercle de la face inférieure de la balance. -
Seite 93: Raccordement D'appareils Périphériques
N´utilisez avec votre balance que des accessoires et des périphériques livrés par KERN, ces derniers étant adaptés de manière optimale à votre balance. 5.6 Première mise en service Pour obtenir des résultats exacts de pesée avec les balances électroniques, elles doivent avoir atteint leur température de service (voir temps d’échauffement au chap. - Seite 94 Procédure à suivre pour l’ajustage: Veillez à avoir des conditions environnementales stables. Un temps de préchauffage (voir au chap. 1) est nécessaire pour la stabilisation. Mettre en marche la balance sur la touche Appuyez sur la touche et maintenez-la enclenchée, après un signal acoustique apparaît pour un bref moment sur l’affichage „CAL“.
-
Seite 95: Commande
6 Commande Vue d’ensemble des affichages 6.2 Pesage Mettre en marche la balance sur la touche La balance affiche pendant à peu près 3 secondes „88888“ sur l’afficheur et passe ensuite à „0“. Elle est maintenant en ordre de marche. Important: Au cas où... -
Seite 96: Tarage
Tarage Mettre en marche la balance à l'aide de la touche et attendre l'affichage "0". Posez le récipient à tare sur le plateau de pesage et appuyez sur la touche L’affichage de la balance s’arrête sur „0“. Ceci indique que l’enregistrement interne du poids du récipient a eu lieu. -
Seite 97: Comptage De Pièces
6.6 Comptage de pièces Mettre en marche la balance à l'aide de la touche et attendre l'affichage "0". Appuyez brièvement sur la touche La quantité de référence 5 apparaît. En répétant l’appel de la touche il y a possibilité d’appeler d’autres quantités de référence 10, 20, 25 et 50. -
Seite 98: Pesées En Pourcentage
6.8 Pesées en pourcentage Symbole affiché: Le mode pesées en pourcentage permet l’affichage du poids en pourcent, rapporté à un poids de référence. Mettre en marche la balance à l'aide de la touche et attendre l'affichage "0". Appuyez plusieurs fois brièvement sur la touche . -
Seite 99: Unités De Pesée (Unit)
6.9 Unités de pesée (Unit) Mettre en marche la balance à l'aide de la touche et attendre l'affichage "0". Appuyer sur la touche et la maintenir enfoncée jusqu'à ce que sur l'affichage apparaît „UNIT“ Appuyez brièvement, l’unité réglée apparaît sur l’affichage A l’aide de la touche il est possible de choisir entre différentes unités (voir le tableau). - Seite 100 Les différents modèles de balance sont dotés d’unités de poids étrangères. Les détails peuvent être repris dans ce tableau: Modèle Unités Gramme Kilogramme Pound Once Troy once Tael Hongkong Tael Taiwan Pennyweight Momme Tola Facteur librement sélectionnable Modèle Unités Gramme Kilogramme Pound Once...
-
Seite 101: Eclairage Du Fond De L'écran D'affichage
6.10 Eclairage du fond de l’écran d’affichage Vous pouvez mettre en marche et hors circuit l’éclairage d’arrière-plan. Procédez à cet effet comme suit: Mettre en marche la balance à l'aide de la touche et attendre l'affichage "0". Appuyer sur la touche et la maintenir enfoncée jusqu'à... -
Seite 102: Fonction De Peséee Des Animaux
6.11 Fonction de peséee des animaux La balance dispose d’une fonction de pesée des animaux intégrée (formation d’une moyenne pondérée). Cette fonction permet de peser avec précision les animaux de maison ou les petits animaux, bien que ces animaux ne restent pas tranquilles sur le plateau de pesée. -
Seite 103: Réglages
7 Réglages 7.1 Appel de la structure du menu Mettre en marche la balance à l'aide de la touche et attendre l'affichage "0". Maintenez la touche enclenchée pendant à peu près 3 sec. pour accéder à la structure du menu jusqu’à ce que „UNIT“ apparaisse. Par pression sur la touche sont appelés les différents points du menu. -
Seite 104: Quitter La Structure Du Menu
7.2 Quitter la structure du menu Partout dans ce menu il est possible de quitter la structure du menu, et de mémoriser ou de rejeter ce faisant les modifications apportées. Après avoir appelé la touche , apparaît „Exit“ sur l’affichage. A: Confirmez sur la touche (Oui) -. -
Seite 105: Sélection Du Poids D'ajustage
7.4 Sélection du poids d’ajustage Sur le modèle KERN DE le poids d’ajustage peut être sélectionné parmi trois valeurs nominales préétablies (à peu près1/3; 2/3; max) (voir également en bas sur le tableau 1, les réglages à l’usine sont surincrustés sur fond gris). Pour parvenir à des résultats de métrologie de qualité, nous recommandons de sélectionner une valeur... -
Seite 106: Interface Rs232C
7.5 Interface RS232C Edition de données par le truchement de l’interface RS 232 C Généralités Le transfert entre la balance et un appareil périphérique (p. ex. imprimante, PC ...) suppose que les deux appareils soient réglés en fonction des mêmes paramètres d’interface (p. -
Seite 107: Taux Baud
7.5.2 Taux Baud Le taux bits/sec détermine la vitesse de transmission par le truchement de l’interface, 1 baud = 1 bit / seconde. En mode pesée maintenir la touche PRINTenclenchée jusqu’à ce que soit affiché [Unit]. Appeler de façon répétée la touche MODE jusqu’à ce que „bAUd“ apparaisse. -
Seite 108: Sélection Édition Sur Imprimante
7.6 Sélection édition sur imprimante Cette fonction permet de sélectionner, quelles données vont être transmises par RS232C (ceci ne concerne pas le mode de transmission BAPr) . En mode pesée maintenir la touche PRINTenclenchée jusqu’à ce que soit affiché [Unit]. ... -
Seite 109: Retour Aux Réglages D'usine
7.7 Retour aux réglages d’usine Cette fonction permet de rétrograder tous les réglages de la balance en état de réglage à l’usine. En mode pesée maintenir la touche PRINTenclenchée jusqu’à ce que soit affiché [Unit]. Appeler de façon répétée la touche MODE jusqu’à ce que „rSt“ apparaisse. -
Seite 110: Sortie De Données Rs 232 C
fiche miniature nécessaire (D-Sub 9 pôles) pour la mise en œuvre d’un interface seul le recours à un câble d’interface KERN respectif de max. 2 m permet un fonctionnement irréprochable 8.2 Attribution des broches du boîtier de sortie de la balance (aperçu frontal) -
Seite 111: Au Pr
8.3.2 AU Pr Dès que la valeur de la pesée est stable, le format est automatiquement transmis à partir de LAPR. c. Format pour les valeurs stables de poids / quantité / pourcentage 10 11 12 13 14 15 16 17 CR LF d. -
Seite 112: Re Cr
8.3.4 rE Cr Les ordres de télécommande s/w/t sont transmis par l’unité de télécommande à la balance sous forme de code ASCII. Après que la balance a reçu les ordres s/w/t, elle émet les données suivantes. Il convient d’observer ici, que les ordres de télécommande suivants doivent être émis sans CR LF à... -
Seite 113: Edition Sur Imprimante À Code À Barres
être interchangée simplement contre un autre sortant de fabrication, mais le logiciel doit y être enregistré au préalable par KERN. Cette imprimante et la balance doivent être interconnectées hors circuit par le câble d’interface joint. -
Seite 114: Maintenance, Entretien, Élimination
9.2 Maintenance, entretien L´appareil ne doit être ouvert que par des dépanneurs formés à cette fin et ayant reçu l´autorisation de KERN. Avant d´ouvrir l´appareil, couper ce dernier du secteur. 9.3 Elimination L´élimination de l´emballage et de l´appareil doit être effectuée par l´utilisateur selon le droit national ou régional en vigueur au lieu d´utilisation. -
Seite 115: Aide Succincte En Cas De Panne
10 Aide succincte en cas de panne En cas d´anomalie dans le déroulement du programme, la balance doit être arrêtée pendant un court laps de temps et coupée du secteur. Le processus de pesée doit alors être recommencé depuis le début. Aide: Défaut Cause possible... -
Seite 116: Déclaration De Conformité
11 Déclaration de conformité Vous trouvez la déclaration de conformité CE- UE actuelle online sous: www.kern-sohn.com/ce DE-BA-f-1758...