Genmitsu 3018-PRO Benutzerhandbuch

Verwandte Anleitungen für Genmitsu 3018-PRO

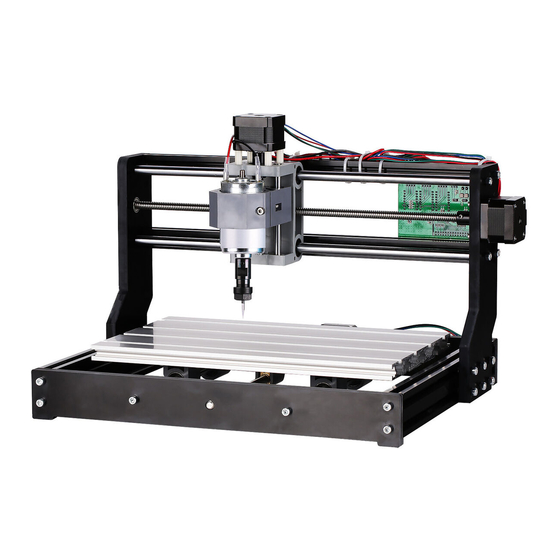
Inhaltszusammenfassung für Genmitsu 3018-PRO
- Seite 1 Genmitsu Contents / Inhalt CNC Router 3018-PRO English 01 - 38 CNC 3018-PRO Fräs-/Graviermaschine Deutsch 39 - 78 V1.3 April 2021...
- Seite 41 Inhalt ............................Vorwort ........................Sicherheitshinweise ........................Teil 1 - Lieferumfang ..................Teil 2 - Mechanischer Zusammenbau ........................Teil 3 - Inbetriebnahme ..........................Teil 4 - Einstieg ......................Teil 5 - Offline-Controller ............... Teil 6 - Benutzeroberfläche des Offline-Controllers...
-
Seite 42: Vorwort
SainSmart Online Resource Center heruntergeladen werden. https://docs.sainsmart.com/3018-pro Bevor Sie versuchen, die GENMITSU CNC 3018-PRO Fräs-/Graviermaschine zu montieren, sehen Sie sich bitte das Montagevideo auf der micro-SD-Karte an. Es wird Ihnen dabei helfen, mögliche Fehler zu vermeiden. Für technische Unterstützung senden Sie uns bitte eine E-Mail an support@sainsmart.com. -
Seite 43: Sicherheitshinweise
● Stellen Sie die Fräs-/Graviermaschine immer auf eine stabile Oberfläche. ● Die SainSmart Genmitsu Fräs-/Graviermaschine wird mit einem Schaltnetzteil für den Betrieb an 230V AC oder 110V AC geliefert. Verwenden Sie niemals eine andere Stromversorgung; diese kann Fehlfunktionen oder Schäden an der Maschine verursachen. -
Seite 44: Teil 1 - Lieferumfang
Teil 1 - Lieferumfang (2) Aluminiumprofil (2) Aluminiumprofil Aluminiumprofil (2) Führungsschiene 20 x 40 x 290 mm 20 x 20 x 360mm 300 x 180mm X-Achse, Ø10 x 360mm (2) Führungsschiene Gewindestange / Spindel Gewindestange / Spindel Phenolharzplatte A Y Achse, Ø10 x 290mm T8, 365mm T8, 295mm (2) Schrittmotor... - Seite 45 Spindelmotor mit X-Z-Achsen-Baugruppe (4) Gleitlager (10) Fräser Spannzange ER11 (vormontiert) Netzteil (mit Anschlusskabel) (3) Anschlusskabel für Anschlusskabel für 24V DC; 5A Schrittmotor, 4- polig 60cm Spindelmotor, 2-polig Steuerplatine (mit Lüfter (4) Klemme Kabelschlange, 2m und Gehäuse), V3.4...
- Seite 46 (4) Innensechskantschlüssel (4) Schraube mit USB Disk 2.0mm,2.5mm, Innensechskant, M5 x 10 3.0mm,4.0mm (34) Schraube mit (8) Schraube mit (2) Spindelmutter, T8 Innensechskant, M5 x 16 Innensechskant, M3 x 14 (16) Nutenstein 20M5 (2) Feder (für Spindelmutter) (10) Nutenstein 30M5...
- Seite 47 (3) Kupplung mit Halter für Spindelmutter Offline-Controller M4*4mm Madenschrauben USB Cable A to B Netzkabel-EU Netzkabel-UK (12) Kabelbinder Pinsel (2) Schraubenschlüssel...
-
Seite 48: Weiteres Zubehör (Nicht Im Lieferumfang Enthalten)
Weiteres Zubehör (Nicht im Lieferumfang enthalten) Ziehen Sie folgende, optionale Upgrades oder Zubehörteile in Betracht, um Ihre CNC-Erfahrung zu verbessern! Sie finden diese auf www.sainsmart.com Sparen Sie 10% mit dem Code 3018PRO10. Lasergravur 5.5W Laser Module Carveco Maker 12-Monatsabo Lightburn Gcode-Lizenz... -
Seite 49: Aufrüstung Des Spindels
Erweitern von 3018 auf 3040 Y-Achsen Erweiterungskit 3040 MDF-Arbeitsplatte 3040 Aluminum HDF-Arbeitsplatte Aufrüstung des Spindels GS-775MR Spindel motor Ganzmetall spindel hater 300W Spindle Upgrade Kit... - Seite 50 Andere Upgrades und Zubehör 2 Stück T-Track Mini-Halteklammer KABA Acryl-CNC-Gehäuse Aluminium-Schraubstock CNC Fräser 1/8"-Schaft, 40 Stück CNC-Fräser, 1/8"-Schaft, 10 Stück Fräser 1/8"-Schaft, 30 Stück PCB-Bohrer, MC40A mit Mikro-Schneiddurchmesser, 0,1 mm-3,0 mm, PD30A EM10A...
-
Seite 51: Teil 2 - Mechanischer Zusammenbau
Teil 2 - Mechanischer Zusammenbau Schritt 1: Zusammenbau des Grundrahmens Was wird benötigt (2) Aluminiumprofil (2) Führungsschiene Phenolharzplatte A 20 x 40 x 290 mm Y-Achse, Ø10mm x 290mm (12) Schraube mit Phenolharzplatte B (4) Gleitlager Innensechskant, M5 x 16... - Seite 52 Phenolharzplatte B (2) Aluminiumprofil 20 x 40 x 290 mm (2) Führungsschiene Y-Achse, Ø10mm × 290mm (4) Gleitlager (12) Schraube mit Innensechskant, Phenolhar- M5 x 16 zplatte A Hinweis: Vergewissern Sie sich, dass diese Baugruppe quadratisch ist und dass die Schieber auf den Führungsschienen mit den Löchern an der Vorder- und Rückseite des Grundrahmens installiert sind.
-
Seite 53: Schritt 2:Montage Des Fräs-/Graviertisches
Schritt 2:Montage des Fräs-/Graviertisches Was wird benötigt Aluminiumprofil Gewindestange / Spindel Schrittmotor, 300 x 180mm T8 (295mm) NEMA 17-42 (10) Innensechskantschraube (4) Innensechskantschraube Spindelmutter M5 x 16 M3 x 14 Halter für Kupplung mit (10) Nutenstein 30M5 Feder 2 Madenschrauben Spindelmutter... - Seite 54 Gewindestange / Spindel Kupplung mit (10) Innensechs- T8 (295mm) 2 Madenschrauben kantschraube Schrittmotor, M5 x 16 (10) Nuten- NEMA 17-42 stein 30M5 (4) Innensechs- kantschraube M3 x 14 Aluminiumprofi 300 x 180mm Halter für Spindelmutter Feder Spindelmutter...
- Seite 55 Schritte 1 und 2 abgeschlossen Ansicht von oben...
-
Seite 56: Ansicht Von Unten
Ansicht von unten... -
Seite 57: Schritt 3 : Montage Des Seitenteils C Am Grundrahmen
Schritt 3 : Montage des Seitenteils C am Grundrahmen Was wird benötigt (6) Innensechskantschraube Phenolharzplatte C (6) Nutenstein 20M5 M5 x 16 Schritt 1: Positionieren Sie das Seitenteil mit einem Abstand von 46,5 mm zwischen dem hinteren Rahmenteil und der Rückseite des Seitenteils, wie auf der Abbildung zu sehen. Tipp: Bei der Montage von T-Muttern ist es hilfreich, diese einige Umdrehungen auf die Schraube zu drehen, um sie an Ort und Stelle zu halten, bevor diese in die Aluminiumführung eingesetzt werden. - Seite 58 Schritt 3a Hinweis: Die hintere Kante der Phenolharzplatte C muss 90° zum Grundrahmen betragen.
-
Seite 59: Schritt 4: Montage Der X-Z-Achsenbaugruppe
Schritt 4: Montage der X-Z-Achsenbaugruppe Was wird benötigt (2) Aluminiumprofil (2) Führungsschiene Gewindestange / Spindel 20 x 20 x 360mm X-Achse, Ø10 x 360mm T8 (365mm) X-Z-Achsen-Baugruppe Schrittmotor, (4) Innensechskantschraube (vormontiert) NEMA 17-42 M5 x 16 (4) Innensechskantschraube Kupplung mit Spindelmutter, T8 Feder M3 x 14... - Seite 60 (2) Aluminiumprofil 20 x 20 x 360mm Gewindestange / Spindel T8 (365mm) (2) Führungsschiene Schrittmotor, X-Achse, Ø10 x 360mm NEMA 17-42 Kupplung mit 2 Madenschrauben (4) Innensechskantschraube M5 x 16 (4) Innensechskantschraube M3 x 14 X-Z- Achsen- Baugruppe Feder Spindelmutter...
-
Seite 61: Schritt 5: Montage Des Seitenteils D
Schritt 5: Montage des Seitenteils D Was wird benötigt Phenolharzplatte D (10) Schraube mit Innensechskant, M5 x 16 (6) Nutenstein (10) Schraube mit 20M5 Innensechskant (6) Nutenstein 20M5 M5 x 16 Phenolharzplatte D... -
Seite 62: Schritt 6: Montage Des Z-Achsen-Spindelhalters
Schritt 6: Montage des Z-Achsen-Spindelhalters Schritt 1: Bereiten Sie den X-Z-Achsen Spindelhalter und die Gewindespindel vor. Drücken Sie die Anti-Backlash „37“ Feder in das unten gezeigte Loch. Setzen Sie Gewindespindelmutter (Messing / T-Nut) „34“, in die Feder ein um diese festzuhalten. -
Seite 63: Schritt 7: Montage Der X-Achsen
Schritt 7: Montage der X-Achsen Schritt 1: Montieren Sie (2) die Aluminium-Rahmenteile mit M5x16mm Schrauben an das rechte Seitenteil „C“. Schritt 2: Montieren Sie (2) die Führungsstangen an den Löchern der Seitenteile mit M5x16mm Schrauben. Schritt 3: Montieren Sie die Kupplung auf den Schrittmotor und befestigen Sie diesen am Seitenteil „C“. Schritt 4: Schieben Sie den X-Z-Achsen-Spindelhalter auf die Führungsstangen. - Seite 64 Schritte 4-7 abgeschlossen Hinweis: Die hintere Kante der Phenolharzplatte D muss 90° zum Grundrahmen betragen.
-
Seite 65: Schritt 8: Installation Des Fräs-/Graviermotors
Schritt 8: Installation des Fräs-/Graviermotors Vorsicht Hinweis: Ziehen Sie die Schraube ohne große Krafteinwirkung an, da ansonsten Kunststoffteile beschädigt werden könnten. -
Seite 66: Schritt 9: Installation Der Steuerplatine
Schritt 9: Installation der Steuerplatine Was wird benötigt Steuerplatine (mit Lüfter im Gehäuse) V3.4 Steuerplatine (mit Lüfter im Gehäuse) V3.4 (4) Innensechskantschraube M5 x 10 (4) Innensechskantschraube M5 x 10 (4) Nutenstein 20M5 (4) Nutenstein 20M5... -
Seite 67: Schritt 10 : Anschluss Der Komponenten
Schritt 10 : Anschluss der Komponenten Schließen Sie das rote Kabel an den Anschluss neben der roten Schrittmotor Markierung an (M+) Spindelmotor Laser (12V 5Amax) (nicht enthalten) 24V DC Netzadapter) Schließen Sie Ihre CNC mit dem mitgelieferten USBKabel an den Computer an Ein-/Aus- Offline Controller... -
Seite 68: Teil 3 - Inbetriebnahme
Teil 3 - Inbetriebnahme 1. Installieren Sie zunächst den erforderlichen Treiber ( Software Driver CH340SER.exe) - Seite 69 2. Anschließend bestimmen Sie den COM-Anschluss Ihres Geräts: Hinweis: Der Port wird nur dann angezeigt, wenn der Controller des Geräts über USB-Kabel mit einem USB-Port Ihres PC verbunden ist. · Windows 7: Klicken Sie auf „Start“ Klicken Sie mit der rechten Maustaste auf „Computer“ Wählen Sie „Verwalten“...
- Seite 70 · Erweitern Sie die Baumstruktur durch einen Doppelklick auf „Anschlüsse (COM & LPT)“. · Der Controller Ihres Geräts ist mit einem der aufgeführten USB Kommunikationsanschlüsse (COMx) verbunden, wobei das „x“ die Nummer des Kommunikationsanschlusses darstellt, z. B. COM12. Wenn mehrere serielle USB-Anschlüsse vorhanden sind, klicken Sie mit der rechten Maustaste auf jeden einzelnen und überprüfen Sie die Treiberbeschreibung.
- Seite 71 3. Starten Sie nun das Programm „Grblcontrol“ (Software Grblcontrol GrblControl.exe) · Klicken Sie auf „Service“ „Settings“ „Connection“. · Stellen Sie anschließend sicher, dass der zuvor ermittelte COM-Port ausgewählt ist und eine Übertragungsgeschwindigkeit von „115200“ Baud eingestellt ist. · Die übrigen Einstellungen belassen Sie bitte so wie sie sind.
- Seite 72 · Bei erfolgreichem Verbindungsaufbau zwischen Computer und Controller sehen Sie nun im Console-Fenster eine Ausgabe der Art: „[CTRL+X] < Grbl 1.1f ['$' for help]“. · War der Verbindungsaufbau zum Controller hingegen nicht erfolgreich, so sehen Sie nun im Console-Fenster eine Ausgabe der Art: „Serial port error 1: No such file or directory“.
- Seite 73 4. Verwendung von Grblcontrol Die Spindeldrehzahl: Dies stellt nicht die tatsächliche Geschwindigkeit, sondern das Verhältnis dar. Der angegebene Prozentsatz ist nicht linear. 100 = 100/1000 Spindel 1000 = 1000/1000 100% max ein/aus 100% X-Y-Z Achsenver- schiebung...
- Seite 74 5. Werkzeugeinstellung Spindelmotor vor Bewegung einschalten ! zero XY zero Z Mit den Richtungstasten wird die Werkstückaufnahme bewegt G-code Datei öffnen Bearbeitung starten abbrechen...
-
Seite 75: Teil 4 - Einstieg
Teil 4 - Einstieg Grundlegende Maschinentests Nachdem Sie Ihre CNC-Maschine vollständig montiert und verkabelt haben, müssen Sie sicherstellen, dass diese ordnungsgemäß funktioniert. Dies ist die empfohlene Startreihenfolge für das System. 1. Stellen Sie sicher, dass das USB-Kabel der CNC-Maschine an Ihren Computer angeschlossen ist, und starten Sie den Computer. 2. -
Seite 76: Teil 5 - Offline-Controller
Teil 5 - Offline-Controller Hinweis: Wenn Sie den Offline-Controller verwenden, entfernen Sie zuvor das USB-Kabel vom PC. Offline-Controller und PC können nicht gleichzeitig verwendet werden. 1. Verbinden Sie den Offline-Controller über ein USB-Kabel mit dem PC. - Seite 77 2. Kopieren Sie zunächst das NC-Dokument auf den Offline Controller.
- Seite 78 3. Schließen Sie nun den Offline-Controller an die Steuerplatine an. 4. Drücken Sie anschließend die Tasten [X+/X-/Y+/Y-/Z+/Z-], um die Spindel auf die „0“-Stellung zu verfahren. Wählen Sie die CNC-Datei aus. Klicken Sie nochmals auf die Taste [OK], um den Fräs-/Gravurvorgang zu starten.
-
Seite 79: Teil 6 - Benutzeroberfläche Des Offline-Controllers
Teil 6 - Benutzeroberfläche des Offline-Controllers Funktionsmenü Manuelle Maschinensteuerung Ctrl File Eine G-code-Datei laden Mit den Tasten [Y+] oder [Y-] auswählen Mit der Taste [OK] Ihre Auswahl bestätigen... - Seite 80 Ctrl-Menü Reference direction X-Achse in positiver Richtung X-Achse in negativer Richtung Y-Achse in positiver Richtung Y-Achse in negativer Richtung Z-Achse in positiver Richtung Z-Achse in negativer Richtung Spindelmotor ein/aus OK/Spindle (SP) Langes Drücken zum Beenden, kurzes Exit/Step Drücken für einen Schritt (0.1/1/5/10mm) Drehzahl der Spindel SP:1% Drücken Sie [OK]+[Z+] zum Erhöhen,...
- Seite 81 File-Menü Wählen Sie mit den Tasten [Y+] oder [Y-] eine der CNC-Dateien Bestätigen Sie Ihre Auswahl mit der Taste [OK] Um den Fräs-/Gravurvorgang zu starten, drücken Sie abermals Taste [OK]...
- Seite 82 Copyright © 2021 by SainSmart All rights reserved. This manual or any portion thereof may not be reproduced or used in any manner whatsoever without the written permission of the publisher, except for the use of brief quotations embodied in critical reviews and certain other noncommercial uses permitted by copyright law.
- Seite 83 Genmitsu Desktop CNC & Laser www.sainsmart.com support@sainsmart.com Vastmind LLC, 5892 Losee Rd Ste. 132, N. Las Vegas, NV 89081...