Herunterladen Inhalt Inhalt Diese Seite drucken
AEG BPK535060B Benutzerinformation
Vorschau ausblenden Andere Handbücher für BPK535060B:
Inhaltsverzeichnis

Werbung

Verfügbare Sprachen
  • DE

Verfügbare Sprachen

  • DEUTSCH, seite 1
DE
Benutzerinformation
EN
User Manual
ES
Manual de instrucciones
FR
Notice d'utilisation
IT
Istruzioni per l'uso
NL
Gebruiksaanwijzing
PT
Manual de instruções
USER
MANUAL
BPK535060B
BPK535060M
2
39
72
107
142
177
211

Werbung

Inhaltsverzeichnis
loading

Inhaltszusammenfassung für AEG BPK535060B

  • Seite 1 Benutzerinformation User Manual Manual de instrucciones Notice d'utilisation Istruzioni per l’uso Gebruiksaanwijzing Manual de instruções USER MANUAL BPK535060B BPK535060M...
  • Seite 2: Inhaltsverzeichnis

    FÜR PERFEKTE ERGEBNISSE Danke, dass Sie sich für dieses AEG Produkt entschieden haben. Wir haben es geschaffen, damit Sie viele Jahre von seiner ausgezeichneten Leistung und den innovativen Technologien, die Ihnen das Leben erleichtern, profitieren können. Es ist mit Funktionen ausgestattet, die in gewöhnlichen Geräten nicht vorhanden sind.
  • Seite 3: Sicherheitshinweise

    SICHERHEITSHINWEISE 6. TÄGLICHER GEBRAUCH......13 11. REINIGUNG UND PFLEGE..... 27 6.1 Einstellung: Ofenfunktionen...13 11.1 Hinweise zur Reinigung....28 6.2 Ofenfunktionen......13 11.2 Entfernen: Einhängegitter.... 28 6.3 Hinweise zu: Feuchte Umluft..15 11.3 Benutzung: 6.4 Einstellung: Koch-Assistent... 15 Pyrolytische Reinigung......29 6.5 Koch-Assistent mit Rezepten..16 11.4 Erinnerungsfunktion Reinigen..30 11.5 Aus- und Einbau: Tür....30 7.
  • Seite 4: Allgemeine Sicherheit

    SICHERHEITSHINWEISE ordnungsgemäßer Bedienung bestehen. Kinder unter 8 Jahren und Personen mit schweren Behinderungen oder Mehrfachbehinderung sollten vom Gerät ferngehalten werden, wenn sie nicht ständig beaufsichtigt werden. Kinder sollten beaufsichtigt werden, um sicherzustellen, • dass sie nicht mit dem Gerät. Halten Sie sämtliches Verpackungsmaterial von Kindern •...
  • Seite 5: Sicherheitsanweisungen

    SICHERHEITSANWEISUNGEN gleichermaßen qualifizierten Person ausgetauscht werden, um Gefahren durch elektrischen Strom zu vermeiden. WARNUNG: Vergewissern Sie sich, dass das Gerät • ausgeschaltet ist, bevor Sie die Lampe austauschen, um einen Stromschlag zu vermeiden. WARNUNG: Das Gerät und die zugänglichen Geräteteile •...
  • Seite 6: Elektrischer Anschluss

    SICHERHEITSANWEISUNGEN • Das Gerät ist mit einem elektrischen Kühlsystem ausgestattet. Es muss mit der elektrischen Stromversorgung betrieben werden. • Das Einbaugerät muss die Stabilitätsanforderungen von DIN 68930 erfüllen. Mindesthöhe des Einbaumöbels (Mindesthöhe des 578 (600) mm Schranks unter der Arbeitsplatte) Schrankbreite 560 mm Schranktiefe...
  • Seite 7: Gebrauch

    SICHERHEITSANWEISUNGEN • Achten Sie darauf, dass das Netzkabel die Gerätetür oder die Nische unter dem Gerät nicht berührt oder in ihre Nähe gelangt, insbesondere wenn das Gerät eingeschaltet oder die Tür heiß ist. • Alle Teile, die gegen direktes Berühren schützen, sowie die isolierten Teile müssen so befestigt werden, dass sie nicht ohne Werkzeug entfernt werden können.
  • Seite 8: Reinigung Und Pflege

    SICHERHEITSANWEISUNGEN • Verfärbungen der Emaille- oder Edelstahlbeschichtung haben keine Auswirkung auf die Leistung des Geräts. • Verwenden Sie eine tiefe Pfanne für feuchte Kuchen. Fruchtsäfte verursachen Flecken, die dauerhaft sein können. • Kochen Sie immer bei geschlossener Gerätetür. • Ist das Gerät hinter einer Möbelfront (wie etwa einer Tür) installiert, achten Sie darauf, dass die Tür während des Gerätebetriebs nicht geschlossen wird.
  • Seite 9: Innenbeleuchtung

    SICHERHEITSANWEISUNGEN • Einige Vögel und Reptilien können im Gegensatz zu den Menschen sehr empfindlich auf die während des Reinigungsvorgangs freigesetzten Dämpfe von Pyrolyse-Backöfen reagieren. – Bringen Sie Tiere (besonders Vögel) für die Zeit während und nach der Pyrolyse und nach der ersten Anwendung der Höchsttemperatur in einen gut belüfteten Bereich. •...
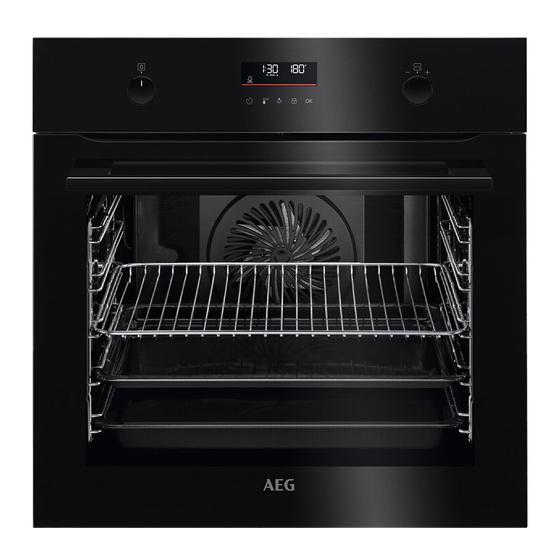
  • Seite 10: Gerätebeschreibung

    GERÄTEBESCHREIBUNG 3. GERÄTEBESCHREIBUNG 3.1 Gesamtansicht Bedienfeld Einstellknopf für die Ofenfunktionen Display Einstellknopf Heizelement Lampe Ventilator Einschubschienen, herausnehmbar Einschubebenen 3.2 Zubehör Kombirost Für Kochgeschirr, Kuchenformen, Braten. Backblech Für Kuchen und Plätzchen. 10/248...
  • Seite 11: Ein- Und Ausschalten Des Backofens

    EIN- UND AUSSCHALTEN DES BACKOFENS Brat- und Fettpfanne Zum Backen und Braten oder zum Auffangen von abtropfendem Fett. 4. EIN- UND AUSSCHALTEN DES BACKOFENS 4.1 Versenkbare Knöpfe Drücken Sie zum Benutzen des Geräts den Knopf. Der Knopf kommt dann heraus. 4.2 Bedienfeld Drehen Sie Sensorfelder des Bedienfelds...
  • Seite 12: Vor Der Ersten Verwendung

    VOR DER ERSTEN VERWENDUNG Display mit der maximalen Anzahl wählbarer Funktionen. Display-Anzeigen Verriege‐ Koch-Assistent Reinigung Einstellungen Schnellaufheizung lung Timer-An‐ zeigen: Fortschrittsbalken - für Temperatur oder Zeit. 5. VOR DER ERSTEN VERWENDUNG WARNUNG! Siehe Kapitel Sicherheitshinweise. 5.1 Erste Reinigung Reinigen Sie den leeren Backofen vor der ersten Inbetriebnahme und stellen Sie die Uhrzeit ein: 00:00 Stellen Sie die Zeit ein.
  • Seite 13: Erstes Vorheizen

    TÄGLICHER GEBRAUCH 5.2 Erstes Vorheizen Heizen Sie den leeren Ofen vor der ersten Inbetriebnahme vor. Schritt Nehmen Sie die Zubehörteile und die herausnehmbaren Einhängegitter aus dem Ofen. Schritt Stellen Sie die Höchsttemperatur für folgende Funktion ein: Lassen Sie den Ofen 1 Stunde lang eingeschaltet. Schritt Stellen Sie die Höchsttemperatur für folgende Funktion ein: Lassen Sie den Ofen 15 Min.
  • Seite 14 TÄGLICHER GEBRAUCH Standard-Ofenfunktionen Ofenfunktion Gerät Zum Backen auf bis zu drei Einschubebenen gleichzeitig und zum Dörren von Lebensmitteln. Stellen Sie eine 20 - 40 °C niedrigere Backofentempe‐ ratur als bei Ober-/Unterhitze ein. Heißluft Zum Backen und Braten von Speisen auf einer Einschubebene. Ober-/Unterhitze Lässt Fertiggerichte (z.
  • Seite 15: Hinweise Zu: Feuchte Umluft

    TÄGLICHER GEBRAUCH Ofenfunktion Gerät Aufrufen des Menüs: Koch-Assistent, Reinigung, Einstellungen. Menü 6.3 Hinweise zu: Feuchte Umluft Diese Funktion wurde zur Bestimmung der Energieeffizienzklasse und den Anforderungen an die umweltgerechte Gestaltung EU 65/2014 und EU 66/2014 verwendet. Tests nach EN 60350-1. Die Backofentür sollte während des Garvorgangs geschlossen bleiben, damit die Funktion nicht unterbrochen wird.
  • Seite 16: Koch-Assistent Mit Rezepten

    TÄGLICHER GEBRAUCH 6.5 Koch-Assistent mit Rezepten Legende Gewichtsautomatik verfügbar. Heizen Sie den Backofen vor, bevor Sie mit dem Kochen beginnen. Einschubebene. Wenn die Funktion beendet ist, prüfen Sie, ob das Gericht fertig ist. Speise Gewicht Einschubebene / Zubehör Dauer Rindfleisch Roastbeef, 40 Min.
  • Seite 17 TÄGLICHER GEBRAUCH Speise Gewicht Einschubebene / Zubehör Dauer Roastbeef, blutig (Nieder‐ 75 Min. temperatur- Garen) 2; Backblech Verwenden Sie Ihre Lieblingsgewürze Roastbeef, ro‐ 1 - 1,5 kg; 4 oder einfach Salz und frisch gemahlenen sa (Niedertem‐ - 5 cm dicke 85 Min.
  • Seite 18 TÄGLICHER GEBRAUCH Speise Gewicht Einschubebene / Zubehör Dauer Lende, frisch 1 - 1,5 kg; 5 55 Min. 2; Bräter auf Kombirost - 6 cm dicke Verwenden Sie Ihre Lieblingsgewürze. Stücke Rippchen 2 - 3 kg; roh, 90 Min. 3; tiefe Pfanne 2 - 3 cm Flüssigkeit hinzufügen, um den Boden dünne Ripp‐...
  • Seite 19 TÄGLICHER GEBRAUCH Speise Gewicht Einschubebene / Zubehör Dauer Gans, ganz 4 - 5 kg 110 Min. 2; tiefe Pfanne Verwenden Sie Ihre Lieblingsgewürze. Legen Sie das Fleisch auf das tiefe Backblech. Die Gans nach der Hälfte der Garzeit wenden. Sonstige Hackbraten 1 kg 60 Min.
  • Seite 20 TÄGLICHER GEBRAUCH Speise Gewicht Einschubebene / Zubehör Dauer Gemüse / Beilagen Kartoffeln 1 kg 50 Min. 2; Backblech Die ganzen Kartoffeln mit der Haut auf das Backblech geben. Wegdes 1 kg 35 Min. 3; Backblech mit Backpapier ausklei‐ Verwenden Sie Ihre Lieblingsgewürze. Kartoffeln in Stücke schneiden.
  • Seite 21: Uhrfunktionen

    UHRFUNKTIONEN Speise Gewicht Einschubebene / Zubehör Dauer Alle Getreide/ 1 kg 60 Min. 2; Backblech mit Backpapier / Roggen/dunk‐ Kombirost les Brot, alle Getreide 7. UHRFUNKTIONEN 7.1 Uhrfunktionen Uhrfunktion Verwendung Kurzzeit-Wecker. Nach Ablauf der Zeit ertönt der Signalton. Garzeitdauer. Nach Ablauf des Timers ertönt ein akustisches Signal und die Ofenfunktion stoppt.
  • Seite 22 UHRFUNKTIONEN Einstellung: Kurzzeit-Wecker Schritt 1 Schritt 2 Schritt 3 Im Display wird Folgen‐ des ange‐ zeigt: 0:00 ange‐ zeigt. Stellen Sie Kurzzeit-We‐ Drücken Sie: Drücken Sie: cker Der Countdown des Timers startet umgehend. Einstellung: Garzeitdauer Schritt 1 Schritt 2 Schritt 3 Schritt 4 Im Display wird Folgen‐...
  • Seite 23: Verwendung: Zubehör

    VERWENDUNG: ZUBEHÖR Einstellung: Zeitvorwahl Der Countdown des Timers beginnt zu der eingestellten Startzeit. 8. VERWENDUNG: ZUBEHÖR 8.1 Einsetzen des Zubehörs Die kleine Einkerbung auf der Oberseite erhöht die Sicherheit. Die Vertiefungen sind auch Kippsicherungen. Durch den umlaufend erhöhten Rand des Rosts ist das Kochgeschirr gegen Abrutschen vom Rost gesichert.
  • Seite 24: Zusatzfunktionen

    ZUSATZFUNKTIONEN 9. ZUSATZFUNKTIONEN 9.1 Verriegelung Diese Funktion verhindert ein versehentliches Verstellen der Ofenfunktion. Einschalten, wenn der Backofen in Betrieb ist – das eingestellte Garen wird fortgesetzt und das Bedienfeld ist verriegelt. Einschalten, wenn der Backofen ausgeschaltet ist – der Backofen kann nicht eingeschaltet wer‐ den, das Bedienfeld ist verriegelt.
  • Seite 25: Feuchte Umluft - Empfohlenes Zubehör

    TIPPS UND HINWEISE Nutzen Sie die dritte Einschubebene. (°C) (Min.) Nudelgratin 200 - 220 45 - 55 Kartoffelgratin 180 - 200 70 - 85 Moussaka 170 - 190 70 - 95 Lasagne, frisch 180 - 200 75 - 90 Cannelloni 180 - 200 70 - 85 Brotpudding...
  • Seite 26 TIPPS UND HINWEISE BACKEN AUF EINER EINSCHUBEBENE. Backen in Formen (°C) (Min.) Biskuit, fettfrei Heißluft 140 - 150 35 - 50 Biskuit, fettfrei Ober-/Unterhitze 35 - 50 Apfelkuchen, 2 Formen Heißluft 60 - 90 à Ø 20 cm Apfelkuchen, 2 Formen Ober-/Unterhitze 70 - 90 à...
  • Seite 27: Reinigung Und Pflege

    REINIGUNG UND PFLEGE BACKEN AUF MEHREREN EBENEN. Plätzchen (°C) (Min.) Mürbeteiggebäck / Fein‐ Heißluft 25 - 45 1 / 4 gebäck Törtchen, 20 pro Blech, Heißluft 23 - 40 1 / 4 Heizen Sie den leeren Backofen vor Biskuit, fettfrei Heißluft 35 - 50 1 / 4...
  • Seite 28: Hinweise Zur Reinigung

    REINIGUNG UND PFLEGE 11.1 Hinweise zur Reinigung Feuchten Sie ein weiches Tuch mit warmem Wasser und etwas mildem Reini‐ gungsmittel an, und reinigen Sie damit die Vorderseite des Backofens. Reinigen Sie die Metalloberflächen mit einer Reinigungslösung. Reinigungs‐ Reinigen Sie Flecken mit einem milden Reinigungsmittel. mittel Reinigen Sie den Garraum nach jedem Gebrauch.
  • Seite 29: Benutzung: Pyrolytische Reinigung

    REINIGUNG UND PFLEGE 11.3 Benutzung: Pyrolytische Reinigung Reinigen Sie den Backofen mit Pyrolytische Reinigung. WARNUNG! Es besteht das Risiko von Verbrennungen. VORSICHT! Befinden sich weitere Geräte in demselben Küchenmöbel, verwenden Sie diese nicht während dieser Funktion. Andernfalls kann der Backofen beschädigt werden. Vor dem Pyrolytische Reinigung: Schalten Sie den Back‐...
  • Seite 30: Erinnerungsfunktion Reinigen

    REINIGUNG UND PFLEGE Nach Abschluss der Reinigung: Schalten Sie den Back‐ Reinigen Sie den Garraum mit Entfernen Sie die Rückstände ofen aus und warten Sie, einem weichen Tuch. vom Garraumboden. bis er abgekühlt ist. 11.4 Erinnerungsfunktion Reinigen Der Backofen erinnert Sie daran, wann er mit der pyrolytischen Reinigung gereinigt werden muss.
  • Seite 31: Austausch: Lampe

    REINIGUNG UND PFLEGE Schritt Fassen Sie die Türabdeckung (B) an der Oberkante der Tür an beiden Seiten an. Drücken Sie sie nach innen, um den Klippverschluss zu lösen. Schritt Ziehen Sie die Türabdeckung nach vorn, um sie abzuneh‐ men. Schritt Fassen Sie die Glasscheiben der Tür nacheinander am oberen Rand an und ziehen...
  • Seite 32: Fehlersuche

    FEHLERSUCHE Obere Lampe Schritt Drehen Sie die Glasabdeckung und nehmen Sie sie ab. Schritt Reinigen Sie die Glasabdeckung. Schritt Ersetzen Sie die Lampe durch eine geeignete, bis 300 °C hitzebeständige Lampe. Schritt Bringen Sie die Glasabdeckung wieder an. 12. FEHLERSUCHE WARNUNG! Siehe Kapitel Sicherheitshinweise.
  • Seite 33: Servicedaten

    FEHLERSUCHE Komponenten Störung Prüfen Sie, ob Folgendes zutrifft ... Die Lampe ist ausgeschaltet. Feuchte Umluft - ist eingeschaltet. Die Lampe funktioniert nicht. Die Lampe ist durchgebrannt. Fehlercodes Im Display erscheint … Prüfen Sie, ob Folgendes zutrifft ... Err C3 Die Backofen-Tür ist geschlossen und die Tür‐ verriegelung ist nicht beschädigt.
  • Seite 34: Energieeffizienz

    ENERGIEEFFIZIENZ 13. ENERGIEEFFIZIENZ 13.1 Produktinformationen und Produktinformationsblatt* Name des Lieferanten BPK535060B 944188596 Modellbezeichnung BPK535060M 944188597 Index der Energieeffizienz 81.2 Energieeffizienzklasse Energieverbrauch mit einer Standardbeladung, konventi‐ 1.09 kWh/Programm oneller Modus Energieverbrauch mit einer Standardbeladung, Umluft- 0.69 kWh/Programm Modus Anzahl der Hohlräume Wärmequelle...
  • Seite 35: Menüstruktur

    MENÜSTRUKTUR Achten Sie darauf, dass die Backofentür während des Ofenbetriebs geschlossen ist. Die Backofentür darf während des Garvorgangs nicht zu oft geöffnet werden. Halten Sie die Türdichtung sauber und stellen Sie sicher, dass sie sich fest in der richtigen Position befindet. Verwenden Sie Kochgeschirr aus Metall, um mehr Energie zu sparen.
  • Seite 36: Informationen Zur Entsorgung

    MENÜSTRUKTUR O1 - O11 Stellen Sie den Wählen Sie Me‐ Bestätigen Sie Wählen Sie die Bestätigen Sie Wert ein und nü, Einstellun‐ die Einstellung. Einstellung. die Einstellung. gen. drücken Sie Einstellungen Uhrzeit Ändern Helligkeit 1 - 5 Tastentöne 1 - Signalton Lautstärke 1 - 4 2 - Klicken...
  • Seite 37 MENÜSTRUKTUR gesammelt und zurückgenommen werden, es darf also nicht in den Hausmüll gegeben werden. Das Gerät kann z. B. bei einer kommunalen Sammelstelle oder ggf. bei einem Vertreiber (siehe zu deren Rücknahmepflichten unten) abgegeben werden. Das gilt auch für alle Bauteile, Unterbaugruppen und Verbrauchsmaterialien des zu entsorgenden Altgeräts.
  • Seite 38 MENÜSTRUKTUR Darüber hinaus ist jeder, der Elektro- und Elektronikgeräte auf einer Verkaufsfläche von mindestens 400 m² verkauft, verpflichtet, Altgeräte, die in keiner äußeren Abmessung größer als 25 cm sind (Elektrokleingeräte), im Ladengeschäft oder in unmittelbarer Nähe kostenlos zurückzunehmen; die Rücknahme darf in diesem Fall nicht vom Kauf eines Elektro- oder Elektronikgerätes abhängig gemacht werden.
  • Seite 39 CONTENTS FOR PERFECT RESULTS Thank you for choosing this AEG product. We have created it to give you impeccable performance for many years, with innovative technologies that help make life simpler – features you might not find on ordinary appliances. Please spend a few minutes reading to get the very best from it.
  • Seite 40: Safety Information

    SAFETY INFORMATION 6. DAILY USE..........49 10.3 Cooking tables for test institutes..61 6.1 How to set: Heating functions..49 11. CARE AND CLEANING......63 6.2 Heating functions......49 11.1 Notes on cleaning......63 6.3 Notes on: Moist Fan Baking...50 11.2 How to remove: Shelf supports ...64 6.4 How to set: Assisted Cooking..
  • Seite 41: General Safety

    SAFETY INFORMATION Children should be supervised to ensure that they do not • play with the appliance. Keep all packaging away from children and dispose of it • appropriately. WARNING: The appliance and its accessible parts become • hot during use. Keep children and pets away from the appliance when in use and when cooling down.
  • Seite 42: Safety Instructions

    SAFETY INSTRUCTIONS Always use oven gloves to remove or insert accessories or • ovenware. To remove the shelf supports first pull the front of the shelf • support and then the rear end away from the side walls. Install the shelf supports in the opposite sequence. Do not use a steam cleaner to clean the appliance.
  • Seite 43: Electrical Connection

    SAFETY INSTRUCTIONS Width of the front of the appliance 595 mm Width of the back of the appliance 559 mm Depth of the appliance 567 mm Built in depth of the appliance 546 mm Depth with open door 1027 mm Ventilation opening minimum size.
  • Seite 44: Use

    SAFETY INSTRUCTIONS 2.3 Use WARNING! Risk of injury, burns and electric shock or explosion. • Do not change the specification of this appliance. • Make sure that the ventilation openings are not blocked. • Do not let the appliance stay unattended during operation. •...
  • Seite 45: Pyrolytic Cleaning

    SAFETY INSTRUCTIONS • Clean the appliance with a moist soft cloth. Use only neutral detergents. Do not use abrasive products, abrasive cleaning pads, solvents or metal objects. • If you use an oven spray, follow the safety instructions on its packaging. 2.5 Pyrolytic cleaning WARNING! Risk of Injury / Fires / Chemical Emissions (Fumes) in Pyrolytic Mode.
  • Seite 46: Disposal

    PRODUCT DESCRIPTION 2.8 Disposal WARNING! Risk of injury or suffocation. • Contact your municipal authority for information on how to dispose of the appliance. • Disconnect the appliance from the mains supply. • Cut off the mains electrical cable close to the appliance and dispose of it. •...
  • Seite 47: How To Turn Oven On And Off

    HOW TO TURN OVEN ON AND OFF Baking tray For cakes and biscuits. Grill- / Roasting pan To bake and roast or as a pan to collect fat. 4. HOW TO TURN OVEN ON AND OFF 4.1 Retractable knobs To use the appliance press the knob. The knob comes out. 4.2 Control panel Control panel sensor fields Press...
  • Seite 48: Before First Use

    BEFORE FIRST USE The display with the maximum number of func‐ tions set. Display indicators Lock Assisted Cook‐ Cleaning Settings Fast Heat Up Timer indi‐ cators: Progress bar - for temperature or time. 5. BEFORE FIRST USE WARNING! Refer to Safety chapters. 5.1 Initial cleaning Before the first use clean the empty oven and set the time: 00:00...
  • Seite 49: Daily Use

    DAILY USE Preheat the empty oven before the first use. Step 2 Set the maximum temperature for the function: Let the oven operate for 1 h. Step 3 Set the maximum temperature for the function: Let the oven operate for 15 min. The oven can emit an odour and smoke during preheating.
  • Seite 50: Notes On: Moist Fan Baking

    DAILY USE Heating function Application To bake and roast food on one shelf position. Conventional Cooking To make convenience food (e.g., french fries, potato wedges or spring rolls) crispy. Frozen Foods To bake pizza. To make intensive browning and a crispy bottom. Pizza Function To bake cakes with crispy bottom and to preserve food.
  • Seite 51: How To Set: Assisted Cooking

    DAILY USE When you use this function the lamp automatically turns off after 30 sec. For the cooking instructions refer to "Hints and tips" chapter, Moist Fan Baking. For general energy saving recommendations refer to "Energy Efficiency" chapter, Energy Saving. 6.4 How to set: Assisted Cooking Every dish in this submenu has a recommended function and temperature.
  • Seite 52 DAILY USE Dish Weight Shelf level / Accessory Duration time Roast Beef, 40 min rare 1 - 1,5 kg; 4 2; baking tray Roast Beef, - 5 cm thick 50 min Fry the meat for a few minutes on a hot medium pieces pan.
  • Seite 53 DAILY USE Dish Weight Shelf level / Accessory Duration time Veal roast 0,8 - 1,5 kg; 80 min 2; roasting dish on wire shelf (e.g. shoulder) 4 cm thick Use your favourite spices. Add liquid. pieces Roast covered. Pork Pork roast 1,5 - 2 kg 120 min 2;...
  • Seite 54 DAILY USE Dish Weight Shelf level / Accessory Duration time Chicken 180 - 200 g 25 min 2; casserole dish on wire shelf breast per piece Use your favourite spices. Fry the meat for a few minutes on a hot pan. Chicken legs, 30 min 3;...
  • Seite 55 DAILY USE Dish Weight Shelf level / Accessory Duration time Apple tart 40 min 2; pie form on wire shelf Apple pie 60 min 22 cm pie form on wire shelf Brownies 2 kg 30 min 3; deep pan Chocolate 25 min 3;...
  • Seite 56: Clock Functions

    CLOCK FUNCTIONS Dish Weight Shelf level / Accessory Duration time Pizza fresh, 2; baking tray lined with baking 15 min thin paper Pizza fresh, 2; baking tray lined with baking 25 min thick paper Quiche 45 min 2; baking tin on wire shelf Baguette / 0,8 kg 30 min...
  • Seite 57 CLOCK FUNCTIONS How to set: Time of day To change the time of day enter the menu Set the clock. Press: and select Settings, Time of day. How to set: Minute minder Step 1 Step 2 Step 3 The display shows: 0:00 Set the Minute minder...
  • Seite 58: How To Use: Accessories

    HOW TO USE: ACCESSORIES How to set: Time Delay Step 1 Step 2 Step 3 Step 4 Step 5 Step 6 The dis‐ The dis‐ play play shows: shows: the time --:-- of day Select Press re‐ Set the Set the STOP Press: Press:...
  • Seite 59: Additional Functions

    ADDITIONAL FUNCTIONS Wire shelf, Baking tray / Deep pan: Push the tray between the guide bars of the shelf support and the wire shelf on the guide bars above. 9. ADDITIONAL FUNCTIONS 9.1 Lock This function prevents an accidental change of the oven function. Turn it on when the oven works - the set cooking continues, the control panel is locked.
  • Seite 60: Cooling Fan

    HINTS AND TIPS 9.3 Cooling fan When the oven operates, the cooling fan turns on automatically to keep the surfaces of the oven cool. If you turn off the oven, the cooling fan can continue to operate until the oven cools down.
  • Seite 61: Cooking Tables For Test Institutes

    HINTS AND TIPS Ceramic Dark, non-reflective Dark, non-reflective Dark, non-reflective 8 cm diameter, 28 cm diameter 26 cm diameter 28 cm diameter 5 cm height 10.3 Cooking tables for test institutes Information for test institutes Tests according to: EN 60350, IEC 60350. BAKING ON ONE LEVEL.
  • Seite 62 HINTS AND TIPS BAKING ON ONE LEVEL. Biscuits Use the third shelf position. (°C) (min) Small cakes, 20 per tray, Conventional Cooking 20 - 30 preheat the empty oven MULTILEVEL BAKING. Biscuits (°C) (min) Short bread / Pastry strips True Fan Cooking 25 - 45 1 / 4 Small cakes, 20 per tray,...
  • Seite 63: Care And Cleaning

    CARE AND CLEANING GRILL Preheat the empty oven for 5 minutes. Grill with the maximum temperature setting. (min) Beef steak, turn halfway Grill 24 - 30 through 11. CARE AND CLEANING WARNING! Refer to Safety chapters. 11.1 Notes on cleaning Clean the front of the oven with a soft cloth with warm water and a mild deter‐...
  • Seite 64: How To Remove: Shelf Supports

    CARE AND CLEANING Clean all accessories after each use and let them dry. Use a soft cloth with warm water and a mild detergent. Do not clean the accessories in a dishwash‐ Do not clean the non-stick accessories using abrasive cleaner or sharp-edged Accessories objects.
  • Seite 65: Cleaning Reminder

    CARE AND CLEANING Pyrolytic Cleaning Step 1 Enter menu: Cleaning Option Duration C1 - Light cleaning C2 - Normal cleaning 1 h 30 min C3 - Thorough cleaning Step 2 - press to select the cleaning programme. Step 3 - press to start the cleaning. Step 4 After cleaning, turn the knob for the heating functions to the off posi‐...
  • Seite 66 CARE AND CLEANING WARNING! The door is heavy. CAUTION! Carefully handle the glass, especially around the edges of the front panel. The glass can break. Step 1 Fully open the door. Step 2 Lift and press the clamping levers (A) on the two door hinges.
  • Seite 67: How To Replace: Lamp

    TROUBLESHOOTING 11.6 How to replace: Lamp WARNING! Risk of electric shock. The lamp can be hot. Before you replace the lamp: Step 1 Step 2 Step 3 Turn off the oven. Wait until Disconnect the oven from the Put a cloth on the bottom of the oven is cold.
  • Seite 68: Service Data

    TROUBLESHOOTING The oven does not turn on or does not heat up The oven does not heat up. The oven door is closed. The oven does not heat up. The fuse is not blown. The oven does not heat up. The Child Lock is off.
  • Seite 69: Energy Efficiency

    Product number (PNC) ......... Serial number (S.N.) ......... 13. ENERGY EFFICIENCY 13.1 Product Information and Product Information Sheet* Supplier's name BPK535060B 944188596 Model identification BPK535060M 944188597 Energy Efficiency Index 81.2 Energy efficiency class Energy consumption with a standard load, conventional 1.09 kWh/cycle...
  • Seite 70: Energy Saving

    MENU STRUCTURE Energy efficiency class is not applicable for Russia. EN 60350-1 - Household electric cooking appliances - Part 1: Ranges, ovens, steam ovens and grills - Methods for measuring performance. 13.2 Energy saving The oven has features which help you save energy during everyday cooking. Make sure that the oven door is closed when the oven operates.
  • Seite 71: Environmental Concerns

    MENU STRUCTURE O1 - O11 Adjust the value Select the Menu, Select the set‐ Confirm setting. Confirm setting. Settings. ting. and press Settings Time of day Change Display brightness 1 - 5 Key tones 1 - Beep Buzzer volume 1 - 4 2 - Click 3 - Sound off Uptimer...
  • Seite 72 CONTENIDO PARA UNOS RESULTADOS PERFECTOS Gracias por elegir este producto AEG. Lo hemos creado para brindarle un rendimiento impecable durante muchos años, con tecnologías innovadoras que lo ayudan a simplificar la vida, características que quizás no encuentre en los electrodomésticos comunes. Dedique unos minutos a leer este documento para sacarle el máximo partido.
  • Seite 73: Información Sobre Seguridad

    INFORMACIÓN SOBRE SEGURIDAD 5. ANTES DEL PRIMER USO....... 82 10.2 Horneado húmedo + ventilador. accesorios recomendados....95 5.1 Limpieza inicial......82 10.3 Tablas de cocción para organismos 5.2 Precalentamiento inicial....82 de control..........95 6. USO DIARIO..........83 11. MANTENIMIENTO Y LIMPIEZA....97 6.1 Cómo ajustar: Funciones 11.1 Notas sobre la limpieza....
  • Seite 74: Instrucciones Generales De Seguridad

    INFORMACIÓN SOBRE SEGURIDAD sobre el uso del electrodoméstico de forma segura y comprendan los riesgos. Es necesario mantener alejados del aparato a los niños de menos de 8 años, así como a las personas con minusvalías importantes y complejas, salvo que estén bajo supervisión continua.
  • Seite 75: Instrucciones De Seguridad

    INSTRUCCIONES DE SEGURIDAD ADVERTENCIA: Asegúrese de que el aparato está • apagado antes de cambiar la bombilla para evitar el riesgo de descarga eléctrica. ADVERTENCIA: El horno y las piezas accesibles se • calientan mucho durante el funcionamiento. Preste mucha atención para no tocar las resistencias.
  • Seite 76: Conexión Eléctrica

    INSTRUCCIONES DE SEGURIDAD • La unidad empotrada debe cumplir los requisitos de estabilidad de la norma DIN 68930. Altura mínima del armario (Altura mínima del ar‐ 578 (600) mm mario debajo de la encimera) Ancho del armario 560 mm Profundidad del armario 550 (550) mm Altura de la parte frontal del aparato 594 mm...
  • Seite 77: Uso

    INSTRUCCIONES DE SEGURIDAD • Los mecanismos de protección contra descargas eléctricas de componentes con corriente y aislados deben fijarse de forma que no puedan aflojarse sin utilizar herramientas. • Conecte el enchufe a la toma de corriente únicamente cuando haya terminado la instalación.
  • Seite 78: Mantenimiento Y Limpieza

    INSTRUCCIONES DE SEGURIDAD • Si el aparato se instala detrás de un panel de un mueble (por ejemplo una puerta) asegúrese de que la puerta nunca esté cerrada mientras funciona el aparato. El calor y la humedad pueden acumularse detrás de un panel del armario cerrado y provocar daños al aparato, el alojamiento o el suelo.
  • Seite 79: Iluminación Interna

    INSTRUCCIONES DE SEGURIDAD • Las superficies antiadherentes de recipientes, sartenes, bandejas, utensilios, etc., pueden dañarse por las altas temperaturas de la limpieza pirolítica y también pueden ser fuente de humos dañinos de baja intensidad. • Los humos emitidos por todos los hornos pirolíticos y residuos de cocción descritos no son dañinos para las personas, incluidos los niños, o personas con problemas médicos.
  • Seite 80: Descripción Del Producto

    DESCRIPCIÓN DEL PRODUCTO 3. DESCRIPCIÓN DEL PRODUCTO 3.1 Resumen general Panel de mandos Mando de las funciones de cocción Programador electrónico Mando de control Resistencia Bombilla Ventilador Soporte de parrilla extraíble Posiciones de las parrillas 3.2 Accesorios Parrilla Para utensilios de cocina, moldes de pastelería, asados.
  • Seite 81: Cómo Encender Y Apagar El Horno

    CÓMO ENCENDER Y APAGAR EL HORNO Parrilla/sartén para asar Para hornear y asar o como bandeja para grasa. 4. CÓMO ENCENDER Y APAGAR EL HORNO 4.1 Mandos escamoteables Para usar el aparato, presione el mando. El mando sale del alojamiento. 4.2 Panel de mandos Sensores del panel de control Pulse...
  • Seite 82: Antes Del Primer Uso

    ANTES DEL PRIMER USO Indicadores de pantalla Bloqueo Cocción asistida Limpieza Ajustes Calentamiento rápido Indicado‐ res de tem‐ porizador: Barra de progreso - para la temperatura o el tiempo. 5. ANTES DEL PRIMER USO ADVERTENCIA! Consulte los capítulos sobre seguridad. 5.1 Limpieza inicial Antes del primer uso, limpie el horno vacío y ajuste el tiempo: 00:00...
  • Seite 83: Uso Diario

    USO DIARIO 6. USO DIARIO ADVERTENCIA! Consulte los capítulos sobre seguridad. 6.1 Cómo ajustar: Funciones de cocción Empezar a cocinar Paso 1 Paso 2 Seleccione una función de cocción. Ajuste la temperatura. 6.2 Funciones de cocción Funciones de cocción estándar Función de coc‐...
  • Seite 84: Notas Sobre: Horneado Húmedo + Ventilador

    USO DIARIO Función de coc‐ Aplicación ción Para hornear pasteles con base crujiente y conservar alimentos. Calor inferior Para descongelar alimentos (verduras y frutas). El tiempo de descongela‐ ción depende de la cantidad y el tamaño de los alimentos congelados. Descongelar Función diseñada para ahorrar energía durante la cocción.
  • Seite 85: Cocción Asistida Con Recetas

    USO DIARIO Para algunos de los platos, también puede El grado de cocinado de un plato: cocinar con: • Peso automático Cocción asistida - utilícelo para preparar rápidamente un plato con los ajustes predetermi‐ nados: Paso 1 Paso 2 Paso 3 Paso 4 1 - 45 Acceda al menú.
  • Seite 86 USO DIARIO Plato Peso Nivel/accesorio de la parrilla Duración Rosbif, poco 40 min hecho 2 bandeja de hornear 1 - 1,5 kg; Rosbif, al Fría la carne durante unos minutos en piezas de 4 50 min punto una sartén caliente. Introdúzcalo en el - 5 cm horno.
  • Seite 87 USO DIARIO Plato Peso Nivel/accesorio de la parrilla Duración Ternera Asado de ter‐ 0,8 - 1,5 kg; 80 min 2 fuente de asado encendida pa‐ nera (por piezas de 4 rrilla ejemplo, el cm de gro‐ Use sus especias favoritas. Añada líqui‐ hombro) do.
  • Seite 88 USO DIARIO Plato Peso Nivel/accesorio de la parrilla Duración Medio pollo 0,5 - 0,8 kg 40 min 3 ; bandeja de hornear Use sus especias favoritas. Pechuga de 180 - 200 g 25 min 2 cazuela sobre parrilla pollo por pieza Use sus especias favoritas.
  • Seite 89 USO DIARIO Plato Peso Nivel/accesorio de la parrilla Duración Tarta de que‐ 90 minutos Molde desmontable de 28 cm sobre parrilla Tarta de man‐ 45 minutos 3; bandeja zana Tarta de man‐ 40 minutos 2 forma pastel encendida parrilla zana Pastel de 60 minutos pastel de 22 cm en parrilla...
  • Seite 90: Funciones Del Reloj

    FUNCIONES DEL RELOJ Plato Peso Nivel/accesorio de la parrilla Duración Gratinados, pan y pizza Lasaña / Fi‐ 1 - 1,5 kg 45 minutos 2 cazuela sobre parrilla deos Patatas grati‐ 1 - 1,5 kg 50 minutos 1 cazuela sobre parrilla nadas Pizza fresca y 2 bandeja de hornear forrado...
  • Seite 91: Cómo Ajustar: Funciones De Reloj

    FUNCIONES DEL RELOJ Función de reloj Aplicación Tiempo de funcionamiento. El máximo es 23 h 59 min. Esta función no influye en el funcionamiento del horno. Para encender y apagar Tiempo de funcionamiento seleccione: Menú, Ajustes. 7.2 Cómo ajustar: Funciones de reloj Cómo ajustar: Hora Paso 1 Paso 2...
  • Seite 92: Instrucciones De Uso: Accesorios

    INSTRUCCIONES DE USO: ACCESORIOS Cómo ajustar: Tiempo de cocción Paso 1 Paso 2 Paso 3 Paso 4 La pantalla muestra: 0:00 Elija una función Pulse repetida‐ Ajuste el tiempo de cocción y la Pulse: de cocción. mente: temperatura. El temporizador comienza la cuenta atrás inmediatamente. Cómo ajustar: Tiempo de retardo Paso 1 Paso 2...
  • Seite 93: Funciones Adicionales

    FUNCIONES ADICIONALES Parrilla: Inserte la parrilla entre las guías del carril. Bandeja / Bandeja honda: Introduzca la bandeja entre las guías del carril de apoyo. Parrilla, Bandeja / Bandeja honda: Posicione la bandeja entre las guías del carril de apoyo y la parrilla en las guías de encima.
  • Seite 94: Desconexión Automática

    CONSEJOS Esta función impide que se produzca accidentalmente un cambio de la función de horno. - mantenga pulsado para ac‐ - mantenga pulsado para tivar la función. apagarla. Suena una señal. - parpadea cuando se enciende el bloqueo. 9.2 Desconexión automática Por motivos de seguridad, el horno se desactiva transcurrido un tiempo si una función de cocción está...
  • Seite 95: Horneado Húmedo + Ventilador. Accesorios Recomendados

    CONSEJOS (°C) (min) Pasta gratinada 200 - 220 45 - 55 Patatas gratinadas 180 - 200 70 - 85 Moussaka 170 - 190 70 - 95 Lasaña 180 - 200 75 - 90 Canelones 180 - 200 70 - 85 Pudding de pan 190 - 200 55 - 70...
  • Seite 96 CONSEJOS HORNEADO EN UN NIVEL. Horneado en moldes (°C) (min) Bizcocho sin grasa Aire caliente 140 - 150 35 - 50 Bizcocho sin grasa Cocción convencio‐ 35 - 50 Tarta de manzana, 2 Aire caliente 60 - 90 moldes, Ø 20 cm Tarta de manzana, 2 Cocción convencio‐...
  • Seite 97: Mantenimiento Y Limpieza

    MANTENIMIENTO Y LIMPIEZA HORNEADO EN VARIOS NIVELES. Galletas (°C) (min) Mantecados / Pastel de Aire caliente 25 - 45 1 / 4 hojaldre Pastelillos, 20 unidades Aire caliente 23 - 40 1 / 4 por bandeja, precaliente el horno vacío Bizcocho sin grasa Aire caliente 35 - 50...
  • Seite 98: Notas Sobre La Limpieza

    MANTENIMIENTO Y LIMPIEZA 11.1 Notas sobre la limpieza Limpie la parte delantera del horno con un paño suave humedecido en agua templada y jabón suave. Utilice un producto de limpieza para limpiar las superficies metálicas. Agentes lim‐ Limpie las manchas con un detergente suave. piadores Limpie el interior después de cada uso.
  • Seite 99: Instrucciones De Uso: Limpieza Pirolítica

    MANTENIMIENTO Y LIMPIEZA 11.3 Instrucciones de uso: Limpieza pirolítica Limpie el horno con Limpieza pirolítica. ADVERTENCIA! Existe riesgo de quemaduras. PRECAUCIÓN! Si hay otros aparatos instalados en el mismo armario, no los utilice al mismo tiempo que esta función. El horno podría dañarse. Antes de Limpieza pirolítica: Apague el horno y espere Retire todos los accesorios del...
  • Seite 100: Aviso De Limpieza

    MANTENIMIENTO Y LIMPIEZA Cuando termina la limpieza: Apague el horno y espere Seque el interior con un paño Retire los residuos de la parte in‐ a que esté frío. suave. ferior del interior. 11.4 Aviso de limpieza El horno le recuerda que debe limpiarlo con la limpieza pirolítica. Para desactivar el aviso, pulse la tecla Menú...
  • Seite 101: Cómo Cambiar: Bombilla

    MANTENIMIENTO Y LIMPIEZA Paso 4 Sujete el marco de la puerta (B) por el borde superior de la puerta por ambos lados y em‐ puje hacia dentro para soltar el cierre. Paso 5 Tire del borde del acabado de la puerta hacia delante para desengancharla.
  • Seite 102: Solución De Problemas

    SOLUCIÓN DE PROBLEMAS Bombilla superior Paso 1 Gire la tapa de cristal para extraer‐ Paso 2 Limpie la tapa de cristal. Paso 3 Cambie la bombilla por otra apropiada termorresistente hasta 300 °C. Paso 4 Coloque la tapa de cristal. 12.
  • Seite 103: Datos De Servicio

    SOLUCIÓN DE PROBLEMAS Componentes Problema Compruebe que... La bombilla está apagada. Horneado húmedo + ventilador - está encendi‐ La bombilla no funciona. La bombilla se ha fundido. Código de error La pantalla muestra… Compruebe que... Err C3 La puerta del horno está cerrada o el cierre de la puerta no está...
  • Seite 104: Eficacia Energética

    EFICACIA ENERGÉTICA 13. EFICACIA ENERGÉTICA 13.1 Información del producto y hoja de información del producto* Nombre del proveedor BPK535060B 944188596 Identificación del modelo BPK535060M 944188597 Índice de eficiencia energética 81.2 Clase de eficiencia energética Consumo de energía con una carga estándar, modo con‐...
  • Seite 105: Estructura Del Menú

    ESTRUCTURA DEL MENÚ Asegúrese de que la puerta del horno está cerrada cuando el horno funciona. No abra la puerta del horno muchas veces durante la cocción. Mantenga limpia la junta de la puerta y asegúrese de que está bien fijada en su posición. Utilice utensilios de cocina de metal para mejorar el ahorro energético.
  • Seite 106: Aspectos Medioambientales

    ESTRUCTURA DEL MENÚ Ajuste el valor y Seleccione la Confirmar ajus‐ Seleccione el Confirmar ajus‐ Menú, Ajustes. ajuste. pulse Ajustes Hora Cambiar Brillo de la pantalla 1 - 5 Tono de teclas 1 - Pitido Volumen del timbre 1 - 4 2 - Haga clic 3 - Sonido apagado...
  • Seite 107 TABLE DES MATIÈRES POUR DES RÉSULTATS PARFAITS Merci d’avoir choisi ce produit AEG. Nous l’avons conçu pour qu’il vous offre des performances irréprochables pendant de nombreuses années, en intégrant des technologies innovantes vous simplifiant la vie – fonctions que vous ne trouverez peut-être pas sur des appareils ordinaires.
  • Seite 108: Information Sur La Sécurité

    INFORMATION SUR LA SÉCURITÉ 5. AVANT LA PREMIÈRE UTILISATION..117 10.2 Circulation d'air humide - accessoires recommandés....130 5.1 Nettoyage initial......117 10.3 Tableaux de cuisson pour les 5.2 Préchauffage initial...... 117 instituts de tests......... 130 6. UTILISATION QUOTIDIENNE....118 11.
  • Seite 109: Sécurité Générale

    INFORMATION SUR LA SÉCURITÉ physiques, sensorielles ou mentales réduites ou dénuées d’expérience ou de connaissance, s'ils sont correctement surveillés ou si des instructions relatives à l'utilisation de l'appareil en toute sécurité leur ont été données et s’ils comprennent les risques encourus. Les enfants de moins de 8 ans et les personnes ayant un handicap très important et complexe doivent être tenus à...
  • Seite 110: Consignes De Sécurité

    CONSIGNES DE SÉCURITÉ Si le câble d’alimentation secteur est endommagé, son • remplacement doit être confié exclusivement au fabricant, à son service après-vente ou à toute autre personne qualifiée afin d’éviter tout danger électrique. AVERTISSEMENT : Assurez-vous que l'appareil est éteint •...
  • Seite 111: Branchement Électrique

    CONSIGNES DE SÉCURITÉ Hauteur minimale du meuble (Hauteur minimale 578 (600) mm du meuble sous le plan de travail) Largeur du meuble 560 mm Profondeur du meuble 550 (550) mm Hauteur de l’avant de l’appareil 594 mm Hauteur de l’arrière de l’appareil 576 mm Largeur de l’avant de l’appareil 595 mm...
  • Seite 112: Utilisation

    CONSIGNES DE SÉCURITÉ • La protection contre les chocs des parties sous tension et isolées doit être fixée de telle manière qu'elle ne puisse pas être enlevée sans outils. • Ne branchez la fiche secteur dans la prise secteur qu'à la fin de l'installation. Assurez-vous que la prise secteur est accessible après l'installation.
  • Seite 113: Entretien Et Nettoyage

    CONSIGNES DE SÉCURITÉ • Utilisez un plat à rôtir pour des gâteaux moelleux. Les jus de fruits provoquent des taches qui peuvent être permanentes. • Cuisinez toujours avec la porte de l’appareil fermée. • Si l’appareil est installé derrière la paroi d’un meuble (par ex. une porte), veuillez à ce que la porte ne soit jamais fermée lorsque l’appareil fonctionne.
  • Seite 114: Éclairage Interne

    CONSIGNES DE SÉCURITÉ – Ne laissez aucun animal, en particulier aucun oiseau, à proximité de l'appareil pendant et après un nettoyage par pyrolyse ; la première fois, utilisez la température de fonctionnement maximale dans une pièce bien ventilée. • Les animaux de petite taille peuvent également être très sensibles aux changements de température survenant à...
  • Seite 115: Description De L'appareil

    DESCRIPTION DE L'APPAREIL 3. DESCRIPTION DE L'APPAREIL 3.1 Vue d’ensemble Bandeau de commande Manette de sélection des modes de cuisson Affichage Manette de commande Résistance Éclairage Chaleur tournante Support de grille, amovible Niveaux de la grille 3.2 Accessoires Grille métallique Pour les plats de cuisson, les moules à...
  • Seite 116: Comment Allumer Et Éteindre Le Four

    COMMENT ALLUMER ET ÉTEINDRE LE FOUR Plat à rôtir Pour cuire et rôtir ou comme plat pour récupérer la graisse. 4. COMMENT ALLUMER ET ÉTEINDRE LE FOUR 4.1 Manettes rétractables Pour utiliser l'appareil, appuyez sur la manette. La manette sort alors de son logement. 4.2 Bandeau de commande Appuyez sur la Tournez la ma‐...
  • Seite 117: Avant La Première Utilisation

    AVANT LA PREMIÈRE UTILISATION L’affichage avec le nombre maximal de fonc‐ tions réglées. Voyants de l’affichage Touches Cuisson assistée Nettoyage Configurations Préchauffage rapide Verrouil. Voyants du minu‐ teur : Barre de progression - de la température ou de l’heure. 5. AVANT LA PREMIÈRE UTILISATION AVERTISSEMENT! Reportez-vous aux chapitres concernant la sécurité.
  • Seite 118: Utilisation Quotidienne

    UTILISATION QUOTIDIENNE Préchauffez le four à vide avant de l'utiliser pour la première fois. Étape 2 Réglez la température maximale pour la fonction : Laissez le four fonctionner pendant 1 heure. Étape 3 Réglez la température maximale pour la fonction : Laissez le four fonctionner pendant 15 minutes.
  • Seite 119: Remarques Sur : Circulation D'air Humide

    UTILISATION QUOTIDIENNE Mode de cuisson Application Pour cuire et rôtir des aliments sur un seul niveau. Chauffage Haut/Bas Pour rendre croustillants vos plats préparés, tels que frites, pommes quar‐ tiers et nems. Plats Surgelés Pour cuire des pizzas. Pour faire dorer de façon intensive et obtenir un dessous croustillant.
  • Seite 120: Comment Régler : Cuisson Assistée

    UTILISATION QUOTIDIENNE La porte du four doit être fermée pendant la cuisson pour que la fonction ne soit pas interrompue et que le four fonctionne avec la plus grande efficacité énergétique possible. Lorsque vous utilisez cette fonction, l'éclairage s'éteint automatiquement au bout de 30 secondes.
  • Seite 121 UTILISATION QUOTIDIENNE Plat Poids Niveau/Accessoire Durée Bœuf Rôti de bœuf, 40 min saignant 2 ; plateau de cuisson 1 - 1,5 kg ; 4 Rôti de bœuf, Faire frire la viande pendant quelques - 5 cm 50 min à point minutes sur une poêle chaude.
  • Seite 122 UTILISATION QUOTIDIENNE Plat Poids Niveau/Accessoire Durée Filet, saignant (cuisson basse 75 min température) 2 ; plateau de cuisson Servez-vous de vos épices préférées ou Filet, à point 0,5 - 1,5 kg ; simplement du sel et du poivre fraîche‐ (cuisson basse 5 - 6 cm 90 min ment moulu.
  • Seite 123 UTILISATION QUOTIDIENNE Plat Poids Niveau/Accessoire Durée Gigot 1,5 - 2 kg ; 7 130 min 2 ; plat à rôtir sur plateau de cuis‐ d’agneau - 9 cm avec os d’épaisseur Ajoutez du liquide. Retournez la viande à la moitié du temps de cuisson. Volaille Poulet entier 1 - 1,5 kg ;...
  • Seite 124 UTILISATION QUOTIDIENNE Plat Poids Niveau/Accessoire Durée Poisson Poisson en‐ 0,5 - 1 kg 30 min 2 ; plateau de cuisson tier, grillé par poisson Remplissez le poisson avec du beurre et utilisez vos épices et herbes préférées. Filet de pois‐ 20 min 3 ;...
  • Seite 125 UTILISATION QUOTIDIENNE Plat Poids Niveau/Accessoire Durée Quartiers 1 kg 35 min 3 ; plateau de cuisson recouvert de papier sulfurisé Utilisez vos épices préférées. Coupez les pommes de terre en morceaux. Mélange de 1 - 1,5 kg 30 min 3 ; plateau de cuisson recouvert de légumes gril‐...
  • Seite 126: Fonctions De L'horloge

    FONCTIONS DE L'HORLOGE Plat Poids Niveau/Accessoire Durée Tous grains/ 1 kg 60 min 2 ; plateau de cuisson recouvert seigle/pain de papier sulfurisé/grille métallique complet grains entiers dans un mou‐ le à pain 7. FONCTIONS DE L'HORLOGE 7.1 Fonctions de l’horloge Fonctions de l’horlo‐...
  • Seite 127 FONCTIONS DE L'HORLOGE Comment régler Minuteur Étape 1 Étape 2 Étape 3 L’affichage indique : 0:00 Réglez la Minuteur Appuyez sur : Appuyez sur Le minuteur commence son décompte immédiatement. Comment régler Heure de cuisson Étape 1 Étape 2 Étape 3 Étape 4 L’affichage in‐...
  • Seite 128: Conseils D'utilisation : Accessoires

    CONSEILS D'UTILISATION : ACCESSOIRES 8. CONSEILS D'UTILISATION : ACCESSOIRES 8.1 Insertion des accessoires Une petite indentation sur le dessus apporte plus de sécurité. Les indentations sont également des dispositifs anti-bascule. Le rebord élevé de la grille empêche les ustensiles de cuisine de glisser sur la grille.
  • Seite 129: Fonctions Supplémentaires

    FONCTIONS SUPPLÉMENTAIRES 9. FONCTIONS SUPPLÉMENTAIRES 9.1 Touches Verrouil. Cette fonction permet d’éviter une modification involontaire de la fonction du four. Activez-la lorsque le four est allumé - la cuisson réglée est maintenue, le bandeau de commande est verrouillé. Activez-la lorsque le four est éteint - le four ne peut pas être allumé, le bandeau de commande est verrouillé.
  • Seite 130: Circulation D'air Humide - Accessoires Recommandés

    CONSEILS (°C) (min) Gratin de pâtes 200 - 220 45 - 55 Gratin de pommes de terre 180 - 200 70 - 85 Moussaka 170 - 190 70 - 95 Lasagnes 180 - 200 75 - 90 Cannelloni 180 - 200 70 - 85 Pudding au pain 190 - 200...
  • Seite 131 CONSEILS CUISSON SUR UN SEUL NIVEAU. Cuisson dans des moules (°C) (min) Génoise allégée Chaleur tournante 140 - 150 35 - 50 Génoise allégée Chauffage Haut/Bas 35 - 50 Tarte aux pommes, Chaleur tournante 60 - 90 2 moules Ø20 cm Tarte aux pommes, Chauffage Haut/Bas 70 - 90...
  • Seite 132: Entretien Et Nettoyage

    ENTRETIEN ET NETTOYAGE CUISSON SUR PLUSIEURS NIVEAUX. Biscuits/Gâteaux secs (°C) (min) Sablé / Tresses feuille‐ Chaleur tournante 25 - 45 1 / 4 tées Petits gâteaux, 20 par Chaleur tournante 23 - 40 1 / 4 plateau, préchauffer le four à vide Génoise allégée Chaleur tournante 35 - 50...
  • Seite 133: Remarques Concernant L'entretien

    ENTRETIEN ET NETTOYAGE 11.1 Remarques concernant l'entretien Nettoyez la façade du four avec un chiffon doux, de l’eau tiède et un détergent doux. Utilisez une solution de nettoyage pour nettoyer les surfaces métalliques. Agents net‐ Nettoyez les taches avec un détergent doux. toyants Nettoyez la cavité...
  • Seite 134: Comment Utiliser : Nettoyage Par Pyrolyse

    ENTRETIEN ET NETTOYAGE 11.3 Comment utiliser : Nettoyage par pyrolyse Nettoyez le four avec Nettoyage par pyrolyse. AVERTISSEMENT! Risque de brûlure. ATTENTION! Si un autre appareil est installé dans le même meuble, ne l’utilisez pas en même temps que cette fonction. Vous risqueriez d’endommager le four. Avant le Nettoyage par pyrolyse : Éteignez le four et atten‐...
  • Seite 135: Nettoyage Conseillé

    ENTRETIEN ET NETTOYAGE Une fois le nettoyage terminé : Éteignez le four et atten‐ Nettoyez la cavité avec un Retirez les résidus du fond de la dez qu’il soit froid. chiffon doux. cavité. 11.4 Nettoyage conseillé Le four vous rappelle lorsque le nettoyage par pyrolyse est terminé. Pour désactiver le rappel, accédez au Menu et clignote sur l’affichage pendant 5 secondes sélectionnez Configurations, Nettoyage con‐...
  • Seite 136: Comment Remplacer : Éclairage

    ENTRETIEN ET NETTOYAGE Étape 4 Tenez la garniture de porte (B) sur le bord supérieur de la porte des deux côtés et pous‐ sez vers l'intérieur pour libérer le joint du clip. Étape 5 Retirez le cache de la porte en le tirant vers l'avant.
  • Seite 137: Dépannage

    DÉPANNAGE Lampe supérieure Étape 1 Tournez le diffuseur en verre pour le retirer. Étape 2 Nettoyez le diffuseur en verre. Étape 3 Remplacez l'éclairage par une ampoule adaptée résistant à une température de 300 °C. Étape 4 Remettez en place le diffuseur en verre. 12.
  • Seite 138: Données De Maintenance

    DÉPANNAGE Composants Problème Vérifiez si... L'éclairage est éteint. La Circulation d'air humide est activée. L’éclairage ne fonctionne pas. L’ampoule est grillée. Codes d'erreur L’affichage indique… Vérifiez si... Err C3 La porte du four est fermée ou le verrouillage de la porte n’est pas cassé. Err F102 La porte du four est fermée.
  • Seite 139: Rendement Énergétique

    RENDEMENT ÉNERGÉTIQUE 13. RENDEMENT ÉNERGÉTIQUE 13.1 Informations produit et fiche d’informations produit* Nom du fournisseur BPK535060B 944188596 Identification du modèle BPK535060M 944188597 Indice d’efficacité énergétique 81.2 Classe d’efficacité énergétique Consommation d’énergie avec charge standard, en mode 1.09 kWh/cycle conventionnel Consommation d’énergie avec charge standard, en mode 0.69 kWh/cycle...
  • Seite 140: Structure Des Menus

    STRUCTURE DES MENUS Lorsque le four est en marche, assurez-vous que la porte est bien fermée. Évitez d'ouvrir la porte trop souvent pendant la cuisson. Nettoyez régulièrement le joint de porte et assurez-vous qu’il est bien en place. Utilisez des plats en métal pour accroître les économies d'énergie. Dans la mesure du possible, ne préchauffez pas le four avant la cuisson.
  • Seite 141: En Matière De Protection De L'environnement

    STRUCTURE DES MENUS Ajustez la valeur Sélectionnez le Confirmez la Sélectionnez la Confirmez la et appuyez sur Menu , Configu‐ configuration. configuration. configuration. rations. Configurations Heure actuelle Modifier Affichage Luminosi‐ 1 - 5 té Son touches 1 - Bip Volume alarme 1 - 4 2 - Clic 3 - Son dés‐...
  • Seite 142 INDICE PER RISULTATI PERFETTI Grazie per aver scelto di acquistare questo prodotto AEG. Lo abbiamo creato per fornirvi prestazioni impeccabili per molti anni, grazie a tecnologie innovative che vi semplificheranno la vita - funzioni che non troverete sulle normali apparecchiature. Vi invitiamo di dedicare qualche minuto alla lettura per sapere come trarre il massimo dal vostro elettrodomestico.
  • Seite 143 INFORMAZIONI DI SICUREZZA 5. PRIMA DEL PRIMO UTILIZZO....152 10.2 Cottura ventilata umida - accessori consigliati......165 5.1 Pulizia iniziale......152 10.3 Tabelle di cottura per gli istituti 5.2 Preriscaldamento iniziale.....152 di test..........165 6. UTILIZZO QUOTIDIANO......153 11. PULIZIA E CURA........167 6.1 Come impostare: 11.1 Note sulla pulizia......168 Funzioni cottura.........
  • Seite 144: Informazioni Di Sicurezza

    INFORMAZIONI DI SICUREZZA disabilità diffuse e complesse vanno tenuti lontani dall’elettrodomestico, a meno che non vi sia una supervisione continua. I bambini devono essere sorvegliati per assicurarsi che non • giochino con l’apparecchiatura. Tenere gli imballaggi lontano dai bambini e smaltirli in modo •...
  • Seite 145: Istruzioni Di Sicurezza

    ISTRUZIONI DI SICUREZZA autorizzato o da una persona qualificata per evitare situazioni di pericolo elettrico. AVVERTENZA: Assicurarsi che l'elettrodomestico sia • spento prima di sostituire la lampadina per evitare la possibilità di scosse elettriche. AVVERTENZA: L’elettrodomestico e le parti accessibili si •...
  • Seite 146: Collegamento Elettrico

    ISTRUZIONI DI SICUREZZA • L'unità a incasso deve soddisfare i requisiti di stabilità DIN 68930. Altezza minima del mobiletto (mobiletto sotto all'al‐ 578 (600) mm tezza minima del piano di lavoro) Larghezza del mobiletto 560 mm Profondità del moibiletto 550 (550) mm Altezza della parte anteriore dell'apparecchiatura 594 mm Altezza della parte posteriore dell'apparecchiatura...
  • Seite 147 ISTRUZIONI DI SICUREZZA • Evitare che i cavi entrino a contatto o si trovino vicino alla porta dell'apparecchiatura o sulla nicchia sotto all'apparecchiatura, in particolare quando il dispositivo è in funzione o la porta è calda. • I dispositivi di protezione da scosse elettriche devono essere fissati in modo tale da non poter essere disattivati senza l'uso di attrezzi.
  • Seite 148 ISTRUZIONI DI SICUREZZA – Non conservare piatti e alimenti umidi all'interno dell'elettrodomestico dopo aver terminato la cottura. – Prestare attenzione in fase di rimozione o installazione degli accessori. • Lo scolorimento dello smalto o dell'acciaio inox non influisce sulle prestazioni dell'elettrodomestico.
  • Seite 149: Illuminazione Interna

    ISTRUZIONI DI SICUREZZA • A differenza delle persone, alcune specie di uccelli e rettili possono essere estremamente sensibili ai fumi che possono venire prodotti durante il processo di pulizia dei Forni Pirolitici. – Allontanare eventuali animali domestici (in particolare gli uccelli) dall'apparecchiatura durante e dopo la pulizia per Pirolisi e prevedere prima di tutto un funzionamento alla massima temperatura in un'area ben ventilata.
  • Seite 150: Descrizione Del Prodotto

    DESCRIZIONE DEL PRODOTTO 3. DESCRIZIONE DEL PRODOTTO 3.1 Panoramica generale Pannello dei comandi Manopola di regolazione delle funzioni cottura Display Manopola di regolazione Resistenza Lampadina Ventola Supporto ripiano, rimovibile Posizioni ripiano 3.2 Accessori Ripiano a filo Per stoviglie, stampi per dolci, arrosti. Lamiera dolci Per torte e biscotti.
  • Seite 151 COME ACCENDERE E SPEGNERE IL FORNO Leccarda Per cuocere al forno e arrostire o per raccogliere il grasso. 4. COME ACCENDERE E SPEGNERE IL FORNO 4.1 Manopola incassabile Per utilizzare l'apparecchiatura, premere la manopola. La manopola fuoriesce. 4.2 Pannello dei comandi Ruotare la ma‐...
  • Seite 152: Prima Del Primo Utilizzo

    PRIMA DEL PRIMO UTILIZZO Il display col numero massimo di funzioni impo‐ state. Spie display Blocco Cottura guidata Pulizia Impostazioni Riscaldamento rapi‐ Spie timer: Barra di avanzamento - per temperatura o tempo. 5. PRIMA DEL PRIMO UTILIZZO AVVERTENZA! Fare riferimento ai capitoli sulla sicurezza. 5.1 Pulizia iniziale Prima della messa in uso, pulire il forno vuoto e impostare l'ora: 00:00...
  • Seite 153: Utilizzo Quotidiano

    UTILIZZO QUOTIDIANO Preriscaldare il forno vuoto prima di utilizzarlo per la prima volta. Fase 2 Impostare la temperatura massima.per la funzione: Lasciare in funzione il forno per un'ora. Fase 3 Impostare la temperatura massima.per la funzione: Lasciare in funzione il forno per 15 minuti. Il forno può...
  • Seite 154 UTILIZZO QUOTIDIANO Funzione cottura Applicazione Per cuocere e arrostire alimenti su una sola posizione del ripiano. Cottura convenzio‐ nale Per rendere croccanti i cibi confezionati, come ad esempio patatine fritte, crocchette o involtini primavera. Cibi congelati Per cuocere la pizza. Per una doratura intensa e una base croccante. Funzione Pizza Per dorare torte con base croccante e per conservare gli alimenti.
  • Seite 155 UTILIZZO QUOTIDIANO 6.3 Note su: Cottura ventilata umida Questa funzione è stata utilizzata per la conformità alla classe energetica e ai requisiti di ecodesign secondo la normativa UE 65/2014 e UE 66/2014. Test secondo la norma EN 60350-1. La porta del forno dovrebbe essere chiusa in fase di cottura, in modo che la funzione non venga interrotta.
  • Seite 156 UTILIZZO QUOTIDIANO Legenda Livello del ripiano. Al termine della funzione, controllare se il cibo è pronto. Piatto Peso Livello / Accessorio ripiano Durata Manzo Roast beef, al 40 min sangue 1 - 1,5 kg; 2 lamiera dolci Roast beef, pezzi spessi 50 min Friggere la carne per alcuni minuti in una cottura media...
  • Seite 157 UTILIZZO QUOTIDIANO Piatto Peso Livello / Accessorio ripiano Durata Filetto, al san‐ gue (cottura 75 min lenta) 2; teglia da forno 0,5 - 1,5 kg; Utilizzare le spezie preferite o il semplice Filetto, cott. pezzi spessi pepe macinato. Friggere la carne per al‐ media (cottura 90 min 5-6 cm...
  • Seite 158 UTILIZZO QUOTIDIANO Piatto Peso Livello / Accessorio ripiano Durata Pollame Pollo intero 1 - 1,5 kg; 60 min. 2 casseruola su lamiera dolci fresco Utilizzare le spezie preferite. Girare il pol‐ lo a metà cottura per ottenere una dora‐ tura uniforme. Mezzo pollo 0,5 - 0,8 kg 40 min...
  • Seite 159 UTILIZZO QUOTIDIANO Piatto Peso Livello / Accessorio ripiano Durata Filetto di pe‐ 20 min 3; casseruola su ripiano a filo Utilizzare le spezie preferite. Dolci da forno / dessert Cheesecake 90 min. Tortiera apribile da 28 cm su ripiano a filo Torta di mele 45 min 3;...
  • Seite 160 UTILIZZO QUOTIDIANO Piatto Peso Livello / Accessorio ripiano Durata Crocchette, 0,5 kg 25 min 3; lamiera dolci surgelate Patatine, sur‐ 0,75 kg 25 min 3; lamiera dolci gelate Gratin, pane e pizza Lasagne / 1 - 1,5 kg 45 min 2 casseruola su ripiano a filo sformato di spaghetti...
  • Seite 161: Funzioni Del Timer

    FUNZIONI DEL TIMER 7. FUNZIONI DEL TIMER 7.1 Funzioni orologio Funzione Orologio Applicazione Contaminuti. Allo scadere del tempo, viene emesso un segnale acusti‐ Tempo di cottura. Quando il timer arriva alla fine, si sente un segnale e la funzione cottura si ferma. Ritardo.
  • Seite 162 COME USARE: ACCESSORI Come impostare: Tempo di cottura Fase 1 Fase 2 Passaggio 3 Passaggio 4 Il display vi‐ sualizza: 0:00 Selezionare una Impostare la du‐ Premere ripetu‐ funzione di cottura rata della cottu‐ Premere: e impostare la tamente: temperatura. Il timer inizia subito il conto alla rovescia.
  • Seite 163: Funzioni Aggiuntive

    FUNZIONI AGGIUNTIVE Ripiano a filo: Spingere il ripiano fra le guide del suppor‐ Lamiera dolci / Teglia profonda: Spingere la lamiera tra le guide del sup‐ porto ripiano. Ripiano a filo, Lamiera dolci / Teglia profonda: Spingere il vassoio tra le guide del suppor‐ to ripiano e il ripiano a filo sulle guide so‐...
  • Seite 164: Consigli E Suggerimenti Utili

    CONSIGLI E SUGGERIMENTI UTILI Questa funzione evita che si cambi per sbaglio la funzione forno. - tenere premuto per attivare - premere e tenere premuto la funzione. per disattivarla. Viene emesso un segnale acu‐ stico. - lampeggia quando il blocco è attivato. 9.2 Spegnimento automatico Per ragioni di sicurezza, il forno si spegne dopo un determinato periodo di tempo se è...
  • Seite 165 CONSIGLI E SUGGERIMENTI UTILI (°C) (min.) Patate gratinate 180 - 200 70 - 85 Moussaka 170 - 190 70 - 95 Lasagne 180 - 200 75 - 90 Cannelloni 180 - 200 70 - 85 Budino di pane 190 - 200 55 - 70 Budino di riso 170 - 190...
  • Seite 166 CONSIGLI E SUGGERIMENTI UTILI COTTURA SU UN LIVELLO Cottura in stampi (°C) (min) Pan di Spagna senza Cottura ventilata 140 - 150 35 - 50 grassi Pan di Spagna senza Cottura convenzio‐ 35 - 50 grassi nale Torta di mele americana, Cottura ventilata 60 - 90 2 stampi Ø20 cm...
  • Seite 167: Pulizia E Cura

    PULIZIA E CURA COTTURA MULTILIVELLO. Biscotti (°C) (min) Frollini al burro / Strisce di Cottura ventilata 25 - 45 1 / 4 pasta Tortine, 20 per teglia, pre‐ Cottura ventilata 23 - 40 1 / 4 riscaldare il forno vuoto Pan di Spagna senza Cottura ventilata 35 - 50...
  • Seite 168 PULIZIA E CURA 11.1 Note sulla pulizia Pulire la parte anteriore del forno con un panno morbido imbevuto di acqua tie‐ pida e detergente delicato. Servirsi di una soluzione detergente per pulire le superfici metalliche. Agenti di pu‐ Pulire le macchie con un detergente delicato. lizia Pulire la cavità...
  • Seite 169 PULIZIA E CURA 11.3 Istruzioni d'uso: Pulizia per pirolisi Pulire il forno con Pulizia per pirolisi. AVVERTENZA! Rischio di ustioni. ATTENZIONE! Se nello stesso armadietto sono installate altre apparecchiature, non utilizzarle allo stesso tempo di questa funzione. Il forno potrebbe subire danni. Prima della Pulizia per pirolisi: Spegnere il forno e atten‐...
  • Seite 170 PULIZIA E CURA Al termine della pulizia: Spegnere il forno e atten‐ Pulire la cavità con un panno Rimuovere il residuo dal basso dere che si raffreddi. morbido. della cavità. 11.4 Promemoria Pulizia Il forno vi ricorda quando pulirlo con la pulizia pirolitica. Per disattivare il promemoria inserire il Menu e lampeggia sul display per 5 secondi dopo selezionare Impostazioni, Promemoria Pulizia.
  • Seite 171 PULIZIA E CURA Pas‐ Tenere il rivestimento della saggio porta (B) sul bordo superiore della porta da entrambi i lati e spingere verso l'interno per sbloccare la guarnizione a clip. Pas‐ Rimuovere il rivestimento ti‐ saggio randolo in avanti. Pas‐ Afferrare uno ad uno i pannel‐...
  • Seite 172: Risoluzione Dei Problemi

    RISOLUZIONE DEI PROBLEMI Lampadina superiore Passa‐ Girare il rivestimento di vetro per gio 1 toglierlo. Passa‐ Pulire il rivestimento di vetro. gio 2 Passa‐ Sostituire la lampadina con una adatta, termoresistente fino a 300 °C. gio 3 Passa‐ Installare la calotta di vetro. gio 4 12.
  • Seite 173 RISOLUZIONE DEI PROBLEMI Componenti Problema Controllare se... La spia è spenta. Cottura ventilata umida - è acceso. La lampadina non funziona. La lampadina è bruciata. Codici di errore Il display visualizza… Controllare se... Err C3 La porta del forno è chiusa o il blocco della por‐ ta non è...
  • Seite 174: Efficienza Energetica

    EFFICIENZA ENERGETICA 13. EFFICIENZA ENERGETICA 13.1 Informazioni sul prodotto e scheda informativa sul prodotto* Nome del fornitore BPK535060B 944188596 Identificazione modello BPK535060M 944188597 Indice di efficienza energetica 81.2 Classe di efficienza energetica Consumo energetico con carico standard, modalità tradi‐ 1.09 kWh/ciclo zionale Consumo di energia con un carico standard, modalità...
  • Seite 175: Struttura Del Menu

    STRUTTURA DEL MENU Verificare che la porta del forno sia chiusa quando lo stesso è in funzione. Non aprire la porta del forno con eccessiva frequenza in fase di cottura. Tenere pulita la guarnizione della porta e assicurarsi che sia ben fissata nella posizione corretta. Servirsi di pentole in metallo per migliorare il risparmio energetico .
  • Seite 176: Considerazioni Sull'ambiente

    STRUTTURA DEL MENU Regolare il valo‐ Selezionare il Confermare l'im‐ Selezionare l'im‐ Confermare l'im‐ re e premere Menu, Imposta‐ postazione. postazione. postazione. zioni. Impostazioni Imposta ora Modifica Luminosità 1 - 5 Volume toni 1 - Bip Volume acustico 1 - 4 2 - Fare clic 3 - Segnale acustico...
  • Seite 177 INHOUDSOPGAVE VOOR PERFECTE RESULTATEN Bedankt dat je voor dit AEG-product hebt gekozen. We hebben het gecreëerd om jarenlang onberispelijke prestaties te leveren, met innovatieve technologieën die het leven eenvoudiger maken – functies die je wellicht niet op gewone apparaten aantreft. Neem een paar minuten de tijd om het beste uit het apparaat te halen.
  • Seite 178: Veiligheidsinformatie

    VEILIGHEIDSINFORMATIE 5. VOORAFGAAND AAN HET EERSTE 10.2 Warmelucht (vochtig) - GEBRUIK............. 187 aanbevolen accessoires....200 10.3 Kooktafels voor testinstituten..200 5.1 Eerste reiniging......187 5.2 Eerste voorverwarming....187 11. ONDERHOUD EN REINIGING....202 6. DAGELIJKS GEBRUIK......188 11.1 Opmerkingen over schoonmaken........202 6.1 Instellen: Verwarmingsfuncties..188 11.2 Hoe te verwijderen: 6.2 Verwarmingsfuncties....
  • Seite 179: Algemene Veiligheid

    VEILIGHEIDSINFORMATIE instructies hebben gekregen over het veilig gebruiken van het apparaat en indien zij de gevaren begrijpen. Kinderen jonger dan 8 jaar en personen met zware en complexe beperkingen dienen altijd uit de buurt van het apparaat te worden gehouden, tenzij ze voortdurend onder toezicht staan.
  • Seite 180: Veiligheidsvoorschriften

    VEILIGHEIDSVOORSCHRIFTEN vervangen teneinde gevaarlijke situaties met elektriciteit te voorkomen. WAARSCHUWING: Zorg ervoor dat het apparaat is • uitgeschakeld voordat u de lamp vervangt om elektrische schokken te voorkomen. WAARSCHUWING: Het apparaat en de toegankelijke • onderdelen ervan worden heet tijdens het gebruik. U dient te voorkomen de verwarmingselementen aan te raken.
  • Seite 181: Elektrische Aansluiting

    VEILIGHEIDSVOORSCHRIFTEN • De inbouweenheid moet voldoen aan de stabiliteitsvereisten van DIN 68930. Minimumhoogte kast (Minimumhoogte kast onder 578 (600) mm werkblad) Kastbreedte 560 mm Kastdiepte 550 (550) mm Hoogte van de voorkant van het apparaat 594 mm Hoogte van de achterkant van het apparaat 576 mm Breedte van de voorkant van het apparaat 595 mm...
  • Seite 182: Gebruik

    VEILIGHEIDSVOORSCHRIFTEN • De schokbescherming van delen onder stroom en geïsoleerde delen moet op zo'n manier worden bevestigd dat het niet zonder gereedschap kan worden verplaatst. • Steek de stekker pas in het stopcontact als de installatie is voltooid. Zorg ervoor dat het netsnoer na installatie bereikbaar is.
  • Seite 183: Onderhoud En Reiniging

    VEILIGHEIDSVOORSCHRIFTEN • Kook altijd met de deur van het apparaat gesloten. • Als het apparaat achter een meubelpaneel gemonteerd is (bijv. een deur), zorg er dan voor dat de deur nooit gesloten is als het apparaat in werking is. Warmte en vocht kunnen achter een gesloten meubelpaneel ophopen en schade aan het apparaat, de behuizing of de vloer veroorzaken.
  • Seite 184: Binnenverlichting

    VEILIGHEIDSVOORSCHRIFTEN • Kleine huisdieren kunnen ook zeer gevoelig zijn voor de plaatselijke temperatuurwijzigingen in de nabijheid van alle pyrolytische ovens wanneer de pyrolytische reiniging in werking is. • Anti-aanbaklagen in potten en pannen, schalen, keukengerei, enz. kunnen worden beschadigd door de hoge temperatuur van het pyrolytische reinigingsproces van alle pyrolytische ovens en kunnen mogelijk ook kleine hoeveelheden schadelijke gassen veroorzaken.
  • Seite 185: Beschrijving Van Het Product

    BESCHRIJVING VAN HET PRODUCT 3. BESCHRIJVING VAN HET PRODUCT 3.1 Algemeen overzicht Bedieningspaneel Knop voor verwarmingsfuncties Display Bedieningsknop Verwarmingselement Lamp Ventilator Inschuifrails, verwijderbaar Inzetniveaus 3.2 Accessoires Bakrooster Voor kookgerei, bak- en braadvormen. Bakplaat Voor gebak en koekjes. 185/248...
  • Seite 186: Het In- En Uitschakelen Van De Oven

    HET IN- EN UITSCHAKELEN VAN DE OVEN Grill-/braadpan Om te bakken en braden of als een pan om vet in op te vangen. 4. HET IN- EN UITSCHAKELEN VAN DE OVEN 4.1 Verzonken knoppen Om het apparaat te bedienen, moet u de bedieningsknop indrukken. De knop komt dan naar buiten.
  • Seite 187: Voorafgaand Aan Het Eerste Gebruik

    VOORAFGAAND AAN HET EERSTE GEBRUIK De display met het maximumaantal ingestelde functies. Indicatielampjes op de display Blokkering Kook- En Bakas‐ Reinigen Instellingen Snel opwarmen sistent Indicatie‐ lampjes ti‐ mer: Voortgangsbalk - voor temperatuur of tijd. 5. VOORAFGAAND AAN HET EERSTE GEBRUIK WAARSCHUWING! Raadpleeg de hoofdstukken Veiligheid.
  • Seite 188: Dagelijks Gebruik

    DAGELIJKS GEBRUIK Warm de lege oven voor het eerste gebruik voor. Stap 2 Stel de maximale temperatuur in voor de functie: Laat de oven één uur werken. Stap 3 Stel de maximale temperatuur in voor de functie: Laat de oven 15 minuten werken. De oven kan een vreemde geur en rook afgeven tijdens het voorverwarmen.
  • Seite 189 DAGELIJKS GEBRUIK Verwarmingsfunc‐ Toepassing Voor het bakken en roosteren op één ovenniveau. Boven + onder‐ warmte Om kant-en-klaar-gerechten (bijv. patat, aardappelpartjes of loempia's) krokant te maken. Bevroren gerech‐ Voor het bakken van pizza. Voor intensieve bruining en een krokante bo‐ dem.
  • Seite 190: Notities Over: Warmelucht (Vochtig)

    DAGELIJKS GEBRUIK 6.3 Notities over: Warmelucht (vochtig) Deze functie wordt gebruikt om te voldoen aan de energie-efficiëntieklasse en ecodesign- vereisten overeenkomstig EU 65/2014 en EU 66/2014. Testen volgens EN 60350-1. De ovendeur dient tijdens de bereiding gesloten te zijn zodat de functie niet wordt onderbroken en de oven werkt op de hoogst mogelijke energie-efficiëntie.
  • Seite 191 DAGELIJKS GEBRUIK Gerecht Gewicht Rekniveau / accessoire Duur Rundvlees Biefstuk, 40 min rauw 1 - 1,5 kg; 4 2; bakplaat Biefstuk: me‐ - 5 cm dik Bak het vlees een paar minuten op een 50 min dium stukken hete pan. Plaats het in de oven. Biefstuk, gaar 60 min Biefstuk, me‐...
  • Seite 192 DAGELIJKS GEBRUIK Gerecht Gewicht Rekniveau / accessoire Duur Kalfsvlees Geroosterd 0,8 - 1,5 kg; 80 min 2 braadschaal op bakrooster kalfsvlees 4 cm dikke Gebruik je favoriete kruiden. Voeg vloei‐ (bijv. schou‐ stukken stof toe. Geroosterd vlees. der) Varkensvlees Varkens‐ 1,5 - 2 kg 120 min 2 braadschaal op bakrooster...
  • Seite 193 DAGELIJKS GEBRUIK Gerecht Gewicht Rekniveau / accessoire Duur Halve kip 0,5 - 0,8 kg 40 min 3 ; bakplaat Gebruik je favoriete kruiden. Kippenborst 180 - 200 g 25 min 2 stoofschotel op bakrooster per stuk Gebruik je favoriete kruiden. Bak het vlees een paar minuten op een hete pan.
  • Seite 194 DAGELIJKS GEBRUIK Gerecht Gewicht Rekniveau / accessoire Duur Appelcake 45 min 3; bakplaat Appeltaart 40 min 2 taartvorm op bakrooster Appeltaart 60 min 22 cm taartvorm op bakroos‐ Brownies 2 kg 30 min 3; diepe pan Chocolade 25 min 3 muffinbakplaat op bakrooster muffins Broodcake 50 min...
  • Seite 195: Klokfuncties

    KLOKFUNCTIES Gerecht Gewicht Rekniveau / accessoire Duur Aardappelgra‐ 1 - 1,5 kg 50 min 1 stoofschotel op bakrooster Pizza vers, 15 min 2; bakplaat bedekt met bakpapier Pizza vers, 25 min 2; bakplaat bedekt met bakpapier Quiche 45 min 2 bakblik op rooster Stokbrood / 0,8 kg 30 min...
  • Seite 196: Instellen: Klokfuncties

    KLOKFUNCTIES 7.2 Instellen: Klokfuncties Instellen: Dagtijd Stap 1 Stap 2 Stap 3 Om de dagtijd te wijzigen, gaat u naar het Stel de klok in. Druk op: menu en selecteert u Instellingen, Tijd. Instellen: Kookwekker Stap 1 Stap 2 Stap 3 Op het dis‐...
  • Seite 197: Ga Als Volgt Te Werk Voor Gebruik: Accessoires

    GA ALS VOLGT TE WERK VOOR GEBRUIK: ACCESSOIRES Instellen: Uitsteltijd Stap 1 Stap 2 Stap 3 Stap 4 Stap 5 Stap 6 Het dis‐ Op het play display toont: ver‐ de dag‐ schijnt: tijd --:-- Selec‐ Druk her‐ teer de Stel de Stel de STAR‐...
  • Seite 198: Extra Functies

    EXTRA FUNCTIES Bakplaat / Diepe schaal: Schuif de plaat tussen de geleidestangen van de inschuifrail. Bakrooster, Bakplaat / Diepe schaal: Plaats de plaat tussen de geleiders van de inschuifrails en het bakrooster op de gelei‐ ders erboven. 9. EXTRA FUNCTIES 9.1 Blokkering Deze functie voorkomt dat de ovenfunctie per ongeluk wordt ingeschakeld.
  • Seite 199: Koelventilator

    AANWIJZINGEN EN TIPS (°C) 30 - 115 12.5 120 - 195 200 - 245 250 - maximaal De automatische uitschakeling werkt niet met de functies: Binnenverlichting, Uitsteltijd. 9.3 Koelventilator Als de oven in werking is, wordt de koelventilator automatisch ingeschakeld om de oppervlakken van de oven koel te houden.
  • Seite 200: Warmelucht (Vochtig) - Aanbevolen Accessoires

    AANWIJZINGEN EN TIPS (°C) (min) Witbrood 190 - 200 55 - 70 10.2 Warmelucht (vochtig) - aanbevolen accessoires Gebruik de donkere en niet-reflecterende bakjes en schalen. Ze nemen de warmte beter op dan licht en reflecterend servies. Ovenschaal‐ tjes Pizza pan Ovenschotel Blik voor flanbodem Donker, niet-reflecte‐...
  • Seite 201 AANWIJZINGEN EN TIPS BAKKEN OP ÉÉN NIVEAU. Koekjes Gebruik de derde rekstand. (°C) (min) Zandtaartdeeg / Deegreep‐ Hetelucht 25 - 40 jes voor op vlaaien/taarten Zandtaartdeeg / Deegreep‐ Boven + onderwarmte 20 - 30 jes voor op vlaaien/taarten, verwarm de lege oven voor Kleine cakes, 20 stuks per Hetelucht 20 - 35...
  • Seite 202: Onderhoud En Reiniging

    ONDERHOUD EN REINIGING GRILLEN Verwarm de lege oven 5 minuten voor. Grill met de maximale temperatuurinstelling. (min) Toast Grillen 1 - 3 Biefstuk, halverwege de be‐ Grillen 24 - 30 reidingstijd omdraaien 11. ONDERHOUD EN REINIGING WAARSCHUWING! Raadpleeg de hoofdstukken Veiligheid. 11.1 Opmerkingen over schoonmaken Maak de voorkant van de oven schoon met een zachte doek, warm water en een mild reinigingsmiddel.
  • Seite 203: Inschuifrails

    ONDERHOUD EN REINIGING Reinig alle accessoires na elk gebruik en laat ze drogen. Gebruik een zachte doek met warm water en een mild reinigingsmiddel. De accessoires niet in de afwasmachine reinigen. Reinig de antiaanbakaccessoires niet met agressieve reinigingsmiddelen of Accessoires scherpe voorwerpen.
  • Seite 204: Reinigingsherinnering

    ONDERHOUD EN REINIGING Pyrolytische reiniging Stap 1 Ga naar het menu: Reinigen Optie Duur C1 - Licht reinigen C2 - Normaal reinigen 1 h 30 min C3 - Grondig reinigen Stap 2 - druk hierop om het reinigingsprogramma te selecteren. Stap 3 - druk hierop om het reinigen te starten.
  • Seite 205 ONDERHOUD EN REINIGING WAARSCHUWING! De deur is zwaar. LET OP! Behandel het glas voorzichtig, vooral rond de randen van het voorpaneel. Het glas kan breken. Stap 1 Open de deur volledig. Stap 2 Hef en druk de klemhendels (A) op de twee deurscharnie‐ ren.
  • Seite 206: Hoe Te Vervangen: Lamp

    PROBLEEMOPLOSSING 11.6 Hoe te vervangen: Lamp WAARSCHUWING! Gevaar voor elektrische schokken. Het lampje kan heet zijn. Voordat u de lamp vervangt: Stap 1 Stap 2 Stap 3 Schakel de oven uit. Wacht tot Trek de oven uit het stopcon‐ Plaats een doek op de bodem de oven afgekoeld is.
  • Seite 207 PROBLEEMOPLOSSING De oven gaat niet aan of warmt niet op De oven wordt niet warm. De automatische uitschakeling is gedeacti‐ veerd. De oven wordt niet warm. De ovendeur is gesloten. De oven wordt niet warm. De zekering is doorgeslagen. De oven wordt niet warm. Het kinderslot staat uit.
  • Seite 208: Servicegegevens

    Model (MOD.) ......... Productnummer (PNC) ......... Serienummer (S.N.) ......... 13. ENERGIEZUINIGHEID 13.1 Productinformatie en productinformatieblad* Naam leverancier BPK535060B 944188596 Modelnummer BPK535060M 944188597 Energie-efficiëntie-index 81.2 Energie-efficiëntieklasse Energieverbruik met een standaard belading, conventio‐ 1.09 kWh/cyclus nele modus Energieverbruik met een standaard belasting, hetelucht‐...
  • Seite 209: Energiebesparing

    MENUSTRUCTUUR * Voor de Europese Unie overeenkomstig EU-verordeningen 65/2014 en 66/2014. Voor de Republiek Belarus overeenkomstig STB 2478-2017, aanhangsel G; STB 2477-2017, bij‐ lagen A en B. Voor Oekraïne overeenkomstig 568/32020. De energie-efficiëntieklasse is niet van toepassing op Rusland. EN 60350-1 - Huishoudelijke elektrische kooktoestellen - Deel 1: Fornuizen, ovens, stoomovens en grills - Methoden voor het meten van prestaties.
  • Seite 210: Milieubescherming

    MENUSTRUCTUUR Menu-structuur te betreden Kook- En Bakassistent Reinigen Instellingen Stap 1 Stap 2 Stap 3 Stap 4 Stap 5 O1 - O11 Stel de waarde Selecteer de Bevestig de in‐ Selecteer de in‐ Bevestig de in‐ in en druk op Menu, Instellin‐...
  • Seite 211 Registe o seu produto para beneficiar de um serviço melhor: www.registeraeg.com Adquira acessórios, consumíveis e peças de substituição originais para o seu aparelho: www.aeg.com/shop Para mais receitas, sugestões e resolução de problemas, transfira a aplicação My AEG Kitchen. APOIO AO CLIENTE E ASSISTÊNCIA Usar sempre peças sobressalentes de origem.
  • Seite 212: Informações De Segurança

    INFORMAÇÕES DE SEGURANÇA 5. ANTES DA PRIMEIRA UTILIZAÇÃO..221 10.2 Ventilado com Resistência - acessórios recomendados....235 5.1 Limpeza inicial......221 10.3 Tabelas de cozedura para 5.2 Pré-aquecimento inicial....221 testes..........235 6. UTILIZAÇÃO DIÁRIA......222 11. MANUTENÇÃO E LIMPEZA....237 6.1 Como definir: Tipos 11.1 Notas sobre a limpeza....
  • Seite 213: Segurança Geral

    INFORMAÇÕES DE SEGURANÇA idade e pessoas com incapacidades muito extensas e complexas afastadas do aparelho, a menos que sejam constantemente vigiadas. As crianças devem ser vigiadas para garantir que não • brincam com o aparelho. Mantenha todos os materiais de embalagem fora do •...
  • Seite 214: Instruções De Segurança

    INSTRUÇÕES DE SEGURANÇA Assistência Técnica Autorizado ou por uma pessoa igualmente qualificada, para evitar perigos elétricos. AVISO: Certifique-se de que o aparelho está desligado • antes de substituir a lâmpada, para evitar a possibilidade de choque elétrico. AVISO: O forno e as partes acessíveis ficam quentes •...
  • Seite 215: Ligação Elétrica

    INSTRUÇÕES DE SEGURANÇA • A unidade de encastrar tem de cumprir os requisitos de estabilidade da norma DIN 68930. Altura mínima do armário (altura mínima do armá‐ 578 (600) mm rio debaixo do balcão) Largura do armário 560 mm Profundidade do armário 550 (550) mm Altura da parte da frente do aparelho 594 mm...
  • Seite 216: Utilização

    INSTRUÇÕES DE SEGURANÇA • As protecções contra choques eléctricos das peças isoladas e não isoladas devem estar fixas de modo a não poderem ser retiradas sem ferramentas. • Ligue a ficha à tomada elétrica apenas no final da instalação. Certifique-se de que a ficha fica acessível após a instalação.
  • Seite 217: Manutenção E Limpeza

    INSTRUÇÕES DE SEGURANÇA • Se o aparelho ficar instalado atrás de uma porta de armário, nunca feche a porta com o aparelho em funcionamento. Se a porta ficar fechada, poderá ocorrer acumulação de calor e humidade que podem danificar o aparelho, os móveis ou o piso. Não feche a porta do armário enquanto o aparelho não tiver arrefecido completamente após utilização.
  • Seite 218: Iluminação Interna

    INSTRUÇÕES DE SEGURANÇA • As superfícies anti-aderentes de tachos, panelas, assadeiras, utensílios e outros objetos podem ser danificadas pela temperatura elevada da limpeza pirolítica dos fornos pirolíticos, assim como podem ser fonte de fumos nocivos em baixo grau. • Os fumos libertados pelos fornos pirolíticos/resíduos de alimentos não são nocivos para pessoas, incluindo crianças e pessoas enfermas.
  • Seite 219: Descrição Do Produto

    DESCRIÇÃO DO PRODUTO 3. DESCRIÇÃO DO PRODUTO 3.1 Resumo geral Painel de commandos Botão para os tipos de aquecimento Visor Botão de controlo Elemento de aquecimento Lâmpada Ventilador Apoio para prateleira, amovível Nível das prateleiras 3.2 Acessórios Prateleira em grelha Para tachos, formas de bolos, assados.
  • Seite 220: Botões Retráteis

    COMO LIGAR E DESLIGAR O FORNO Tabuleiro para grelhar/assar Para cozer e assar ou como tabuleiro para recolher gordura. 4. COMO LIGAR E DESLIGAR O FORNO 4.1 Botões retráteis Para utilizar o aparelho, prima o botão. O botão fica saliente. 4.2 Painel de commandos Campos do sensor do painel de controlo Prima o botão...
  • Seite 221: Antes Da Primeira Utilização

    ANTES DA PRIMEIRA UTILIZAÇÃO O visor com o número máximo das definições das funções. Indicadores do visor Bloquear Cozedura assis‐ Limpeza Definições Aquecimento rápido tida Indicado‐ res do temporiza‐ dor: Barra de progresso - para temperatura ou tempo. 5. ANTES DA PRIMEIRA UTILIZAÇÃO AVISO! Consulte os capítulos relativos à...
  • Seite 222: Utilização Diária

    UTILIZAÇÃO DIÁRIA Pré-aqueça o forno vazio antes da primeira utilização. Passo 2 Regule a temperatura máxima para a função. Deixe o forno funcionar durante 1 hora. Passo 3 Regule a temperatura máxima para a função. Deixe o forno funcionar durante 15 min. O forno pode emitir algum odor e fumo durante o pré-aquecimento.
  • Seite 223 UTILIZAÇÃO DIÁRIA Tipos de aquecimento normal Tipo de aqueci‐ Aplicação mento Para cozer em até três posições de prateleira ao mesmo tempo e para secar alimentos. Defina a temperatura 20 - 40 °C abaixo da que utiliza com Calor superior/inferior. Ventilado + Resis‐...
  • Seite 224: Notas Sobre: Ventilado Com Resistência

    UTILIZAÇÃO DIÁRIA Tipo de aqueci‐ Aplicação mento Para assar peças de carne grandes ou aves com ossos numa posição da prateleira. Para fazer gratinados e alourar. Grelhador ventila‐ Para entrar no Menu: Cozedura assistida, Limpeza, Definições. Menu 6.3 Notas sobre: Ventilado com Resistência Esta função foi utilizada para cumprir com os requisitos de classe de eficiência energética e design ecológico de acordo com as normas EU 65/2014 e EU 66/2014.
  • Seite 225: Cozedura Assistida Com Receitas

    UTILIZAÇÃO DIÁRIA 6.5 Cozedura assistida com receitas Legenda Peso automático disponível. Pré-aqueça o forno antes de começar a cozinhar. Nível da grelha. Quando a função terminar, verifique se os alimentos estão prontos. Prato Peso Nível da grelha/Acessório Tempo de duração Carne de vaca Carne assada, 40 min...
  • Seite 226 UTILIZAÇÃO DIÁRIA Prato Peso Nível da grelha/Acessório Tempo de duração Carne assada, mal passada 75 min (cozedura len‐ 2 tabuleiro para assar 1 - 1,5 kg; 4 Utilize as suas especiarias preferidas ou Carne assada, - 5 cm de apenas sal e pimenta fresca moída. Frite média (coze‐...
  • Seite 227 UTILIZAÇÃO DIÁRIA Prato Peso Nível da grelha/Acessório Tempo de duração Lombo, fres‐ 1 - 1,5 kg; 5 55 min 2 tabuleiro de assar ligado prateleira - 6 cm de em grelha espessura Utilize as suas especiarias preferidas. de peças grossas Entrecosto 2 - 3 kg;...
  • Seite 228 UTILIZAÇÃO DIÁRIA Prato Peso Nível da grelha/Acessório Tempo de duração Pato inteiro 2 - 3 kg 100 min 2 tabuleiro de assar ligado prate‐ leira em grelha Utilize as suas especiarias preferidas. Coloque a carne no assadeira. Vire o pa‐ to a meio do tempo de cozedura.
  • Seite 229 UTILIZAÇÃO DIÁRIA Prato Peso Nível da grelha/Acessório Tempo de duração Brownies 2 kg 30 min. 3 tabuleiro para grelhar Queques de 25 min 3 tabuleiro de muffins no prateleira chocolate em grelha Bolo de pão 50 min 2 recipiente do pão ligado prateleira em grelha Legumes/Acompanhamentos Batatas assa‐...
  • Seite 230: Funções De Relógio

    FUNÇÕES DE RELÓGIO Prato Peso Nível da grelha/Acessório Tempo de duração Pizza fresca, 2 tabuleiro para assar revestido 15 min fina com papel vegetal Pizza fresca, 2 tabuleiro para assar revestido 25 min espessa com papel vegetal Quiche 45 min 2 forma para bolos prateleira em grelha Baguete / Cia‐...
  • Seite 231: Como Definir: Funções Do Relógio231

    FUNÇÕES DE RELÓGIO 7.2 Como definir: Funções do relógio Como definir: Hora Passo 1 Passo 2 Passo 3 Para alterar a hora do dia, introduza o me‐ Acertar o relógio. Premir: nu e seleccione Definições, Hora do dia. Como definir: Conta-minutos Passo 1 Passo 2 Passo 3...
  • Seite 232: Como Utilizar: Acessórios

    COMO UTILIZAR: ACESSÓRIOS Como definir: Atraso do temporizador Passo Passo 2 Passo 3 Passo 4 Passo 5 Passo 6 O visor apre‐ O visor senta: mostra: hora do --:-- dia. PA‐ Selecio‐ INI‐ Prima re‐ ne a Defina a Defina a CIAR petida‐...
  • Seite 233: Funções Adicionais

    FUNÇÕES ADICIONAIS Tabuleiro para assar / Tabuleiro para grelhar: Introduza o tabuleiro entre as barras-guia do apoio para prateleiras. Prateleira em grelha, Tabuleiro para as‐ sar / Tabuleiro para grelhar: Introduza o tabuleiro entre as barras-guia dos apoios para prateleiras e a prateleira em grelha sobre as barras imediatamente acima.
  • Seite 234: Ventoinha De Arrefecimento

    SUGESTÕES E DICAS (°C) 30 - 115 12.5 120 - 195 200 - 245 250 - máximo A Desativação Automática não funciona com as seguintes funções: Luz, Atraso do temporizador. 9.3 Ventoinha de arrefecimento Quando o forno está a funcionar, a ventoinha de arrefecimento é ativada automaticamente para manter as superfícies do forno frias.
  • Seite 235: Ventilado Com Resistência - Acessórios Recomendados

    SUGESTÕES E DICAS (°C) (min.) Bolo de maçã, feito com massa batida (forma 160 - 170 70 - 80 de bolo redonda) Pão branco 190 - 200 55 - 70 10.2 Ventilado com Resistência - acessórios recomendados Utilize os tabuleiros e recipientes escuros e não refletores. Têm melhor absorção do calor do que a loiça de cor clara e refletora.
  • Seite 236 SUGESTÕES E DICAS COZEDURA NUM NÍVEL Bolos em formas (°C) (min) Tarte de maçã, 2 for‐ Ventilado + Resis‐ 60 - 90 mas, Ø 20 cm tência Circ Tarte de maçã, 2 for‐ Calor superior/inferi‐ 70 - 90 mas, Ø 20 cm COZEDURA NUM NÍVEL Biscoitos Utilize a terceira posição de prateleira.
  • Seite 237: Manutenção E Limpeza

    MANUTENÇÃO E LIMPEZA COZEDURA EM VÁRIOS NÍVEIS Biscoitos (°C) (min) Pão pequeno / Tiras de Ventilado + Resistência 25 - 45 1 / 4 massa folhada Circ Bolos pequenos, 20 por Ventilado + Resistência 23 - 40 1 / 4 tabuleiro, pré-aquecer o Circ forno vazio...
  • Seite 238: Notas Sobre A Limpeza

    MANUTENÇÃO E LIMPEZA 11.1 Notas sobre a limpeza Limpe a parte da frente do forno com um pano macio com água morna e um detergente suave. Utilize uma solução de limpeza para limpar as superfícies metálicas. Agentes de Limpe manchas com um detergente suave. limpeza Limpe a cavidade após cada utilização.
  • Seite 239: Como Utilizar: Limpeza Pirolítica239

    MANUTENÇÃO E LIMPEZA 11.3 Como utilizar: Limpeza pirolítica Limpeza do forno com Limpeza pirolítica. AVISO! Existe o risco de queimaduras. CUIDADO! Se existirem outros aparelhos instalados no mesmo armário, não os utilize enquanto estiver a utilizar esta função. Isso pode danificar o forno. Antes da Limpeza pirolítica: Desligue o forno e aguar‐...
  • Seite 240: Aviso De Limpeza

    MANUTENÇÃO E LIMPEZA Quando a limpeza termina: Desligue o forno e aguar‐ Limpe a cavidade com um pa‐ Retire os resíduos do fundo da de até estar frio. no macio. cavidade. 11.4 Aviso de limpeza O forno avisa quando for necessário limpá-lo com a limpeza pirolítica. Para desligar o aviso, introduza o Menu e se‐...
  • Seite 241: Como Substituir: Lâmpada

    MANUTENÇÃO E LIMPEZA Passo 4 Segure no friso da porta (B) no rebordo superior da porta, nos dois lados, e pressione para dentro para soltar o fe‐ cho de encaixe. Passo 5 Puxe o friso da porta para a frente para o remover. Passo 6 Segure os painéis de vidro da porta, um após o outro, pela...
  • Seite 242: Resolução De Problemas

    RESOLUÇÃO DE PROBLEMAS Lâmpada superior Passo 1 Rode a proteção de vidro para a re‐ tirar. Passo 2 Limpe a proteção de vidro. Passo 3 Substitua a lâmpada por uma lâmpada adequada, resistente ao calor até 300 °C. Passo 4 Instale a proteção de vidro.
  • Seite 243: Dados De Assistência Técnica

    RESOLUÇÃO DE PROBLEMAS Componentes A lâmpada está desligada. Ventilado com Resistência - está ativada. A lâmpada não funciona. A lâmpada está fundida. Códigos de erro O visor mostra… Verificar se... Err C3 A porta do forno está fechada ou o bloqueio da porta não está...
  • Seite 244: Eficiência Energética

    EFICIÊNCIA ENERGÉTICA 13. EFICIÊNCIA ENERGÉTICA 13.1 Informação do produto e ficha informativa do produto* Nome do fornecedor BPK535060B 944188596 Identificação do modelo BPK535060M 944188597 Índice de Eficiência Energética 81,2 Classe de eficiência energética Consumo de energia com uma carga normal, modo con‐...
  • Seite 245: Estrutura Do Menu

    ESTRUTURA DO MENU Certifique-se de que a porta do forno está fechada quando o forno funcionar. Não abra a porta do forno muitas vezes durante o funcionamento. Mantenha a junta da porta limpa e certifique- se de que está bem fixa na posição correta. Utilize recipientes de metal para melhorar a poupança de energia.
  • Seite 246: Preocupações Ambientais

    Ajuste o valor e Selecione o Me‐ Confirme a defi‐ Selecione a defi‐ Confirme a defi‐ nu, Definições. nição. nição. nição. prima Definições Hora Alterar Brilho do visor 1 - 5 Sons “teclado” 1 - Sinal so‐ Volume do alarme 1 - 4 noro 2 - Clique...
  • Seite 247 247/248...
  • Seite 248 www.aeg.com/shop...

Diese Anleitung auch für:

Bpk535060m

Inhaltsverzeichnis