Herunterladen Inhalt Inhalt Diese Seite drucken
Velleman WS3080 Bedienungsanleitung

Velleman WS3080 Bedienungsanleitung

Wetterstation mit solarsender und pc-schnittstelle
Vorschau ausblenden Andere Handbücher für WS3080:
Inhaltsverzeichnis

Werbung

Verfügbare Sprachen
  • DE

Verfügbare Sprachen

  • DEUTSCH, seite 55
WS3080
WEATHER CENTRE WITH SOLAR TRANSMITTER AND PC INTERFACE
WEERSTATION MET ZENDER OP ZONNE-ENERGIE EN PC-INTERFACE
STATION MÉTÉO AVEC ÉMETTEUR SOLAIRE ET INTERFACE PC
ESTACIÓN METEOROLÓGICA CON TRANSMISOR SOLAR E INTERFAZ PC
WETTERSTATION MIT SOLARSENDER UND PC-SCHNITTSTELLE
PROFESJONALNE CENTRUM POGODOWE Z NADAJNIKIEM SŁONECZNYM I
INTERFEJSEM PC
CENTRAL METEOROLÓGICA COM TRANSMISSOR SOLAR E INTERFACE PC
4
17
30
43
55
68
81

Werbung

Inhaltsverzeichnis
loading

Inhaltszusammenfassung für Velleman WS3080

  • Seite 1: Inhaltsverzeichnis

    WS3080 WEATHER CENTRE WITH SOLAR TRANSMITTER AND PC INTERFACE WEERSTATION MET ZENDER OP ZONNE-ENERGIE EN PC-INTERFACE STATION MÉTÉO AVEC ÉMETTEUR SOLAIRE ET INTERFACE PC ESTACIÓN METEOROLÓGICA CON TRANSMISOR SOLAR E INTERFAZ PC WETTERSTATION MIT SOLARSENDER UND PC-SCHNITTSTELLE PROFESJONALNE CENTRUM POGODOWE Z NADAJNIKIEM SŁONECZNYM I INTERFEJSEM PC CENTRAL METEOROLÓGICA COM TRANSMISSOR SOLAR E INTERFACE PC...
  • Seite 2 WS3080 V. 02 – 21/01/2015 ©Velleman nv...
  • Seite 3 WS3080 V. 02 – 21/01/2015 ©Velleman nv...
  • Seite 4: Safety Instructions

    If in doubt, contact your local waste disposal authorities. Thank you for choosing Velleman! Please read the manual thoroughly before bringing this device into service. If the device was damaged in transit, don't install or use it and contact your dealer.
  • Seite 5 WS3080  synchronized instant reception  12 or 24 hour display  perpetual calendar  time zone setting  alarm clock  LED backlight  wall mount or standing free Overview Refer to the illustrations on page 2 and 3 of this manual.
  • Seite 6 WS3080 15. Once testing is completed, you can mount the station on an outdoor pole (not incl.) using the included clamps. Choose a suitable mounting location for the receiver. Commonly, the communication between the two stations can reach a distance of 100m in the open field, provided that there are no obstacles such as buildings, trees, vehicles, high-voltage lines, etc.
  • Seite 7 WS3080 measurement Weather Refer to §8.2 for more information. forecast tendency select tendency tendency pressure threshold set threshold between 2 ~ 4 hPa (default = 2hPa) storm threshold set threshold between 3 ~ 9 hPa (default = 4hPa) Indoor high alarm...
  • Seite 8 WS3080 the alarm icon appears. reset max (both outdoor temperature [12] and max icon (between [14] and [15]) are flashing) press and hold the ENTER button for ±3s to reset max value to current measurement reset min (both outdoor temperature [12] and min icon (between [14] and [15]) are flashing) press and hold the ENTER button for ±3s to reset min value to current...
  • Seite 9: Symbol Overview

    WS3080 Operational notes Initialization RF connection  When batteries are inserted into the base station, it enters RF receiving mode and tries to connect to the sensor for 144s. When connection is established, it will receive data for temperature, humidity, wind speed and rain each 48s, for light intensity each 60s.
  • Seite 10: Reset To Factory Defaults

    WS3080 storm snowstorm clear night cloudy night Pressure sensitivity setting The pressure threshold for weather forecasting can be set from 2 ~ 4hPa (default 2hPa). Areas that experience frequent changes in air pressure require a higher hPa setting compared to areas where the air pressure is more stable.
  • Seite 11 WS3080 4. Click next and select the destination folder (change directory when desired). 5. Click next and the software will be installed automatically. 6. Press OK to finish the installation process. 7. When required, restart the computer. 8. Plug the included USB cable into the USB port on the receiver (left side) and plug the other end into the USB port of the computer.
  • Seite 12 WS3080 System alarm settings  Use this menu to set the alarm limits of the base station.  When finished, click Save to send the data to the base station. It takes about 1 minute for the update to take effect.
  • Seite 13: Language Selection

    WS3080 Min. and max. history values  Use this menu to review and reset minimum and maximum measured values.  Select the desired data entries. It takes about 1 minute for the update to take effect. Language selection  Use this menu to select your language.
  • Seite 14 WS3080 Display history  Use this menu to see the measurement history list.  Set the time interval (condition) in the upper left corner of the display (1 hour, 24 hours, a week, a month or user defined). When user defined is selected, set the desired start and end time.
  • Seite 15 WS3080 Upload data Use this menu to upload data.  Sign up to wunderground.com to upload data to the website.  Select Custom to upload data to your own website. Help option Use this option to see the release version of the EasyWeatherPlus software.
  • Seite 16: Technical Specifications

    United States and other countries. © COPYRIGHT NOTICE The copyright to this manual is owned by Velleman nv. All worldwide rights reserved. No part of this manual may be copied, reproduced, translated or reduced to any electronic medium or otherwise without the prior written consent of the copyright holder.
  • Seite 17: Gebruikershandleiding

    Veiligheidsinstructies Houd buiten het bereik van kinderen en onbevoegden. Algemene richtlijnen Raadpleeg de Velleman ® service- en kwaliteitsgarantie achteraan deze handleiding. Gebruik het toestel enkel binnenshuis. Bescherm tegen regen, vochtigheid en opspattende vloeistoffen.
  • Seite 18 WS3080  gesynchroniseerde ontvangst  12/24 u tijdsweergave  eeuwige kalender  instelbare tijdzone  klok met alarm  achtergrondverlichting met led  muurmontage of vrijstaand gebruik Omschrijving Raadpleeg de figuren op pagina’s 3 en 4 van deze handleiding. bovenste mast...
  • Seite 19 WS3080 voertuigen tussen zender en ontvanger bevinden. Radio-interferentie afkomstig van pc’s, radio- en televisietoestellen kunnen het signaal volledig onderbreken. Opmerkingen  Op de windvaan [E] staat de windrichting aangeduid (“N” = noord, “E” = oost, “S” = zuid en “W” = west).
  • Seite 20 WS3080 drempel luchtdruk stel drempel in tussen 2 ~ 4 hPa (standaard = 2 hPa) drempel storm stel drempel in tussen 3 ~ 9 hPa (standaard = 4 hPa) Vochtigheid alarm hoog stel het hoog alarmniveau in binnenshuis druk op ALARM ON/OFF om het alarm in/uit te schakelen; bij een...
  • Seite 21: Bijkomende Informatie

    WS3080 eenheid kies tussen km/h, mph, m/s, knots of bft (standaard = mph) alarm hoog stel het hoog alarmniveau in druk op ALARM ON/OFF om het alarm in/uit te schakelen; bij een ingeschakeld alarm verschijnt alarmrichting kies de alarmrichting druk op ALARM ON/OFF om het alarm in/uit te schakelen; bij een ingeschakeld alarm verschijnt max.
  • Seite 22 Voor meer informatie, zie www.ptb.de (PTB = Physikalisch-Technische Bundesanstalt). Uw WS3080 zal bij ontvangst van het DCF-signaal de aangegeven tijd automatisch met de atoomklok synchroniseren. Het radiosignaal is gemakkelijk binnenshuis te ontvangen. De ontvangst kan echter verzwakken indien er beton en metaal aanwezig is.
  • Seite 23: Fabrieksinstellingen Herstellen

    WS3080 8.3 Uv-index uv-index uv-intensiteit omschrijving code 0 ~ 2 zeer laag vrijwel geen gevaar groen 3 ~ 5 laag weinig gevaar bij onbeschermde blootstelling geel 6 ~ 7 matig gevaar bij onbeschermde blootstelling oranje 8 ~ 10 hoog verhoogd risico bij onbeschermde blootstelling...
  • Seite 24 WS3080 3. De pc start met het downloaden van alle gegevens op het weerstation. Dit kan enkele minuten duren. Stel het station niet in tijdens dit proces om gegevensverlies te vermijden. Setup  Wijzig alle instellingen van het basisstation en schakel alle alarmen in via dit menu.
  • Seite 25 WS3080 Alarm  Stel alle alarmgegevens in via dit menu.  Klik op SAVE om de wijzigingen op te slaan en ze naar het basisstation door te zenden. Min. en max. waarden  Raadpleeg en herstel alle minimum- en maximumwaarden.
  • Seite 26 WS3080 Taalkeuze  Stel uw taal in via dit menu.  Kies de gewenste taal. History  Raadpleeg de historiek via dit menu.  Stel start- en eindtijd linksboven in.  Klik op SEARCH om de gegevens op te vragen.
  • Seite 27 WS3080 Display graph data Raadpleeg de grafische voorstelling van de gegevens via dit menu.  Kies de gegevens uit het dropdownmenu.  Stel start- en eindtijd linksboven in.  Klik op EXPORT om de grafiek als een JPEG-bestand op te slaan.
  • Seite 28: Technische Specificaties

    WS3080 Help Raadpleeg hier de versie van de software. Opmerking Ga als volgt te werk indien de grafiek niet correct wordt afgebeeld: 1. Ga naar de map EasyWeatherPlus.exe. 2. Open een nieuw tekstbestand (met Notepad of WordPad) en typ: regsvr32 easyweatherplus.ocx 3.
  • Seite 29 ± 1,5 mm Gebruik dit toestel enkel met originele accessoires. Velleman nv is niet aansprakelijk voor schade of kwetsuren bij (verkeerd) gebruik van dit toestel. Voor meer informatie over dit product en de laatste versie van deze handleiding, zie www.velleman.eu.
  • Seite 30: Mode D'emploi

    Consignes de sécurité Garder hors de la portée des enfants et des personnes non autorisées. Directives générales Se référer à la garantie de service et de qualité Velleman ® en fin de cette notice. Utiliser cet appareil uniquement à l'intérieur. Protéger de la pluie, de l’humidité et des projections d’eau.
  • Seite 31 WS3080  alarmes : température, humidité, indice de refroidissement, point de rosée, pluviosité, vitesse du vent, pression atmosphérique, tempête  réception synchronisée  affichage de l'heure au format 12 ou 24 h  calendrier perpétuel  fuseau horaire programmable ...
  • Seite 32 WS3080 15. Une fois le test complété, monter la station sur un mât (non inclus) à l’aide des colliers de serrage inclus. Choisir un emplacement pour le récepteur en tenant compte du fait que la portée peut atteindre la distance de 100 m pourvu qu’il n’y ait aucun obstacle (immeubles, arbres, véhicules, lignes à...
  • Seite 33 WS3080 seuil de pression configurer le seuil entre 2 et 4 hPa (standard = 2 hPa) seuil de tempête configurer le seuil entre 3 et 9 hPa (standard = 4 hPa) Humidité alarme supérieure configurer le niveau de l’alarme supérieure intérieure...
  • Seite 34: Informations Supplémentaires

    WS3080 unité sélectionner l’unité : km/h, mph, m/s, nœuds ou bft (standard = mph) alarme supérieure configurer le niveau de l’alarme supérieure enfoncer ALARM ON/OFF pour activer/désactiver l’alarme ; s’affiche lors d’une alarme activée alarme direction configurer l’alarme de direction du vent enfoncer ALARM ON/OFF pour activer/désactiver l’alarme ;...
  • Seite 35: Prévisions Météo

    WS3080 Le principe du signal DCF Le thermo-hygromètre WS3080 capte un signal radio provenant de la station centrale de Mainflingen en Allemagne. Cette grande onde radio (DCF77 ; 77,5 kHz) transporte les données horaires d’une horloge atomique. Pour plus d’information, consulter le site www.ptb.de (PTB = Physikalisch-Technische Bundesanstalt).
  • Seite 36: Connexion À L'ordinateur

    WS3080 8 ~ 10 haute rapidement rouge très haute très rapidement violet  Remarque : Le tableau ci-dessous affiche des valeurs valables pour un type de peau claire adulte non protégée et n’est qu’une indication. Les enfants et personnes avec une peau sensible risquent des brûlures dès l’exposition à...
  • Seite 37 WS3080 3. Le téléchargement des données se fait de manière automatique. Ceci peut durer quelques minutes. Ne pas régler la station pendant le téléchargement afin d’éviter toute perte de données. Setup  Configurer la station et les alarmes depuis ce menu.
  • Seite 38 WS3080 Alarm  Configurer les données d’alarme depuis ce menu.  Cliquer sur SAVE pour sauvegarder les modifications et les transmettre à la station. Valeurs min. et max.  Consulter et rétablir les valeurs minimales et maximales dans ce menu.
  • Seite 39 WS3080 Sélection de la langue  Sélectionner la langue dans ce menu.  Sélectionner votre langue. Display history  Consulter l’historique depuis ce menu.  Configurer l’heure de début et de fin.  Cliquer sur SEARCH pour appeler les données.
  • Seite 40 WS3080 Graph Afficher une représentation graphique des données depuis ce menu.  Sélectionner les données dans le menu déroulant.  Configurer l’heure de début et de fin.  Cliquer sur SEARCH pour afficher le graphique au format JPEG. Téléchargement de données Télécharger des données dans ce menu.
  • Seite 41 WS3080 Help Consulter ici la version du logiciel EasyWeatherPlus. Remarque Procéder comme suit en cas d’affichage erroné du graphique : 1. Aller vers le fichier EasyWeatherPlus.exe. 2. Ouvrir un nouveau fichier texte (avec Notepad ou WordPad) et taper : regsvr32 easyweatherplus.ocx 3.
  • Seite 42: Spécifications Techniques

    ± 1,5 mm N’employer cet appareil qu’avec des accessoires d’origine. La SA Velleman ne peut, dans la mesure conforme au droit applicable être tenue responsable des dommages ou lésions (directs ou indirects) pouvant résulter de l’utilisation de cet appareil.
  • Seite 43: Instrucciones De Seguridad

    Si tiene dudas, contacte con las autoridades locales para residuos. ¡Gracias por haber comprado el WS3080! Lea atentamente las instrucciones del manual antes de usarlo. Si el aparato ha sufrido algún daño en el transporte no lo instale y póngase en contacto con su distribuidor.
  • Seite 44 WS3080  alarmas: temperatura, humedad, factor de enfriamiento, punto de rocío, pluviosidad, velocidad del viento, presión atmosférica, tormenta  recepción sincronizada  formato de 12 ó 24 horas seleccionable  calendario perpetuo  husos horarios regulables  reloj con alarma ...
  • Seite 45 WS3080 (edificios, árboles, vehículos, líneas de alta tensión, etc.) entre las 2 estaciones. Las ondas electromagnéticas que vienen de ordenadores, radios y televisores también pueden causar interferencias.  Observación:  Asegúrese de que las indicaciones de la veleta [E] (“N” = norte, “E” = este, “S” = sur y “W” = oeste) coincidan con la dirección del viento.
  • Seite 46 WS3080 Humedad alarma superior ajuste el nivel de la alarma superior interior pulse ALARM ON/OFF para activar/desactivar la alarma; se visualiza está activada una alarma alarma inferior ajuste el nivel de la alarma inferior pulse ALARM ON/OFF para activar/desactivar la alarma; se visualiza está...
  • Seite 47: Información Adicional

    WS3080 pulse ALARM ON/OFF para activar/desactivar la alarma; se visualiza está activada una alarma alarma dirección ajuste la alarma de dirección del viento pulse ALARM ON/OFF para activar/desactivar la alarma; se visualiza está activada una alarma reinicialización (les symboles de vitesse du vent [14] et max (entre [14] y [15]) máx.
  • Seite 48: Pronóstico Del Tiempo

    WS3080 El principio de la señal DCF La WS3080 recibe una señal radio de la estación central de Mainflingen en Alemania. Esta gran onda radio (DCF77; 77,5 kHz) transporta los datos horarios de un reloj atómico. Para más información, véase la página web www.ptb.de (PTB = Physikalisch- Technische Bundesanstalt).
  • Seite 49: Restaurar Los Ajustes De Fábrica

    WS3080 8.3 Índice UV índice UV intensidad UV descripción código baja bajo riesgo de que la exposición al sol sin protección verde 0 ~ 2 resulte perjudicial para la salud moderada riesgo moderado de que la exposición al sol sin protección...
  • Seite 50 WS3080 3. Los datos están descargados automáticamente. Esto puede durar algunos minutos. No ajuste la estación durante la descarga para evitar la pérdida de datos. 4. Seleccione el idioma de la interfaz por Display > Language. Setup  Ajuste la estación y las alarmas por este menú.
  • Seite 51 WS3080 Alarm  Ajuste los datos de alarma por este menú.  Haga clic en SAVE para guardar las modificaciones y transmitirlas a la estación. Valores mín. y máx.  Consulte y restaure los valores mín. y máx. en este menú.
  • Seite 52 WS3080 Selección de Idiomas  Utilice este menú para seleccionar el idioma.  Seleccione el idioma deseado. Se necesita aproximadamente 1 minuto para que la actualización surta efecto. History  Consulte el historial por este menú.  Ajuste el intervalo de la parte superior izquierda (1 hora, 24 horas, 1 semana, 1 mes o user defined).
  • Seite 53 WS3080 Cargar datos Utilice este menú para cargar datos.  Regístrese para wunderground.com para cargar datos en la página web.  Seleccione Personalizar para cargar datos en su propia página web. Opción Ayuda Utilice esta opción para ver la versión del software EasyWeatherPlus.
  • Seite 54 ± 1,5 mm Utilice este aparato sólo con los accesorios originales. Velleman NV no será responsable de daños ni lesiones causados por un uso (indebido) de este aparato. Para más información sobre este producto y la versión más reciente de este manual del usuario, visite nuestra página www.velleman.eu. Se pueden modificar las especificaciones y el contenido de este manual sin previo aviso.
  • Seite 55: Einführung

    Falls Zweifel bestehen, wenden Sie sich für Entsorgungsrichtlinien an Ihre örtliche Behörde. Wir bedanken uns für den Kauf des WS3080! Lesen Sie diese Bedienungsanleitung vor Inbetriebnahme sorgfältig durch. Überprüfen Sie, ob Transportschäden vorliegen. Sollte dies der Fall sein, verwenden Sie das Gerät nicht und wenden Sie sich an Ihren Händler.
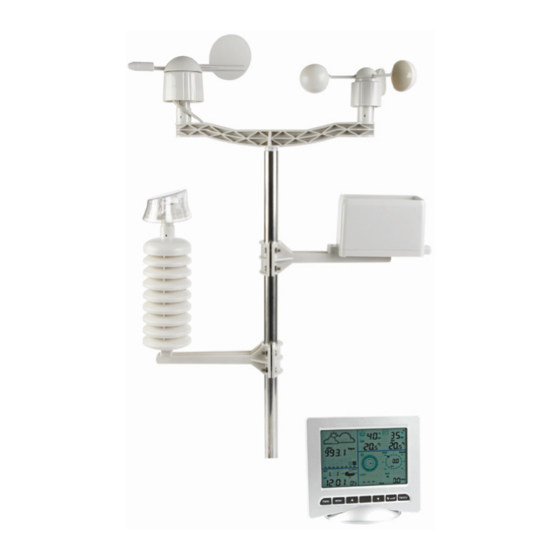
  • Seite 56: Beschreibung

    WS3080  Alarm: Temperatur, Feuchtigkeit, gefühlte Temperatur, Regenfall, Windgeschwindigkeit, Luftdruck, Sturm  synchronisierter Empfang  12/24-Stunden-Anzeige  ewiger Kalender  einstellbare Zeitzone  Uhr mit Alarm  LED-Hintergrundbeleuchtung  Wandmontage oder eigenständiges Gerät Beschreibung Siehe Abbildungen, Seite 3 und 4 dieser Bedienungsanleitung.
  • Seite 57: Funktion

    WS3080 13. Warten Sie bis die zwei Geräte synchronisieren. Dies kann einige Minuten dauern. Drücken Sie während der Synchronisierung auf keine Taste. Überprüfen Sie nach diesem Verfahren, ob alle Teile korrekt funktionieren. 14. Nach dem Testverfahren können Sie die Station mit dem mitgelieferten Befestigungsmaterial am Mast (nicht mitgeliefert) befestigen.
  • Seite 58: Innentemperatur Einheit

    WS3080 halten Sie ENTER gedrückt, um den Maximum-Wert zurückzusetzen Min. zurücksetzen (Luftdruck- [2] und min-Symbol (zwischen [14] und [15]) blinken) halten Sie ENTER gedrückt, um den Minimum-Wert zurückzusetzen Wettervorhersage siehe §8.2 für mehr Information Trend wählen Sie den Trend aus...
  • Seite 59 WS3080 Max. zurücksetzen (Temperatur- [12] und max-Symbol (zwischen [14] und [15]) blinken) halten Sie ENTER gedrückt, um den Maximum-Wert zurückzusetzen Min. zurücksetzen (Temperatur- [12] und min-Symbol (zwischen [14] und [15]) blinken) halten Sie ENTER gedrückt, um den Minimum-Wert zurückzusetzen UV-Index siehe §8.2 für mehr Information...
  • Seite 60: Zusätzliche Informationen

    Die Station empfängt dast Signal am besten zwischen 00:00 Std. und 06:00 Std. Das DCF-Signal Die WS3080 empfängt Radiosignale von der Atomuhr in Mainflingen. Diese DCF77-Signale auf Langwelle (77,5 kHz) enthalten Zeit- und Datuminformation basiert auf Atomuhren. Für mehr Information, siehe www.ptb.de (PTB = Physikalisch- Technische Bundesanstalt).
  • Seite 61: Die Luftdruckempfindlichkeit

    WS3080 Schnee möglich Sturm Schneesturm klare Nacht Nacht: bewölkt Die Luftdruckempfindlichkeit Die Empfindlichkeit kann von 2 bis 4 hPa (Standard 2 hPa) eingestellt werden. Stellen Sie eine niedrigere Empfindlichkeit (4 hPa) ein für ein Gebiet wo der Luftdruck sich viel ändert. Stellen Sie eine höhere Empfindlichkeit (2 hPa) ein für ein Gebiet mit einem stabileren Luftdruck.
  • Seite 62: Die Software Verwenden

    WS3080  Klicken Sie auf NEXT. Die Software wird automatisch installiert.  Klicken Sie auf OK um die Installation zu beenden.  Starten Sie den Rechner neu.  Verbinden Sie den Empfänger über das mitgelieferte USB-Kabel mit dem PC. Die Software verwenden 1.
  • Seite 63: Minimum- Und Maximum-Werte

    WS3080 System alarm settings  Stellen Sie alle Alarmdaten über dieses Menü ein.  Klicken Sie auf SAVE um die Änderungen zu speichern und diese zur Basisstation zu senden. Minimum- und Maximum-Werte  Überprüfen und setzen Sie alle Minimum- und Maximum-Werte zurück.
  • Seite 64 WS3080 Sprache wählen  Verwenden Sie dieses Menü, um Ihre Sprache zu wählen.  Gewünschte Sprache wählen. Es dauert etwa 1 Minute bis die Aktualisierung wirksam wird. Display history  Überprüfen Sie die Übersicht über dieses Menü.  Stellen Sie das Intervall links oben ein (1 Stunde, 24 Stunden, 1 Woche, 1 Monat oder user defined).
  • Seite 65 WS3080 Graph Data Überprüfen Sie die grafische Vorstellung der Daten über dieses Menü.  Gewünschte Daten in der Drop-Down-Liste wählen.  Stellen Sie das Intervall links oben ein (1 Stunde, 24 Stunden, 1 Woche, 1 Monat oder user defined). ...
  • Seite 66: Bemerkung

    WS3080 Hilfe-Option Mit dieser Option können Sie die Version der EasyWeatherPlus-Software anzeigen. Bemerkung Gehen Sie vor wie folgt, wenn die Grafik nicht korrekt angezeigt wird: 1. Gehen Sie zu EasyWeatherPlus.exe. 2. Öffnen Sie eine neue Textdatei (mit Notepad oder WordPad) und geben Sie ein: regsvr32 easyweatherplus.ocx...
  • Seite 67 Genauigkeit Regenfall ± 1,5 mm Verwenden Sie dieses Gerät nur mit originellen Zubehörteilen. Velleman NV übernimmt keine Haftung für Schaden oder Verletzungen bei (falscher) Anwendung dieses Gerätes. Für mehr Informationen zu diesem Produkt und die neueste Version dieser Bedienungsanleitung, siehe www.velleman.eu.
  • Seite 68: Instrukcje Bezpieczeństwa

    Instrukcje bezpieczeństwa Chronić urządzenie przed dziećmi i nieupoważnionymi użytkownikami. Informacje ogólne Proszę zapoznać się z informacjami w części Usługi i gwarancja jakości Velleman® na końcu niniejszej instrukcji. Wyłącznie do użytku wewnątrz pomieszczeń. Chronić wyświetlacz przed deszczem, wilgocią, rozpryskami i ściekającymi cieczami.
  • Seite 69 WS3080 temperaturę punktu rosy: °C, °F wewnętrzną i zewnętrzną wilgotność  alarmy pogodowe: temperatury, wilgotności, temperatury odczuwalnej, temperatury punktu rosy, opadów, prędkości wiatru, ciśnienia powietrza, burzy  zsynchronizowany odbiór ciągły  wyświetlany 12 lub 24-godzinny  kalendarz ciągły  ustawianie strefy czasowej ...
  • Seite 70 WS3080 12. Na górze drugiej podpory bocznej [F] umieścić termohigrometr [J] i zabezpieczyć za pomocą śruby. 13. Zaleca się przetestowanie stacji przed jej montażem na zewnątrz. 14. Poczekać, aż obie stacje się zsynchronizują. Synchronizacja może trwać kilka minut. W czasie synchronizacji nie dotykać...
  • Seite 71 WS3080 uaktywnić/dezaktywować alarm. Po włączeniu pojawi się ikonka alarmu. alarm dla niskich ustawianie poziomu alarmu niskich wartości wartości Wcisnąć przycisk wł./wył. alarmu (ALARM ON/OFF), aby uaktywnić/dezaktywować alarm. Po włączeniu pojawi się ikonka alarmu. resetowanie (miga ikonka ciśnienia [2] oraz wartości maks. (między [14] a [15]) wartości...
  • Seite 72 WS3080 alarmu. resetowanie (miga ikonka wilgotności zewnętrznej [11] i wartości maksymalnej wartości (między [14] a [15]). maksymalnych nacisnąć i przytrzymać przez ±3 sekundy przycisk ENTER, aby zresetować wartość maksymalną dla aktualnej wielkości resetowanie (miga ikonka wilgotności zewnętrznej [11] a wartością minimalną...
  • Seite 73: Uwagi Dotyczące Obsługi

    WS3080 resetowanie (miga ikonka natężenia światła [17] i wartości maksymalnej (między wartości [14] a [15]) maksymalnych nacisnąć i przytrzymać przez ±3 sekundy przycisk ENTER, aby zresetować wartość maksymalną dla aktualnej wielkości deszcz tryb wyświetlania wybór między 1h, 24h, tygodniem, miesiącem lub wartością całkowitą...
  • Seite 74 WS3080 Zasada działania sygnału DCF Termohigrometr wyposażono w odbiornik służący do odbioru sygnału radiowego ze stacji radiowej w Mainflingen, w pobliżu Frankfurtu (Niemcy). Sygnał radiowy nadawany w paśmie fal długich (DCF77, 77.5 kHz), zawierające dane dotyczące daty i godziny, jest zsynchronizowany z zegarem atomowym. Aby uzyskać więcej informacji należy odwołać...
  • Seite 75: Powrót Do Ustawień Fabrycznych

    WS3080 indeks UV Indeks natężenie Opis 0 ~ 2 niska brak niebezpieczeństwa dla osób zielony umiarkowane niewielkie ryzyko obrażeń w wyniku narażenia bez żółty 3 ~ 5 ochrony 6 ~ 7 ekstremalne wysokie ryzyko obrażeń w wyniku narażenia bez ochrony pomarańczowy...
  • Seite 76 WS3080 3. Komputer rozpocznie pobieranie wszystkich danych ze stacji pogodowej. Może to trwać kilka minut. Nie zmieniać ustawień w czasie pobierania, gdyż w przeciwnym razie transmisja danych nie powiedzie się. Setup  W tym menu można zmienić ustawienia stacji bazowej oraz włączyć alarmy.
  • Seite 77 WS3080 Ustawienia alarmu systemu  W menu tym można ustawić limity alarmu dla stacji bazowej.  Po zakończeniu, kliknąć Save , aby wysłać dane do stacji bazowej. Aktualizacja zakończy się po ok. 1 minucie. Min. i maks. wartości historii ...
  • Seite 78: Wybór Języka

    WS3080 Wybór języka  Przy użyciu tego menu wybrać odpowiedni język.  Wybrać wymagany język. Aktualizacja zakończy się po ok. 1 minucie. Wyświetlanie historii  W tym menu można zobaczyć listę historii pomiarów.  Ustawić odstęp czasu (warunek) w lewym górnym rogu wyświetlacza (1 godzina, 24 godziny, tydzień, miesiąc lub zdefiniowany przez użytkownika).
  • Seite 79 WS3080 Wyświetlanie wykresów W tym menu można zobaczyć graficzne przedstawienie wybranych danych.  Wybrać wymagane dane z rozwijanej listy.  Ustawić odstęp czasu (warunek) w lewym górnym rogu wyświetlacza (1 godzina, 24 godziny, tydzień, miesiąc lub zdefiniowany przez użytkownika). Jeśli wybrano odstęp czasu zdefiniowany przez użytkownika, ustawić czas rozpoczęcia i zakończenia.
  • Seite 80: Wykrywanie I Usuwanie Usterek

    Microsoft Corporation w Stanach Zjednoczonych i innych krajach. © INFORMACJA O PRAWACH AUTORSKICH Instrukcja jest własnością firmy Velleman NV i jest chroniona prawami autorskimi. Wszystkie prawa są zastrzeżone na całym świecie. Żadna część niniejszej instrukcji nie może być kopiowana, przedrukowywana, tłumaczona lub przenoszona na nośniki elektroniczne lub w inny sposób, bez uprzedniej pisemnej zgody właściciela praw autorskich.
  • Seite 81: Instruções De Segurança

    Mantenha o aparelho fora do alcance de crianças e pessoas não qualificadas. Normas gerais Consulte a Garantia de serviço e qualidade Velleman® na parte final deste manual do utilizador. Usar apenas em interiores. Mantenha o aparelho protegido da chuva, humidade, gotas ou salpicos.
  • Seite 82 WS3080  alarmes meteorológicos: temperatura, humidade, ventos frios, ponto de orvalho, precipitação, velocidade do vento, pressão do ar, tempestade  recepção sincronizada instantâneamente  formato 12 ou 24 horas  calendário perpétuo  definir fuso horário  relógio com alarme ...
  • Seite 83 WS3080 14. Aguarde até as duas estações estarem sincronizadas. A sincronização pode demorar alguns minutos. Não toque em nenhum botão durante a sincronização. Uma vez terminada a sincronização, verifique se todos os componentes funcionam correctamente. 15. Logo que o teste esteja concluído, pode montar a estação num poste exterior (não incl.) usando os grampos incluídos.
  • Seite 84 WS3080 Mantenha o botão ENTER pressionado durante ±3seg para apatar o valor máx. e indicar o valor actual apagar o valor mín os ícones da pressão [2] e mín (entre [14] e [15]) ficam intermitentes) mantenha o botão ENTER pressionado durante ±3s para apagar o valor mín e indicar o valor actual...
  • Seite 85 WS3080 Pressione o botão ALARM ON/OFF para ligar/desligar o alarme. Se estiver ligado, o ícone de alarme aparece. alarme para valor definir nível do alarme para valor baixo baixo Pressione o botão ALARM ON/OFF para ligar/desligar o alarme. Se estiver ligado, o ícone de alarme...
  • Seite 86 WS3080  Use o botão HISTORY [f] para aceder à memória da estação base. Observação: o intervalo por defeito para a memória de dados é de 30 minutos. Este intervalo só pode ser alterado através do software (consulte a secção ligação ao PC ).
  • Seite 87 WS3080 Tendência da previsão meteorológica Símbolos parcialmente nublado nublado chuvoso neve tempestade tempestade de neve noite clara noite nublada Definir a sensibilidade da pressão O limiar da pressão para previsão meteorológica pode ser definida entre 2 ~ 4hPa (por defeito 2hPa). Áreas que registem alterações frequentes da pressão do ar requerem um hPa mais elevado se comparadas com zonas...
  • Seite 88 WS3080 Ligação ao PC  O receptor suporta até 4,080 entradas de dados meteorológicos (com data e hora) na memória interna. Esta é uma memória não volátil (EEPROM) e será preservada em caso de falha de energia (por ex. substituição das pilhas). Quando a memória está cheia, os novos dados será gravados por cima dos dados mais antigos.
  • Seite 89 WS3080 3. O computador começa a descarregar todos os dados para a estação meteorológica. Pode demorar alguns minutos até estar concluído. Não tente alterar as definições durante este download ou a transferência dos dados falhará. Setup  Use este menu para alterar as definições da estação base e para activar os alarmes.
  • Seite 90 WS3080 Valores mín e máx do histórico  Use este menu para rever e apagar os valores mínimos e máximos medidos.  Selecione as entradas de dados pretendidas. É necessário cerca de 1 minuto para que a actualização produza efeito.
  • Seite 91 WS3080 Seleção de idioma  Utilize este menu para selecionar o seu idioma.  Selecione o idioma pretendido. É necessário cerca de 1 minuto para que a actualização produza efeito. Mostrar histórico  Use este menu para aceder ao histórico das medições em formato de lista.
  • Seite 92 WS3080 Mostrar gráfico de dados Use este menu para ver uma representação gráfica dos dados seleccionados.  Selecione os dados que pretende recuperar a partir da lista.  Determine o período de tempo (condição) no canto superior esquerdo do ecrã (1 hora, 24 horas, uma semana, um mês ou a definir pelo utilizador).
  • Seite 93: Especificações

    WS3080 Opção de Ajuda Escolha esta opção para ver a versão do software EasyWeatherPlus. resolução de problemas Se a função gráfica não estiver a funcionar correctamente, siga os seguintes passos: 1. Localize a pasta que contem o“EasyWeatherPlus.exe”. 2. Crie um ficheiro de texto(usando o notepad ou o WordPad)contento o seguinte: regsvr32 easyweatherplus.ocx...
  • Seite 94 U.S. e em outros países. © DIREITOS DE AUTOR A Velleman NV detém os direitos de autor deste manual do utilizador. Todos os direitos mundiais reservados. É estritamente proibido reproduzir, traduzir, copiar, editar e gravar este manual do utilizador ou partes deste sem prévia autorização escrita por parte da detentora dos direitos.
  • Seite 95 Type or model / type of model / type ou modèle / Typ oder Modell / tipo o modelo / Tipo ou modelo / Typu lub modelu: WS3080 & WS3080/xxx (spare sensors) constituting the subject of this declaration, conforms with the essential requirements and other relevant stipulations...
  • Seite 96 Los datos técnicos están disponibles y pueden ser solicitados a: Os dados técnicos estão disponíveis e podem ser solicitados a: Dane techniczne są dostępne i zostaną udostępnione na życzenie: Velleman NV Legen Heirweg, 33 9890 Gavere (België) Place and date of issue / Plaats en datum van uitgifte / Place et date d’émission / Ort und Datum der Ausstellung / Lugar y fecha de emisión / Local e data de emissão / Miejsce i data sporządzenia:...
  • Seite 97 Velleman®; worden. - se calcula gastos de transporte de y a Velleman® si el aparato ya no está • Bij reparaties buiten de waarborgperiode zullen transportkosten aangerekend cubierto por la garantía.
  • Seite 98 Velleman® Service- und Qualitätsgarantie wymienione wyżej warunki są bez uszczerbku dla wszystkich komercyjnych gwarancji. Seit der Gründung in 1972 hat Velleman® sehr viel Erfahrung als Verteiler in der Powyższe postanowienia mogą podlegać modyfikacji w zależności od Elektronikwelt in über 85 Ländern aufgebaut.

Inhaltsverzeichnis