Herunterladen Inhalt Inhalt Diese Seite drucken
Velleman ED31168 Bedienungsanleitung

Velleman ED31168 Bedienungsanleitung

Drahtlose wetterstation

Werbung

Verfügbare Sprachen
  • DE

Verfügbare Sprachen

ED31168 (WS8707)
WIRELE
ESS WEATHE
DRAAD
DLOOS WEER
STATIO
ON MÉTÉO SA
ESTACI
IÓN METEOR
DRAHT
LOSE WETTE
ER STATION
RSTATION
ANS FIL
ROLÓGICA IN
ERSTATION
NALÁMBRICA
A
3
 
9
 
15
21
 
 
27

Werbung

Inhaltsverzeichnis
loading

Inhaltszusammenfassung für Velleman ED31168

  • Seite 1: Inhaltsverzeichnis

    ED31168 (WS8707) WIRELE ESS WEATHE ER STATION DRAAD DLOOS WEER RSTATION STATIO ON MÉTÉO SA ANS FIL ESTACI IÓN METEOR ROLÓGICA IN NALÁMBRICA DRAHT LOSE WETTE ERSTATION USER M ANUAL   GEBRUI KERSHANDLE EIDING   NOTICE D’EMPLOI MANUAL L DEL USUARI  ...
  • Seite 1: Inhaltsverzeichnis

    ED31168 (WS8707) WIRELE ESS WEATHE ER STATION DRAAD DLOOS WEER RSTATION STATIO ON MÉTÉO SA ANS FIL ESTACI IÓN METEOR ROLÓGICA IN NALÁMBRICA DRAHT LOSE WETTE ERSTATION USER M ANUAL   GEBRUI KERSHANDLE EIDING   NOTICE D’EMPLOI MANUAL L DEL USUARI  ...
  • Seite 2 WS8707 07.10.2010 ©Velleman nv...
  • Seite 2 WS8707 07.10.2010 ©Velleman nv...
  • Seite 3: User Manual

    Refer to an authorized dealer r for service and/ /or spare parts. neral Guidelin Refer to t he Velleman® S Service and Qu ality Warranty on the last page of this ma anual. Keep this dev...
  • Seite 3: User Manual

    Refer to an authorized dealer r for service and/ /or spare parts. neral Guidelin Refer to t he Velleman® S Service and Qu ality Warranty on the last page of this ma anual. Keep this dev...
  • Seite 4 10 outdoor temperature 11 outdoor trend indicator 12 outdoor humidity 13 channel indicator 14 link indicator B DOWN button UP button D SET button ALARM button CHANNEL selector G SNOOZE button 07.10.2010 ©Velleman nv...
  • Seite 4 10 outdoor temperature 11 outdoor trend indicator 12 outdoor humidity 13 channel indicator 14 link indicator B DOWN button UP button D SET button ALARM button CHANNEL selector G SNOOZE button 07.10.2010 ©Velleman nv...
  • Seite 5 • Press the °C/°F selector [S5] to set the temperature scale on the remote LCD [S1] to °C or °F. Note: this setting is only applicable for the temperature indication on the remote sensor itself, not on the clock. • Close the back of the sensor. 07.10.2010 ©Velleman nv...
  • Seite 5 • Press the °C/°F selector [S5] to set the temperature scale on the remote LCD [S1] to °C or °F. Note: this setting is only applicable for the temperature indication on the remote sensor itself, not on the clock. • Close the back of the sensor. 07.10.2010 ©Velleman nv...
  • Seite 6 1°C lower than the recorded value, the arrow will point down and the current temperature becomes the recorded. In all other cases, the arrow will be flat. Note: the recorded temperature is set to the current temperature at start-up or reset of the weather station. raising steady falling 07.10.2010 ©Velleman nv...
  • Seite 6 1°C lower than the recorded value, the arrow will point down and the current temperature becomes the recorded. In all other cases, the arrow will be flat. Note: the recorded temperature is set to the current temperature at start-up or reset of the weather station. raising steady falling 07.10.2010 ©Velleman nv...
  • Seite 7 After replacing the batteries on the remote sensor, press and hold the channel button [F] on the weather station for ±2s to clear all previous sensor data. Than press the test button [S3] on the remote senor to re- establish connection. • Close the back of the sensor. 07.10.2010 ©Velleman nv...
  • Seite 7 After replacing the batteries on the remote sensor, press and hold the channel button [F] on the weather station for ±2s to clear all previous sensor data. Than press the test button [S3] on the remote senor to re- establish connection. • Close the back of the sensor. 07.10.2010 ©Velleman nv...
  • Seite 8 © COPYRI IGHT NOTICE This manu ual is copyrighted. . The copyright to this manual is ow wned by Velleman nv. All worl ldwide rights reserv ved. No part of this m manual may be cop ied, reproduced, translated o...
  • Seite 8 © COPYRI IGHT NOTICE This manu ual is copyrighted. . The copyright to this manual is ow wned by Velleman nv. All worl ldwide rights reserv ved. No part of this m manual may be cop ied, reproduced, translated o...
  • Seite 9: Gebrui Kershandle Eiding

    ® Raadpleeg g de Velleman service- en kw waliteitsgarantie e achteraan deze handleidin Bescherm t tegen regen, voc htigheid en opsp attende vloeistoffen...
  • Seite 9: Gebrui Kershandle Eiding

    ® Raadpleeg g de Velleman service- en kw waliteitsgarantie e achteraan deze handleidin Bescherm t tegen regen, voc htigheid en opsp attende vloeistoffen...
  • Seite 10 (4 aanduidingen) trendweergave binnenshuis comfortweergave binnentemperatuur vochtigheidsgraad binnenshuis 10 buitentemperatuur 11 trendweergave buitenshuis 12 vochtigheidsgraad buitenshuis 13 kanaal 14 ontvangstsymbool B DOWN C UP D SET ALARM CHANNEL G SNOOZE 07.10.2010 ©Velleman nv...
  • Seite 11 [14] en zal de klok eenmaal piepen. • Druk op de selectieknop °C/°F [S5] om de meeteenheid op de sensor [S1] te selecteren. Opmerking: Enkel geldig voor de meeteenheid op de sensor en niet voor die op de klok zelf. 07.10.2010 ©Velleman nv...
  • Seite 12 Is de huidige temperatuur minstens 1°C lager dan de gemeten temperatuur, dan zal de pijl naar beneden wijzen en de huidige temperatuur in het geheugen opgenomen worden. In alle andere gevallen wijst de pijl naar rechts. 07.10.2010 ©Velleman nv...
  • Seite 13 -symbool op de display verschijnt. • Open het batterijvak en plaats twee nieuwe AAA-batterijen van elk 1,5 V (niet meegeleverd) volgens de polariteitaanduidingen. • Sluit het batterijvak. Sensor • Open het batterijvak achteraan de sensor (schuif het deksel naar onder). 07.10.2010 ©Velleman nv...
  • Seite 14 235 g sensor 86 g Gebruik dit toestel enke el met originele e accessoires. V Velleman nv is niet aans sprakelijk voor schade of kwe tsuren bij (verk keerd) gebruik van dit to oestel. Voor me eer informatie o...
  • Seite 15: Notice D'emploi

    éclinera toute respons sabilité pour les p problèmes et les défauts qui en ré ésultent. 07.10.2010 ©Velleman...
  • Seite 16 10 température extérieure 11 tendance extérieure 12 taux d’humidité extérieure 13 canal 14 réception B touche DOWN C touche UP D touche SET touche ALARM touche CHANNEL G touche SNOOZE 07.10.2010 ©Velleman nv...
  • Seite 17 • Enfoncer le bouton de test [S3] pour établir la connexion entre le capteur et l’horloge. Le symbole s’affiche [14] et l’horloge émet une tonalité lors d’une bonne réception. • Enfoncer le sélecteur °C/°F [S5] pour sélectionner l’unité de mesure [S1]. 07.10.2010 ©Velleman nv...
  • Seite 18 1°C plus basse que la température de référence. Dans les autres cas, la flèche pointera vers la droite. Remarque : La température actuelle devient automatiquement la 07.10.2010 ©Velleman nv...
  • Seite 19 Remplacer les piles dès que le symbole s’affiche. • Ouvrir le compartiment des piles et y insérer deux nouvelles piles de 1,5 V type R03 (non incluse) selon les indications de polarité. • Refermer le compartiment des piles. 07.10.2010 ©Velleman nv...
  • Seite 20 235 g capteur 86 g N’employ yer cet apparei l qu’avec des a ccessoires d’or rigine. SA Velleman n ne sera aucun nement respons sable de domm mages ou lésions survenus s à un usage (in ncorrect) de ce t appareil. Pou r plus d’inform...
  • Seite 21: Manuall Del Usuari Io

    ® Véase la G Garantía de ser rvicio y calidad Velleman al fi inal de este manual de el usuario. No exponga este equipo a llu via, humedad ni a ningún tipo de salpicadura o o goteo.
  • Seite 22: Características

    10 temperatura exterior 11 visualización de la tendencia de la temperatura exterior 12 humedad exterior 13 canal 14 recepción B tecla DOWN C tecla UP D tecla SET tecla ALARM tecla CHANNEL G tecla SNOOZE 07.10.2010 ©Velleman nv...
  • Seite 23 El símbolo se visualiza [14] y el reloj emite un tono si hay una buena recepción. • Pulse el selector °C/°F [S5] para seleccionar la unidad de medición [S1]. Observación: Es sólo válido para la visualización del sensor. 07.10.2010 ©Velleman nv...
  • Seite 24 1°C más baja que la temperatura medida. En cualquier otro caso, la flecha apunta hacia la derecha. Nota: La temperatura actual vuelve automáticamente la temperatura medida al activar o reinicializar el reloj. 07.10.2010 ©Velleman nv...
  • Seite 25 Vuelva a cerrar el compartimiento de pilas. Sensor • Abra el sensor al deslizar la tapa de la parte trasera hacia abajo. • Introduzca dos pilas AAA de 1,5 V en el compartimiento de pilas. ¡Respete la polaridad! 07.10.2010 ©Velleman nv...
  • Seite 26 Utilice es ste aparato sólo o con los acces orios originales s. Velleman NV no será r responsable de daños ni lesion nes causados p por un uso (indebido o) de este apar rato. Para más información so...
  • Seite 27: Bedien Ungsanleitu Ung

    Garant tieanspruch. • Verwen nden Sie das Ger rät nur für Anwen ndungen beschrie eben in dieser Bedien ungsanleitung so onst kann dies zu u Schäden am Pro odukt führen und erlischt t der Garantieans spruch. 07.10.2010 ©Velleman...
  • Seite 28: Eigenschaften

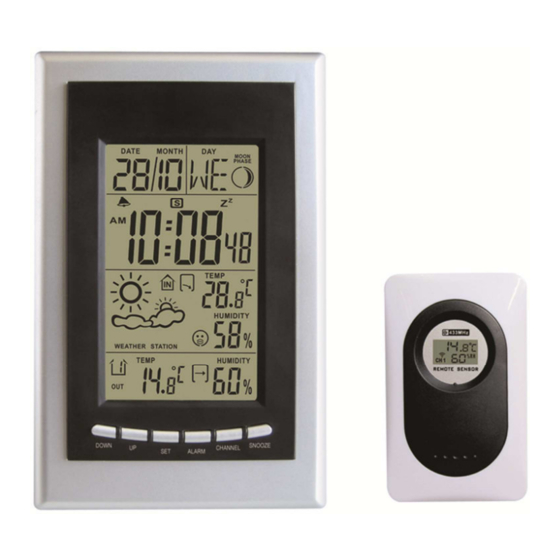
    Batterie Alarm eingeschaltet Wettervorhersage (4 Anzeigen) Anzeige der Temperaturtendenz im Innenbereich Komfortanzeige Innentemperatur Feuchtigkeit im Innenbereich 10 Außentemperatur 11 Anzeige der Temperaturtendenz im Außenbereich 12 Feuchtigkeit im Außenbereich 13 Kanal 14 Empfang B DOWN-Taste UP-Taste D SET-Taste 07.10.2010 ©Velleman nv...
  • Seite 29: Einstellen Sielungen

    Der Kanal wird im LCD-Bildschirm [13] angezeigt. • Drücken Sie den Testknopf [S3] um den Empfang zwischen der Uhr und dem Sensor zu prüfen. Bei gutem Empfang erscheint ein Symbol LCD-Bildschirm [14] und ertönt ein Mal ein Signal. 07.10.2010 ©Velleman nv...
  • Seite 30 Temperatur mindestens 1°C höher als die gemessene Temperatur, dann zeigt der Pfeil nach oben und ist die aktuelle Temperatur gespeichert worden. Ist die aktuelle Temperatur mindestens 1°C niedriger als die gemessene Temperatur, dann zeigt der Pfeil nach unten und ist die 07.10.2010 ©Velleman nv...
  • Seite 31: Wartung

    • Ersetzen Sie die Batterien wenn das -Symbol im Display erscheint. • Öffnen Sie das Batteriefach und legen Sie zwei neue AAA-Batterien von je 1,5V (nicht mitgeliefert) ein. Respektieren Sie die Polarität. • Schließen Sie das Batteriefach. 07.10.2010 ©Velleman nv...
  • Seite 32: Urhebe Errecht

    Gewicht Haupt einheit 235g Senso Verwend den Sie dieses G Gerät nur mit or riginellen Zube ehörteilen. Velleman n NV übernimm mt keine Haftun ng für Schaden oder Verletzun ngen bei (falsc her) Anwendun ng dieses Gerät tes. Für mehr...
  • Seite 33 Konformität tserklärung Declara ación de con formidad R& &TTE We / wij / n nous / Wir / nostros Velleman NV Legen Heirweg, 33 9890 Gavere (Belg gië) Declare on our own responsibil lity that the finished d product(s): Verklaren o...
  • Seite 34 Technische gegevens zijn beschikbaar en kunnen worden aangevraagd bij: Die technische Dokumentation zu den oben gennanten Produkten wird geführt bei: Los datos técnicos están disponibles y pueden ser solicitados a: Velleman NV Legen Heirweg, 33 9890 Gavere (België) Place and date of issue / Plaats en datum van uitgifte / Place et date d’émission / Ort und Datum der Ausstellung / Lugar y fecha de emisión:...
  • Seite 35 The above enumeration is subject to • Velleman® can decide to replace an article modification according to the article (see with an equivalent article, or to refund the article’s manual).
  • Seite 36 50% van de kostprijs of Velleman® terugbetaling van 50 % bij ontdekking na één jaar tot 2 jaar. Velleman® jouit d’une expérience de plus de • Valt niet onder waarborg: 35 ans dans le monde de l’électronique avec - alle rechtstreekse of onrechtstreekse une distribution dans plus de 85 pays.
  • Seite 37 SA Velleman® ; - frais de En este caso, recibirá un artículo de recambio transport de et vers Velleman® si l’appareil o el reembolso completo del precio de n’est plus couvert sous la garantie.
  • Seite 38 Kaufsumme ganz oder - se calcula gastos de transporte de y a teilweise zurückzuzahlen. In diesem Fall Velleman® si el aparato ya no está cubierto erhalten Sie ein Ersatzprodukt oder eine por la garantía. Rückzahlung im Werte von 100% der Kaufsumme im Falle eines Defektes bis zu 1 •...
  • Seite 39 mit dem Original-Kaufbeleg vor. Fügen Sie eine deutliche Fehlerumschreibung hinzu. • Hinweis: Um Kosten und Zeit zu sparen, lesen Sie die Bedienungsanleitung nochmals und überprüfen Sie, ob es keinen auf de Hand liegenden Grund gibt, ehe Sie das Gerät zur Reparatur zurückschicken. Stellt sich bei der Überprüfung des Geräts heraus, dass kein Geräteschaden vorliegt, könnte dem Kunden eine Untersuchungspauschale...

Diese Anleitung auch für:

Ws8707

Inhaltsverzeichnis