Herunterladen Inhalt Inhalt Diese Seite drucken
Optika Italy ECOVISION-Serie Bedienungsanleitung
Vorschau ausblenden Andere Handbücher für ECOVISION-Serie:
Inhaltsverzeichnis

Werbung

Verfügbare Sprachen
  • DE

Verfügbare Sprachen

  • DEUTSCH, seite 62
ECOVISION Series
INSTRUCTION MANUAL
Model
B-20R
B-20CR
M-100FX
M-100FLed
Ver. 2.1
2022

Werbung

Inhaltsverzeichnis
loading

Inhaltszusammenfassung für Optika Italy ECOVISION-Serie

  • Seite 1 ECOVISION Series INSTRUCTION MANUAL Model B-20R B-20CR M-100FX M-100FLed Ver. 2.1 2022...
  • Seite 2: Inhaltsverzeichnis

    Table of contents Warning Safety Information Unpacking Intended use Symbols and conventions Instrument description B-20R B-20CR M-100FX M-100FLed Assembling Microscope assembling 7.1.1 Installing the batteries (M-100FLed) 7.1.2 Installing the batteries (B-20R / B-20CR) Use of the microscope Switching on the microscope 8.1.1 B-20R / B-20CR / M-100FX 8.1.2...
  • Seite 3: Warning

    Warning This microscope is a scientific precision instrument designed to last for many years with a minimum of maintenance. It is built to high optical and mechanical standards and to withstand daily use. We remind you that this manual contains important information on safety and maintenance, and that it must therefore be made accessible to the instrument users.
  • Seite 4: Instrument Description

    Instrument description B-20R EYEPIECE OBSERVATION HEAD LOCK SCREW NOSEPIECE CARRYING HANDLE OBJECTIVE MAIN BODY SLIDE CLAMP STAGE COARSE FOCUSING KNOB CONDENSER FINE FOCUSING KNOB ILLUMINATOR Page 4...
  • Seite 5: B-20Cr

    B-20CR EYEPIECE OBSERVATION HEAD LOCK SCREW CARRYING HANDLE NOSEPIECE OBJECTIVE MAIN BODY SLIDE CLAMP STAGE FINE FOCUSING KNOB STAGE KNOBS CONDENSER COARSE FOCUSING KNOB ILLUMINATOR APERTURE DIAPHRAGM Page 5...
  • Seite 6: M-100Fx

    M-100FX EYEPIECE OBSERVATION HEAD LOCK SCREW NOSEPIECE OBJECTIVE MAIN BODY SLIDE CLAMP STAGE CONDENSER APERTURE COARSE DIAPHRAGM FOCUSING KNOB ILLUMINATOR FINE FOCUSING KNOB Page 6...
  • Seite 7: M-100Fled

    M-100FLed EYEPIECE OBSERVATION HEAD LOCK SCREW NOSEPIECE OBJECTIVE MAIN BODY SLIDE CLAMP STAGE CONDENSER APERTURE COARSE FOCUSING KNOB DIAPHRAGM ILLUMINATOR FINE FOCUSING KNOB ON-OFF / BRIGHTNESS ADJUSTMENT KNOB Page 7...
  • Seite 8: Assembling Microscope Assembling

    Assembling Microscope assembling The microscope comes already assembled from the factory. No assembling procedure is requested. 7.1.1 Installing the batteries (M-100FLed) • It is necessary to use 3x AA rechargeable NiMh 1.2V. 1. Remove the cover (Fig. 1) and insert the batteries (not pro- vided), respecting the polarity.
  • Seite 9: Use Of The Microscope

    Use of the microscope Switching on the microscope 8.1.1 B-20R / B-20CR / M-100FX 1. Operate on the main switch ① placed in the rear side of the microscope, moving the selector on “I”. (Fig. 4) F ig. 4 ig. 4 ①...
  • Seite 10: Placing The Specimen

    Placing the specimen 8.3.1 B-20R / M-100FX / M-100FLed 1. Place the specimen on the stage and secure it using the stage clips ①. (Fig. 7). ① F ig. 7 ig. 7 8.3.2 B-20CR Stage accepts standard slides 26 x 76 mm, thickness 1,2 mm with coverslide 0,17 mm.
  • Seite 11: Aperture Diaphragm

    Aperture diaphragm • The Numerical Aperture (N.A.) value of the aperture dia- phragm affects the image contrast. Increasing or reducing this value one can vary resolution, contrast and depth of fo- cus of the image. Move the diaphragm ring ① (Fig. 10) on the value corresponding to the objective in use.
  • Seite 12: Maintenance

    Maintenance Microscopy environment This microscope is recommended to be used in a clean, dry and shock free environment with a temperature of 5°- 40°C and a maximum relative humidity of 85 % (non condensing). Use a dehumidifier if needed. To think about when and after using the microscope •...
  • Seite 13: 10. Troubleshooting

    10. Troubleshooting Review the information in the table below to troubleshoot operating problems. PROBLEM CAUSE SOLUTION I. Optical Section: LED operates, but field of view remains Power supply is unplugged. Connect dark. Brightness is too low Set brightness to a proper level Batteries discharged Charge the batteries Dirt or dust is visible in the field of view.
  • Seite 14: Equipment Disposal

    Equipment disposal Art.13 Dlsg 25 July 2005 N°151. “According to directives 2002/95/EC, 2002/96/EC and 2003/108/EC relating to the reduc- tion in the use of hazardous substances in electrical and electronic equipment and waste disposal.” The basket symbol on equipment or on its box indicates that the product at the end of its useful life should be collected sepa- rately from other waste.
  • Seite 15 OPTIKA S.r.l. ® Via Rigla, 30 - 24010 Ponteranica (BG) - ITALY Tel.: +39 035.571.392 info@optikamicroscopes.com - www.optikamicroscopes.com OPTIKA Spain spain@optikamicroscopes.com OPTIKA USA usa@optikamicroscopes.com OPTIKA China china@optikamicroscopes.com OPTIKA India india@optikamicroscopes.com OPTIKA Central America camerica@optikamicroscopes.com...
  • Seite 16 Serie ECOVISION MANUALE DI ISTRUZIONI Modello B-20R B-20CR M-100FX M-100FLed Ver. 2.1 2022...
  • Seite 17 Sommario Avvertenza Informazioni sulla sicurezza Disimballaggio Utilizzo previsto Simboli Descrizione dello strumento B-20R B-20CR M-100FX M-100FLed Assemblaggio Procedura di assemblaggio 7.1.1 Montaggio delle batterie (M-100FLed) 7.1.2 Montaggio delle batterie (B-20R / B-20CR) Uso del microscopio Accensione del microscopio 8.1.1 B-20R / B-20CR / M-100FX 8.1.2 M-100FLed Regolazione dell’intensità...
  • Seite 18: Avvertenza

    Avvertenza Questo microscopio è uno strumento scientifico di alta precisione, progettato per durare a lungo con una minima manutenzione; la realizzazione è secondo i migliori standard ottici e meccanici, per poter essere utilizzato quotidianamente. Vi ricordiamo che questo manuale contiene informazioni importanti per la sicurezza e per la manutenzione dello strumento, e deve quindi essere messo a disposizione di coloro che lo utilizzeranno.
  • Seite 19: Descrizione Dello Strumento

    Descrizione dello strumento B-20R OCULARE TESTA DI OSSERVAZIONE VITE DI BLOCCO REVOLVER MANIGLIA DI TRASPORTO OBIETTIVI STATIVO MOLLETTINE TAVOLINO MANOPOLA MACROMETRICA CONDENSATORE MANOPOLA MICROMETRICA ILLUMINATORE Pagina 19...
  • Seite 20: B-20Cr

    B-20CR OCULARE TESTA DI OSSERVAZIONE VITE DI BLOCCO MANIGLIA DI TRASPORTO REVOLVER OBIETTIVI STATIVO MOLLETTINE TAVOLINO MANOPOLA MICROMETRICA MANOPOLE TAVOLINO CONDENSATORE MANOPOLA MACROMETRICA ILLUMINATORE DIAFRAMMA DI APERTURA Pagina 20...
  • Seite 21: M-100Fx

    M-100FX OCULARE TESTA DI OSSERVAZIONE VITE DI BLOCCO REVOLVER OBIETTIVI STATIVO MOLLETTINE TAVOLINO CONDENSATORE MANOPOLA DIAFRAMMA DI MACROMETRICA APERTURA ILLUMINATORE MANOPOLA MICROMETRICA Pagina 21...
  • Seite 22: M-100Fled

    M-100FLed OCULARE TESTA DI OSSERVAZIONE VITE DI BLOCCO REVOLVER OBIETTIVI STATIVO MOLLETTINE TAVOLINO CONDENSATORE MANOPOLA DIAFRAMMA DI MACROMETRICA APERTURA ILLUMINATORE MANOPOLA MICROMETRICA MANOPOLA ACCENSIONE / REGOLAZIONE LUMINOSITÀ Pagina 22...
  • Seite 23: Assemblaggio

    Assemblaggio Procedura di assemblaggio • Per questa serie di microscopi non è richiesta alcuna proce- dura di installazione. • Posizionare il microscopio su un tavolo robusto e collegare l’alimentazione elettrica. 7.1.1 Montaggio delle batterie (M-100FLed) • È necessario utilizzare 3x AA ricaricabili NiMh 1,2V. 1.
  • Seite 24: Uso Del Microscopio

    Uso del microscopio Accensione del microscopio 8.1.1 B-20R / B-20CR / M-100FX 1. Operare sull’interruttore principale ① posto nella parte po- steriore del microscopio, spostando il selettore su “I”. (Fig. 4) F ig. 4 ig. 4 ① 8.1.2 M-100FLed 1. Operare sull’interruttore principale ② posto davanti al micro- scopio.
  • Seite 25: Posizionare Il Campione

    Posizionare il campione 8.3.1 B-20R / M-100FX / M-100FLed 1. Posizionare il campione sul tavolino e fissarlo con le mollet- tine ①. (Fig. 7). ① F ig. 7 ig. 7 8.3.2 B-20CR Il tavolino accetta vetrini standard 26 x 76 mm, spessore 1,2 mm con coprioggetto 0,17 mm.
  • Seite 26: Diaframma Di Apertura

    Diaframma di apertura • Il valore di apertura numerica (A.N.) del diaframma di aper- tura influenza il contrasto dell’immagine. Aumentando o di- minuendo questo valore in funzione dell’apertura numerica dell’obiettivo si variano risoluzione, contrasto e profondità di campo dell’immagine. Spostare la ghiera del diaframma ① (Fig.
  • Seite 27: Manutenzione

    Manutenzione Ambiente di lavoro Si consiglia di utilizzare il microscopio in un ambiente pulito e secco, privo di urti, ad una temperatura fra 0°C e 40°C e con una umidità relativa massima dell’85% (in assenza di condensazione). Si consiglia l’uso di un deumidificatore se necessa- rio.
  • Seite 28: 10. Risoluzione Dei Problemi

    10. Risoluzione dei problemi Consultare le informazioni riportate nella tabella seguente per risolvere eventuali problemi operativi. PROBLEMA CAUSA SOLUZIONE I. Sezione Ottica: Il microscopio è acceso, ma il campo L’alimentatore è scollegato. Collegarlo visivo è scuro. La luminosità è troppo bassa Regolarla ad un livello adeguato Batterie scariche Caricare le batterie...
  • Seite 29: Smaltimento

    Smaltimento Ai sensi dell’articolo 13 del decreto legislativo 25 luglio 2005 n°151. “Attuazione delle direttive 2002/95/CE, 2002/96/CE e 2003/108/CE, relative alla riduzione dell’uso di sostanze pericolose nelle apparecchiature elettriche ed elettroniche, nonché allo smaltimento dei rifiuti”. Il simbolo del cassonetto riportato sulla apparecchiatura o sulla sua confezione indica che il prodotto alla fine della propria vita utile deve essere raccolto separatamente degli altri rifiuti.
  • Seite 30 OPTIKA S.r.l. ® Via Rigla, 30 - 24010 Ponteranica (BG) - ITALY Tel.: +39 035.571.392 info@optikamicroscopes.com - www.optikamicroscopes.com OPTIKA Spain spain@optikamicroscopes.com OPTIKA USA usa@optikamicroscopes.com OPTIKA China china@optikamicroscopes.com OPTIKA India india@optikamicroscopes.com OPTIKA Central America camerica@optikamicroscopes.com...
  • Seite 31 Serie ECOVISION MANUAL DE INSTRUCCIONES Modelos B-20R B-20CR M-100FX M-100FLed Ver. 2.1 2022...
  • Seite 32 Indice Advertencia Información de seguridad Desembalaje Utilización Símbolos Descripción del instrumento B-20R B-20CR M-100FX M-100FLed Montaje Procedimiento de montaje 7.1.1 Montaje de las pilas (M-100FLed) 7.1.2 Montaje de las pilas (B-20R / B-20CR) Uso del microscopio Encender el microscopio 8.1.1 B-20R / B-20CR / M-100FX 8.1.2 M-100FLed...
  • Seite 33: Advertencia

    Advertencia Este microscopio es un instrumento científico de precisión. Su utilización está pensada para una larga duración con un mínimo nivel de mantenimiento. Para su fabricación se han utilizado elementos ópticos y mecánicos de elevada calidad que lo convierten en el instrumento ideal para la utilización diaria en las aulas y el laboratorio. Informamos que esta guía contiene importantes informaciones sobre la seguridad y el mantenimiento del producto y por lo tanto debe ser accesible a todos aquellos que utilizan dicho instrumento.
  • Seite 34: Descripción Del Instrumento

    Descripción del instrumento B-20R OCULAR CABEZA DE OBSERVACIÓN TORNILLO DE BLOQUEO REVÓLVER AGARRADERA OBJETIVO ESTATIVO PINZA SUJETA-MUESTRAS PLATINA MANDO DE ENFOQUE MACROMETRICO CONDENSADOR MANDO DE ENFOQUE MICROMETRICO ILUMINADOR Página 34...
  • Seite 35: B-20Cr

    B-20CR OCULAR CABEZA DE OBSERVACIÓN TORNILLO DE BLOQUEO AGARRADERA REVÓLVER OBJETIVO ESTATIVO PINZA SUJETA-MUESTRAS PLATINA MANDO DE ENFOQUE MICROMETRICO MANDOS DE LA PLATINA CONDENSADOR MANDO DE ENFOQUE MACROMETRICO ILUMINADOR DIAFRAGMA DE APERTURA Página 35...
  • Seite 36: M-100Fx

    M-100FX OCULAR CABEZA DE OBSERVACIÓN TORNILLO DE BLOQUEO REVÓLVER OBJETIVO ESTATIVO PINZA SUJETA-MUESTRAS PLATINA CONDENSADOR MANDO DE ENFOQUE DIAFRAGMA DE MACROMETRICO APERTURA ILUMINADOR MANDO DE ENFOQUE MICROMETRICO Página 36...
  • Seite 37: M-100Fled

    M-100FLed OCULAR CABEZA DE OBSERVACIÓN TORNILLO DE BLOQUEO REVÓLVER OBJETIVO ESTATIVO PINZA SUJETA-MUESTRAS PLATINA CONDENSADOR MANDO DE ENFOQUE DIAFRAGMA DE MACROMETRICO APERTURA ILUMINADOR MANDO DE ENFOQUE MICROMETRICO BOTÓN DE ENCENDIDO Y REGULACIÓN DE LA ILUMINACIÓN Página 37...
  • Seite 38: Montaje

    Montaje Procedimiento de montaje • No se requiere ningún procedimiento de instalación para esta serie de microscopio. • Ponga el microscopio en una mesa resistente y conecte la fuente de alimentación. 7.1.1 Montaje de las pilas (M-100FLed) • Deben utilizarse 3 AA recargables NiMh 1,2V. 1.
  • Seite 39: Uso Del Microscopio

    Uso del microscopio Encender el microscopio 8.1.1 B-20R / B-20CR / M-100FX 1. Gire el interruptor principal ① en la parte posterior del instru- mento girando el interruptor a “I”. (Fig. 4) F ig. 4 ig. 4 ① 8.1.2 M-100FLed 1.
  • Seite 40: Colocar La Muestra

    Colocar la muestra 8.3.1 B-20R / M-100FX / M-100FLed 1. Coloque la muestra en la platina y fíjela con los clips ①. (Fig. ① F ig. 7 ig. 7 8.3.2 B-20CR La platina acepta portaobjetos estándar de 26 x 76 mm, 1,2 mm de espesor con cubreobjetos de 0,17 mm.
  • Seite 41: Diafragma De Apertura

    Diafragma de apertura • El valor de apertura numérica (A.N.) del diafragma de aper- tura influye en el contraste de la imagen. Aumentar o dis- minuir este valor dependiendo de la apertura numérica de la lente variará la resolución, el contraste y la profundidad de campo de la imagen.
  • Seite 42: Mantenimiento

    Mantenimiento Ambiente de trabajo Se aconseja utilizar este microscopio en un ambiente limpio y seco; también se deben evitar los impactos. La temperatura de trabajo recomendada es de 0-40°C y la humedad relativa máxima es de 85 % (en ausencia de condensación). Si es necesario, utilizar un deshumidificador.
  • Seite 43: 10. Resolución De Problemas

    10. Resolución de problemas Consulte la información en la siguiente tabla para resolver cualquier problema operacional. PROBLEMA CAUSA SOLUCIÓN I. Sección Óptica: El microscopio está encendido, pero el La fuente de alimentación está desco- Conectar campo de visión es oscuro. nectada.
  • Seite 44: Disposición

    Disposición De conformidad con el artículo 13 del decreto legislativo de 25 de julio de 2005 n. 151. “Aplicación de las Directivas 2002/95 / CE, 2002/96 / CE y 2003/108 / CE, relativas a la reducción del uso de sustancias peligrosas en equipos eléctricos y elec- trónicos, así...
  • Seite 45 OPTIKA S.r.l. ® Via Rigla, 30 - 24010 Ponteranica (BG) - ITALY Tel.: +39 035.571.392 info@optikamicroscopes.com - www.optikamicroscopes.com OPTIKA Spain spain@optikamicroscopes.com OPTIKA USA usa@optikamicroscopes.com OPTIKA China china@optikamicroscopes.com OPTIKA India india@optikamicroscopes.com OPTIKA Central America camerica@optikamicroscopes.com...
  • Seite 46 Série ECOVISION MANUEL D’UTILISATION Modéles B-20R B-20CR M-100FX M-100FLed Ver. 2.1 2022...
  • Seite 47 Sommaire Avertissement Précautions Déballage Emploi prévu Symboles Description de l’instrument B-20R B-20CR M-100FX M-100FLed Assemblage Procédure de montage 7.1.1 Montage des piles (M-100FLed) 7.1.2 Montage des piles (B-20R / B-20CR) Utilisation du microscope Allumage du microscope 8.1.1 B-20R / B-20CR / M-100FX 8.1.2 M-100FLed Réglage de l’intensité...
  • Seite 48: Avertissement

    Avertissement Le présent microscope est un appareil scientifique de précision créé pour offrir une durée de vie de plusieurs années avec un niveau d’entretien minimum. Les meilleurs composants optiques et mécaniques ont été utilisés pour sa conception ce qui fond de lui un appareil idéal pour une utilisation journalière. Ce guide contient des informations importantes sur la sécurité...
  • Seite 49: Description De L'instrument

    Description de l’instrument B-20R OCULAIRE TÊTE DE OBSERVATION VIS DE FIXATION REVOLVER POIGNÉE DE TRANSPORT OBJECTIFS STATIF CLIPS DE FIXATION PLATINE COMMANDE MACROMÉTRIQUE CONDENSEUR COMMANDE MICROMÉTRIQUE ÉCLAIRAGE Page 49...
  • Seite 50: B-20Cr

    B-20CR OCULAIRE TÊTE DE OBSERVATION VIS DE FIXATION POIGNÉE DE TRANSPORT REVOLVER OBJECTIFS STATIF CLIPS DE FIXATION PLATINE COMMANDE MICROMÉTRIQUE COMMANDES DE TRANSLATION CONDENSEUR COMMANDE MACROMÉTRIQUE ÉCLAIRAGE DIAPHRAGME DE OUVERTURE Page 50...
  • Seite 51: M-100Fx

    M-100FX OCULAIRE TÊTE DE OBSERVATION VIS DE FIXATION REVOLVER OBJECTIFS STATIF CLIPS DE FIXATION PLATINE CONDENSEUR COMMANDE DIAPHRAGME DE MACROMÉTRIQUE OUVERTURE ÉCLAIRAGE COMMANDE MICROMÉTRIQUE Page 51...
  • Seite 52: M-100Fled

    M-100FLed OCULAIRE TÊTE DE OBSERVATION VIS DE FIXATION REVOLVER OBJECTIFS STATIF CLIPS DE FIXATION PLATINE CONDENSEUR COMMANDE DIAPHRAGME DE MACROMÉTRIQUE OUVERTURE ÉCLAIRAGE COMMANDE MICROMÉTRIQUE BOUTON DE MISE SOUS TENSION / RÉGLAGE DE LA LUMINOSITÉ Page 52...
  • Seite 53: Assemblage

    Assemblage Procédure de montage • Aucune procédure d’installation n’est requise pour cette sé- rie de microscopes. • Placez le microscope sur une table solide et branchez l’ali- mentation électrique. 7.1.1 Montage des piles (M-100FLed) • Il faut utiliser 3x AA rechargeable NiMh 1.2V. 1.
  • Seite 54: Utilisation Du Microscope

    Utilisation du microscope Allumage du microscope 8.1.1 B-20R / B-20CR / M-100FX 1. Tournez l’interrupteur principal à l’arrière de l’appareil en ① plaçant le sélecteur sur “I”. (Fig. 4) F ig. 4 ig. 4 ① 8.1.2 M-100FLed 1. Actionnez l’interrupteur principal devant le microscope.
  • Seite 55: Placer L'échantillon

    Placer l’échantillon 8.3.1 B-20R / M-100FX / M-100FLed 1. Placez l’échantillon sur la platine et fixez-le avec les clips ①. (Fig. 8) ① F ig. 7 ig. 7 8.3.2 B-20CR La platine accepte des lamelles standard de 26 x 76 mm, épais- seur 1,2 mm et verre de protection 0,17 mm.
  • Seite 56: Diaphragme De Ouverture

    Diaphragme de ouverture • La valeur numérique de l’ouverture (A.N.) du diaphragme d’ouverture affecte le contraste de l’image. L’augmentation ou la diminution de cette valeur en fonction de l’ouverture numérique de l’objectif modifie la résolution, le contraste et la profondeur de champ de l’image. Déplacez la bague d’ouver- ture (Fig.
  • Seite 57: Réparation Et Entretien

    Réparation et entretien Environnement de travail Il est conseillé d’utiliser le microscope dans un environnement propre et sec, protégé des impactes, à une température comprise entre 0°C y 40°C et avec une humidité relative maximale de 85% (en absence de condensation). Il est conseillé d’utiliser un déshumidificateur si nécessaire.
  • Seite 58: 10. Résolution De Problèmes

    10. Résolution de problèmes Consulter les informations ci-dessous pour la résolution de problèmes durant l’utilisation. PROBLÈME CAUSE SOLUTION I. Section Optique: La lampe est allumée mais le champ L’alimentation n’est pas branchée. Branchez-le correctement visuel est sombre. L’intensité lumineuse est trop faible Procéder au réglage Piles déchargées Charger les piles...
  • Seite 59: Ramassage

    Ramassage Conformément à l’Article 13 du D.L du 25 Juillet 2005 nº151 Action des Directives 2002/95/CE, 2002/96/CE et 2003/108/CE, relatives à la réduction de l’utilisation de substances dan- gereuses dans l’appareil électrique et électronique et à l’élimination des résidus. Le Symbole du conteneur qui figure sur l’appareil électrique ou sur son emballage indique que le produit devra être, à la fin de sa vie utile, séparé...
  • Seite 60 OPTIKA S.r.l. ® Via Rigla, 30 - 24010 Ponteranica (BG) - ITALY Tel.: +39 035.571.392 info@optikamicroscopes.com - www.optikamicroscopes.com OPTIKA Spain spain@optikamicroscopes.com OPTIKA USA usa@optikamicroscopes.com OPTIKA China china@optikamicroscopes.com OPTIKA India india@optikamicroscopes.com OPTIKA Central America camerica@optikamicroscopes.com...
  • Seite 61 Serie ECOVISION BEDIENUNGSANLEITUNG Modell B-20R B-20CR M-100FX M-100FLed Ver. 2.1 2022...
  • Seite 62 Inhalt Hinweis Sicherheitsinformationen Auspacken Verwendung Wartung- und Gefahrzeichen Beschreibung des Instruments B-20R B-20CR M-100FX M-100FLed Montage Montage verfahren 7.1.1 Montage der Batterien (M-100FLed) 7.1.2 Montage der Batterien (B-20R / B-20CR) Verwendung des Mikroskops Einschalten des Mikroskops 8.1.1 B-20R / B-20CR / M-100FX 8.1.2 M-100FLed Einstellung der Lichtintensität...
  • Seite 63: Hinweis

    Hinweis Dieses Mikroskop ist ein wissenschaftliches Präzisionsgerät, es wurde entwickelt für eine jahrelange Verwendung bei einer minimalen Wartung. Dieses Gerät wurde nach den höchsten optischen und mechanischen Standards und zum täglichen Gebrauch hergestellt. Diese Bedienungsanleitung enthält wichtige Informationen zur korrekten und sicheren Benutzung des Geräts.
  • Seite 64: Beschreibung Des Instruments

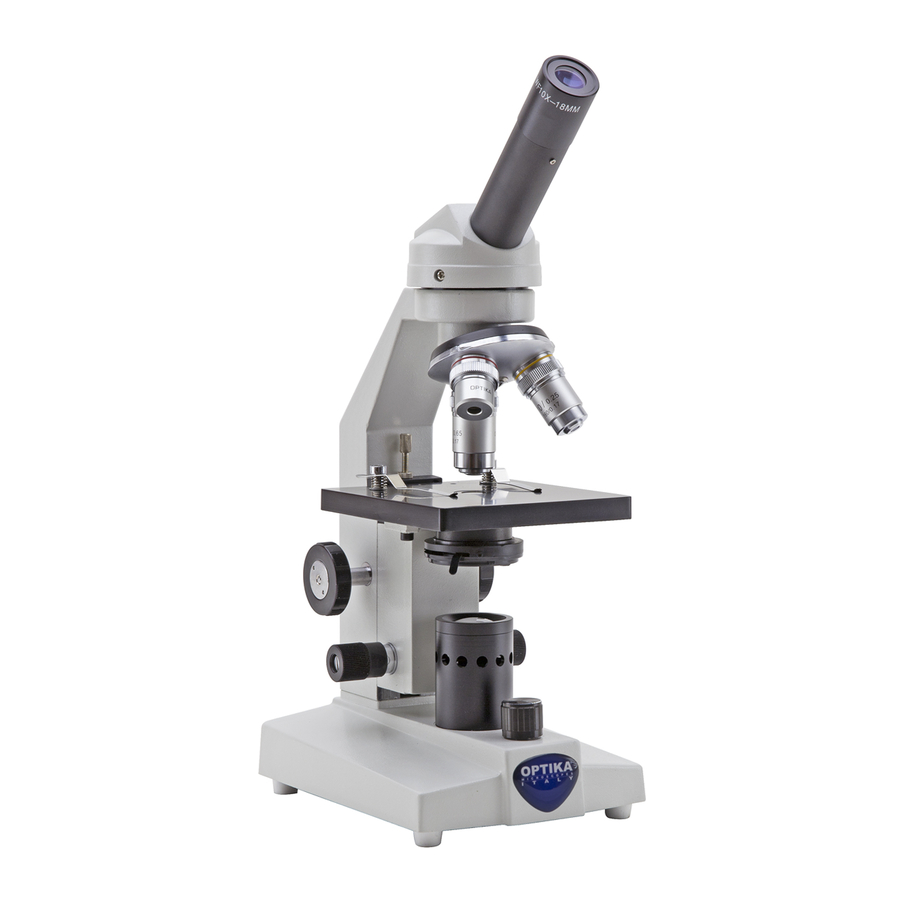
    Beschreibung des Instruments B-20R OKULAR BEOBACHTUNGSKOPF BEFESTIGUNGSSCHRAUBE REVOLVER HANDGRIFF OBJEKTIVE STATIV MUSTER-CLIPS OBJEKTTISCH GROBTRIEBSKNOPF KONDENSOR FEINTRIEBSKNOPF HELLIGKEITSVERSTEL- LUNG Seite 64...
  • Seite 65: B-20Cr

    B-20CR OKULAR BEOBACHTUNGSKOPF BEFESTIGUNGSSCHRAUBE HANDGRIFF REVOLVER OBJEKTIVE STATIV MUSTER-CLIPS OBJEKTTISCH FEINTRIEBSKNOPF VERLE- GUNGSKNÖPFE KONDENSOR GROBTRIEBSKNOPF HELLIGKEITSVERSTEL- LUNG APERTURBLENDE Seite 65...
  • Seite 66: M-100Fx

    M-100FX OKULAR BEOBACHTUNGSKOPF BEFESTIGUNGSSCHRAUBE REVOLVER OBJEKTIVE STATIV MUSTER-CLIPS OBJEKTTISCH KONDENSOR GROBTRIEBSKNOPF APERTURBLENDE HELLIGKEITSVERSTELLUNG FEINTRIEBSKNOPF Seite 66...
  • Seite 67: M-100Fled

    M-100FLed OKULAR BEOBACHTUNGSKOPF BEFESTIGUNGSSCHRAUBE REVOLVER OBJEKTIVE STATIV MUSTER-CLIPS OBJEKTTISCH KONDENSOR GROBTRIEBSKNOPF APERTURBLENDE HELLIGKEITSVERSTELLUNG FEINTRIEBSKNOPF ON/OFF HELLIGKEITSVERSTEL- LUNG Seite 67...
  • Seite 68: Montage

    Montage Montage verfahren • Für diese Serie von Mikroskopen ist kein Installationsverfah- ren erforderlich. • Stellen Sie das Mikroskop auf einen stabilen Tisch und schließen Sie die Stromversorgung an. 7.1.1 Montage der Batterien (M-100FLed) • Es müssen 3 wiederaufladbare AA NiMh 1.2V verwendet werden.
  • Seite 69: Verwendung Des Mikroskops

    Verwendung des Mikroskops Einschalten des Mikroskops 8.1.1 B-20R / B-20CR / M-100FX 1. Drehen Sie den Hauptschalter auf der Rückseite des Ge- ① räts, indem Sie den Wahlschalter auf “I” stellen. (Fig. 4) F ig. 4 ig. 4 ① 8.1.2 M-100FLed 1.
  • Seite 70: Platzieren Sie Die Probe

    Platzieren Sie die Probe 8.3.1 B-20R / M-100FX / M-100FLed 1. Legen Sie die Probe auf den Objekttisch und befestigen Sie sie mit den Clips ①. (Fig. 7). ① F ig. 7 ig. 7 8.3.2 B-20CR Der Objekttisch nimmt Standardschlitten 26 x 76 mm, Dicke 1,2 mm und Deckglas 0,17 mm auf.
  • Seite 71: Aperturblende

    Aperturblende • Der numerische Öffnungswert (A.N.) der Aperturblende be- einflusst den Kontrast des Bildes. Das Erhöhen oder Ver- ringern dieses Wertes in Abhängigkeit von der numerischen Apertur des Objektivs ändert die Auflösung, den Kontrast und die Tiefenschärfe des Bildes. Bewegen Sie den Blen- denhebel (Fig.
  • Seite 72: Wartung

    Wartung Arbeitsumfeld Es wird empfohlen, das Mikroskop an einem sauberen, trockenen und stoßsicheren Ort zu verwenden, bei einer Tempe- ratur zwischen 0° und 40° und einer Feuchtigkeit nicht über 85% (ohne Kondensation). Wenn nötig wird die Verwendung eines Luftentfeuchters empfohlen. Vor und nach dem Gebrauch des Mikroskops •...
  • Seite 73: 10. Probleme Und Lösungen

    10. Probleme und Lösungen Lesen Sie die Informationen in der folgenden Tabelle, um Probleme bei der Bedienung zu beheben. PROBLEM URSACHE LÖSUNG I. Optisches System: Die Beleuchtung ist eingeschaltet, Stromversorgungsstecker sind nicht Verbinden Sie aber das Sichtfeld ist dunkel. gut angeschlossen. Die Helligkeit ist zu gering.
  • Seite 74: Wiederverwertung

    Wiederverwertung Gemäß dem Artikel 13 vom Dekret Nr. 151 vom 25.07.2005 “Umsetzung der Richtlinien 2002/95/EG, 2002/96/EG und 2003/108/EG in Bezug auf die Verwendung gefährlicher Stoffe in elektrischen und elektronischen Geräten sowie die Abfal- lentsorgung”. Das Symbol vom Müllcontainer erscheint auf dem Gerät oder der Verpackung und weist darauf hin, dass das Produkt Ende des Lebens separat von anderen Abfällen entsorgt werden muss.
  • Seite 75 OPTIKA S.r.l. ® Via Rigla, 30 - 24010 Ponteranica (BG) - ITALY Tel.: +39 035.571.392 info@optikamicroscopes.com - www.optikamicroscopes.com OPTIKA Spain spain@optikamicroscopes.com OPTIKA USA usa@optikamicroscopes.com OPTIKA China china@optikamicroscopes.com OPTIKA India india@optikamicroscopes.com OPTIKA Central America camerica@optikamicroscopes.com...
  • Seite 76 Série ECOVISION MANUAL DE INSTRUÇÕES Modelos B-20R B-20CR M-100FX M-100FLed Ver. 2.1 2022...
  • Seite 77 Tabela de Conteúdos Advertência Informações sobre a segurança Desembalando Utilização prevista Simbolos Descrição do instrumento B-20R B-20CR M-100FX M-100FLed Montagem Procedimento de montagem 7.1.1 Montagem das baterias (M-100FLed) 7.1.2 Montagem das baterias (B-20R / B-20CR) Utilização do microscópio Ligação do microscópio 8.1.1 B-20R / B-20CR / M-100FX 8.1.2...
  • Seite 78: Advertência

    Advertência Este microscópio é um instrumento científico de alta precisão, projectado para durar um longo tempo com manutenção mínima; a sua realização respeita os melhores padrões ópticos e mecânicos, para que possa ser utilizado diariamente. Recordamos que este manual contém informações importantes para a segurança e a manutenção do instrumento, portanto deve ser colocado à...
  • Seite 79: Descrição Do Instrumento

    Descrição do instrumento B-20R OCULAR CABEÇA DE OBSERVAÇÃO PARAFUSO DO FECHAMENTO REVOLVER ASA DE TRANSPORTE OBJETIVO CORPO PRINCIPAL BRAÇADEIRA DE CORREDIÇA PLATINA BOTÃO DE FOCALIZAÇÃO GROSSEIRO CONDENSADOR BOTÃO DE FOCALIZAÇÃO FINO ILUMINADOR Página 79...
  • Seite 80: B-20Cr

    B-20CR OCULAR CABEÇA DE OBSERVAÇÃO PARAFUSO DO FECHAMENTO ASA DE TRANSPORTE REVOLVER OBJETIVO CORPO PRINCIPAL BRAÇADEIRA DE CORREDIÇA PLATINA BOTÃO DE FOCALIZAÇÃO FINO PUXADORES DE PLATINA CONDENSADOR BOTÃO DE FOCALIZAÇÃO GROSSEIRO ILUMINADOR DIAFRAGMA DE ABERTURA Página 80...
  • Seite 81: M-100Fx

    M-100FX OCULAR CABEÇA DE OBSERVAÇÃO PARAFUSO DO FECHAMENTO REVOLVER OBJETIVO CORPO PRINCIPAL BRAÇADEIRA DE CORREDIÇA PLATINA CONDENSADOR BOTÃO DE DIAFRAGMA DE FOCALIZAÇÃO ABERTURA GROSSEIRO ILUMINADOR BOTÃO DE FOCALIZAÇÃO FINO Página 81...
  • Seite 82: M-100Fled

    M-100FLed OCULAR CABEÇA DE OBSERVAÇÃO PARAFUSO DO FECHAMENTO REVOLVER OBJETIVO CORPO PRINCIPAL BRAÇADEIRA DE CORREDIÇA PLATINA CONDENSADOR BOTÃO DE DIAFRAGMA DE FOCALIZAÇÃO ABERTURA GROSSEIRO ILUMINADOR BOTÃO DE FOCALIZAÇÃO FINO BOTÃO DE LIGAÇÃO / AJUSTE DE LUMINOSIDADE Página 82...
  • Seite 83: Montagem

    Montagem Procedimento de montagem • Não é necessário nenhum procedimento de instalação para esta série de microscópios. • Coloque o microscópio sobre uma mesa robusta e conecte a fonte de alimentação. 7.1.1 Montagem das baterias (M-100FLed) • 3x AA recarregável NiMh 1.2V deve ser utilizado. 1.
  • Seite 84: Utilização Do Microscópio

    Utilização do microscópio Ligação do microscópio 8.1.1 B-20R / B-20CR / M-100FX 1. Gire o interruptor principal na parte de trás do instrumen- ① to, girando o interruptor selector para “I”. (Fig. 4) F ig. 4 ig. 4 ① 8.1.2 M-100FLed 1.
  • Seite 85: Colocar A Amostra

    Colocar a amostra 8.3.1 B-20R / M-100FX / M-100FLed 1. Coloque a amostra sobre a platina e fixe-a com os clipes ① (Fig. 7). ① F ig. 7 ig. 7 8.3.2 B-20CR A amostra padrão é lâmina de vidro, espessura 1,2 mm com lâmina de cobertura 0,17 mm.
  • Seite 86: Diafragma De Abertura

    Diafragma de abertura • O valor de abertura numérica (A.N.) do diafragma de abertu- ra afecta o contraste da imagem. Aumentar ou diminuir este valor em função da abertura numérica da objectiva altera a resolução, o contraste e a profundidade de campo da ima- gem.
  • Seite 87: Manutenção

    Manutenção Ambiente de trabalho Recomenda-se de utilizar o microscópio em um ambiente limpo e seco, sem o risco de colisões, a uma temperatura entre 0°C e 40°C e com uma humidade relativa máxima de 85% (em ausência de condensação). Recomenda-se o uso de um desumidificador, se necessário.
  • Seite 88: 10. Resolução De Problemas

    10. Resolução de problemas Reveja a informação na tabela abaixo para tentar solucionar problemas de operação. PROBLEMA CAUSA SOLUÇÃO I. Secção Óptica: O microscópio está ligado, mas o cam- A fonte de alimentação está desligada. Conectar po de visão é escuro. O brilho é...
  • Seite 89: Eliminação

    Eliminação Art.13 Dlsg 25 de Julho de 2005 N°151. “De acordo com as Directivas 2002/95/CE, 2002/96/CE e 2003/108/CE relativas à redução do uso de substâncias perigosas em equipamentos eléctricos e electrónicos e à eliminação de resíduos. O símbolo do cesto no equipamento ou na sua caixa indica que o produto no final da sua vida útil deve ser recolhido separadamente dos outros resíduos.
  • Seite 90 OPTIKA S.r.l. ® Via Rigla, 30 - 24010 Ponteranica (BG) - ITALY Tel.: +39 035.571.392 info@optikamicroscopes.com - www.optikamicroscopes.com OPTIKA Spain spain@optikamicroscopes.com OPTIKA USA usa@optikamicroscopes.com OPTIKA China china@optikamicroscopes.com OPTIKA India india@optikamicroscopes.com OPTIKA Central America camerica@optikamicroscopes.com...

Inhaltsverzeichnis