
Verwandte Anleitungen für Klarstein AeroVital Cube


Inhaltszusammenfassung für Klarstein AeroVital Cube
- Seite 1 AeroVital Cube Heißluftfritteuse Air Fryer Friteuse à air chaud Freidora sin aceite Friggitrice ad aria calda Artikelnummer 10033248...
-
Seite 3: Konformitätserklärung
Sehr geehrter Kunde, wir gratulieren Ihnen zum Erwerb Ihres Gerätes. Lesen Sie die folgenden Hinweise sorgfältig durch und befolgen Sie diese, um möglichen Schäden vorzubeugen. Für Schäden, die durch Missachtung der Hinweise und unsachgemäßen Gebrauch entstehen, übernehmen wir keine Haftung. Scannen Sie den QR-Code, um Zugriff auf die aktuellste Bedienungsanleitung und weitere Informationen rund um das Produkt zu erhalten. -
Seite 5: Inhaltsverzeichnis
INHALTSVERZEICHNIS Sicherheitshinweise ........................6 Komponenten des Gerätes ....................10 Zubehör Montage ............................11 Entpacken Erstreinigung Einsetzen der Komponenten Aufstellen Stromversorgung Erstbetrieb Verwendung ..........................15 Auswahl der Garunterlage Bedienung ........................... 18 Ein- und Ausschalten Pause Standby-Modus Startvorwahl Programmwahl Temperatur und Gardauer einstellen Die Rotationsfunktion Manuelle Garkontrolle Nachgaren... -
Seite 6: Sicherheitshinweise
SICHERHEITSHINWEISE Lesen Sie diese Broschüre sorgfältig durch und bewahren Sie sie zum späteren Nachschlagen auf. In diesen Sicherheitshinweisen und später im Text finden Sie die folgenden Hervorhebungen: GEFAHR weist auf eine gefährliche Situation hin, die zu Tod oder schweren Verletzungen führt, wenn sie nicht vermieden wird. WARNUNG weist auf eine gefährliche Situation hin, die zu Tod oder schweren Verletzungen führen kann, wenn sie nicht vermieden wird. - Seite 7 WARNUNG: Die Verwendung dieses Geräts birgt allgemeine Gefahren. Zur Vorbeugung vor Schäden: • Verwenden Sie das Gerät nicht für einen anderen als den vorgesehenen Zweck. • Verwenden Sie dieses Gerät nicht, wenn es in irgendeiner Weise beschädigt wurde oder Fehlfunktionen aufweist. •...
- Seite 8 WARNUNG: Während des Gebrauchs tritt heißer Dampf aus dem Gerät aus. Das Innere des Gerätes, die erhitzten Speisen, das Tropfblech, der Frittierkorb und das Grillgitter sind während das Betriebes und einige Zeit darüber hinaus heiß. Um Verbrennungen und Verbrühungen zu vermeiden: •...
-
Seite 10: Komponenten Des Gerätes
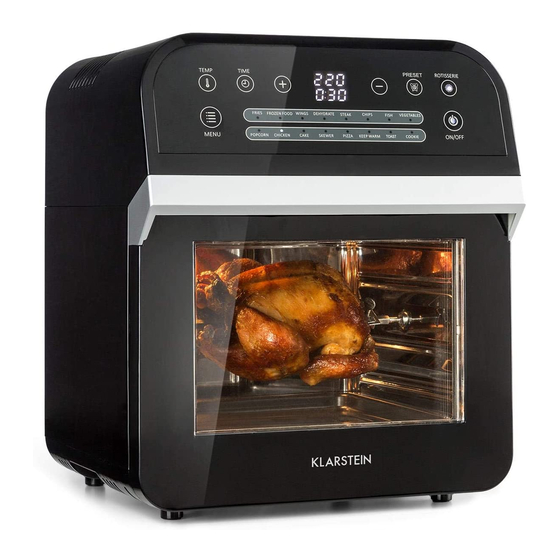
KOMPONENTEN DES GERÄTES 1 Abdeckung 7 Spießheber 2 Bedienfeld 8 Drehspieß 3 Gehäuse 9 Grillgitter 4 Stromkabel 10 Frittierkorb 5 Garraum 1 1 Tropfblech 6 Tür Zubehör Drehspießheber Der Spießheber dient dazu, den Drehspieß aus dem Gerät zu nehmen, ohne sich zu verbrennen, oder um den Drehspieß... -
Seite 11: Montage
13 Taste: Temperatur (TEMP) 18 Taste: Startvorwahl (PRESET) 14 Taste: Zeit (TIME) 19 Taste: Rotieren (ROTISSERIE) 15 Taste: ERHÖHEN 20 Taste: Menü (MENU) 16 Anzeige: Display 21 Anzeige: Programmauswahl 17 Taste: VERRINGERN 22 Taste: Start/Stopp (On/Off) MONTAGE Entpacken Entfernen Sie alle Verpackungsmaterialien und Etiketten von der Innen- und Außenseite des Gerätes und seiner Komponenten. - Seite 12 Tropfblech Öffnen Sie vorsichtig die Tür und schieben Sie das Tropfblech auf den Seitenschienen wie in der Abbildung gezeigt in das Gerät ein. Grillgitter Öffnen Sie vorsichtig die Tür und schieben Sie das Grillgitter auf den Seitenschienen wie in der Abbildung gezeigt in das Gerät ein. Frittierkorb Öffnen Sie vorsichtig die Tür und schieben Sie den Frittierkorb auf den Seitenschienen wie in der Abbildung gezeigt in das Gerät ein.
-
Seite 13: Drehspieß
Drehspieß Schieben Sie die Fixateure (B) auf den Drehspießstab (A). Drehen Sie die Schrauben der Fixateure fest, sodass die Fixateure fest am Drehspieß sitzen. Setzen Sie den Drehspieß in die Rotatoren (D) im Gerät ein. Er passt nur auf eine bestimmte Weise in die Rotatoren. -
Seite 14: Stromversorgung
Stromversorgung Das Gerät verfügt über einen standardmäßigen Schuko-Stecker und benötigt eine Schuko-Steckdose mit einer Stromversorgung von 220-240 V ~ 50/60 Hz. Schließen Sie das Gerät nur an, wenn die Netzspannung der Steckdose mit der Angabe auf dem Gerät übereinstimmt. Sollten das Stromkabel oder der Stecker äußerlich beschädigt sein, schließen Sie das Gerät nicht an. -
Seite 15: Verwendung
Neben der Taste MENÜ befindet sich die Programmübersicht. Jedem Programm ist ein Symbol zugeordnet. Durch mehrmaliges Drücken der Taste MENÜ navigieren Sie nacheinander durch die Pragramme, beginnend in der ersten Zeile links oben bis zur zweiten Zeile rechts unten. Das gerade aktive Programmsymbol leuchtet. Drücken Sie die Taste MENÜ... -
Seite 16: Auswahl Der Garunterlage
Auswahl der Garunterlage Wählen Sie Art und Menge der Grillgüter und passend dazu die Garunterlage: • Verwenden Sie das Grillgitter für einzelne Gargüter, wie zum Beispiel Hähnchenkeulen oder Pizza. • Nutzen Sie den Frittierkorb, um größere Mengen wie Nuggets oder Pommes frites gleichmäßig zu garen. •... - Seite 17 ACHTUNG: Verwenden Sie anstatt des Drehspießes den Frittierkorb, wenn das Grillgut schwerer als 1,2kg ist, um den Motor der Rotatoren nicht zu beschädigen. So nutzen Sie den Drehspieß: Vergewissern Sie sich vor der Verwendung, dass der Drehspieß nicht heiß ist. Wenn der Drehspieß...
-
Seite 18: Bedienung
BEDIENUNG ACHTUNG: Während und nach dem Betrieb sind das Innere des Gerätes, die Speisen, die Garunterlagen und der Dampfauslass auf der Rückseite des Gerätes heiß. Je nach Art der Speisen kann Dampf aus dem Gerät entweichen. Tragen Sie im Umgang mit dem Gerät stets Ofenhandschuhe. Greifen Sie die Garunterlagen und Speisen stets mit hitzebeständigen lebensmittelechten Küchenutensilien, um Verbrennungen, Verbrühen und Schäden an Gerät und Zubehör zu vermeiden. -
Seite 19: Standby-Modus
Standby-Modus Das Gerät schaltet nach 60 Sekunden in den Standby-Modus um, • wenn das Gerät im Bereitschaftsmodus ist und Sie keine Taste betätigen oder • wenn kein Programm ausgeführt wird. Im Standby-Modus sind bis auf die Tasten On/Off, MENÜ und PRESET alle Tasten inaktiv. - Seite 20 Und so geht‘s: Vergewissern Sie sich, dass das Gerät an das Stromnetz angeschlossen und ausgeschaltet ist. Drücken Sie gegebenenfalls die Taste On/Off, um das Gerät auszuschalten. Öffnen Sie vorsichtig die Tür des Gerätes. Vergewissern Sie sich, dass das Geräteinnere und die Garunterlage beziehungsweise der Drehspieß...
-
Seite 21: Temperatur Und Gardauer Einstellen
Speise Temperatur Garzeit Pommes frites 220°C 25 Minuten AUFTAUEN 80°C 10 Minuten Hähnchenflügel 200°C 15 Minuten DÖRREN* 70°C* 8 Stunden Steak 180°C 12 Minuten Chips 220°C 20 Minuten Fisch 180°C 15 Minuten Gemüse 180°C 12 Minuten Popcorn 220°C 10 Minuten (Vorheizzeit: 2 Minuten) Hähnchen 220°C 30 Minuten... -
Seite 22: Gardauer Manuell Einstellen
Drücken Sie die Taste (Temperatur). Der aktuell eingestellte Temperaturwert im Display blinkt. • Drücken Sie die Taste +, um die Temperatur zu erhöhen. • Drücken Sie die Taste —, um die Temperatur zu verringern. Der eingestellte Temperaturwert im Display hört auf zu blinken und leuchtet wieder dauerhaft, wenn Sie die Tasten + oder —... -
Seite 23: Nachgaren
Während des Garvorgangs stoppt das Gerät automatisch, sobald Sie die Tür öffnen. Bis auf die Tasten „On/Off“, „Preset“ (Startvorwahl) und „Rotieren“ sind alle Tasten inaktiv. Um die Garung fortzusetzen, schließen Sie die Tür. Das Gerät setzt den Garvorgang erst fort, sobald die Tür vollständig geschlossen ist. HINWEIS: Wenn Sie die Tür öffnen und nicht innerhalb von 30 Minuten wieder schließen, schaltet sich das Gerät automatisch aus. -
Seite 24: Reinigung Und Pflege
12 Das Gerät beendet den Garvorgang automatisch mit einem dreimaligen Signalton. Die Ventilatoren sind noch weitere 60 Sekunden in Betrieb und senken die Innentemperatur des Gerätes. 13 Überprüfen Sie, ob die Speisen gar sind. • Wenn die Speisen nach Beendigung des Garvorgangs nicht zu Ihrer Zufriedenheit gegart sind, wiederholen Sie die Schritte 7-14. -
Seite 25: Aufbewahrung
HINWEIS: Weichen Sie die entnommenen Komponenten in heißem Wasser ein, um hartnäckige Verschmutzungen zu lösen. Lösen sie die Schrauben am Drehspieß, um den Drehspieß und die Fixateure gründlich zu reinigen. WARNUNG: Tauchen Sie das Gerät zur Reinigung nicht in Wasser. Das Gerät wird elektrisch betrieben. -
Seite 26: Entsorgung
ENTSORGUNG Befindet sich die linke Abbildung (durchgestrichene Mülltonne auf Rädern) auf dem Produkt, gilt die Europäische Richtlinie 2012/19/EU. Diese Produkte dürfen nicht mit dem normalen Hausmüll entsorgt werden. Informieren Sie sich über die örtlichen Regelungen zur getrennten Sammlung elektrischer und elektronischer Gerätschaften. Richten Sie sich nach den örtlichen Regelungen und entsorgen Sie Altgeräte nicht über den Hausmüll. -
Seite 29: Declaration Of Conformity
Dear Customer, Congratulations on purchasing your device. Please, read the following instructions carefully and follow them to prevent possible damage. We accept no liability for damage resulting from not following the instructions and improper use. Please, scan the QR code to get access to the latest user manual and other information about the product. - Seite 31 TABLE OF CONTENTS Security Instructions ......................32 Components of the Device ....................34 Accessories Assembly ............................35 Unpacking Initial cleaning Inserting the components Placing Power supply Initial use Use ..............................39 Selection of the grill underlay Operation ............................ 41 Switching on and off Pause Standby mode Start delay...
-
Seite 32: Security Instructions
SECURITY INSTRUCTIONS Read this booklet carefully and keep it for future reference. In these safety instructions and later in the text, you will find the following highlights: Danger indicates a hazardous situation which, if not avoided, will result in death or serious injury. - Seite 33 • Do not leave the appliance unattended during use as it requires manual operation. • Children must not play with the device. • Before disposal, remove the door of the appliance to prevent accidental trapping of children playing with it or pets and wild animals. DANGER: The appliance is electrically powered.
-
Seite 34: Components Of The Device
COMPONENTS OF THE DEVICE 1 Cover 7 Roasting spit lifter 2 Control panel 8 Roasting spit 3 Housing 9 Grill grate 4 Power cable 10 Frying basket 5 Cooking space 1 1 Drip tray 6 Door Accessories Roasting spit lifter The roasting spit lifter serves to take the raosting spit out of the appliance without burning yourself, and to put it in. -
Seite 35: Assembly
13 Key: temperature (TEMP) 18 Key: delay start up (PRESET) 14 Key: time (TIME) 19 Key: rotate (ROTISSERIE) 15 Key: increase 20 Key: programs (MENU) 16 Display 21 Display: programs 17 Key: decrease 22 Key: Start/Stop ASSEMBLY Unpacking Remove all packaging materials and labels from the inside and outside of the appliance and its components. - Seite 36 Drip tray Carefully open the door and slide the drip tray along the side rails into the appliance as shown in the illustration. Grill grate Carefully open the door and slide the grill along the side rails into the appliance as shown in the illustration.
-
Seite 37: Placing
Roasting spit Slide the fixators (B) onto the roasting spit (A). Tighten the screws of the fixators so that the fixators sit firmly on the spit. Insert the roasting spit into the rotators (D) inside of the device. They only fit into the rotators in a certain way. Do not use force. Placing CAUTION: Be sure to leave at least 10 cm of space between the appliance and surrounding objects and the walls to ensure that steam can escape. -
Seite 38: Initial Use
Otherwise it may be permanently damaged, live parts may be exposed and cause a dangerous electrical shock. Connect the appliance to an easily accessible socket to be able to quickly disconnect it from the power supply if malfunctioning. NOTE: Disconnect the appliance from the power supply when not in use to save electricity and to prevent damage when the appliance is not under your supervision. -
Seite 39: Use
Please, always mind the following when handling the device. CAUTION: During and after cooking, the inside of the appliance, the food and the grill underlays are hot. Depending on the type of food, steam may escape from the appliance. Always wear oven gloves when handling the appliance. If necessary, wear long-sleeved clothing to protect body parts from steam and from hot juices that may possibly escape from the food. -
Seite 40: Using The Roasting Spit
3 Place the food that way that: • the food does not touch the inside of the appliance during cooking. • the grill underlay with the food can be easily removed from the appliance after cooking. • an even air circulation between the pieces of the food is ensured. Fill the basket up to two thirds at most to ensure even cooking. -
Seite 41: Operation
OPERATION ATTENTION: During and after operation, the inside of the appliance, the food, the grill underlays and the steam outlet on the back of the appliance are hot. Depending on the type of food, steam may escape from the appliance. Always wear oven gloves when handling the appliance. -
Seite 42: Standby Mode
Standby mode The appliance will switch to standby mode after 60 seconds, • when the appliance is in standby mode and you do not press any button or • if no program is running. In Standby mode, all buttons are inactive except for the buttons Start/Stop, MENU and PRESET. - Seite 43 Food Temperature Cooking time French fries 425°F 25 minutes DEFROST 175°F 10 minutes Chicken wings 400°F 15 minutes DESICCATE* 160°F* 8 hours Steak 350°F 12 minutes Chips 425°F 20 minutes Fish 350°F 15 minutes Vegetables 350°F 12 minutes Popcorn 425°F 10 minutes (preheat: 2 minutes) Chicken 425°F...
-
Seite 44: Setting Temperature And Cooking Time
spit are not hot. If necessary, wear oven gloves and grab the roasting spit or grill underlay with a heat-resistant food-safe kitchen utensil to prevent burns. Place the grill underlay or roasting spit on a clean, heat-resistant food-safe work surface. Insert the drip tray into the appliance as described in INSERTING THE COMPONENTS. -
Seite 45: Rotation
Press the button (Temperature). The currently set temperature value will flash on the display. • Press the + button to increase the temperature. • Press the — button to decrease the temperature. The set temperature value in the display will stop flashing and remain lit if you do not touch the buttons + or —... -
Seite 46: Subsequent Cooking
During cooking, the appliance will stop automatically when you open the door. All buttons will be inactive except for the buttons Start/Stop, PRESET and ROTATE. To continue cooking, close the door. The appliance will not continue cooking until the door is completely closed. -
Seite 47: Cleaning And Care
• When the food is cooked to your satisfaction, press the button Start/Stop to turn off the appliance. 15 Wear oven gloves. 16 Remove the roasting spit or the grill underlay with the food from the appliance. 17 Put them on a clean, food-safe and heat-resistant surface 18 Remove the food for serving. -
Seite 48: Storage
12 Clean the drip tray, roasting spit and grill underlays with hot water, food-safe detergent and a non-abrasive sponge. You may use a degreasing fluid to remove the remaining dirt. NOTE: Soak the drip tray, roasting spit and cooking pads in hot water and a few drops of detergent for 15 minutes to remove stubborn dirt. -
Seite 49: Technical Data
TECHNICAL DATA Article number 10033248 Power supply 220-240V ~ 50/60 Hz Technology Hot air Power consumption 1600 W Fryer Volume 12 litres Operation manual, automatic Temperature Range adjustable, 50-220°C Timer adjustable, 1-60 minutes... -
Seite 51: Déclaration De Conformité
Chère cliente, cher client, Toutes nos félicitations pour l’acquisition de ce nouvel appareil. Veuillez lire attentivement et respecter les instructions de ce mode d’emploi afin d’éviter d’éventuels dommages. Nous ne saurions être tenus pour responsables des dommages dus au non-respect des consignes et à... - Seite 53 SOMMAIRE Consignes de sécurité ......................54 Composants de l‘appareil ........................58 Accessoires Montage ................................59 Déballage Premier nettoyage Installation des composants Installation Alimentation Première utilisation Utilisation ................................ 63 Choix de la plaque de cuisson Fonctionnement ............................66 Pour allumer et éteindre Pause Mode veille Démarrage différé...
-
Seite 54: Consignes De Sécurité
CONSIGNES DE SÉCURITÉ Lisez attentivement cette brochure et conservez-la pour vous y référer ultérieurement Vous trouverez les poins importants suivants dans les consignes de sécurité et plus bas dans le texte : DANGER indique une situation dangereuse qui peut entraîner la mort ou des blessures graves si elle n’est pas évitée. - Seite 55 MISE EN GARDE : L’utilisation de cet appareil comporte des risques généraux. Pour éviter les dommages: • N‘utilisez pas l‘appareil à d‘autres fins que celles prévues. • N‘utilisez pas cet appareil s‘il a été endommagé de quelque manière que ce soit ou s‘il fonctionne mal.
- Seite 56 MISE EN GARDE : L’appareil émet de la vapeur chaude pendant l’utilisation. L’intérieur de l’appareil, les aliments chauffés, le bac d’égouttage, le panier à frire et les grilles sont également très chauds pendant le fonctionnement et quelque temps après encore. Pour éviter les brûlures : •...
-
Seite 58: Composants De L'appareil
COMPOSANTS DE L‘APPAREIL 1Cache 7 Support de broche 2 Panneau de commande 8 Tournebroche 3 Boîtier 9 Grille de cuisson 4 Câble secteur 10 Panier à friture 5 Espace de cuisson 1 1 Bac d‘égouttage 6 Porte Accessoires Support de broche Le support de broche sert à... -
Seite 59: Montage
13 Bouton : température (TEMP) 18 Bouton : programme (PRESET) 14 Bouton : durée (TIME) 19 Bouton : rôtir (RÔTISSERIE) 15 Bouton : AUGMENTER 20 Bouton : menu (MENU) 16 Affichage : écran 21 Affichage : programme (PRESETS) 17 Bouton : RÉDUIRE 22 Bouton : marche/arrêt MONTAGE Déballage... -
Seite 60: Grille De Cuisson
Bac d‘égouttage Öffnen Sie vorsichtig die Tür und schieben Sie das Tropfblech auf den Seitenschienen wie in der Abbildung gezeigt in das Gerät ein. Grille de cuisson Ouvrez la porte avec précaution et faites glisser la grille sur les rails latéraux dans l‘appareil, comme indiqué... -
Seite 61: Installation
Tournebroche Faites glisser les crochets (B) sur la tige de la broche (A). Serrez les vis des crochets pour qu‘ils soient bien en place sur la broche. Insérez la broche du tournebroche dans les supports rotatifs (D) de l‘appareil. Elle ne peut s‘insérer que d‘une manière précise. Ne forcez pas. -
Seite 62: Première Utilisation
Ne branchez l‘appareil que si la tension du secteur correspond à celle indiquée sur l‘appareil. Si le cordon d‘alimentation ou la prise sont endommagés à l‘extérieur, ne branchez pas l‘appareil. Faites-les remplacer par un centre de service agréé par le fabricant. L‘appareil ne doit pas être utilisé... -
Seite 63: Utilisation
À côté de la touche MENU se trouve le guide des programmes. Chaque programme est associé à un symbole. Appuyez plusieurs fois sur la touche MENU pour parcourir les programmes l‘un après l‘autre, en commençant par la première rangée dans le coin supérieur gauche jusqu‘à... -
Seite 64: Choix De La Plaque De Cuisson
Choix de la plaque de cuisson Choisissez le type et la quantité d‘aliments à cuire et le support de cuisson adapté : • Utilisez la grille de cuisson pour les aliments individuels, tels que les pilons de poulet ou les pizzas. •... - Seite 65 ATTENTION : Au lieu de la rôtissoire, utilisez le panier à friture si les aliments à cuire dépassent 1,2 kg, afin de ne pas endommager le moteur du tournebroche. Utilisez le tournebroche de la façon suivante : Avant utilisation, assurez-vous que le tournebroche n‘est pas chaud. Si le tournebroche est chaud : Portez des gants de cuisson.
-
Seite 66: Fonctionnement
FONCTIONNEMENT ATTENTION Pendant le fonctionnement et encore après, l’intérieur de l’appareil, les aliments, les plaques de cuisson et la sortie de vapeur à l’arrière de l’appareil sont chauds. Selon le type d’aliment, de la vapeur peut s’échapper de l’appareil. Portez toujours des gants de cuisine lorsque vous manipulez l’appareil. Prenez toujours les plaques de cuisson et les aliments avec des ustensiles de cuisine résistants à... -
Seite 67: Mode Veille
Mode Veille L‘appareil passe en mode veille au bout de 60 secondes : • lorsque l‘appareil est en mode veille et que vous n‘appuyez sur aucune touche ou • si aucun programme n‘est en cours d‘exécution. En mode veille, toutes les touches sont inactives, à l’exception des touches marche/ arrêt, MENU et PRESET. - Seite 68 Et ensuite : Assurez-vous que l’appareil est branché mais éteint. Si nécessaire, appuyez sur le bouton Marche/Arrêt pour éteindre l’appareil. Ouvrez la porte de l’appareil avec précaution. Assurez-vous que l’intérieur de l’appareil et la plaque de cuisson ou la rôtissoire ne sont pas chauds.
-
Seite 69: Température Et Durée De Cuisson
Aliment Température Temps de cuisson Frites 220°C 25 minutes DÉCONGÉLATION 80°C 10 minutes Ailes de poulet 200°C 15 minutes DÉSHYDRATATION* 70°C* 8 Heures Steak 180°C 12 minutes Chips 220°C 20 minutes Poisson 180°C 15 minutes Légumes 180°C 12 minutes Popcorn 220°C 10 minutes (préchauffage : 2 minutes) Poulet... -
Seite 70: Fonction Rotation
Appuyez sur le bouton (Température). La valeur actuelle clignote à l‘écran. • Appuyez sur le bouton + pour augmenter la température. • Appuyez sur le bouton — pour réduire la température. La valeur de température réglée cesse de clignoter à l‘écran et reste allumée en fixe lorsque vous n‘appuyez plus sur les boutons + ou —... -
Seite 71: Prolonger La Cuisson
Pendant la cuisson, l‘appareil s‘arrête automatiquement lorsque vous ouvrez la porte. Tous les boutons sont inactifs, à l‘exception des touches marche/arrêt, Preset (démarrage différé) et Rôtisserie. Pour continuer la cuisson, refermez la porte. L‘appareil ne reprend pas la cuisson tant que la porte n‘est pas complètement fermée. REMARQUE : Si vous ouvrez la porte et ne la refermez pas dans les 30 minutes, l‘appareil s‘éteint automatiquement. -
Seite 72: Nettoyage Et Entretien
12 L‘appareil arrête automatiquement la cuisson et émet trois bips. La ventilation fonctionne encore pendant 60 secondes et abaisse la température interne de l‘appareil. 13 Assurez-vous que les aliments sont cuits. • Si les aliments ne sont pas cuits à votre goût en fin de cuisson, répétez les étapes 7 à... -
Seite 73: Stockage
CONSEIL : Faites tremper les composants retirés dans de l‘eau chaude pour éliminer la saleté tenace. Desserrez les vis du tournebroche pour bien le nettoyer ainsi que les crochets. MISE EN GARDE : Ne plongez pas l‘appareil dans l‘eau pour le nettoyer. L‘appareil est alimenté... -
Seite 74: Recyclage
RECYCLAGE Vous trouverez sur le produit l’image ci-contre (une poubelle sur roues, barrée d‘une croix), ce qui indique que le produit se trouve soumis à la directive européenne 2012/19/UE. Renseignez-vous sur les dispositions en vigueur dans votre région concernant la collecte séparée des appareils électriques et électroniques. -
Seite 77: Declaración De Conformidad
Estimado cliente: Le felicitamos por la adquisición de este producto. Lea atentamente el siguiente manual y siga cuidadosamente las instrucciones de uso con el fin de evitar posibles daños. La empresa no se responsabiliza de los daños ocasionados por un uso indebido del producto o por haber desatendido las indicaciones de seguridad. - Seite 79 ÍNDICE Indicaciones de seguridad ....................80 Vista general del aparato ........................84 Accesorios Montaje ................................85 Desembalar Limpiar el aparato antes del primer uso Montar los accesorios Instalación Conexión a la red eléctrica Puesta en marcha por primera vez Puesta en funcionamiento .......................... 89 Selección del accesorio Funcionamiento ............................
-
Seite 80: Indicaciones De Seguridad
INDICACIONES DE SEGURIDAD Lea atentamente todas las indicaciones y conserve este manual de instrucciones para consultas posteriores En estas indicaciones de seguridad y más adelante en el texto, encontrará las siguientes advertencias : PELIGRO indica una situación peligrosa que, si no se evita, causa la muerte o lesiones graves. - Seite 81 ADVERTENCIA: El uso de este aparato puede provocar daños generales. Para evitar daños: • No utilice el aparato con otro fin distinto al del indicado. • No utilice el aparato si no funciona correctamente o si se ha visto dañado de alguna manera.
- Seite 82 ADVERTENCIA: Cuando el aparato está en marcha, genera vapor caliente. El interior de la freidora, los alimentos, la bandeja de goteo, la cesta y la rejilla alcanzan temperaturas elevadas durante el funcionamiento y se mantienen calientes un tiempo después de apagar el aparato. Para evitar quemarse : •...
-
Seite 84: Vista General Del Aparato
VISTA GENERAL DEL APARATO 1Cubierta 7 Gancho de la brocheta giratoria 2 Panel de control 8 Brocheta giratoria 3 Carcasa 9 Rejilla grill 4 Cable de alimentación 10 Cesto de fritura 5 Espacio de fritura 1 1 Bandeja de goteo 6 Puerta Accesorios Gancho de la brocheta giratoria... -
Seite 85: Montaje
13 Botón: Temperatura (TEMP) 18 Botón: Programa (PRESET) 14 Botón: Tiempo (TIME) 19 Botón: Asar (ROTISSERIE) 15 Botón: Aumentar 20 Botón: Menú (MENU) 16 Indicador: Display 21 Indicador: Programa (PRESETS) 17 Botón: Disminuir 22 Botón: Start/Stop MONTAJE Desembalar Retire todo el material de embalaje, así como los adhesivos en la parte interior y exterior del aparato y de sus accesorios. -
Seite 86: Bandeja De Goteo
Bandeja de goteo Abra con cuidado la puerta e introduzca la bandeja de goteo en las ranuras laterales como se indica en la imagen. Rejilla grill Abra con cuidado la puerta e introduzca la rejilla grill en las ranuras laterales como se indica en la imagen. -
Seite 87: Instalación
Brocheta giratoria Inserte los fijadores (B) en la brocheta (A). Ajuste los tornillos para que los fijadores estén bien sujetos en la brocheta. Inserte la brocheta en el cabezal giratorio (D) de la freidora. Sólo encaja en los cabezales de una forma determinada. No ejerza fuerza. Instalación ATENCIÓN: Asegúrese de dejar un espacio de al menos 10 cm entre la freidora y los objetos adyacentes, así... -
Seite 88: Puesta En Marcha Por Primera Vez
Conecte la freidora únicamente a las tomas de corriente cuya tensión corresponde a las especificaciones técnicas del aparato. No conecte el aparato si el cable de alimentación o el enchufe está dañado. En este caso, póngase en contacto con un centro técnico autorizado por el fabricante para llevar a cabo una reparación. -
Seite 89: Puesta En Funcionamiento
Cerca del botón MENU se encuentran los indicadores de programas. Cada programa tiene su icono. Pulse varias veces el botón MENU para navegar entre los programas. Los indicadores se irán iluminando desde la primera fila a la izquierda hasta la segunda fila a la derecha. -
Seite 90: Selección Del Accesorio
Selección del accesorio Elija el tipo y la cantidad del alimento que desea preparar y el accesorio adecuado para ello: • Utilice la rejilla grill para alimentos individuales como, por ejemplo, los muslos de pollo o la pizza. • Utilice el cesto de fritura para asar uniformemente alimentos más grandes como nuggets o patatas fritas. - Seite 91 Utilice la brocheta de la siguiente manera : Antes de utilizar la brocheta, asegúrese de que no está caliente. Si la brocheta está caliente: Póngase guantes de cocina. Retire la brocheta giratoria con la ayuda de un utensilio apto para alimentos y resistente al calor para evitar quemarse.
-
Seite 92: Funcionamiento
FUNCIONAMIENTO ATENCIÓN: Durante y después de la preparación, el interior del aparato, los accesorios, los alimentos y la salida de vapor en la parte posterior del aparato están muy calientes. Es posible que salga vapor del compartimento para freír según el tipo de alimento. Siempre lleve guantes de cocina cuando maneje el aparato. -
Seite 93: Inicio Programado
• está en modo operativo y no se pulsa ningún botón o • no se ha elegido ningún programa. En modo Standby, todos los botones están inactivos excepto los botones Start/Stop, Menu y Preset. Pulse el botón Menu, para «despertar» el aparato del modo Standby. Inicio programado La freidora dispone de la función Inicio programado de 1-60 minutos que permite empezar la preparación a una hora determinada en el futuro. - Seite 94 Empezamos: Asegúrese de que el aparato esté desenchufado y apagado. En caso necesario, pulse el botón Start/Stop para apagar el aparato. Abra con cuidado la puerta. Compruebe que el interior y los accesorios del aparato no están calientes. De ser necesario, lleve manoplas y retire los accesorios con un utensilio apto para alimentos y resistente al calor para evitar quemarse.
-
Seite 95: Temperatura Y Tiempo De Preparación
Alimento Temperatura Tiempo Patatas fritas 220°C 25 minutod Alimentos 80°C 10 minutos congelados Alitas de pollo 200°C 15 minutos Deshidratrar* 70°C* 8 horas Filete 180°C 12 minutos Chips 220°C 20 minutos Pescado 180°C 15 minutos Verdura 180°C 12 minutos Palomitas 220°C 10 minutos (Precalentamiento: 2 minutos) -
Seite 96: Función De Rotación
rapidement la température. Pulse el botón (Temperatura). El valor de la temperatura actual empieza a parpadear en el display. • Pulse el botón + para aumentar la temperatura. • Pulse el botón - para disminuir la temperatura. Cuando deja de pulsar por unos segundos los botones + y -, la temperatura configurada actual deja de parpadear en el display y se ilumina de forma continua. -
Seite 97: Continuar La Preparación
Abra con cuidado la puerta. El aparato interrumpe automáticamente el programa. Durante la preparación, el aparato se detiene automáticamente si abre la puerta. Todos los botones están inactivos, incluso los botones Start/Stop, Preset (Inicio programado) y Asar. Para continuar con la preparación, cierre la puerta. El aparato prosigue con la preparación tan pronto como cierra la puerta. -
Seite 98: Limpieza Y Cuidado
12 La freidora finaliza automáticamente la preparación y emite 3 pitidos. Los ventiladores funcionan durante 1 minuto más para enfriar el aparato. 13 Compruebe que los alimentos estén listos. • Si el aparato ha finalizado la preparación, pero el alimento no está lo suficientemente hecho para su gusto, repita los pasos 7-1 1. -
Seite 99: Almacenaje
RECOMENDACIÓN: Deje los accesorios extraídos en remojo en agua caliente para retirar la suciedad incrustada. Desatornille los tornillos de la brocheta giratoria para limpiar a fondo la brocheta y los fijadores. ADVERTENCIA: Nunca sumerja el aparato en agua. El aparato funciona con corriente eléctrica, por lo que puede dañarse o causar una descarga eléctrica muy peligrosa cuando vuelva a ponerlo en marcha. -
Seite 100: Retirada Del Aparato
RETIRADA DEL APARATO Si el aparato lleva adherida la ilustración de la izquierda (el contenedor de basura tachado), entonces rige la directiva europea 2012/19/UE. Este producto no debe arrojarse a un contenedor de basura común. Infórmese sobre las leyes territoriales que regulan la recogida separada de aparatos eléctricos y electrónicos. -
Seite 103: Dichiarazione Di Conformità
Gentile Cliente, La ringraziamo per aver acquistato il dispositivo. La preghiamo di leggere attentamente le seguenti istruzioni per l’uso e di seguirle per evitare possibili danni tecnici. Non ci assumiamo alcuna responsabilità per danni scaturiti da una mancata osservazione delle avvertenze di sicurezza e da un uso improprio del dispositivo. - Seite 105 INDICE Avvertenze di sicurezza ..................... 106 Componenti del dispositivo ......................110 Accessori Montaggio ............................... 111 Disimballaggio Pulizia del dispositivo prima del primo uso Inserire i componenti Installazione Alimentazione Primo utilizzo Messa in funzione ............................115 Scegliere il supporto di cottura Controllo delle funzioni ........................
-
Seite 106: Avvertenze Di Sicurezza
AVVERTENZE DI SICUREZZA Leggere attentamente il manuale e conservarlo per future consultazioni. In queste avvertenze di sicurezza e nel testo seguente si trovano i seguenti avvisi in risalto: PERICOLO indica una situazione pericolosa, che se non viene evitata, può causare morte o lesioni gravi. - Seite 107 AVVERTENZA: l’utilizzo di questo dispositivo può presentare pericoli generici. Per evitare danni. • Non utilizzare il dispositivo per scopi diversi da quelli descritti. • Non utilizzare il dispositivo se è stato danneggiato in qualche modo o se presenta malfunzionamenti. • Non modificare il dispositivo e non cercare di riparare autonomamente eventuali guasti.
- Seite 108 AVVERTENZA: durante l’utilizzo esce vapore dal dispositivo. L’interno del dispositivo, le pietanze riscaldate, la vaschetta di gocciolamento, il cestello per friggere e la griglia sono bollenti durante il funzionamento e per un certo tempo a seguire. Per evitare di scottarsi: •...
-
Seite 110: Componenti Del Dispositivo
COMPONENTI DEL DISPOSITIVO 1Copertura 7 Impugnatura per lo spiedo 2 Pannello di controllo 8 Spiedo 3 Alloggiamento 9 Griglia 4 Cavo di alimentazione 10 Cestello per friggere 5 Vano di cottura 1 1 Vaschetta di gocciolamento 6 Sportello Accessori Impugnatura per lo spiedo Questo accessorio serve a togliere e inserire lo spiedo senza scottarsi. -
Seite 111: Montaggio
13 Tasto: Temperatura (TEMP) 18 Tasto: Programma (PRESET) 14 Tasto: Tempo (TIME) 19 Tasto: Girarrosto (ROTISSERIE) 15 Tasto: AUMENTARE 20 Tasto: Menu 16 Indicazione: Display 21 Indicazione: Programma (PRESETS) 17 Tasto: DIMINUIRE 22 Tasto: Start/Stop MONTAGGIO Disimballaggio Rimuovere tutti i materiali di imballaggio e le etichette dall’interno, dall’esterno del dispositivo e dai suoi componenti. - Seite 112 Vaschetta di gocciolamento Aprire lo sportello con cura e far scorrere la vaschetta di gocciolamento sulle guide laterali, come mostrato in immagine. Griglia Aprire lo sportello con cura e far scorrere la griglia sulle guide laterali, come mostrato in immagine. Cestello per friggere Aprire lo sportello con cura e far scorrere il cestello per friggere sulle guide laterali, come mostrato in immagine.
-
Seite 113: Installazione
Spiedo Posizionare i fissaggi (B) sull’asta dello spiedo (A). Avvitare i fissaggi, in modo che siano posizionati saldamente sullo spiedo. Posizionare lo spiedo sui rotori (D). Lo spiedo può essere inserito sui rotori solo in una determinata posizione. Non esercitare forza. Installazione ATTENZIONE: assicurarsi di lasciare almeno 10 cm di spazio tra il dispositivo e oggetti o pareti circostanti, in modo da permettere al vapore di fuoriuscire. -
Seite 114: Primo Utilizzo
Collegare il dispositivo solo se la tensione della presa elettrica corrisponde a quella del dispositivo. Se il cavo di alimentazione o la spina sono danneggiati, non collegare il dispositivo. Lasciarli sostituire da un centro di assistenza autorizzato dal produttore. Il dispositivo non può essere utilizzato con un timer o un sistema di controllo a distanza. -
Seite 115: Messa In Funzione
Accanto al tasto MENU si trova la Panoramica dei programmi. Ogni programma è rappresentato da un simbolo. Premendo più volte MENU si naviga in sequenza tra i programmi, iniziando a sinistra in alto sulla prima linea, fino a destra in basso sulla seconda linea. -
Seite 116: Scegliere Il Supporto Di Cottura
Scegliere il supporto di cottura Selezionare il tipo e la quantità di pietanze da cuocere e il supporto di cottura: • Utilizzare la griglia per pietanze singole, come cosce di pollo o pizza. • Utilizzare il cestello di frittura per cuocere in modo omogeneo grandi quantità, come crocchette di pollo o patatine fritte. - Seite 117 Prima dell’utilizzo, assicurarsi che il girarrosto non sia bollente. Se il girarrosto è bollente: Indossare guanti da forno. Afferrare il girarrosto con un utensile da cucina termoresistente e adatto agli alimenti, in modo da evitare ustioni. Lasciare raffreddare il girarrosto su un fondo termoresistente e adatto agli alimenti, prima di procedere con il passaggio successivo.
-
Seite 118: Controllo Delle Funzioni
CONTROLLO DELLE FUNZIONI ATTENZIONE: durante e dopo la cottura, l’interno del dispositivo, le pietanze e i supporti di cottura sono bollenti. In base al tipo di pietanza, può fuoriuscire vapore dal dispositivo. Indossare sempre guanti da forno quando si utilizza il dispositivo. Afferrare supporti di cottura e spiedo con un utensile da cucina termoresistente e adatto agli alimenti, in modo da evitare ustioni. -
Seite 119: Avvio Programmato
• Non viene impostato alcun programma In modalità standby sono inattivi tutti i tasti tranne Start/Stop, MENU e PRESET. Premere MENU per riattivare il dispositivo dalla modalità standby. Avvio programmato Il dispositivo permette di utilizzare un avvio programmato da 1 a 60 minuti, in modo di inziare la cottura ad un preciso momento. - Seite 120 Ecco come funziona: Assicurarsi che il dispositivo sia collegato alla rete elettrica e che sia spento. Se necessario, premere Start/Stop per spegnere il dispositivo. Aprire con cura lo sportello del dispositivo. Assicurarsi che l’interno del dispositivo, il supporto di cottura o lo spiedo non siano caldi.
-
Seite 121: Tempo E Temperatura Di Cottura
Alimento Temperatura Tempo Patatine 220°C 25 minuti SCONGELARE 80°C 10 minuti Ali di pollo 200°C 15 minuti ESSICCARE* 70°C* 8 ore Bistecca 180°C 12 minuti Chips 220°C 20 minuti Pesce 180°C 15 minuti Verdure 180°C 12 minuti Popcorn 220°C 10 minuti (preriscaldare: 2 minuti) Pollo 220°C 30 minuti... -
Seite 122: La Funzione Rotante
display. • Premere + per aumentare la temperatura. • Premere – per diminuire la temperatura. La temperatura impostata sul display smette di lampeggiare e rimane poi illuminata, se + o – non vengono premuti per qualche secondo. Impostare manualmente il tempo di cottura Il tempo può... -
Seite 123: Continuare La Cottura
la cottura appena lo sportello è completamente chiuso. AVVERTENZA: se lo sportello viene aperto e non viene richiuso entro 30 minuti, il dispositivo si spegne automaticamente. In tal caso, premere Start/Stop per accendere il dispositivo. ATTENZIONE: durante e dopo la cottura, l’interno del dispositivo, le pietanze e i supporti di cottura sono estremamente caldi. -
Seite 124: Pulizia E Manutenzione
12 Il dispositivo conclude automaticamente la cottura emettendo tre volte un segnale acustico. Le ventole funzionano per altri 60 secondi e abbassano la temperatura interna del dispositivo. 13 Controllare se le pietanze sono cotte. • Se la cottura delle pietanze a fine sessione non è soddisfacente, ripetere i passaggi 7-1 1. -
Seite 125: Conservazione
CONSIGLIO: far ammorbidire i componenti estratti in acqua bollente, in modo da eliminare sporco ostinato. Svitare le viti del girarrosto per pulire a fondo spiedo e fissaggi. AVVERTENZA: non immergere il dispositivo in acqua per pulirlo. Il dispositivo è alimentato elettricamente e può essere danneggiato o causare folgorazioni fatali quando viene riacceso. -
Seite 126: Smaltimento
SMALTIMENTO Se sul prodotto è presente la figura a sinistra (il bidone dei rifiuti con le ruote), si applica la direttiva europea 2012/19/ UE. Questi prodotti non possono essere smaltiti con i rifiuti normali. Informarsi sulle disposizioni vigenti per la raccolta di dispositivi elettrici ed elettronici.