Herunterladen Inhalt Inhalt Diese Seite drucken
testo 616 Bedienungsanleitung

testo 616 Bedienungsanleitung

Materialfeuchte-messgerät
Vorschau ausblenden Andere Handbücher für 616:

Werbung

Verfügbare Sprachen

Verfügbare Sprachen

testo 616
Materialfeuchte Messgerät
Bedienungsanleitung
Material moisture measuring instrument
Instruction manual
Appareil de mesure de l'humidité
des matériaux.
Mode d'emploi

Werbung

Inhaltsverzeichnis
loading

Inhaltszusammenfassung für testo 616

  • Seite 1 616 Materialfeuchte Messgerät Bedienungsanleitung Material moisture measuring instrument Instruction manual Appareil de mesure de l'humidité des matériaux. Mode d’emploi...
  • Seite 2 Bedienungsanleitung (de)..........3 Instruction manual (en) ..........17 Mode d’emploi (fr) ............31...
  • Seite 3: Inhaltsverzeichnis

    Inhalt 3 Inhalt Inhalt ..............3 Allgemeine Hinweise ..........4 Sicherheitshinweise ..........5 Bestimmungsgemäße Verwendung ......6 Produktbeschreibung ..........7 Anzeige- und Bedienelemente ........7 Spannungsversorgung ............8 Feuchtemessverfahren ............8 Inbetriebnahme ............9 Bedienung............9 Gerät ein- / ausschalten ..........9 Displaybeleuchtung ein- / ausschalten ......10 Einstellungen vornehmen ..........10 Messen ..............11 Wartung und Pflege..........13 Fragen und Antworten........14 Technische Daten ..........14...
  • Seite 4: Allgemeine Hinweise

    Allgemeine Hinweise Allgemeine Hinweise Dieses Kapitel gibt wichtige Hinweise zur Nutzung der vor - liegen den Dokumentation. Diese Dokumentation enthält Informationen, die für einen sicheren und effizienten Einsatz des Produkts beachtet werden müssen. Lesen Sie diese Dokumentation aufmerksam durch und machen Sie sich mit der Bedienung des Produkts vertraut, bevor Sie es einsetzen.
  • Seite 5: Sicherheitshinweise

    Aus Sicher heits gründen nur Original- Ersatzteile von Testo verwenden. Fachgerecht entsorgen Defekte Akkus / leere Batterien an den dafür vor - gesehenen Sammelstellen abgeben. Produkt nach Ende der Nutzungszeit an Testo senden. Wir sorgen für eine umwelt schonende Entsorgung.
  • Seite 6: Bestimmungsgemäße Verwendung

    Dieses Kapitel nennt die Anwendungsbereiche, für die das Produkt bestimmt ist. Setzen Sie das Produkt nur für die Bereiche ein, für die es konzipiert wurde. Im Zweifelsfall bitte bei Testo nachfragen. Das Produkt wurde für folgende Aufgaben / Bereiche konzipiert: ·...
  • Seite 7: Produktbeschreibung

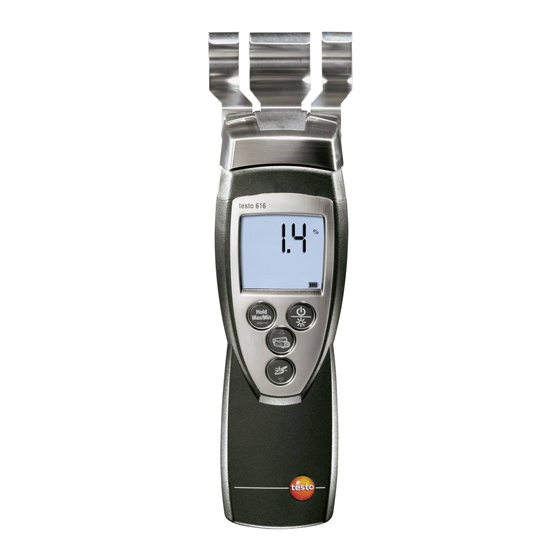
    3. Produktbeschreibung 7 Produktbeschreibung Dieses Kapitel gibt eine Übersicht über die Komponenten des Produkts und deren Funktionen. 3.1 Anzeige- und Bedienelemente Übersicht ➀ Kontaktbleche ➁ Display ➂ Bedientasten ➃ Batteriefach (Rückseite) Tastenfunktionen Taste Funktionen Gerät einschalten; Gerät ausschalten (gedrückt halten) Displaybeleuchtung ein-/ ausschalten Messwert halten, Maximal-/ Minimal - wert anzeigen...
  • Seite 8: Spannungsversorgung

    3. Produktbeschreibung 3.2 Spannungsversorgung Die Spannungsversorgung erfolgt über eine 9V Block - batterie (im Lieferumfang) bzw. -akku. Ein Netzbetrieb und das Laden eines Akkus im Gerät ist nicht möglich. 3.3 Feuchtemessverfahren Die zerstörungsfreie Streufeldmessung nutzt die Fähigkeit von Wassermolekülen, elektromagnetische Felder zu dämpfen und damit zu verändern.
  • Seite 9: Inbetriebnahme

    4. Inbetriebnahme 9 Inbetriebnahme Dieses Kapitel beschreibt die Handlungsschritte, die zur Inbetrieb nahme des Produkts erforderlich sind. ➣ Display-Schutzfolie entfernen: Schutzfolie vorsichtig abziehen. ➣ Batterie / Akku einlegen: Batteriefach auf der Rückseite des Gerätes öffnen: Batteriefachdeckel in Pfeilrichtung schieben und abnehmen.
  • Seite 10: Displaybeleuchtung Ein- /Ausschalten

    5. Bedienung 5.2 Displaybeleuchtung ein- /ausschalten ➣ Displaybeleuchtung ein- / ausschalten: ✓ Das Gerät ist eingeschaltet. drücken. 5.3 Einstellungen vornehmen Konfigurationsmodus öffnen: ✓ Das Gerät ist eingeschaltet und befindet sich in der Mess ansicht. Hold, Max oder Min sind nicht aktiviert. gedrückt halten (ca.
  • Seite 11: Messen

    6. Messen 11 Reset durchführen: ✓ Der Konfigurationsmodus ist geöffnet, RESET leuchtet. die gewünschte Option wählen und mit bestätigen: · no: Keinen Reset durchführen. · Yes: Einen Reset durchführen. Dabei wird das Gerät auf die Werkseinstellungen zurück gesetzt. - Das Gerät wechselt zurück zur Messansicht. Messen Dieses Kapitel beschreibt die Handlungsschritte, die zur Durch führung von Messungen mit dem Produkt erforder -...
  • Seite 12 6. Messen ➣ Messung durchführen: ✓ Das Gerät ist eingeschaltet und befindet sich in der Mess ansicht. Gerät waagerecht zur Auflagefläche halten. Anpress- druck langsam auf 1 bis 3kg erhöhen, bis ein stabiler Wert angezeigt wird. Um einen Feuchteverlauf beurteilen zu können sind mehrere Messungen an verschiedenen Stellen oder zu verschiedenen Zeitpunkten notwendig.
  • Seite 13: Wartung Und Pflege

    7. Wartung und Pflege 13 Wartung und Pflege Dieses Kapitel beschreibt die Handlungsschritte, die zur Erhaltung der Funktionsfähigkeit und zur Verlängerung der Lebensdauer des Produkts beitragen. ➢ Gehäuse reinigen: Das Gehäuse bei Verschmutzung mit einem feuchten Tuch (Seifen lauge) reinigen. Keine scharfen Reinigungs- oder Lösungsmittel verwenden! ➢...
  • Seite 14: Fragen Und Antworten

    · Zulässigen Mess- wurde überschritten. bereich einhalten. Falls wir Ihre Frage nicht beantworten konnten: Wenden Sie sich bitte an Ihren Händler oder den Testo-Kunden - dienst. Kontakt daten finden Sie im Garantieheft oder im Internet unter www.testo.com . Technische Daten...
  • Seite 15: Tipps Und Hilfe

    < 5 Gewichts % In einem Raumklima von 20 °C und 65 %rF 11. Zubehör/ Ersatzteile Bezeichnung Artikel-Nr. Bereitschaftstasche 0516 0210 Eine vollständige Liste aller Zubehör- und Ersatzteile finden Sie in den Produktkatalogen und -broschüren oder im Internet unter: www.testo.com...
  • Seite 16 Notizen...
  • Seite 17 Content 17 Content General notes ............18 Safety instructions ..........19 Intended purpose ..........20 Product description ..........21 Display and control elements ........21 Voltage supply ..............22 Humidity measurement procedure ........22 Commissioning ..........23 Operation ............23 Switching the instrument on/off ........23 Switching the display light on/off ........24 Performing settings ............24 Measuring ............25 Care and maintenance ........27...
  • Seite 18: General Notes

    General notes General notes This chapter provides important advice on using this documentation. This documentation contains information that must be applied if the product is to be used safely and efficiently. Please read this documentation through carefully and familiarize yourself with the operation of the product before putting it to use.
  • Seite 19: Safety Instructions

    Ensure correct disposal Take faulty rechargeable batteries/spent batteries to the collection points provided for them. Send the product back to testo at the end of its useful life. We will ensure that it is disposed of in an environmentally friendly manner.
  • Seite 20: Intended Purpose

    This chapter gives the areas of application for which the product is intended. Use the product only for those applications for which it was designed. Ask testo if you are in any doubt. The product was designed for the following tasks/applications: ·...
  • Seite 21: Product Description

    3. Product description 21 Product description This chapter provides an overview of the components of the product and their functions. 3.1 Display and control elements Overview ➀ Contact plates ➁ Display ➂ Control keys ➃ Battery compartment (rear) Key functions Functions Switch instrument on;...
  • Seite 22: Voltage Supply

    3. Product description 3.2 Voltage supply Voltage is supplied by means of a 9 V monobloc battery (included in delivery) or rechargeable battery. It is not possible to run the instrument from the mains supply or charge a rechargeable battery in the instrument. 3.3 Humidity measurement procedure The non-destructive stray field measurement uses the...
  • Seite 23: Commissioning

    4. Commissioning 23 Commissioning This chapter describes the steps required to commission the product. ➣ Removing the protective film on the display: Pull the protective film off carefully. ➣ Inserting a battery/rechargeable battery: To open the battery compartment on the rear of the instrument, push the lid of the battery compartment in the direction of the arrow and remove it.
  • Seite 24: Switching The Display Light On/Off

    5. Operation 5.2 Switching the display light on/off ➣ Switching the display light on/off: ✓ The instrument is switched on. Press 5.3 Performing settings To open configuration mode: ✓ The instrument is switched on and is in measurement view. Hold, Max or Min are not activated. Press and hold (for approx.
  • Seite 25: Measuring

    6. Measuring 25 To reset: ✓ Configuration mode is opened, RESET is lit. Select the desired option with and confirm with · no: Instrument is not reset. · Yes: Instrument is reset. The instrument is reset to the factory settings. - The instrument returns to measurement view.
  • Seite 26 6. Measuring ➣ Taking a measurement: ✓ The instrument is switched on and is in measurement view. Hold instrument horizontal to contact surface. Slowly increase contact pressure to 1 to 3 kg until a stable value is shown In order to be able to evaluate a moisture course, several measurements at different positions or at different times are necessary.
  • Seite 27: Care And Maintenance

    7. Care and maintenance 27 Care and maintenance This chapter describes the steps that help to maintain the functionality of the product and extend its operating life. ➢ Cleaning the housing: Clean the housing with a moist cloth (soap suds) if it is dirty.
  • Seite 28: Questions And Answers

    · Permitted measuring range · Keep to permitted was exceeded. measuring range. If we could not answer your question, please contact your dealer or testo Customer Service. Contact details can be found on the guarantee card or on the Internet under www.testo.com . Technical data...
  • Seite 29: Tips And Assistance

    In ambient conditions 20 °C and 65 %RH 11. Accessories/spare parts Designation Article no. Case 0516 0210 For a complete list of all accessories and spare parts, please refer to the product catalogues and brochures or look up our website at: www.testo.com...
  • Seite 30 Notes...
  • Seite 31 Sommaire 31 Sommaire Recommandations générales ......31 Consignes de sécurité........33 Utilisation conforme..........34 Description du produit ........35 Éléments d'affichage et de commande ......35 Alimentation électrique ..........36 Procédé de mesure de l'humidité ........36 Mise en service ..........37 Fonctionnement ..........37 Allumer/éteindre l'appareil ..........37 Allumer/éteindre l'éclairage de l'afficheur ......38 Paramétrage ..............38 Mesures ............39 Maintenance et entretien ........41...
  • Seite 32: Recommandations Générales

    Recommandations générales Recommandations générales Ce chapitre donne des recommandations importantes pour l'utilisation de ce document. Ce document comporte des informations devant être prises en compte pour une utilisation efficace du produit en toute sécurité. Veuillez, attentivement, prendre connaissance de ce document et familiarisez-vous avec le maniement du produit avant de l'utiliser.
  • Seite 33: Consignes De Sécurité

    Testo. Élimination selon les règles de l'art Déposez les accus défectueux/les piles vides aux endroits prévus à cet effet (points de collecte). Renvoyez le produit chez Testo au terme de sa durée d'utilisation. Nous assurons une élimination respectueuse de l'environnement.
  • Seite 34: Utilisation Conforme

    N'utilisez le produit que dans les domaines pour lesquels il a été conçu. En cas de doute, veuillez vous adresser à Testo. Le produit a été conçu pour les tâches/domaines suivants : · Evaluation rapide et non destructive du taux d'humidité...
  • Seite 35: Description Du Produit

    3. Description du produit 35 Description du produit Ce chapitre fournit un aperçu des composants du produit et de leurs fonctions. 3.1 Éléments d'affichage et de commande Aperçu ➀ Pattes de contact ➁ Afficheur ➂ Touches de fonction ➃ Compartiment pile (au dos) Fonctions des touches Touche Fonctions...
  • Seite 36: Alimentation Électrique

    3. Description du produit 3.2 Alimentation électrique L'alimentation électrique est assurée par une pile monobloc de 9 V (comprise dans la livraison) ou par un accu monobloc. Un fonctionnement sur secteur et le chargement d'un accu dans l'appareil sont impossibles. 3.3 Procédé...
  • Seite 37: Mise En Service

    4. Mise en service 37 Mise en service Ce chapitre décrit les manipulations nécessaires à la mise en service du produit. ➣ Enlever la feuille de protection de l'afficheur : Enlevez la feuille de protection avec précaution. ➣ Insérer la pile/l'accu : Ouvrez le compartiment pile au dos de l'appareil : faites glisser le couvercle du compartiment pile dans le sens de la flèche puis retirez-le..
  • Seite 38: Allumer/Éteindre L'éclairage De L'afficheur

    5. Fonctionnement 5.2 Allumer/éteindre l'éclairage de l'afficheur ➣ Allumer/éteindre l'éclairage de l'afficheur : ✓ L'appareil est allumé. Appuyez sur 5.3 Paramétrage Ouvrir le mode configuration : ✓ L'appareil est allumé et se trouve en mode affichage de mesure. Hold, Max ou Min ne sont pas activés. Maintenez la touche enfoncée (pendant env.
  • Seite 39: Mesures

    6. Mesures 39 Effectuer un reset : ✓ Le mode configuration est activé, RESET s'affiche. Sélectionnez l'option souhaitée avec confirmez avec · no : ne pas effectuer de reset. · Yes : effectuer un reset. Les réglages d'usine de l'appareil sont alors rétablis. - L'appareil repasse en mode affichage de mesure.
  • Seite 40 6. Mesures ➣ Effectuer une mesure : ✓ L'appareil est allumé et se trouve en mode affichage de mesure. Tenez l'appareil à l'horizontale par rapport à la surface. Augmentez doucement la pression de contact de 1 à 3 kg jusqu'à ce qu'une valeur stable s'affiche.
  • Seite 41: Maintenance Et Entretien

    7. Maintenance et entretien 41 Maintenance et entretien Ce chapitre décrit les manipulations contribuant au maintien du bon fonctionnement et à la prolongation de la durée d'utilisation du produit. ➢ Nettoyer le boîtier : En cas de salissure, nettoyez le boîtier avec un linge humide (eau savonneuse).
  • Seite 42: Questions Et Réponses

    été dépassée par le haut. de mesure autorisée. Au cas où nous n'aurions pu répondre à votre question : veuillez vous adresser à votre revendeur ou au service après-vente Testo. Vos contacts figurent dans le carnet de garantie ou sur internet à l'adresse suivante : www.testo.com .
  • Seite 43: Conseils Et Dépannage

    Conditions ambiantes de 20°C et 65% d'HR 11. Accessoires/pièces de rechange Désignation Référence Étui de transport 0516 0210 Vous trouverez une liste complète de tous nos accessoires et pièces de rechange dans nos catalogues produits et brochures ainsi que sur internet à l'adresse : www.testo.com...
  • Seite 44 Testo SE & Co. KGaA Celsiusstraße 2 79822 Titisee-Neustadt Germany Telefon: +49 7653 681-0 E-Mail: info@testo.de Internet: www.testo.com 0977 6160 de en fr 02 - 04.2022...

Inhaltsverzeichnis