Herunterladen Inhalt Inhalt Diese Seite drucken
auna IR 160 Bedienungsanleitung

auna IR 160 Bedienungsanleitung

Internet radio
Vorschau ausblenden Andere Handbücher für IR 160:

Werbung

Verfügbare Sprachen
  • DE

Verfügbare Sprachen

  • DEUTSCH, seite 1

Werbung

Inhaltsverzeichnis
loading

Inhaltszusammenfassung für auna IR 160

  • Seite 3: Inhaltsverzeichnis

    Sehr geehrter Kunde, wir gratulieren Ihnen zum Erwerb Ihres Gerätes. Lesen Sie die folgenden Hinweise sorgfältig durch und befolgen Sie diese, um möglichen Schäden vorzubeugen. Für Schäden, die durch Missachtung der Hinweise und unsachgemäßen Gebrauch entstehen, übernehmen keine Haftung. Scannen Sie den QR-Code, um Zugriff auf die aktuellste Bedienungsanleitung weitere...
  • Seite 4: Technische Daten

    TECHNISCHE DATEN Artikelnummer 10031584, 10031585, 10032796 Stromversorgung Netzgerät 220-240V ~ 50/60Hz Netzgerät Ausgang 5,9 V 1,2 A TFT-Anzeige Größe 2,8", Auflösung 320 x 240 Unterstützes WLAN-Netzwerk IEEE 802.11 b/g/n Unterstützte Verschlüsselungen WEP, WPA, WPA2 (PSK), WPS Streaming UPNP, DLNA Unterstützte Dateitypen WMA, MP3, OGG Anschlüsse 1 x 3.5mm Aux-In, 3.5mm Line Out, USB...
  • Seite 5: Sicherheitshinweise

    SICHERHEITSHINWEISE DIE NICHTBEFOLGUNG DIESER HINWEISE KANN ERNSTE PERSONENVERLETZUNGEN ZUR FOLGE HABEN UND DAS GERÄT BESCHÄDIGEN Allgemein Sicherheitshinweise • GEFAHR: NICHT ZUR NUTZUNG FÜR KINDER GEEIGNET. • Das Gerät ist ausschließlich zur privaten Nutzung im Heimbereich bestimmt. Jeder andere Gebrauch wird als Fehlanwendung betrachet. •...
  • Seite 6 Besondere Sicherheitshinweise Kleine Objekte/Verpackungsteile (Plastikbeutel, Karton, etc.): • Bewahren Sie kleine Objekte (z. B. Schrauben und anderes Montagematerial, Speicherkarten) und Verpackungsteile außerhalb der Reichweite von Kindern auf, damit sie nicht von diesen verschluckt werden können. Lassen Sie kleine Kinder nicht mit Folie spielen. Es besteht Erstickungsgefahr! Transport des Gerätes: Bitte bewahren Sie die Originalverpackung auf.
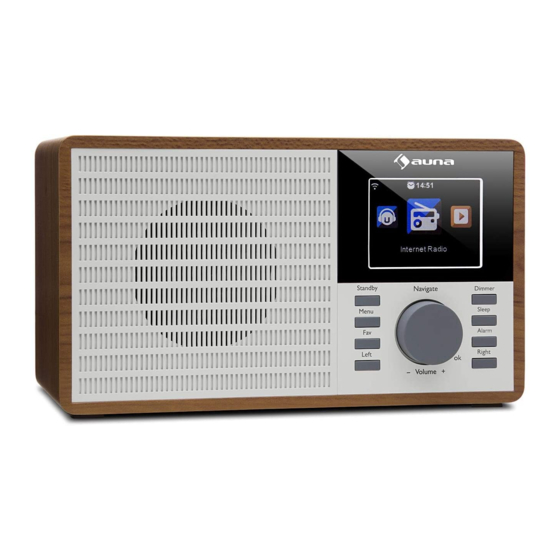
  • Seite 7: Geräteübersicht

    GERÄTEÜBERSICHT Gerät vorne Lautsprecher Menütaste Zeigt das Menü für den aktuellen Modus an. Links Nach links gehen. Schnellzugriff auf die Lieblingsstationen Standby Standby-Betrieb / einschalten. Multifunktions-Drehkknopf: - Volume/Navigator/OK Einstellung der Lautstärke - Auswahl im Menü - Bestätigungstaste, um einen Menüpunkt auszuwählen - Im Betrieb das Programmenü...
  • Seite 8 Rückseite 12 Typenschild 13 Ein/Aus-Schalter 14 Anschluss Netzgerät 15 Line-Out-Ausgang 16 Aux-Eingang 17 USB-Eingang für USB-Sticks zum Abspielen von MP3...
  • Seite 9: Fernbedienung

    Fernbedienung Dimmer Sleep Alarm MODE HOME VOL+ VOL- PQRS WXYZ FAV+ Standby 13 Cusor hoch 14 Cursor links Stummschaltung Equalizer 15 Cursor rechts Dimmer 16 Cursor runter Abschaltung nach Zeit 17 Auswahlbestätigung Einstellung des Alarms 18 Lautstärke - Titel zurück 19 Lautstärke + Titel vor 20 Eingabe von Zahlen...
  • Seite 10: Einschalten

    Einschalten Schließen Sie das Netzgerät an den Anschluss der Stromversorgung auf der Rückseite des Gerätes an. Stellen Sie den ON/OFF-Schalter auf die Position ON. Daraufhin erscheint der Welcome-Bildschirm. Das Radio sucht in der Zeit automatisch nach einem verfügbaren Zugangspunkt. Verwenden Sie den Drehknopf, um das Netzwerk zu wählen.
  • Seite 11: Menüstruktur

    MENÜSTRUKTUR Drehknopf drehen und Hauptmenü Lokal-Radio drücken um etwas auszuwählen. Internet-Radio Informations-Center Einstellungen Media-Center Einstellungen Um einen Zeitanzeige Analog Menüpunkt zurückzugehen LEFT drücken. Digital My mediaU verwalten Netzwerk Funknetz-Einstellung Funknetz (WPS PBC) Manuelle Konfiguration Netzwerk prüfen beim Anschalten Datum & Zeit Datum und Zeit einstellen Zeitformat einstellen Datumsformat einstellen...
  • Seite 12 Einstellung Wecker Wecker 1 Wecker 2 Schlummer-Wecker Timer Wecker-Lautstärke Sprache Dimmer Energiesparmodus Einschalten Anzeige Farbe Monochrom Energieeinstellungen Sleep Timer Zwischenspeicher Wetter Lokale Einstellungen Temperatureinheit Anzeigen bei Standby...
  • Seite 13 Einstellung Automatisch (Land) Lokale Stationseinstellung Manuell (Stadt) Automatische Erkennung Wiedergabe-Einstellung Alle wiederholen Eins wiederholen zufällig Gerät Umbennen (AirMusic) AirMusic Control App Equalizer Fortsetzen der Wiedergabe Softwareupdate Auf Werkeinstellungen zurückksetzen...
  • Seite 14 Internet-Radio Meine Favoriten Radiosender/Musik Lokale Station Zuletzt gehörte Sender Service Radiosender suchen Radiosender hinzufügen Media -Center UPnP Meine Wiedergabeliste Meine Wiedergabeliste löschen Informations-Center Wetter-Information Finanz-Information Systeminformation...
  • Seite 15: Funktionsbeschreibung

    FUNKTIONSBESCHREIBUNG AUX (Line input) Mit AUX wählen Sie eine externe Quelle. Internetradio Folgende Menüpunkte erscheinen in der Anzeige: Meine Favoriten Radiosender/Musik Lokale Station Zuletzt gehörte Sender Service Media-Center 1. USB Funktionen: Abspielen von Audio-Dateien über USB. Die kompatiblen Formate sind WMA/MP3/FLAC/WAV. Kompatibel mit USB 3.0 und niedriger.
  • Seite 16: Einstellungen

    4. Meine Wiedergabeliste leeren Es erscheint die Frage „Sicher entfernen?“ Anschließend „Ja“ oder „Nein“ drücken. My media U Funktion: Schnellzugriff auf die Programme des Internetradios über die persönliche Wiedergabeliste. Hinweis: Zu Beginn müssen Sie sich auf http://www.mediayou.net registrieren und die entsprechenden Einstellungen vornehmen, bevor Sie „My media U“...
  • Seite 17 „My MediaU“ verwalten „Aktivieren“ wählen, um die „My MediaU“-Funktion zu aktivieren und ins Menü aufzunehmen. „Deaktieren“ entfernt die Funktion aus dem Menü. Netzwerk WLAN-Konfiguration: Automatische Suche des WLAN und Anzeige der verfügbaren Netzwerke. OK drücken, um mit dem jeweilig ausgewählten Netzwerk zu verbinden.
  • Seite 18 Wecker Einstellung von drei Weckern (Wecker 1, Wecker 2, Schlummer-Wecker) und der Weckerlautstärke. • Die Zeit des Schlummer-Weckers geht von 5 bis 120 Minuten. Nach der Einstellung des Weckers beginnt der Countdown. Wenn die Zeit abgelaufen ist, schaltet das Gerät sich dann automatisch in den Standby-Modus und startet den Alarm.
  • Seite 19 Sleeptimer Auschalten des Gerätes durch Ausschalten des Schlaftimers. Die Zeitspanne berträgt 5,30,60,90,120,150,180 Minuten. Zwischenspeicher Einstellbar von 2 bis 8 Sekunden. Wetter Anzeige des Wetter der eingestellten Stadt. Die nachfolgenden Punkte stehen zur Auswahl: • Lokale Einstellung (Ortseinstellung). Wählen Sie den Kontinent, das Land und die Region.
  • Seite 20 Wenn die Option ausgeschaltet ist, startet das Radio nach dem Einschalten ganz regulär mit dem Hauptmenü. Wenn die Option eingeschaltet ist, fährt das Radio nach dem Einschalten mit der letzten Aktion fort. Softwareupdate Achtung: Bevor Sie ein Softwareupdate starten, achten Sie darauf, dass das Gerät fest in eine Steckdose eingesteckt ist.
  • Seite 21: Spotify Connect

    SPOTIFY CONNECT Dein neues Gerät hat Spotify Connect Verwende dein Smartphone, Tablet oder deinen Computer als Fernbedienung für Spotify. Auf spotify.com/connect erfährst du mehr. 1. Verbinde den iTuner mit Deinem WLAN-Netzwerk (Siehe Produktanleitung für Details). 2. Öffne die Spotify-App auf Deinem Smartphone, Tablet oder PC und verbinde Dich mit demselben WLAN-Netzwerk.
  • Seite 22 Chal-Tec GmbH Wallstr. 15 10179 Berlin www.chal-tec.com Die Spotify-Software unterliegt den Nutzungsrechten von Drittanbietern, die auf folgender Seite eingesehen werden können: https://www.spotify.com/connect/third-party-licenses Alle aufgeführten Marken sind Warenzeichen der jeweiligen Unternehmen. Fehler und Auslassungen ausgenommen und technischen Änderungen unterliegend. Unsere allgemeinen Geschäftsbedingungen finden Anwendung.
  • Seite 23: Spezielle Entsorgungshinweise Für Verbraucher In Deutschland

    SPEZIELLE ENTSORGUNGSHINWEISE FÜR VERBRAUCHER IN DEUTSCHLAND Entsorgen Sie Ihre Altgeräte fachgerecht. Dadurch wird gewährleistet, dass die Altgeräte umweltgerecht verwertet und negative Auswirkungen auf die Umwelt und menschliche Gesundheit vermieden werden. Bei der Entsorgung sind folgende Regeln zu beachten: • Jeder Verbraucher ist gesetzlich verpflichtet, Elektro- und Elektronikaltgeräte (Altgeräte) sowie Batterien und Akkus getrennt vom Hausmüll zu entsorgen.
  • Seite 24 • Bei einem Vertrieb unter Verwendung von Fernkommunikationsmitteln ist die unentgeltliche Abholung am Ort der Abgabe auf Elektro- und Elektronikgeräte der Kategorien 1, 2 und 4 gemäß § 2 Abs. 1 ElektroG, nämlich „Wärmeüberträger“, „Bildschirmgeräte“ (Oberfläche von mehr als 100 cm²) oder „Großgeräte“ (letztere mit mindestens einer äußeren Abmessung über 50 Zentimeter) beschränkt.
  • Seite 25: Hinweise Zur Entsorgung

    Importeur für Großbritannien: Berlin Brands Group UK Ltd PO Box 1145 Oxford, OX1 9UW United Kingdom Hiermit erklärt Chal-Tec GmbH, dass der Funkanlagentyp IR 160 der Richtlinie 2014/53/EU entspricht. Der vollständige Text der EU-Konformitätserklärung ist unter der folgenden Internetadresse verfügbar: use. berlin/10032796...
  • Seite 26 Dear Customer, Congratulations on purchasing this equipment. Please read this manual carefully and take care of the following hints to avoid damages. Any failure caused by ignoring the mentioned items and cautions mentioned in the instruction manual are not covered by our warranty and any liability. Scan the QR code to get access to the latest user manual and other information about the product.
  • Seite 27: Technical Data

    TECHNICAL DATA Item number 10031584, 10031585, 10032796 Power supply input 220-240V ~ 50/60Hz Power supply output 5, 9 V 1, 2 A TFT Display Size 2. 8", resolution 320 x 240 Supported WLAN network IEEE 802. 11 b/g/n Supported encryption WEP, WPA, WPA2 (PSK), WPS Streaming UPNP, DLNA...
  • Seite 28: Safety Instructions

    SAFETY INSTRUCTIONS FAILURE TO CAREFULLY FOLLOW THESE INSTRUCTIONS MAY LEAD TO SERIOUS PERSONAL INJURY AND DAMAGE TO YOUR PRODUCT. General Instructions • DANGER. NOT FOR USE BY CHILDREN. • For home and personal use only. Any other usage shall be construed as a misuse as set forth herein.
  • Seite 29 Special Instructions This manual is intended to familiarize you with the operation of this device. Keep this manual in a safe place for future reference. • Please use the device only in its intended way. Any other use may result in damage to the device or items in the vicinity of the device.
  • Seite 30: Controls

    CONTROLS Front Speaker Menu---Show Menu for the current mode Left---Turn left Fav---Quick access to favorite stations Standby--- Press to switch between standby and on. Volume/Navigator/OK---Combine key. Rotate rotary knob to adjust the volume when in working mode. Rotate rotary knob to select when in menu mode. Press rotary knob to confirm when in menu mode.
  • Seite 31 Rear 12 Rating label recess 13 On/Off switch button 14 DC IN socket 15 Line out socket 16 AUX in socket 17 USB port-play your USB sticks...
  • Seite 32: Remote Control

    Remote Control Dimmer Sleep Alarm MODE HOME VOL+ VOL- PQRS WXYZ FAV+ Standby button 13 Up cursor button, Mute button 14 Left cursor button EQ set tone 15 Right cursor button Dimmer button 16 Down cursor butt,on Sleep button 17 OK button Alarm button 18 Vol- button Previous button...
  • Seite 33 Switch On or Off Plug the adaptor into the DC in socket (on the rear of the product) and switch the ON/OFF switch to “ON,” then “Welcome” will be shown on the screen. Meanwhile, the radio will scan the available access point automatically.
  • Seite 34: Basic Operation

    BASIC OPERATION Main Interface Local Radio Rotate button and press OK to access a menu item. Internet Radio Information Center Configuration Media Center Configuration Time Display Analog Digital To go back to the last menu level press LEFT. Manage my mediaU Wireless Network Configuration Network Wireless Network(WPS PBC)
  • Seite 35 Configuration Alarm Alarm 1 Turn on Turn off Alarm 2 Turn on Turn off NAP Alarm 1 (turn off) Timer Alarm Volume Language Dimmer Power Saving Turn On Display Color Monochrome Power Management Sleep Timer Buffer Weather Set Location Temperature Unit Show on Standy...
  • Seite 36 Configuration Manual Setup (Country) Local Radio Setup Manual Setup (City) Auto Detect Playback Setup Repeat all Repeat one Shuffle DLNA Setup Rename (AirMusic) AirMusic Control App Equaliser Resume When Power On Software Update Reset to Default...
  • Seite 37 Internet Radio My Favorite Radio Station/Music Local Radio History Service Search Radio Station Add New Radio Station Media Center UPnP My Playlist Clear My Playlist Information Center Weather Information Financial Information System Information...
  • Seite 38: Function Operation

    FUNCTION OPERATION AUX (Line input) Function: To set up the playing mode of program with audio play from out source. Internet Radio The choices below will be shown on the screen: My Favorite Radio Station/Music Local Radio History Service Media Center 1.
  • Seite 39: Weather Information

    Note: You must install the software of “Windows Media Player 11” ( or upgrade versions) or Twonky Media on your computer, which is necessary for the UPNP operation. In “Windows Media Player,” you should get the media to share in your playlist. Your computer must be connected to the internet.
  • Seite 40: System Information

    System information Functions: To check the software version, the MAC, ID, and IP of the wireless internet. Configuration Functions: To set up Network, Alarm, Date & Time, Language, Weather, Dimmer and etc. Note: Press left button can return to the upper menu. There are 20 items which can be setting as below: Time Display There are 2 modes: Analog and Digital...
  • Seite 41 Note: If the network is not linked in the “Enable” mode, it will automatically show the choices for you to set up the network. Date and Time • Set Date and Time • Manual Setup: You can manually set the date and time. •...
  • Seite 42 Sound :To set the alarm sound 1. Beep 2. Melody 3. Internet Radio 4. USB Default alarm sound is Melody. Timer Press Left and Right to set the time and confi rm by pressing the rotary knob. When in countdown, you can press OK button to stop. Language It can support 17 languages: English, German, Spanish, French, Portuguese, Dutch, Italian, Russian, Swedish, Norwegian, Danish, Hungarian, Czech,...
  • Seite 43 Weather To show the current weather of selected city. You may choose from the items below. • Set Location: To set up global city weather • Steps : Choose district, country, city. • Press OK to confirm it and the weather info will be shown in the display. •...
  • Seite 44 Software Update Caution : Before starting a software upgrade, ensure that the unit is plugged into a stable mains power connection. Disconnecting power during a software may permanently damage the unit. Reset to Default When you choose this item, it will show “Are you sure to reset to default setting?”...
  • Seite 45: Spotify Connect

    SPOTIFY CONNECT Your new device has Spotify Connect built in Use your phone, tablet or computer as a remote control for Spotify. Go to spotify.com/connect to learn how. Spotify Connect 1. Connect your iTuner to your wifi network. 2. Open up the Spotify app on your phone, tablet or laptop using the same wifi network.
  • Seite 46 SPOTIFY CONNECT Your new device has Spotify Connect built in Use your phone, tablet or computer as a remote control for Spotify. Go to spotify.com/connect to learn how. Licenses The Spotify Software is subject to third party licenses found here: https://www.spotify.com/connect/third-party-licenses All listed brands are trademarks of their companies.
  • Seite 47: Disposal Considerations

    EU declaration of conformity is available at the following internet address: use.berlin/10032796 For Great Britain: Hereby, Chal-Tec GmbH declares that the radio equipment type IR 160 is in compliance with the relevant statutory requirements. The full text of the declaration of conformity is available...
  • Seite 49 Cher client, Toutes nos félicitations pour l’acquisition de ce nouvel appareil. Veuillez lire attentivement les instructions suivantes de branchement et d’utilisation afin d’éviter d’éventuels dommages. Le fabricant ne saurait être tenu pour responsable des dommages dus au non-respect des consignes de sécurité...
  • Seite 50: Fiche Technique

    FICHE TECHNIQUE Numéro d'article 10031584, 10031585, 10032796 Alimentation 220-240V ~ 50/60Hz Sortie d'alimentation 5,9 V 1,2 A Écran TFT Taille 2.8“, résolution 320 x 240 Réseau Wifi IEEE 802.11 b/g/n Formats de cryptage WEP, WPA, WPA2 (PSK), WPS Streaming UPNP, DLNA Formats de fichiers WMA, MP3, OGG Connectivité...
  • Seite 51: Consignes De Sécurité

    CONSIGNES DE SÉCURITÉ LE NON RESPETC DES CONSIGNES DE SÉCURITÉ PEUT PROVOQUER DE GRAVES BLESSURES AUX PERSONNES ET DES DOMMAGES À VOTRE APPAREIL. Consignes générales • DANGER : L'APPAREIL NE DOIT PAS ÊTRE UTILISÉ PAR DES ENFANTS DE MOINS DE 18 ANS. •...
  • Seite 52 Consignes particulières Petits éléments / éléments d’emballage (sacs en plastique, cartons, etc.) : • Conservez les petits éléments (par exemple vis, matériel de montage) et éléments d’emballage hors de portée des enfants pour éviter les risques d’étouffement. Ne pas laisser les enfants jouer avec les emballages plastiques, il y a risque d'étouffement.
  • Seite 53: Commandes

    COMMANDES Face avan Haut-parleur Menu affiche le menu du mode en cours Gauche aller à gauche. accès rapide aux stations favorites Standby appuyez pour basculer entre veille et en marche. Volume/Navigation/OK---bouton à commande multiple. - Tournez le bouton rotatif pour ajuster le volume lorsque l‘appareil est en marche.
  • Seite 54 Dos de l'appareil 12 Logement de la plaque signalétique 13 Interrupteur On/Off 14 Prise DC IN 15 Prise Line out 16 Prise AUX IN 17 Port USB – lecture de clés USB...
  • Seite 55 Télécommande Dimmer Sleep Alarm MODE HOME VOL+ VOL- PQRS WXYZ FAV+ bouton de mise en veille 13 direction vers la gauche aut-parleur marche/arrêt 14 direction vers la gauche réglages de l'égaliseur 15 direction vers la droite dimmer 16 direction vers le bas réglage de l'arrêt automatique 17 confirmation de sélection réglage de l'alarme...
  • Seite 56 Pour allumer ou éteindre Branchez l‘adaptateur dans la prise d‘entrée DC (à l‘arrière du produit) et placez l‘interrupteur ON/OFF sur ON, puis „Welcome“ s‘aff ichera à l‘écran. Faites to Pendant ce temps, la radio va rechercher automatiquement le point d‘accès le bouton disponible.
  • Seite 57: Menu

    MENU ourner n et Menu principal Radio locale sur Ok céder à ent du Radio Internet Centre d'information Configuration Media-Center Configuration ourner Affichage de analogique l'heure Numérique e de Gestionde my mediaU Réseau configuration du réseau sans fil Réseau sans fil (WPS PBC) Configuration manuelle Vérifier le réseau au démarrage Date et heure...
  • Seite 58 Configuration Alarme Alarme 1 Activer Désactiver Alarme 2 Activer Désactiver NAP alarme 1 (désactiver) Minuterie Volume de l'alarme Langue Dimmer Economie d'énergie Allumer Écran Couleur Monochrome Gestion de l'alimentation Arrêt automatique Tampon Météo Réglage du lieu Unité de température Afficher en veille...
  • Seite 59 Configuration Réglage manuel (du Réglage des radios locales pays) Réglage manuel (de la ville) Détection automatique Désactivé Paramètres de lecture Tout répéter Répéter une fois Lecture aléatoire Paramètres DLNA Renommer (AirMusic) Application de commande AirMusic Egaliseur Activé Reprendre au démarrage Désactivé...
  • Seite 60 Radio Internet Mes favoris Stations de radio/ musique Radio locale Zuletzt gehörte Sender Service Recherche de station de radio Ajouter une nouvelle station de radio Media -Center UPnP Ma liste de lecture Effacer ma liste de lecture Centre d'information Informations météo Informations financières Informations système...
  • Seite 61: Fonctions

    FONCTIONS AUX (entrée de ligne) Fonction : paramétrer le mode de lecture d‘un programme ayant une source audio externe. Radio Internet Les choix suivants apparaissent à l‘écran : Mes favoris Station de radio / musique Radio locale Historique Service Media-Center 1.
  • Seite 62 Nota : en mode UPNP pendant la lecture, vous pouvez faire un appui long sur le bouton OK pour ajouter le ficher choisi à „My playlist“. 4. Effacer My Playlist Choisissez „My playlist“ en tournant le bouton de navigation. Entrez en appuyant sur le bouton OK.
  • Seite 63 Affichage de l‘heure 2 modes : Analogique ou numérique Si vous choisissez le mode analogique, l‘heure s‘affichera avec des aiguilles en mode veille. Si vous choisissez numérique, l‘heure sera affichée en numérique. Gestion de My MediaU „Enable“ signifie gérer my media; „Disable“ signifie ne pas gérer my media. Si vous choisissez Disable, l‘option My Media du menu disparaîtra.
  • Seite 64 Réglage du format de la date (le format of DD/MM/YYYY est réglé par défaut) • YYYY/MM/DD • DD/MM/YYYY • MM/DD/YYYY Alarme Vous pouvez paramétrer 3 alarmes (Alarm1, Alarm 2, NAP Alarm) et le volume de l‘alarme. • La durée de la NAP Alarm peut aller de 5 minutes à 120 minutes. Après avoir réglé...
  • Seite 65: Arrêt Automatique

    Gestion de l‘alimentation Minutes : Choisissez la minuterie de gestion de l‘alimentation (5/15/30 min) pour régler la durée au bout de laquelle la radio passe automatiquement en mode veille lorsque vous ne l‘utilisez pas. Choisissez „Désactiver“ pour ignorer la fonction de gestion de l‘alimentation. Arrêt automatique Pour éteindre automatiquement l‘appareil en réglant une durée.
  • Seite 66 pour utiliser le DLNA. Égaliseur Fonction : “Égaliseur” peut renforcer l‘impact musical sur place. Pour choisir un autre renforcement musical (Normal, Flat, Jazz, Rock, Bande originale, Classique, POP, News). Reprendre au démarrage Au démarrage, appuyez sur OK pour choisir On ou Off. “On” signifie poursuivre ce mode automatiquement lorsque l‘alimentation a été...
  • Seite 67: Spotify Connect

    SPOTIFY CONNECT Votre nouvel appareil possède Spotify Connect Utilisez votre smartphone, tablette ou ordinateur comme votre Télécommande pour Spotify. Sur spotify.com/connect vous pouvez découvrir plus. 1. Connectez l'iTuner à votre réseau sans fil (voir le manuel du produit pour plus de détails). 2.
  • Seite 68: Conseils Pour Le Recyclage

    Oxford, OX1 9UW United Kingdom Le soussigné, Chal-Tec GmbH, déclare que l’équipement radioélectrique du type IR 160 est conforme à la directive 2014/53/UE. Le texte complet de la déclaration UE de conformité est disponible à l’adresse internet suivante : use.
  • Seite 69 Chal-Tec GmbH Wallstr. 15 10179 Berlin www.chal-tec.com Le logiciel Spotify est soumis aux droits d’utilisation de tiers, disponibles à la page suivante : https://www.spotify.com/connect/third-party-licenses Toutes les marques citées sont la propriété de leurs sociétés respectives. Sauf erreurs et omissions et sous réserve de modifications techniques. Nos conditions générales sont applicables.
  • Seite 71 Gentile Cliente, La ringraziamo per aver acquistato il dispositivo. La preghiamo di leggere attentamente le seguenti istruzioni per l’uso e di seguirle per evitare possibili danni tecnici. Non ci assumiamo alcuna responsabilità per danni scaturiti da una mancata osservazione delle avvertenze di sicurezza e da un uso improprio del dispositivo.
  • Seite 72: Dati Tecnici

    DATI TECNICI Numero articolo 10031584, 10031585, 10032796 Alimentazione alimentatore 220-240V ~ 50/60Hz Uscita alimentatore 5,9 V 1,2 A Schermo TFT Dimensioni 2,8", risoluzione 320 x 240 Rete WLAN supportata IEEE 802.11 b/g/n Codifiche supportate WEP, WPA, WPA2 (PSK), WPS Streaming UPNP, DLNA File supportati WMA, MP3, OGG...
  • Seite 73: Avvertenze Di Sicurezza

    AVVERTENZE DI SICUREZZA IL MANCATO RISPETTO DI QUESTE AVVERTENZE PUÒ CAUSARE SERIE LESIONI A PERSONE O DANNI AL DISPOSITIVO Avvertenze di sicurezza generiche • PERICOLO: NON ADATTO ALL’USO DA PARTE DI BAMBINI. • Il dispositivo è adatto solo a uso privato in contesti casalinghi. Ogni altro tipo di utilizzo viene considerato improprio.
  • Seite 74 Avvertenze di sicurezza particolari Oggetti piccoli/parti di imballaggio (sacchetto di plastica, scatola, ecc.) Conservare i piccoli oggetti (ad es. viti e altro materiale di montaggio, schede di memoria) e le parti dell’imballaggio fuori dalla portata dei bambini, in modo che non li ingeriscano. Non permettere ai bambini di giocare con la pellicola.
  • Seite 75: Descrizione Del Dispositivo

    DESCRIZIONE DEL DISPOSITIVO Lato anteriore Altoparlante Menu indica il menu per la modalità attuale. Sinistra muoversi verso sinistra. accesso rapido alle emittenti preferite. Standby Funzionamento standby/accendere. Manopola multifunzione - Volume/navigatore/OK impostazione del volume - Selezione nel menu - Tasto di conferma, per selezionare una voce del menu - Cambiare il menu di programmazione durante il funzionamento Sonno impostare l’ora di spegnimento...
  • Seite 76 Lato posteriore 12 Targhette informativa del dispositivo 13 Interruttore on/off 14 Connessione alimentatore 15 Uscita line-out 16 Ingresso aux 17 Ingresso USB per chiavette USB per la riproduzione di MP3...
  • Seite 77 Telecomando Dimmer Sleep Alarm MODE HOME VOL+ VOL- PQRS WXYZ FAV+ Standby 12 Menu principale Muto 13 Cursore verso l’alto Equalizzatore 14 Cursore verso sinistra Dimmer 15 Cursore verso destra Spegnimento a tempo 16 Cursore verso il basso scaduto 17 Conferma selezione Impostazione sveglia 18 Volume- Titolo precedente...
  • Seite 78 Accensione Collegare l’alimentatore alla connessione di alimentazione sul retro del dispositivo. Mettere l’interruttore su ON. Compare la schermata di benvenuto. La radio cerca automaticamente un punto di accesso disponibile. Utilizzare la manopola per selezionare la rete. Premere OK per selezionare il punto di accesso. Seguire questi passaggi al primo utilizzo della web radio.
  • Seite 79: Struttura Del Menu

    STRUTTURA DEL MENU Girare la manopola e Menu principale Radio locale premerla per selezionare. Media-Center Impostazioni Internet Radio Centro informazioni Impostazioni Per tornare Indicazione Analogica indietro di oraria un punto nel menu, premere Digitale SINISTRA. Gestire My mediaU Rete Impostazione rete senza fili Rete senza fili (WPS PBC) Configurazione manuale Controllare rete all’accensione...
  • Seite 80 Impostazione Sveglia Sveglia 1 Sveglia 2 Volume sveglia Timer Wecker-Lautstärke Lingua Dimmer Modalità di risparmio energetico Accendere Schermo Colore Monocromatico Impostazioni energetiche Impostazioni energetiche Memoria temporanea Meteo Impostazioni locali Impostazioni locali Indicazioni in standby...
  • Seite 81 Rilevamento automatico Impostazione Impostazione stazione Automatica (Paese) locale Manuale (città) Rilevamento automatico Impostazione di riproduzione Ripetere tutto Ripetere uno Casuale Dispositivo Rinominare (AirMusic) AirMusic Control App Equalizzatore Proseguire la riproduzione Aggiornamento software Tornare alle impostazioni di fabbrica...
  • Seite 82 Web radio I miei preferiti Emittente radio/Musica Stazione locale Ultima emittente ascoltata Service Cercare emittente radio Aggiungere emittente radio Media Center UPnP La mia playlist Cancella la mia playlist Informations-Center Wetter-Information Finanz-Information Systeminformation...
  • Seite 83: Descrizione Delle Funzioni

    DESCRIZIONE DELLE FUNZIONI AUX (line input) Con AUX si sceglie una fonte esterna.. Web radio Le seguenti voci del menu compaiono sullo schermo I miei preferiti Emittente radio/Musica Emittente locale Ultima emittente ascoltata Service Media center 1. USB Funzioni: riprodurre fi le audio tramite USB. I formati compatibili sono WMA/ MP3/FLAC/WAV.
  • Seite 84: Informazioni Meteo

    4. Cancellare “La mia playlist” Compare la domanda “Sicuri di voler cancellare?”. Premere dunque “Sì” o “No”. My media U Funzione: accesso rapido ai programmi della web radio tramite la playlist personale. Avvertenza: inizialmente è necessario registrarsi su http://www.mediayou. net e realizzare le impostazioni necessarie, prima di utilizzare “My media U”. In caso contrario compare nel menu il messaggio che indica la necessità...
  • Seite 85 menu. “Disattivare” rimuove la funzione dal menu. Rete Configurazione WLAN: ricerca automatica della WLAN e indicazione delle reti disponibili. Premere OK per collegarsi con la rete selezionata. Se la rete ha una password, inserirla con il menu delle lettere. Rete senza fili (rete WLAN WPS PBC): : selezionando WPS PBC, compare “Si prega di premere il tasto WPS sul router entro 120 secondi”.
  • Seite 86 Sveglia Impostazione di 3 sveglie (sveglia 1, sveglia 2, sveglia Sonnellino) e volume della sveglia. • La durata della sveglia Sonnellino va da 5 a 120 minuti. Dopo aver impostato la sveglia inizia il conto alla rovescia. Quando il tempo è scaduto, il dispositivo passa automaticamente in standby e suona la sveglia.
  • Seite 87 impostabile su 5, 30, 60, 90, 120, 150, 180 minuti. Memoria temporanea Impostabile tra 2 e 8 secondi. Meteo Indicazione del meteo della città impostata. Sono disponibili le seguenti voci: • Impostazione locale (impostazione della località). Selezionare continente, Paese e regione. Confermare con OK. Il meteo viene mostrato.
  • Seite 88: Aggiornamento Software

    Aggiornamento software Attenzione: prima di iniziare l’aggiornamento del software, assicurarsi che il dispositivo sia saldamente collegato a una presa elettrica. Non scollegare l’alimentazione durante un aggiornamento, altrimenti potrebbero risultare danni irreversibili. Tornare alle impostazioni di fabbrica Compare il messaggio “Sicuri di voler tornare alle impostazioni di fabbrica?”.
  • Seite 89: Spotify Connect

    Utilizzate il vostro smartphone, tablet o computer come telecomando per Spotify. Scoprite di più alla pagina spotify.com/connect. 1. Collegare IR 160 con la rete WLAN (v. istruzioni del prodotto per dettagli). 2. Aprire la app Spotify su smartphone, tablet o pc e collegarsi con la stessa rete.
  • Seite 90 Chal-Tec GmbH Wallstr. 15 10179 Berlin www.chal-tec.com Il software Spotify è sottoposto ai diritti di utilizzo di parti terze, che possono essere visionati alla pagina web seguente: https://www.spotify.com/connect/third-party-licenses Tutti i marchi indicati sono marchi registrati delle rispettive aziende. Esclusi errori e omissioni e soggetto a modifiche tecniche.
  • Seite 91: Smaltimento

    PO Box 1145 Oxford, OX1 9UW United Kingdom Il fabbricante, Chal-Tec GmbH, dichiara che il tipo di apparecchiatura radio IR 160 è conforme alla direttiva 2014/53/UE. Il testo completo della dichiarazione di conformità UE è disponibile al seguente indirizzo Internet: use.
  • Seite 92 Estimado cliente: Le felicitamos por la adquisición de este producto. Lea atentamente el siguiente manual y siga cuidadosamente las instrucciones de uso con el fin de evitar posibles daños. La empresa no se responsabiliza de los daños ocasionados por un uso indebido del producto o por haber desatendido las indicaciones de seguridad.
  • Seite 93: Datos Técnicos

    DATOS TÉCNICOS Número de artículo 10031584, 10031585, 10032796 Fuente de alimentación 220-240V ~ 50/60Hz Salida del cable de 5, 9 V 1, 2 A alimentación Display TFT 2,8", resolución 320 x 240 Red WLAN compatible IEEE 802. 11 b/g/n Codificaciones compatibles WEP, WPA, WPA2 (PSK), WPS Streaming UPNP, DLNA...
  • Seite 94: Indicaciones De Seguridad

    INDICACIONES DE SEGURIDAD EL INCUMPLIMIENTO DE ESTAS INSTRUCCIONES PUEDE PROVOCAR LESIONES PERSONALES GRAVES Y DAÑO AL PRODUCTO. Instrucciones generales • PELIGRO: NO PERMITA QUE NIÑOS UTILICEN EL PRODUCTO. • El aparato está diseñado únicamente para uso doméstico y personal. Cualquier otro uso se interpretará como uso indebido. •...
  • Seite 95 Instrucciones especiales Este manual tiene por objeto familiarizarle con el funcionamiento de este dispositivo. Guarde este manual en un lugar seguro para futuras consultas. • Por favor, utilice el dispositivo sólo en la forma prevista. Cualquier otro uso puede provocar daños en el dispositivo o en los objetos que se encuentren cerca del mismo.
  • Seite 96: Vista General Del Aparato

    VISTA GENERAL DEL APARATO Parte frontal Altavoz Botones de Menú---Muestra el menú del modo actual Izquierda---Ir a la izquierda Fav---Acceso rápido a las emisoras favoritas Standby--- Modo Standby/Encender Perilla multifunción: Volumen/Navegador/OK Ajuste de volumen Selección en modo Menú Botón de confirmación para elegir una opción de menú Cambiar el menú...
  • Seite 97 Parte posterior 12 Placa técnica 13 Interruptor de encendido/apagado 14 Conexión cable de alimentación 15 Salida de línea 16 Entrada Aux 17 Puerto USB para lápices USB para reproducir archivos MP3...
  • Seite 98: Control Remoto

    Control remoto Dimmer Sleep Alarm MODE HOME VOL+ VOL- PQRS WXYZ FAV+ Standby 14 Flecha izquierda Función Silencio 15 Flecha derecha Ecualizador 16 Flecha abajo Dimmer 17 Confirmar la selección Temporizador de apagado 18 Volumen- Configurar la alarma 19 Volumen+ Pista anterior 20 Introducción de números y Siguiente pista...
  • Seite 99 Encender Conecte el cable de alimentación situado en la parte posterior al tomacorriente. Coloque el interruptor ON/OFF en posición ON. A continuación, aparecerá la imagen de bienvenida. La radio buscará automáticamente las emisoras de radio disponibles. Utilice la perilla para elegir la red.
  • Seite 100: Estructura Del Menú

    ESTRUCTURA DEL MENÚ Gire la presió selecc Menú principal Radio local Radio de Centro multim Centro de Configuraciones internet edia información Configuraciones Para v última Reloj Analógico de me IZQUIE Digital Gestionar My mediaU Configuración de la red inalámbrica Red inalámbrica (WPS PBC) Configuración manual Comprobar red al encender el aparato...
  • Seite 101 Configuración a perilla y ónela para Despertador Alarma 1 Encender cionar. Apagar Alarma 2 Alarma 2 Apagar Alarma de siesta Temporizador Volumen de volver a la alarma Idioma a opción enú, pulse ERDA. Modo de ahorro Dimmer de energía Encender Display Color Monocromo...
  • Seite 102 Configuración Automático (país) Configuración de radio local Manual (ciudad) Reconocimiento automático Apagado Configuración de reproducción Repetir todo Repetir pista actual Aleatorio DLNA Setup Renombrar (AirMusic) AirMusic Control App Ecualizador Encender Continuar reproducción Apagar Actualización de software Restablecer configuración predeterminada...
  • Seite 103 Radio de internet Mis favoritos Emisoras de radio/ Música Radio local Última emisora escuchada Servicio Buscar emisoras de radio Añadir emisoras de radio Media Center UPnP Mi lista de reproducción Eliminar Mi lista de reproducción Centro de información Información de tiempo Información de finanzas...
  • Seite 104: Descripción De Funciones

    DESCRIPCIÓN DE FUNCIONES AUX (entrada de línea) Con AUX, elije la fuente de audio externa. Radio de internet Las siguientes opciones de menú aparecerán en el display: Mis favoritos Emisoras de radio/Música Radio local Última emisora escuchada Servicio Centro multimedia 1.
  • Seite 105 Atención: tiene que tener instalado el «Windows Media Player 11» (o una versión reciente) o el Twonky Media Server en su computadora, pues son necesarios para utilizar UPnP. En el «Windows Media Player», puede transferir las pistas de su lista de reproducción. Para ello, su computadora debe estar conectada a internet.
  • Seite 106: Configuraciones

    Información de finanzas Recibe información bursátil actual. Información de sistema Funciones: muestra la versión del software, la dirección MAC, el ID y IP del punto de acceso WLAN. Configuraciones Funciones: configuración de red, despertador, fecha, hora, etc. Pulse el botón IZQUIERDA para volver a la opción de menú superior. Se pueden realizar las siguientes 20 configuraciones: Reloj Existen 2 modos de visualización: analógica y digital.
  • Seite 107 Atención: Si la red ligada a «Activar» no está conectada, se mostrarán automáticamente las opciones para activar la red. Fecha y hora • Configuración de la fecha y hora. • Configuración manual: configuración manual de la fecha y hora. • Configuración automática (UTC+01:00).
  • Seite 108 Sonido: confi guración del tono de la alarma 1. Beep 2. Melodía 3. Radio de internet 4. USB Tono de alarma» es la confi guración estándar. Temporizador Para confi rmar la confi guración, pulse la perilla. Para detener el temporizador, vuelva a pulsar la perilla Idioma El aparato dispone de 17 idiomas: inglés, alemán, español, francés, portugués, neerlandés, italiano, ruso, sueco, noruego, danés, húngaro,...
  • Seite 109 Tiempo Muestra el tiempo atmosférico de la localidad configurada. Se pueden elegir las siguientes opciones: • Configurar ubicación (configuración de la localidad). Elija el continente, el país y la región. Pulse OK para confirmar. A continuación, se indicará el tiempo atmosférico. •...
  • Seite 110: Software Update

    Software Update Advertencia: Antes de iniciar la actualización de software, asegúrese de que el aparato está conectado a un tomacorriente. No desconecte la radio del tomacorriente durante la actualización de software, ya que podría dañar el aparato Restablecer configuración predeterminada Aparecerá...
  • Seite 111: Spotify Connect

    SPOTIFY CONNECT Tu nuevo dispositivo tiene Spotify Connect Utilice su smartphone, tableta u ordenador como su mando a distancia para Spotify. En spotify.com/connect puedes obtener más información. 1. Conecte el iTuner a su red inalámbrica (consulte el manual del producto para obtener más detalles).
  • Seite 112 Chal-Tec GmbH Wallstr. 15 10179 Berlin www.chal-tec.com El software Spotify está sujeto a los derechos de uso de terceros, disponibles en la pági- na siguiente: https://www.spotify.com/connect/third-party-licenses Todas las marcas comerciales mencionadas son propiedad de sus respectivas compañías. Salvo error u omisión, salvo modificaciones técnicas. Se aplican nuestros términos y condiciones generales.
  • Seite 113: Retirada Del Aparato

    Oxford, OX1 9UW United Kingdom Por la presente, Chal-Tec GmbH declara que el tipo de equipo radioeléctrico IR 160 es conforme con la Directiva 2014/53/UE. El texto completo de la declaración UE de conformidad está disponible en la dirección Internet siguiente: use.

Diese Anleitung auch für:

100315841003158510032796

Inhaltsverzeichnis