Lightmaxx Vector Beam 2.0 Bedienungsanleitung
Inhaltsverzeichnis
Verfügbare Sprachen
Verfügbare Sprachen
Inhaltsverzeichnis

Verwandte Anleitungen für Lightmaxx Vector Beam 2.0


Inhaltszusammenfassung für Lightmaxx Vector Beam 2.0
- Seite 1 DEUTSCH/ENGLISCH lightmaXX Vector Beam 2.0 LIG0016699-000 11/2019 Bedienungsanleitung User’s Manual...
- Seite 2 DEUTSCH Wichtige Sicherheitshinweise! Bitte vor Anschluss lesen! GEFAHR! (Elektrischer Schlag durch hohe Spannungen im Gerät) Das Gehäuse darf nicht entfernt werden! Es befinden sich keine zu wartenden Teile im Gerät. Im Geräteinneren befinden sich Bauteile, welche unter hoher elektrischer Spannung stehen. Überprüfen Sie das Gerät vor jeder Nutzung auf Beschädigungen oder das Fehlen von Komponenten, Schutzvorrichtungen oder Gehäuseteilen.
- Seite 3 DEUTSCH WARNUNG! (Bewegliches Gerät) Aufgrund seiner baulichen Eigenschaften ist das Gerät in der Lage schnelle Bewegungen (Neigung und Drehung) auszuführen. Dies gilt ab dem unmittelbaren Zeitpunkt des Einschaltens bis zum Ausschalten des Gerätes. Stellen Sie vor dem Einschalten unbedingt sicher, dass sich keine Personen unmittelbar am Gerät befinden und der Bewegungsradius des Gerätes in keiner Weise eingeschränkt wird.
- Seite 4 DEUTSCH Hinweis! (Kondensation) Um Kondensation im Gerät zu vermeiden, sollte sich das Gerät vor Inbetriebnahme an die Umgebungstemperatur anpassen. Hinweis! (Unerwünschte Gerüche) Ein neues Produkt kann manchmal zu unerwünschten Gerüchen führen. Diese Reaktion ist normal und verschwindet nach einigen Minuten wieder. Symbole auf Gerät und Verpackung: Das Blitzsymbol warnt den Nutzer vor nicht isolierter Spannung und der Gefahr eines Stromschlages.
- Seite 5 DEUTSCH Installation: Überprüfen Sie das Gerät vor der Verwendung unbedingt auf Schäden. Benutzen Sie die Originalverpackung oder eine geeignete Transport- oder Lagerverpackung, um das Produkt bei Nichtbenutzung optimal vor Einflüssen wie Staub, Feuchtigkeit etc. zu schützen. Das Gerät kann wahlweise stehend oder hängend installiert werden. Die Befestigung ist dabei stets an einem festen, dafür zugelassenen Träger oder einer entsprechenden Oberfläche vorzunehmen.
-
Seite 6: Lieferumfang
Bedienungsanleitung Bestimmungsgemäßer Gebrauch: Das Produkt lightmaXX Vector Beam 2.0 wurde für den Einsatz als elektronischer LED- Beleuchtungseffekt konzipiert. Das Gerät darf ausschließlich zu diesem Zwecke und im Sinne der Bedienungsanleitung betrieben werden. Andere Verwendungszwecke, sowie der Betrieb unter anderen Betriebsbedingungen sind ausdrücklich nicht bestimmungsgemäß und können zu Sach- oder Personenschäden führen! Für Schäden, die aus einer nicht bestimmungsgemäßen... -
Seite 7: Betriebsart Dmx
DEUTSCH Inbetriebnahme: Sämtliche Verbindungen des Gerätes sollten vor dem Einschalten erfolgen. Benutzen Sie für die Verbindungen ausschließlich hochwertige, möglichst kurze Kabel. Konfiguration des DMX Steckers: 3-polig: Widerstand 120 Ohm // ¼ W zwischen Pin 2 (DMX-) und Pin 3 (DMX+) der letzten Fixierung. 5-polig: Betriebsart DMX: Verbinden Sie den DMX Eingang Ihres Gerätes mit dem DMX Ausgang Ihres DMX-Controllers,... -
Seite 8: Kanal-Modus
DEUTSCH 6 Kanal-Modus Kanal Wert Funktion 000-255 000-255 000-255 Dimmer (0-100%) 000-004 Shutter, geschlossen 005-250 Strobe-Efffekt (Geschwindigkeit: langsam zu schnell) 251-255 Shutter, geöffnet 000-007 Keine Funktion 008-047 Auto Play 1 048-087 Auto Play 2 088-127 Auto Play 3 128-167 Auto Play 4 168-207 Auto Play 5 208-247... - Seite 9 DEUTSCH 15 Kanal-Modus Kanal Wert Funktion 000-255 Dimmer (0-100%) 000-004 Shutter, geschlossen 005-250 Strobe-Efffekt (Geschwindigkeit: langsam zu schnell) 251-255 Shutter, geöffnet 000-255 000-255 X-Fine 000-255 000-255 Y-Fine 000-255 XY Einstellung Geschwindigkeit 000-007 Offen (Weiß) 008-013 Weiß/Farbe 1 014-019 Farbe 1 020-025 Farbe 1/Farbe 2 026-031...
- Seite 10 DEUTSCH 020-025 Gobo 3 026-031 Gobo 4 032-037 Gobo 5 038-043 Gobo 6 044-049 Gobo 7 050-055 Gobo 8 056-061 Gobo 9 062-067 Gobo 10 068-073 Gobo 11 074-079 Gobo 12 080-085 Gobo 13 086-091 Gobo 1 Shake 092-097 Gobo 2 Shake 098-103 Gobo 3 Shake 104-109...
-
Seite 11: Betriebsart Statisch, Auto Oder Sound
DEUTSCH 059-084 X/Y Automatischer Ablauf 3 085-110 X/Y Automatischer Ablauf 4 111-136 X/Y Automatischer Ablauf 5 137-162 X/Y Automatischer Ablauf 6 163-188 X/Y Automatischer Ablauf 7 189-214 X/Y Automatischer Ablauf 8 215-240 X/Y Automatischer Ablauf 9 241-255 X/Y Musikgesteuerter Modus 0-200 Einstellung Geschwindigkeit (bei automatischer Ausführung) -
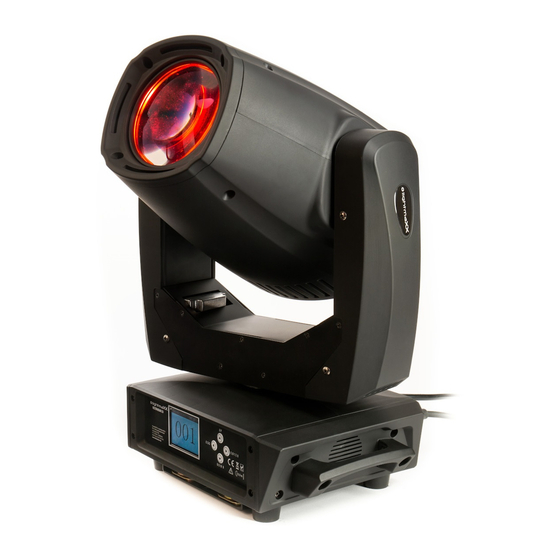
Seite 12: Anschlüsse Und Bedienelemente
DEUTSCH Anschlüsse und Bedienelemente: Bezeichnung Bezeichnung Linse Display Projektorkopf Bedientasten Spannungsversorgungseingang Projektorarm (PowerCon) Spannungsversorgungsausgang Base (PowerCon) Tragegriff Sicherungshalter Lüftungsgitter DMX Out (5-polig) Gummifuß DMX In (5-polig) DMX-Leuchte DMX Out (3-polig) Fehler-Leuchte DMX IN (3-polig) - Seite 13 DEUTSCH Lumen Chart Menü: e Na ga Men er lg e er Men as en un er al splays. M er„Mod “- Tas e a eren e as Men e Na ga n er lg e „Up-“ un „Down-“ Tasten. Eine en spre en e Auswa l w r er „Enter-“Tas e es...
-
Seite 14: Die Menüstruktur Im Detail
DEUTSCH Die Menüstruktur im Detail Menü Untermenü Wert Funktion 001-512 Einstellung der DMX-Adresse DMX Adress DMX 6 Ch DMX 6 Kanal-Modus DMX 15 CH DMX 15 Kanal-Modus Perform Mode 1 Perform Mode 2 Perform Mode 3 Perform Mode 4 Programmwahl für Auto Perform Mode 5 Autoprogramm... - Seite 15 DEUTSCH Temperature Temperaturanzeige Software Software Version Version . =000 TILT . =000 TILT PAN/TILT Speed . =000 PAN/TILT Einstellung Geschwindigkeit Dimmer . =000 Dimmer Manual Strobe . =000 Strobe Control Color . =000 Farbe, manuelle Einstellung fixed Gobo . =000 fixiertes Gobo Focus .
- Seite 16 DEUTSCH Befestigungsmöglichkeiten: ACHTUNG: Das Gerät außerhalb der Publikumsreichweite montieren. Es muss sichergestellt sein, dass der vorgesehene Montagepunkt eine ausreichende Belastbarkeit aufweist. Die Aufhängevorrichtungen des Projektors muss so gebaut und bemessen sein, dass sie 1 Stunde lang ohne dauernde schädliche Deformierung das 10-fache der Nutzlast aushalten kann. Das Gerät muss immer mit einer zweiten unabhängigen Sicherung, die den geltenden Bestimmungen entspricht, abgesichert werden.
- Seite 17 DEUTSCH Das Gerät kann direkt auf den Boden gestellt werden oder in jeder möglichen Position im Trussing installiert werden, ohne seine funktionellen Eigenschaften zu verändern. Das Gerät ist mit zwei schnell zu montierenden Omega-Hängebügel ausgestattet. Diese werden mit dem Gerät verschraubt und bieten eine Montagebohrung für gängige Schellen. Bei der Montage dieser Vorrichtung an einer Traverse ist darauf zu achten, dass die Schelle über eine M10 Schraube und Mutter mit den Omega-Hängebügeln verschraubt wird.
-
Seite 18: Spezifikationen
DEUTSCH Spezifikationen: Model lightmaxx Vector Beam 2.0 Spannungsversorgung AC100-240V 50/60 Hz Gesamtanschlusswert 230 Watt Automatikbetrieb, DMX, Master/Slave, Betriebsmodi Musikgesteuerter Modus DMX-Kanäle 6 und 15 PAN Scan 540° (16-bit), Elektrische Korrektur TILT Scan 220° (16-bit), Elektrische Korrektur ein Farbrad, 12 Arten von Farbchips in einem... - Seite 19 DEUTSCH Fehlerbehebung: e na lgen e en als r e ne s nelle e ler e e ung. Sollten Sie sich unsicher sein, kontaktieren Sie den Hersteller, den Händler oder entsprechendes Fachpersonal. Öffnen Sie niemals eigenständig das Gerät! Symptom Fehlerbehebung Überprüfen Sie die Netzverbindung, sowie Ihre Keine Funktion Sicherung.
-
Seite 20: Reinigung
DEUTSCH Reinigung: Eine regelmäßige Reinigung des Gerätes von Verunreinigungen und Staub erhöht die Haltbarkeit des Produktes. Trennen Sie das Gerät stets vom Stromnetz bevor Sie es reinigen! Reinigen Sie das Gerät niemals nass! Optische Linsen sollten mit Hilfe eines trockenen Mikrofasertuches gereinigt werden, wobei die Lichtleistung optimiert wird. - Seite 21 DEUTSCH Notizen MS ID: LIG0016699-000 11/2019...
- Seite 40 ENGLISH Notes MS ID: LIG0016699-000 11/2019...