Beko BDSA250K3SN Gebrauchsanweisung
Vorschau ausblenden
Andere Handbücher für BDSA250K3SN:
- Gebrauchsanweisung (52 Seiten) ,
- Gebrauchsanweisung (128 Seiten)
Inhaltsverzeichnis
Quicklinks
Kapitel
Inhaltsverzeichnis
Fehlerbehebung

Verwandte Anleitungen für Beko BDSA250K3SN


Inhaltszusammenfassung für Beko BDSA250K3SN
- Seite 3 Citiţi mai întâi acest manual! Stimate client, Sperăm că veţi fi mulţumit de acest produs, care a fost fabricat în unităţi moderne și verificat conform celor mai riguroase proceduri de control al calităţii. Vă recomandăm să citiţi cu atenţie întregul manual înainte de a folosi produsul; păstraţi manualul la îndemână, pentru a-l putea consulta pe viitor.
-
Seite 4: Inhaltsverzeichnis
CUPRINS 4 Pregãtirea frigiderului 1 Frigiderul 5 Ut lizarea frigiderului 2 Avertismente importante privind siguranţa Buton de reglare termostat ....1 ....1 Destinaţia produsului ......4 ..Informaţii generale privind siguranţa ...4 Dezgheţarea ........1 ......Oprirea frigiderului ......Siguranţa copiilor ....... -
Seite 5: Frigiderul
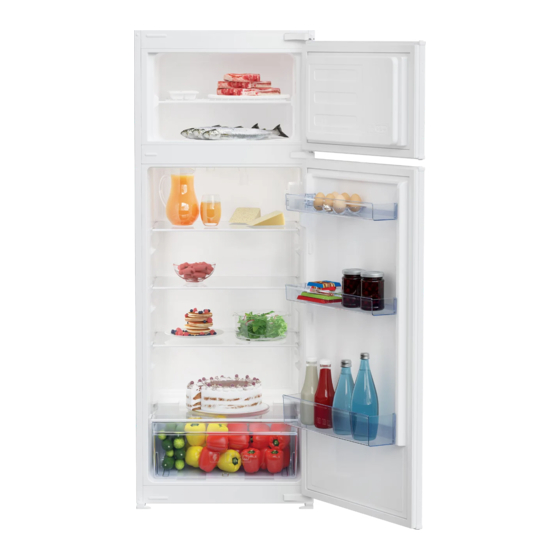
Frigiderul Grãtar congelator Tăviţă pentru ouă Rafturi ajustabile Compartimentul congelatorului Canal de colectare a apei dezgheţate Figurile din acest manual sunt , fiind posibil să nu fie identice cu produsul dvs. Componentele care nu există în dotarea produsului achiziţionat de dvs. sunt prezente pe alte modele. -
Seite 6: Avertismente Importante Privind Siguranţa
Avertismente importante privind siguranţa Vă rugăm să citiţi următoarele instrucţiuni. Dacă acestea nu sunt crăpa. respectate, se pot produce accidentări sau pagube materiale. Nerespectarea duce la anularea tuturor garanţiilor și de mână. asigurărilor privind fiabilitatea. Destinaţia produsului casnic și aplicaţiilor similare, cum ar fi componentele electrice, provocând un scurtcircuit sau un șoc electric. - Seite 7 optice. sprayurile cu agent de propulsare inflamabil. frigiderelor cu comandă manuală, așteptaţi minim 5 minute înainte de l reconecta. decât cele recomandate de către manual trebuie transmis noului producător. proprietar. de către persoane (inclusiv alimentare în timpul mutării copii) frigiderului. de alimentare nu trebuie răsucit.
-
Seite 8: Siguranţa Copiilor
Avertisment HCA necesită păstrarea la o anumită Dacă produsul dvs. este echipat cu temperatură, cum ar fi vaccinurile, un sistem de răcire cu gaz R600a: medicamentele sensibile la temperatură, materialele știinţifice etc. sistemul de răcire și conductele în perioadă mai lungă de timp, defectă... -
Seite 9: Instalarea
Instalarea compresorului. De asemenea, este nstrucţiunilor din manual. răcire, indiferent dacă compresorul Instrucţiuni pentru transportul ulterior al sunt normale. frigiderului 1. Frigiderul trebuie golit și curăţat înainte de a fi transportat. Conexiunea electrică deplasarea acestora. și cu o siguranţă de capacitate adecvată. -
Seite 10: Îndepărtarea Ambalajului
Îndepărtarea ambalajului Amplasarea şi instalarea În cazul în care ușa de intrare a În camerei în care va fi instalat frigiderul nu este suficient de lată pentru ca aparatul conform normelor în vigoare. Nu le să treacă prin ea, faceți apel la un service autorizat pentru a-i demonta ușile și pentru a-l trece lateral prin ușa încăperii. - Seite 11 Inversarea ușilor ţi ordine numer ă...
-
Seite 12: Pregãtirea Frigiderului
Preg tirea frigiderului Frigider dvs. ar trebui să fie instalat la cel puțin 30 cm distanță de sursele de căldură cum ar fi plite, cuptoare, sisteme de încălzire centrală, sobe și cel puțin 5 cm distanță de la cuptoare electrice și nu ar trebui să fi situat sub lumina directa a soarelui. -
Seite 13: Ut Lizarea Frigiderului
Ut lizarea frigiderului Buton de reglare termostat Temperatura interioară a frigiderului se modifică din următoarele motive: Temperatura exterioară Deschiderea frecventă a ușii și lăsarea ușii deschise perioade lungi de timp Dezgheţarea Alimente introduse în frigider fără a fi răcite la temperatura camerei Compartimentul frigiderului se Amplasarea frigiderului în încăpere (de dezgheaţă... -
Seite 14: Oprirea Frigiderului
Oprirea frigiderului Compartimentul de congelare nu se În cazul în care termostatul este dezgheaţă automat, pentru a preveni marcat cu poziția “0”: alterarea alimentelor congelate. Producerea cuburilor de gheaţã Umpleţi trei sferturi cu apã tãviţa pentru cuburi de gheaţã și puneţi-o în compartimentul . -
Seite 15: Protejarea Suprafeţelor Din Plastic
Protejarea suprafeţelor din A Nu curăţaţi aparatul cu benzină, plastic benzen sau substanţe similare. B Recomandăm deconectarea C Nu introduceţi în frigider ulei sau aparatului de la priză înainte de alimente gătite în ulei în recipiente curăţare. fără capac, deoarece acestea vor C Nu utilizaţi pentru curăţare deteriora suprafeţele din plastic ale instrumente ascuţite sau abrazive,... - Seite 16 Înainte de a apela la service, citiţi această listă. Puteţi economisi timp și bani. Lista include probleme frecvente care nu sunt provocate de defecte de material sau de manoperă. Este posibil ca unele funcţii descrise aici să nu existe în produsul dvs. Frigiderul nu funcţionează...
- Seite 17 Temperatura din frigider sau congelator este foarte mare. Aţi selectat o temperatură foarte înaltă a frigiderului. Temperatura setată pentru frigider afectează temperatura congelatorului. Modificaţi temperatura frigiderului sau congelatorului până când temperatura din frigider sau congelator ajunge la un nivel adecvat. Este posibil ca ușa să...
- Seite 19 Por favor, leia primeiro este manual! Caro cliente, Para isso, recomendamos que leia cuidadosa e inteiramente o manual do seu produto antes de utilizá-lo e guarde-o para futuras consultas. Este manual Os símbolos e as suas descrições Informações importantes ou dicas úteis de utilização.
- Seite 20 CONTEÚDO 1 O seu frigorífico 4 Preparação 5 Utilizar o seu frigorífico 1 ..1 Uso pretendido ..............1 ............1 Para produtos com um dispensador de Descongelação ........1 água; ..........Para o seu produto ......1 ....
-
Seite 21: Seu Frigorífico
O seu frigorífico Prateleira do congelador Prateleiras da porta Prateleiras do compartimento do refrigerador Canal de recolha da água da Compartimento do congelador Compartimento do refrigerador... -
Seite 22: Avisos Importantes De Segurança
Avisos importantes de segurança Por favor, reveja as informações Desligue o seu frigorífico da tomada seguintes. A não-observância destas antes da limpeza ou descongelação. informações pode causar ferimentos O vapor e materiais de limpeza ou danos ao material. Caso contrário, vaporizados nunca deverão ser todas as garantias e compromissos de utilizados nos processos de limpeza... - Seite 23 outros para acelerar o processo as instruções recomendadas pelo Este produto não se destina com as mãos molhadas quando a ser usado por pessoas com a introduz na tomada para ligar o produto. mentais ou sem conhecimento ou alguém responsável pela sua uso do produto.
-
Seite 24: Para Produtos Com Um Dispensador De Água
Ignore este aviso se o sistema de arrefecimento do seu produto contiver R134a: O tipo de gás usado no produto está localizada na parede esquerda no O que se pode fazer para economizar energia para que a circulação do ar no interior Para produtos com um que emitem calor tais... -
Seite 25: Instalação
Instalação conforme recomendado na secção “Manutenção e limpeza”. fornecidas no manual de instruções. Pontos a serem considerados ao transportar novamente o seu frigorífico limpo antes de ser transportado. funcionar, o que é perfeitamente normal. para frutas e legumes, etc. do seu podem ficar quentes. -
Seite 26: Eliminação Da Embalagem
Eliminação da embalagem Colocação e instalação instalado não for o suficientemente larga alcance das crianças ou para que ele passe, chame o serviço de elimine-os, classificando-os de acordo assistência autorizado para que possam com as remover as portas do seu normal. -
Seite 27: Inverter As Portas
Inverter as portas Proceda em ordem numérica. -
Seite 28: Preparação
Preparação de quaisquer fontes de calor, tais como placas, fornos, aquecimento central e fogões e de 5 cm de fornos eléctricos e não deverá ficar exposto compartimento onde está instalado condições de temperatura mais Certifique-se de que o interior do limpo. -
Seite 29: Utilizar O Seu Frigorífico
Utilizar o seu frigorífico Botão de ajuste do termóstato Descongelação descongelação totalmente automática. passa do sulco de recolha da água e corre para dentro do evaporador temperatura interior devido a esses evapora-se aqui por si mesma. arrefecimento. -
Seite 30: Para O Seu Produto
Para o seu produto - O seu produto parará o seu produto não iniciará a menos que para a posição "1" ou uma das outras posições. Fazer gelo Poderá retirar facilmente o seu gelo, descongelando levemente o... -
Seite 31: Manutenção E Limpeza
Manutenção e limpeza Nunca utilize agentes de limpeza ou água que contenha cloro para limpeza. partes cromadas do produto. O cloro Recomendamos que desligue a ficha do equipamento da tomada antes da metálicas. limpeza. Protecção das superfícies plásticas produtos de limpeza doméstica, Utilize água morna para limpar o uma vez que podem danificar as com um pano. -
Seite 32: Soluções Recomendadas
Soluções recomendadas para os problemas funções descritas aqui podem não existir no seu produto. tomada de parede. mais frio. O compressor não está a funcionar. voltará a funcionar aproximadamente 6 minutos depois. Por favor, chame a assistência se descongelação totalmente automático. O ciclo de descongelação ocorre periodicamente. O refrigerador está... - Seite 33 até que alcance a temperatura segura de armazenamento. temperatura actual. refrigerador é suficiente. temperatura do congelador para um grau mais quente e verifique. congelador é suficiente. Os alimentos guardados nas gavetas do compartimento do refrigerador estão congelados. suficiente.
- Seite 34 e nivelado. completamente fechadas. humidade for menor, a condensação irá desaparecer. água morna ou água com gás. gaveta.
- Seite 52 www.beko.com...
- Seite 53 Dishwasher User’s Manual Document Number : 15 9757 0100_AA_BEKO_E5_EN/ 08-01-18.(11:44)
-
Seite 54: Please Read This User Manual First
Please read this user manual first! Dear Customer, We hope that you get the best results from your product which has been manufactured with high quality and state-of-the-art technology. Therefore, please read this entire user manual and all other accompanying documents carefully before using the product and keep it as a reference for future use. - Seite 55 Dishwasher User’s Manual Document Number : 15 9757 0100_AA_BEKO_E5_EN/ 08-01-18.(11:44)
- Seite 56 Please read this user manual first! Dear Customer, We hope that you get the best results from your product which has been manufactured with high quality and state-of-the-art technology. Therefore, please read this entire user manual and all other accompanying documents carefully before using the product and keep it as a reference for future use.
- Seite 57 CONTENTS 1 INSTRUCTIONS FOR SAFETY Lower basket multipurpose / height adjustable service rack ..... 24 AND ENVIRONMENT Lower basket bottle wire ....25 General safety ........4 Upper basket height adjustable rack 25 Intended use ..........4 Upper basket multipurpose service Children’s safety ........5 rack ............
-
Seite 58: Instructions For Safety And Environment
instructions for safety and environment This section contains safety Never touch the plug with • instructions that will help to get wet hands! Never unplug by protected from risk of personal pulling on the cable, always injury or property damage. Failure pull out by grabbing the plug. -
Seite 59: Children's Safety
instructions for safety and environment This appliance is intended Ch ldren’s safety • to be used in household and Electrical products are • similar applications such as: dangerous for the children. - Staff kitchen areas in shops, Keep children away from the offices and other working product when it is in use. -
Seite 60: Compliance With Weee Directive And Disposing Of The Waste Product
instructions for safety and environment 1. Unplug the product before Package nformat on transporting it. Packaging materials of the 2. Remove water drainage and product are manufactured water supply connections. from recyclable materials in accordance with our National 3. Drain the remaining water in Environment Regulations. -
Seite 61: Dishwasher
Dishwasher Overv ew 1. Upper basket 2. Upper impeller 3. Lower impeller 4. Silverware basket 5. Door 6. Rating Label 7. Control panel 8. Detergent dispenser 9. Lower basket 10. Filters 11. Salt reservoir lid 12. Upper basket rail 13. Upper cutlery basket (depends on model) 14. -
Seite 62: Technical Speci Cations
Dishwasher Techn cal spec f cat ons Compliance to standards and test data / EC declaration of conformity This product complies with the following EU directives; Development, production and sales stages of this product comply with the safety rules included in all pertaining European Community regulations. 2014/35/EU, 2014/30/EU, 93/68/EC, IEC 60436/DIN 44990, EN 50242 Power input 220-240 V, 50 Hz (see rating label) -
Seite 63: Installation
Installation Refer to the nearest Authorised Service Appropr ate nstallat on Agent for installation of your product. To locat on make the product ready for use, make sure Place the product on a solid and flat • that the electricity, tap water supply and floor that has sufficient load carrying water drainage systems are appropriate capacity! The product must be... -
Seite 64: Connection To The Drain
Installation Permitted water temperature: up Connect on to the dra n to 25°C Water discharge hose can directly be The dishwasher may not be connected to connected to the drain hole or sink’s open warm water devices or flow-through drainage. The length of this connection water heaters. -
Seite 65: Aquasafe
Installation Aquasafe+ Connection must comply with national • regulations. (depends on model) Power cable plug must be within easy • The Aquasafe+ system protects against reach after installation. water leaks that may occur at the hose inlet.Water contact with the valve box of Unplug the product after the the system must be avoided to prevent washing programme is over. -
Seite 66: Initial Use
Installation In t al use Before starting to use the product, make sure that all preparations are made in accordance with the instructions in sections “Important safety instructions” and “Installation”. To prepare the product to do the • dishes, perform first operation in the shortest programme with detergent while the machine is empty. -
Seite 67: Preparation
Preparation T ps for energy sav ng Adjust ng the water soften ng system Following information will help you use the product in an ecological and energy- Cleaning, rinsing and drying performance of efficient manner. your dishwasher will increase when water Wipe away any coarse food remnants on softening system is adjusted properly. - Seite 68 Installation Use the test strip supplied with the product according to the steps given below to determine hardness level of your supply water. Remove the test Turn on the tap and Hold the test strip in Remove the test Wait for 1 minute. The test strip shows strip from the let the water run for...
-
Seite 69: Water Softening System
Preparation If you move your house, it is necessary to readjust water hardness level of your machine by considering the information given above according to the hardness level of the supply water in your new location. Your machine will display the most recently adjusted water hardness level. -
Seite 70: Detergent
Preparation Since different salt brands in the market have different particle sizes and since the water hardness may vary, dissolution of the salt in water may take a couple of hours. Therefore, Salt Indicator remains on for a 2. Put suggested amount of powder, while after adding salt into the liquid/gel or tablet detergent in the machine. -
Seite 71: Tablet Detergents
Preparation The best washing performance in dishwashers is obtained by using detergent, rinse aid and water softening salt individually. Observe the instructions of the detergent manufacturer on the package when using tablet detergents. Contact the detergent manufacturer if your dishes are wet and/or if you notice Use powder or liquid/gel limescale spots particularly on... -
Seite 72: Items Not Suitable For Washing In The Dishwasher
Preparation R nse a d 4. If there are stains on tableware items after washing, level must be increased The rinse aid used in and if there is a blue trace after wiping dishwashers is a special them by hand, it must be decreased. combination that aims to This is set to position 3 as factory increase drying efficiency and... -
Seite 73: Placing The Dishes Into The Dishwasher
Preparation Plac ng the d shes nto the d shwasher You can use your dishwasher in the optimum way with respect to energy consumption and washing and drying performance only if you place the dishes in an orderly way. Wipe away any coarse food remnants •... - Seite 74 Preparation Suggestions for loading the dishwasher Improper Loading Of Dishware Lower basket Upper basket Improper Loading Of Dishware /45 EN Dishwasher / User’s Manual...
-
Seite 75: Cutlery Basket
Preparation Cutlery basket Cutlery basket (depends on model) (depends on model) Cutlery basket is designed to wash your Cutlery basket is designed to wash your dishes such as knife, fork, spoon, etc. in an dishes such as knife, fork, spoon, etc. in an efficient manner. -
Seite 76: Collapsible Lower Basket Tines
Preparation Collaps ble lower basket Bringing the tines to the horizontal position by holding t nes them from the tips may cause (depends on model) them to bend. Therefore, it There are foldable tines (A) located at the will be appropriate to bring the tines in the middle to horizontal lower basket of the machine are designed or vertical position by holding... -
Seite 77: Tray Wash Supports
Preparation SoftTouch Accessory (depends on model) The SoftTouch Accessory found in the lower basket of your machine enables a safe washing for your fragile glasses. Bringing the tines to the horizontal position by holding them from the tips may cause them to bend. -
Seite 78: Lower Basket Multipurpose / Height Adjustable Service Rack
Preparation Lower basket mult purpose Make sure that the impeller / he ght adjustable serv ce does not touch the dishes you rack placed on the racks. (depends on model) To close the racks: This accessory located at the lower basket Fold the rack (A). - Seite 79 Preparation Lower basket bottle w re (depends on model) The bottle wire is designed for easier washing of long pieces with wide mouths. You may take out the bottle wire from the basket when not in use by pulling it out from both sides (H).
- Seite 80 Preparation Adjust ng the he ght of the To lower the basket, while it is in the uppermost position; upper basket Hold the upper basket wires with both (depends on model) hands, slightly lift up the basket and The upper basket height adjustment simultaneously push and release the mechanism has been designed for you to latches shown in the figure (B).
-
Seite 81: Basket
Preparation Collaps ble upper basket Pull out the basket out completely. Place the basket back into the tracks at the w res desired height (depends on model) Push the latches back into the correct You can use collapsible wires when you position. -
Seite 82: Ceiling Cutlery Basket
Preparation Ce l ng cutlery basket (depends on model) Ceiling cutlery basket is designed to wash your cutlery items such as forks, spoons and etc. by placing them between the bars on the basket. When the central tray is in the lower position, you can load long/high items such as coffee cups, ladles, etc. -
Seite 83: Operating The Product
Operating the product On/Off key 2. Programme Selection / Programme Cancel (3 seconds) key 3. Function keys Tablet detergent function Half Load function 4. Programme indicator 5. Salt indicator Not in use 7. Start / Cancel indicator 8. Time Delay / Programme Time indicator 9. - Seite 84 Operating the product Keys Programme select on On/Off key Press the On/Off button to turn on When you press On / Off key, indicator lights your machine. illuminate on the display for ON position. 2. Check the Salt and Rinse Aid indicators The lights turn off in OFF position.
- Seite 86 Operating the product Aux l ary funct ons Tablet detergent function Allows to obtain a better drying Washing programmes of your dishwasher performance from the multi-purpose are designed to obtain the best cleaning detergents called as all in one detergents effect, considering the type of the soiling, such as 2in1, 3in1, 4in1, 5in1 and etc., soiling degree and properties of the dishes...
- Seite 87 Operating the product Changing Warning Sound Volume You can delay the start of the selected programme until 24 hours. After switching your machine on, press Time Delay and P / P+ keys Press the Time Delay function key after simultaneously. Keep them pressed selecting the washing programme and until the countdown 3, 2, 1 is completed other auxiliary functions.
- Seite 88 Operating the product 2 - 1 countdown, 0:01 is displayed, close You can select and start a the door of the product and wait for the new programme following the draining process complete. Draining is cancellation of Time Delay completed in 2 minutes and the machine function.
-
Seite 89: End Of Programme
Operating the product 3. Set to the appropriate level with the Leave your dishes in the Time Delay key. machine for about 15 minutes 4. Press On / Off key to save the setting. to allow them cool down after they are washed. -
Seite 90: Innerclean
Operating the product InnerClean This programme is recommended to be operated on each 1-2 months for machine cleaning and necessary hygiene. The programme should be operated while the machine is empty. In order to achieve an efficient result, it is recommended to use together with special machine cleaning agents. -
Seite 91: Maintenance And Cleaning
Maintenance and cleaning Service life of the product extends and Clean ng the f lters frequently faced problems decrease if it is Clean the filters at least once a week in cleaned at regular intervals. order for the machine operates efficiently. Unplug the product and turn off Check if food residues are left on the filters. -
Seite 92: Cleaning The Hose Lter
Maintenance and cleaning Clean ng the hose f lter Damages on the machine that may be caused by impurities coming from the urban supply water or your own water installation (such as sand, dirt, rust, etc.) can be prevented by means of the filter attached to the water inlet hose. -
Seite 93: Cleaning The Impellers
Maintenance and cleaning Clean ng the mpellers Upper mpeller Clean the impellers at least once a week in Check if the holes on the upper impeller (1) order for the machine operates efficiently. are clogged. If they are clogged, remove and clean the impeller. -
Seite 94: Troubleshooting
Troubleshooting Machine does not start. • Power cable is unplugged. >>> Check if the power cable is plugged in. • Fuse is blown. >>> Check the fuses in your house. • Water is cut. >>> Make sure that the water inlet tap is open. •... - Seite 95 Troubleshooting • Rinse aid is not sufficient. >>> Check the rinse aid indicator and add rinse aid if necessary. Increase the rinse aid setting if there is enough amount of rinse aid in the machine. • Machine is unloaded right after the programme is over. >>> Do not unload your machine right after washing process is completed.
- Seite 96 Troubleshooting the filling process. Run the prewash programme to remove the salt that spilled inside the machine. Since the salt granules that will remain under the lid will dissolve during prewash, causing the lid loosen, check the lid once again at the end of the programme. There is a different odour in the machine A new machine has a peculiar odour.
- Seite 97 Troubleshooting Detergent remains in detergent dispenser. • Detergent dispenser was damp when adding detergent. >>> Make sure that the detergent dispenser is dried well prior to filling it with detergent. • Detergent is added long before the washing process. >>> Pay attention to add detergent shortly before start-up of the washing.
- Seite 98 Troubleshooting A smear remains on glasses that resembles milk stain which can not be removed when wiped by hand. A bluish / rainbow appearance occurs when the glass is pointed to light. • Excessive rinse aid is used. >>>Lower rinse aid setting. Clean the spilled rinse aid when adding rinse aid.
- Seite 121 Geschirrspüler Bedienungsanleitung DIN24310 Document Number : 15 9743 0200_AA_BEKO_E5sT_DE/ 22-12-17.(9:13)
- Seite 122 Bitte zuerst diese Anleitung lesen! Sehr geehrte Kund n, sehr geehrter Kunde, W r hoffen, dass d eses Produkt, das m t hochwert ger und hochmoderner Technolog e hergestellt wurde, beste Ergebn sse erz elt. Daher b tte d e gesamte Bed enungsanle tung und alle be l egenden Dokumente aufmerksam durchlesen und zum zukünft gen Nachschlagen aufbewahren.
- Seite 123 Geschirrspüler Bedienungsanleitung DIN24310 Document Number : 15 9743 0200_AA_BEKO_E5sT_DE/ 22-12-17.(9:13)
- Seite 124 Bitte zuerst diese Anleitung lesen! Sehr geehrte Kund n, sehr geehrter Kunde, W r hoffen, dass d eses Produkt, das m t hochwert ger und hochmoderner Technolog e hergestellt wurde, beste Ergebn sse erz elt. Daher b tte d e gesamte Bed enungsanle tung und alle be l egenden Dokumente aufmerksam durchlesen und zum zukünft gen Nachschlagen aufbewahren.
- Seite 125 INHALT 1 HINWEISE ZU SICHERHEIT 5 BEDIENUNG UND UMWELT Lüfter-Trocknungssystem ........ 26 Tasten ..............26 Allgemeine Sicherheit...........4 Vorbereiten ............26 Dinge, die nicht im Geschirrspüler gereinigt Programmauswahl..........26 werden dürfen ............5 Zusatzfunktionen ..........28 Bestimmungsgemäßer Gebrauch ....... 5 Spülen zeitlich vorplanen ........29 Sicherheit von Kindern .........6 Klarspülerdosierung einstellen ......
-
Seite 126: Hinweise Zu Sicherheit Und Umwelt
Hinweise zu Sicherheit und Umwelt D eser Abschn tt enthält den örtl chen Vorschr ften H nwe se, d e für d e S cherhe t entsprechende Erdung des Benutzers und anderer entstehen. Personen unerlässl ch s nd. D ese Wasserzulauf- und •... -
Seite 127: Dinge, Die Nicht Im Geschirrspüler Gereinigt Werden Dürfen
Hinweise zu Sicherheit und Umwelt vollständ g auf der Tür. Tür Spülen S e n Ihrer • n cht noch we ter belasten Masch ne ke n Gesch rr, – andernfalls kann das das m t Z garettenasche, Gerät k ppen. Kerzenwachs, Lack, Tür des Gerätes nur zum Farben oder Chem kal en... -
Seite 128: Sicherheit Von Kindern
Hinweise zu Sicherheit und Umwelt D e Nutzungsdauer des Sämtl che Re n gungs- und • • Gerätes beträgt 10 Jahre. In Zusatzm ttel an e nem d esem Ze traum werden s cheren Ort und außerhalb Or g nal-Ersatzte le gel efert, der Re chwe te von K ndern dam t das Gerät se ne lagern. -
Seite 129: Erfüllung Von Weee-Vorgaben Zur Entsorgung Von Altgeräten
Hinweise zu Sicherheit und Umwelt 1. Vor Transport eren oder Einhaltung von RoHS- Verrücken des Gerätes Vorgaben grundsätzl ch den Das von Ihnen erworbene Netzstecker z ehen. Produkt erfüllt d e Vorgaben der 2. Wasserablauf und EU-RoHS D rekt ve (2011/65/EU). Wasserzulauf schl eßen Es enthält ke ne n der D rekt ve (Hahn zuvor schl eßen). -
Seite 130: Geschirrspüler
Geschirrspüler Übersicht 1. Oberer Korb 2. M ttlerer Sprüharm 3. Unterer Sprüharm 4. Besteckkorb 5. Tür 6. Typensch ld 7. Bed enfeld 8. Spülm ttelbehälter 9. Unterer Korb 10. F lter 11. Salzbehälterdeckel 12. Obere Korbsch ene 13. Oberer Besteckschublade (je nach Modell) 14. -
Seite 131: Technische Daten
Geschirrspüler Technische Daten D eses Produkt erfüllt d e folgenden EU-D rekt ven/EG Konform tätserklärung: Be der Entw cklung, Produkt on und be m Vertr eb d eses Produktes wurden d e S cherhe tsr chtl n en der zutreffenden Regul erungen der Europä schen Geme nschaft e ngehalten. - Seite 132 Geschirrspüler Für elektrische Haushaltsgeschirrspüler (nach Verordnung (EU) Nr. 1059/2010) Marke Beko Modell DIN24310 Nennkapazität in Standardgedecken für den Standardreinigungszyklus Energieeffizienzklasse Jährlicher Energieverbrauch (AE ) (kWh/Jahr) Energieverbrauch (E ) (kwh) des Standardreinigungszyklus 1,03 Leistungsaufnahme im Aus-Zustand (P ) (W) 0,50 Leistungsaufnahme im unausgeschalteten Zustand (P...
-
Seite 133: Installation
Installation Be Inbetr ebnahme des Gerätes und vor und Bed enfeld n cht als Gr ffe zum Kontaktaufnahme m t dem Kundend enst Bewegen oder Versch eben des Gerätes darauf achten, dass Wasserzulauf und m ssbrauchen. Wasserablauf n e nwandfre em Zustand Der richtige Aufstellungsort s nd (dazu auch d e Bed enungsanle tung Gerät auf e nem stab len, ebenen... -
Seite 134: Wasserablauf Anschließen
Installation - Kaltwasserzulaufschlauch (b s zu 25°C) Den Wasserzulauf aus - Warmwasserzulaufschlauch (b s zu 60°C) S cherhe tsgründen nach jedem B tte überprüfen S e, welcher Schlauch für E nsatz des Gerätes schl eßen. Ihr Modell gee gnet st. Wenn S e vorhaben, Ihren Gesch rrspüler an natürl che Energ equellen oder an d e zentrale Warmwasserle tung... -
Seite 135: Füße Einstellen
Installation Falls d e Stromversorgung m t e ner Der Wasserablauf sollte d rekt ger ngeren als e ner 16A -S cherung n d e Kanal sat on führen; ausgestattet st, muss e ne 16A das Abwasser darf n cht -S cherung durch e nen qual f z erten n das Oberflächen- oder Elektr ker nstall ert werden. - Seite 136 Installation Der Gesch rrspüler wurde m Werk e ner strengen Qual tätsprüfung unterzogen. Dabe kann etwas Wasser n der Masch ne zurückble ben. Das Gerät w rd dadurch n cht bee nträcht gt. /42 DE Gesch rrspüler / Bed enungsanle tung...
-
Seite 137: Vorbereitungen
Vorbereitungen Tipps zum Energiesparen Wasserenthärtungssystem einstellen Wenn S e d e folgenden H nwe se beachten, können S e Ihr Gerät besonders Re n gungs-, Klarspül- und ökolog sch und energ esparend e nsetzen. Trocknungsle stung Ihres W schen S e grobe Spe sereste Gesch rrspülers verbessern s ch, wenn vom Gesch rr ab, ehe S e es n den das Wasserenthärtungssystem r cht g... - Seite 138 Vorbereitungen Drehen Sie den Wasserhahn auf und Nehmen Sie den Halten Sie den Ziehen Sie den Warten Sie eine Am Teststreifen lassen Sie das Wasser Teststreifen aus Teststreifen etwa eine Teststreifen aus Minute. können Sie den etwa eine Minute lang der Packung.
-
Seite 139: Wasserenthärtungssystem Einstellen
Vorbereitungen Falls d e Härte Ihrer lokalen Verwenden S e Wasserversorgung über 90 °dF l egt ausschl eßl ch spez elle oder S e Brunnenwasser verwenden, Salze zur Gesch rrspüler- sollten S e spez elle F lter und Wasserenthärtung n Ihrem Wasserre n gungsgeräte e nsetzen. -
Seite 140: Spülmittel
Vorbereitungen 5. Setzen S e den Deckel w eder auf den Salzbehälter, z ehen S e hn an. S e müssen Salz d rekt vor Inbetr ebnahme des Gerätes h nzugeben. Dadurch w rd überlaufendes Salzwasser sofort ausgespült, was d e Gefahr von Korros on n der Masch ne verr ngert. - Seite 141 Vorbereitungen Spülm ttel e nfüllen Im Inneren des Beachten S e zur Erz elung Spülm ttelbehälters f nden besserer Spül- und S e Mark erungen, d e Ihnen Trocknungsergebn sse be der r cht gen Dos erung d e Warnh nwe se auf der pulverförm gen Spülm ttels Spülm ttelverpackung.
-
Seite 142: Tab-Spülmittel
Vorbereitungen 3. Drücken S e den Deckel des Wert überste gt, müssen S e zusätzl ch zum Spülm ttelbehälters zu. Der Deckel Spülm ttel Enthärtungssalz und Klarspüler rastet e n, wenn er r cht g geschlossen e nfüllen. Ihr Gesch rrspüler arbe tet am besten, wenn S e separate Spülm ttel, Klarspüler und Wasserenthärtungssalze... -
Seite 143: Klarspüler
Vorbereitungen 4. Passen S e d e Klarspülerdos erung entsprechend an. Klarspüler Der Klarspüler, der n Gesch rrspülern verwendet w rd, besteht aus e ner 4. Falls nach dem Spülen Flecken am spez ellen Komb nat on von Gesch rr verble ben, stellen S e e ne Inhaltsstoffen, d e das Trocknen höhere Stufe e n. -
Seite 144: Geschirr Im Geschirrspüler Platzieren
Vorbereitungen zählen auch Gegenstände aus Kupfer Dam t es n cht zu Verletzungen und verz nnte Art kel. kommt, platz eren S e scharfe Das Dekor von Porzellan und sp tze Gegenstände sow e Gegenstände aus w e Gabeln, Brotmesser und Alum n um und S lber können dergle chen entweder m t der s ch –... - Seite 145 Vorbereitungen Beispiele zu alternativen Falsche Platzierung Geschirr-Platzierungen Unterer Korb Oberer Korb Falsche Platzierung Gesch rrspüler / Bed enungsanle tung 23 / 42 DE...
-
Seite 146: Besteckkorb
Vorbereitungen Besteckkorb Mehrzweckablage des oberen Korbs Im Besteckkorb werden Besteck w e Messer, Gabeln, Löffel etc. besonders D ese E nr chtung am oberen Korb gründl ch gere n gt. ermögl cht das problemlose Spülen von Da s ch der Besteckkorb an besonders langen Schöpfkellen oder untersch edl chen Stellen platz eren lässt Brotmessern. -
Seite 147: Bedienung
Bedienung E n-/Austaste 2. Programmauswahl-/ Programmabbruch- (3 Sekunden) Taste 3. Funkt onstasten Mult tab - Funkt on Halbe-Beladung-Funkt on 4. Programmanze ge 5. Salzanze ge (N cht verwendet) 7. Start-/Abbrechen-Anze ge 8. Ze tverzögerung-/Programmze tanze ge 9. Ze tverzögerungstaste 10. Ze tverzögerungsanze ge 11. -
Seite 148: Lüfter-Trocknungssystem
Bedienung Tasten Vorbereiten E n-/Austaste Öffnen S e d e Gerätetür. Nach der Betät gung der E n-/Austaste 2. Geben S e das Gesch rr w e n der leuchtet d e Betr ebsanze ge auf. D e Bed enungsanle tung beschr eben n Leuchte erl scht be m Abschalten. - Seite 149 InnerClean Eco * Intensiv Clean&Shine Mini (Selbstreinigung) 50 ºC 70 ºC 65 ºC 35 ºC Wir empfehlen, dieses Ein besonders Für stark verschmutztes Das Täglich-Spülprogramm Für leicht verschmutztes Programm alle 1-2 Monate energiesparendes Geschirr wie Töpfe und eignet sich für normal Geschirr des täglichen durchlaufen zu lassen: Es Programm für Geschirr des...
-
Seite 150: Zusatzfunktionen
Bedienung Zusatzfunktionen Mult tab - Funkt on D ese Funkt on ermögl cht e ne bessere D e Spülprogramme Ihres Gesch rrspülers Trocknungsle stung m t komb n erten wurden auf beste Re n gungsle stung Alles- n-e nem-Gesch rrspülm tteln (auch opt m ert;... -
Seite 151: Spülen Zeitlich Vorplanen
Bedienung S gnaltonlautstärke ändern Taste n 30-M nuten-Schr tten auf b s Halten S e nach dem E nschalten des zu 6 Stunden erhöht; anschl eßend Gerätes d e Ze tverzögerungstaste erhöht s e s ch m t jeder Betät gung n und d e P / P+ gle chze t g gedrückt. -
Seite 152: Klarspülerdosierung Einstellen
Bedienung Programme starten Abhäng g davon, zu welchem Ze tpunkt S e e n Programm Schl eßen S e nach Auswahl von Programm abbrechen, kann es natürl ch und Zusatzfunkt onen zum Starten d e vorkommen, dass Reste von Gerätetür. Spülm ttel oder Klarspüler Je nach Wasserhärte m Gerät oder am Gesch rr... -
Seite 153: Programmende
Bedienung In Spülpos t on P:0 w rd ke n Klarspüler Lassen S e das Gesch rr ausgegeben. noch etwa 15 M nuten m In Pos t on P:1 w rd 1 Dos s Klarspüler Gerät abkühlen, bevor S e es ausgegeben. -
Seite 154: Innerclean (Selbstreinigung)
Bedienung InnerClean (Selbstreinigung) W r empfehlen, d eses Programm alle 1 – 2 Monate durchlaufen zu lassen: Es re n gt das Gerät von nnen und sorgt für e ne bessere Hyg ene. Lassen S e d eses Programm nur „leer“ durchlaufen, geben S e dabe ke n Gesch rr n d e Masch ne. -
Seite 155: Reinigung Und Pflege
Reinigung und Pflege Be regelmäß ger Re n gung hält Ihr Filter reinigen Gerät länger; auch kommt es seltener zu Dam t Ihr Gerät stets e nwandfre arbe ten störenden Problemen. kann, sollten S e d e F lter m ndestens Z ehen S e den Netzstecker und e nmal wöchentl ch re n gen. -
Seite 156: Schlauch Lter Reinigen
Reinigung und Pflege 3. Drücken S e d e be den Sperren am Schlauch lter reinigen Grobf lter nach nnen, lösen S e den Verunre n gungen des Wassers (w e Grobf lter von der Baugruppe. zum Be sp el Sand, Schmutz, Rost usw.) können den Gesch rrspüler beschäd gen. -
Seite 157: Sprüharme Reinigen
Reinigung und Pflege Sprüharme reinigen Oberer Sprüharm Dam t Ihr Gerät stets e nwandfre arbe ten Vergew ssern S e s ch, dass d e Öffnungen kann, sollten S e d e Sprüharme m ndestens m oberen Sprüharm (1) n cht verstopft e nmal pro Woche re n gen. -
Seite 158: Problemlösung
Problemlösung Das Gerät arbeitet nicht. • Der Netzstecker st n cht e ngesteckt. >>> Prüfen S e ob der Netzstecker e ngesteckt • D e S cherung st durchgebrannt. >>> Überprüfen S e Ihre Hauss cherungen. • Das Wasser st abgestellt. >>> Überzeugen S e s ch davon, dass der Wasserzulauf geöffnet st. - Seite 159 Problemlösung Das Geschirr wird nicht richtig trocken. • Das Gesch rr wurde n cht r cht g m Gerät platz ert. >>> Platz eren S e das Gesch rr so, dass s ch ke n Wasser darauf sammeln kann. • Zu wen g Klarspüler.
- Seite 160 Problemlösung Kalkflecken bleiben am Geschirr zurück, Gläser werden milchig • Zu wen g Klarspüler. >>> Prüfen S e d e Klarspüler-Anze ge, geben S e be Bedarf Klarspüler h nzu. Erhöhen S e d e Klarspülermenge. • Wasserhärtee nstellung zu ger ng oder zu wen g Salz >>>Erm tteln S e d e Wasserhärte Ihrer Wasserversorgung, prüfen S e d e Wasserhärtee nstellung.
- Seite 161 Problemlösung • D e Elektro nstallat on st n cht r cht g geerdet. >>>Überprüfen S e d e ordnungsgemäße Erdung Ihres Gesch rrspülers. Andernfalls können s ch be Utens l en aus Metall kle ne Funkenüberschläge durch stat sche Elektr z tät e nstellen, Beschäd gungen verursachen, Schutzsch chten von den Oberflächen abtragen und zu Verfärbungen führen.
- Seite 162 Problemlösung Dekor und Verzierungen von Küchenutensilien verschwinden. M t Dekor versehene Gläser und Porzellan sollten n cht m Gesch rrspüler gere n gt werden. D e Hersteller solcher Produkte raten von der masch nellen Re n gung ab. Das Geschirr wird verkratzt. Küchenutens l en aus Alum n um und solche, d e Alum n um enthalten, sollten n cht m Gesch rrspüler gere n gt werden.
- Seite 163 Problemlösung • Be m Klarspüler-Nachfüllen wurde Klarspüler verschüttet. >>> Achten S e be m Befüllen des Klarspülerbehälters darauf, n chts zu verschütten. Entfernen S e verschütteten Klarspüler m t e nem Tuch. • Der Deckel des Klarspülerbehälters wurde n cht (r cht g) geschlossen. >>> Sorgen S e dafür, dass der Deckel des Klarspülerbehälters nach dem E nfüllen fest geschlossen w rd.