Herunterladen Inhalt Inhalt Diese Seite drucken
HumanTechnik scalla3 combo Bedienungsanleitung

HumanTechnik scalla3 combo Bedienungsanleitung

Grosstasten-komforttelefon kombiniert mit schnurlosstation
Vorschau ausblenden Andere Handbücher für scalla3 combo:
Inhaltsverzeichnis

Werbung

Verfügbare Sprachen
  • DE

Verfügbare Sprachen

  • DEUTSCH, seite 1
DE
Bedienungsanleitung
Großtasten-Komforttelefon kombiniert mit Schnurlosstation
EN
Instruction manual
Large-button convenience phone combined with a wireless
set
FR
Téléphone filaire amplifié à grandes touches avec combiné
additionnel sans fil
NL
Comfort-telefoon met grote toetsen in combinatie met
draadloos station
IT
Telefono multifunzione a grande tastiera combinato con un
set senza filo
ES
Teléfono fijo de teclas grandes con un teléfono inalámbrico
All manuals and user guides at all-guides.com
Mode d'emploi
Gebruiksaanwijzing
Istruzioni per l'uso
Manual de instrucciones
Seite 2
Page 44
Page 86
Pagina 128
Pagina 170
Pagina 212

Werbung

Inhaltsverzeichnis
loading

Inhaltszusammenfassung für HumanTechnik scalla3 combo

  • Seite 1 All manuals and user guides at all-guides.com Bedienungsanleitung Seite 2 Großtasten-Komforttelefon kombiniert mit Schnurlosstation Instruction manual Page 44 Large-button convenience phone combined with a wireless Mode d’emploi Page 86 Téléphone filaire amplifié à grandes touches avec combiné additionnel sans fil Pagina 128 Gebruiksaanwijzing Comfort-telefoon met grote toetsen in combinatie met...
  • Seite 2: Sicherheitshinweise

    All manuals and user guides at all-guides.com Wir beglückwünschen Sie zum Erwerb Ihres scalla combo Telefons und hoffen, dass Sie lange Zeit daran Freude haben. Bitte lesen Sie diese Bedienungsanleitung aufmerksam durch, um das Telefon richtig in Betrieb nehmen zu können und mit allen Möglichkeiten des Systems vertraut zu werden.
  • Seite 3: Inhaltsverzeichnis

    All manuals and user guides at all-guides.com Inhaltsverzeichnis Seite Sicherheitshinweise Inbetriebnahme Verpackungsinhalt Einlegen der Batterien im Grundgerät Einlegen der Akkus im Mobilteil Anschluss des Telefons Anschluss der Mobilteilladestation Tasten und ihre Bedeutung Basis Tasten und ihre Bedeutung Mobilteil Bedienelemente Basisstation (BS) Bedienelemente Mobilteil (MT) Telefonieren mit Basis (BS) Anrufen...
  • Seite 4 All manuals and user guides at all-guides.com Inhaltsverzeichnis Seite Anrufer ID Basis (BS) Ein Anruf aus der Anrufer-ID-Liste löschen Alle Anrufe aus der Anrufer-ID-Liste löschen Bildschirmanzeige (BS) einstellen Anrufe in Abwesenheit anzeigen lassen Anzeigesprache einstellen Bildschirmkontrast einstellen Darstellung Numerneingabe einstellen Datum / Zeit einstellen (BS) Zeitformat einstellen Datumsformat einstellen...
  • Seite 5 All manuals and user guides at all-guides.com Inhaltsverzeichnis Seite SOS automatisch einschalten Geheimzahl für SOS definieren Zusätzliche Anschlüsse (BS) Anschlussbuchse für Vibrationskissen und/oder Module Headset-Anschluss Kopfhöreranschluss Wandmontage Mobilteil Ein-/Ausschalten Telefonieren mit Mobilteil (MT) Anrufen Anruf annehmen Telefonieren mit einem angeschlossenen Headset Nutzung des Gerätelautsprechers bei einem Gespräch Einstellung der Lautstärke des Gerätelautsprechers Wahlwiederholung der zuletzt gewählten Telefonnummer...
  • Seite 6 All manuals and user guides at all-guides.com Inhaltsverzeichnis Seite Telefoneinstellungen (MT) Alarm einstellen Alarm ausschalten Rufton einstellen Ruftonlautstärke einstellen Tastaturton ein-/ausschalten Reichweitenalarm Sprache Mobilteil umbenennen Displaykontrast Automatische Rufannahme Verstärkung einstellen Sprachausgabe Mobilteil Datum / Zeit einstellen (MT) Zeit einstellen Datum einstellen Zeitformat einstellen Datumsformat einstellen Basis wählen...
  • Seite 7 SOS-Nummer einprogrammieren Wenn das Telefon nicht funktioniert Allgemein Das Telefon funktioniert nicht Warnton während eines Gespräches Rufnummer wird nicht angezeigt Wartung und Pflege Garantie Wichtiger Hinweis Anhang Umwelthinweis/Entsorgung Akkus Technische Daten Basis Technische Daten Mobilteil Humantechnik Service-Partner Umschlag Rückseite Deutsch 7...
  • Seite 8: Inbetriebnahme

    All manuals and user guides at all-guides.com Inbetriebnahme Einlegen der Akkus im Mobilteil Das Schnurlostelefon benötigt drei 1,2V Ak- Verpackungsinhalt kus (Typ »AAA«) für den Betrieb. Überprüfen Sie bitte, ob alle nachfolgend Zum Einlegen der Akkus gehen Sie wie folgt aufgeführten Teile enthalten sind: vor: •...
  • Seite 9: Tasten Und Ihre Bedeutung Basis

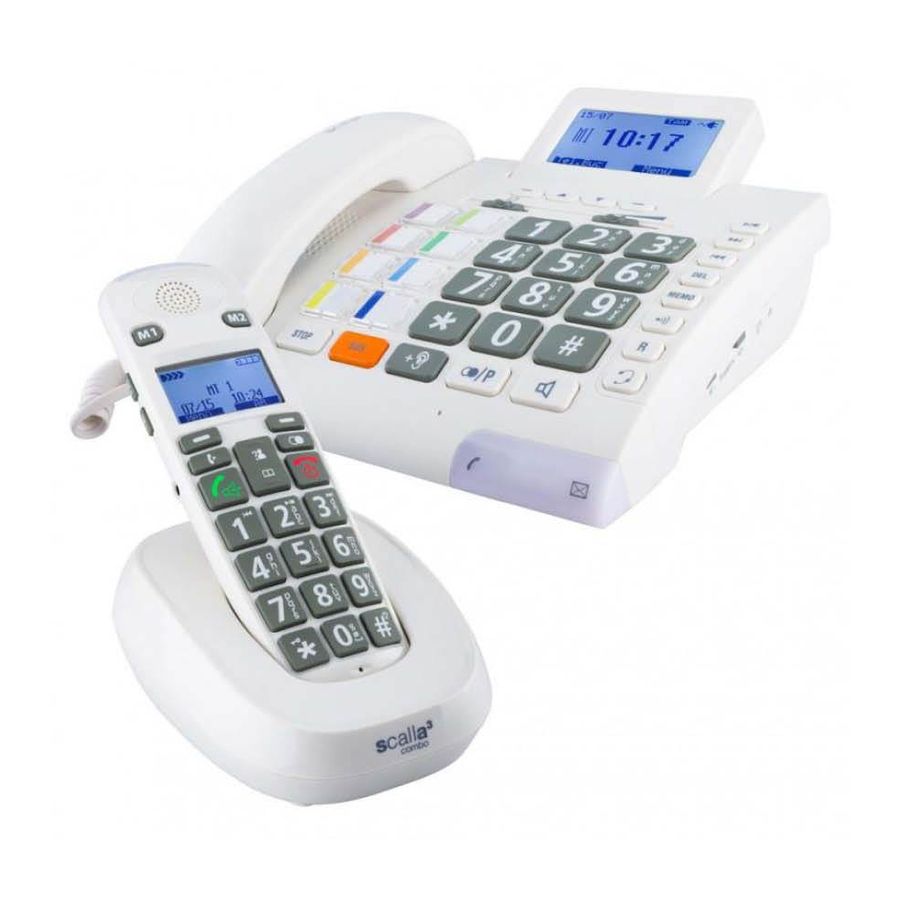
    All manuals and user guides at all-guides.com Tasten und ihre Bedeutung Basis Rückfragetaste z.B. zum Ver- Menütaste mitteln von Gesprächen bei An- - Menüauswahl rechts schluss des Telefons an eine Tele- - Menüauswahl links fonanlage Pfeiltasten hoch/runter Lautsprechertaste: Blättern im Menü –...
  • Seite 10: Bedienelemente Basisstation (Bs)

    All manuals and user guides at all-guides.com Bedienelemente Basisstation (BS) Schiebeschalter Ton- Display Funktionstasten zur regelung/ Lautstärke- Menübedienung einstellung Einlegeschild für Fotozielwahltasten (im Telefonhörer) Wahltasten Anrufbe- antworter Mobilteil, Such- / MEMO Kopplungstaste R-Taste Headset-Taste STOP Anzeige »Neuer Anruf« Lautsprecher Funktionstasten (Freisprechen) Telefonhörer mit Fotozielwahl-...
  • Seite 11 All manuals and user guides at all-guides.com Permanente Display- Audio-Ausgang Headset-Anschluss Anschlussbuchse für hindergrundbeleuch- (3,5 mm) (2,5 mm) Telefonhörerkabel tung Ein / Aus-Schal- OFF ON DC 7.5V Anschlussbuchse für Signalwahl- Anschlussbuchse für Anschlussbuchse für Sonderzubehör wie schalter Steckernetzteil Telefonkabel Vibrationskissen und/ Schalter zur Einstellung der oder ergänzende Lautstärkerücksetzung...
  • Seite 12: Bedienelemente Mobilteil (Mt)

    All manuals and user guides at all-guides.com Bedienelemente Mobilteil (MT) Taschenlampe Visuelle Klingel Verstärkung Hörkapsel Kurzwahltaste Display Aufwärts / Abwärts- Taste Menütaste Wahlwiederholungs- INT-Taste Taste Hörer abnehmen Hörer auflegen MT ein-/auschal- Wahltasten Sterntaste Rautetaste Tastatursperre Taschenlampe Mikrofon 12 Deutsch...
  • Seite 13 All manuals and user guides at all-guides.com SOS-Taste Lautsprecher Batteriefachdeckel Ladekontakte Ladekontakte Lautstärke einstellen Ton einstellen Verstärkung einstellen Headset-Anschluss (2,5 mm) Deutsch 13...
  • Seite 14: Telefonieren Mit Basis (Bs)

    All manuals and user guides at all-guides.com Telefonieren mit Basis (BS) 2. Legen Sie nun den Telefonhörer auf, da- mit der Gerätelautsprecher eingeschaltet Anrufen wird. 1. Heben Sie den Telefonhörer ab oder 3. Sie können nun das Telefongespräch über drücken Sie die Taste den Gerätelautsprecher und das eingebau- 2.
  • Seite 15: Schalter Zur Einstellung Der Lautstärkerücksetzung

    All manuals and user guides at all-guides.com Mit der Tonkontrolle (Schiebeschalter auf der Nutzung des Telefons mit Hörgeräten Vorderseite, siehe Abbildung 1) können Sie Sie können Ihr Telefon mit Hörgeräten zusätzlich hohe bzw. tiefe Töne erhöhen. verwenden, die mit einer Telefonspule (T- Anmerkung: Spule) ausgestattet sind.
  • Seite 16: Fotozielwahltasten Basis

    All manuals and user guides at all-guides.com Fotozielwahltasten Basis Nummer im Display verschoben wird. Drücken Sie »Speichern«. Fotozielwahltasten mit Rufnummern be- 2. Geben Sie als nächstes den Namen ein legen und drücken erneut »Speichern«. Die 8 Fotozielwahltasten können mit belie- 4.
  • Seite 17: Lautstärke Des Rufsignals Einstellen

    All manuals and user guides at all-guides.com Lautstärke des Rufsignals einstellen 3. Die Kontakte sind alphabetisch geordnet. Die Lautstärke des Klingeltons kann mittels Um im Telefon schneller vorwärts zu kom- der beiden Schalter auf der rechten Seite men, können Sie mit den Wahltasten zum des Telefons eingestellt werden.
  • Seite 18: Sprachaufnahme Im Telefonbuch Bearbeiten

    All manuals and user guides at all-guides.com Anrufer ID Basis (BS) Sprachaufnahme im Telefonbuch bear- beiten Um die Sprachaufnahme zu bearbeiten, ge- Anrufe in Abwesenheit werden auf dem Dis- hen Sie wie folgt vor: play angezeigt. 1. Drücken Sie die Taste »Tel.Buc.« um in Eine Anrufer-ID besteht aus den folgenden das Telefonbuch zu gelangen.
  • Seite 19: Ein Anruf Aus Der Anrufer-Id-Liste Löschen

    All manuals and user guides at all-guides.com Bildschirmanzeige (BS) ein- 7. Wählen Sie nun den gewünschten Klin- gelton für diese Telefonnummer aus und stellen drücken »Auswahl«. Somit ist diese Num- Anzeigesprache einstellen mer gespeichert 1. Drücken Sie die Taste »Menü«, um in das Einstellmenü...
  • Seite 20: Datum / Zeit Einstellen (Bs)

    All manuals and user guides at all-guides.com Zeitformat einstellen Telefoneinstellungen (BS) Hier können Sie einstellen ob die Zeitanzei- ge auf dem Display im 24-Stunden Modus Ruftonlautstärke ändern oder im 12-Stunden Modus angezeigt wer- 1. Drücken Sie die Taste »Menü«, um in das den soll.
  • Seite 21: Einstellung Der Rückfragezeit

    All manuals and user guides at all-guides.com Sprachausgabe (BS) 2. Mit den Tasten wählen Sie »Tel. ein- stellen« und bestätigen mit »Auswahl«. Dieses Telefon ist mit einer Sprachausgabe 3. Wählen Sie »Anruf wartet« und bestätigen ausgestattet. Es werden Zahlen und Funkti- mit »Auswahl«.
  • Seite 22: Rote Anzeige Für Anrufe In Abwesenheit / Neue Nachrichten

    All manuals and user guides at all-guides.com Sprache für die Sprachausgabe festlegen. 1) Anrufbeantworter einschalten Sie können die Sprache auswählen, in der 1. Drücken Sie die Taste »Menü«, um in das Ihnen vorgelesen wird. Es stehen max. 3 Einstellmenü zu gelangen. Sprachen zur Verfügung.
  • Seite 23: Ansagetext Löschen

    All manuals and user guides at all-guides.com 1. Drücken Sie die Taste »Menü«, um in das ter nach dem 4ten Klingeln nicht antwortet, Einstellmenü zu gelangen. wurde keine Nachricht aufgezeichnet und Sie können auflegen, bevor Sie für den An- 2. Mit den Tasten wählen Sie »AB ein- ruf bezahlen müssen.
  • Seite 24: Nachrichten Abhören (Bs)

    All manuals and user guides at all-guides.com Nachrichten abhören (BS) 3. Wird die Fernabragegeheimzahl akzep- Das Telefon zeigt im Display an, wenn Sie tiert, wird der AB eine Folge von Befehlen eine neue Nachricht haben. abspielen. Folgen Sie den Aufforderun- gen für die Handhabung.
  • Seite 25: Sos Funktionen (Bs)

    All manuals and user guides at all-guides.com SOS Funktionen (BS) 3. Wählen Sie »SOS-Text« und bestätigen mit »Auswahl«. Dieser Teil der Anleitung bezieht sich auf die 4. Wählen Sie »Text aufnehmen« und bestä- SOS-Funktion in der Basisstation. tigen mit »Auswahl«. Die Aufnahme Das Telefon ist mit einer SOS-Funktion aus- beginnt...
  • Seite 26: Geheimzahl Für Sos Definieren

    All manuals and user guides at all-guides.com Zusätzliche Anschlüsse (BS) der Anruf weitergeführt wird, sonst wird die Leitung unterbrochen. Wenn die Funktion Anschlussbuchse für Vibrationskissen »automatisch trennen« aktiviert ist, kann und/oder Module der Benutzer die Freisprechtaste drücken Ihr Telefon verfügt über ein Anschlussbuch- und die Freisprechfunktion ist eingeschaltet, se für Vibrationskissen oder ergänzende Si- ohne das die Geheimzahl eingegeben wer-...
  • Seite 27: Wandmontage

    All manuals and user guides at all-guides.com Wandmontage 1. Schieben Sie die Halterung für den Tele- fonhörer aus ihrer Position heraus und drehen Sie diese um 180 Grad. Schieben Sie die Halterung anschließend wieder in ihre ursprüngliche Position, sodass die Haltenase nach oben zeigt.
  • Seite 28: Mobilteil Ein-/Ausschalten

    All manuals and user guides at all-guides.com Mobilteil Ein-/Ausschalten 3. Um das Telefonat zu beenden, drücken Sie die Taste Wenn das Mobilteil ausgeschaltet ist, wird Nutzung des Gerätelautsprechers bei ei- es durch Einlegen in die Ladeschale auto- nem Gespräch matisch eingeschaltet. 1.
  • Seite 29: Löschen Der Zuletzt Gewählten Nummern

    All manuals and user guides at all-guides.com 6. Wählen Sie die gewünschte Melodie zu Stummschaltung diesem Kontakt und wählen »Speich«, um Sie können an Ihrem Telefon das Mikrofon den Vorgang abzuschliessen. während eines Gesprächs vorübergehend ausschalten, sodass Sie Ihr Gesprächspart- Löschen der zuletzt gewählten Nummern ner nicht mehr hören kann.
  • Seite 30: Kurzwahltasten M1/M2 (Mt)

    All manuals and user guides at all-guides.com Kurzwahltasten M1/M2 (MT) Mit Kurzwahltasten wählen Drücken Sie die Taste M1 oder M2. Kurzwahltasten M1/M2 mit Rufnummern Die gespeicherte Telefonnummer wird ge- belegen wählt. Die 2 Kurzwahltasten M1/M2 können mit be- Telefonbuch Mobilteil (MT) liebigen Telefonnummern (max.
  • Seite 31: Kontakt Im Telefonbuch Bearbeiten

    All manuals and user guides at all-guides.com 4. Auf dem Display wählen Sie mit der Tas- 2. Mit den Tasten , können Sie im Telefon- »TB Status«, um die Information an- buch blättern und den gewünschten Kon- zeigen zu lassen. takt suchen.
  • Seite 32: Ein Anruf Aus Der Anrufer-Id-Liste Löschen

    All manuals and user guides at all-guides.com Ein Anruf aus der Anrufer-ID-Liste lö- 2) Wahlverfahren von Basis einstellen schen 1. Drücken Sie die Taste »Menü.« und wäh- 1. Drücken Sie die Taste »Menü« und wäh- len mit den Eintrag »BS Einstell.«. len mit den Eintrag »Anruferlis.«.
  • Seite 33: Telefoneinstellungen (Mt)

    All manuals and user guides at all-guides.com Telefoneinstellungen (MT) 3. Wählen Sie »Rufton Einst« und bestätigen mit »Wählen«. 1-1) Alarm einstellen 4. Sie haben nun folgende Optionen zur Auswahl: Sie können mit dem Mobilteil einen Alarm - Rufton Int. mit Schlummerfunktion festlegen. - Rufton Ext.
  • Seite 34: Sprache

    All manuals and user guides at all-guides.com 3. Wählen Sie »Ton einst.« und bestätigen 7) Automatische Rufannahme mit »Wählen«. Bei der automatischen Ruftonabnahme kön- 4. Wählen Sie »Reichweite« und bestätigen nen Sie einen Anruf durch Abheben des Mo- mit »Wählen«. bilteils von der Ladestation, ohne Drücken einer beliebigen Taste, annehmen.
  • Seite 35: Datum / Zeit Einstellen (Mt)

    All manuals and user guides at all-guides.com 10) Datum / Zeit einstellen (MT) 11) Basis wählen 10-1) Datumsformat einstellen Sie können eine Basis, auf dem bereits das Mobilteil angemeldet ist, auswählen. Sie 1. Drücken Sie die Taste »Menü.« und wäh- können nur Basen auswählen, die bereits len mit den Eintrag »MT Einstell«.
  • Seite 36: Neues Mobilteil Anmelden

    All manuals and user guides at all-guides.com Neues Mobilteil anmelden Mobilteil zurücksetzen Das Mobilteil das mitgeliefert wird, ist be- Sie können das Mobilteil in den Auslieferzu- reits an der Basis angemeldet. Dies ist als stand zurücksetzen. Gehen Sie hierzu wie Mobilteil 1 angemeldet.
  • Seite 37: Drei-Wege-Konferenz

    All manuals and user guides at all-guides.com 2. Geben Sie die gewünschte Mobilteilnum- Anrufer-ID beim Anklopfen mer zwischen 1 bis 5 ein. Wenn Sie über einen Anklopfdienst von Ih- 3. Das angewählte Mobilteil wird klingeln. rer lokalen Telefongesellschaft verfügen, Die Nummer des anrufenden Mobilteils wird Ihnen im Display der Name und/oder wird auf dem Display angezeigt.
  • Seite 38: Ansagetext Abspielen

    All manuals and user guides at all-guides.com 1-2) Ansagetext abspielen lässt, wird ein Tonbandsymbol im Display angezeigt und an der Basis leuchtet das 1. Drücken Sie die Taste »Menü.« und wäh- Briefsymbol.(sofern aktiviert, siehe Seite 22) len mit den Eintrag »Anrufbeantw.«. Die Wiedergabe dieser Nachricht erfolgt wie 2.
  • Seite 39: Gebühren Sparen Bei Fernabfrage Mit Dem Ab

    All manuals and user guides at all-guides.com Sie können festlegen, nach wie viel mal klin- 3. Suchen Sie »Einstellun.« und bestäti- geln der AB aktiviert wird. gen mit »Wählen«. 1. Drücken Sie die Taste »Menü.« und wäh- 3. Wählen Sie »Aufnahmeze« und bestäti- len mit den Eintrag »Anrufbeantw.«.
  • Seite 40: Sos Funktionen Mt

    All manuals and user guides at all-guides.com SOS Funktionen MT Wenn das Telefon nicht funk- tioniert Allgemein Dieser Teil der Anleitung bezieht sich auf die SOS-Funktion im Mobilteil. Vergewissern Sie sich, dass das Telefonka- Das Mobilteil ist mit einer einfachen SOS- bel unbeschädigt und korrekt eingesteckt Funktion ausgestattet.
  • Seite 41: Wartung Und Pflege

    All manuals and user guides at all-guides.com Rufnummer wird nicht angezeigt Garantiereparaturen werden nur bei Ein- • Die Rufnummernanzeige muss von Ihrem sendung der ausgefüllten Garantiekarte und Netzbetreiber unterstützt werden. einer Kopie der Rechnung/Kassenbeleg des • Bei Anschluss an einer Nebenstelle funk- Fachhändlers durchgeführt.
  • Seite 42: Technische Daten Basis

    All manuals and user guides at all-guides.com Technische Daten Basis Stromversorgung: Netzteil: Primär 100-240V 50/60 Hz AC Sekundär 7,5V DC / 1000 mA Abmessungen (LxBxH): 243 mm x 240 mm x 94 mm Gewicht: ca. 965 g Technische Daten Mobilteil Standard: DECT = Digital Enhanced Cordless Telecommunication Erweiterter Digitalstandard für schnurlose Telefone...
  • Seite 43 - 2004/108/EG EMV-Richtlinie - 2002/96/EG WEEE-Richtlinie - 2006/95/EG Niederspannungsrichtlinie - 1999/5/EG R&TTE-Richtlinie Die Konformität mit den o. a. Richtlinie wird durch das CE-Zeichen auf dem Gerät bestätigt. EG Konformitätserklärungen stehen im Internet unter www.humantechnik.com zur Verfügung. Technische Änderungen vorbehalten. Deutsch 43...
  • Seite 44: Safety Instructions

    All manuals and user guides at all-guides.com Congratulations for purchasing your scalla combo phone. We hope that you will enjoy it for a long time. Please review these operating instructions carefully to ensure that you set up the phone correctly and that you are familiar with all the functions of the system. Safety instructions Please read the safety information in the section "Setup"...
  • Seite 45 All manuals and user guides at all-guides.com Table of contents Page Safety instructions Setup Packaging content Inserting the batteries into the basic unit Inserting the accumulator into the mobile unit Connecting the phone Connecting the mobile charging station Keys and their meaning Base Keys and their meaning mobile unit Control elements Base station (BS) Control elements mobile unit (MT)
  • Seite 46 All manuals and user guides at all-guides.com Table of contents Page Caller ID with Base (BS) Save phone numbers from the caller ID list in the phone book Erase a call from the caller ID list Erase all calls from the caller ID list Display calls received during absence Setup screen display (BS) Set display language...
  • Seite 47 All manuals and user guides at all-guides.com Table of contents Page SOS functions (BS) Program SOS number Program SOS text Replay SOS text Erase SOS text Switch SOS on automatically Define security ID for SOS Additional connections (BS) Connecting socket for vibration pad and/or module Headset connection Headphone connection Wall mounting...
  • Seite 48 All manuals and user guides at all-guides.com Table of contents Page Caller ID mobile unit (MU) Review callers in CID Book Save phone numbers from the caller ID list in the phone book Delete a call from the caller ID list Erase all calls from the caller ID list Modifying the base settings with the mobile unit (MU) Unregister mobile unit (MT) from Base...
  • Seite 49: Humantechnik Service-Partner

    The phone does not work. Warning tone during a call Phone number will not be displayed Important note Appendix Maintenance and care Warranty Environmental information/disposal Batteries Technical Data Base Technical data - mobile unit Humantechnik Service-Partner Rear cover English 49...
  • Seite 50: Setup

    All manuals and user guides at all-guides.com Setup Inserting the batteries into the mobile unit The wireless phone needs three 1.2 V accu- Packaging content mulator (type "AAA") to function. Please check whether all of the parts listed Please proceed as follows when inserting in the following are included: the rechargeable batteries: •...
  • Seite 51: Keys And Their Meaning Base

    All manuals and user guides at all-guides.com Keys and their meaning Base Call back key, e.g. to distribute Menu key calls when connecting a phone to - Menu selection right a phone system - Menu selection left Arrow keys up/down Loudspeaker button: Browsing in menu –...
  • Seite 52: Control Elements Base Station (Bs)

    All manuals and user guides at all-guides.com Control elements Base station (BS) Sliding switch sound Display Function keys for control/volume adjust- menu control ment Plate for photo target dial key (in the phone receiver) Dial keys Answering machine Mobile unit search/coupling MEMO R-button...
  • Seite 53 All manuals and user guides at all-guides.com Permanent display Audio output Headset connec- Connection socket for backlight on / off (3.5 mm) tion phone receiver cable switch (2.5 mm) OFF ON DC 7.5V Connection socket for Signal selector Connection socket Connection socket special accessories...
  • Seite 54: Control Elements Mobile Unit (Mt)

    All manuals and user guides at all-guides.com Control elements mobile unit (MT) Flashlight Visual ringer Amplification Earphone Speed dial key Display Upwards/down- wards key Menu key Redial key INT key Lift the receiver. Hang up receiver Switch MT on/off Dial keys Star key Pound key Keyboard block...
  • Seite 55 All manuals and user guides at all-guides.com SOS button Speakers Battery compartment cover Charger contacts Charging contacts Set volume Audio adjuster Set amplifica- tion Headset connection (2.5 mm) English 55...
  • Seite 56: Phone Calls With Base (Bs)

    All manuals and user guides at all-guides.com Phone calls with Base (BS) 2. Hang the receiver up to switch the equip- ment loudspeaker on. 3. You can now continue the phone call Calling through the equipment loudspeaker and 1. Lift the telephone receiver or press the the installed microphone.
  • Seite 57: Switch To Adjust The Volume Reset

    All manuals and user guides at all-guides.com You can also increase high or low frequen- Use of the phone with a hearing aid cies by using the sound control (slide switch You can use your phone with hearing aids, on the front, see figure 1). assumed they are equipped with a T-coil.
  • Seite 58: Photo Target Dial Key Base

    All manuals and user guides at all-guides.com Photo target dial key Base 3. Select the desired ring tone for the phone number and press »Select«. This means that the number is saved. Assign phone numbers to photo target dial keys Photo target dial key The 8 photo target dial keys can be assig- You can insert a small photo of the desired...
  • Seite 59: Adjust The Ringer Volume Of The Ring Tone

    All manuals and user guides at all-guides.com Adjust the ringer volume of the ring tone 3. The contacts are listed in alphabetical The ringer volume of the ring tone can be order. To move faster through the phone, adjusted with the two switches on the right you can use the dial keys to jump to the side of the phone.
  • Seite 60: Modify Voice Recording In Phone Book

    All manuals and user guides at all-guides.com Caller ID with Base (BS) Modify voice recording in phone book Please follow the instruction when editing Calls that were not answered will be shown the voice recording: on the display. 1. Press the key »PhoneBK« to get to the A caller ID consists of the following informa- phone book.
  • Seite 61: Erase A Call From The Caller Id List

    All manuals and user guides at all-guides.com Setup screen display (BS) Erase a call from the caller ID list 1. The keys are used to transfer to the Set display language caller ID list. 1. Press the »Menu« key to get to the setup 2.
  • Seite 62: Set Hour Format

    All manuals and user guides at all-guides.com Phone settings (BS) Set hour format This setup is used to decide whether the Change ring tone volume time on the display is shown in a 24 hour or 12 hour mode. 1. Press the »Menu« key to get to the setup 1.
  • Seite 63: Set The Call Back Time

    All manuals and user guides at all-guides.com Set Talk (BS) »Select« by using the keys. 3. Select "Call waiting" and confirm with »Select«. This phone is equipped with voice output. 4. Use to switch the function on/off and Numbers and functions will be read out loud confirm with »Select«.
  • Seite 64: Set The Language For Set Talk

    All manuals and user guides at all-guides.com Set the language for set talk. 1) Switch answering machine on You can set the language that will be read 1. Press the »Menu« key to get to the setup to you. A maximum of three languages are menu.
  • Seite 65: Delete Outgoing Message

    All manuals and user guides at all-guides.com 2. Select »TAM setup« and confirm with If the answering machine answers after 3 »Select« by using the keys. rings, then a new message was recorded. 3. Select "Outgoing Msg" and confirm with 1.
  • Seite 66: Listen To Messages (Bs)

    All manuals and user guides at all-guides.com Listen to messages (BS) 3. The TAM will replay a sequence of com- The phone shows on the display if you have mands if the remote query security ID is a new message. accepted.
  • Seite 67: Sos Functions (Bs)

    All manuals and user guides at all-guides.com SOS functions (BS) Replay SOS text 1. Press the »Menu« key to get to the setup menu. This part of the instructions covers the SOS 2. Select »Set SOS« and confirm with »Se- functions of the base station.
  • Seite 68: Define Security Id For Sos

    All manuals and user guides at all-guides.com Additional connections (BS) 1. Select "SOS autom on" and confirm with »Select«. Connecting socket for vibration pad and/ to switch the function on/off and or module confirm with »Select«. Your phone includes a connection socket for vibration pads or supplementary signal Define security ID for SOS generator modules.
  • Seite 69: Wall Mounting

    All manuals and user guides at all-guides.com Wall mounting 1. Slide the bracket for the phone receiver from its position and rotate it by 180 de- grees. Afterwards, slide the bracket back into the original position in such a way the the bracket nose points upward (see figu- re 2).
  • Seite 70: Switch Mobile Unit On/Off

    All manuals and user guides at all-guides.com Switch mobile unit On/Off Use of the equipment loudspeaker du- ring a call 1. Press key to switch the equipment louds- If the mobile unit is switched off, then it will peaker on .
  • Seite 71: Erase The Last Dialed Numbers

    All manuals and user guides at all-guides.com Erase the last dialed numbers Muting 1. By pressing the key , the last dialed You can switch the microphone of your pho- number will be displayed. ne temporarily off during a call, which me- 2.
  • Seite 72: Speed Dial Keys M1/M2 (Mu)

    All manuals and user guides at all-guides.com Speed dial keys M1/M2 (MU) Phone book the mobile unit (MU) Assign phone numbers to speed dial Key assignment keys M1/M2 Letter/character The 2 speed dial keys M1/M2 can be assi- 1 _ + - « ( ) % gned to any phone number (max.
  • Seite 73: Modify Contact In Phone Book

    All manuals and user guides at all-guides.com Caller ID mobile unit (MU) 4. The contact will be called up by pressing key. Calls that were not answered will be shown on the display, e.g. "2 New calls". Modify contact in phone book Please follow the instructions when modify- Review callers in CID Book ing the contacts:...
  • Seite 74: Delete A Call From The Caller Id List

    All manuals and user guides at all-guides.com Delete a call from the caller ID list 2) Set the dialing mode of the base 1. Press the »Menu« key and select the 1. Press the »Menu« key and select the »BS »CID Book«...
  • Seite 75: Phone Settings (Mu)

    All manuals and user guides at all-guides.com Phone settings (MU) 2. Press »Select«. 3. Select »Set ringer tone« and confirm with 1-1) Set alarm »Select«. You can set an alarm with the snooze func- 4. The following options are available: tion on the mobile unit.
  • Seite 76: Range Alarm

    All manuals and user guides at all-guides.com 3. Select »Tone Setup« and confirm with »Se- 7) Automatic call acceptance lect«. With automatic call acceptance, you can ac- cept a call by lifting the mobile unit from the 4. Select »Range« and confirm with »Select«. charging station without pressing any key.
  • Seite 77: Voice Output Mobile Unit

    All manuals and user guides at all-guides.com 10) Set date/time (MU) 11) Select Base You can select a Base on which a mobile 10-1) Select date format unit has already been registered. You can 1. Press the »Menu« key and select the only select Bases, which are already regis- »HS Settings«...
  • Seite 78: Register New Mobile Unit

    All manuals and user guides at all-guides.com Register new mobile unit Reset mobile unit to default The delivered mobile unit is already registe- The mobile unit can be reset to its default red with the Base. It is registered as mobile state: unit 1.
  • Seite 79: Three Way Conference Call

    All manuals and user guides at all-guides.com Answering machine (MU) 5. If desired, a conversation with the dialed user can take place. You can also hang up before the user picks up. In this case The phone is equipped with an answering the call will be directly re-directed.
  • Seite 80: Playback Outgoing Message

    All manuals and user guides at all-guides.com 2-1) Listen to messages (MU) 3-1) Switch answering machine (TAM) on The phone shows tape symbol on the dis- 1. Press the »Menu« key and select the play if you have received a new message. »ANS.
  • Seite 81: Save Toll At Remote Inquiry With The Tam

    All manuals and user guides at all-guides.com 3-3-2) Save toll at remote inquiry with the 3-5) Secret security ID for TAM setup. A confidential four digit secret number is In toll saver mode, incoming calls will be required to access your messages from an answered after 5 rings until the first new external phone.
  • Seite 82: Sos Functions (Mu)

    All manuals and user guides at all-guides.com SOS functions (MU) If the phone does not work General information This part of the instructions covers the SOS Please ensure that the phone cable is un- functions of the mobile unit. damaged and correctly plugged in. Remo- The mobile unit is equipped with a simple ve possible existing accessories, extension SOS function.
  • Seite 83: Important Note

    All manuals and user guides at all-guides.com Important note Environmental information/disposal Disposal of used electrical and electronic devices (to be applied in The device is not protected against splas- countries of the European Union and hing water. Do not put objects that are filled other European countries with a with fluids on the device, e.g.
  • Seite 84: Technical Data Base

    All manuals and user guides at all-guides.com Technical Data Base Electrical supply: Power supply: Primary 100-240V 50/60 Hz AC Secondary 7.5V DC / 1000 mA Dimensions (L×W×H): 243 mm × 240 mm × 94 mm Weight: app. 965 g Technical data - mobile unit Standard: DECT = Digital Enhanced Cordless Telecommunication Expanded digital standard for wireless phones...
  • Seite 85 - 2006/95/EG low voltage directive - 1999/5/EG R&TTE directive The conformity of the a.m. directives is confirmed by the CE mark on the device. EU confor- mity declarations are available on the Internet under www.humantechnik.com. Subject to technical changes. English 85...
  • Seite 86: Conseils De Sécurité

    All manuals and user guides at all-guides.com Vous venez de faire l'acquisition d'un téléphone scalla combo. Nous espérons que vous en serez entièrement satisfait pendant longtemps ! Pour utiliser au mieux les fonctionnalités de votre téléphone, nous vous conseillons de lire attentivement les instructions suivantes. Conseils de sécurité...
  • Seite 87 All manuals and user guides at all-guides.com Sommaire Page Conseils de sécurité Mise en service Contenu de l'emballage Insertion des accus dans la base Insertion des accus dans le combiné Raccordement du téléphone Raccordement de la station de charge du combiné sans fil Signification des touches sur la base Signification des touches sur le combiné...
  • Seite 88 All manuals and user guides at all-guides.com Sommaire Page Modifier un enregistrement vocal dans le répertoire Modifier un contact dans le répertoire Identification de l'appelant (base) Enregistrer un numéro de téléphone dans le répertoire à partir de la liste d'identification des appelants Effacer un appel de la liste d'identification des appelants Effacer tous les appels de la liste d'identification des appelants Afficher les appels entrants «...
  • Seite 89 All manuals and user guides at all-guides.com Sommaire Page Ecouter les messages (base) Lecture plus lente des messages enregistrés Effacer tous les messages (base) Commande à distance Fonctions SOS (base) Programmer un numéro SOS Programmer un message SOS Ecouter un message SOS Effacer un message SOS Activation automatique SOS Définir un code d'accès confidentiel SOS...
  • Seite 90 All manuals and user guides at all-guides.com Sommaire Page Répertoire du combiné Affectation des touches Ajouter un contact au répertoire (combiné) Appeler un contact à partir du répertoire Modifier un contact dans le répertoire Etat du répertoire Identification de l'appelant sur le combiné Voir la liste des appels entrants Enregistrer un numéro de téléphone dans le répertoire à...
  • Seite 91 All manuals and user guides at all-guides.com Sommaire Page Transfert d'appels entre combinés Conférence à trois Identifier l'appelant lors d'un appel en attente Répondeur (combiné) Enregistrer une annonce Ecouter l‘annonce Ecouter les messages (combiné) Effacer tous les messages (combiné) Enregistrer un mémo Activer le répondeur Réglage de la langue du répondeur Réglage du nombre de sonneries précédant le déclenchement...
  • Seite 92: Mise En Service

    All manuals and user guides at all-guides.com Mise en service Insertion des accus dans le combiné Le combiné sans fil fonctionne avec 3 accus de 1,2 V NIMH (type « AAA »). Contenu de l'emballage Pour insérer les accus, procédez comme suit : Veuillez vérifier si les pièces suivantes sont 1.
  • Seite 93: Signification Des Touches Sur Le Combiné Sans Fil

    All manuals and user guides at all-guides.com Signification des touches sur la base Répétition des derniers numéros/ Touche de menu Insertion d’une pause pendant la - Touche de fonction droite prénumérotation - Touche de fonction gauche Touche haut-parleur : Touches de défilement vers le haut/ –...
  • Seite 94: Eléments De Commande De La Base

    All manuals and user guides at all-guides.com Eléments de commande de la base Réglage coulissant Ecran Touches fonctions pour la tonalité et volume commande du menu Etiquettes des touches mémoire photo (sous le combiné) Touches de numérotation Répondeur Touche de localisation/ couplage du combiné...
  • Seite 95 All manuals and user guides at all-guides.com Sortie audio Raccord casque télé- Prise de raccordement du (3,5 mm) phonique (2,5 mm) câble de combiné de base OFF ON DC 7.5V Prise de raccordement Sélecteur de Prise de raccordement Prise de raccordement pour accessoires tels signaux pour bloc-secteur...
  • Seite 96: Eléments De Commande Du Combiné

    All manuals and user guides at all-guides.com Eléments de commande du combiné Lampe de poche Signalisation visuelle de la sonnerie Amplification Ecouteur Touche de numérotation Ecran abrégée Touche vers le haut/ vers le bas Touche de menu Touche de répétition du Touche INT dernier numéro composé...
  • Seite 97 All manuals and user guides at all-guides.com Touche SOS Haut-parleur Couvercle du logement à accus Contacts de charge Contacts de charge Réglage du volume Réglage de la tonalité Réglage de l'amplification Raccordement pour casque d'écoute Français 97...
  • Seite 98: Utilisation Du Téléphone (Base)

    All manuals and user guides at all-guides.com Utilisation du téléphone (base) 2. Reposez maintenant le combiné sur la base pour activer le haut-parleur de la base. 3. Vous pouvez à présent continuer la commu- Passer un appel nication téléphonique via le haut-parleur et 1.
  • Seite 99: Réinitialisation Du Volume

    All manuals and user guides at all-guides.com Remarque : Mode secret La réglage de la tonalité est seulement pris Vous pouvez communiquer avec une personne en compte si la touche d'amplification est qui se trouve à vos côtés, sans que votre activée.
  • Seite 100: Touches Mémoire Photo (Base)

    All manuals and user guides at all-guides.com Touches mémoire photo (base) numéro soit déplacé l'écran. Appuyez sur « Enreg. ». 2. Saisissez ensuite le nom et appuyez à Attribuer des numéros de téléphone aux nouveau sur « Enreg. ». touches mémoire photo 3.
  • Seite 101: Réglage Du Volume De La Sonnerie

    All manuals and user guides at all-guides.com Réglage du volume de la sonnerie Le volume de la tonalité est réglable au moyen 3. Les contacts sont enregistrés dans l‘ordre des deux boutons situés sur le côté droit de alphabétique. Pour rechercher plus votre téléphone.
  • Seite 102: Modifier Un Enregistrement Vocal Dans Le Répertoire

    All manuals and user guides at all-guides.com Identification l'appelant Modifier un enregistrement vocal dans le répertoire (base) Pour modifier un enregistrement vocal, procédez comme suit : Les appels entrants pendant une absence 1. Appuyez sur la touche « Répert. » pour sont affichés sur l'écran.
  • Seite 103: Effacer Un Appel De La Liste D'identification Des Appelants

    All manuals and user guides at all-guides.com Réglages de l‘affichage (base) 7. Sélectionnez maintenant la sonnerie de votre choix pour ce numéro de téléphone et appuyez sur « Sélect ». Le numéro est Réglage de la langue d‘affichage alors enregistré. 1.
  • Seite 104: Réglage Du Format Heure

    All manuals and user guides at all-guides.com Réglages du téléphone (base) Réglage du format heure Vous pouvez définir l'affichage de l'heure sur Modifier le volume de la sonnerie le mode 24 heures ou 12 heures. 1. Appuyez sur la touche de fonction « Menu » 1.
  • Seite 105: Réglage De L'appel En Attente

    All manuals and user guides at all-guides.com Synthèse vocale (base) Réglage de l'appel en attente 1. Appuyez sur la touche de fonction « Menu » Ce téléphone est équipé d‘une synthèse pour accéder au menu de réglage. vocale. Chiffres et fonctions du répondeur 2.
  • Seite 106: Déterminer La Langue De La Synthèse Vocale

    All manuals and user guides at all-guides.com Déterminer la langue de la synthèse 1) Activer le répondeur vocale 1. Appuyez sur la touche de fonction « Menu » pour accéder au menu de réglage. Vous pouvez sélectionner la langue de sortie vocale.
  • Seite 107: Effacer Une Annonce

    All manuals and user guides at all-guides.com 1. Appuyez sur la touche de fonction « Menu » cher avant de devoir payer pour l‘appel. Si le pour accéder au menu de réglage. répondeur se déclenche après la 3e sonnerie, 2. Au moyen des touches de défilement un nouveau message a été...
  • Seite 108: Ecouter Les Messages (Base)

    All manuals and user guides at all-guides.com Ecouter les messages (base) 3. Si le code d'accès est accepté, le répondeur L'écran du téléphone indique si vous avez un vous annoncera les différentes commandes nouveau message. disponibles. Suivez les indications qui vous sont données pour commander le répon- deur.
  • Seite 109: Fonctions Sos (Base)

    All manuals and user guides at all-guides.com Fonctions SOS (base) 2. Avec touches sélectionnez « Réglage SOS » et confirmez avec Cette partie de la notice d'utilisation se rapporte « Sélect. ». 3. Sélectionnez « Message SOS » et confir- à...
  • Seite 110: Définir Un Code D'accès Confidentiel Sos

    All manuals and user guides at all-guides.com Raccords supplémentaires qui est l‘invite à entrer le code PIN. La fonc- tion mains libres est alors activée. Toutes les (base) 2 minutes, l‘appelant entend une tonalité, puis il doit appuyer sur une touche pour continu- Prise de raccordement pour coussin vibrant er l‘appel, sinon la ligne est interrompue.
  • Seite 111: Montage Mural

    All manuals and user guides at all-guides.com Montage mural 1. Faites coulisser support com- biné hors emplacement réinsérez-le en le tournant de 180°. Le tenon de retenue est orienté vers le haut (voir figure ci-dessous). Cela permet de maintenir le combiné sur le téléphone lorsqu’il est monté...
  • Seite 112: Activer/Désactiver Le Combiné

    All manuals and user guides at all-guides.com Activer/désactiver le combiné Utilisation du haut-parleur pendant une communication Si le combiné est éteint, il se rallume automati- 1. Pour activer le haut-parleur, appuyez sur quement lorsqu'il est placé dans sa station de .
  • Seite 113: Supprimer Les Derniers Numéros Composés

    All manuals and user guides at all-guides.com Supprimer les derniers numéros composés Mode secret 1. Appuyez sur pour afficher le dernier Si vous le souhaitez, vous pouvez parler à une numéro composé. personne qui se trouve à vos côtés, sans que 2.
  • Seite 114: Touches De Numérotation Abrégée M1/M2 (Combiné)

    All manuals and user guides at all-guides.com Touches numérotation Composer un numéro avec les touches de numérotation abrégée abrégée M1/M2 (combiné) Appuyez sur la touche M1 ou M2. Le numéro de téléphone enregistré est Attribuer des numéros de téléphone aux composé.
  • Seite 115: Appeler Un Contact À Partir Du Répertoire

    All manuals and user guides at all-guides.com Appeler un contact à partir du répertoire Etat du répertoire 1. Une fois que vous avez enregistré le numé- Le menu 'Etat du Répertoire' vous indique ro de téléphone, naviguez avec la touche le nombre de contacts enregistrés dans le vers le bas (symbole répertoire) pour répertoire :...
  • Seite 116: Effacer Un Appel De La Liste D'identification Des Appelants

    All manuals and user guides at all-guides.com 1. Sélectionnez « Option » avec « Sélect. ». 4. Avec les touches , sélectionnez « Ajouter » 2. Avec les touches , sélectionnez « Ajouter » 4. Saisissez votre code PIN puis appuyez sur puis confirmez avec «...
  • Seite 117: Réglages Du Téléphone (Combiné)

    All manuals and user guides at all-guides.com on vous demandera d'entrer le nouveau un appel entrant. Vous pouvez choisir une code à 4 chiffres et d'appuyer ensuite sur mélodie différente pour un appel interne « Sélect. ». (provenant d'un autre combiné enregistré sur la 7.
  • Seite 118: Alerte De Portée

    All manuals and user guides at all-guides.com 3-2) Alerte de portée 6) Réglage du contraste d'écran Vous entendrez un bip chaque fois que le com- 1. Appuyez sur la touche « Menu » et sur biné se trouve hors de portée de la base. Vous pour faire défiler le menu jusqu'à...
  • Seite 119: Synthèse Vocale Du Combiné

    All manuals and user guides at all-guides.com 9) Synthèse vocale du combiné 4. Sélectionnez « Régl. heure » et confirmez avec « Sélect. ». Le combiné est équipé d'une synthèse vocale simple. Des chiffres sont lus lors de la saisie. 5.
  • Seite 120: Fonctions Supplémentaires (Combiné)

    All manuals and user guides at all-guides.com Fonctions supplémentaires Vous pouvez également enregistrer jusqu'à 4 bases différentes pour chaque combiné. (combiné) Pour enregistrer nouveau combiné, procédez comme suit : Verrouillage du clavier du combiné 1. Maintenez enfoncée pendant environ Lorsque la fonction est activée, toutes les tou- 5 secondes la touche de localisation ches sont verrouillées, à...
  • Seite 121: Interphone

    All manuals and user guides at all-guides.com Interphone Conférence à trois Si vous avez associé plusieurs combinés à une Si vous avez simultanément un appel extérieur même base, vous pouvez passer des appels et un appel en interphone en cours, vous pouvez entre ces différents combinés et transférer établir une conférence à...
  • Seite 122: Répondeur (Combiné)

    All manuals and user guides at all-guides.com Répondeur (combiné) 2. Sélectionnez « Message » et confirmez avec « Sélect. ». Le téléphone est équipé d‘un répondeur 3. Sélectionnez « Lire message » intégré. Celui-ci peut être commandé à partir de confirmez avec «...
  • Seite 123: Réglage De La Langue Du Répondeur

    All manuals and user guides at all-guides.com 4. Sélectionnez « Rép. on/off » et confirmez 2. Appuyez maintenant sur « Sélect. ». avec « Sélect. ». 3. Sélectionnez « Régl rép. » et confirmez avec 5. Avec vous pouvez activer/désactiver la «...
  • Seite 124: Fonctions Sos (Combiné)

    All manuals and user guides at all-guides.com Fonctions SOS (combiné) Alerte sonore en cours de conversation • Les accus sont déchargés - Reposez le combiné sur son support Cette partie de la notice d‘utilisation se pour le recharger. rapporte à la fonction SOS du combiné. •...
  • Seite 125: Caractéristiques Techniques (Base)

    All manuals and user guides at all-guides.com Caractéristiques techniques (base) Alimentation : Bloc-secteur : Primaire 100 - 240 V 50/60 Hz Secondaire 7,5 V DC / 1000 mA 4 accus NIMH AAA 1,2 V (en option) Dimensions (H x l x P) : 243 mm x 240 mm x 94 mm Poids : env.
  • Seite 126: Garantie

    - 2006/95/CE Directive « basse tension » - 1999/5/CE Directive ETRT La conformité avec les directives ci-dessus est confirmée par le marquage CE sur l‘appareil. Les déclarations de conformité CE peuvent être consultées sur le site Internet www.humantechnik.com Sous réserve de modifications techniques. 126 Français...
  • Seite 127 All manuals and user guides at all-guides.com Français 127...
  • Seite 128: Veiligheidsinstructies

    All manuals and user guides at all-guides.com Wij wensen u van harte geluk met de aankoop van uw scalla combo-telefoon en hopen dat u er lang plezier van zult hebben. Gelieve de gebruiksaanwijzing aandachtig door te lezen, om de telefoon correct in bedrijf te kunnen nemen en vertrouwd te raken met alle mogelijk- heden van het systeem.
  • Seite 129 All manuals and user guides at all-guides.com Inhoudsopgave Pagina Veiligheidsinstructies Ingebruikname Verpakkingsinhoud De batterijen in het basisapparaat plaatsen De accumulator in de handset plaatsen Aansluiting van de telefoon Aansluiting van het laadstation voor handsets Toetsen en hun betekenis basis Toetsen en hun betekenis handset Bedieningselementen basisstation (BS) Bedieningselementen handset (HS) Telefoneren met basis (BS)
  • Seite 130 All manuals and user guides at all-guides.com Inhoudsopgave Pagina Beller-ID basis (BS) Telefoonnummers uit de beller-ID-lijst in het telefoonboek opslaan Een oproep uit de beller-ID-lijst wissen Alle oproepen uit de beller-ID-lijst wissen Oproepen bij afwezigheid laten weergeven Beeldschermweergave (BS) instellen Weergavetaal instellen Beeldschermcontrast instellen Weergave nummerinvoer instellen...
  • Seite 131 All manuals and user guides at all-guides.com Inhoudsopgave Pagina SOS-functies (BS) SOS-nummer programmeren SOS-tekst programmeren SOS-tekst afspelen SOS-tekst wissen SOS automatisch inschakelen Geheim getal voor SOS definiëren Extra aansluitingen (BS) Aansluitbus voor trilkussen en/of module Headset-aansluiting Koptelefoonaansluiting Wandmontage Handset in-/uitschakelen Telefoneren met handset (HS) Bellen Oproep aannemen...
  • Seite 132 All manuals and user guides at all-guides.com Inhoudsopgave Pagina Beller-ID handset (HS) Beller in bellijst bekijken Telefoonnummers uit de beller-ID-lijst in het telefoonboek opslaan Een oproep uit de beller-ID-lijst wissen Alle oproepen uit de beller-ID-lijst wissen Basisinstellingen met handset (HS) Handset (HS) bij de basis afmelden Kiesmodus van basis instellen Instelling van de herinneringstijd...
  • Seite 133 SOS-functies HS SOS-nummer programmeren Als de telefoon niet functioneert Algemeen De telefoon functioneert niet Waarschuwingstoon tijdens een gesprek Het telefoonnummer wordt niet weergegeven Belangrijke aanwijzing Bijvoegsel Onderhoud Garantie Milieu/Verwijdering Accu‘s Technische gegevens basis Technische gegevens handset Humantechnik servicepartner Achterflap Nederlands 133...
  • Seite 134: Ingebruikname

    All manuals and user guides at all-guides.com Ingebruikname De accus in de handset plaatsen De draadloze telefoon heeft drie 1,2V-ac- Verpakkingsinhoud cumulator (type »AAA«) nodig voor de wer- Controleer of alle hieronder opgesomde de- king. len aanwezig zijn: Ga als volgt te werk om de accumulator te •...
  • Seite 135: Toetsen En Hun Betekenis Basis

    All manuals and user guides at all-guides.com Toetsen en hun betekenis basis Ruggespraaktoets bv. voor het Menutoets overdragen van gesprekken bij - menukeuze rechts aansluiting van de telefoon op - menukeuze links een telefooncentrale Pijltoetsen omhoog/omlaag Luidspreker-toets: Bladeren in het menu –...
  • Seite 136: Bedieningselementen Basisstation (Bs)

    All manuals and user guides at all-guides.com Bedieningselementen basisstation (BS) Schuifschakelaar Display Functietoetsen voor toonregeling / de menubediening volume-instelling Inlegplaatje voor foto- snelkiestoetsen (in de telefoonhoorn) Keuzetoetsen Antwoordapparaat Handset, zoek- / MEMO verbindingstoets R-toets Headset toets STOP Weergave »Nieu- we oproep« Luidspreker Functietoetsen (Handsfree)
  • Seite 137 All manuals and user guides at all-guides.com Permanente verlichting Audio uitgang Headset-aansluiting Aansluitbus voor tele- van de display aan / (3.5 mm) (2.5 mm) foonhoornkabel uit-schakelaar OFF ON DC 7.5V Aansluitbus voor Signaalkeuze- Aansluitbus voor Aansluitbus voor speciaal toebehoren schakelaars netadapter telefoonkabel zoals trilkussen en/of...
  • Seite 138: Bedieningselementen Handset (Hs)

    All manuals and user guides at all-guides.com Bedieningselementen handset (HS) Zaklamp Visuele bel Versterking Luidspreker Snelkiestoets Display Omhoog / Omlaag- toets Menutoets Kiesherhalingstoets INT-toets Hoorn opnemen Hoorn neerleggen HS in-/uitschakelen Keuzetoetsen Sterretjes-toets Hekjes-toets Toetsenbordblokkering Zaklamp Microfoon 138 Nederlands...
  • Seite 139 All manuals and user guides at all-guides.com SOS-toets Luidspreker Klepje batterijvak Laadcontacten Laadcontacten Volume instellen Toon instellen Versterking instellen Headset-aansluiting (2.5 mm) Nederlands 139...
  • Seite 140: Telefoneren Met Basis (Bs)

    All manuals and user guides at all-guides.com Telefoneren met basis (BS) 2. Leg nu de telefoonhoorn erop, zodat de luidspreker van het apparaat wordt inge- schakeld. Bellen 3. U kunt nu het telefoongesprek via de 1. Neem de telefoonhoorn op of druk op de luidspreker van het apparaat en de inge- 1.
  • Seite 141: Schakelaar Voor De Instelling Van De Volume-Reset

    All manuals and user guides at all-guides.com Met de tooncontrole (schuifschakelaar op de Gebruik van de telefoon met gehoorap- voorkant, zie afbeelding 1) kunt u daarnaast paraten hoge resp. diepe tonen versterken. U kunt uw telefoon met gehoorapparaten gebruiken, die voorzien zijn van een tele- Opmerking: foonspoel (T-spoel).
  • Seite 142: Fotosnelkiestoetsen Basis

    All manuals and user guides at all-guides.com Fotosnelkiestoetsen basis 2. Voer hierna de naam in en druk opnieuw op »Opslaan«. 3. Selecteer nu de gewenste beltoon voor Telefoonnummers toekennen aan foto- dit telefoonnummer en druk op »Selecti«. snelkiestoetsen Hiermee is dit nummer opgeslagen. De 8 fotosnelkiestoetsen kunnen met wille- keurige telefoonnummers (max.
  • Seite 143: Volume Van Het Belsignaal Instellen

    All manuals and user guides at all-guides.com Volume van het belsignaal instellen 3. De contacten zijn in alfabetische volg- Het volume van de rinkeltoon kan worden orde. Om de telefoon sneller te kunnen ingesteld met behulp van de twee schakel- doorlopen, kunt u met de keuzetoetsen aars op de rechterkant van de telefoon.
  • Seite 144: Spraakregistratie In Het Telefoonboek Bewerken

    All manuals and user guides at all-guides.com Beller-ID basis (BS) Spraakregistratie in het telefoonboek be- werken Oproepen bij afwezigheid worden op het Om de spraakregistratie te bewerken, gaat display weergegeven. u als volgt te werk: Een beller-ID bestaat uit de volgende infor- 1.
  • Seite 145: Een Oproep Uit De Beller-Id-Lijst Wissen

    All manuals and user guides at all-guides.com Beeldschermweergave (BS) 7. Selecteer nu de gewenste beltoon voor dit telefoonnummer en druk op »Selecti«. instellen Hiermee is dit nummer opgeslagen. Weergavetaal instellen Een oproep uit de beller-ID-lijst wissen 1. Druk op de toets »Menu« om het instel- 1.
  • Seite 146: Tijdformaat Instellen

    All manuals and user guides at all-guides.com Telefooninstellingen (BS) Tijdformaat instellen Hier kunt u instellen of de tijdweergave op Beltoonvolume wijzigen het display in de 24-uursmodus of in de 12-uursmodus moet worden getoond. 1. Druk op de toets »Menu« om het instel- menu te openen.
  • Seite 147: Instelling Van De Herinneringstijd

    All manuals and user guides at all-guides.com Vocale antwoordinrichting (BS) 3. Kies »Oproep wacht« en bevestig met »Selecti«. Deze telefoon is uitgerust met een vocale 4. Met kunt u de functie in-/uitschakelen antwoordinrichting. Er worden getallen en en bevestigen met »Selecti«.. functies via de externe luidspreker voorge- lezen..
  • Seite 148: Taal Voor De Vocale Antwoordinrichting Vastleggen

    All manuals and user guides at all-guides.com Taal voor de vocale antwoordinrichting 3. Kies »AA in-/uitschak.« en bevestig met vastleggen. »Selecti«. U kunt de taal selecteren, waarin u voorge- 4. Met kunt u de functie in-/uitschakelen lezen wordt. Er staan max. 3 talen ter be- en bevestigen met »Selecti«.
  • Seite 149: Berichttekst Wissen

    All manuals and user guides at all-guides.com 4. Kies »Bericht wijzigen« en kies tussen antwoordt, is er een nieuw bericht opgeno- »Stand. bericht« en »Gereg. bericht« en men. bevestig met »Selecti«. 1. Druk op de toets »Menu« om het instel- menu te openen.
  • Seite 150: Luisteren Naar Berichten (Bs)

    All manuals and user guides at all-guides.com Luisteren naar berichten (BS) 3. Als het geheime getal voor de toegang op Op het display van de telefoon ziet u, wan- afstand geaccepteerd wordt, speelt het neer u een nieuw bericht heeft. AA een reeks commando‘s af.
  • Seite 151: Sos-Functies (Bs)

    All manuals and user guides at all-guides.com SOS-functies (BS) SOS-tekst afspelen 1. Druk op de toets »Menu« om het instel- menu te openen. Dit deel van de handleiding heeft betrekking 2. Met de toetsen kiest u »SOS instel- op de SOS-functie in het basisstation. len«...
  • Seite 152: Geheim Getal Voor Sos Definiëren

    All manuals and user guides at all-guides.com Extra aansluitingen (BS) 3. Kies »SOS autom. aan« en bevestig me »Selecti« Aansluitbus voor trilkussen en/of module kunt u de functie in-/uitschakelen en Uw telefoon beschikt over een aansluitbus bevestigen met »Selecti«. voor trilkussen of aanvullende signaal- gevende modules.
  • Seite 153: Wandmontage

    All manuals and user guides at all-guides.com Wandmontage 1. Schuif de houder voor de telefoonhoorn uit zijn positie en draai deze 180°. Schu- if de houder vervolgens weer in zijn oor- spronkelijke positie, zodat het nokje naar boven wijst (zie afbeelding 2). Hierdoor wordt voorkomen dat de hoorn uit de te- lefoonhaak valt, wanneer de telefoon aan de wand gemonteerd wordt.
  • Seite 154: Handset In-/Uitschakelen

    All manuals and user guides at all-guides.com Handset in-/uitschakelen Gebruik van de luidspreker van het apparaat bij een gesprek Als de handset is uitgeschakeld, wordt deze 1. Om de luidspreker van het apparaat in te automatisch ingeschakeld door hem in de schakelen, drukt u op de toets .
  • Seite 155: De Laatst Gekozen Nummers Wissen

    All manuals and user guides at all-guides.com De laatst gekozen nummers wissen Uitschakeling beltoon 1. Door te drukken op de toets wordt een gesprek tijdelijk uitschakelen, zodat uw het laatst gekozen nummer weergege- gesprekspartner u niet meer kan horen. ven. Tijdens het gesprek verschijnt op het display 2.
  • Seite 156: Snelkiestoetsen M1/M2 (Hs)

    All manuals and user guides at all-guides.com Snelkiestoetsen M1/M2 (HS) Telefoonboek handset (HS) Telefoonnummers toekennen aan snel- Toetsfuncties kiestoetsen M1/M2 Toets Letter/ teken De 2 snelkiestoetsen M1/M2 kunnen met 1 _ + - « ( ) % willekeurige telefoonnummers (max. 24 ci- A B C a b c 2 jfers voor iedere toets) bezet worden.
  • Seite 157: Contact In Het Telefoonboek Bewerken

    All manuals and user guides at all-guides.com Beller-ID handset (HS) als u een naam met »T« zoekt, drukt u daarvoor op toets 8 om naar de letter T Oproepen bij afwezigheid worden op het te gaan. display weergegeven met bv. »2 Nieuwe 4.
  • Seite 158: Een Oproep Uit De Beller-Id-Lijst Wissen

    All manuals and user guides at all-guides.com Een oproep uit de beller-ID-lijst wissen 2) Kiesmodus van basis instellen 1. Druk op de toets »Menu« en kies met 1. Druk op de toets »Menu« en kies met het invoerveld »Bellijst«.. het invoerveld »BS Instell«. 2.
  • Seite 159: Telefooninstellingen (Hs)

    All manuals and user guides at all-guides.com Telefooninstellingen (HS) zen«. 4. U heeft nu de keuze uit de volgende opties: 1-1) Alarm instellen - beltoon int. U kunt met de handset een alarm met slui- - beltoon ext. merfunctie vastleggen. Selecteer nu de gewenste optie met »Kiezen«.
  • Seite 160: Taal

    All manuals and user guides at all-guides.com 4) Taal 7) Automatische oproepontvangst De handset beschikt over 6 talen om uit te Bij de automatische oproepontvangst kunt kiezen. u een oproep aannemen door de handset uit het laadstation op te tillen, zonder een 1.
  • Seite 161: Datum / Tijd Instellen (Hs)

    All manuals and user guides at all-guides.com 10) Datum / tijd instellen (HS) 11) Basis kiezen U kunt een basis waarop de handset reeds 10-1) Datumformaat instellen is aangemeld, selecteren. U kunt alleen ba- 1. Druk op de toets »Menu« en kies met ses selecteren die reeds op de handset zijn het invoerveld »HS instell«.
  • Seite 162: Nieuwe Handset Aanmelden

    All manuals and user guides at all-guides.com Nieuwe handset aanmelden Handset terugzetten De handset die meegeleverd wordt, is reeds De handset kan worden gereset naar de op de basis aangemeld. Deze is als handset standaardtoestand: 1 aangemeld. Iedere extra handset die u 1.
  • Seite 163: Drieweg-Conferentie

    All manuals and user guides at all-guides.com 3. De geselecteerde handset gaat rinkelen. ler wordt in de wacht geschakeld. Druk opni- Het nummer van de bellende handset euw op »R« om het eerste gesprek weer op wordt op het display weergegeven. te nemen.
  • Seite 164: Luisteren Naar Berichten (Hs)

    All manuals and user guides at all-guides.com 2-1) Luisteren naar berichten (HS) 3-1) Antwoordapparaat (AA) inschakelen Op het display van de telefoon ziet u een cassette-symbool, wanneer u een nieuw be- 1. Druk op de toets »Menu« en kies met richt ontvangen heeft.
  • Seite 165: Kosten Besparen Bij Toegang Op Afstand Met Het Aa

    All manuals and user guides at all-guides.com 3-3-2) Kosten besparen bij toegang op 5. Met kunt u tussen 60s, 120s, 180 of afstand met het AA »Onbeperkt« kiezen en bevestigen met »Kiezen«. In de kostenbesparende modus worden inkomende oproepen na 5 × rinkelen be- antwoord, tot het eerste nieuwe bericht is 3-5) Geheim getal toegang op afstand opgenomen.
  • Seite 166: Sos-Functies Hs

    All manuals and user guides at all-guides.com SOS-functies HS Als de telefoon niet functioneert Algemeen Dit deel van de handleiding heeft betrekking op de SOS-functie in de handset. De hand- Controleer of de telefoonkabel onbe- set is uitgerust met een eenvoudige SOS- schadigd en correct aangesloten is.
  • Seite 167: Belangrijke Aanwijzing

    All manuals and user guides at all-guides.com Belangrijke aanwijzing Milieu/Verwijdering Verwijdering van gebruikte elektri- Het apparaat is niet beschermd tegen op- sche en elektronische apparatuur spattend water. Zet geen met vloeistof (toe te passen in de landen van de gevulde voorwerpen, bv. vazen, op het Europese Unie en andere Europese apparaat.
  • Seite 168: Technische Gegevens Basis

    All manuals and user guides at all-guides.com Technische gegevens basis Stroomvoorziening: Adapter: Primair 100-240V 50/60 Hz AC Secundair 7,5V DC / 1000 mA Afmetingen (lxbxh): 243 mm × 240 mm × 94 mm Gewicht: ca. 965 g Technische gegevens handset Standaard: DECT = Digital Enhanced Cordless Telecommunication Uitgebreide digitale standaard voor draadloze telefoons...
  • Seite 169 - 2002/95/EG RoHS-richtlijn - 2004/108/EG EMV-richtlijn - 2002/96/EG WEEE-richtlijn - 2006/95/EG laagspanningsrichtlijn - 1999/5/EG R&TTE-richtlijn De conformiteit met bovengenoemde richtlijn wordt bevestigd door het CE-teken op het toestel. EG-conformiteitsverklaringen staan online ter beschikking op www.humantechnik.com. Technische wijzigingen voorbehouden. Nederlands 169...
  • Seite 170: Avvertenze Per La Sicurezza

    All manuals and user guides at all-guides.com Congratulazioni per aver acquistato il telefono scalla combo. Ci auguriamo che ve ne di- vertiate a lungo. Leggere attentamente le presenti istruzioni per l‘uso per accertarsi di aver configurato correttamente il telefono e di avere familiarità con tutte le funzioni del sistema. Avvertenze per la sicurezza Leggere le informazioni sulla sicurezza nella sezione »Installazione«...
  • Seite 171 All manuals and user guides at all-guides.com Indice Pagina Avvertenze per la sicurezza Installazione Contenuto dell‘imballaggio Inserimento delle batterie nell‘unità base Inserimento delle batterie ricaricabili nell‘unità mobile Collegamento del telefono Collegamento della stazione di ricarica mobile Tasti e loro significato, Base Tasti e loro significato, unità...
  • Seite 172: Indice

    All manuals and user guides at all-guides.com Indice Pagina ID chiamante, stazione base (SB) Salvare numeri di telefono dell‘elenco ID chiamante nella rubrica Cancellare una chiamata dall‘elenco ID chiamante Cancellare tutte le chiamate dall‘elenco ID chiamante Visualizzazione delle chiamate ricevute durante una assenza Impostazione del display (SB) Impostare la lingua del display Regolazione contrasto schermo...
  • Seite 173 All manuals and user guides at all-guides.com Indice Pagina Funzioni SOS (SB) Programmazione numeri SOS Programmazione messaggio SOS Riprodurre il messaggio SOS Cancellare il messaggio SOS Accensione automatica di SOS Definire l‘ID di sicurezza per SOS Connessioni supplementari (SB) Presa di connessione per cuscino vibrante e/o moduli Collegamento del auricolare microfono Collegamento cuffie Montaggio a parete...
  • Seite 174 All manuals and user guides at all-guides.com Indice Pagina ID chiamante, unità mobile (UM) Visualizzazione dei chiamanti nell‘elenco IDC Salvare i numeri di telefono dall‘elenco ID chiamante nella rubrica Eliminazione di una voce dall‘elenco ID chiamante Cancellare tutte le voci dall‘elenco ID chiamante Modifica delle impostazioni di base con l‘unità...
  • Seite 175 Il telefono non funziona Tono di avviso durante una chiamata Il numero di chiamante non viene visualizzato Nota importante Appendice Manutenzione e cura Garanzia Informazioni ambientali/smaltimento Batterie Specifiche tecniche Specifiche tecniche - unità mobile Centri di assistenza Humantechnik Coperchio posteriore Italiano 175...
  • Seite 176: Installazione

    All manuals and user guides at all-guides.com Installazione Inserimento delle batterie ricaricabili nell‘unità mobile Il telefono cellulare necessita di tre accumu- Contenuto dell‘imballaggio latori da 1,2 V (tipo »AAA«) per funzionare. Controllare se tutte le parti elencate di se- Per l‘inserimento delle batterie ricaricabili guito sono incluse: procedere come segue: •...
  • Seite 177: Tasti E Loro Significato, Base

    All manuals and user guides at all-guides.com Tasti e loro significato, stazione base Tasto di richiamo, ad esempio per Tasti Menu distribuire le chiamate quando si - Selezione menu destra collega un telefono a un centrali- - Selezione menu sinistra no telefonico Tasti freccia su/giù...
  • Seite 178: Elementi Di Comando, Stazione Base (Sb)

    All manuals and user guides at all-guides.com Elementi di comando, Stazione Base (SB) Interruttore scorrevole Display Tasti funzione per la per il controllo del suono navigazione nel menu / regolazione del volume Targhetta elenco per i tasti di composizione ra- pida foto (nel ricevitore del telefono) Tasti di composizione...
  • Seite 179 All manuals and user guides at all-guides.com interruttore retroillu- Uscita audio Presa auricolare Presa per cavo rice- minazione del display (3.5 mm) (2.5 mm) vitore acceso/spento OFF ON DC 7.5V Presa per accessori Selettore del Presa per Presa per cavo tele- come cuscino vibran- segnale l‘alimentatore...
  • Seite 180: Elementi Di Comando, Unità Mobile (Um)

    All manuals and user guides at all-guides.com Elementi di comando, Unità Mobile (UM) Torcia elettrica Suoneria a vista Auricolare Tasto di composizione rapida Display Tasto su/giù Tasto menu Tasto ricomposizione Tasto INT Sollevare il ricevitore Agganciare ricevitore Attivare/disattivare UM Tasti di composizione Tasto asterisco Tasto cancelletto Blocco tastiera...
  • Seite 181 All manuals and user guides at all-guides.com Tasto SOS Altoparlante Coperchio vano batterie Contatti di carica Contatti di carica Impostazione volume Impostazione audio Tasto amplificazione Presa per auricolari (2.5 mm) Italiano 181...
  • Seite 182: Telefonate Per Stazione Base (Sb)

    All manuals and user guides at all-guides.com Telefonate per stazione base 2. Agganciare il ricevitore per accendere l‘altoparlante dell‘apparecchio. (SB) 3. Ora è possibile continuare la telefonata attraverso l‘altoparlante dell‘apparecchio Chiamare e il microfono installato. 1. Sollevare il ricevitore telefonico o preme- 4.
  • Seite 183: Regolazione Del Volume Del Ricevitore/Alte/Basse Frequenze

    All manuals and user guides at all-guides.com È anche possibile aumentare le alte o basse Uso del telefono con un apparecchio frequenze utilizzando il controllo audio (in- acustico terruttore a scorrimento sulla parte anteriore, È possibile utilizzare il telefono con appa- vedere figura 1).
  • Seite 184: Tasti Foto, Stazione Base

    All manuals and user guides at all-guides.com Tasti foto, stazione base ente fino a quando il numero sul display non viene spostato. Premere »Salva«. 2. Immettere ora il nome e premere di nuovo Assegnazione di numeri di telefono ai »Salva«. tasti foto di composizione rapida 3.
  • Seite 185: Regolare Il Volume Della Suoneria

    All manuals and user guides at all-guides.com Regolare il volume della suoneria 3. I contatti sono elencati in ordine alfabe- tico. Per spostarsi più velocemente att- Il volume della suoneria può essere regola- raverso il telefono, è possibile utilizzare i to con i due interruttori sul lato destro del tasti di composizione rapida per passare telefono.
  • Seite 186: Modificare La Registrazione Vocale Nella Rubrica

    All manuals and user guides at all-guides.com ID chiamante, stazione base (SB) Modificare la registrazione vocale nella rubrica Seguire le istruzioni per modificare una re- Le chiamate a cui non è stata data risposta gistrazione vocale: verranno visualizzate sul display. 1.
  • Seite 187: Cancellare Una Chiamata Dall'elenco Id Chiamante

    All manuals and user guides at all-guides.com Impostazione del display (SB) Cancellare una chiamata dall‘elenco ID chiamante Impostare la lingua del display 1. I tasti vengono utilizzati per trasferire all‘elenco ID chiamante. 1. Premere il tasto »Menu« per accedere al menu di impostazione.
  • Seite 188: Selezionare Il Formato Ora

    All manuals and user guides at all-guides.com Impostazioni telefono (SB) Selezionare il formato ora Questa impostazione viene utilizzata per Modificare il volume della suoneria decidere se l‘ora sul display deve essere vi- 1. Premere il tasto »Menu« per accedere al sualizzata in modalità...
  • Seite 189: Impostare Il Tempo Di Richiamata

    All manuals and user guides at all-guides.com Impostare la voce (SB) 3. Selezionare »Avviso chiamata« e confer- mare con »Selezio.«. 4. Attivare/disattivare la funzione con Questo telefono è dotato di uscita vocale. I confermare con »Selezio.«. numeri e le funzioni vengono letti attraverso l‘altoparlante.
  • Seite 190: Impostare La Lingua Della Voce

    All manuals and user guides at all-guides.com Impostare la lingua della voce 2. Selezionare »Imp. Segret.Tel.« e confer- mare con »Selezio.« via i tasti È possibile impostare la lingua che verrà 3. Selezionare »Seg. Tel. Acc/Sp« e confer- letta. mare con »Selezio.«. 1.
  • Seite 191: Cancellare Messaggio In Uscita

    All manuals and user guides at all-guides.com 3. Selezionare »Messaggio uscita« e con- Se la segreteria risponde dopo 3 squilli, vie- fermare con »Selezio.«. ne registrato un nuovo messaggio. 4. Select "Cambia messaggio« e scegliere 1. Premere il tasto »Menu« per accedere al tra »Messagg.Standard"...
  • Seite 192: Ascoltare I Messaggi (Bs)

    All manuals and user guides at all-guides.com Ascoltare i messaggi (BS) 2. Durante la riproduzione dell‘annuncio, premere e immettere l‘ID di sicurezza. Il telefono indica nuovi messaggi sul display. 3. Il TAM riprodurrà una sequenza di coman- 07/12 di se l‘ID di sicurezza viene accettato. Uti- DO 14:49 lizzare i comandi indicati per la gestione.
  • Seite 193: Funzioni Sos (Sb)

    All manuals and user guides at all-guides.com Funzioni SOS (SB) Riprodurre il messaggio SOS 1. Premere il tasto »Menu« per accedere al Questa parte delle istruzioni riguar- menu di impostazione. da le funzioni SOS della stazione base. 2. Selezionare »Impostazione SOS« e con- Questo telefono è...
  • Seite 194: Definire L'id Di Sicurezza Per Sos

    All manuals and user guides at all-guides.com Connessioni supplementari 1. Selezionare »SOS Acc. Autom.« e con- fermare con »Selezio.«. (SB) 2. Attivare/disattivare la funzione con confermare con »Selezio.«. Presa di connessione per cuscino vib- rante e/o moduli Definire l‘ID di sicurezza per SOS Il telefono è...
  • Seite 195: Montaggio A Parete

    All manuals and user guides at all-guides.com Montaggio a parete 1. Far scorrere la staffa per il ricevitore del telefono dalla sua posizione e ruotarlo di 180 gradi. Successivamente, far scorrere la staffa nella posizione originale in modo che il nasello della staffa sia rivolto verso l‘alto (vedere la figura 2).
  • Seite 196: Attivare/Disattivare L'unità Mobile

    All manuals and user guides at all-guides.com Attivare/disattivare l‘unità Uso dell‘altoparlante dell‘apparecchio durante una chiamata mobile (UM) 1. Premere per accendere l‘altopar- Se l‘unità mobile viene spenta, si accenderà lante. L‘altoparlante nel ricevitore rimane automaticamente mettendola nella ciotola di attivato. carica.
  • Seite 197: Cancellare Gli Ultimi Numeri Composti

    All manuals and user guides at all-guides.com Cancellare gli ultimi numeri composti Silenziamento / Muting 1. Premendo il tasto viene visualizza- È possibile spegnere temporaneamente il to l‘ultimo numero composto. microfono del telefono durante una chiama- 2. Con è possibile selezionare gli ultimi ta, il che significa che l‘interlocutore non è...
  • Seite 198: Tasti Di Composizione Rapida M1/M2 (Um)

    All manuals and user guides at all-guides.com Tasti di composizione rapida Rubrica telefonica dell‘unità mo- M1/M2 (UM) bile (UM) I due tasti di composizione rapida M1/M2 Assegnazione tasti possono essere assegnati a qualsiasi nu- Tasto Lettera/carattere mero di telefono (max. 24 cifre per ogni 1 _ + - «...
  • Seite 199: Modificare Un Contatto In Rubrica

    All manuals and user guides at all-guides.com ID chiamante, unità mobile (UM) se si sta cercando una voce con »T«, pre- mere il tasto 8 per spostarsi alla lettera T. Le chiamate a cui non è stata data risposta 4. Il contatto viene richiamato premendo il vengono visualizzate sul display, ad esem- tasto pio „2 nuove chiamate“.
  • Seite 200: Eliminazione Di Una Voce Dall'elenco Id Chiamante

    All manuals and user guides at all-guides.com Eliminazione di una voce dall‘elenco ID 2) Selezionare il modo di selezione della chiamante stazione base 1. Premere il tasto verso l‘alto per acce- 1. Premere il tasto »Menu« e selezionare dere direttamente all‘elenco IDC. »Impost.
  • Seite 201: Impostazioni Telefono (Um)

    All manuals and user guides at all-guides.com Impostazioni unità mobile (MU) 3. Sono disponibili le seguenti opzioni: - Suoneria int. 1-1) Allarme sveglia - Suoneria ext. È possibile impostare una sveglia con la Selezionare l‘opzione desiderata con »Se- funzione snooze sull‘unità mobile. lez.«.
  • Seite 202: Lingua

    All manuals and user guides at all-guides.com 4) Lingua 7) Accettazione automatica delle chiamate L‘unità mobile comprende una selezione di Con l‘accettazione automatica della chia- lingue. mata, è possibile accettare una chiamata sollevando l‘unità mobile dalla stazione di 1. Premere il tasto »Menu« e selezionare ricarica senza premere alcun tasto.
  • Seite 203: Imposta Data/Ora (Um)

    All manuals and user guides at all-guides.com Funzioni supplementari (UM) 10) Imposta data/ora (UM) 10-1) Imposta formato data Seleziona Base 1. Premere il tasto »Menu«, selezionare È possibile selezionare una stazione base »Impost. UM« via e premere »Selez.«. su cui è già stata registrata un‘unità mobile. 2.
  • Seite 204: Registrazione Di Un'altra Unità Mobile

    All manuals and user guides at all-guides.com Registrazione di un‘altra unità mobile »Reimpost.« via e premere »Selezio.«. L‘unità mobile in questione è già registrata 2. Immettere il codice PIN (il valore predefi- nella base. È registrato come „UM 1“. Ogni nito è...
  • Seite 205: Conferenza Telefonica A Tre

    All manuals and user guides at all-guides.com Segreteria telefonica (UM) conversazione con l‘utente selezionato. È anche possibile riagganciare prima che l‘utente si riaccenda. In questo caso la Il telefono è dotato di segreteria telefonica. Può essere comandato dalla stazione base chiamata sarà...
  • Seite 206: Ascoltare I Messaggi (Um)

    All manuals and user guides at all-guides.com 2-1) Ascoltare i messaggi (UM) 3-1) Attivare la segreteria telefonica (TAM) The phone shows tape symbol on the dis- play if you have received a new message. 1. Premere il tasto »Menu«, selezionare »Segret.Tel.«...
  • Seite 207: Risparmia Pedaggio Durante La Richiesta Remota Con Il Tam

    All manuals and user guides at all-guides.com 3-3-2) Risparmia pedaggio durante la ri- 3-5) ID di sicurezza segreto per chiesta remota con il TAM l‘impostazione TAM In modalità risparmio pedaggio, le chiamate Per accedere ai messaggi da un telefono in arrivo riceveranno risposta dopo 5 squilli esterno è...
  • Seite 208: Funzioni Sos (Um)

    All manuals and user guides at all-guides.com Funzioni SOS (UM) Se il telefono non funziona Informazioni generali Questa parte delle istruzioni riguarda le fun- zioni SOS dell‘unità mobile. Assicurarsi che il cavo telefonico sia integro L‘unità mobile è dotata di una semplice fun- e correttamente collegato.
  • Seite 209: Nota Importante

    All manuals and user guides at all-guides.com Nota importante Smaltimento delle apparecchiature elettriche ed elettroniche (norme da osservare nei Questo prodotto non è protetto dagli schiz- paesi dell‘Unione Europea e in altri- zi. Non appoggiare contenitori di liquidi (ad paesi europei nei quali sia prevista la esempio un vaso da fiori), né...
  • Seite 210: Specifiche Tecniche

    All manuals and user guides at all-guides.com Specifiche tecniche Alimentazione elettrica: Primario 100-240V 50/60 Hz AC Secondario 7.5V DC / 1000 mA Dimensioni (L × P × A): 243 mm × 240 mm × 94 mm Peso: ca. 965 g Dati tecnici unità...
  • Seite 211 - 2006/95/UE direttiva Bassa Tensione - 1999/5/UE direttiva R&TTE La conformità con le direttive di cui sopra viene confermata dalla marcatura CE sull’apparecchio. Le dichiarazioni CE di conformità sono disponibili sul sito Internet https://www.humantechnik.com/en/service/declarations-of-conformity/ Ci riserviamo di effettuare modifiche tecniche. Italiano 211...
  • Seite 212: Instrucciones De Seguridad

    All manuals and user guides at all-guides.com Le felicitamos por haber adquirido el teléfono combo scalla y esperamos que pueda dis- frutar de él durante mucho tiempo. Por favor, lea detenidamente este Manual de instruc- ciones para poder poner en marcha el teléfono adecuadamente y poder familiarizarse con todas las opciones del sistema.
  • Seite 213 All manuals and user guides at all-guides.com Índice Página Instrucciones de seguridad Puesta en servicio Contenido del embalaje Insertar las pilas en el equipo básico Insertar las acumulador en el teléfono inalámbrico Conexión del teléfono Conexión de la estación de carga para el teléfono inalámbrico Teclas y significado, equipo básico Teclas y significado, teléfono inalámbrico Elementos de control del equipo básico (EB)
  • Seite 214 All manuals and user guides at all-guides.com Índice Página ID de llamada en el equipo básico (EB) Guardar en la agenda los números de teléfono de la lista de ID de llamadas 228 Borrar una llamada de la lista de ID de llamadas Borrar todas las llamadas de la lista de ID de llamadas.
  • Seite 215 All manuals and user guides at all-guides.com Índice Página Funciones de emergencia (EB) Programar número de emergencia Programar mensaje de emergencia Reproducir mensaje de emergencia Borrar mensaje de emergencia Activar automáticamente la emergencia Definir contraseña para emergencia Conexiones adicionales (EB) Casquillo de conexión para cojines vibratorios o módulos Conexión para auriculares Conexión de los auriculares...
  • Seite 216 All manuals and user guides at all-guides.com Índice Página ID de la llamada entrada en el teléfono inalámbrico (TI) Ver la id de la llamada en la lista de llamadas Guardar en la agenda los números de teléfono de la lista de ID de llamadas 241 Borrar una llamada de la lista de ID de llamadas Borrar todas las llamadas de la lista de ID de llamadas Configurar el equipo básico con el teléfono inalámbrico (TI)
  • Seite 217 El teléfono no funciona Tono de advertencia durante una llamada El número de teléfono no se ve Indicación importante Anexo Mantenimiento y cuidado Garantía Indicación medioambiental/Eliminación Baterías Datos técnicos, equipo básico Datos técnicos, teléfono inalámbrico Socios de servicio de Humantechnik Contraportada Español 217...
  • Seite 218: Puesta En Servicio

    All manuals and user guides at all-guides.com Puesta en servicio Insertar las acumulador en el teléfono in- alámbrico El teléfono inalámbrico precisa tres acumu- Contenido del embalaje lador de 1,2 V (tipo “AAA”) para el funcion- Compruebe si hay todos los componentes amiento.
  • Seite 219: Teclas Y Significado, Equipo Básico

    All manuals and user guides at all-guides.com Teclas y significado, equipo básico Tecla de solicitud p. ej. para Tecla de menú transmitir conversaciones si el - Selección de menú a derecha teléfono está conectado a una - Selección de menú a izquierda central telefónica.
  • Seite 220: Elementos De Control Del Equipo Básico (Eb)

    All manuals and user guides at all-guides.com Elementos de control del equipo básico (EB) Interruptor deslizante Pantalla Teclas de función para de regulación del tono manejar el menú / ajuste del volumen Pantalla para teclas de selección con foto (en el auricular del teléfono) Teclas selectoras C o n -...
  • Seite 221 All manuals and user guides at all-guides.com Retroiluminación de la Salida de audio Conexión para au- Casquillo de conexión pantalla Permanente de (3,5 mm) riculares para cable del auricu- encendido / apagado In- (2.5 mm) lar del teléfono terruptor OFF ON DC 7.5V Casquillo de conexión Selector de...
  • Seite 222: Elementos De Control Del Teléfono Inalámbrico (Ti)

    All manuals and user guides at all-guides.com Elementos de control del te- léfono inalámbrico (TI) Lámpara de bol- Sonido visual sillo Amplificación Auricular Tecla de marcaci- ón abreviada Pantalla Tecla de arriba / abajo Tecla de menú Tecla de repetición de Tecla INT la marcación Descolgar auricu-...
  • Seite 223 All manuals and user guides at all-guides.com Tecla de emergencia Altavoz Tapa del comparti- mento de las pilas Contactos de carga Contactos de carga Configurar volumen Configurar sonido Configurar la amplificación Conexión para auricula- res (2.5 mm) Español 223...
  • Seite 224: Hacer Llamadas Con El Equipo Básico (Eb)

    All manuals and user guides at all-guides.com Hacer llamadas con el equipo 2. Cuelgue el auricular del teléfono para que se encienda el altavoz del aparato. básico (EB) 3. Puede continuar hablando por el altavoz del aparato y el micrófono incorporado. Llamar 4.
  • Seite 225: Interruptor Para Configurar El Restablecimiento Del Volumen

    All manuals and user guides at all-guides.com Observación: Uso del teléfono con aparatos auditivos El control de tono funciona únicamente con Puede utilizar su teléfono con aparatos au- la amplificación encendida. ditivos que estén equipados con una bobina de teléfono (bobina en T). Para ello, ponga Ilustración 1: el selector de su aparato auditivo en la po- Regulación del tono / ajuste del volumen...
  • Seite 226: Teclas De Selección Con Foto Del Equipo Básico

    All manuals and user guides at all-guides.com Teclas de selección con foto 2. A continuación introduzca el nombre y pulse de nuevo “Guardar”. del equipo básico 3. Ahora seleccione el tono de llamada de- seado para este número de teléfono y Asignar número de teléfono a las teclas pulse “Elegir”.
  • Seite 227: Ajustar El Volumen De La Señal De Llamada

    All manuals and user guides at all-guides.com Ajustar el volumen de la señal de llamada camente. Para avanzar más rápidamente Se puede ajustar el volumen del tono de en el teléfono, puede saltar a la letra cor- llamada mediante ambos interruptores del respondiente con las teclas de selección, lado derecho del teléfono.
  • Seite 228: Editar La Grabación De La Agenda

    All manuals and user guides at all-guides.com ID de llamada en el equipo Editar la grabación de la agenda Para editar la grabación, proceda como básico (EB) sigue: 1. Pulse la tecla “Agenda” para ir a la agen- Las llamadas que ha recibido cuando no es- taba en casa se mostrarán en la pantalla.
  • Seite 229: Borrar Una Llamada De La Lista De Id De Llamadas

    All manuals and user guides at all-guides.com Configurar pantalla (EB) deseado para este número de teléfono y pulse “Elegir”. Así este número se ha guardado. Configurar idioma de visualización 1. Pulse la tecla “Menú” para ir al menú de Borrar una llamada de la lista de ID de configuración.
  • Seite 230: Configurar El Formato De La Hora

    All manuals and user guides at all-guides.com Configuraciones del teléfono Configurar el formato de la hora Aquí puede configurar cómo se debe visu- (EB) alizar la hora, en el modo de 24 horas o de 12 horas. Modificar el volumen del tono de llamada 1.
  • Seite 231: Configuración Del Tiempo De Solicitud

    All manuals and user guides at all-guides.com Función de voz (EB) 3. Seleccione “Llam. en espera” y confirme con “Elegir”. 4. Con puede encender/apagar la funci- Este teléfono está equipado con una funci- ón y confirmar con “Elegir”. ón de voz. Se reproducen los números y las funciones mediante altavoces externos.
  • Seite 232: Establecer Idioma Para La Función De Voz

    All manuals and user guides at all-guides.com Establecer idioma para la función de voz. 1) Encender contestador Puede seleccionar el idioma en que oirá la 1. Pulse la tecla “Menú” para ir al menú de información. Hay máx. 3 idiomas disponib- configuración.
  • Seite 233: Cambiar Mensaje De Salida

    All manuals and user guides at all-guides.com 2-3) Cambiar mensaje de salida cuando quiere realizar una consulta a distan- Puede configurar un mensaje estándar o un cia. Si el contestador no salta tras el 4 tono, mensaje grabado por usted. significa que no hay ningún mensaje y puede 1.
  • Seite 234: Escuchar Mensajes De Voz (Eb)

    All manuals and user guides at all-guides.com Escuchar mensajes de voz (EB) 3. Si se acepta dicha contraseña, el con- El teléfono indica en la pantalla si tiene un testador reproducirá una sucesión de co- nuevo mensaje de voz. mandos. Sígalos para poder controla el contestador.
  • Seite 235: Funciones De Emergencia (Eb)

    All manuals and user guides at all-guides.com Funciones de emergencia (EB) Reproducir mensaje de emergencia 1. Pulse la tecla “Menú” para ir al menú de configuración. Este apartado del manual trata la función de 2. Con las teclas seleccione “Ajustar emergencia del equipo básico.
  • Seite 236: Definir Contraseña Para Emergencia

    All manuals and user guides at all-guides.com Conexiones adicionales (EB) Definir contraseña para emergencia 1. Pulse la tecla “Menú” para ir al menú de Casquillo de conexión para cojines vib- configuración. ratorios o módulos 2. Con las teclas seleccione “Ajustar Su teléfono dispone de una casquillo de emerg.”...
  • Seite 237: Montaje En Pared

    All manuals and user guides at all-guides.com Montaje en pared 1. Saque el soporte para el auricular del te- léfono de su posición y gírelo 180 grados. Vuelva a poner el soporte en su posición original de modo que el saliente del mismo señale hacia arriba (véase Ilustración 2).
  • Seite 238: Encender/Apagar Teléfono Inalámbrico

    All manuals and user guides at all-guides.com Encender/apagar teléfono in- Uso del altavoz del aparato durante una conversación alámbrico 1. Para encender el altavoz del aparato, pul- se la tecla . El altavoz del auricular Cuando el teléfono inalámbrico está apa- permanece encendido.
  • Seite 239: Borrar Los Últimos Números Marcados

    All manuals and user guides at all-guides.com Borrar los últimos números marcados Enmudecedor 1. Pulsando la tecla se ve el último Puede desconectar temporalmente el micró- número al que se ha llamado. fono de su teléfono durante una conversaci- 2. Con puede seleccionar los últimos nú- ón para que su interlocutor no pueda oírle.
  • Seite 240: Teclas De Marcación Abreviada M1/M2 (Ti)

    All manuals and user guides at all-guides.com Teclas de marcación Agenda del teléfono inalámbrico abreviada M1/M2 (TI) (TI) Asignar números de teléfono a las teclas Asignación de las teclas Tecla Letra/ carácter de marcación abreviada M1/M2 1 _ + - “ ( ) % Se pueden asignar a las 2 teclas de marcaci- A B C a b c 2 ón abreviada los números de teléfono que se...
  • Seite 241: Editar Contacto De La Agenda

    All manuals and user guides at all-guides.com ID de la llamada entrada en el 4. Pulsando la tecla se llamará al con- teléfono inalámbrico (TI) tacto. Editar contacto de la agenda Las llamadas no atendidas se mostrarán en Para editar los contactos, proceda como la pantalla con p.
  • Seite 242: Borrar Una Llamada De La Lista De Id De Llamadas

    All manuals and user guides at all-guides.com Borrar una llamada de la lista de ID de 2) Configurar el proceso de marcación llamadas del equipo básico 1. Pulse la tecla “Menú” y seleccione con 1. Pulse la tecla “Menú” y seleccione con la entrada “Lista llam.”.
  • Seite 243: Configuraciones Del Teléfono (Ti)

    All manuals and user guides at all-guides.com Configuraciones del teléfono (TI) 5. Seleccione la opción deseada con “Elegir”. 6. Seleccione el tono de llamada deseado y cierre la configuración con “Elegir”. 1-1) Configurar alarma Con el teléfono inalámbrico puede estable- 2-2) Configurar volumen de tono de llamada cer una alarma con función de dormir.
  • Seite 244: Idioma

    All manuals and user guides at all-guides.com 4) Idioma 7) Respuesta automática de llamadas El teléfono inalámbrico dispone de 6 idio- Con la respuesta automática de llamadas mas a elegir. puede responder a una llamada elevando el 1. Pulse la tecla “Menú” y seleccione con teléfono inalámbrico de la estación de carga la entrada “Ajus.
  • Seite 245: Configurar Fecha / Hora (Ti)

    All manuals and user guides at all-guides.com 10) Configurar fecha / hora (TI) 11) Seleccionar equipo básico Puede seleccionar una base en la que el 10-1) Configurar formato de fecha teléfono inalámbrico ya está registrado. So- 1. Pulse la tecla “Menú” y seleccione con lamente puede seleccionar bases que ya la entrada “Ajus.
  • Seite 246: Registrar Un Nuevo Teléfono Inalámbrico

    All manuals and user guides at all-guides.com Registrar un nuevo teléfono inalámbrico Restablecer un teléfono inalámbrico a sus valores predeterminados El teléfono inalámbrico suministrado ya está registrado en el equipo básico. Está registra- El teléfono inalámbrico se puede restablecer a do como teléfono inalámbrico 1.
  • Seite 247: Conferencia A Tres

    All manuals and user guides at all-guides.com Contestador (TI) 3. El teléfono inalámbrico seleccionado sonará. El número del teléfono inalámbrico que llama se verá en la pantalla. El teléfono tiene un contestador incorporado. 4. Responda a la llamada con Este puede controlarse desde el equipo bási- 5.
  • Seite 248: Escuchar Mensajes De Voz (Ti)

    All manuals and user guides at all-guides.com 2-1) Escuchar mensajes de voz (TI) 3-1) Activar el contestador (Cont.) El teléfono muestra en la pantalla el símbolo 1. Pulse la tecla “Menú” y seleccione con de un casete si tiene un nuevo mensaje de la entrada “Contestador”.
  • Seite 249: Ahorrar Tasas Al Realizar Una Consulta A Distancia Con El Contestador

    All manuals and user guides at all-guides.com 3-3-2) Ahorrar tasas al realizar una con- 3-5) Configurar contraseña para consulta sulta a distancia con el contestador a distancia para el contestador. En el modo de ahorro de tasas las llamadas Se precisa una contraseña de 4 dígitos para entrantes se contestarán tras el 5 tono de poder escuchar sus mensajes de voz desde llamada hasta que no se haya grabado el...
  • Seite 250: Funciones De Emergencia Del Teléfono Inalámbrico

    All manuals and user guides at all-guides.com Funciones de emergencia del Cuando el teléfono no teléfono inalámbrico funciona Este apartado del manual trata la función de Generalidades emergencia del teléfono inalámbrico. Asegúrese de que el cable del teléfono no El teléfono inalámbrico siempre va equipa- esté...
  • Seite 251: Indicación Importante

    All manuals and user guides at all-guides.com Indicación importante Indicación medioambiental/Eliminación Eliminación de aparatos eléctricos y electrónicos usados (aplicable en los El aparato no está protegido contra sal- países de la Unión Europea y otros picaduras de agua. No coloque objetos países europeos con un sistema de llenos de líquido, p.
  • Seite 252: Datos Técnicos, Equipo Básico

    All manuals and user guides at all-guides.com Datos técnicos, equipo básico Suministro de corriente: Alimentador de red: primario 100-240V 50/60 Hz CA secundario 7,5V CC / 1000 mA Dimensiones (LxAnxAl): 243 mm x 240 mm x 94 mm Peso: aprox. 965 g Datos técnicos, teléfono inalámbrico Estándar: DECT = Digital Enhanced Cordless Telecommunication...
  • Seite 253 - 1999/5/CE Directiva sobre equipos radioeléctricos y equipos terminales de telecomunica- ción La conformidad con las directivas mencionadas arriba se confirma con el símbolo CE en el aparato. Las declaraciones de conformidad CE están a disposición en Internet en www.humantechnik.com/service Salvo modificaciones técnicas. Español 253...
  • Seite 254 Im Wörth 25 Fax: +49 (0) 76 21/ 9 56 89-70 D-79576 Weil am Rhein E-mail: info@humantechnik.com Germany Humantechnik GHL AG Tel.: +41 (0) 61/ 6 93 22 60 Rastatterstrasse 9 Fax: +41 (0) 61/ 6 93 22 61 CH-4057 Basel E-mail: info@humantechnik.com...

Inhaltsverzeichnis