Herunterladen Inhalt Inhalt Diese Seite drucken
ViewSonic VSD243 Bedienungsanleitung
Vorschau ausblenden Andere Handbücher für VSD243:
Inhaltsverzeichnis

Werbung

Verfügbare Sprachen

Verfügbare Sprachen

VSD243
Smart Display
User Guide
Guide de l'utilisateur
Bedienungsanleitung
Руководство пользователя
Model No. VS16340

Werbung

Inhaltsverzeichnis
loading

Inhaltszusammenfassung für ViewSonic VSD243

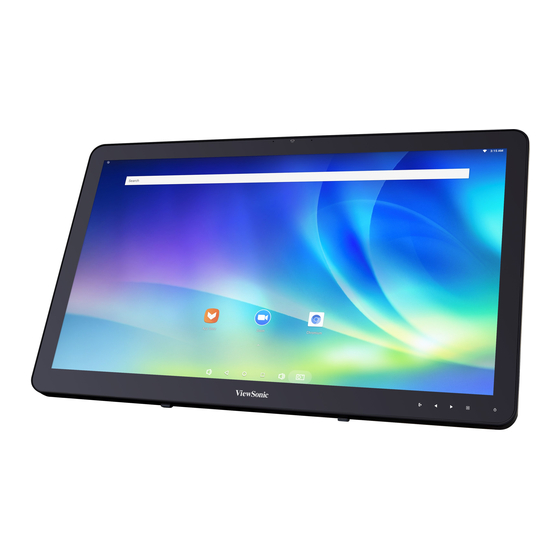
  • Seite 1 VSD243 Smart Display User Guide Guide de l’utilisateur Bedienungsanleitung Руководство пользователя Model No. VS16340...
  • Seite 2 Thank you for choosing ViewSonic With over 30 years as a world leading provider of visual solutions, ViewSonic is dedicated to exceeding the world’s expectations for technological evolution, innovation, and simplicity. At ViewSonic, we believe that our products have the potential to make a positive impact in the world, and we are confident that the ViewSonic product you have chosen will serve you well.
  • Seite 3: Compliance Information

    Compliance Information Please read before proceeding • Use only the batteries and power adapter provided by the manufacturer. The use of unauthorized accessories may void your warranty. • Do not store your device in temperatures higher than 50°C (122°F). • The operating temperature for this device is from 0°C (32°F) to 35°C (95°F). CE Conformity for European Countries The device complies with the relevant section of the Low Voltage Directive 2014/35/EC, Eco-Design Directive 2009/125/EC, RoHS Directive 2011/65/EU,...
  • Seite 4 Declaration of RoHS2 Compliance This product has been designed and manufactured in compliance with Directive 2011/65/ EU of the European Parliament and the Council on restriction of the use of certain hazardous substances in electrical and electronic equipment (RoHS2 Directive) and is deemed to comply with the maximum concentration values issued by the European Technical Adaptation Committee (TAC) as shown below: Proposed Maximum...
  • Seite 5: Important Safety Instructions

    Important Safety Instructions DO NOT place objects on top of the device, as objects may scratch the screen. DO NOT expose the device to dirty or dusty environments. DO NOT place the device on an uneven or unstable surface. DO NOT insert any foreign objects into the device. DO NOT expose the device to strong magnetic or electrical field.
  • Seite 6 ® Disclaimer: ViewSonic Corporation shall not be liable for technical or editorial errors or omissions contained herein; nor for incidental or consequential damages resulting from furnishing this material, or the performance or use of this product.In the interest of continuing product improvement, ViewSonic Corporation reserves the right to change product specifications without notice.
  • Seite 7: Product Registration

    Purchase Date: Product disposal at end of product life ViewSonic respects the environment and is committed to working and living green. Thank you for being part of Smarter, Greener Computing. Please visit ViewSonic website to learn more. USA & Canada: http://www.viewsonic.com/company/green/recycle-program/ Europe: http://www.viewsoniceurope.com/eu/support/call-desk/...
  • Seite 8: Inhaltsverzeichnis

    Table of Contents Table of Contents 1 VSD243 Smart Display Features 2 Set Up Your VSD243 Smart Display 2.1 Connection ................. 4 2.2 Get Your Smart Display Ready for Use ......4 2.3 Power on Your Device ............5 2.4 Power Off Your Device ............6 3 About Your VSD243 Smart Display 3.1 Touch Screen ..............
  • Seite 9: Vsd243 Smart Display Features

    Table of Contents VSD243 is a Smart Display with 23.6-inch quad-core display running on Android 8.1 (Oreo) Comes with 1920x1080p HD resolution, allow you to work with HDMI, full-sized USB connectivity as well. 1 VSD243 Smart Display Features This section introduces you to the features of your Smart Display.
  • Seite 10 Table of Contents No. Components Descriptions Touch screen - Touch the screen to control the on-screen configurations including menu items,applications, buttons,keyboard and so on. Power button Press to power on / lock the smart display. - Press about 0.5 seconds to power on the power. - Lock the smart display when the display is on.
  • Seite 11 VSD243 Smart Display Features Back View LEFT SIDE RIGHT SIDE LEFT SIDE No. Components Descriptions RJ45 Connector Connect with a RJ45 cable for network connection. Connect to digital high quality device for video and HDMI OUT audio configurations (e.g. PC Monitor, BD Player,...
  • Seite 12: Set Up Your Vsd243 Smart Display

    Set Up Your VSD243 Smart Display 2 Set Up Your VSD243 Smart Display 2.1 Connection USB Type-A Printer PC Monitor HDMI OUT USB Type-A USB Storage Notebook HDMI IN External USB Type-A Computer DVD Player Keyboard Headset Earphone USB Type-A...
  • Seite 13: Power On Your Device

    Set Up Your VSD243 Smart Display Connect the Power Cord Connect the included power cord to the power jack. Connect the other end of the power cord to a power outlet. 2.3 Power on Your Device After connecting the power cord, you can press the power button about 0.5 seconds to power on your device.
  • Seite 14: Power Off Your Device

    Set Up Your VSD243 Smart Display 2.4 Power Off Your Device Press and hold the power button for about 3 seconds. When the power off menu appears, touch OK.
  • Seite 15: About Your Vsd243 Smart Display

    About Your VSD243 Smart Display 3 About Your VSD243 Smart Display 3.1 Touch Screen To navigate and interact on the display, use your finger to touch the sensitive surface of the screen directly. You can manipulate icons, buttons, menu items, on-screen keyboard and other items on the touch screen with...
  • Seite 16: Applications, Widgets And Shortcuts

    About Your VSD243 Smart Display 3.2 Applications, Widgets and Shortcuts The soft buttons or icons offer a variety of functions and shortcuts. On the Home screen, it is your starting point to access all the features on your device. It displays application icons, widgets, shortcuts and so on.
  • Seite 17 About Your VSD243 Smart Display Items Descriptions Date & Time Display the current date and time. 3:11 You can add an application shortcut to the Home screen and move it freely by touching Shortcuts and holding the App icon. This icon allows you to open a shortcut item quickly.
  • Seite 18: Customizing Your Home Screen

    About Your VSD243 Smart Display 3.4 Customizing Your Home Screen 3.4.1 Add an Item (Shortcut) • On the Apps screen, touch APPS or WIDGETS tab to enter APPS or WIDGETS configuration screen. • Select one of the APPS or WIDGETS item that you want to add.
  • Seite 19 About Your VSD243 Smart Display • You can touch the Back button to return to the previous screen without making any change. NOTE • All Home Screens share the same background. You cannot set different wallpapers to individual Home Screen panel.
  • Seite 20: Connecting To Hdmi-Compliant Devices Via Hdmi Input

    You can obtain the best user experience for video playback and gaming via HDMI. VSD243 is equipped with an HDMI input for connecting to an external HDMI-compliant device. You can connect your PC, notebook, Blu-ray player or any other HDMI-compliant device to the VSD243 as a high-definition video display.
  • Seite 21: Osd Menu

    C O N T R A S T B R I G H T N E S S Press the Menu/Exit button on bottom right of your VSD243 to launch the OSD configuration screen. The OSD configuration screen can be used to configure the Contrast/Brightness, Input Select, Audio Adjust, Color Adjust, Information, Manual Image Adjust, Setup Menu and Memory Recall.
  • Seite 22: Functions Items

    HDMI cable to other HDMI source first before selecting the HDMI input. Color Adjust: Available seletions are sRGB, Bluish, Cool, Native, Warm and user color. Information: Select this item to show the information about your VSD243 such as the Resolution, H.Frequency, V.Frequency, Pixel Clock, Model Number and Website.
  • Seite 23: Osd Notice

    OSD Menu 4.3 OSD Notice idling: The OSD menu will close and return to the original processed OSD menu after the OSD time out value expired. No signal: • There is no HDMI connection. • The connected HDMI source and your smart display is not active. Make sure the HDMI source is not in Off, Standby, Hibernate or Sleep mode.
  • Seite 24: Troubleshooting

    - Ensure that the DC connector is fully inserted into the correct No power socket on the rear of the VSD243 located under the cover - Check the power outlet with another device (i.e. table lamp) - If there is still has no power then contact ViewSonic support or the Reseller from whom the device was purchased.
  • Seite 25: Appendix Specifications

    Appendix 6 Appendix Specifications LCD Spec. 60cm (23.6” viewable) Size Resolution 1920x1080 Brightness 250 cd/m Backlight Thickness 47 mm Touch screen PCT 10 points touch supported Hardware Buttons Power button *1 Control keys *4 Power LED Indicator Blue (on) / Amber (saving) LAN RJ45, supports 10/100/1000 Mbps I/O ports HDMI-OUT...
  • Seite 26 Appendix 5.62Kg (12.39 lbs.) (Net) Weight 8.12Kg (17.90 lbs.) (Gross) Android 8.1 (Oreo) System CPU/SoC Rockchip RK3288W 1.8GHz Speed Cores Quad-core Graphic Embedded DDR3 2GB, Speed to 800Mbps Memory eMMC (NAND), 16GB Storage WLAN 802.11 b/g/n Environment Temperature & Operation: 20%~90% @ 35 C Non-condensing Humidity Storage: 90% R.H.
  • Seite 27: Customer Support

    C= http://www.viewsonic.com/ Latin America soporte@viewsonic.com www.viewsonic.com/la/ la/soporte/servicio-tecnico Nexus Hightech Solutions, Cincinnati #40 Desp. 1 Col. De los Deportes Mexico D.F. Tel: 55) 6547-6454 55)6547-6484 Other places please refer to http://www.viewsonic.com/la/soporte/servicio-tecnico#mexico T= (853)-2833-8407 service@hk.viewsonic.com Macau www.hk.viewsonic.com Middle East Contact your reseller service@ap.viewsonic.com ap.viewsonic.com/me/...
  • Seite 28: Smart Display

    Smart Display What the warranty covers: ViewSonic warrants its products to be free from defects in material and workmanship, under normal use, during the warranty period. If a product proves to be defective in material or workmanship during the warranty period, ViewSonic will, at its sole option, repair or replace the product with a like product.
  • Seite 29 Exclusion of damages: ViewSonic’s liability is limited to the cost of repair or replacement of the product. ViewSonic shall not be liable for: 1. Damage to other property caused by any defects in the product, damages based...
  • Seite 30 évolutions technologiques, l’innovation et la simplicité. Chez ViewSonic, nous croyons que nos produits ont le potentiel d’avoir un impact positif sur le monde, et sommes confiants que le produit ViewSonic que vous avez choisi vous sera utile.
  • Seite 31: Informations De Conformité

    Informations de conformité Veuillez lire la section suivante avant de continuer • Utilisez seulement les batteries et l’adaptateur secteur fournis par le fabricant. L’utilisation d’accessoires non autorisés peut annuler la garantie. • Ne rangez pas votre téléphone dans des endroits où la température est plus de 50ºC ou 122ºF.
  • Seite 32 Déclaration de conformité RoHS2 (LSDEEE2) Ce produit a été conçu et fabriqué dans le respect de la directive 2011/65/EU du Parlement Européen et du Conseil relative à la limitation de l’utilisation de certaines substances dangereuses dans les équipements électriques et électroniques (Directive RoHS2 - LSDEEE2) et il est déclaré...
  • Seite 33: Importantes Instructions De Sécurité

    Importantes instructions de sécurité NE PAS placer d'objet sur l'appareil. Les objets peuvent le rayer ou pénétrer dans l'écran. NE PAS exposer l'appareil à la saleté ou à la poussière. NE PAS placer l'appareil sur une surface instable ou irrégulière. NE PAS faire pénétrer un objet étranger dans l'appareil.
  • Seite 34 ViewSonic Corp. décline également toute responsabilité vis-à- vis des performances ou de l’utilisation de ce produit.Dans un souci amélioration constant de ses produits, ViewSonic Corporation se réserve le droit de modifier les spécifications du produit sans avis préalable. Les informations contenues dans ce document peuvent changer sans préavis.
  • Seite 35: Enregistrement Du Produit

    _______________________________ Elimination du produit en fin de vie ViewSonic respecte l’environnement et fait des efforts allant dans le sens d’un environnement de travail et de vie écologiques. Merci d’oeuvrer aussi pour une informatique plus intelligente et plus écologique. Pour en savoir plus, veuillez visiter le site web de ViewSonic.
  • Seite 36 Table des matières Table des matières 1 Caractéristiques du Smart Display (Écran intelligent) VSD243 2 Configurer votre Smart Display VSD243 2.1 Connexion ................4 2.2 Préparer votre Smart Display avant de l'utiliser ....4 2.3 Allumez votre appareil ............5 2.4 Éteignez votre appareil ............
  • Seite 37: Caractéristiques Du Smart Display (Écran Intelligent) Vsd243

    Table des matières VSD243 est un Smart Display (écran intelligent) avec un affichage de 23,6-pouces quad-core fonctionnant sous Android 8.1 (Oreo). Il est fourni avec une résolution HD de 1920 x 1080p, ce qui vous permet de travailler avec : HDMI, et aussi une connectivité USB.
  • Seite 38 Table des matières Numéro Composants Descriptif Touchez l'écran pour contrôler les Ecran tactile configurations d'écran, dont les éléments de menu, les applications, les boutons, le clavier, etc. Bouton d'alimentation Appuyez pour allumer / verrouiller l'écran intelligent. - Appuyez pendant environ 0,5 seconde pour le mettre sous tension.
  • Seite 39: Côté Gauche

    Caractéristiques du Smart Display (Écran intelligent) VSD243 Vue arrière CÔTÉ GAUCHE CÔTÉ DROIT CÔTÉ GAUCHE Numéro Composants Descriptif Pour raccorder l'écran avec un câble RJ45 pour une Connecteur RJ45 connexion réseau. SORTIE HDMI Connecter à un appareil numérique de qualité...
  • Seite 40: Configurer Votre Smart Display Vsd243

    Configurer votre Smart Display VSD243 Configurer votre Smart Display VSD243 2.1 Connexion USB Type-A Printer PC Monitor HDMI OUT USB Type-A USB Storage Notebook HDMI IN External USB Type-A Computer DVD Player Keyboard Headset Earphone USB Type-A Microphone Mouse Microphone...
  • Seite 41: Allumez Votre Appareil

    Configurer votre Smart Display VSD243 Branchez le cordon d'alimentation Branchez le cordon d'alimentation fourni à la prise électrique. Branchez l'autre extrémité du cordon d'alimentation à une prise de courant. 2.3 Allumez votre appareil Après la connexion du cordon d'alimentation, vous pouvez appuyer sur le bouton d'alimentation environ 0,5 seconde pour allumer votre appareil.
  • Seite 42: Éteignez Votre Appareil

    Configurer votre Smart Display VSD243 2.4 Éteignez votre appareil Appuyez et maintenez enfoncé le bouton d'alimentation pendant environ 3 secondes. Quand le menu de mise hors tension apparaît, touchez OK.
  • Seite 43: Propos De Votre Smart Display Vsd243

    À propos de votre Smart Display VSD243 3 À propos de votre Smart Display VSD243 3.1 Ecran tactile Pour naviguer et interagir avec l’écran, utilisez votre doigt pour toucher directement la surface sensible de l'écran. Vous pouvez manipuler les icônes, les boutons, les éléments du menu, le clavier à...
  • Seite 44: Applications, Widgets Et Raccourcis

    À propos de votre Smart Display VSD243 3.2 Applications, widgets et raccourcis Les boutons programmables ou icônes offrent multiples fonctionnalités et raccourcis. Sur l'écran Accueil, ils servent de point de départ pour accéder à toutes les fonctionnalités de votre appareil. Ils affichent des icônes d'applications, des widgets, des raccourcis, etc.
  • Seite 45 À propos de votre Smart Display VSD243 10 8 N° Éléments Descriptif Date et heure Afficher la date et l'heure actuelles. 3:11 Vous pouvez ajouter un raccourci d'application sur l'écran Home (Accueil) et le déplacer à votre guise en touchant pendant quelques Raccourcis secondes l'icône de l’application.
  • Seite 46: Votre Écran Accueil Personnalisé

    À propos de votre Smart Display VSD243 3.4 Votre écran Accueil personnalisé 3.4.1 Ajoutez un élément (raccourci) • Sur l'écran Apps, touchez l'onglet APPS ou WIDGETS pour saisir l'écran de configuration APPS ou WIDGETS. • Sélectionnez un des éléments APPS ou WIDGETS que vous souhaitez ajouter.
  • Seite 47 À propos de votre Smart Display VSD243 • Vous pouvez toucher le bouton Back (Retour) » pour revenir à l’écran précédent sans effectuer de changement. REMARQUE • Tous les écrans Accueil partagent le même arrière-plan. Vous ne pouvez pas définir plusieurs papiers...
  • Seite 48: Connexion À Des Appareils Compatibles Hdmi Via Une Entrée Hdmi

    Vous pouvez obtenir via HDMI la meilleure expérience utilisateur pour une lecture vidéo et des jeux. L'écran VSD243 est équipé d'une entrée HDMI pour une connexion à un appareil externe compatible HDMI.
  • Seite 49: Menu Osd

    B R I G H T N E S S Appuyez sur le bouton Menu/Exit (Menu/Quitter) en bas à droite de votre VSD243 pour lancer l'écran de configuration OSD. L'écran de configuration OSD peut être utilisé pour configurer le Contraste / la Luminosité, la Sélection d'entrée, le Réglage audio, la Colorimétrie, les Informations, le Réglage...
  • Seite 50: Éléments De Fonctions

    éléments de couleur de l'utilisateur. Information : Sélectionnez cet élément pour afficher les informations concernant votre VSD243, comme la résolution, la haute fréquence (HF), la très haute fréquence (VHF), l'horloge Pixel, le numéro de modèle et le site Web.
  • Seite 51: Notice Osd

    Menu OSD 4.3 Notice OSD ralenti : Le menu OSD se ferme et revient au menu OSD initialement traité après expiration de la valeur de délai d'expiration de l’OSD. Aucun signal : • Il n’y a aucune connexion HDMI. • La source HDMI connectée ou votre écran intelligent n'est pas actif. Assurez-vous que la source HDMI n'est pas en mode Off (Arrêt), Standby (Veille), Hibernate (Veille prolongée) ou Sleep (Sommeil).
  • Seite 52: Dépannage

    électricité dans une prise de courant correcte. - S'assurer que le connecteur CC est entièrement inséré dans la bonne prise sur l'arrière du VSD243 situé sous le couvercle - Vérifiez la prise d'alimentation avec un autre appareil (comme une lampe de table) - S'il n'y a toujours aucun courant, contactez l'assistance ViewSonic ou le Revendeur auprès duquel l'appareil a été...
  • Seite 53: Annexe

    Annexe Annexe Spécifications Spécifications de l'affichage LCD. Taille 60cm (23,6” viewable) 1920x1080 Résolution 250 cd/m Luminosité Rétroéclairage Épaisseur 47 mm PCT 10 points contact soutenu Ecran tactile Matériel Boutons Bouton d'alimentation *1 Touches de contrôle *4 Voyant DEL Bleu (en marche) / Orange (enregistrement) d’alimentation LAN (RJ45, prend en charge 10/100/1000 Mbit/s) *1 Ports E/S...
  • Seite 54 Annexe Android 8.1 (Oreo) Système CPU/SoC Rockchip RK3288 1,8GHz Vitesse Quadricœur Cœurs Graphique Incorporé DDR3 2 Go, vitesse jusqu'à 800 Mbit/s Mémoire eMMC (NAND), 16Go En stockage 802,11 b/g/n WLAN Environnement Température et humidité Fonctionnement : 20% ~ 90% @ 35 C sans condensation En stockage : 90% H.R.
  • Seite 55: Service Clientèle

    C= http://www.viewsonic.com/ soporte@viewsonic.com Amérique Latine www.viewsonic.com/la/ la/soporte/servicio-tecnico Nexus Hightech Solutions, Cincinnati #40 Desp. 1 Col. De los Deportes Mexico D.F. Tel: 55) 6547-6454 55)6547-6484 Autres lieux, veuillez vous référer à http://www.viewsonic.com/la/soporte/servicio-tecnico#mexico T= (853)-2833-8407 service@hk.viewsonic.com Macao www.hk.viewsonic.com Moyen Orient service@ap.viewsonic.com ap.viewsonic.com/me/...
  • Seite 56 état. Durée de la garantie : Les appareils ViewSonic Smart Display sont garantis de 1 à 3 ans en fonction du pays d’achat; cette garantie s’applique à tous les composants, y compris la source lumineuse, et comprend la main d’oeuvre à compter de la première date d’achat du produit.
  • Seite 57 Exclusion des dommages : La responsabilité de viewsonic se limite au coût de réparation ou de remplacement du produit. La sociéte viewsonic ne pourra pas être tenue pour responsable: 1. Des dommages causés à d’autres biens en raison d’un défaut du produit, les dom- mages résultant d’une gêne, de l’impossibilité...
  • Seite 58 Gracias por elegir ViewSonic Con más de 30 años como proveedor líder mundial de soluciones visuales, ViewSonic se dedica a superar las expectativas del mundo en lo que a evolución, innovación y simplicidad tecnológicas se refiere. En ViewSonic, creemos que nuestros productos tienen el potencial necesario para impactar positivamente en el mundo y confiamos en que el producto de ViewSonic que ha elegido le proporcione un buen servicio.
  • Seite 59: Información De Conformidad

    Información de conformidad Lea estas instrucciones antes de continuar • Use exclusivamente las baterías y el adaptador de alimentación suministrados por el fabricante. El uso de accesorios no autorizados puede invalidar la garantía. • No almacene el teléfono en lugares con temperaturas superiores a 50 ºC o 122 ºF. •...
  • Seite 60 Declaración de Cumplimiento de RoHS2 Este producto ha sido diseñado y fabricado cumpliendo la Directiva 2011/65/EU del Parlamento Europeo y el Consejo para la restricción del uso de ciertas sustancias peligrosas en equipos eléctricos y electrónicos (Directiva RoHS2) y se considera que cumple con los valores de concentración máximos publicados por el European Technical Adaptation Committee (Comité...
  • Seite 61 Importantes Instruciones de Seguridad NO coloque ningún objeto sobre el dispositivo. Los objetos pueden arañar la pantalla o entrar en ella. NO exponga el dispositivo a entornos sucios o polvorientos. NO coloque el dispositivo en una superficie irregular o inestable. NO inserte ningún objeto extraño en el dispositivo.
  • Seite 62 La información contenida en este documento puede cambiar sin previo aviso.Queda prohibida la copia, reproducción o transmisión de este documento por ningún medio ni para ningún fin, sin el previo consentimiento por escrito de ViewSonic Corporation. Información de derechos de propiedad intelectual Los derechos de todas las tecnologías y productos que componen este dispositivo son...
  • Seite 63: Registro Del Producto

    ViewSonic es respetuoso con el medioambiente y está comprometido a trabajar y vivir de una manera que sea respetuosa con el medioambiente. Gracias por ser parte de una forma de Computación más Inteligente y más Verde. Visite el sitio web de ViewSonic para saber más.
  • Seite 64 Conexión .....................4 Preparar la pantalla inteligente para utilizarla ........4 Encender el dispositivo ...............5 Apagar el dispositivo ................6 3 Información acerca de la pantalla inteligente VSD243 Pantalla táctil ..................7 Aplicaciones, widgets y accesos directos ...........8 Pantalla de inicio .................8 Personalizar la pantalla Inicio ............10 3.4.1 Agregar un elemento (acceso directo) .......10...
  • Seite 65: Funciones De La Pantalla Inteligente Vsd243

    Tabla de contenido VSD243 es una pantalla inteligente de 23,6 pulgadas y cuatro núcleos que tiene instalado Android 8.1 (Oreo). Cuenta con una resolución HD de 1920x1080p, permite trabajar con HDMI y también tiene opciones de conectividad USB de tamaño completo.
  • Seite 66 Tabla de contenido Nº Componentes Descripciones Toque la pantalla táctil para controlar las Pantalla táctil configuraciones en pantalla, como por ejemplo elementos de menú, aplicaciones, botones, teclado, etc. Botón de encendido y Presione este botón para encender o bloquear la apagado pantalla inteligente.
  • Seite 67 Funciones de la pantalla inteligente VSD243 Vista posterior LADO IZQUIERDO LADO DERECHO LADO IZQUIERDO Nº Componentes Descripciones Conector RJ45 Permite conectar un cable RJ45 para conexión de red. SALIDA HDMI Permite conectar dispositivos digitales de alta calidad para configuraciones de vídeo y audio ENTRADA HDMI (p.
  • Seite 68: Configurar La Pantalla Inteligente Vsd243

    Configurar la pantalla inteligente VSD243 Configurar la pantalla inteligente VSD243 2.1 Conexión USB Type-A Printer PC Monitor HDMI OUT USB Type-A USB Storage Notebook HDMI IN External USB Type-A Computer DVD Player Keyboard Headset Earphone USB Type-A Microphone Mouse Microphone...
  • Seite 69: Encender El Dispositivo

    Configurar la pantalla inteligente VSD243 Conectar el cable de alimentación Conecte el cable de alimentación incluido a la toma de alimentación. Conecte el otro extremo del cable de alimentación a una toma de corriente. 2.3 Encender el dispositivo Después de conectar el cable de alimentación, puede presionar el botón de alimentación durante aproximadamente 0,5 segundos para...
  • Seite 70: Apagar El Dispositivo

    Configurar la pantalla inteligente VSD243 2.4 Apagar el dispositivo Presione sin soltar el botón de alimentación durante 3 segundos aproximadamente. Cuando aparezca el menú de apagado, toque OK (Aceptar).
  • Seite 71: Información Acerca De La Pantalla Inteligente Vsd243

    Información acerca de la pantalla inteligente VSD243 Información acerca de la pantalla inteligente VSD243 3.1 Pantalla táctil Para navegar por la pantalla e interactuar con ella, use el dedo para tocar la superficie sensible de dicha pantalla directamente. Puede manipular iconos, botones, elementos de menú, el teclado en pantalla y otros elementos de la...
  • Seite 72: Aplicaciones, Widgets Y Accesos Directos

    Información acerca de la pantalla inteligente VSD243 3.2 Aplicaciones, widgets y accesos directos Los botones en pantalla o los iconos ofrecen una gran variedad de funciones y accesos directos. La pantalla Inicio, es su punto de partida para acceder a todas las funciones del dispositivo.
  • Seite 73 Información acerca de la pantalla inteligente VSD243 Elementos Nº Descripciones Fecha y hora 3:11 Permite mostrar la fecha y hora actuales. Puede agregar un acceso directo de aplicación a la pantalla Home (Inicio) y moverlo libremente Accesos tocando sin soltar el icono Aplicación. Este icono...
  • Seite 74: Personalizar La Pantalla Inicio

    Información acerca de la pantalla inteligente VSD243 3.4 Personalizar la pantalla Inicio 3.4.1 Agregar un elemento (acceso directo) • En la pantalla Apps (Aplicaciones), toque la ficha APPS (APLICACIONES) o WIDGETS para entrar en la pantalla de configuración respectiva del mismo nombre.
  • Seite 75 Información acerca de la pantalla inteligente VSD243 • Puede tocar el botón Atrás para volver a la pantalla anterior sin hacer ningún cambio. NOTA • T odas las pantallas Inicio comparten el mismo papel tapiz. No puede establecer fondos de pan-...
  • Seite 76: Conectar Dispositivos Hdmi A Través De La Entrada Hdmi

    HDMI externo. Puede conectar su equipo de sobremesa, equipo portátil, reproductor Blu-ray o cualquier otro dispositivo HDMI a la pantalla VSD243 como una pantalla de vídeo de alta definición. Cómo empezar Debe tener disponible un cable HDMI de tipo A a HDMI tipo A.
  • Seite 77: Menú Osd

    B R I G H T N E S S Presione el botón Menu/Exit (Menús/Salir) situado en la parte inferior derecha de su VSD243 para iniciar la pantalla de configuración OSD.La pantalla de configuración del menú OSD se puede ajustar para definir los siguientes parámetros: Contrast/Brightness (Contraste y brillo), Input Select...
  • Seite 78: Elementos De Funciones

    Cool (Frío), Native (Nativo), Warm (Cálido) y elementos de color del usuario. Information (Información): Seleccione este elemento para mostrar información de la pantalla VSD243. Los elementos de información que se puede mostrar son los siguientes: Resolution (Resolución), H.Frequency (Frecuencia H.), V.Frequency (Frecuencia V.), Pixel Clock (Reloj de píxeles), Model Number (Número de modelo) y Website (Sitio Web).
  • Seite 79: Aviso Sobre El Menú Osd

    Menú OSD 4.3 Aviso sobre el menú OSD Inactividad: El menú OSD se cerrará y volverá al menú OSD procesado original después de que se haya superado el valor del tiempo de espera del menú OSD. No signal (No hay señal): •...
  • Seite 80: Solucionar Problemas

    - Asegúrese de que el conector de CC está completamente insertado en la toma correcta situada en la parte posterior de la unidad VSD243 que se encuentra debajo de la tapa. - Compruebe la toma de corriente con otro dispositivo, como por ejemplo con una lámpara de mesa.
  • Seite 81: Apéndice

    Apéndice 6 Apéndice Especificaciones Especificaciones de la pantalla LCD Tamaño 60 cm (23,6”) 1920x1080 Resolución Brightness (Brillo) 250 cd/m Retroiluminación Grosor 47 mm PCT 10 puntos de contacto soportado Pantalla táctil Hardware Botones Botón de alimentación *1 Botones de control *4 Indicador LED de Azul (encendido) / Naranja (ahorro) encendido...
  • Seite 82 Apéndice Android 8.1 (Oreo) System (Sistema) Rockchip RK3288W CPU/SoC 1,8GHz Velocidad Núcleos Cuatro núcleos Tarjeta gráfica Incrustada DDR3 2 GB, 800 Mbps de velocidad Medio eMMC (NAND), 16 GB Almacenamiento WLAN 802.11 b/g/n Entorno Temperatura y humedad Funcionamiento: 20% ~ 90% @ 35 C sin condensación Almacenamiento: H.R.
  • Seite 83: Servicio De Atención Al Cliente

    C= http://www.viewsonic.com/ América Latina soporte@viewsonic.com www.viewsonic.com/la/ la/soporte/servicio-tecnico Nexus Hightech Solutions, Cincinnati #40 Desp. 1 Col. De los Deportes México D.F. Tel: 55) 6547-6454 55)6547-6484 Para otros lugares, remítase a http://www.viewsonic.com/la/soporte/servicio-tecnico#mexico www.hk.viewsonic.com T= (853)-2833-8407 service@hk.viewsonic.com Macao Oriente Medio service@ap.viewsonic.com ap.viewsonic.com/me/ Contact your reseller T= 1-800-688-6688 (English) "service.us@viewsonic.com...
  • Seite 84 Duración de la garantía: ViewSonic Smart Display tiene una garantía de entre 1 y 3 años, dependiendo del país donde se hayan comprado, para todas las piezas, incluida la fuente de luz, y para toda la mano de obre desde la fecha del primer día de compra por el consumidor.
  • Seite 85 Exclusión de daños: La responsabilidad de viewsonic se limita al coste de la reparación o sustitución del producto. Viewsonic no se hace responsable de: 1. Daños a otras pertenencias causados por defectos del producto, inconvenientes, pérdida de uso del producto, de tiempo, de beneficios, de oportunidades comer-...
  • Seite 86 Lösungen verpflichtet sich ViewSonic, die Erwartungen der Welt an technologische Weiterentwicklung, Innovation und Einfachheit zu übertreffen. Wir bei ViewSonic glauben, dass unsere Produkt das Potenzial haben, die Welt positiv zu beeinflussen, und wir sind davon überzeugt, dass Ihnen das ViewSonic-Produkt, für das Sie sich entschieden haben, gute Dienste leisten wird.
  • Seite 87: Informationen Zur Konformität

    Informationen zur Konformität Bitte lesen, bevor Sie fortfahren • Verwenden Sie nur die Batterien und das Netzteil, die vom Hersteller bereitgestellt wurden. Der Einsatz nicht autorisierter Zubehörartikel kann Ihre Garantie erlöschen lassen. • Bewahren Sie Ihr Gerät nicht bei Temperaturen von mehr als 50 °C auf. •...
  • Seite 88: Rohs2-Konformitätserklärung

    RoHS2-Konformitätserklärung Dieses Produkt wurde in Übereinstimmung mit der Richtlinie 2011/65/EU des Europäischen Parlaments und des Rates zur Beschränkung des Einsatzes bestimmter gefährlicher Stoffe in Elektro- und Elektronikgeräte (RoHS2-Richtlinie) entwickelt und hergestellt und gilt als mit den vom Ausschuss für die Anpassung der Richtlinien an den technischen Fortschritt festgelegten maximalen Konzentrationen wie nachstehend gezeigt übereinstimmend: Empfohlene maximale...
  • Seite 89: Wichtige Sicherheitshinweise

    Wichtige Sicherheitshinweise Stellen Sie keine Gegenstände auf dem Gerät ab, da diese den Bildschirm verkratzen könnten. Setzen Sie das Gerät keinen schmutzigen oder staubigen Umgebungen aus. Platzieren Sie das Gerät nicht auf einer unebenen oder unstabilen Oberfläche. Stecken Sie keine Fremdkörper in das Gerät. Setzen Sie das Gerät keinen starken magnetischen oder elektrischen Feldern aus.
  • Seite 90 Folgeschäden aufgrund von Aufbereitung dieses Materials oder der Leistung ode r Nutzungdieses Produktes. Im Interesse kontinuierlicher Produktverbesserung behält sich ViewSonic Corporation das Recht vor, technische Daten des Produktes ohne Ankündigung zu ändern. Die Angaben in diesem Dokument können daher Änderungen unterworfen werden.
  • Seite 91: Produktregistrierung

    _______________________________ Kaufdatum: Entsorgung zum Ende der Einsatzzeit ViewSonic nimmt den Umweltschutz sehr ernst, verpflichtet sich daher zu umweltfreundlichen Lebens- und Arbeitsweisen. Vielen Dank für Ihre Mitwirkung an einem intelligenteren, umweltfreundlicheren Einsatz moderner Computertechnik. Mehr dazu erfahren Sie auf den ViewSonic-Internetseiten.
  • Seite 92 Inhalt Inhalt 1 VSD243 Smart Display Features 2 Set Up Your VSD243 Smart Display 2.1 Connection ................. 4 2.2 Get Your Smart Display Ready for Use ......4 2.3 Power on Your Device ............5 2.4 Power Off Your Device ............6 3 About Your VSD243 Smart Display 3.1 Touch Screen ..............
  • Seite 93: Vsd243 Smart-Display - Eigenschaften

    Inhalt VSD243 ist ein Smart Display mit 23,6-Zoll-Quad-Core-Display mit Android 8.1 (Oreo). Es kommt mit einer HD-Auflösung von 1920 x 1080p, ermöglicht Ihnen, mit HDMI und USB-Konnektivität in voller Größe zu arbeiten. 1 VSD243 Smart-Display – Eigenschaften Dieser Abschnitt stellt Ihnen die Eigenschaften Ihres Smart-Displays vor.
  • Seite 94 Inhalt Komponenten Beschreibungen Touchscreen - Berühren Sie den Bildschirm zur Steuerung der Anzeigekonfigurationen, einschließlich Menüelementen, Anwendungen, Schaltflächen, Tastatur usw. Ein-/Austaste Zum Einschalten/Sperren des Smart-Displays. - Zum Einschalten etwa 0,5 Sekunden drücken. - Sperrt das Smart-Display, wenn es eingeschaltet ist. - Im gesperrten Zustand geben Sie das Smart-Display mit dieser Taste wieder frei.
  • Seite 95 VSD243 Smart-Display – Eigenschaften Rückansicht Linke Seite Rechte Seite Linke Seite Komponenten Beschreibungen RJ45-Anschluss Zur Netzwerkanbindung über RJ45-Kabel. Zum Anschluss hochwertiger Video- und HDMI-Ausgang Audiogeräte (z. B. PC-Monitor, BD-Player, HDMI-Eingang Computer, Spielkonsole). Headset-Anschluss Zum Anschluss von Kopfhörern oder Headsets. Schließen Sie ein kompatibles Mikrofon an das Mikrofoneingang Gerät an.
  • Seite 96: Verbindung

    Smart-Display VSD243 einrichten Smart-Display VSD243 einrichten 2.1 Verbindung USB Type-A Printer PC Monitor HDMI OUT USB Type-A USB Storage Notebook HDMI IN External USB Type-A Computer DVD Player Keyboard Headset Earphone USB Type-A Microphone Mouse Microphone USB Type-B Computer SD Card...
  • Seite 97: Einschalten

    Smart-Display VSD243 einrichten Netzkabel anschließen Schließen Sie das das Kabel an den Netzteileingang an. Verbinden Sie den Netzstecker mit einer Steckdose. 2.3 Einschalten Nach Anschluss des Netzkabels können Sie Ihr Gerät einschalten, indem Sie die Ein-/Austaste etwa 0,5 Sekunden lang drücken.
  • Seite 98 Smart-Display VSD243 einrichten 2.4 Abschalten Halten Sie die Ein-/Austaste etwa 3 Sekunden lang gedrückt. Tippen Sie im Abschaltmenü auf OK.
  • Seite 99: Über Ihr Smart-Display Vsd243

    Über Ihr Smart-Display VSD243 Über Ihr Smart-Display VSD243 3.1 Touchscreen Berühren Sie zur Navigation und Interaktion am Display direkt die berührungsempfindliche Oberfläche des Bildschirms. Mit den folgenden Aktionen können Sie Symbole, Schaltflächen, Menüelemente, die Bildschirmtastatur und andere Dinge über den Touchscreen bedienen:...
  • Seite 100: Applikationen, Widgets Und Verknüpfungen

    Über Ihr Smart-Display VSD243 3.2 Applikationen, Widgets und Verknüpfungen Die Schaltflächen und Symbole bieten Ihnen eine Vielzahl von Funktionen und Verknüpfungen. Der Startbildschirm ist der Ausgangspunkt, von dem aus Sie auf sämtliche Funktionen Ihres Gerätes zugreifen können. Unter anderem finden Sie hier Applikationssymbole, Widgets, Verknüpfungen usw.
  • Seite 101 Über Ihr Smart-Display VSD243 Elemente Beschreibungen Datum/Zeit Zur Anzeige von Datum und Uhrzeit. 3:11 Sie können eine Verknüpfung zum Startbildschirm zufügen, indem Sie das App-Symbol angetippt halten und an die Verknüpfungen gewünschte Stelle ziehen. Mit diesem Symbol können Sie eine Verknüpfung schnell öffnen.
  • Seite 102: Startbildschirm Anpassen

    Über Ihr Smart-Display VSD243 3.4 Startbildschirm anpassen 3.4.1 Ein Element (Verknüpfung) zufügen • Im Apps-Bildschirm rufen Sie über die Apps- und Widgets-Register die Apps- und Widgets-Konfigurationsbildschirme auf. • Wählen Sie das APPS- oder WIDGETS-Element, das Sie zufügen möchten. • Zum Zufügen zum ausgewählten Startbildschirm halten Sie das Element angetippt.
  • Seite 103 Über Ihr Smart-Display VSD243 • Bei manchen Hintergrundbildern (zum Beispiel bei Magic Smoke) können Sie die Farbe auswählen. Wenn während der Änderung des Hintergrundbildes „Settings… (Einstellungen…)“ erscheint, tippen Sie es an. Im oberen Bildschirmbereich wird „Tap to change (Zum Ändern antippen)“...
  • Seite 104: Per Hdmi-Anschluss Mit Hdmi-Fähigen Geräten Verbinden

    Verbinden Sie das andere Ende des HDMI-Kabels mit dem HDMI- Eingang an der Rückseite des VSD243. Tippen Sie zum Umschalten in den HDMI-Modus auf das Auswahlsymbol Wenn Sie einen Computer anschließen, stellen Sie zuvor die richtige Auflösung ein. Das VSD243 unterstützt eine Auflösung von bis zu 1920 x 1080.
  • Seite 105: Einstellschieber

    C O N T R A S T B R I G H T N E S S Drücken Sie zur Anzeige des OSD-Konfigurationsbildschirms die Menü/Verlassen-Taste an der Seite Ihres VSD243. Im OSD- Konfigurationsbildschirm können Sie Einstellungen wie Kontrast/Helligkeit, Eingangswahl, Audioeinstellungen, Farbeinstellungen, Informationen, Manuelle Bildeinstellungen, Einrichtungsmenü...

Diese Anleitung auch für:

Vs16340

Inhaltsverzeichnis