Inhaltsverzeichnis
Werbung
Verfügbare Sprachen
Verfügbare Sprachen
Quicklinks
All manuals and user guides at all-guides.com
PEHA Elektro GmbH & Co. KG
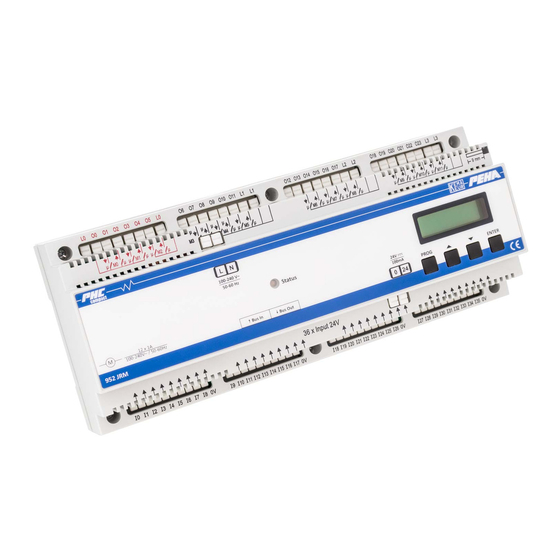
Compact 952 JRM
L0
O0 O1
O2
O3
O4
O5 L0
O6 O7
O8
O9 O10
O11
L1 L1
O12
O13 O14
O15
O16 O17
L2
L2
µ
µ
µ
µ
µ
M0
µ
µ
M1
µ
µ
M2
µ
M3
M4
µ
M5
µ
µ
M6
µ
µ
M7
µ
µ
M8
µ
compact
L
N
1 0 0 - 240 V ~
5 0 - 6 0 Hz
Sta tu s
24V
1 0 0 mA
12 x 1A
M
0 24
100- 240V~ / 50- 6 0Hz
B u s In
B u s O u t
95 2 JRM
36 x Input 24V
I0
I1
I2
I3
I4
I5
I6 I7 I8
0V
I9
I10
I11
I12
I13
I14
I15 I16 I17
0V
I18
I19
I20
I21
I22
I23
I24 I25 I26
0V
PEHA_M_952JRM (Rev01-130308)
O18
O19
O20 O21
O22
O23 L3
L3
µ
M9
µ
µ
M10
µ
µ
M11
µ
9 m m
C o m p a c t
14 : 14
17 . 10. 2012
PRO G
E N T E R
I27
I28
I29
I30
I31
I32
I33 I34 I35
0V
Werbung
Kapitel
Inhaltsverzeichnis

Verwandte Anleitungen für Honeywell PEHA Compact 952 JRM


Inhaltszusammenfassung für Honeywell PEHA Compact 952 JRM
- Seite 1 All manuals and user guides at all-guides.com PEHA Elektro GmbH & Co. KG Compact 952 JRM O0 O1 O5 L0 O6 O7 O9 O10 L1 L1 O13 O14 O16 O17 O20 O21 O23 L3 µ µ µ µ µ µ µ...
- Seite 2 all-guides.com...
- Seite 3 All manuals and user guides at all-guides.com...
- Seite 4 All manuals and user guides at all-guides.com PEHA Elektro GmbH & Co. KG Compact 952 JRM Bedienungsanleitung...
-
Seite 5: Inhaltsverzeichnis
All manuals and user guides at all-guides.com InHALTSvERzEICHnIS Aufbau & Beschreibung ..........3 Prioritäten ..............23 Erweiterung durch zusätzliche PHC-Module ..... 24 Sicherheit ..............4 Montage und Installation ......... 25 Technische Daten ............. 5 Sicherheitshinweis ..............25 Bedienung ..............6 Montage ................ -
Seite 6: Aufbau & Beschreibung
All manuals and user guides at all-guides.com AuFBAu & BESCHREIBunG Mit dem Compact 952 JRM wird eine komfortable Ansteuerung von Rollladen, Jalousien und Markisen ermöglicht, bei der keine Programmierung von dem Anwender vorgenommen werden muss. Alle Funktionen sind vorprogrammiert und den Ein- und Ausgängen zugeordnet. Die Installation kann nach einer Funktionstabelle und einem Anschlussbild erfolgen. -
Seite 7: Sicherheit
All manuals and user guides at all-guides.com SICHERHEIT vORSICHT! Gefahr eines Stromschlages! Im Inneren des Gehäuses befinden sich spannungsführende Teile. Eine Berührung kann eine Körperverletzung zur Folge haben! Alle Arbeiten am Versorgungsnetz und Gerät dürfen nur von autorisierten Elektrofachkräften durchgeführt werden. •... - Seite 8 all-guides.com...
-
Seite 9: Technische Daten
All manuals and user guides at all-guides.com TECHnISCHE DATEn Betriebsspannung 952 JRM 100-240V~ /50-60Hz Absicherung der versorgungsleitungen Sicherungsautomat max. 10 A Spannungsversorgung Compact System Nom. 24 V DC (SELV), 21-28 V DC (Brummspannung 5 %) Sensoranschluss 24 V DC / 100 mA Motorlast je Ausgang 100-240V~ /50-60Hz maximal 1A Eigenverbrauch (Standby) -
Seite 10: Bedienung
All manuals and user guides at all-guides.com BEDIEnunG GERäTEMEnü 01 Schaltuhren Seite 7 1 0 0 - 240 V ~ 02 Uhrzeit/Datum Seite 8 C o m p a c t R o l l l a d e n m o d u l 5 0 - 6 0 Hz 14 : 14 Mo 13: 5 7... -
Seite 11: Schaltuhren (Motor /Gruppe)
All manuals and user guides at all-guides.com BEDIEnunG SCHALTuHREn (MOTOR /GRuPPE) G e r ä t e m e n ü M o t o r / G r u p p e L a u f r i c h t u n g S c h a l t u h r Enter Mo - F r 07: 30... -
Seite 12: Uhrzeit / Datum
All manuals and user guides at all-guides.com BEDIEnunG uHRzEIT /DATuM G e r ä t e m e n ü U h r z e i t D a t u m S o / W i Enter S o / W i A uto : U h r z e i t: U h r z e i t: 12: 00... -
Seite 13: Sprache
All manuals and user guides at all-guides.com BEDIEnunG SPRACHE G e r ä t e m e n ü S p r a c h e Enter S pr a c h e 03 Sprache D e uts c Prog Auswahl: Einstellung: Beenden:... - Seite 14 all-guides.com...
-
Seite 15: Laufzeiten
All manuals and user guides at all-guides.com BEDIEnunG LAuFzEITEn G e r ä t e m e n ü M o t o r 0 0 - 1 1 L a u f z e i t e n Enter 04 Laufzeiten Enter Enter... -
Seite 16: Motor-Typ
All manuals and user guides at all-guides.com BEDIEnunG MOTOR-TyP G e r ä t e m e n ü M o t o r 0 0 - 1 1 M o t o r - T y p V e r s t e l l z e i t T : 0. -
Seite 17: Gruppen
All manuals and user guides at all-guides.com BEDIEnunG GRuPPEn G e r ä t e m e n ü G r u p p e M o t o r z u o r d n e n M o t o r z u o r d n e n Enter Enter G r u p p e... -
Seite 18: Automatik
All manuals and user guides at all-guides.com BEDIEnunG AuTOMATIK G e r ä t e m e n ü M o t o r 0 0 - 1 1 L a u f r i c h t u n g S t a t u s S e n s o r i k Enter... -
Seite 19: Sensorik
All manuals and user guides at all-guides.com BEDIEnunG SEnSORIK G e r ä t e m e n ü M o t o r 0 0 - 1 1 S e n s o r S e n k z e i t T : 10s T : 10s 08 Sensorik... - Seite 20 all-guides.com...
-
Seite 21: Windsensor
All manuals and user guides at all-guides.com BEDIEnunG WInDSEnSOR G e r ä t e m e n ü M o t o r 0 0 - 1 1 V e r r i e g e l u n g Enter 09 Windsensor Enter... -
Seite 22: Gruppe 2 Konfigurieren
All manuals and user guides at all-guides.com BEDIEnunG GRuPPE 2 KOnFIGuRIEREn G e r ä t e m e n ü M o d u s Enter Mo d us G r uppe 2: 10 Gruppe2 konf. Standard Prog Auswahl: Einstellung: Beenden: Prog... -
Seite 23: Versatzzeit
All manuals and user guides at all-guides.com BEDIEnunG vERSATzzEIT G e r ä t e m e n ü V e r s a t z z e i t Enter Ve r s a tz z e i t 11 Versatzzeit 0. -
Seite 24: Broadcast
All manuals and user guides at all-guides.com BEDIEnunG BROADCAST G e r ä t e m e n ü M o d u s M o d u s Externe Sensordaten (Compact Bus) Enter Mo d us : Mo d us : Slave •... -
Seite 25: Werkseinstellung / Version
All manuals and user guides at all-guides.com BEDIEnunG WERKSEInSTELLunG / vERSIOn G e r ä t e m e n ü W e r k s e i n s t e l l u n g G e r ä t e m e n ü V e r s i o n Enter W e r k s e i ns te l l ung... - Seite 26 all-guides.com...
-
Seite 27: Funktionen
All manuals and user guides at all-guides.com FunKTIOnEn Funktion Beschreibung Das JRM kann 12 motorgetriebene Rollladen, Jalousien und Markisen (M0-M11) ansteuern. Sie können variabel 3 Gruppen (0-2) zugeordnet werden. Die Handbedienung erfolgt lokal, zentral oder in Gruppen mit Doppeltastern. Eine zeitabhängige Ansteuerung der Ausgänge (Motoren) ist über programmierte Schaltuhren möglich. - Seite 28 All manuals and user guides at all-guides.com FunKTIOnEn Funktion Beschreibung Bei langem Tastendruck werden alle Motoren der Zentral-Gruppe AUF oder AB gefahren. Mit einem kurzen Tastendruck stoppen die Motoren. Ein Tippbetrieb ist nicht möglich! In der Zentral-Gruppe sind ab Werk alle Motoren aktiviert. Tastbetrieb zentral Tip: Die Motoren mehrerer JRM können zentral gesteuert werden.
- Seite 29 All manuals and user guides at all-guides.com FunKTIOnEn Funktion Beschreibung Mit den Schaltuhren des JRMs können Motoren und Gruppen zeitgesteuert AUF und AB gefahren werden. Wird die Schaltuhr Schaltuhren auf 00:00 eingestellt ist die Schaltuhr ausgeschaltet. Die Programmierung der Schaltuhren erfolgt über die Tastatur und Anzeige des JRMs (s.
-
Seite 30: Prioritäten
All manuals and user guides at all-guides.com PRIORITäTEn Eingangsfunktion Priorität Beschreibung Der Wind-/Regensensor hat die höchste Priorität. Wind-/ Regensensor Das Signal eines Sensors mit niedrigerer Priorität oder die Bedienung eines Tasters wird ignoriert. Taster Die Bedienung eines Tasters beendet alle Eingangsfunktionen mit niedrigerer Priorität. Dämmerungssensor Die Eingangsfunktion “Dämmerungssensor”... -
Seite 31: Erweiterung Durch Zusätzliche Phc-Module
All manuals and user guides at all-guides.com ERWEITERunG DuRCH zuSäTzLICHE PHC-MODuLE Wahlweise kann zur Erweiterung ein PHC Easyclick Funkinterface 940 FU-C oder 941 FU-C angeschlossen werden. Dadurch können mit Funktastern Rollladen angesteuert werden. Einzelbedienungen und Gruppenbedienungen sind möglich. Eine weitere Erweiterungsmöglichkeit ergibt sich mit zwei PHC JRM Modulen und einem PHC Eingangsmodul. Durch die Erweiterung können insgesamt maximal 20 Rollladen angesteuert werden. - Seite 32 all-guides.com...
-
Seite 33: Montage Und Installation
All manuals and user guides at all-guides.com MOnTAGE & InSTALLATIOn SICHERHEITSHInWEIS Die Installation und Inbetriebnahme darf nur von autorisierten Elektrofachkräften durchgeführt werden. Bei der Installation an das Versorgungs netz (230V~ /50Hz) ist die elektrische Anlage spannungfrei zu schalten. Es sind die geltenden Gesetze und Normen des Landes einzuhalten, in dem das Gerät betrieben wird! MOnTAGE Das 952 JRM ist für die Montage auf eine 35 mm Hutschiene nach EN 50022 im Verteilungs-Ein/Aufbaugehäuse mit geschraubter Abdeckung konzipiert. -
Seite 34: Planungshilfe
All manuals and user guides at all-guides.com PLAnunGSHILFE gehört zu Ausgangsgruppe gehört zu Ausgangsgruppe Ausgang Ausgang Motor Motor 952 JRM 952 JRM M0 AUF M6 AUF M0 AB M6 AB M1 AUF M7 AUF M1 AB ... -
Seite 35: Störungsdiagnose-/Behebung (Elektrofachkraft)
All manuals and user guides at all-guides.com STöRunGSDIAGnOSE-/BEHEBunG (ELEKTROFACHKRAFT) nEuAnLAGE ODER vORHAnDEnE AnLAGE • Sicherungautomaten und Versorgungsspannungen überprüfen. • Anschlussleitungen der Eingänge (Taster, Sensoren) prüfen. • Compact Busanschluss prüfen. • Der Automatikbetrieb wurde nicht eingeschaltet. • Die Prioritäten der Eingangsfunktionen sind zu beachten! Wurde z.B. eine Jalousie mit einem Taster lokal AB gefahren, werden die Signale des Sonnensensors ignoriert (Verriegelung)! Erst eine Eingangsfunktion wie z.B. -
Seite 36: Faq-Liste
All manuals and user guides at all-guides.com FAQ-LISTE Frage: Werden mehrere JRM in einer Anlage eingesetzt, kann dann der Anschluss der zentralen AUF/AB Funktion gemeinsam (parallel) erfolgen? Antwort: Der Anschluss der zentralen AUF/AB Funktion darf nicht parallel erfolgen. Es ist ein potentialfreies Relais zu verwenden. Frage: Wie kann man mehrere JRM mit einem Sensor betreiben? Antwort: Für mehrere JRM können Sensoren gemeinsam über den Compact Bus genutzt werden (s. - Seite 37 All manuals and user guides at all-guides.com FAQ-LISTE Frage: Wie hoch kann der Sensoranschluss 24V belastet werden? Antwort: Mit maximal 100 mA. Frage: Können auch Gleichstrommotoren eingesetzt werden? Antwort: Nein, nur Wechselstrommotoren (230V~/50Hz max. 1A). Frage: Können Motoren parallel angeschlossen werden? Antwort: Nein, nur ein Motor (230V~/50Hz max.
- Seite 38 all-guides.com...
- Seite 39 All manuals and user guides at all-guides.com FAQ-LISTE Frage: Wie lange ist die Uhrzeit bei Spannungsausfall gespeichert? Antwort: Ca. 24 Stunden. Frage: Ist das grüne blinken der Status-LED normal? Antwort: Ja, die LED blinkt grün im Normalbetrieb. Frage: Wird der Eingangsbefehl „Sonnensensor EIN“ nach Freigabe des Windsensors nachgeholt? Antwort: Ja! Frage: Dürfen Sensor-/ oder Steuerleitungen mit Motorleitungen in einem Kabel verlegt werden? Antwort: Nein, siehe Installationshinweise!
-
Seite 40: Allgemeines
All manuals and user guides at all-guides.com ALLGEMEInES EnTSORGunG DES GERäTES Zur Entsorgung des Gerätes sind die geltenden Gesetze und Normen des Landes einzuhalten, in dem das Gerät betrieben wird! Das Gerät ent- hält elektrische Bauteile, die als Elektronikschrott entsorgt werden müssen. Das Gehäuse besteht aus recycelbarem Kunststoff. GARAnTIEBESTIMMunGEn Diese Bedienungsanleitung ist Bestandteil des Gerätes und der Garantiebedingungen. - Seite 41 All manuals and user guides at all-guides.com...
- Seite 42 All manuals and user guides at all-guides.com PEHA Elektro GmbH & Co. KG Compact 952 JRM Operating instruction...
- Seite 43 All manuals and user guides at all-guides.com COnTEnTS Structure & Description ..........3 Priorities ..............23 Enhancements with additional PHC modules .... 24 Safety ............... 4 Mounting and Installation ........25 Technical Specifications ........... 5 Safety information ..............25 Operation ..............6 Mounting ................
- Seite 44 all-guides.com...
-
Seite 45: Structure & Description
All manuals and user guides at all-guides.com STRuCTuRE & DESCRIPTIOn The compact 952 JRM module allows the convenient control of shutters, blinds, and awnings without user programming. All functions are preprogram- med and assigned to the inputs and outputs. A function table and wiring diagram can also be consulted for the installation. O5 L0 O5 L0 O5 L0... -
Seite 46: Safety
All manuals and user guides at all-guides.com SAFETy CAuTIOn! Danger of electrical shock! The housing contains current-carrying components. Contact can lead to personal injury! All work on the mains network and the device may only be done by an authorised electrician. •... -
Seite 47: Technical Specifications
All manuals and user guides at all-guides.com TECHnICAL SPECIFICATIOnS Operating voltage 952 JRM 100-240V~ /50-60Hz Fusing the supply lines Circuit breaker rated for 10 A, maximum PHC supply voltage for compact system Nom. 24 V DC (SELV), 21-28 V DC (Ripple voltage 5 %) Sensor connection 24 V DC / 100 mA Motor load per output... -
Seite 48: Operation
All manuals and user guides at all-guides.com OPERATIOn DEvICE MEnu 01 Timer Page 7 1 0 0 - 240 V ~ 02 Set Time/Date Page 8 C o m p a c t R o l l l a d e n m o d u l 5 0 - 6 0 Hz 14 : 14 Mo 13: 5 7... -
Seite 49: Timers (Motor /Group)
All manuals and user guides at all-guides.com OPERATIOn TIMERS (MOTOR /GROuP) D e v i c e m e n u M o t o r / G r o u p R u n d i r e c t i o n T i m e r Enter Mo - F r 07: 30... - Seite 50 all-guides.com...
-
Seite 51: Time /Date
All manuals and user guides at all-guides.com OPERATIOn TIME /DATE D e v i c e m e n u T i m e D a t e S Z / W Z Enter S Z / W Z A uto : Y e s T i m e : T i m e :... -
Seite 52: Language
All manuals and user guides at all-guides.com OPERATIOn LAnGuAGE D e v i c e m e n u L a n g u a g e Enter La ng ua g e 03 Language E ng l i s Prog Selection: Setting:... -
Seite 53: Running Times
All manuals and user guides at all-guides.com OPERATIOn RunnInG TIME D e v i c e m e n u M o t o r 0 0 - 1 1 R u n n i n g t i m e Enter 04 Running time Enter... -
Seite 54: Motor-Type
All manuals and user guides at all-guides.com OPERATIOn MOTOR-TyPE D e v i c e m e n u M o t o r 0 0 - 1 1 M o t o r - T y p e A d j u s t m e n t t i m e T : 0. -
Seite 55: Groups
All manuals and user guides at all-guides.com OPERATIOn GROuPS D e v i c e m e n u G r o u p A s s i g n . t h e m o t o r A s s i g n . t h e m o t o r Enter Enter G r o u p... - Seite 56 all-guides.com...
-
Seite 57: Automatic
All manuals and user guides at all-guides.com OPERATIOn AuTOMATIC D e v i c e m e n u M o t o r 0 0 - 1 1 R u n d i r e c t i o n S t a t u s S e n s o r s Enter... -
Seite 58: Sensors
All manuals and user guides at all-guides.com OPERATIOn SEnSORS D e v i c e m e n u M o t o r 0 0 - 1 1 S e n s o r L o w e r i n g t i m e T : 10s T : 10s 08 Sensors... -
Seite 59: Wind Sensor
All manuals and user guides at all-guides.com OPERATIOn WInD SEnSOR D e v i c e m e n u M o t o r 0 0 - 1 1 B l o c k i n g Enter 09 Wind sensor Enter Enter Standard... -
Seite 60: Group 2 Configuring
All manuals and user guides at all-guides.com OPERATIOn GROuP 2 COnFIGuRInG D e v i c e m e n u M o d e Enter Mo d e G r o up 2: 10 Group2 conf. Standard Prog Selection: Setting: Finish: Prog... -
Seite 61: Offset Time
All manuals and user guides at all-guides.com OPERATIOn OFFSET TIME D e v i c e m e n u O f f s e t t i m e Enter Of f s e t ti m e 11 Offset time 0. - Seite 62 all-guides.com...
-
Seite 63: Broadcast
All manuals and user guides at all-guides.com OPERATIOn BROADCAST D e v i c e m e n u M o d e M o d e External sensor data (compact bus) Enter Mo d e : Mo d e : Slave •... -
Seite 64: Factory Setting / Version
All manuals and user guides at all-guides.com OPERATIOn FACTORy SETTInG / vERSIOn D e v i c e m e n u Fa c t o r y s e t t i n g D e v i c e m e n u V e r s i o n Enter F a c to r y s e t. -
Seite 65: Functions
All manuals and user guides at all-guides.com FunCTIOnS Function Description The JRM can control 12 servo powered blinds, shutters and awnings (M0-11). They can be variably assigned to 3 groups (0-2). Manual operation is performed locally, centrally or in groups using dual buttons. Programmed timers can activate the outputs (motors) at specific times. - Seite 66 All manuals and user guides at all-guides.com FunCTIOnS Function Description A long press of the pushbutton causes all motors in the central group to move UP or DOWN. A short button press stops the motors. Jog mode is not possible! All motors in the central group are activated ex works. Pushbutton mode Central Tip: The motors for multiple JRMs can be controlled centrally.
- Seite 67 All manuals and user guides at all-guides.com FunCTIOnS Function Description The JRM’s timers can be used to move the motors UP and DOWN at specific times. Setting the timer to 00:00 deactivates Timer it. The timers are programmed via the JRM module’s keyboard and display (see page 7). Auto mode must be switched ON if the device is to function properly! In twilight conditions, the motors run DOWN when the twilight sensor sends an ON signal.
- Seite 68 all-guides.com...
-
Seite 69: Priorities
All manuals and user guides at all-guides.com PRIORITIES Input function Priority Description The wind/rain sensor has highest priority. Wind- / rain sensor Signals transmitted by lower priority sensors or button activations are ignored. Button Button activation terminates all input functions with lower priority. Twilight sensor A “Twilight sensor”... -
Seite 70: Enhancements With Additional Phc Modules
All manuals and user guides at all-guides.com EnHAnCEMEnTS WITH ADDITIOnAL PHC MODuLES Enhancements can also be connected in the form of a PHC Easyclick RF interface 940 FU-C or 941 FU-C. Shutters can therefore be controlled at RF pushbuttons. Devices can also be operated singly and in groups. An additional enhancement option can take the form of two PHC JRM modules and a PHC input module. -
Seite 71: Mounting And Installation
All manuals and user guides at all-guides.com MOunTInG & InSTALLATIOn SAFETy InFORMATIOn Installation and commissioning may only be done by an authorised electrician. Mains power (230 V ~/50 Hz) to electrical equipment must be switched off during installation. Applicable laws and standards of the country in which the device is operated must be observed! MOunTInG The 952 JRM is designed for mounting on a 35mm top hat rail acc. -
Seite 72: Planning Assistance
All manuals and user guides at all-guides.com PLAnnInG ASSISTAnCE belongs to output group belongs to output group Output Output Motor Motor 952 JRM 952 JRM M0 UP M6 UP M0 DOWN M6 DOWN M1 UP M7 UP ... -
Seite 73: Troubleshooting & Remedies (Authorised Electrician)
All manuals and user guides at all-guides.com TROuBLESHOOTInG & REMEDIES (AuTHORISED ELECTRICIAn) nEW SySTEM OR ExISTInG SySTEM • Check the automatic circuit breakers and supply voltages. • Check the connection cables for the inputs (buttons, sensors). • Check the compact bus port. •... - Seite 74 all-guides.com...
-
Seite 75: Faq List
All manuals and user guides at all-guides.com FAQ LIST Question: If several JRMs are used within one system, can the central UP/DOWN function be activated jointly (parallel)? Answer: The central UP/DOWN function may not be connected in parallel. A potential-free relay must be used. Question: How can I operate more than one JRM with the one sensor? Answer: Sensors can be used for more than one JRM via the compact bus (see page 24). - Seite 76 All manuals and user guides at all-guides.com FAQ LIST Question: How high a load can the 24V sensor connection withstand? Answer: Max. 100 mA. Question: Can direct current motors be used as well? Answer: No, only alternating current motors (230V~/50Hz max. 1A). Question: Can motors be connected in parallel? Answer: No, only one motor (230V~/50Hz max.
- Seite 77 All manuals and user guides at all-guides.com FAQ LIST Question: How long with the time be stored if the power fails? Answer: Approx. 24 hours. Question: Does the status LED normally flash green? Answer: Yes, the LED flashes green in normal mode. Question: Is the input command “Sun sensor ON”...
-
Seite 78: General
All manuals and user guides at all-guides.com GEnERAL DISPOSAL OF THE DEvICE The device must be disposed of in compliance with the laws and standards of the country in which it is operated! The device contains electrical components that must be disposed of as electronics waste. The enclosure is made from recyclable plastic. WARRAnTy COnDITIOnS These operating instructions are an integral part of both the device and our terms of warranty. - Seite 79 All manuals and user guides at all-guides.com...
- Seite 80 all-guides.com...
- Seite 81 All manuals and user guides at all-guides.com PEHA Elektro GmbH & Co. KG Compact 952 JRM Bedieningshandleiding...
- Seite 82 All manuals and user guides at all-guides.com InHOuDSOPGAvE Opbouw en Beschrijving ........... 3 Prioriteiten ............... 23 uitbreiding met extra PHC-modulen ......24 veiligheid ..............4 Montage en installatie ..........25 Technische gegevens ..........5 Veiligheidsaanwijzing .............. 25 Bediening ..............6 Montage ................
-
Seite 83: Opbouw En Beschrijving
All manuals and user guides at all-guides.com OPBOuW En BESCHRIJvInG Met de Compact 952 JRM wordt een comfortabele besturing van rolluiken, jaloezieën en markiezen mogelijk gemaakt, waarbij de gebruiker geen pro- grammering hoeft uit te voeren. Alle functies zijn al voorgeprogrammeerd en de in- en uitgangen zijn al toegewezen. De installatie kan aan de hand van een functietabel en een aansluitschema worden uitgevoerd. -
Seite 84: Veiligheid
All manuals and user guides at all-guides.com vEILIGHEID VOORZICHTIG! Gevaar voor elektrische schok! In het apparaat bevinden zich spanningvoerende delen. Bij aanraking kan dit leiden tot lichamelijk letsel! Alle werkzaamheden aan de voeding en het apparaat mogen alleen door erkende elektriciens worden uitgevoerd. •... -
Seite 85: Technische Gegevens
All manuals and user guides at all-guides.com TECHnISCHE GEGEvEnS voedingsspanning 952 JRM 100-240V~ /50-60Hz Veiligheid van de voedingsleidingen Automatische zekering max. 10 A Voedingsspanning Compact-systeem nom. 24 V DC (SELV), 21-28 V DC (rimpelspanning 5 %) Sensoraansluiting 24 V DC / 100 mA Motorbelasting per uitgang 100-240V~ /50-60Hz max. - Seite 86 all-guides.com...
- Seite 87 All manuals and user guides at all-guides.com BEDIEnInG BESTuRInGSMEnu 01 Schakelkokken pagina 7 1 0 0 - 240 V ~ 02 Tijd/Datum pagina 8 C o m p a c t R o l l l a d e n m o d u l 5 0 - 6 0 Hz 14 : 14 Mo 13: 5 7...
-
Seite 88: Bediening
All manuals and user guides at all-guides.com BEDIEnInG SCHAKELKLOKKEn (MOTOR /GROEP) B e s t u r i n g s m e n u M o t o r / G r o e p L o o p r i c h t i n g S c h a k e l k l o k Enter Ma - Vr 07: 30... -
Seite 89: Tijd / Datum
All manuals and user guides at all-guides.com BEDIEnInG TIJD /DATuM B e s t u r i n g s m e n u T i j d D a t u m Z T / W T Enter Z T / W T A uto : T i j d : T i j d : 12: 00... -
Seite 90: Taal
All manuals and user guides at all-guides.com BEDIEnInG TAAL B e s t u r i n g s m e n u T a a l Enter T a a l 03 Taal N e d e r l a nd Prog Selectie: Instelling:... -
Seite 91: Looptijden
All manuals and user guides at all-guides.com BEDIEnInG LOOPTIJDEn B e s t u r i n g s m e n u M o t o r 0 0 - 1 1 L o o p t i j d e n Enter 04 Looptijden Enter... - Seite 92 all-guides.com...
-
Seite 93: Motor Type
All manuals and user guides at all-guides.com BEDIEnInG MOTOR TyPE B e s t u r i n g s m e n u M o t o r 0 0 - 1 1 M o t o r T y p e I n s t e l t i j d T : 0. -
Seite 94: Groepen
All manuals and user guides at all-guides.com BEDIEnInG GROEPEn B e s t u r i n g s m e n u G r o e p M o t o r t o e w i j z e n M o t o r t o e w i j z e n Enter Enter... -
Seite 95: Automatisch
All manuals and user guides at all-guides.com BEDIEnInG AuTOMATISCH B e s t u r i n g s m e n u M o t o r 0 0 - 1 1 L o o p r i c h t i n g S t a t u s S e n s o r e n Enter... - Seite 96 All manuals and user guides at all-guides.com BEDIEnInG SEnSOREn B e s t u r i n g s m e n u M o t o r 0 0 - 1 1 S e n s o r N e e r l a a t t i j d T : 10s T : 10s 08 Sensoren...
-
Seite 97: Wind Sensor
All manuals and user guides at all-guides.com BEDIEnInG WInD SEnSOR B e s t u r i n g s m e n u M o t o r 0 0 - 1 1 V e r g r e n d e l i n g Enter 09 Wind sensor Enter... - Seite 98 all-guides.com...
-
Seite 99: Groep 2 Configureren
All manuals and user guides at all-guides.com BEDIEnInG GROEP 2 COnFIGuREREn B e s t u r i n g s m e n u M o d e Enter Mo d e G r o e p 2: 10 Groep2 conf. Standaard Prog Selectie:... -
Seite 100: Offset Tijd
All manuals and user guides at all-guides.com BEDIEnInG OFFSET TIJD B e s t u r i n g s m e n u O f f s e t t i j d Enter Of f s e t ti j d 11 Offset tijd 0. -
Seite 101: Broadcast
All manuals and user guides at all-guides.com BEDIEnInG BROADCAST B e s t u r i n g s m e n u M o d e M o d e Externe sensordata (Compact Bus) Enter Mo d e : Mo d e : Slave •... -
Seite 102: Fabrieksinstelling / Versie
All manuals and user guides at all-guides.com BEDIEnInG FABRIEKSInSTELLInG / vERSIE B e s t u r i n g s m e n u Fa b r i e k s i n s t e l l i n g B e s t u r i n g s m e n u V e r s i e Enter... -
Seite 103: Functies
All manuals and user guides at all-guides.com FunCTIES Functies Beschrijving De JRM kan 12 motoraangedreven rolluiken, jaloezieën en markiezen (M0-M11) aansturen. Er kunnen 3 groepen (0-2) variabel worden toegewezen. De handbediening gebeurt lokaal, centraal of in groepen met dubbele druktoetsen. De uit- gangen (motoren) kunnen via geprogrammeerde schakelklokken tijdsafhankelijk worden aangestuurd. - Seite 104 all-guides.com...
- Seite 105 All manuals and user guides at all-guides.com FunCTIES Functie Beschrijving Door de toets lang in te drukken, worden alle motoren uit de Centraal-groep OP of NEER geschakeld. Door de toets kort in te drukken worden de motoren stilgezet. Tipbedrijf is niet mogelijk! In de Centraal-groep zijn in de fabrieksinstelling alle motoren geactiveerd. Toetsbediening Centraal Tip: De motoren van meerdere JRM's kunnen centraal worden aangestuurd.
- Seite 106 All manuals and user guides at all-guides.com FunCTIES Functies Beschrijving Met de schakelklokken van de JRM kunnen motoren tijdgestuurd OP en NEER worden geschakeld. Als de schakelklok 00:00 wordt Schakelklokken ingesteld, is de schakelklok uitgeschakeld. De programmering van de schakelklokken gebeurt met de toetsen en het display van de JRM (zie pag.
-
Seite 107: Prioriteiten
All manuals and user guides at all-guides.com PRIORITEITEn Ingangsfunctie Prioriteit Beschrijving De wind-/regensensor heeft de hoogste prioriteit. Wind-/ Regensensor Het signaal van een sensor met een lagere prioriteit of de bediening van een druktoets wordt genegeerd. Toets De bediening van een druktoets beëindigt alle ingangsfuncties met een lagere prioriteit. Schemeringssensor De ingangsfunctie “Schemeringssensor”... -
Seite 108: Uitbreiding Met Extra Phc-Modulen
All manuals and user guides at all-guides.com uITBREIDInG MET ExTRA PHC-MODuLEn Indien gewenst kan ter uitbreiding een PHC Easyclick Funkinterface 940 FU-C of 941 FU-C worden aangesloten. Daardoor kunnen met draadloze funk- knoppen rolluiken worden aangestuurd. Afzonderlijke bedieningen en groepsbedieningen zijn mogelijk. Een andere uitbreidingsmogelijkheid wordt gevormd door twee PHC JRM-modulen en een PHC-ingangsmodule. -
Seite 109: Montage En Installatie
All manuals and user guides at all-guides.com MOnTAGE En InSTALLATIE vEILIGHEIDSAAnWIJzInG De installatie en inbedrijfstelling mag alleen door erkende elektriciens worden uitgevoerd. Bij de aansluiting op het voedingsnet (230 V~) /50 Hz dient de elek- trische installatie spanningsvrij te worden geschakeld. De geldende wetten en normen van het land waarin het apparaat wordt gebruikt, dienen te worden aan- gehouden. - Seite 110 all-guides.com...
-
Seite 111: Ontwerpschema
All manuals and user guides at all-guides.com OnTWERPSCHEMA Hoort bij uitgangsgroep Hoort bij uitgangsgroep uitgang uitgang Motor Motor 952 JRM 952 JRM M0 Op M6 Op M0 Neer M6 Neer M1 Op M7 Op M1 Neer ... -
Seite 112: Nieuwe Of Bestaande Installatie
All manuals and user guides at all-guides.com STORInGSDIAGnOSE En OPLOSSInGEn (DOOR ELEKTRICIEn) nIEuWE OF BESTAAnDE InSTALLATIE • Zekeringsautomaten en voedingsspanning controleren. • Aansluitleidingen van de ingangen (druktoetsen, sensoren) controleren. • Compact Bus-aansluiting controleren. • Het automatisch bedrijf is niet ingeschakeld. •... -
Seite 113: Faq-Lijst
All manuals and user guides at all-guides.com FAQ-LIJST Vraag: Als er meerdere JRM modulen in een installatie worden gebruikt, kan de centrale OP/NEER-functie dan gemeenschappelijk (parallel) worden aangesloten? Antwoord: De aansluiting van de centrale OP/NEER-functie kan niet parallel plaatsvinden. Er moet een potentiaalvrij relais worden gebruikt. vraag: Hoe kunnen meerdere JRM-modulen met één sensor worden aangestuurd? Antwoord: Sensoren kunnen via de Compact Bus gemeenschappelijk worden gebruikt voor meerdere JRM-modulen (zie pag. - Seite 114 All manuals and user guides at all-guides.com FAQ-LIJST vraag: Wat is de maximale belasting van de 24V sensoraansluiting? Antwoord: Maximaal 100 mA. vraag: Kunnen er ook gelijkstroommotoren worden toegepast? Antwoord: Nee, alleen wisselstroommotoren (230V~/50Hz max. 1A). vraag: Kunnen motoren parallel worden aangesloten? Antwoord: Nee, slechts één motor (230V~/50Hz max.
- Seite 115 All manuals and user guides at all-guides.com FAQ-LIJST vraag: Hoe lang wordt de tijd bij spanningsuitval opgeslagen? Antwoord: Ca. 24 uur. vraag: Is het normaal dat de groene status-led knippert? Antwoord: Ja, bij normale werking knippert de groene led. vraag: Wordt de ingangsopdracht „Zonnesensor IN“ na vrijgave van de windsensor alsnog achteraf uitgevoerd? Antwoord: Ja! vraag: Mogen sensor-/ of stuurleidingen samen met motorleidingen in één kabel worden gelegd? Antwoord: Nee, zie installatieaanwijzingen!
- Seite 116 all-guides.com...
-
Seite 117: Algemeen
De garantieperiode bedraagt 24 maanden vanaf de aankoop van het apparaat door de eindverbruiker bij een dealer en eindigt ten laatste 36 maanden na de productie van het apparaat. Voor de afhandeling van de garantieclaims geldt het Duitse recht. KOnTAKT Telefoon: ......+31 (0)26 36 875 00 Telefax: ......+31 (0)26 36 875 09 Internet: ......www.peha.de mailto: ....... pehainfo.nl@honeywell.com nL-31... - Seite 118 All manuals and user guides at all-guides.com...
- Seite 119 All manuals and user guides at all-guides.com PEHA Elektro GmbH & Co. KG Compact 952 JRM Mode d'emploi...
- Seite 120 All manuals and user guides at all-guides.com SOMMAIRE Structure et Description ........... 3 Priorités ..............23 Extension avec des modules PHC supplémentaires ... 24 Sécurité ..............4 Montage et installation ..........25 Caractéristiques techniques ........5 Consignes de sécurité ............. 25 Commande ...............
-
Seite 121: Structure Et Description
All manuals and user guides at all-guides.com STRuCTuRE & DESCRIPTIOn Le module Compact 952 JRM permet à l’utilisateur de commander en tout confort les volets roulants, les stores et les stores de terrasse sans program- mation. Toutes les fonctions sont préprogrammées et affectées aux entrées et aux sorties. L’installation peut être réalisée selon un tableau de fonction- nement et un schéma de raccordement. - Seite 122 all-guides.com...
-
Seite 123: Sécurité
All manuals and user guides at all-guides.com SÉCuRITÉ ATTEnTIOn ! Risque de choc électrique ! L’appareil contient des composants internes sous tension. Risque de lésions corporelles en cas de contact ! Toutes les interventions sur le réseau d’alimentation et sur l’appareil doivent être effectuées uniquement par des professionnels autorisés. •... -
Seite 124: Caractéristiques Techniques
All manuals and user guides at all-guides.com CARACTÉRISTIQuES TECHnIQuES Tension de service 952 JRM 100-240V~ /50-60Hz Protection des câbles d’alimentation Coupe-circuit automatique max. 10A Alimentation du système PHC Compact Nom. 24 VCC (SELV), 21-28 VCC (tension d’ondulation 5 %) Connexion du capteur 24 V DC / 100 mA Charge de moteur par sortie 100-240V~ /50-60Hz max. -
Seite 125: Commande
All manuals and user guides at all-guides.com COMMAnDE MEnu DE L’APPAREIL 01 Minuterie Page 7 1 0 0 - 240 V ~ 02 Heure/Date Page 8 C o m p a c t R o l l l a d e n m o d u l 5 0 - 6 0 Hz 14 : 14 Mo 13: 5 7... -
Seite 126: Minuteries (Moteur /Groupe)
All manuals and user guides at all-guides.com COMMAnDE MInuTERIES (MOTEuR /GROuPE) M e n u d e l ’ a p p a r e i l M o t e u r / G r o u p e S e n s d e m a r c h e M i n u t e r i e Enter... -
Seite 127: Heure / Date
All manuals and user guides at all-guides.com COMMAnDE HEuRE/DATE M e n u d e l ’ a p p a r e i l H e u r e D a t e S Z / W Z Enter S Z / W Z A uto : H e ur e : H e ur e :... - Seite 128 all-guides.com...
-
Seite 129: Langue
All manuals and user guides at all-guides.com COMMAnDE LAnGuE M e n u d e l ’ a p p a r e i l L a n g u e Enter La ng ue 03 Langue F r a nc a i Prog Sélection: Réglage:... -
Seite 130: Durées
All manuals and user guides at all-guides.com COMMAnDE DuREES M e n u d e l ’ a p p a r e i l M o t e u r 0 0 - 1 1 D u r é e s Enter 04 Durées Enter... -
Seite 131: Moteur-Type
All manuals and user guides at all-guides.com COMMAnDE MOTEuR-TyPE M e n u d e l ’ a p p a r e i l M o t e u r 0 0 - 1 1 M o t e u r - T y p e T e m p s d e r é... -
Seite 132: Groupes
All manuals and user guides at all-guides.com COMMAnDE GROuPES M e n u d e l ’ a p p a r e i l G r o u p e A f f e c t e r m o t e u r A f f e c t e r m o t e u r Enter Enter... -
Seite 133: Automatique
All manuals and user guides at all-guides.com COMMAnDE AuTOMATIQuE M e n u d e l ’ a p p a r e i l M o t e u r 0 0 - 1 1 S e n s d e m a r c h e É... - Seite 134 all-guides.com...
-
Seite 135: Capteurs
All manuals and user guides at all-guides.com COMMAnDE CAPTEuRS M e n u d e l ’ a p p a r e i l M o t e u r 0 0 - 1 1 C a p t e u r T e m p s d e d e s c e n t e T : 10s T : 10s... -
Seite 136: Capteurs Vent
All manuals and user guides at all-guides.com COMMAnDE CAPTEuR DE vEnT M e n u d e l ’ a p p a r e i l M o t e u r 0 0 - 1 1 V e r r o u i l l a g e Enter 09 Capteur de vent Enter... -
Seite 137: Groupe 2 Configurer
All manuals and user guides at all-guides.com COMMAnDE GROuPE 2 COnFIGuRER M e n u d e l ’ a p p a r e i l M o d e Enter Mo d e G r o upe 2: 10 Groupe2 conf. -
Seite 138: Temps De Décalage
All manuals and user guides at all-guides.com COMMAnDE TEMPS DE DECALAGE M e n u d e l ’ a p p a r e i l T e m p s d e d e c a l a g e Enter T e m ps d e d é... -
Seite 139: Diffusion
All manuals and user guides at all-guides.com COMMAnDE DIFFuSIOn M e n u d e l ’ a p p a r e i l M o d e M o d e Données de capteurs externes (bus Compact) Enter Mo d e : Mo d e : Arrêt... - Seite 140 all-guides.com...
-
Seite 141: Réglage D'usine / Version
All manuals and user guides at all-guides.com COMMAnDE RÉGLAGE D'uSInE / vERSIOn M e n u d e l ’ a p p a r e i l R é g l a g e d ' u s i n e M e n u d e l ’... -
Seite 142: Fonctions
All manuals and user guides at all-guides.com FOnCTIOnS Fonction Description Le JRM peut commander 12 stores, volets roulants et stores de terrasse (M0 à M11). Il est possible de les affecter, de ma- nière variable, à 3 groupes (0 à 2). La commande manuelle a lieu de manières locale, centralisée ou en groupes au moyen des boutons-poussoirs doubles. - Seite 143 All manuals and user guides at all-guides.com FOnCTIOnS Fonction Description Une longue pression de touche permet de commuter tous les moteurs du groupe central en HAUT ou en BAS. Une brève pression de touche arrête les moteurs. Le mode pas à pas est impossible ! Par défaut, tous les moteurs sont activés dans le groupe central. Mode touche Central Conseil : Les moteurs de plusieurs modules JRM peuvent être contrôlés au moyen d’une commande centrale.
- Seite 144 All manuals and user guides at all-guides.com FOnCTIOnS Fonction Description Les minuteries du JRM permettent de commuter les moteurs sur Haut et BAS en fonction du temps. Si la minuterie est Minuteries réglée sur 00:00, elle est désactivée. La programmation des minuteries s’effectue via le clavier et l’écran du module JRM (voir la page 7).
-
Seite 145: Priorités
All manuals and user guides at all-guides.com PRIORITÉS Fonction entrée Priorité Description Capteur de vent/ de Le capteur de vent/pluie a la priorité la plus élevée. pluie Le signal d’un capteur à priorité moins élevée ou la commande d’un bouton-poussoir est ignoré(e) Bouton La commande d’un bouton-poussoir met fin à... - Seite 146 all-guides.com...
-
Seite 147: Extension Avec Des Modules Phc Supplémentaires
All manuals and user guides at all-guides.com ExTEnSIOn AvEC DES MODuLES PHC SuPPLEMEnTAIRES Pour l’extension du module, il est possible de raccorder une interface radio PHC Easyclick 940 FU-C ou 941 FU-C. Des boutons radio permettent de commander les volets roulants. Une commande individuelle ou groupée est possible. Deux modules PHC JRM et un module d’entrée PHC offrent une autre possibilité... -
Seite 148: Montage Et Installation
All manuals and user guides at all-guides.com MOnTAGE ET InSTALLATIOn COnSIGnES DE SÉCuRITÉ Le l’installation et la mise en service doivent être effectués uniquement par des électriciens professionnels autorisés. Il est nécessaire de mettre l’installation électrique hors tension avant de la raccorder au réseau (230V/50 Hz~). Se conformer à la législation et aux normes en vigueur dans le pays où... -
Seite 149: Aide À La Planification
All manuals and user guides at all-guides.com AIDE à LA PLAnIFICATIOn fait partie du groupe de sortie fait partie du groupe de sortie Sortie Sortie Moteur Moteur 952 JRM 952 JRM M0 HAUT M6 HAUT M0 BAS M6 BAS ... -
Seite 150: Recherche De Pannes / Dépannage (Électriciens)
All manuals and user guides at all-guides.com RECHERCHE DE PAnnES / DÉPAnnAGE (ÉLECTRICIEnS) InSTALLATIOn nOuvELLE Ou ExISTAnTE • Vérifier les coupe-circuits automatiques et les tensions d’alimentation. • Contrôler les lignes de raccordement des entrées (boutons-poussoirs, capteurs). • Vérifier le raccordement au bus Compact. •... -
Seite 151: Liste Des Faq
All manuals and user guides at all-guides.com LISTE DES FAQ Question: Si plusieurs JRM sont utilisés dans une installation, est-il possible de raccorder ensemble (en parallèle) la fonction Haut/BAS centralisée ? Réponse: Il est interdit de brancher la fonction Haut/BAS centralisée en parallèle. Utiliser un relais sans potentiel. Question: Comment peut-on utiliser plusieurs modules JRM avec un capteur Réponse: Il est possible d’utiliser en même temps des capteurs pour plusieurs modules JRM via le bus Compact (voir la page 24). - Seite 152 all-guides.com...
- Seite 153 All manuals and user guides at all-guides.com LISTE DES FAQ Question: À quel niveau est-il possible de charger le raccordement du capteur de 24 V ? Réponse: Avec 100 mA au maximum. Question: Est-il possible d’utiliser des moteurs à courant continu ? Réponse: Non, il n’est possible d’utiliser que des moteurs à...
- Seite 154 All manuals and user guides at all-guides.com LISTE DES FAQ Question: Combien de temps est mémorisée l’heure en cas de panne de secteur ? Réponse: Environ 24 heures. Question: La LED d’état clignote en vert. Est-ce normal ? Réponse: Oui, elle clignote en vert en mode de fonctionnement normal. Question: Est-ce que la commande d’entrée "Capteur solaire MARCHE"...
-
Seite 155: Généralités
All manuals and user guides at all-guides.com GÉnÉRALITÉS ÉLIMInATIOn DE L’APPAREIL Ne jeter jamais les appareils usagés dans les ordures ménagères! Pour l’élimination de l’appareil, se conformer à la législation et aux normes en vigueur dans le pays où l’appareil est utilisé. L‘appareil comprend des pièces électriques qui doivent être jetées séparément avec les déchets électroniques. - Seite 156 All manuals and user guides at all-guides.com...
- Seite 157 All manuals and user guides at all-guides.com...
- Seite 158 all-guides.com...
- Seite 159 PEHA Elektro GmbH & Co. KG • Postfach 1727 • D-58467 Lüdenscheid • Tel.: +49 (0)2351 185-0 Fax: +49 (0)2351 27666 • e-mail: peha@peha.de • Internet: www.peha.de PEHA Elektro B.V. • Pieter Calandweg 58 • 6827 BK Arnhem • Tel.: +31 (0)26 368 7500 Fax: +31 (0)26 368 7509 • e-mail: pehainfo.nl@honeywell.com • Internet: www.peha.de...