
Verwandte Anleitungen für geo-FENNEL FL 30


Inhaltszusammenfassung für geo-FENNEL FL 30
- Seite 1 DE | EN | FR All manuals and user guides at all-guides.com FL 30 / FL 30-KIT BEDIENUNGSANLEITUNG USER MANUAL MODE D‘EMPLOI www.geo-fennel.de www.geo-fennel.com www.geo-fennel.fr...
-
Seite 2: Inhaltsverzeichnis
All manuals and user guides at all-guides.com Sehr geehrter Kunde, vielen Dank für das Vertrauen, welches Sie uns beim Erwerb Ihres neuen geo-FENNEL-Gerätes ent- gegengebracht haben. Dieses hochwertige Qualitätsprodukt wurde mit größter Sorgfalt produziert und qualitätsgeprüft. Die beigefügte Anleitung wird Ihnen helfen, das Gerät sachgemäß zu bedienen. Bitte lesen Sie ins- besondere auch die Sicherheitshinweise vor der Inbetriebnahme aufmerksam durch. -
Seite 3: Funktionen
All manuals and user guides at all-guides.com Technische Daten Genauigkeit ± 2 mm/10 m Arbeitsbereich • ohne Empfänger Ø 30 mm* • Scanning Ø 20 m • mit Empfänger Ø 120 m Rotationsgeschwindigkeit 150 - 300 U/min. stufenlos Scanningwinkel 0°, 5°, 10° Laserklasse Temperaturbereich -10°C bis + 50°C... -
Seite 4: Bedienelemente
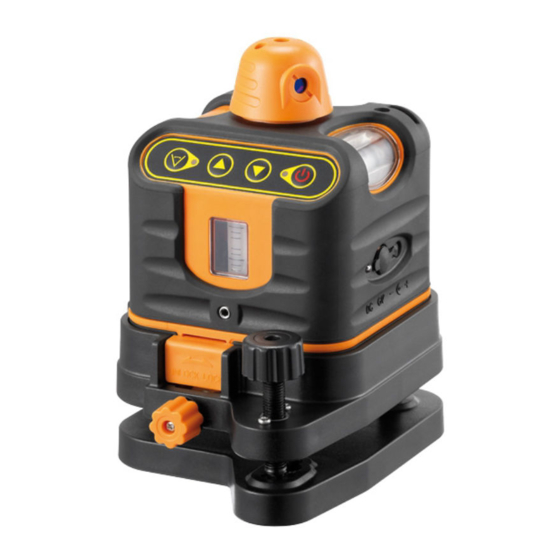
All manuals and user guides at all-guides.com BEDIENELEMENTE 1. Laseraustrittsöffnung 2. Tastatur 3. Libelle Z-Richtung 4. Kompensatorklemme / Transportsicherung 5. Justierschraube 6. Libelle Y-Richtung 7 . Libelle X-Richtung 8. 5/8“-Gewinde HORIZONTALEINSATZ Das Gerät mit der Stativauflage auf einer ebenen Fläche aufstellen oder auf einem Stativ befestigen. Die Horizontallibellen (6 + 7) mit Hilfe der Justierschrauben (5) zentrieren, damit das Gerät gerade steht. -
Seite 5: Bedienung
All manuals and user guides at all-guides.com BEDIENUNG Gerät mit dem Schalter einschalten; der Laser beginnt automatisch, mit der höchsten Rotationsge- schwindigkeit zu rotieren. Ausschalten des Gerätes durch erneutes Drücken dieser Taste. Mit der Taste wird der Scan-Modus eingeschaltet: 1 x Drücken = kleiner Scan-Bereich 2 x Drücken = großer Scan-Bereich 3 x Drücken = Punktfunktion 4 x Drücken = Rotationsfunktion (300 U/min,) -
Seite 6: Sicherheitshinweise
All manuals and user guides at all-guides.com SICHERHEITSHINWEISE UMSTÄNDE, DIE DAS MESSERGEBNIS VERFÄLSCHEN KÖNNEN Messungen durch Glas- oder Plastikscheiben; verschmutzte Laseraustrittsfenster; Sturz oder starker Stoß. Bitte Genauigkeit überprüfen. Große Temperaturveränderungen: Wenn das Gerät aus warmer Umgebung in eine kalte oder umgekehrt gebracht wird, vor Benutzung einige Minuten warten. -
Seite 7: Bestimmungsgemässe Verwendung
All manuals and user guides at all-guides.com BESTIMMUNGSGEMÄSSE VERWENDUNG Das Gerät sendet einen sichtbaren Laserstrahl aus, um z.B. folgende Messaufgaben durchzuführen: Ermittlung von Höhen; rechten Winkeln, Ausrichtung von horizontalen und vertikalen Bezugsebenen. WARN- UND SICHERHEITSHINWEISE · Richten Sie sich nach den Anweisungen der Bedienungsanleitung. ·... - Seite 8 7 . Safety notes SUPPLIED WITH Rotating laser FL 30 is available as laser unit with standard accessories as well as rotating laser KIT. FL 30 SUPPLIED WITH Rotating Laser Level FL 30, set of batteries, floor-/wall mount, padded bag, manual.
-
Seite 9: Technical Data
All manuals and user guides at all-guides.com Technical Data Accuracy ± 2 mm/10 m Working range • without receiver Ø 30 mm* • Scanning Ø 20 m • with receiver Ø 120 m Rotating speed 150 - 300 rpm adjustable Scan angle 0°, 5°, 10°... -
Seite 10: Features
8. 5/8“-thread HORIZONTAL USE Put FL 30 with tripod mount on a flat smooth surface or mount it on tripod head. Adjust horizontal vials (6 + 7) by means of adjusting knobs (5) to centre so that unit stands perfectly even. -
Seite 11: Operation
All manuals and user guides at all-guides.com OPERATION Switch on unit with key ; the unit starts rotating with maximum rotating speed. Switch unit off by pressing same key again. With key scan mode will be switched on: Press 1 x = small scan range Press 2 x = large scan range Press 3 x = laser point mode Press 4 x = rotating function (highest speed) -
Seite 12: Safety Notes
All manuals and user guides at all-guides.com SAFETY NOTES SPECIFIC REASONS FOR ERRONEOUS MEASURING RESULTS Measurements through glass or plastic windows; dirty laser emitting windows; after instrument has been dropped or hit. Please check accuracy. Large fluctuation of temperature: If instrument will be used in cold areas after it has been stored in warm areas (or the other way round) please wait some minutes before carrying out measurements. -
Seite 13: Intended Use Of Instrument
All manuals and user guides at all-guides.com INTENDED USE OF INSTRUMENT The instrument emits a visible laser beam in order to carry out the following measuring tasks (depending on instru- ment): Setting up heights, horizontal and vertical planes, right angles. SAFETY INSTRUCTIONS ·... -
Seite 14: Livré Comme Suit
6. Détecteur 7 . Notices de sécurité LIVRÉ COMME SUIT Le laser rotatif FL 30 peut être livré seul avec ses accessoires standard ou en version malette SET laser rotatif. LE LASER SEUL EST LIVRE COMME SUIT: Laser rotatif FL 30, set de piles alcalines, support pour fixation sol / mural, étui rembourré, mode d‘emploi... -
Seite 15: Données Techniques
All manuals and user guides at all-guides.com Données techniques Précision ± 2 mm/10 m Portée • sans détecteur Ø 30 mm* • mode scan Ø 20 m • avec détecteur Ø 120 m Vitesse de rotation 150 x 300 rpm. adjustable Angle scan 0°, 5°, 10°... -
Seite 16: Description
All manuals and user guides at all-guides.com DESCRIPTION 1. Sortie du faisceau laser 2. clavier 3. Nivelle en direction Z 4. Blocage du compensteur 5. Vis de réglage 6. Nivelle en direction Y 7 . Nivelle en direction X 8. Filetage 5/8“ UTILISATION EN MODE HORIZONTAL Fixer l‘appareil sur une surface à... -
Seite 17: Mise En Route
All manuals and user guides at all-guides.com MISE EN ROUTE Allumer le laser avec le bouton ; le laser commence à tourner avec la vitesse la plus grande. Tou- cher ce bouton de nouveau pour arrêter le laser. Allumer le mode Scan avec le bouton Presser 1 x = plage de scan étroit Presser 2 x = place de scan large Presser 3 x = mode point... -
Seite 18: Notices De Sécurité
All manuals and user guides at all-guides.com NOTICES DE SÉCURITÉ CIRCONSTANCES POUVANT FAUSSER LES RESULTATS DE MESURES Mésures effectuées à travers des plaques de verre ou de matière plastique; mesures effectuées à travers la fenêtre de sortie du faisceau laser lorsqu‘elle est sale. Mesures après que le niveau soit tombé ou ait subi un choc très fort. Mesures effectuées pendant de grandes différences de température - p.ex. - Seite 19 All manuals and user guides at all-guides.com 5. Le fabricant et son représentant déclinent toute responsabilité pour les dommages et le bénéfices non réalisés par suite d‘une manoeuvre non conforme aux instructions. 6. Le fabricant et son représentant déclinent toute responsabilité pour les dommages et les bénéfices non réalisés qui decoulent d‘une utilisation inadéquante ou en liaison avec des produits d‘autres fabricants.
- Seite 20 All manuals and user guides at all-guides.com geo-FENNEL GmbH Technische Änderungen vorbehalten. Kupferstraße 6 All instruments subject to technical changes. D-34225 Baunatal Sous réserve de modifications techniques. Tel. +49 561 / 49 21 45 +49 561 / 49 72 34 info@geo-fennel.de...