Futech MULTIPOWER 4.6 Kurzanleitung
Inhaltsverzeichnis
Quicklinks
Inhaltsverzeichnis

Verwandte Anleitungen für Futech MULTIPOWER 4.6

Inhaltszusammenfassung für Futech MULTIPOWER 4.6
- Seite 1 MULTIPOWER 4.6 QUICK GUIDE EN / SL / PT / DE...
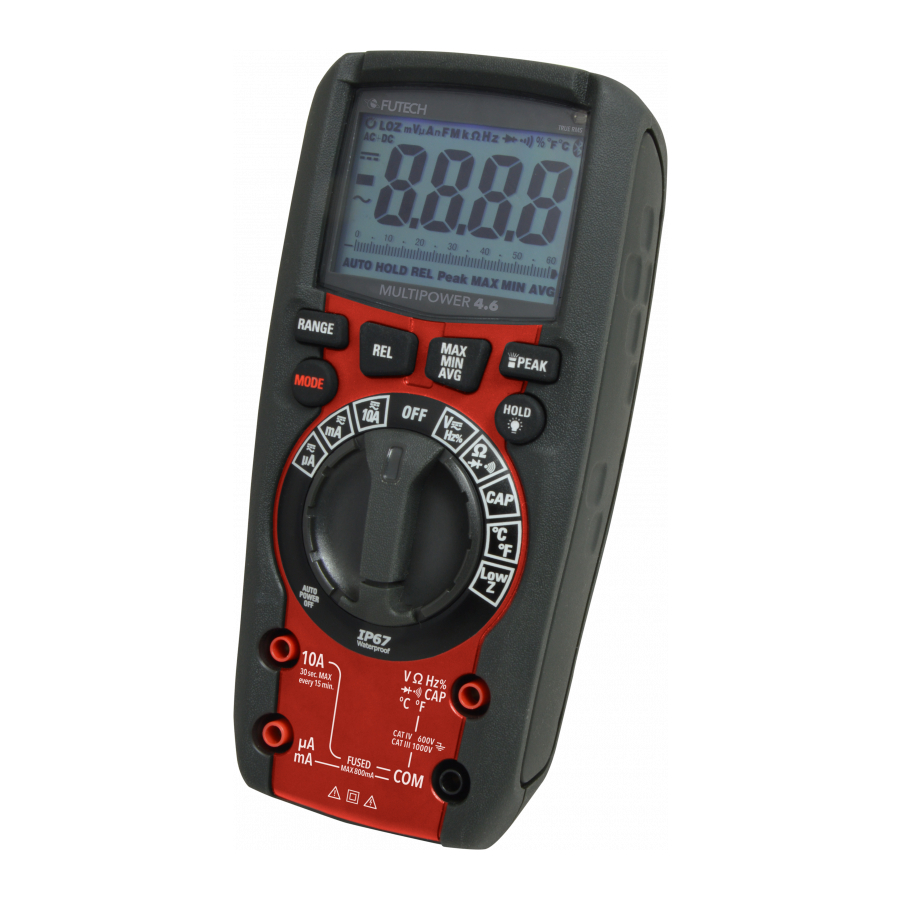
- Seite 2 1. Read the manual and warranty clauses on www.futech-tools.com 2. Remove eventual packaging and protection foils and place the battery. 3. Controls and Jacks 1. Display 2. Relative button 3. RANGE button 4. MODE button 5. Rotary function switch 6. 10A input jack 7.
- Seite 3 MULTIPOWER 4.6 1. Preberite priročnik in garancijske 1. Leia o manual e as cláusulas 1. Lesen Sie sich die Anleitung klavzule na spletni strani de garantia em und die Garantieklauseln unter www.futech-tools.com www.futech-tools.com www.futech-tools.com durch. 2. Entfernen Sie mögliche Verpa- 2. Odstranite morebitno embalažo 2. Remova as embalagens ckungen und Schutzfolien und in zaščitne folije ter vstavite...
- Seite 4 4. Symbols and warning files Auto power off milli (10 Volt (tension) micro (10 Ampere (current) nano (10 Farad (capacitance) mega (10 kilo (10 Ohm (resistance) Hertz (frequency) Diode test Continuity Percent (duty ratio) Degrees Fahrenheit Degrees Celcius Direct current Minus sign Alternating current Low battery Autoranging Display hold...
- Seite 5 MULTIPOWER 4.6 4. Simboli in opozorila 4. Símbolos e avisadores Automatisch Abschaltung Samodejni izklop Desligamento automático milli (10 desligado mili (10 Volt (Spannung) mili (10 Volt (napetost) micro (10 Volt (tensão) mikro (10 Ampere (Stromstärke) micro (10 Amper (tok) nano (10...
-
Seite 6: Range Button
5. Operating instructions Risk of electrocutation. High voltage circuits, both AC and DC, are very dangerous and should be measured with great care. Always turn the fucntion switch to the OFF position when the meter is not in use. If “OL” (overload) appears on the display during a measurement, value exceeds the selected range. - Seite 7 MULTIPOWER 4.6 5. Navodila za uporabo 5. Instruções de operação Stromschlaggefahr. Hoch- Nevarnost električnega Risco de eletrocussão. Os spannungsschaltkreise, udara. Visokonapetostna circuitos de alta tensão, sowohl Wechsel- als auch vezja, tako izmenična kot tanto CA como CC, são Gleichstrom, sind sehr enosmerna, so zelo nevarna muito perigosos e devem gefährlich und müssen mit...
- Seite 8 mode for most applications. For measurement situatons requir- ing that a range be manually selected, perform the following: ∙ Press the RANGE-button. The “AUTO” indicator will no longer be shown on the display. ∙ Press the RANGE button to step through the available ranges until the desired range is selected.
- Seite 9 MULTIPOWER 4.6 uporabe. V situacijah, ki zahte- mente o melhor modo para a Messung ausgewählt, der im vajo ročno izbiro območja za maioria das aplicações. Para Allgemeinen der beste Modus meritve, izvedite naslednje: situações de medição que re- für die meisten Anwendungen ∙...
-
Seite 10: Mode-Button
5.2 MODE-button Used to select AC or DC, Fre- quency or Duty Cycle, Resist- ance, Continuity or Diode Test and °C or °F. 5.3 REL-button The RELATIVE function zeros out the reading on the display and stores it as a reference. Sub- sequent readings will be dis- played as the relative difference between the actual measure-... - Seite 11 MULTIPOWER 4.6 5.2 Gumb za način delovanja 5.2 Botão de MODO (MODE) 5.2 MODE-Taste “MODE” Usado para selecionar CA ou Mit dieser Taste wählen Sie Uporablja se za izbiro izmenič- CC, Frequência ou Ciclo de Wechsel- oder Gleichstrom, Fre- nega ali enosmernega toka, serviço, Resistência, Continui- quenz oder Betriebszyklus, Wi- frekvenčnega ali obratovalnega...
- Seite 12 will show “OL” (overload) if the difference exceeds the range. REL does not work on frequency, Duty Cycle, Temperature or Low Z. 5.4 MAX/MIN/AVG Button ∙ Press the MAX/MIN/AVG but- ton to activate the MAX/MIN mode. The “MAX” indicator will appear on the LCD display. The meter will display and hold the maximum reading and will update when a higher “MAX”...
- Seite 13 MULTIPOWER 4.6 kaže „OL“ (preobremenitev), mostrará “OL” (sobrecarga) relative Modus aktiv ist. Das če razlika presega obseg. se a diferença exceder o in- Display zeigt „OL“ (Überlas- “REL” ne deluje na frekvenci, tervalo. REL não funciona em tung), wenn die Differenz obratovalnem ciklusu, tempe- Frequência, Ciclo de serviço, den Bereich übersteigt.
- Seite 14 appear on the LCD display. The meter will display the running average and will update when the average value changes. ∙ Press and hold the MAX/MIN/ AVG button to end MAX/MIN and return to normal opera- tion. MAX/MIN does not work on frequency, Duty cycle, Capacitance of Temperature.
-
Seite 15: Hintergrundbeleuchtung
MULTIPOWER 4.6 ∙ Za ogled povprečne vrednos- alizar a leitura média (AVG). O re MIN-Messung durchgeführt ti ponovno pritisnite gumb símbolo “AVG” aparecerá no wird. “MAX/MIN/AVG”. Na LCD za- ecrã LCD. O medidor mostrará ∙ Drücken Sie die MAX/MIN/ slonu se prikaže simbol “AVG”. - Seite 16 HOLD and return to normal operation. ∙ To turn the backlight in the display on, press and hold the HOLD button until the backlight turns on. To turn the backlight off, press and hold the HOLD buttton until the backlight turns off. AUTO Backlight When the meter is in the dark- ness, the backlight can be...
- Seite 17 MULTIPOWER 4.6 gumb “HOLD”, da se vrnete v sione o botão HOLD de novo Sie die HOLD-Taste erneut, um normalno delovanje. para voltar à operação normal. HOLD zu beenden und zum ∙ Če želite vklopiti osvetlitev za- ∙ Para ligar a luz de fundo do normalen Betrieb zurückzu-...
- Seite 18 when measuring AC Voltage or Current. It captures and dis- plays the highest positive peak and the highest negative peak of the AC waveform. ∙ Press and hold the PEAK but- ton untill “Peak MAX” appears on the display. The meter will display the highest reading and will update the reading when a higher positive peak...
- Seite 19 MULTIPOWER 4.6 cija višek “PEAK” je dostopna função PEAK está acessível ao on kann genutzt werden, wenn pri merjenju napetosti ali toka medir a tensão ou corrente CA. Wechselstromspannung izmeničnega toka. Zajame in Capta e mostra o pico positivo oder -stromstärke messen. Sie prikaže najvišji pozitivni višek in...
- Seite 20 The meter does not Autorange when the Peak mode is active. The display will read “OL” (over- load) if the range is exceeded. When this occurs, exit Peak and use the RANGE button to select a higher range. Peak does not work on DCV, DCA, Frequency, Duty Cycle, Capacitanceor Low 5.7 AC/DC Voltage measure-...
- Seite 21 MULTIPOWER 4.6 “PEAK” in se vrnete v normalno voltar à operação normal. um zwischen den Messungen delovanje. für Peak MAX und Peak MIN um- O medidor não faz intervalo zuschalten. Merilnik samodejno ne izbere automático quando o modo de ∙ Halten Sie die PEAK-Taste ge- obsega, ko je aktiviran način za...
-
Seite 22: Frequency And % Duty Cycle Measurements
lect AC or DC voltage. The AC “~” or DC “ ” symbol will ap- pear on the display. ∙ Insert the black test lead into the COM input jack and the red test lead into the V input jack. ∙... -
Seite 23: Meritve Frekvence In % Obratovalnega Ciklusa
MULTIPOWER 4.6 ∙ Pritisnite gumb “MODE”, da selecionar tensão CA ou CC. O tion. izberete napetost izmeničnega símbolo CA “~” ou CC “ ” apa- ∙ Drücken Sie die MODE-Tas- ali enosmernega toka. Na za- recerá no ecrã. te, um Wechselstrom- oder slonu se bo prikazal simbol AC ∙... - Seite 24 ∙ Set the rotary function switch to the V ~Hz% position. ∙ To select Frequency, press and hold the MODE button until the “Hz” symbol appears on the display. To select % Duty Cycle, press and hold the MODE again until the “%” ap- pears on the display.
- Seite 25 MULTIPOWER 4.6 repe! tensões ativas! unter Spannung durchführen! ∙ Vrtljivo funkcijsko stikalo nasta- ∙ Coloque o seletor de funções ∙ Schalten Sie den Drehfunkti- vite v položaj V ~ Hz%. rotativo na posição V ~Hz%. onsschalter in die V~/Hz/%-Po- ∙ Za izbiro frekvence držite ∙...
- Seite 26 The Frequency function can only be accessed when the me- ter is set to AC voltage. 5.9 Low Z Voltage Observe all safety precautions when working on live voltages. Do not connect to circuits that exceed 600V AC/DC when the —...
-
Seite 27: Spannung Z Niedrig
MULTIPOWER 4.6 Do frekvenčne funkcije lahko A função de Frequência só pode Frequenzfunktion kann dostopate le, če je merilnik ser acedida quando o medidor nur aufgerufen werden, wenn nastavljen na pregled napetosti estiver configurado para tensão das Messgerät auf Wechsel- izmeničnega toka. strom-Spannung eingestellt ist. - Seite 28 to the Low Z position. ∙ Press the MODE button to se- lect AC or DC voltage. The AC “~” or DC “ ” symbol will ap- pear on the display. ∙ Insert the black test lead into the COM input jack and the red test lead into the V input jack.
- Seite 29 MULTIPOWER 4.6 ∙ Vrtljivo funkcijsko stikalo nasta- tensão fantasma. wären die nicht gespeisten vite v položaj nizke impedance ∙ Coloque o seletor de funções Drähte mit einer echten Span- “Low Z”. rotativo na posição Low Z. nungsquelle verbunden. Die ∙ Pritisnite gumb “MODE”, da iz- ∙...
- Seite 30 5.10 AC/DC Current measure- ments Observe all safety precautions when working on live circuits. Do not measure current on max. 600mA circuits that exceed 1000V. Measurements in the 10A range — should be limited to 30 seconds maximum every 15 minutes. ∙...
- Seite 31 MULTIPOWER 4.6 Display ab. 5.10 Meritve izmeničnega/eno- 5.10 Medições de corrente CA/ 5.10 Wechselstrom-/Gleich- smernega toka strom-Strommessungen Pri delu z vezji pod napetostjo Observe todas as precauções Beachten Sie alle Sicherheits- upoštevajte vse varnostne ukre- de segurança ao trabalhar com maßnahmen, wenn Sie Arbeiten...
- Seite 32 10A input jack. ∙ Press the MODE button to se- lect AC or DC current. The AC “~” or DC “ ” symbol will ap- pear on the display. ∙ Remove power from the circuit under test, then open up the circuit at the point whereyou widh to measure current.
- Seite 33 MULTIPOWER 4.6 ∙ Pritisnite gumb “MODE”, da iz- 10A e introduza a ponta de rote Prüfleitung in den µA/ berete izmenični ali enosmerni teste vermelha na entrada de mA-Eingang. tok. Na zaslonu se bo prikazal 10A. ∙ Für Strommessungen bis zu 10 simbol AC “~” ali DC “ ”.
-
Seite 34: Resistance Measurements
5.11 Resistance measurements Never test resistance on a live circuit — 5.11 ∙ Set the rotary function switch to the Ω/ position. ∙ Press the MODE button until the “Ω” symbol appears on the display. ∙ Insert the black test lead into the COM input jack and the red test lead into the Ω input jack. -
Seite 35: Medições De Resistência
MULTIPOWER 4.6 ∙ Lesen Sie den Strom im Dis- play ab. 5.11 Meritve upora 5.11 Medições de resistência 5.11 Widerstandsmessungen Nikoli ne preizkušajte upora na Nunca teste a resistência de um Testen Sie niemals den Wieder- tokokrogu pod napetostjo circuito ativo. -
Seite 36: Continuity Test
5.12 Continuity Test Never test continuity on a live circuit. ∙ Set the rotary function switch 5.12 to the Ω/ position. — ∙ Press the MODE button until the “ ” symbol appears on the display. ∙ Insert the black test lead into the COM input jack and the red test lead into the Ω input jack. -
Seite 37: Teste De Continuidade
MULTIPOWER 4.6 5.12 Preskus neprekinjenosti 5.12 Teste de continuidade 5.12 Durchgangsprüfung električnega toka Nunca teste a continuidade de Führen Sie niemals eine Durch- Nikoli ne preizkušajte nepreki- um circuito ativo. gangsprüfung an einem span- njenosti toka na tokokrogu pod nungsführenden Schaltkreis napetostjo. -
Seite 38: Diode Test
5.13 Diode Test Never test diodes on a live cir- cuit. ∙ Set the rotary function switch 5.13 to the position. — ∙ Press the MODE button until the “ ” symbol appears on the display. ∙ Insert the black test lead into the COM input jack and the red test lead into the input... -
Seite 39: Diodentest
MULTIPOWER 4.6 5.13 Preskus diode 5.13 Teste de díodo 5.13 Diodentest Nikoli ne preizkušajte diod na Nunca teste díodos de um cir- Führen Sie niemals einen Dio- tokokrogu pod napetostjo. cuito ativo. dentest an einem spannungs- führenden Schaltkreis durch. ∙ Vrtljivo funkcijsko stikalo nasta- ∙... - Seite 40 5.14 Capacitance measure- ments — Safely discharge capacitors be- fore taking capacitance measu- rements. 5.14 — ∙ Set the rotary function switch to the CAP position ∙ Insert the black test lead into the COM input jack and the red test lead into the CAP in- put jack.
-
Seite 41: Kapazitätsmessungen
MULTIPOWER 4.6 5.14 Meritve kapacitivnosti 5.14 Medições de capacitância 5.14 Kapazitätsmessungen Pred merjenjem kapacitivnosti Descarregue os condensadores Entladen Sie Kondensatoren varno izpraznite kondenzatorje. em segurança antes de fazer sicher, bevor Sie Kapazitäts- medições de capacitância. messungen durchführen. ∙ Vrtljivo funkcijsko stikalo nasta- vite v položaj “CAP”... -
Seite 42: Temperature Measurement
5.15 Temperature measurement °C °F Do not touch the temperature probe to live circuits ∙ Set the rotary function switch 5.15 to the °F°C position. ∙ Press the MODE buton to se- lect readings in °F or °C ∙ Connect the Temperature Pro- be to the banana Plug adap- ter. -
Seite 43: Merjenje Temperature
MULTIPOWER 4.6 5.15 Merjenje temperature 5.15 Medição de temperatura 5.15 Temperaturmessung S temperaturno sondo se ne Não toque com a sonda de tem- Berühren Sie keine spannungs- dotikajte tokokrogov pod na- peratura em circuitos ativos. führenden Schaltkreise mit petostjo dem Temperaturfühler. -
Seite 44: Battery Replacement
5.16 Battery Replacement To avoid electric shock, remove the test leads from the meter before removing the battery/ fuse cover. ∙ Lift up the stand on the back of the device. ∙ Loosen the screws on the bat- tery/fuse cover. ∙... -
Seite 45: Zamenjava Baterije
MULTIPOWER 4.6 kunden). ∙ Lesen Sie die Temperatur im Display ab. 5.16 Zamenjava baterije 5.16 Substituição das pilhas 5.16 Austauschen der Batterie Da preprečite električni udar, Para evitar choques elétricos, Um Stromschläge zu vermei- odstranite preskusne svinčnice desligue as pontas de teste do den, entfernen Sie die Prüflei-... -
Seite 46: Fuse Replacement
To avoid electric shock, do not operate meter until the battery/ fuse cover is securely fastened to the meter. 5.17 Fuse Replacement To avoid electric shock, remove the test leads from the meter before removing the battery/ fuse cover. ∙ Loosen the screws on the bat- ter/fuse cover. -
Seite 47: Zamenjava Varovalke
MULTIPOWER 4.6 Da ne pride do električnega Para evitar choque elétrico, não Um Stromschläge zu vermei- udara, ne uporabljajte merilni- opere o medidor até que a tam- den, bedienen Sie das Mess- ka, dokler pokrov baterije/varo- pa das pilhas/fusível esteja fir- gerät erst, wenn die Batterie-/... - Seite 48 To avoid electric shock, do not operate meter until the battery/ fuse cover is securely fastened to the meter.
- Seite 49 MULTIPOWER 4.6 Da ne pride do električnega aperte os parafusos. V (6,3 x 32 mm) für den µA/ udara, ne uporabljajte merilni- mA-Bereich und eine flinke Si- ka, dokler pokrov baterije/varo- cherung mit 10 A/1.000 V (10 x valke ni varno pritrjen. 38 mm) für den 10-A-Bereich.
- Seite 50 Safety Category Ratings Per iec1010 overvoltage installation category Overvoltage category I Equipment of overvoltage category I is equipment for connection to circuits in which measures are taken to limit the transient overvoltages to an appropriate low level. Note: Examples include protected electronic circuits. Overvoltage category II Equipment of overvoltage category II is energy-consuming equipment to be supplied from the fixes installation.
- Seite 51 MULTIPOWER 4.6 Input Limits Voltage AC or DC 1000V AC RMS/1000 V DC Low Z 600V AC RMS/600V DC μA, mA Current AC/DC 800mA 1000V fast acting fuse 10A Current AC or DC 10A 1000V fast acting fuse (10A for 30 seconds max. every 15 minutes)