Max EQ-3 Bedienungsanleitung
Funk-wandthermostat
Vorschau ausblenden
Andere Handbücher für EQ-3:
- Bedienungsanleitung (20 Seiten) ,
- Bedienungsanleitung (32 Seiten)

Verwandte Anleitungen für Max EQ-3


Inhaltszusammenfassung für Max EQ-3
- Seite 1 Bedienungsanleitung Operating Manual MAX! Wandthermostat Funk-Wandthermostat (S. 2) MAX! Wireless wall thermostat (p. 28)
-
Seite 2: Inhaltsverzeichnis
20. Technische Daten ............27 Lesen Sie diese Anleitung sorgfältig, bevor Sie das Gerät in Be- trieb nehmen. Bewahren Sie die Anleitung zum späteren Nach- schlagen auf. 1. Ausgabe Deutsch 04/2012 Dokumentation © 2012 eQ-3 Ltd., Hong Kong. Alle Rechte vorbehalten. BC-TC-C-WM, V2.0, 99109... -
Seite 3: Bestimmungsgemäßer Einsatz
1. Bestimmungsgemäßer Einsatz Mit dem MAX! Wandthermostat können bis zu 8 MAX! Heizkörperthermostate in einem Raum komfortabel re- guliert werden. Der Wandthermostat verfügt über einen internen Sensor, der die Temperatur im Raum misst und zyklisch an die Heizkörperthermostate übermittelt. Betreiben Sie das Gerät nur in Innenräumen und ver- meiden Sie den Einfluss von Feuchtigkeit, Staub so- wie Sonnen- oder Wärmebestrahlung. -
Seite 4: Bedienung Und Display
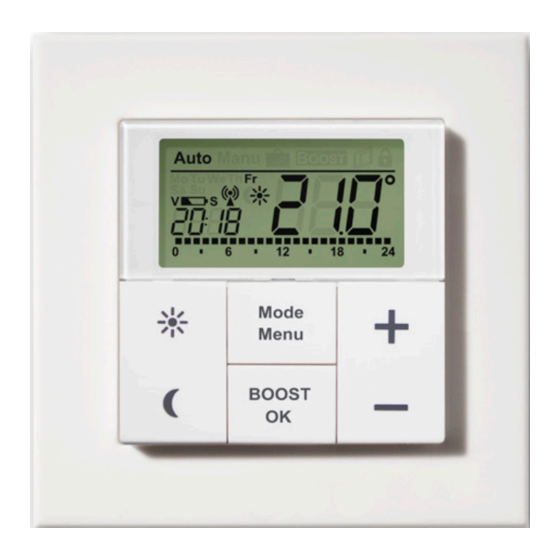
3. Bedienung und Display Automatikbetrieb (Auto), Manueller Betrieb (Manu), Urlaubsfunktion ), Boost-Funktion ( ), Fenster-auf-Symbol ( ), Bedien- BOOST sperre-Symbol ( Wochentag, Batterie-leer-Symbol ( ), Funksynchronität ( ), Kom- fort-/Absenktemperatur ( ), Uhrzeit/Datum Eingestellte Zeiträume im Wochenprogramm Komfort-Taste ( ): zum Wechseln auf die Komforttemperatur Absenk-Taste ( ): zum Wechseln auf die Absenktemperatur Mode-/Menu-Taste: Zum Wechseln des Betriebsmodus und zum Öffnen... -
Seite 5: Sicherheitshinweise
Wenn Sie das Gerät zum ersten Mal in Betrieb nehmen, entfernen Sie zunächst die Montageplatte (A) auf der Rück- seite des Tasters. • Halten Sie dazu den MAX! Wandthermostat in einer Hand fest und ziehen Sie die Montageplatte an einer Ecke ab. -
Seite 6: Datum Und Uhrzeit Einstellen (Dat)
2. Montierter Zustand Im montierten Zustand lässt sich der Taster (C) einfach aus dem Rahmen und von der Montageplatte ziehen. • Ziehen Sie den Taster (C) samt Rahmen (B) von der Wand ab, indem Sie seitlich am Rahmen ziehen. Ein Entfernen der Wippe oder Öffnen des Gerätes ist nicht erforderlich. - Seite 7 Minuten: Nach abgeschlossener Zeit- und Datumseingabe wechselt der Wandthermostat in den Normalbetrieb. Wurde der MAX! Wandthermostat an den MAX! Cube angelernt, so erhält er anschließend von diesem das Datum und die Uhrzeit. Datum und Uhrzeit können jederzeit über „dAt“ im...
-
Seite 8: Montage
8. Montage Sie können den MAX! Wandthermostat entweder im bei- liegenden Rahmen an eine Wand schrauben/kleben oder in eine bestehende Schalterserie integrieren (Näheres zur Kompatibilität finden Sie in Kapitel 9). Klebestreifen-Montage: • Wählen Sie einen beliebigen Ort zur Befestigung aus. - Seite 9 • Halten Sie die Montageplatte an die gewünschte Mon- tageposition. Achten Sie darauf, dass der Pfeil auf der Vorderseite der Montageplatte nach oben zeigt. • Zeichnen Sie zwei der Bohrlöcher A anhand der Monta- geplatte (diagonal gegenüberliegend) mit einem Stift an der Wand an.
-
Seite 10: Montage In Bestehende Schalterserien
10. Anlernen an MAX! Komponenten Um den MAX! Wandthermostaten in Ihrer Installation nut- zen zu können, müssen Sie ihn an das MAX! System an- lernen. Sie können den MAX! Wandthermostat sowohl in Verbindung mit dem MAX! Cube als auch ohne Einsatz des MAX! Cubes nutzen. - Seite 11 10.1 Anlernen an das MAX! System mit dem MAX! Cube In Verbindung mit dem MAX! Cube wird der MAX! Wand- thermostat über die lokale MAX! Software angelernt und konfiguriert. Die in Kapitel 17. beschriebenen Funktionen sind dann durch die MAX! Software verfügbar. Das Konfigu- rationsmenü...
-
Seite 12: Ablernen Von Max! Komponenten (Unl)
• Der MAX! Wandthermostat wechselt nach erfolgreichem Anlernen zurück in den normalen Betriebsmodus. 11. Ablernen von MAX! Komponenten (UnL) Beim Betrieb mit dem MAX! Cube erfolgt das Ablernen des MAX! Wandthermostats und der anderen Geräte über die MAX! Software im jeweiligen Raum. -
Seite 13: Display-Inhalt Im Normalbetrieb
• Bestätigen Sie Ihre Auswahl mit der OK-Taste. • Im Display erscheint ACC (Accept). Bestätigen Sie den Ablern-Vorgang mit der OK-Taste. Zum Abschluss muss der MAX! Wandthermostat über das Herstellen der Werkseinstellungen (siehe Kapitel 18. Reset) gelöscht werden. 12. Display-Inhalt im Normalbetrieb Im Normalbetrieb werden Betriebsmodus, Wochentag, Soll-Temperatur, Uhrzeit, Funksynchronität und Schalt-... -
Seite 14: Kindersicherung / Bediensperre ( )
Urlaubsfunktion ( ): Einstellen einer Temperatur, die bis zu einem fixen Zeitpunkt gehalten werden soll. Die Einstellungen hierfür können Sie im Betrieb mit MAX! Cube bequem in der Software vornehmen. Beim Betrieb ohne MAX! Cube, können Sie die Funktio- nen über einen kurzen Druck der Mode-Taste wechseln. -
Seite 15: Frostschutzbetrieb Einstellen (Off)
(Manu) oder drücken Sie die (+) Taste. 17. Konfigurationsmenü (Menu) (Betrieb ohne MAX! Cube) Wenn Sie Ihr MAX! System mit einem MAX! Cube betreiben, können Sie die in den folgenden Ka- piteln beschriebenen Funktionen bequem in der MAX! Software in jedem Raum einstellen. - Seite 16 führt zur vorherigen Ebene zurück. Nach 60 Sekunden In- aktivität schließt sich das Menü automatisch. dAt: Ändern von Uhrzeit und Datum (Abschnitt 7.) UnL: Ablernen von Funkkomponenten (UnL) (Abschnitt 11.) Pro: Einstellen des Wochenprogramms (Ab - schnitt 17.1) t-d: Anzeige von Uhrzeit und Datum umschalten (Abschnitt 17.2) S-A: Ändern der Displayanzeige von Soll- und Ist-...
-
Seite 17: Wochenprogramm Einstellen (Pro)
Zeitraum von 0:00 bis 23:59 Temperaturen hinterlegt sind. Im Auto-Modus kann das eingestellte Wochenprogramm automatisch von angelernten MAX! Heizkörperthermosta- ten übernommen und die Temperatur über die (+) - und (-) -Taste bzw. Komfort ( )- und Absenktaste ( ) jederzeit... - Seite 18 Programmwechsel erhalten. Die Programmierung am Gerät ist nur dann möglich, wenn dieses nicht an den MAX! Cube angelernt ist. 17.1.1 Wochenprogramm: Beispiele Mit dem MAX! Wandthermostat können für jeden Wochen- tag bis zu 6 Heizzeiten (13 Schaltzeitpunkte) mit individu- eller Temperaturvorgabe hinterlegt werden.
-
Seite 19: Anzeige Uhrzeit/Datum Einstellen (T-D)
Soll ein Raum (z.B. Badezimmer) auch zur Mittagszeit beheizt werden, kann eine Programmierung wie folgt aussehen: Montag bis Sonntag: ab 00:00 bis 06:00 15.0°C ab 06:00 bis 09:00 23.0°C ab 09:00 bis 12:00 17.0°C ab 12:00 bis 14:00 19.0°C ab 14:00 bis 18:00 17.0°C ab 18:00 bis 22:00 21.0°C... -
Seite 20: Komfort- Und Absenktemperatur Einstellen
Umschalten zwischen Kom- fort- und Absenktemperatur. Werkseitig liegen diese bei 21.0°C und 17.0°C. Beim Einsatz ohne MAX! Cube passen Sie die Werte über die jeweilige Taste (Komfort- bzw. Absenktemperatur) wie folgt am Gerät an: • Halten Sie die Komfort( )-Taste lange gedrückt, um die Komfort-Temperatur anzupassen bzw. -
Seite 21: Boost-Funktion ( 17.6 Die Urlaubsfunktion Einstellen ( )
Auch im Auto-Modus kann die Temperatur über die Tasten jederzeit geändert werden. Diese Änderung bleibt dann bis zum nächsten Schaltzeitpunkt des Programms erhalten. 17.5 Boost-Funktion ( , bOS) einstellen BOOST Die Boost-Funktion nutzt das menschliche Wärmeempfin- den aus. Die Erwärmung eines Raumes dauert in der Re- gel länger als 5 Minuten, die vom Heizkörper abgegebe- ne Strahlungswärme kann jedoch sofort wahrgenommen werden. -
Seite 22: Die Urlaubsfunktion Einstellen ( )
Die abgegeben Wärme hat keinen unmittelbaren Ef- fekt, wenn der Heizkörper verdeckt ist (z.B. durch ein Sofa). Ist die Dauer der Boost-Funktion (z.B. über den MAX! Cube) so eingestellt, dass die Anzeige im Display eine Anzeige von 999 Sek. überschreitet, wird sie in Minuten dargestellt. -
Seite 23: Entkalkungsfahrt Einstellen (Dec)
• Bestätigen Sie die Auswahl mit der OK-Taste. • Stellen Sie das Datum ein, bis zu dem die Urlaubsfunk- tion aktiv sein soll. • Bestätigen Sie die Auswahl mit der OK-Taste. • Stellen Sie die Temperatur ein und drücken Sie die OK- Taste. -
Seite 24: Fenster-Auf-Funktion / Lüften ( , Aer) Einstellen
17.8 Fenster-auf-Funktion / Lüften ( , AEr) einstellen Der MAX! Wandthermostat regelt beim Lüften im Raum die Temperatur automatisch herunter, um Heizkosten zu sparen. Dabei wird im Display des Wandthermostats und aller angelernten Geräte das Fenster-auf-Symbol ( ) angezeigt. In Verbindung mit einem MAX! Fensterkontakt wird das Öffnen und Schließen eines Fensters zeitgenau erkannt. -
Seite 25: Zurücksetzen In Den Auslieferungszustand/Reset (Res)
Bevor Sie den MAX! Wandthermostat auf Werkzu- stand zurücksetzen, löschen Sie das Gerät beim Be- trieb mit MAX! Cube zuerst aus der MAX! Software. • Drücken Sie die Mode-Taste länger als 3 Sekunden. • Wählen Sie mit den (+) und (-) Tasten den Menüpunkt „rES“... -
Seite 26: Hinweise Zum Funkbetrieb
ßer der Sendeleistung und den Empfangseigenschaften der Empfänger spielen Umwelteinflüsse wie Luftfeuchtig- keit neben baulichen Gegebenheiten eine wichtige Rolle. Hiermit erklärt die eQ-3 Entwicklung GmbH, dass sich dieses Gerät in Übereinstimmung mit den grundlegenden Anforder-ungen und den anderen relevanten Vorschriften der Richtlinie 1999/5/EG befindet. -
Seite 27: Technische Daten
868,3 MHz Reichweite im Freifeld: 100 m Empfängerklasse: SRD Class 2 Wirkungsweise: Typ 1 Anlernbare Komponenten: 1 MAX! Cube, (über MAX! Cube) 8 MAX! Heizkörper- thermostate 8 MAX! Fensterkontakte Gehäuseabmessung: 86 x 86 x 21,5 mm (B x H x T) Umgebungstemperatur: (+)5°C bis (+)55°C...