Herunterladen Inhalt Inhalt Diese Seite drucken

Werbung

Verfügbare Sprachen
  • DE

Verfügbare Sprachen

  • DEUTSCH, seite 13
Hardware 
TM
IRIScan
 Pro 3 scanner 
Power adapter 
US power cable (US version only) 
UK power cable (UK version only) 
EU power cable 
USB power cable 
USB cable 
Spare ADF pad assembly 
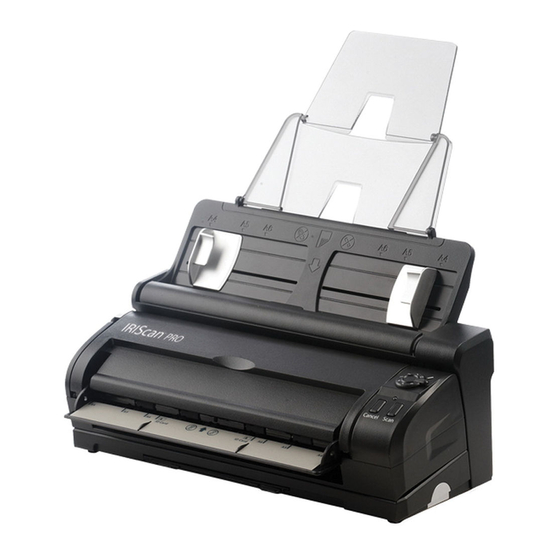
 
1. Preparation 
Unfold the scanner as shown in the image above. 
2. Installing the Button Manager (PC version only) 
TM
The IRIScan
 Pro 3 scanner is equipped with a Scan button and a number knob. To each number on the 
knob you can assign a different scan function.  In order to use these functions, you need to install the 
Button Manager: 
Insert the IRIScan
Click Run menu.exe in the AutoPlay window that appears. 
Click Button Manager and follow the on‐screen instructions to install it. 
Note: the Button Manager must be installed before you install the scanner driver or any software. 
How you can use the Button Manager is discussed in the section Using the scanner. 
Scanner 
Package Contents 
TM
IRIScan
 Pro Office 3 DVD‐ROM: 
Scanner driver and I.R.I.S. 
Capture Tool 
Readiris
(PC & Mac) 
Cardiris
Cardiris
IRISFile
Roxio Photosuite® 9 for I.R.I.S. CD‐
ROM (PC) 
Installation 
TM
 Pro Office 3 DVD‐ROM in the DVD‐ROM drive.  


Software 
Quick User Guides for: 
TM
 Corporate 12 
TM
 Pro 5 (PC) 
TM
 Pro 4 (Mac) 
Registration Card 
TM
 Pro 12 (PC) 
I.R.I.S. License Agreement 
I.R.I.S. License Sheet 
ENGLISH 
 
Documentation 
TM
Readiris
 Corporate 12 
(PC & Mac) 
TM
Cardiris
 Pro 5 (PC) 
TM
Cardiris
 Pro 4 (Mac) 
TM
IRISFile
 Pro 12 (PC) 
 

Werbung

Inhaltsverzeichnis
loading

Inhaltszusammenfassung für IRIS IRISCan Pro 3 Office

  • Seite 1   ENGLISH        Scanner    Package Contents  Hardware  Software  Documentation  IRIScan  Pro 3 scanner  IRIScan  Pro Office 3 DVD‐ROM:  Quick User Guides for:  Power adapter  ‐ Scanner driver and I.R.I.S.  ‐ Readiris  Corporate 12  US power cable (US version only)  Capture Tool  (PC & Mac)  UK power cable (UK version only)  ‐ Readiris  Corporate 12  ‐ Cardiris  Pro 5 (PC)  EU power cable  (PC & Mac)  ‐ Cardiris  Pro 4 (Mac)  USB power cable  ‐ Cardiris  Pro 5 (PC) ...
  • Seite 2: Installing The Scanner Driver

      Click Run menu.exe in the AutoPlay  Double‐click the IRIScan  Pro 3 icon that  window that appears.  appears on the Desktop.    Click Scanner in the Setup screen and  Open the IRIScan  Pro 3 Driver folder.   follow the on‐screen instructions to install  Double‐click the driver Installer and follow  it.  the on‐screen instructions.  Note: during the installation of the scanner driver, a basic scanning  application called Capture Tool is also installed on your PC. You can  access it from Start>Programs>IRIS IRIScan Pro Scanner>Capture Tool.     3. Installing the software packages  The IRIScan  Pro 3 scanner is delivered with the software applications Readiris  and Cardiris , which  allow you to scan, recognize and process all kinds of documents and business cards, and IRISFile , a  document management application. To install these applications:  Windows users  Mac users    Return to the Setup screen and click the  Return to the IRIScan  Pro 3 screen and  application you want to install.  double‐click the application you want to ...
  • Seite 3: Using The Scanner

    2. Using the front input tray   Open the cover of the front input tray.   Place your document into the tray, with the top of the page  pointing towards the scanner and the text facing down.    Center the document using the paper size marks on the tray.  3. Scanning documents via the software applications  Once the scanner driver has been installed, you can use the IRIScan  Pro 3 scanner from within the  Readiris  and Cardiris  interface. Refer to the paper Quick User Guides in the IRIScan  Pro Office 3  package to learn how to use these applications.  4. Scanning documents with the scanner buttons and the Button Manager (PC only)  To use the scanner buttons you need to configure the Button Manager:   Start the Button Manager from the Windows Start menu>Programs>  IRIS Button Manager>Button Manager.   Select IRIScan Pro and click OK. The Button Manager will appear in the bottom right  corner of your screen.   The first 3 buttons are preconfigured. Right‐click them to view the Button Properties   To add and configure a new scan function, right‐click an empty button.    Button Manager icon  Click the Options and Settings tab to access additional settings. Type in the name of the button  Click Add to add a configuration:   E.g. scan in 300 dpi, color By default, the scans are stored   in C:\Button_Data\  Click Add/Delete to add an  application that will process your ...
  • Seite 4  To scan your documents, turn the number knob to the required number and press the Scan  button, or click the required scan function in the Button Manager.  Tips  1. Disassembling the scan module from the document feeder  The scan module can be disassembled from the automatic document feeder. That way, it can be  conveniently carried around as a portable scanner.     Press and hold down the release button at the bottom of the right  side of the scanner.   Tilt the scan module towards you, and then disassemble it from the  feeder.  2.  Checking and replacing the ADF pad assembly  Check if the ADF (automatic document feeder) pad assembly is mounted correctly at the back of the  scanner:  1. Retract the document feeder.  3. The rubber part of the pad assembly should be  inserted in the slot.      2. Press down the 2 latches at the back of the  4. If that is not the case, use your fingers to press  document feeder to open the rear cover. and hold the two sides of the pad assembly to  remove it.      5. Insert the rubber part into the slot and re‐attach  the pad assembly.  Note: you find an extra pad assembly in the IRIScan  Pro Office 3 package, should the current one need replacing  (recommended after 20,000 scans or in case of repeated paper jams).    Should you experience any problems with your IRIScan  Pro 3 scanner, refer to our website for help:  www.irislink.com/support       ...
  • Seite 5: Installation

      FRANÇAIS      Scanneur    Contenu de la boîte  Matériel  Logiciel  Documentation  Scanneur IRIScan  Pro 3  DVD‐ROM IRIScan  Pro Office 3 :  Guides de démarrage rapide pour :  Adaptateur secteur  ‐ Pilote du scanneur et  ‐ Readiris  Corporate 12  Cordon d'alimentation US (version  I.R.I.S. Capture Tool  (PC et Mac)  US uniquement)  ‐ Readiris  Corporate 12  ‐ Cardiris  Pro 5 (PC)  Cordon d'alimentation UK (version  (PC et Mac)  ‐ Cardiris  Pro 4 (Mac)  UK uniquement)  ‐ Cardiris  Pro 5 (PC) ...
  • Seite 6: Installation Des Logiciels

      Dans la fenêtre d'exécution automatique  Double‐cliquez sur l'icône IRIScan  Pro 3  qui apparaît à l'écran, cliquez sur Run  qui apparaît sur le Bureau.   menu.exe.  Ouvrez le dossier IRIScan  Pro 3 Driver.    Cliquez sur Scanner dans l'écran Setup et  Double‐cliquez sur l'installateur du pilote  suivez les instructions.  et suivez les instructions à l'écran.  Remarque: Pendant l'installation du pilote du scanneur, une  application de numérisation de base appelée Capture Tool s’installe  sur votre ordinateur. Vous pouvez y accéder à partir du menu  Démarrer>Programmes>IRIS IRIScan Pro Scanner>Capture Tool       3. Installation des logiciels  Le scanneur IRIScan  Pro 3 est livré avec les applications Readiris  et Cardiris , vous permettant de  scanner, d'effectuer la reconnaissance optique des caractères et de traiter toutes sortes de documents  et de cartes de visite. L'application de gestion documentaire IRISFile  est également livrée avec le  scanneur. Installation de ces applications :  Utilisateurs Windows  Utilisateurs Mac    Revenez au menu d'installation et cliquez  Revenez à l'écran IRIScan  Pro 3 et ...
  • Seite 7 Ajustez les guides papier à la taille des pages.                                      Remarque: assurez‐vous que le couvercle du bac d'entrée avant                                        reste fermé pendant l'utilisation du bac d'alimentation arrière.  2. Utilisation du bac d'entrée avant   Ouvrez le couvercle du bac d'entrée avant.   Placez votre document dans le bac, face vers le bas. Le haut du  document doit être dirigé vers le scanneur.    Centrez le document par rapport aux repères de taille du  papier sur le bac.  3. Numérisation de documents à partir des applications  Une fois le pilote du scanneur installé, vous pouvez utiliser le scanneur IRIScan  Pro 3 depuis l'interface  de Readiris  et de Cardiris . Reportez‐vous aux guides de démarrage rapide livrés dans la boîte de  l'IRIScan  Pro Office 3 pour l'utilisation de ces applications.  4. Numérisation de documents grâce aux boutons du scanneur et au Gestionnaire de  boutons (version PC uniquement)  Afin d'utiliser les boutons du scanneur, vous devez configurer le Gestionnaire de boutons :   Démarrez le Gestionnaire de boutons (Button Manager) à partir du menu  Démarrer>Programmes>IRIS Button Manager>Button Manager.   Sélectionnez IRIScan Pro et cliquez sur OK. Le Gestionnaire de boutons   s'affichera dans le coin inférieur droit de votre écran.   Les trois premiers boutons sont déjà configurés. Cliquez sur les boutons   avec le bouton droit de la souris pour en afficher les propriétés.   Pour ajouter et configurer une nouvelle fonctionnalité de numérisation,   cliquez sur un bouton vide avec le bouton droit de la souris.  Icône du gestionnaire de    boutons ...
  • Seite 8 Cliquez sur les onglets Options et  Paramètres pour accéder aux  autres paramètres.  Insérez le nom du bouton  Cliquez sur Ajouter pour ajouter  une configuration. Ex : scanner  en 300 dpi, couleur Par défaut, les  documents  scannés sont sauvegardés dans  Cliquez sur Ajouter/Supprimer  le dossier C:\Button_Data\  pour ajouter une application de  Sélectionnez le format de fichier  traitement des documents  dans lequel vous désirez  scannés. Ex : Readiris.  sauvegarder vos documents.  Cliquez sur Appliquer pour  appliquer les paramètres.         Pour scanner vos documents, tournez le bouton à chiffres jusqu'au chiffre désiré et appuyez sur  le bouton Scan, ou cliquez sur la fonction de numérisation désirée dans le Gestionnaire de  boutons.  Conseils  1. Détachement du module du scanneur du bac d'alimentation  Le module du scanneur peut être détaché du bac d'alimentation automatique. Ainsi, le scanneur peut  être transporté facilement comme un scanneur portable.     Appuyez sur le bouton de déclenchement en bas à droite du scanneur  et maintenez‐le enfoncé.   Tirez le module du scanneur vers vous et détachez‐le du bac  d'alimentation.  2.  Vérification et remplacement du tampon ADF  Vérifiez si le tampon ADF est correctement placé à l'arrière du scanneur :  1. Retirez le bac d'alimentation.  3. La partie en caoutchouc du tampon ADF doit  être insérée dans l'encoche.   ...
  • Seite 9   NEDERLANDS        Scanner    Pakketinhoud  Hardware  Software  Documentatie  IRIScan  Pro 3‐scanner  IRIScan  Pro Office 3‐dvd‐rom:  Beknopte gebruiksaanwijzingen bij:  Stroomadapter  ‐ Scannerstuurprogramma en I.R.I.S.  ‐ Readiris  Corporate 12 (PC & Mac)  Stroomkabel VS (alleen in VS‐versie)  Capture Tool  ‐ Cardiris  Pro 5 (PC)  Stroomkabel UK (alleen in UK‐versie)  ‐ Readiris  Corporate 12 (PC & Mac)  ‐ Cardiris  Pro 4 (Mac)  Stroomkabel EU  ‐ Cardiris  Pro 5 (PC)  ‐ IRISFile  Pro 12 (PC) ...
  • Seite 10  Klik op Run menu.exe in het AutoPlay‐ Dubbelklik op het IRIScan  Pro 3‐ venster dat verschijnt.  pictogram dat verschijnt op het   Bureaublad.  Klik op Scanner in het Setup‐scherm en   volg de instructies op het scherm om hem  Open de map IRIScan  Pro 3 Driver.   te installeren.  Dubbelklik op het Installatieprogramma  van het stuurprogramma en volg de  instructies op het scherm.  Opmerking: tijdens de installatie van het scannerstuurprogramma wordt er ook  een eenvoudige scantoepassing geïnstalleerd op uw pc: Capture Tool. Die kunt u  bereiken via Start>Programma's>IRIS IRIScan Pro Scanner>Capture Tool.      3. De softwarepakketten installeren  De IRIScan  Pro 3‐scanner wordt geleverd samen met de softwaretoepassingen Readiris  en Cardiris ,  waarmee u allerlei soorten documenten en visitekaartjes kunt scannen, herkennen en verwerken, en  IRISFile , een documentbeheertoepassing. Om die toepassingen te installeren:  Windows‐gebruikers  Mac‐gebruikers    Keer terug naar het Setup‐scherm en klik  Keer terug naar het scherm IRIScan  Pro 3  op de toepassing die u wil installeren.  en dubbelklik op de toepassing die u wil ...
  • Seite 11: De Scanner Gebruiken

     Pas de papiergeleiders aan de grootte van de pagina's aan.                                      Opmerking: zorg ervoor dat de klep van de voorste invoerlade                                         gesloten blijft wanneer u de documentinvoer gebruikt.  2. De voorste invoerlade gebruiken   Open de klep van de voorste invoerlade.   Plaats uw documenten in de lade, met de bovenrand van de  pagina naar de scanner gericht en met de tekst naar beneden  gericht.    Centreer het document met behulp van de  grootteaanwijzingen op de lade.  3. Documenten scannen via de softwaretoepassingen  Zodra het scannerstuurprogramma geïnstalleerd is, kunt u de IRIScan  Pro 3‐scanner vanuit de  interfaces van Readiris  en Cardiris  gebruiken. Raadpleeg de papieren Beknopte gebruiksaanwijzingen  in het IRIScan  Pro Office 3‐pakket om deze toepassingen te leren gebruiken.  4. Documenten scannen met de scannerknoppen en het Knoppenbeheer (alleen PC)  Om de scannerknoppen te gebruiken, moet u het Knoppenbeheer configureren:   Start het Knoppenbeheer via het menu Start van Windows>Programma's>  IRIS Button Manager>Button Manager.   Selecteer IRIScan Pro en klik op OK. Het Knoppenbeheer zal beneden rechts   in uw scherm worden weergegeven.   De eerste 3 knoppen zijn vooraf geconfigureerd. Klik rechts op de knoppen om de   Knopeigenschappen te bekijken.   Om een nieuwe scanfunctie toe te voegen, klik rechts op een lege knop.    Pictogram Knoppenbeheer ...
  • Seite 12 Klik op de tabbladen Options  en Settings om bijkomende  instellingen te bereiken. Typ de naam van de knop  Klik op Add om een  configuratie toe te voegen:  Bv. scannen in 300 dpi, en in  De scan worden standaard    kleur. opgeslagen in: C:\Button_Data\  Klik op Add/Delete om een  toepassing toe te voegen die  Selecteer de bestandsindeling  uw gescande documenten zal  waarin u uw scans wil opslaan.  verwerken. Bv. Readiris.  Klik op Apply om de  instellingen toe te passen.         Om uw documenten te scannen, draai de genummerde draaiknop naar het gewenste cijfer en  druk op de Scan‐knop, of klik op de gewenste scanfunctie in het Knoppenbeheer.  Tips  1. De scanmodule loskoppelen van de documentinvoer  De scanmodule kan worden losgekoppeld van de automatische documentinvoer. Op die manier kan hij  handig worden vervoerd als draagbare scanner.     Houd de ontspanknop, die zich beneden aan de rechterkant van de  scanner bevindt, ingedrukt.   Kantel de scanmodule in uw richting, en koppel hem los van de  documentinvoer.   2.  Het montageplaatje van de ADF controleren en vervangen  Controleer of het montageplaatje van de ADF (automatic document feeder) correct gemonteerd is op de  achterkant van de scanner:  1. Klap de documentinvoer naar voren.  3. Het rubberen gedeelte van het montageplaatje  zou in de gleuf moeten zitten.   ...
  • Seite 13   DEUTSCH      Scanner    Packungsinhalt  Hardware Software Dokumentation  IRIScan  Pro 3 Scanner  IRIScan  Pro Office 3 DVD‐ROM:  Kurzanleitungen für:  Netzteil  ‐ Scannertreiber und  ‐ Readiris  Corporate 12  Stromkabel für die USA (nur  I.R.I.S. Capture Tool  (PC & Mac)  Version für die USA)  ‐ Readiris  Corporate 12  ‐ Cardiris  Pro 5 (PC)  Stromkabel für GB (nur Version für  (PC & Mac)  ‐ Cardiris  Pro 4 (Mac)  Großbritannien)  ‐ Cardiris  Pro 5 (PC)  ‐...
  • Seite 14: Installieren Des Scanner-Treibers

    Doppelklicken Sie auf dem Schreibtisch auf  Automatische Wiedergabe auf Ausführen  IRIScan  Pro 3.   menu.exe.  Öffnen Sie den Ordner IRIScan  Pro 3   Klicken Sie im Fenster Installation auf  Driver.   Scanner und befolgen Sie die  Doppelklicken Sie auf das  Bildschirmanweisungen zur Installation.  Installationsprogramm des Treibers und  befolgen Sie die Bildschirmanweisungen  zur Treiberinstallation.  Hinweis: Während der Treiberinstallation wird die einfache Scanner‐ Anwendung Capture Tool auf Ihrem PC installiert. Sie können diese über  Start>Programme>IRIS IRIScan Pro Scanner>Capture Tool starten.      3. Installieren der Softwarepakete  Der IRIScan  Pro 3 Scanner wird mit den Softwareanwendungen Readiris  und Cardiris  geliefert, die  Sie verwenden können, um Dokumente und Visitenkarten zu scannen, erkennen und verarbeiten.  Außerdem enthalten ist IRISFile , eine Anwendung zur Dokumentverwaltung. So installieren Sie diese  Anwendungen:  Benutzer von Windows  Mac‐Benutzer    Wechseln Sie zum Bildschirm Setup und  Wechseln Sie zum Bildschirm IRIScan  Pro  klicken Sie auf die Anwendung, die Sie ...
  • Seite 15: Verwenden Des Scanners

    Scanner zeigt.   Passen Sie die Papierführung an die Papiergröße an.                                    Hinweis: Stellen Sie sicher, dass die Abdeckung des vorderen                                        Papierfachs bei Verwendung des Dokumenteinzugs                                        geschlossen bleibt.                2. Verwenden des vorderen Papierfachs   Öffnen Sie die Abdeckung des vorderen Papierfachs.   Legen Sie das Dokument ein, sodass der Anfang der Seite zum  Scanner und der Text nach unten zeigt.    Zentrieren Sie das Dokument mithilfe der Markierungen für  verschiedene Papiergrößen.  3. Scannen von Dokumenten mit Softwareanwendungen  Nach der Installation des Scannertreibers können Sie IRIScan  Pro 3 Scanner über die Oberfläche von  Readiris  und Cardiris  verwenden. Weitere Informationen zur Verwendung dieser Anwendungen  finden Sie auf den mitgelieferten Kurzanleitungen des IRIScan  Pro Office 3 Pakets.  4. Scannen von Dokumenten mit den Scanner‐Tasten und dem Button Manager (nur PC)  Zur Verwendung der Scanner‐Tasten müssen Sie den Button Manager konfigurieren:   Starten Sie den Button Manager in Windows über Start >Programme>  IRIS Button Manager>Button Manager.   Wählen Sie IRIScan Pro aus und klicken Sie auf OK.   Der Button Manager wird unten rechts auf Ihrem Bildschirm angezeigt.   Die ersten 3 Tasten sind vorkonfiguriert. Zeigen Sie die   Schaltflächeneigenschaften mithilfe der rechten Maustaste an.   Klicken Sie mit der rechten Maustaste auf eine leere Schaltfläche, um   eine neue Scan‐Funktion hinzuzufügen und zu konfigurieren.    Symbol des Button Manager  ...
  • Seite 16: Entnehmen Des Scan-Moduls Aus Dem Dokumenteinzug

    Klicken Sie auf die Registerkarten    Optionen und Einstellungen,  um weitere Einstellungen  anzuzeigen.  Geben Sie einen Namen für  die Schaltfläche ein.  Klicken Sie auf Hinzufügen, um  eine Konfiguration hinzuzufügen: Beispielsweise mit 300 dpi, Farbe  Standardmäßig werden die  scannen.    gescannten Dokumente  unter C:\Button_Data\  Klicken Sie auf  gespeichert.  Hinzufügen/Löschen, um eine  Anwendung zur Bearbeitung Ihrer  gescannten Dokumente  Wählen Sie das Dateiformat  hinzuzufügen. (Beispielsweise  zum Speichern der  Readiris.)  gescannten Dokumente aus.  Klicken Sie auf Übernehmen, um  die Einstellungen zu übernehmen.        Drehen Sie zum Scannen Ihrer Dokumente den Drehknopf auf die gewünschte Zahl und drücken  Sie auf die Taste Scan oder klicken Sie auf die gewünschte Scan‐Funktion im Button Manager.  Tipps  1. Entnehmen des Scan‐Moduls aus dem Dokumenteinzug  Das Scan‐Modul kann aus dem automatischen Dokumenteinzug entnommen werden. Sie können es  dann bequem als tragbaren Scanner verwenden.     Drücken und halten Sie die Entriegelungstaste unten an der rechten  Seite des Scanners.   Kippen Sie das Scan‐Modul nach vorne und entnehmen Sie es aus ...
  • Seite 17: Installazione

      ITALIANO      Scanner    Contenuto della confezione  Hardware Software Documentazione  Scanner IRIScan  Pro 3  DVD‐ROM IRIScan  Pro Office 3:  Guide rapide per l'uso per:  Alimentatore  ‐ Driver dello scanner e  ‐ Readiris  Corporate 12  Cavo di alimentazione USA (solo versione USA)  Capture Tool di I.R.I.S.  (PC e Mac)  Cavo di alimentazione UK (solo versione UK)  ‐ Readiris  Corporate 12  ‐ Cardiris  Pro 5 (PC)  Cavo di alimentazione EU  (PC e Mac)  ‐ Cardiris  Pro 4 (Mac)  Cavo di alimentazione USB  ‐ Cardiris  Pro 5 (PC)  ‐...
  • Seite 18   Fare clic su Esegui menu.exe nella finestra  Fare doppio clic sull'icona IRIScan  Pro 3  AutoPlay che viene visualizzata.  che viene visualizzata sulla Scrivania.    Fare clic su Scanner nella schermata  Aprire la cartella IRIScan  Pro 3 Driver.   Installazione e seguire le istruzioni a video  Fare doppio clic sul driver Installer e  per installarlo.  seguire le istruzioni a video.  Nota: durante l'installazione del driver dello scanner, viene installata  sul PC anche un'applicazione di scansione di base chiamata Capture  Tool. È possibile accedere a tale applicazione selezionando il percorso  Start>Programmi>IRIS IRIScan Pro Scanner>Capture Tool.      3. Installazione dei pacchetti software  Lo scanner IRIScan  Pro 3 viene fornito unitamente alle applicazioni software Readiris  e Cardiris , che  vi consentono di acquisire, riconoscere ed elaborare tutti i tipi di documenti e biglietti da visita, nonché  IRISFile , un'applicazione per la gestione documentale. Per installare queste applicazioni:  Utenti Windows  Utenti Mac    Tornare alla schermata di Installazione e  Tornare alla schermata IRIScan  Pro 3 e  fare clic sull'applicazione che si desidera  fare doppio clic sull'applicazione che si ...
  • Seite 19: Uso Dello Scanner

     Regolare le guide in base alla dimensione delle pagine.                                      Nota: assicurarsi che il coperchio del cassetto di ingresso frontale                                         rimanga chiuso quando si utilizza l'alimentatore a fogli.  2. Uso del cassetto di ingresso frontale   Aprire il coperchio del cassetto di ingresso frontale.   Posizionare il documento nel cassetto, con la parte superiore  della pagina rivolta verso lo scanner e il testo da acquisire  rivolto verso il basso.    Centrare il documento facendo riferimento ai segni relativi alla  dimensione della carta riportati sul vassoio.  3. Scansione di documenti tramite le applicazioni software  Una volta installato il driver dello scanner, è possibile utilizzare lo scanner IRIScan  Pro 3 mediante le  interfacce di Readiris  e Cardiris . Per informazioni su come utilizzare queste applicazioni, consultare le  relative Guide rapide per l'uso incluse in formato cartaceo nel pacchetto IRIScan  Pro Office 3.  4. Scansione di documenti con i pulsanti dello scanner e Button Manager (solo PC)  Per utilizzare i pulsanti dello scanner è necessario configurare Button Manager:   Avviare Button Manager dal menu Start di Windows, selezionando il percorso  Programmi> IRIS Button Manager>Button Manager.   Selezionare IRIScan Pro e fare clic su OK. Viene visualizzato Button Manager   nell'angolo in basso a destra della schermata.   I primi 3 pulsanti sono preconfigurati. Fare clic sugli stessi per visualizzare  la finestra Proprietà tasto.   Per aggiungere e configurare una nuova funzione di scansione, fare clic  col pulsante destro del mouse su un pulsante vuoto.  Icona Button Manager   ...
  • Seite 20 Fare clic sulla scheda Opzioni e    Impostazione  per accedere ad altre  Digitare il nome del pulsante  impostazioni.  Fare clic su Aggiungi per  aggiungere una configurazione:  Per impostazione predefinita,  Ad esempio, scansione a 300 dpi,    le scansioni sono salvate    colori in C:\Button_Data\  Fare clic sul pulsante Aggiungi/e  per aggiungere un'applicazione  Selezionare il formato file in cui si  che elaborerà i documenti  desidera salvare le proprie  acquisiti, ad esempio, Readiris.  scansioni.  Fare clic su Applica per        applicare le impostazioni.  Per acquisire i documenti, ruotare la manopola numerica verso il  numero desiderato, premere il  pulsante Scansione, quindi fare clic sulla funzione di scansione desiderata in Button Manager.  Suggerimenti  1. Smontaggio del modulo di scansione dall'alimentatore a fogli  Il modulo di scansione può essere scollegato dall'alimentatore a fogli automatico. In questo modo, può  essere facilmente trasportato come uno scanner portatile.     Tenere premuto il pulsante di sgancio sul lato inferiore destro dello  scanner.   Inclinare il modulo di scansione verso di voi, quindi scollegarlo  dall'alimentatore a fogli.    2. Controllo e sostituzione del blocco cuscinetto dell'alimentatore a fogli ...
  • Seite 21: Instalación

      ESPAÑOL    Escáner    Contenido del paquete  Hardware  Software  Documentación  Escáner IRIScan  Pro 3  DVD‐ROM de IRIScan  Pro Office 3:  Guías rápidas del usuario de:  Adaptador de corriente  ‐ Controlador del escáner e  ‐ Readiris  Corporate 12 (PC y  Cable de alimentación para Estados  I.R.I.S. Capture Tool  Mac)  Unidos (sólo versión para EE UU)  ‐ Readiris  Corporate 12 (PC y  ‐ Cardiris  Pro 5 (PC)  Cable de alimentación para Reino  Mac)  ‐ Cardiris  Pro 4 (Mac)  Unido (sólo versión para Reino Unido)  ‐ Cardiris  Pro 5 (PC)  ‐ IRISFile  Pro 12 (PC) ...
  • Seite 22 Haga clic en la opción Ejecutar menu.exe  Haga doble clic en el icono de IRIScan  Pro  en la ventana de Reproducción  3 que aparece en el Escritorio.   automática que aparece.  Abra la carpeta IRIScan  Pro 3 Driver.    Haga clic en Scanner (Escáner) en la  Haga doble clic en el instalador del  pantalla del programa de instalación y siga  controlador y siga las instrucciones que  las instrucciones que aparecen en pantalla  aparecen en pantalla.  para instalar el controlador.  Nota: durante la instalación del controlador del escáner, también se instalará una  aplicación de escaneado básica llamada Capture Tool en su ordenador. Podrá  acceder a ella desde Inicio > Programas > IRIS IRIScan Pro Scanner > Capture Tool.     3. Instalar los paquetes de software  El escáner IRIScan  Pro 3 se entrega con las aplicaciones Readiris  y Cardiris , que permiten escanear,  reconocer y procesar todo tipo de documentos y tarjetas de visita, e IRISFile , una aplicación de gestión  documental. Para instalar estas aplicaciones:  Usuarios de Windows  Usuarios de Mac    Vuelva a la pantalla del programa de  Vuelva a la pantalla de IRIScan  Pro 3 y  instalación y haga clic en la aplicación que  haga doble clic en la aplicación que desee ...
  • Seite 23                              Nota: asegúrese de que la cubierta de la bandeja de entrada delantera                                   esté cerrada mientras utilice el alimentador de documentos.  2. Utilizar la bandeja de entrada delantera   Abra la cubierta de la bandeja de entrada delantera.   Coloque el documento en la bandeja, con la parte superior de  la página encarada hacia el escáner y el texto cara abajo.    Centre el documento utilizando las marcas del tamaño del  papel de la bandeja.  3. Escanear documentos a través de las aplicaciones de software  Una vez instalado el controlador del escáner, podrá utilizar el IRIScan  Pro 3 scanner desde la interfaz  de Readiris  y de Cardiris . Consulte las Guías rápidas del usuario en papel entregadas con su IRIScan   Pro Office 3 para aprender a utilizar estas aplicaciones.  4. Escanear documentos con los botones del escáner y el Gestor de botones (sólo para  PC)  Para utilizar los botones del escáner que necesita para configurar el Gestor de botones:   Ejecute el Gestor de botones desde el menú Inicio de   Windows > Programas > IRIS Button Manager > Button Manager.   Seleccione IRIScan Pro y haga clic en Aceptar. El Gestor de botones  aparecerá en el extremo inferior derecho de la pantalla.   Los primeros tres botones están configurados de antemano.   Haga clic con el botón derecho encima de estos botones para ver   las Propiedades del botón.   Para añadir y configurar una nueva función del escáner, haga clic   con el botón derecho encima de un botón sin ninguna función asignada.    Icono del Gestor de  botones ...
  • Seite 24 Haga clic en las pestañas Opciones   y Configuración para acceder a más parámetros. Escriba el nombre del botón.  Haga clic en Añadir para añadir  una configuración predefinida:  Por defecto, los archivos creados  por ejemplo, escanear a 300 ppp  mediante el proceso de  .  en color   escaneado se almacenan  en C:\Button_Data\   Haga clic en Añadir/Eliminar para  añadir una aplicación que procese  los documentos escaneados (por  Seleccione el formato de    ejemplo, Readiris).  archivo en que desea que  se guarden los documentos  escaneados.  Haga clic en Aplicar para aplicar  la nueva configuración.         Para escanear documentos, gire el botón de control numérico hasta que el puntero señale el  número deseado y, a continuación, pulse el botón de escaneado del escáner o haga clic en la  función que desee del Gestor de botones.   Consejos  1. Desmontar el módulo de escaneado del alimentador de documentos  El módulo de escaneado se puede separar del alimentador automático de documentos.  De este modo, se puede transportar fácilmente, como si se tratase de un escáner portátil.     Mantenga pulsado el botón de liberación que hay en la parte baja del  lado derecho del escáner.  ...

Inhaltsverzeichnis