Inhaltsverzeichnis
Werbung
Verfügbare Sprachen
Verfügbare Sprachen
Quicklinks
EN
Dear Customer,
Gigaset Communications GmbH is the legal successor to
Siemens Home and Office Communication Devices GmbH &
Co. KG (SHC), which in turn continued the Gigaset business
of Siemens AG. Any statements made by Siemens AG or
SHC that are found in the user guides should therefore be
understood as statements of Gigaset Communications
GmbH.
We hope you enjoy your Gigaset.
DE
Sehr geehrte Kundin, sehr geehrter Kunde,
die Gigaset Communications GmbH ist Rechtsnachfolgerin
der Siemens Home and Office Communication Devices
GmbH & Co. KG (SHC), die ihrerseits das Gigaset-Geschäft
der Siemens AG fortführte. Etwaige Erklärungen der
Siemens AG oder der SHC in den Bedienungsanleitungen
sind daher als Erklärungen der Gigaset Communications
GmbH zu verstehen.
Wir wünschen Ihnen viel Freude mit Ihrem Gigaset.
FR
Chère Cliente, Cher Client,
la société Gigaset Communications GmbH succède en droit
à Siemens Home and Office Communication Devices GmbH
& Co. KG (SHC) qui poursuivait elle-même les activités Giga-
set de Siemens AG. Donc les éventuelles explications de Sie-
mens AG ou de SHC figurant dans les modes d'emploi
doivent être comprises comme des explications de Gigaset
Communications GmbH.
Nous vous souhaitons beaucoup d'agrément avec votre
Gigaset.
IT
Gentile cliente,
la Gigaset Communications GmbH è successore della Sie-
mens Home and Office Communication Devices GmbH &
Co. KG (SHC) che a sua volta ha proseguito l'attività della
Siemens AG. Eventuali dichiarazioni della Siemens AG o
della SHC nei manuali d'istruzione, vanno pertanto intese
come dichiarazioni della Gigaset Communications GmbH.
Le auguriamo tanta soddisfazione con il vostro Gigaset.
NL
Geachte klant,
Gigaset Communications GmbH is de rechtsopvolger van
Siemens Home and Office Communication Devices GmbH &
Co. KG (SHC), de onderneming die de Gigaset-activiteiten
van Siemens AG heeft overgenomen. Eventuele uitspraken
of mededelingen van Siemens AG of SHC in de gebruiksaan-
wijzingen dienen daarom als mededelingen van Gigaset
Communications GmbH te worden gezien.
Wij wensen u veel plezier met uw Gigaset
ES
Estimado cliente,
la Gigaset Communications GmbH es derechohabiente de la
Siemens Home and Office Communication Devices GmbH &
Co. KG (SHC) que por su parte continuó el negocio Gigaset
de la Siemens AG. Las posibles declaraciones de la
Siemens AG o de la SHC en las instrucciones de uso se
deben entender por lo tanto como declaraciones de la Giga-
set Communications GmbH.
Le deseamos que disfrute con su Gigaset.
PT
SCaros clientes,
Gigaset Communications GmbH é a sucessora legal da Sie-
mens Home and Office Communication Devices GmbH &
Co. KG (SHC), que, por sua vez, deu continuidade ao sector
de negócios Gigaset, da Siemens AG. Quaisquer declara-
ções por parte da Siemens AG ou da SHC encontradas nos
manuais de utilização deverão, portanto, ser consideradas
como declarações da Gigaset Communications GmbH.
Desejamos que tenham bons momentos com o seu Gigaset.
Issued by
Gigaset Communications GmbH
Schlavenhorst 66, D-46395 Bocholt
Gigaset Communications GmbH is a trademark
licensee of Siemens AG
DA
FI
SV
NO
EL
HR
.
SL
Kære Kunde,
Gigaset Communications GmbH er retlig efterfølger til Sie-
mens Home and Office Communication Devices GmbH &
Co. KG (SHC), som fra deres side videreførte Siemens AGs
Gigaset-forretninger. Siemens AGs eller SHCs eventuelle
forklaringer i betjeningsvejledningerne skal derfor forstås
som Gigaset Communications GmbHs forklaringer.
Vi håber, du får meget glæde af din Gigaset.
Arvoisa asiakkaamme,
Gigaset Communications GmbH on Siemens Home and
Office Communication Devices GmbH & Co. KG (SHC)-yri-
tyksen oikeudenomistaja, joka jatkoi puolestaan Siemens
AG:n Gigaset-liiketoimintaa. Käyttöoppaissa mahdollisesti
esiintyvät Siemens AG:n tai SHC:n selosteet on tämän
vuoksi ymmärrettävä Gigaset Communications GmbH:n
selosteina.
Toivotamme Teille paljon iloa Gigaset-laitteestanne.
Kära kund,
Gigaset Communications GmbH övertar rättigheterna från
Siemens Home and Office Communication Devices GmbH &
Co. KG (SHC), som bedrev Gigaset-verksamheten efter Sie-
mens AG. Alla förklaringar från Siemens AG eller SHC i
användarhandboken gäller därför som förklaringar från
Gigaset Communications GmbH.
Vi önskar dig mycket nöje med din Gigaset.
Kjære kunde,
Gigaset Communications GmbH er rettslig etterfølger etter
Siemens Home and Office Communication Devices GmbH &
Co. KG (SHC), som i sin tur videreførte Gigaset-geskjeften i
Siemens AG. Eventuelle meddelelser fra Siemens AG eller
SHC i bruksanvisningene er derfor å forstå som meddelelser
fra Gigaset Communications GmbH.
Vi håper du får stor glede av din Gigaset-enhet.
Αγαπητή πελάτισσα, αγαπητέ πελάτη,
η Gigaset Communications GmbH είναι η νομική διάδοχος της
Siemens Home and Office Communication Devices GmbH &
Co. KG (SHC), η οποία έχει αναλάβει την εμπορική
δραστηριότητα Gigaset της Siemens AG. Οι δηλώσεις της
Siemens AG ή της SHC στις οδηγίες χρήσης αποτελούν
επομένως δηλώσεις της Gigaset Communications GmbH.
Σας ευχόμαστε καλή διασκέδαση με τη συσκευή σας Gigaset.
Poštovani korisnici,
Gigaset Communications GmbH pravni je sljednik tvrtke
Siemens Home and Office Communication Devices GmbH &
Co. KG (SHC), koji je nastavio Gigaset poslovanje tvrtke
Siemens AG. Zato sve izjave tvrtke Siemens AG ili SHC koje
se nalaze u uputama za upotrebu treba tumačiti kao izjave
tvrtke Gigaset Communications GmbH.
Nadamo se da sa zadovoljstvom koristite svoj Gigaset
uređaj.
Spoštovani kupec!
Podjetje Gigaset Communications GmbH je pravni naslednik
podjetja Siemens Home and Office Communication Devices
GmbH & Co. KG (SHC), ki nadaljuje dejavnost znamke
Gigaset podjetja Siemens AG. Vse izjave podjetja Siemens
AG ali SHC v priročnikih za uporabnike torej veljajo kot izjave
podjetja Gigaset Communications GmbH.
Želimo vam veliko užitkov ob uporabi naprave Gigaset.
© Gigaset Communications GmbH 2008
All rights reserved.
Subject to availability. Rights of modifications
reserved.
www.gigaset.com
Werbung
Kapitel
Inhaltsverzeichnis

Verwandte Anleitungen für Siemens Gigaset 4000i Micro


Inhaltszusammenfassung für Siemens Gigaset 4000i Micro
- Seite 1 Nadamo se da sa zadovoljstvom koristite svoj Gigaset de la Siemens AG. Las posibles declaraciones de la uređaj. Siemens AG o de la SHC en las instrucciones de uso se deben entender por lo tanto como declaraciones de la Giga- Spoštovani kupec! set Communications GmbH.
- Seite 2 Devices GmbH & Co. KG (SHC), kroz koju je nastavljeno poslovanje kompanije Gigaset kao dela Siemens AG. Stoga sve izjave od strane Siemens AG ili SHC koje se mogu naći u korisničkim uputstvima treba tumačiti kao izjave kompanije Gigaset Communications GmbH.
- Seite 3 Be inspired Bedienungsanleitung Istruzioni d’uso Mode d’emploi Instrucciones de manejo Operating instructions...
- Seite 4 Be inspired Bedienungsanleitung und Sicherheitshinweise...
-
Seite 5: Kurzübersicht Des Mobilteils
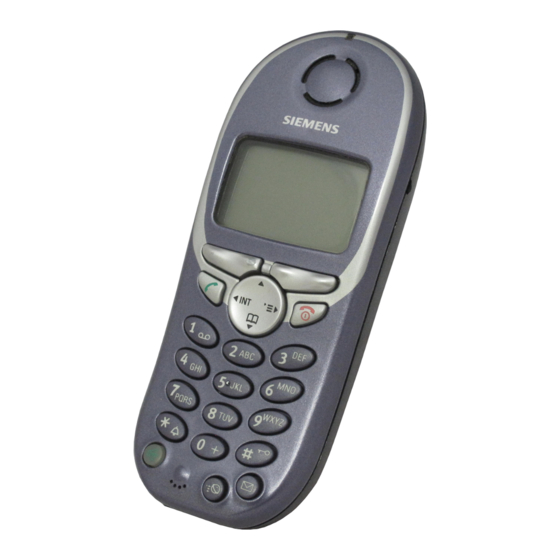
Kurzübersicht des Mobilteils Kurzübersicht des Mobilteils Das Display ist durch eine Folie geschützt. Bitte Schutzfolie abziehen! Status-LED (Leuchtdiode) Display (Anzeigefeld) leuchtet im Gespräch; blinkt bei: Ladezustand – ankommendem Ruf leer – neuen Nachrichten voll – Weckruf, Termine, blinkt: Akkustand niedrig Jahrestage Aktuelle Funktionen Empfangsstärke... -
Seite 6: Wichtige Menüs
Kurzübersicht des Mobilteils Wichtige Menüs © <Neuer Eintrag> Textmeldung* Anna T-Net-LM Familie/Freizeit Barbara © Termine/Uhr Claus Audio OKƒ Kosten Nr. verwenden Einstellungen Eintrag löschen Basis einstellen Eintrag senden Anrufbeantw. Liste löschen Liste senden Telefonlautst. Speicherplatz Rufton einst. Hinweistöne Display-Symbole Je nach Bediensituation sehen Sie über den Display-Tasten folgende Symbole: Bedeutung Display-Tasten ¨... -
Seite 7: Sicherheitshinweise
Sicherheitshinweise Sicherheitshinweise Verwenden Sie nur das mitgelieferte Steckernetzgerät, wie auf der Unterseite des Gerätes gekennzeichnet. Legen Sie nur zugelassene, aufladbare Akkus des gleichen Typs ein! ‹ Wiederaufladbaren Akku richtig gepolt einlegen. Œ Akkutyp gemäß dieser Bedienungsanleitung verwenden Medizinische Geräte können in ihrer Funktion beeinflusst werden. Beach- ten Sie die technischen Bedingungen des jeweiligen Umfeldes (z. -
Seite 8: Inhaltsverzeichnis
Inhaltsverzeichnis Inhaltsverzeichnis Kurzübersicht des Mobilteils ..........2 Zusammenhang zwischen Steuer-Taste und Display-Tasten . -
Seite 9: Mobilteil Vorbereiten
Mobilteil vorbereiten Tasten drücken: Mobilteil vorbereiten Verpackungsinhalt Mobilteil Gigaset 4000i Micro, ein Akku, Steckernetz- gerät, Ladeschale, Gürtelclip, Bedienungsanleitung. Akku einlegen Die Liefereinstellung der Display-Sprache an Ih- rem Mobilteil ist italienisch. Um die gewünschte Sprache einzustellen s. Seite 8. Mobilteil anmelden Schritt 1: ©... -
Seite 10: Akku Laden
Mobilteil vorbereiten Tasten drücken: 3010/3015 Die graue Taste der Basis so lange drücken, bis Sie Signaltöne hören. Einstellungen 3020/25 Im Menü des Basistelefons System-Einstell. Gerät anmelden 3030/35 aus- 4030/35 wählen und mit bestätigen. 3070/75 Die Anzeige (LED) drücken – sie blinkt 4070/75 während der Anmeldung. -
Seite 11: Datum Und Uhrzeit Einstellen
Mobilteil vorbereiten Tasten drücken: Datum und Uhrzeit einstellen Die Datums- und Uhrzeiteinstellung ist notwendig, da- mit der Zeitpunkt des Eingangs von Nachrichten/ Anru- fen korrekt angezeigt wird. © Menü öffnen. åååååååååååååååååååååååååååååååå Auswählen und bestätigen. Termine/Uhr åååååååååååååååååååååååååååååååå Auswählen und bestätigen. Datum/Uhrzeit Die aktuelle Einstellung wird angezeigt. -
Seite 12: Telefonieren
Telefonieren Tasten drücken: Telefonieren Extern anrufen o Rufnummer eingeben. Ggf. mit der Display-Taste einzelne Zeichen korri- gieren. Abheben-Taste drücken. Auflegen-Taste drücken, um das Gespräch zu been- den. Sie können auch zuerst die Abheben-Taste drücken und dann die Rufnummer eingeben - jede Ziffer wird sofort gewählt. -
Seite 13: Anruf Annehmen
Telefonieren Tasten drücken: Anruf annehmen Ihr Telefon klingelt (Rufton) und die Status-LED blinkt. Abheben- oder Freisprech-Taste drücken. oder das Mobilteil nur aus der Ladeschale nehmen (Liefer- zustand: „Automatische Rufannahme“). Ö Anrufer-/Nachrichtenliste aufrufen Neue Anrufe/Nachrichten werden durch einen Hinweis im Display und das Blinken der Status-LED angezeigt. Drücken Freisprechen Freisprechen beim Wählen... -
Seite 14: Externes Gespräch Verbinden, Rückfrage
Wahlwiederholung Tasten drücken: Externes Gespräch verbinden, Rückfrage Sie können ein externes Gespräch an ein anderes Mobilteil verbinden oder intern eine Rückfrage halten. Liste der Intern-Teilnehmer öffnen. Internen Teilnehmer auswählen und anrufen. Wenn sich der interne Teilnehmer meldet: Gespräch verbinden: Auflegen-Taste drücken. -
Seite 15: Rufnummer Aus Wahlwiederholungsliste Löschen
Telefonbuch und Netzanbieterliste Tasten drücken: Rufnummer aus Wahlwiederholungsliste löschen Rufnummer anzeigen und auswählen. © Menü öffnen. åååååååååååååååååååååååååååååååå Rufnummer wird gelöscht. Eintrag löschen Rufnummer ins Telefonbuch übernehmen Rufnummer anzeigen und auswählen. © Menü öffnen. åååååååååååååååååååååååååååååååå Die Rufnummer wird eingetragen. Nr. ins Tel.buch o Ggf. -
Seite 16: Mit Telefonbuch Wählen
Telefonbuch und Netzanbieterliste Tasten drücken: Mit Telefonbuch wählen Telefonbuch öffnen. z. B. Anfangsbuchstaben des Namens eingeben, z. B. für „E“ , die Taste zweimal drücken oder mit der Taste blättern. Abheben-Taste drücken. Nach Auswahl des Namens können Sie auch das Menü... - Seite 17 Telefonbuch und Netzanbieterliste Tasten drücken: Zeichentabelle Entsprechende Taste mehrmals bzw. lang drücken: â Leer- £ ¥ ¤ zei- chen Ÿ ä á à â ã ç ë é è ê ¡ ï í ì î ¢ £ ö ñ ó ò...
-
Seite 18: Eintrag Anzeigen, Ändern Oder Löschen
Telefonbuch und Netzanbieterliste Tasten drücken: Eintrag anzeigen, ändern oder löschen Telefonbuch/Netzanbieterliste öffnen. Gewünschten Eintrag auswählen. Ansehen Alle Informationen zum Eintrag anzeigen. Ändern Das Eingabefeld öffnen und die gewünschten Ände- rungen vornehmen. o Ggf. Rufnummer ändern. o Ins Namensfeld springen und Name ändern. Eingabe von Buchstaben und Zeichen, s. -
Seite 19: Telefonbuch/Netzanbieterliste Löschen
Telefonbuch und Netzanbieterliste Tasten drücken: Telefonbuch/Netzanbieterliste senden: Sie können das ganze Telefonbuch/Netzanbieterliste an ein anderes Micro/Comfort-Mobilteil übertragen. Siehe „Eintrag an ein anderes Mobilteil senden“ . Die Übertragung wird abgebrochen, wenn: der Speicher des Empfänger-Mobilteils voll ist. Sie angerufen werden. Die aktuelle Übertragung eines Eintrags wird zu Ende gebracht. -
Seite 20: Einstellungen
Einstellungen Tasten drücken: Einstellungen Wecker einstellen Ist an Ihrem Mobilteil eine Weckzeit eingestellt ¼ (Symbol ), klingelt es täglich zur gleichen Uhrzeit. Das Mobilteil befindet sich im Ruhezustand: © Menü öffnen. åååååååååååååååååååååååååååååååå Auswählen und bestätigen. Termine/Uhr åååååååååååååååååååååååååååååååå Auswählen und bestätigen. Wecker Die aktuelle Einstellung wird angezeigt. -
Seite 21: Termin Einstellen
Einstellungen Tasten drücken: Termin einstellen Sie können sich von Ihrem Mobilteil an einen Termin erinnern lassen. Ein eingestellter Termin wird mit dem ¼ Symbol angezeigt. Das Mobilteil befindet sich im Ruhezustand. © Menü öffnen. åååååååååååååååååååååååååååååååå Auswählen und bestätigen. Termine/Uhr åååååååååååååååååååååååååååååååå Auswählen und bestätigen. -
Seite 22: Nicht Angenommene Termine Und Jahrestage
Einstellungen Tasten drücken: Nicht angenommene Termine und Jahrestage Ein Termin und Jahrestage, die vom Mobilteil signali- siert aber nicht angenommen wurden, werden in einer Liste gespeichert. Ein neuer nicht angenommener Termin/Jahrestag Termin wird mit angezeigt. Drücken Sie die rechte Display-Taste, die Liste der Ereignisse wird ange- ¼... -
Seite 23: Zeitsteuerung Für Rufton-Lautstärke
Einstellungen Tasten drücken: Zeitsteuerung für Rufton-Lautstärke Sie können für einen bestimmten Zeitraum eine ande- re Rufton-Lautstärke einstellen. © Menü öffnen. åååååååååååååååååååååååååååååååå Auswählen und bestätigen. Audio åååååååååååååååååååååååååååååååå Die aktuelle Rufton-Lautstärke ertönt und wird ange- Rufton einst. zeigt. Zeitstrg Drücken. Zeitsteuerung ein-/ausschalten. o Zeitraum für den gewünschten Rufton eingeben ]]ÞÞ... -
Seite 24: Vibrationsalarm Ein-/Ausschalten
Einstellungen Tasten drücken: Vibrationsalarm ein-/ausschalten Um durch den Rufton nicht gestört zu werden, können Sie stattdessen den Vibrationsalarm im Mobilteil ein- schalten. Er kann auch zusätzlich zum Rufton einge- schaltet werden (z. B. bei lauter Umgebung). © Menü öffnen. åååååååååååååååååååååååååååååååå Auswählen und bestätigen. -
Seite 25: Babyfon
Babyfon Tasten drücken: Babyfon-Pegel hoch Zeitsteuerung Display-Sprache landesspezif. Vibrationsalarm Babyfon Mit Ihrem Mobilteil können Sie Geräusche im Raum Ihres Babys von einem anderen Ort aus überwachen. Der Abstand des Mobilteils zum Baby sollte mindestens 1 bis 2 Meter betragen. Wird ein bestimmter Geräusch- pegel erreicht (z.B. -
Seite 26: Walkie-Talkie-Modus
Walkie-Talkie-Modus Tasten drücken: Mit der Display-Taste kann die Babyfon-Funktion ausgeschaltet werden. Babyfon-Funktion von Extern ausschalten Sie können von Extern (z. B. vom „Handy“) die Baby- fonfunktion ausschalten. Nehmen Sie den durch die Babyfon-Funktion ausgelösten Anruf an und drücken ¬ª Sie die Tasten , um die Funktion zu deakti- vieren. -
Seite 27: Anhang
Anhang Anhang Betrieb an Basen der Gigaset-Familie Gigaset 1000/2000/3000 Folgende Funktionen Ihres 4000i Micro-Mobilteil werden nicht von Basen dieser Gigaset-Familie unterstützt. Uhrzeiteinstellung (nach Ausschalten des Mobilteils wird die Uhr- zeit nicht mehr übermittelt) Sprachwahl Babyfon (kann von extern nicht ausgeschaltet werden) SMS Übermittlung (nur SMS-fähige Basen)* Gigaset 4010/4015 Classic Folgende Funktionen Ihres 4000i Micro-Mobilteil werden nicht von... -
Seite 28: Empfohlene Akkus
Die Reichweite beträgt im freien Gelände ca. 300 m. In Gebäuden werden Reichweiten bis 50 m erreicht. Tischladestation Die Tischladestation für Siemens Mobiltelefone lässt sich ebenfalls zum Laden Ihres Mobilteils verwenden. (Zubehör für Siemens Mobiltelefone C45, ME45, S45) Bestell-Nr. L36880-N4501-A101 ½... -
Seite 29: Garantie
Neugeräte und deren Komponenten, die aufgrund von Fabrikations- und/oder Materialfehlern innerhalb von 24 Monaten ab Kauf einen Defekt aufweisen, werden von Siemens nach eigener Wahl gegen ein dem Stand der Technik entsprechendes Gerät kostenlos ausge- tauscht oder repariert. Für Verschleißteile (z.B. Akkus, Tastaturen, Gehäuse) gilt diese Haltbarkeitsgarantie für 6 Monate ab Kauf. -
Seite 30: Service (Customer Care)
Anhang Durch eine erbrachte Garantieleistung verlängert sich der Garantie- zeitraum nicht. Soweit kein Garantiefall vorliegt, behält sich Siemens vor, dem Kun- den den Austausch oder die Reparatur in Rechnung zu stellen. Eine Änderung der Beweislastregeln zum Nachteil des Kunden ist mit den vorstehenden Regelungen nicht verbunden. - Seite 32 Be inspired Istruzioni d’uso e di sicurezza...
-
Seite 33: Breve Descrizione Del Portatile
Breve descrizione del portatile Breve descrizione del portatile Il display è protetto da una pellicola. Toglierla! LED di stato Display (campo indicazione) Acceso: in conversazione Livello di carica Lampeggia in caso di: scarica – chiamate entranti carica – nuovi messaggi * lampeggia: batteria quasi –... -
Seite 34: Menu Importanti
Breve descrizione del portatile Menu importanti © Msg.testo/SMS* Nuova voce T-Net-LM Anna BabyC o WalkieT Barbara © Appuntam/ora Claus Audio OKƒ Addebiti* Utilizza Numero Impostazioni Cancellazione Impost.base Trasferisci Segreteria Cancella Tutto Trasfer.Tutto Telefonlautst. Memoria Libera Impost.suoneria Toni di avviso Vibrazione Attenzione: I „Servizi di rete“... -
Seite 35: Istruzioni Di Sicurezza
Breve descrizione del portatile Istruzioni di sicurezza Utilizzare soltanto l’alimentatore in dotazione, come indicato sul lato inferiore dell’apparecchio. Utilizzare soltanto una batteria consigliata ricaricabile. Ciò significa, non utilizzare in nessun caso una batteria comune (non ricaricabile), poiché può causare danni alla salute e alle persone. - Seite 36 Indice Indice Breve descrizione del portatile ......... . . 2 Relazione tra tasto di navigazione e tasti del display .
-
Seite 37: Preparare Il Portatile
Preparare il portatile Premere i tasti: Preparare il portatile Contenuto della confezione Portatile Gigaset 4000i Micro, una batteria, caricabatte- rie, clip da cintura, istruzioni d’uso. Inserire la batteria L'impostazione all'acquisto della lingua del dis- play del vostro portatile è italiano. Per impostare la lingua desiderata, vedi pagina 9. -
Seite 38: Caricare La Batteria
Preparare il portatile Premere i tasti: Gigaset Preparazione della base 4010/4015 Premere a lungo il tasto sul lato inferiore della base. 3010/3015 Premere il tasto paging della base fino a quando vengono emessi dei toni di se- gnalazione. Impostazio- 3020/25 Nel menu della base scegliere Impostaz.Sistema Reg.Portatile... -
Seite 39: Impostare La Data E L'ora
Preparare il portatile Premere i tasti: Impostare la data e l’ora L ’impostazione della data e dell’ora serve per vedere quando sono giunti i messaggi/le chiamate. © Aprire il menu. åååååååååååååååååååååååååååååååå Scegliere e confermare. Appuntam/ora åååååååååååååååååååååååååååååååå Scegliere e confermare. Impostare ora Viene visualizzata l’impostazione corrente. -
Seite 40: Cambiare La Lingua Del Display
Telefonare Premere i tasti: Cambiare la lingua del display © Aprire il menu. åååååååååååååååååååååååååååååååå Confermare la funzione. Impostazioni åååååååååååååååååååååååååååååååå La lingua attiva riporta il segno Lingua Scegliere la lingua desiderata e confermare. Una tabella è riportata all'ultima pagina di questo ma- nuale.. -
Seite 41: Telefonare Sulla Linea Interna
Telefonare Premere i tasti: Telefonare sulla linea interna Aprire la lista dei portatili registrati. Il proprio apparec- chio presenta il segno “<“ . Scegliere il portatile da chiamare e premere il tasto di impegno linea. oppure Ÿ Inserire il numero interno del portatile da chiamare. per esempio opp. -
Seite 42: Viva Voce
Telefonare Premere i tasti: Viva voce Selezionare in viva voce o Selezionare il numero. Premere il tasto viva voce. Quando il viva voce è attivato il tasto viva voceu e il LED di stato sono accesi. * non disponibile in tutti i Paesi Viva voce durante la conversazione Attivare il viva voce. -
Seite 43: Ripetizione Della Selezione
Ripetizione della selezione Premere i tasti: Ripetizione della selezione Ripetizione manuale della selezione Il telefono memorizza gli ultimi cinque numeri selezio- nati. Aprire la lista dei numeri selezionati e scegliere quello desiderato. Premere il tasto di impegno linea. Ripetizione automatica della selezione Questa funzione non è... -
Seite 44: Rubrica E Rubrica Speciale
Rubrica e rubrica speciale Premere i tasti: Registrare un numero nella rubrica Aprire la lista dei numeri selezionati e scegliere quello desiderato. © Aprire il menu. åååååååååååååååååååååååååååååååå Il numero viene registrato. Copia in Rubrica o Se necessario, inserire il nome (eventualmente inse- rire l’anniversario, v. -
Seite 45: Selezione Rapida Dalla Rubrica Speciale
Rubrica e rubrica speciale Premere i tasti: Selezionare numeri dalla rubrica Aprire la rubrica. Inserire la prima lettera del nome (per esempio per la “E“ premere due volte il tasto o scorrere conD. Dopo aver scelto il nome potete aprire anche il menu, scegliere , completare/modificare il Utilizza Numero... - Seite 46 Rubrica e rubrica speciale Premere i tasti: Tabella dei caratteri Premere più volte o a lungo il tasto corrispondente: 2 x 3 x 4 x 5 x 6 x 7 x 8 x 9 x 10 x â £ ¥ spa- Ÿ...
- Seite 47 Rubrica e rubrica speciale Premere i tasti: Visualizzare, modificare o cancellare una voce Aprire la rubrica/rubrica speciale. Scegliere la voce desiderata. Visualiz. Visualizzare tutte le informazioni riguardanti la voce. Cambia Aprire l’area da modificare. o Eventualmente modificare il numero di telefono. o Passare al campo del nome e modificare il nome.
- Seite 48 Rubrica e rubrica speciale Premere i tasti: Trasferire una voce ad un altro portatile Le voci possono essere trasferite da un portatile all’altro. Aprire la rubrica/rubrica speciale. Scegliere la voce desiderata. © Aprire il menu. åååååååååååååååååååååååååååååååå Scegliere e confermare. Trasferisci Scegliere l’interno a cui trasferire il numero e confer- mare.
- Seite 49 Rubrica e rubrica speciale Premere i tasti: Inserire anniversari (per esempio compleanni) Il telefono vi consente di memorizzare date da ricordare che vi verranno segnalate alla scadenza della data e ora impostate. Aprire la rubrica. Visualiz. Scegliere e visualizzare la voce. Cambia Aprire il numero a cui associare la data da ricordare.
-
Seite 50: Impostazioni
Impostazioni Premere i tasti: Impostazioni Impostare la sveglia ¼ Se nel portatile è impostata la sveglia (simbolo essa suonerà tutti i giorni alla stessa ora. Il portatile è in stand by © Aprire il menu. åååååååååååååååååååååååååååååååå Scegliere e confermare. Appuntam/ora åååååååååååååååååååååååååååååååå... -
Seite 51: Impostare Un Appuntamento
Impostazioni Premere i tasti: Impostare un appuntamento Nel portatile potete anche impostare un appuntamen- ¼ to. Esso viene indicato dal simbolo Il portatile è in stand by. © Aprire il menu. åååååååååååååååååååååååååååååååå Scegliere e confermare. Appuntam/ora åååååååååååååååååååååååååååååååå Scegliere e confermare. Inserire Appunt. -
Seite 52: Volume Di Auricolare E Altoparlante
Impostazioni Premere i tasti: Appuntamenti e anniversari scaduti Appuntamenti e anniversari segnalati dal telefono in vo- stra assenza, vengono salvati in una lista. Un nuovo appuntamento/anniversario scaduto in vostra Appunt. assenza viene visualizzato con . Premere il tasto destro del display; viene visualizzata la lista degli eventi, ¼... - Seite 53 Impostazioni Premere i tasti: Impostare il volume/la melodia della suoneria Potete scegliere tra cinque volumi della suoneria, “Crescendo“ (aumento progressivo del volume), Suo- neria spenta e tra dieci melodie: © Aprire il menu. åååååååååååååååååååååååååååååååå Scegliere e confermare. Audio åååååååååååååååååååååååååååååååå La suoneria si attiva sul volume impostato e viene Impost.suoneria visualizzato il livello attuale.
-
Seite 54: Attivare/Disattivare I Toni Di Avviso E Di Segnalazione
Impostazioni Premere i tasti: Attivare/disattivare i toni di avviso e di segnalazione Tono tasti: la pressione dei tasti viene confermata acusticamente. Toni di conferma: tono di conferma (sequenza cre- scente) che viene emesso alla fine di un’operazione/ impostazione e quando viene riposto il portatile nel caricabatteria. -
Seite 55: Attivare/Disattivare La Risposta Automatica
Babycall Premere i tasti: Attivare/disattivare la risposta automatica Se la funzione è attivata per rispondere alle chiamate basta sollevare il portatile dal caricabatteria, senza do- ver premere il tasto di impegno linea (impostazione all’acquisto). © Aprire il menu. åååååååååååååååååååååååååååååååå Scegliere e confermare. Impostazioni åååååååååååååååååååååååååååååååå... -
Seite 56: Impostare Il Babycall
Babycall Premere i tasti: Impostare il Babycall © Aprire il menu. åååååååååååååååååååååååååååååååå Scegliere e confermare. BabyC o WalkieT åååååååååååååååååååååååååååååååå Scegliere e confermare. Baby Call Scegliere oppure Passare alla riga successiva. Cambia Aprire il campo di inserimento del numero di telefono a cui inviare l’allarme. -
Seite 57: Modalità Walkie-Talkie
Modalità Walkie-Talkie Premere i tasti: Modalità Walkie-Talkie Premessa: I portatili hanno le stesse impostazioni della base (per esempio Staz.Migliore), o non sono registrati su nes- suna stazione (la modalità Walkie-Talkie riduce note- volmente l’autonomia della batteria). Nella modalità Walkie-Talkie i portatili non possono ri- cevere chiamate. -
Seite 58: Appendice
Appendice Appendice Funzionamento con le basi della gamma Gigaset Gigaset serie 1000/2000/3000 Le basi delle serie Gigaset suindicate non supportano le seguenti fun- zioni dei portatili 4000i Micro/Comfort. Impostazione dell’ora (se l’ora e’ inserita viene persa spegnendo il portatile) Impostazione della lingua Babycall (non può... -
Seite 59: Portata
(per esempio presenza di cemento armato). Stazione di ricarica da tavolo La stazione di ricarica da tavolo per alcuni modelli di telefoni cellulari Siemens, può essere usata anche per caricare il proprio portatile. (Accessorio per i cellulari C45, ME45, S45) codice L36880-N4501-A101 ½... -
Seite 60: Customer Care (Servizio)
Per quanto riguarda le domande tecniche e quelle relative all'uso dell'apparecchio, potete avere un supporto semplice e senza compli- cazioni tramite il nostro sito Internet: www.my-siemens.com/customercare Nel caso sia necessaria una riparazione, rivolgetevi ad uno dei nostri centri di servizio. -
Seite 61: Lingue A Display
Appendice Lingue a display Durante la registrazione del portatile sulla stazione di base del Giga- set 4010i si possono impostare le lingue identificate con *: Einstellungen Sprache Deutsch H/Set Settings Language English Réglages comb. Langue Français Impostazioni Lingua Italiano Ajuste terminal Idioma Español... - Seite 62 Be inspired Mode d’emploi et consignes de sécurité...
- Seite 63 Présentation du combiné Présentation du combiné L ’écran est protégé par un film. Retirez le film ! Ecran (affichage) LED état (DEL) Fixe : Niveau de charge - en communication vide Clignotante : pleine - Appel entrant clignotante : faible - Nouveaux messages - Réveil, RDV, anniversaire Intensité...
-
Seite 64: Symboles À L'écran
Présentation du combiné Menus importants © SMS/Messg. txt * <Nouv. entrée> Services réseau Anna Famille/Loisirs Barbara RDV/Heure © Claus Sons / Audio OKƒ Coûts Utiliser le N° Réglages comb. Effacer entrée Réglages base Copier entrée Répondeur Effacer liste Copier liste Volume écoute Mémoire dispo. -
Seite 65: Consignes De Sécurité
Consignes de sécurité Consignes de sécurité Utiliser exclusivement le bloc-secteur fourni comme indiqué sous la base par le symbole. Utiliser uniquement une batterie homologuée (rechargable)! Ne jamais utiliser une pile normale (non rechargeable) qui peut endommager l'appareil, représenter un ris- que pour la santé... - Seite 66 Sommaire Sommaire Présentation du combiné ..........2 Touche de navigation et touches écran.
- Seite 67 Sommaire Sons/Audio ............24 Volume d'écoute du combiné...
-
Seite 68: Préparer Le Combiné
Préparer le combiné Appuyer sur les touches: Préparer le combiné Contenu de l’emballage Combiné Gigaset 4000i Micro, une batterie, chargeur, clip ceinture, mode d’emploi. Insérer la batterie A la livraison, la langue d'affichage de votre com- biné est l'italien. Pour paramétrer la langue souhaitée, voir page 10. -
Seite 69: Charger La Batterie
Préparer le combiné Appuyer sur les touches : Gigaset Préparation sur la base ou sur le téléphone 4010/4015 Appuyer sur la touche située sous la base. 3010/3015 Maintenir appuyée la touche grise de la base jusqu’à ce que vous entendiez le si- gnal sonore. -
Seite 70: Fixer Le Clip Ceinture
Préparer le combiné Appuyer sur les touches: Fixer le clip ceinture Placer le clip ceinture à l’arrière du combiné et appuyer jusqu’à ce que les "ergots" disposés latéralement s’en- clipsent dans les trous. Régler la date et l’heure Vous devez régler la date et l’heure afin que soit affiché correctement le moment de réception des messages/ appels. -
Seite 71: Affichage : Choisir La Langue
Préparer le combiné Appuyer sur les touches : Affichage : choisir la langue Les combinés supplémentaires sont universels et identiques quel que soit le pays de destination. ils sont configurés d'origine en langue Anglaise et doi- vent de ce fait être localement réglés lors de la mise en service. -
Seite 72: Téléphoner
Téléphoner Appuyer sur les touches: Téléphoner Appel externe Cette fonction n'est possible que pour une configura- tion système multi-combinés (maxi 6 combinés décla- rés sur la même base). o Entrer le numéro. Si nécessaire, corriger certains caractères avec la touche écran Appuyer sur la touche "Décrocher". -
Seite 73: Accepter Un Appel Entrant
Téléphoner Appuyer sur les touches : Accepter un appel entrant Votre téléphone sonne (sonnerie) et la LED d’état clignote. Appuyer sur la touche "Décrocher" ou "Mains-libres". Soulever uniquement le combiné de la base/du char- geur (configuration usine : "Décroché automatique"). Ö... -
Seite 74: Double Appel Interne/Transfert
Répétition de la numérotation (Bis) Appuyer sur les touches: Double appel interne/Transfert Vous êtes en communication avec un correspondant externe, vous pouvez établir un double appel interne, transférer la communication en cours ou revenir à votre correspondant. Ouvrir la liste des usagers internes. Sélectionner l’usager interne et l’appeler. - Seite 75 Répétition de la numérotation (Bis) Appuyer sur les touches : Liste des numéros "Bis" • Effacer un numéro Afficher la liste "Bis" et sélectionner le numéro à effacer. © Ouvrir le menu. åååååååååååååååååååååååååååååååå Le numéro est effacé. Effacer entrée • Enregistrer un numéro dans l’annuaire Afficher la liste "Bis"...
-
Seite 76: Annuaire Et Annuaire Spécial
Annuaire et Annuaire spécial Appuyer sur les touches: Annuaire et Annuaire spécial L ’ Annuaire vous permet d’appeler de façon sim- plifiée jusqu’à 200 numéros (nombre fonction de la taille des entrées et des noms associés ou non dans le partage de la capacité... -
Seite 77: Annuaire Spécial : Touches De Raccourci
Annuaire et Annuaire spécial Appuyer sur les touches : Numéroter à partir de l’ A nnuaire spécial (sélection appel par appel) Afficher l’ A nnuaire spécial. D© Sélectionner le numéro spécial et ouvrir le menu. åååååååååååååååååååååååååååååååå Sélectionner et valider. Utiliser le N° o Compléter en entrant le numéro du correspondant souhaité. - Seite 78 Annuaire et Annuaire spécial Appuyer sur les touches: Editeur de texte et numéros : tableau des caractères Appuyer sur la touche correspondante plusieurs fois ou de manière prolongée : 2 x 3 x 4 x 5 x 6 x 7 x 8 x 9 x 10 x â...
- Seite 79 Annuaire et Annuaire spécial Appuyer sur les touches : Afficher, modifier ou effacer l’entrée Ouvrir l’ A nnuaire/l’ A nnuaire spécial. Sélectionner l’entrée souhaitée. Afficher Afficher toutes les informations concernant l’entrée. Modifier Ouvrir le champ de saisie et effectuer les modifica- tions souhaitées.
- Seite 80 Annuaire et Annuaire spécial Appuyer sur les touches: Copier l’entrée sur un autre combiné Dans une configuration sytème multi-combinés ( maxi 6 combinés déclarés sur la même base), vous pouvez copier l’entrée sur un autre combiné de confort de la gamme Gigaset.
- Seite 81 Annuaire et Annuaire spécial Appuyer sur les touches : Dates anniversaires Pour chaque entrée de l'annuaire, vous pouvez enregis- trer la date et l'heure anniversaire pour qu'elles vous soient rappelées. Ouvrir l’annuaire. Afficher Sélectionner l’entrée et l’afficher. Modifier Ouvrir la zone de saisie. Placer le curseur dans la zone correspondant à...
-
Seite 82: Réglages
Réglages Appuyer sur les touches: Réglages Réveil : régler Si une heure de réveil est programmée sur votre com- ¼ biné (symbole ), celui-ci sonne tous les jours à la même heure. Le téléphone est en mode veille: © Ouvrir le menu. åååååååååååååååååååååååååååååååå... -
Seite 83: Rendez-Vous (Rdv) : Activer
Réglages Appuyer sur les touches : Rendez-vous (RDV) : activer Vous pouvez paramétrer le combiné de manière à ce qu’il vous rappelle un RDV. Si vous avez réglé un RDV, ¼ cela est signalé par le symbole à l’écran. Le téléphone est en mode veille. ©... - Seite 84 Réglages Appuyer sur les touches: Pour afficher un RDV déjà consulté, procédez comme indiqué ci-après. © Ouvrir le menu. åååååååååååååååååååååååååååååååå Sélectionner et valider. RDV/Heure åååååååååååååååååååååååååååååååå Sélectionner et valider. Dates échues ¼ ‚ Sélectionner les RDV ou les anniversaires acquittés. Les informations correspondantes s’affi- chent.
-
Seite 85: Sons/Audio
Sons/Audio Appuyer sur les touches : Sons/Audio Volume d'écoute du combiné Volume du haut-parleur mains-libres © Ouvrir le menu. åååååååååååååååååååååååååååååååå Sélectionner Menu. Sons / Audio åååååååååååååååååååååååååååååååå Une tonalité se fait entendre à son volume actuel. Volume écoute Régler le volume souhaité pour Mains-libres u. Sauter à... -
Seite 86: Tonalités D'avertissement
Sons/Audio Appuyer sur les touches: SVC Nuit (Service de nuit) Pour une plage horaire déterminée, vous pouvez régler temporairement le volume de sonnerie différemment, l'atténuer ou le renforcer selon le cas (par exemple la nuit). © Ouvrir le menu. åååååååååååååååååååååååååååååååå Sélectionner et valider. -
Seite 87: Vibreur : Activer/Désactiver
Sons/Audio Appuyer sur les touches : Vibreur : activer/désactiver Afin de ne pas être dérangé par la sonnerie, vous pou- vez à la place activer le vibreur de votre combiné. Vous pouvez aussi activer le vibreur parallèlement à la son- nerie (par exemple lorsque vous vous trouvez dans un environnement bruyant). -
Seite 88: Réglages Combiné
Réglages combiné Appuyer sur les touches: Réglages combiné Décroché automatique Lorsque cette fonction est paramétrée, il suffit de retirer le combiné du chargeur pour prendre l’appel (configuration usine), sans avoir à appuyer sur la touche © Ouvrir le menu. åååååååååååååååååååååååååååååååå Sélectionner et valider. -
Seite 89: Famille/Loisirs
Famille/Loisirs Appuyer sur les touches : Famille/Loisirs Surveillance de pièce A l’aide de votre combiné, vous pouvez surveiller les bruits d'ambiance d'une pièce à partir d'une autre pièce ou à distance depuis l'extérieur.Si un certain niveau de bruit est atteint, le combiné sélectionne automatique- ment le numéro (interne /externe) enregistré... -
Seite 90: Mode Talkie-Walkie
Mode Talkie-Walkie Appuyer sur les touches: Mode Talkie-Walkie Condition: Les combinés possèdent les mêmes réglages de base (p. ex. meilleure base) ou il ne sont pas encore enregistrés sur une base. (En mode Talkie-Walkie, l’autonomie d’un combiné est considérablement réduite). En mode Talkie-Walkie, les combinés ne sont plus joi- gnables pour les appels entrants. -
Seite 91: Annexe
Annexe Annexe Utilisation sur les bases de la gamme Gigaset Gigaset 1000/2000/3000 Les fonctions suivantes de votre combiné 4000i Micro/Comfort ne sont pas supportées par les bases Gigaset 1000/2000/3000. Réglage de l’heure (après mise à l’arrêt du combiné, l’heure n’est plus transmise) Sélection de la langue Surveillance de pièce (désactivation en externe impossible) -
Seite 92: Entretien
Annexe Entretien Essuyer la base et le combiné avec un chiffon humide ou un chiffon antistatique. Ne jamais utiliser de chiffon sec ! Risque de charge sta- tique ! Contact avec les liquides Si le poste mobile a été mis en contact avec un liquide, il ne faut en aucun cas le mettre en marche. -
Seite 93: Service Clients
Chargeur de table Pour recharger votre combiné, vous pouvez aussi vous servir du char- geur de table. (Accessoire pour les combinés Siemens voir page\ <$SeiteNum>) N° commande L36880-N4501-A101 ½ Lors de la charge du combiné Gigaset dans le chargeur de table, la batterie de réserve n’est plus en charge tant que le combiné... -
Seite 94: Langues D'affichage
Annexe Langues d'affichage Lors de l'enregistrement du combiné portatif sur la base Gigaset 4010i, vous pouvez paramétrer les langues marquées d'un *: Einstellungen Sprache Deutsch H/Set Settings Language English Réglages comb. Langue Français Impostazioni Lingua Italiano Ajuste terminal Idioma Español... - Seite 96 Be inspired Instrucciones de manejo e indicaciones de seguridad...
- Seite 97 Esquema general del terminal inalámbrico Esquema general del terminal inalámbrico El display está protegido con una lámina de plástico. Retire la lámina de protec- ción. LED de estado (diodo) Display (campo de indicación) Iluminado en llamada; Estado de carga intermitente en caso de: agotada –...
- Seite 98 Esquema general del terminal inalámbrico Menús importantes © Texto mensaje* Nuevo registro Servicios red Familia/ocio Bárbara © Citas/hora Claus Ajuste audio OKƒ Tasas Utilizar número Ajuste terminal Borrar registro Ajustes base Enviar registro Contestador Borrar lista Enviar lista Vol. teléfono Memoria libre Ajustar timbre Tonos de aviso...
-
Seite 99: Indicaciones De Seguridad
Indicaciones de seguridad Indicaciones de seguridad Utilice exclusivamente el alimentador enchufable incluido en el sumi- nistro, tal y como se indica en la parte inferior del equipo. Utilice sólo baterías recargables homologadas y del mismo tipo. No utilice en ningún caso pilas normales (no recargables), ya que estas podrían dañar la salud y causar daños personales. - Seite 100 Indice Indice Esquema general del terminal inalámbrico....... . . 2 Relación entre la tecla de control y las teclas de display.
-
Seite 101: Preparar El Terminal
Preparar el terminal Pulsar las teclas: Preparar el terminal Contenido del embalaje Terminal Gigaset 4000i Micro, una batería, soporte car- gador, clip para cinturón, instrucciones de manejo. Colocar la batería El ajuste de suministro del idioma en el display de su terminal inalámbrico es el italiano. -
Seite 102: Cargar La Batería
Preparar el terminal Pulsar las teclas: Gigaset Preparación en estación base/teléfono 4010/4015 Pulsar prolongadamente la tecla de la par- te inferior de la estación base. 3010/3015 Pulsar la tecla paging de la estación base hasta que se escuchen unas señales acústicas. -
Seite 103: Ajustar Fecha Y Hora
Preparar el terminal Pulsar las teclas: Ajustar fecha y hora El ajuste de la fecha y la hora es necesario para obtener una indicación correcta de la hora de entrada de las lla- madas/los mensajes. © Abrir el menú. åååååååååååååååååååååååååååååååå Seleccionar y confirmar. -
Seite 104: Realizar Llamadas
Realizar llamadas Pulsar las teclas: Realizar llamadas Llamadas externas o Introducir el número de teléfono. Si es necesario, corregir dígitos con la tecla de display Pulsar la tecla de descolgar. Pulsar la tecla de colgar para finalizar la comunicación. También es posible pulsar primero la tecla de des- colgar e introducir a continuación el número de teléfono, las cifras se marcarán entonces de inme-... -
Seite 105: Contestar Llamadas
Realizar llamadas Pulsar las teclas: Contestar llamadas El teléfono suena (timbre de llamada) y el LED de estado parpadea. Pulsar la tecla de descolgar o de manos libres. o bien retirar simplemente el terminal de la estación soporte cargador (estado suministro: "Aceptación automática Ö... -
Seite 106: Transferir Una Llamada Externa, Consulta
Rellamada Pulsar las teclas: Transferir una llamada externa, consulta Es posible transferir llamadas externas a otro terminal inalámbrico o realizar llamadas internas de consulta. Abrir lista de extensiones internas. Seleccionar extensión interna y llamar. Al contestar el usuario interno: Pasar la llamada: pulsar la tecla de colgar Terminar consulta: Conmutar con al usuario en espera. -
Seite 107: Listín Telefónico Y Lista De Proveedores De Red
Listín telefónico y lista de proveedores de red Pulsar las teclas: Guardar número de teléfono en el listín telefónico Mostrar número de teléfono y seleccionar. © Abrir el menú. åååååååååååååååååååååååååååååååå El número de teléfono se registra. Guardar en list. o Si es necesario, modificar el n° de teléfono, introducir el nombre (si se desea, con el cumpleaños v. -
Seite 108: Marcación Rápida De La Lista De Proveedores De Red
Listín telefónico y lista de proveedores de red Pulsar las teclas: Marcar desde el listín telefónico Abrir el listín telefónico. p. ej. Introducir la inicial del nombre, p. ej. para "E“ , pulse dos veces la tecla u hojee con la tecla Pulsar la tecla de descolgar. -
Seite 109: Marcar Con Marcación Rápida
Listín telefónico y lista de proveedores de red Pulsar las teclas: Marcar con marcación rápida Ÿ p. ej. Pulsar la tecla prolongadamente: se visualiza el nombre del proveedor de red programa- p. ej. o Introducir el número de teléfono o bien Seleccionar un registro del listín telefónico y confer- mar. - Seite 110 Listín telefónico y lista de proveedores de red Pulsar las teclas: La inserción de los caracteres se efectúa siempre a la izquierda del cursor. Anteponiendo un espacio en blanco , el registro correspondiente salta a la 1ª posición (ej.: " Carla“). Orden de clasificación: 1.
- Seite 111 Listín telefónico y lista de proveedores de red Pulsar las teclas: Enviar registro a otro terminal inalámbrico Es posible enviar un registro a otro terminal inalámbrico Comfort. Abrir el listín telefónico/la lista de proveedores de red. Seleccionar el registro deseado. ©...
-
Seite 112: Ajustes
Ajustes Pulsar las teclas: Introducir aniversarios (p.ej. cumpleaños) Puede introducir la fecha y la hora para los datos de cumpleaños/aniversarios y hacer que el teléfono le avi- Abrir el listín telefónico. Seleccionar el registro deseado y mostrar. Cambiar Abrir campo de entrada. Mover el cursor al campo del cumpleaños/aniversario. -
Seite 113: Desactivar El Despertador
Ajustes Pulsar las teclas: No se emitirá ninguna llamada de alarma si está acti- vada la función de babyphone (vigilancia de habita- ción) o la rellamada automática. Desactivar el despertador El despertador está ajustado, pero no desea que sue- © Abrir el menú. -
Seite 114: Volumen Del Microteléfono Y Del Altavoz
Ajustes Pulsar las teclas: La llamada de cita sólo se activa si el terminal inalám- brico se encuentra en estado de reposo. No se emitirá ninguna llamada de cita si está activada la función de babyphone (vigilancia de habitación) o la rellamada au- tomática. - Seite 115 Ajustes Pulsar las teclas: Ajustar volumen del timbre/melodía Puede elegir entre cinco niveles de volumen de timbre, la llamada "progresiva" (volumen en aumen- to), timbre desactivado, y diez melodías de timbre: © Abrir el menú. åååååååååååååååååååååååååååååååå Seleccionar y confirmar. Ajuste audio åååååååååååååååååååååååååååååååå...
-
Seite 116: Activar/Desactivar Tonos De Aviso Y Señales Acústicas
Ajustes Pulsar las teclas: Activar/desactivar tonos de aviso y señales acústicas Tono de confirmación de teclas: se confirma cada pulsación de tecla. Tonos de confirmación: Tono de confirmación (se- cuencia de tonos ascendente) al final de las entra- das/ajustes y al depositar el terminal en la estación base;... -
Seite 117: Activar/Desactivar Aceptación Automática De Llamada
Ajustes Pulsar las teclas: Activar/desactivar aceptación automática de llamada Si está activada esta función, para contestar una llama- da basta con retirar el terminal inalámbrico del soporte cargador (estado de suministro), sin necesidad de pul- sar la tecla © Abrir el menú. åååååååååååååååååååååååååååååååå... -
Seite 118: Babyphone (Vigilancia De Habitación)
Babyphone (vigilancia de habitación) Pulsar las teclas: Babyphone (vigilancia de habitación) Mediante su terminal inalámbrico puede supervisar los ruidos de la habitación de su bebé desde otro lugar. La distancia entre el terminal inalámbrico y su bebé debe ser de, como mín., 1 a 2 metros. Si se alcanza un nivel de ruido determinado (p.ej., el bebé... -
Seite 119: Modo Walkie-Talkie
Modo walkie-talkie Pulsar las teclas: Ud. puede desactivar desde el exterior (p.ej., desde el teléfono móvil) la función babyphone. Atienda la lla- mada activada por la función babyphone. ¬ª Desactivar con Ahora la función babyphone se encuentra desacti- vada. Ya no se activan más llamadas por el baby- phone. -
Seite 120: Anexo
Anexo Anexo Operación con estaciones base de la gama Gigaset Gigaset 1000/2000/3000 Las siguientes funciones de su teléfono inalámbrico 4000i Micro/ Comfort no se ofrecen en las estaciones base de esta gama Gigaset. Ajuste de la hora (tras apagar el terminal inalámbrico, la hora deja de visualizarse) Marcación por voz Babyphone (no puede desactivarse desde el exterior) -
Seite 121: Alcance
El alcance en espacios abiertos es de aprox. 300 m. Dentro de edifi- cios se registran alcances de hasta 50 m. Cargador de sobremesa El cargador de sobremesa para teléfonos móviles Siemens también se puede utilizar para cargar su terminal inalámbrico. (Accesorio para los teléfonos móviles Siemens C45, ME45, S45) de pedido L36880-N4501-A101) ½... - Seite 122 Anexo Idiomas de display Al registrarse en la estación base 4010i pueden ajustarse los idiomas marcados con *: Einstellungen Sprache Deutsch H/Set Settings Language English Réglages comb. Langue Français Impostazioni Lingua Italiano Ajuste terminal Idioma Español...
- Seite 124 Be inspired Operating instructions and safety precautions...
- Seite 125 Brief overview of the handset Brief overview of the handset The display is protected by a plastic film. Remove the plastic film. Status LED (light-emitting diode) Display (display field) lights up during a call; flashes at: Charging status – Incoming call empty –...
-
Seite 126: Display Symbols
Brief overview of the handset Important menus © Text Message* New Entry Select Services Anne Add. Features Barbara © Calendar/Clock Chris Sound Settings OKƒ Call Charges Display Number H/Set Settings Delete Entry Base Settings Copy Entry Voice Mail Delete List Send List Handset Volume Available Memory... -
Seite 127: Safety Precautions
Safety precautions Safety precautions Only use the power supply unit supplied as indicated on the underside of the device. Only insert approved rechargeable batteries of the same type. Never use ordi- nary (non-rechargeable) batteries as they may pose a health hazard or cause injury. ‹... - Seite 128 Contents Contents Brief overview of the handset ..........2 Interaction between control key and display keys.
-
Seite 129: Preparing The Handset
Preparing the handset Press Keys: Preparing the handset Delivery package Gigaset 4000 Micro handset, one battery, charging unit, belt clip, operating instructions. Inserting the battery The default display language on your handset is Italian. To set the desired language, see page 8. Registering the handset Step 1: ©... -
Seite 130: Charging The Battery
Preparing the handset Press Keys: 4010/4015 Hold down the key on the underside of the base station. 3010/3015 Hold down the paging-key on the base station until you hear signal tones. settings system settings regi- 3020/25 Select ster handset 3030/35 in the menu at the base sta- 4030/35 tion telephone and confirm with... -
Seite 131: Setting The Date And Time
Preparing the handset Press Keys: Setting the date and time You need to set the date and time so that the time that messages and calls are received is shown correctly. © Open the menu. åååååååååååååååååååååååååååååååå Select and confirm. Calendar/Clock åååååååååååååååååååååååååååååååå... -
Seite 132: Making Calls
Making calls Press Keys: Making calls Making an external call o Enter the telephone number. If you make a mistake use the key to correct individual digits. Press the talk key. Press the end call key to end the call. You can also press the talk key first and then enter the telephone number - each digit will be di-... -
Seite 133: Open Caller List/Message List
Making calls Press Keys: Open caller list/message list A message appears in the display and the status LED flashes to indicate that there are new calls/messages. Press Handsfree talking Handsfree talking when dialling o Dial the telephone number. Press the handsfree key. When handsfree talking is activated, the handsfree key u and the status LED are lit. -
Seite 134: Automatic Redial
Automatic redial Press Keys: Automatic redial Manual redial You have access to the last five telephone numbers di- alled. Display and select the telephone number. Press the talk key. Automatic redial This function is not available in all countries. The handsfree key flashes and open listening is activat- ed. -
Seite 135: Directory And Network Access List
Directory and network access list Press Keys: Directory and network access list With the directory you can store up to 200 tele- phone numbers and then dial them at the push of a button. You can save the prefixes (Call-by-Call) of telephone companies in the network access list . -
Seite 136: Speed Dialling From The Network Access List
Directory and network access list Press Keys: Dialling with the network access list (Call-by-Call) Open the network access list. D© Select call-by-call number and open the menu. åååååååååååååååååååååååååååååååå Select the menu item and confirm. Display Number o Enter the telephone number of the person you want to call. -
Seite 137: Character Map
Directory and network access list Press Keys: Character map Press the relevant key repeatedly or hold down: 2 x 3 x 4 x 5 x 6 x 7 x 8 x 9 x 10 x â blank £ ¥ ¤ Ÿ... -
Seite 138: Displaying, Changing Or Deleting An Entry
Directory and network access list Press Keys: Displaying, changing or deleting an entry Open the directory/network access list. Select the entry you want. View View all the information for the entry. Change Open the input field and make the necessary changes. o Change the number if necessary. - Seite 139 Directory and network access list Press Keys: Copying the directory/network access list You can copy the entire directory/network access list to another Micro/Comfort handset. See “Copying an entry to another handset” . Transmission is interrupted: if the memory of the receiving handset is full. if you receive a call.
-
Seite 140: Settings
Settings Press Keys: Settings Setting the alarm clock ¼ If activated, the alarm clock ( icon) on your handset will ring every day at the time entered. With the handset idle: © Open the menu. åååååååååååååååååååååååååååååååå Select the menu item and confirm. Calendar/Clock åååååååååååååååååååååååååååååååå... -
Seite 141: Setting An Appointment
Settings Press Keys: Setting an appointment Your handset is able to remind you of one appoint- ment. If you have set an appointment, this is indicated ¼ by the icon in the display. With the handset idle. © Open the menu. åååååååååååååååååååååååååååååååå... -
Seite 142: Handset And Loudspeaker Volume
Settings Press Keys: Missed appointments and anniversaries An appointment and anniversaries that have been sig- nalled on the handset but not been accepted are saved in a list. A new missed appointment/anniversary is indicated Appt. . Press the right display key to display the list ¼... -
Seite 143: Activating/Deactivating Warning And Signal Tones
Settings Press Keys: Time control for ringer volume You can set a different ringer volume for a particular time of day. © Open the menu. åååååååååååååååååååååååååååååååå Select the menu item and confirm. Sound Settings åååååååååååååååååååååååååååååååå You will hear the current ringer volume and its level Ringer Settings will be displayed. -
Seite 144: Activating/Deactivating The Vibration Alarm
Settings Press Keys: Activating/deactivating the vibration alarm If you do not wish to be disturbed by the ringing tone you can activate the handset’s vibration alarm instead. This can also be activated in addition to the ringing tone (in noisy surroundings, for instance). ©... -
Seite 145: Resetting To The Factory Defaults
Room monitoring (babyphone) Press Keys: Resetting to the factory defaults The directory, the network access list and the caller list are not deleted when you reset the handset. Registra- tion at the base station is not affected. © Open the menu. åååååååååååååååååååååååååååååååå... -
Seite 146: Setting The Room Monitor
Room monitoring (babyphone) Press Keys: Setting the room monitor © Open the menu. åååååååååååååååååååååååååååååååå Select the menu item and confirm. Add. Features åååååååååååååååååååååååååååååååå Select the menu item and confirm. Room Monitor. Select Scroll forward one line. Change Open the entry field for the telephone number. Delete an existing external number with Delete an existing internal number with (you will... -
Seite 147: Walk And Talk Mode
Walk and Talk mode Press Keys: Walk and Talk mode Requirements: The handsets must have the same base settings (e.g. best base station) or they must not be registered at any base station. (Walk and Talk mode reduces the handset's talk time considerably). In Walk and Talk mode, handsets are not available for incoming calls. -
Seite 148: Appendix
Appendix Appendix Operating on base stations in the Gigaset family Gigaset 1000/2000/3000 The following functions on your 4000i Micro/Comfort handset are not supported by base stations in this Gigaset family: Setting the time (the time is not transferred after the handset has been switched off) Changing the display language Room monitoring (cannot be switched off externally) -
Seite 149: Range
The handset will operate away from the base station up to about 300 m outdoors and up to 50 m indoors. Desktop charging station The desktop charging station for Siemens mobile telephones can also be used to charge your handset. (Accessory for Siemens C45, ME45, S45 mobile telephones) Order No. - Seite 150 Any further claims are excluded. Siemens is not liable in any circumstances for downtime, loss of profits, loss of data or loss of any other information. The customer alone is responsible for...
-
Seite 151: Guarantee Period
Appendix Changes to this guarantee require prior approval by Siemens in writing. Guarantee period The guarantee applies in countries in the EU from 1 January 2002 for a period of 24 months. In all other countries the guarantee period shall be the relevant minimum statutory guarantee period, but no longer than 24 months. -
Seite 152: Customer Care Service
You can get assistance easily when you have technical questions or questions about how to use your device by using our online support service on the Internet at: www.my-siemens.com/customercare If the device needs to be repaired, please contact one of our service centers: Service telephone number see back cover. -
Seite 153: Display Languages
Appendix Display languages When registering the handset with the Gigaset 4010i base station, the languages marked with an * can be set: Einstellungen Sprache Deutsch H/Set Settings Language English Réglages comb. Langue Français Impostazioni Lingua Italiano Ajuste terminal Idioma Español... - Seite 154 Appendix We, Siemens AG, declare, that the above mentioned product is manu- factured according to our Full Quality Assurance System certified by CE- TECOM ICT Services GmbH with the registration number „Q810820M“ in compliance with ANNEX V of the R&TTE-Directive 99/05/EC. The presumption of conformity with the essential requirements regarding Council Directive 99/05/EC is ensured.
- Seite 155 Issued by Information and Communication mobile Haidenauplatz 1 D-81667 München © Siemens AG 2002 All rights reserved. Subject to availability. Right of modification reserved. Printed in Germany (05/2002). Siemens AG http://www.my-siemens.com A3 1 0 0 8 - G4 0 0 0 - B0 2 7 - 1 - 6 4 1 9...