Exsys EX-6111 Anleitung

Verwandte Anleitungen für Exsys EX-6111


Inhaltszusammenfassung für Exsys EX-6111
- Seite 1 Anleitung EX-6111 Ethernet zu 1x Seriell RS-232 Ethernet to 1x Serial RS-232 Vers. 1.0 / 20.01.21 Manual...
-
Seite 2: Inhaltsverzeichnis
Layout ······················································································································ 14 Connections & LED‘s······························································································· 14-15 Hardware Installation ····················································································· 16-17 Configuration of the Device Server ········································································16 VCOM Admin Utility ······················································································ 17-21 Cleaning ··········································································································22 Technical Information ·························································································22 Technical Drawing ·····························································································22 © Copyright 2021 by EXSYS Vertriebs GmbH. All Rights Reserved... -
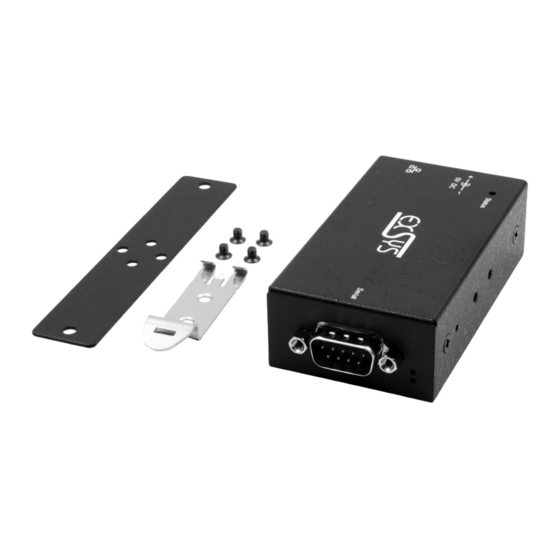
Seite 3: Beschreibung
Unterstützt 15KV ESD-Schutz für alle serielle Signale • Unterstützt 5V über seriellen Anschluss • Zertifiziert für 2. Lieferumfang Bevor Sie den EX-6111 in Ihr Netzwerk einbinden, überprüfen Sie bitte zuerst den Inhalt der Lieferung: • EX-6111 • Netzteil (5V/4A) •... -
Seite 4: Aufbau, Anschlüsse & Led's
3.2 Anschlüsse & LED‘s DB 9M: Seriell 9 Pin D-SUB Stecker Signal Signal Signal GROUND (Power) RJ45 Anschluss: RJ45 Anschluss Signal Signal Signal BI_DA+ BI_DC+ BI_DD+ BI_DA- BI_DC- BI_DD- BI_DB+ BI_DB- © Copyright 2021 by EXSYS Vertriebs GmbH. All Rights Reserved... -
Seite 5: Hardware Installation
4. Hardware Installation Beachten Sie bitte die folgenden Installationshinweise. Da es große Unterschiede zwischen PC‘s gibt, können wir Ihnen nur eine generelle Anleitung zum Anschluss der EX-6111 geben. Bei Un- klarheiten halten Sie sich bitte an die Bedienungsanleitung Ihres Computersystems. -
Seite 6: Konfiguration Des Geräteserver
4. Schließen Sie jetzt das im Lieferumfang enthaltene 5V Netzteil an die dafür vorhergesehene 5V Buchse der EX-6111 an. Warten Sie etwa 25-30 Sekunden bis die Status LED anfängt zu blin- ken. Sobald diese LED blinkt, ist das Gerät betriebsbereit. -
Seite 7: Vcom Admin Utility
Administrator ausführen“). Klicken Sie auf Remote Device Management > ADD Device > Search Nachdem der EX-6111 gefunden wurde, klicken Sie auf Cancel, um die Suche abzubrechen. Klicken Sie auf OK, um den EX-6111 hinzuzufügen. © Copyright 2021 by EXSYS Vertriebs GmbH. All Rights Reserved... - Seite 8 Gerät zuzuordnen, klicken Sie auf COM Mapping > Add COM > OK Um die COM-Port-Nummer zu ändern, klicken Sie auf COM Mapping > Modify COM Der COM1 wurde nun hinzugefügt! © Copyright 2021 by EXSYS Vertriebs GmbH. All Rights Reserved...
- Seite 9 Schnittstelle auf andere Werte als die Standardwerte ändern (z.B. Device Description, Pass- word, ...), müssen Sie sich zuerst am Device Server anmelden (das Standardpasswort hierfür "system"). Klicken Sie auf Remote Device Management > Login © Copyright 2021 by EXSYS Vertriebs GmbH. All Rights Reserved...
- Seite 10 Device Server in der Liste. Doppelklick Klicken Sie auf Remote Device Management > (Doppelklick auf das ausgewählte Element in der Liste) > Basic > Device Description > OK Doppelklick © Copyright 2021 by EXSYS Vertriebs GmbH. All Rights Reserved...
- Seite 11 > Open in Browser und geben Sie folgende Anmeldedaten ein: User Name: admin Password: system Klicken Sie auf Port Config > Port 1 > Operation Mode > Apply > Save & Restore © Copyright 2021 by EXSYS Vertriebs GmbH. All Rights Reserved...
-
Seite 12: Reinigung
0° bis 60° Celsius Lagertemperatur: -20° bis 75° Celsius Rel. Luftfeuchtigkeit: 5% bis 95% Schutzklasse: IP30 Stromversorgung: +5V/4A Abmessung: 82,00 x 46,20 x 25,00 mm Gewicht: 540g 9. Technische Zeichnung © Copyright 2021 by EXSYS Vertriebs GmbH. All Rights Reserved...