Herunterladen Inhalt Inhalt Diese Seite drucken

Werbung

Verfügbare Sprachen
  • DE

Verfügbare Sprachen

  • DEUTSCH, seite 1
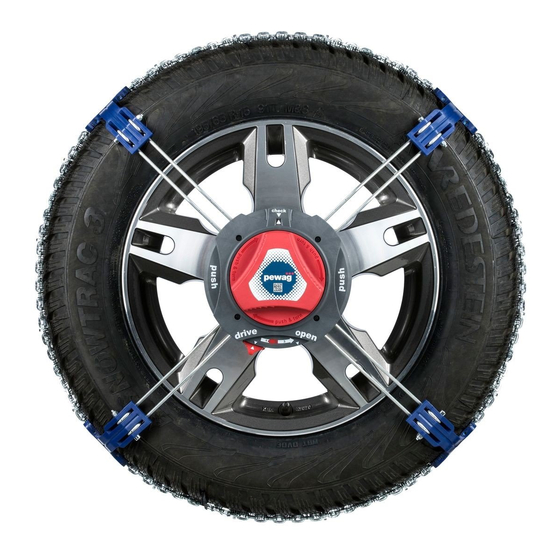
Mounting instruction
for RSC
Hinweise
Fahrzeugherstellerdaten und beiliegende Warnhinweise beachten!
DE
Einsatzbereich PKW. Für Reparaturen wenden Sie sich bitte an den Fachhandel.
Technische Anpassungen und Farbänderungen vorbehalten.
Note
Please refer to the vehicle manufacturer's information and warnings! For use
EN
with passenger cars only. For repairs, please contact your specialist dealer. Please be
advised that all products are subject to technical adjustments and changes in colour.
Avertissement
Respectez les préconisations du constructeur ! Usage prévu
FR
pour véhicules de tourisme. Pour toute réparation veuillez contacter votre revendeur.
Sous réserve de modifications techniques et changement de couleur.
Instructies
a.u.b aanwijzingen in uw auto instructieboekje en bijgaande
NL
informatie goed lezen. Geschikt voor personenwagens. Voor reparaties, kunt u
terecht bij uw dealer. Technische aanpassingen en kleurwijzigingen voorbehouden.
Avvertenze
Osservate quanto indicato nel manuale uso e manutenzione
IT
della ditta costruttrice del mezzo! Ambito d´impiego: autovetture. Per riparazione
rivolgetevi esclusivamente a rivenditori autorizzati. Si prega di voler prestare
attenzione a possibili adeguamenti tecnici e cambi di colore.
Upozornění
bejte pokynů a varování výrobce vozu týkající se použití
CZ
sněhových řetězů. Použití pouze pro osobní automobily. Ohledně opravy se obraťte
na autorizovaného prodejce. U produktu může dojít k technické úpravěa změně barvy.
Upozornenie
Dbajte na pokyny a varovania od výrobcu vozidla týkajúcich
SK
sa použitia snehových reťazí. Použitie iba pre osobné vozidlá. V prípade opravy sa
obráťte na autorizovaných predajcov. Pri produkte môže prísť k technickéj úprave a
zmene farby.
Uwaga
Łańcuchy przeznaczone są tylko do samochodów osobowych. Należy
PL
stosować się do zapisów i ostrzeżeń zawartych w instrukcji obsługi pojazdu!
W kwestii ewentualnych napraw należy skontaktować się z autoryzowanym
dystrybutorem. Firma pewag zastrzega sobie prawo do zmian technicznych służących
ulepszeniu produktu.

Werbung

Inhaltsverzeichnis
loading

Inhaltszusammenfassung für pewag RSC

  • Seite 1 Łańcuchy przeznaczone są tylko do samochodów osobowych. Należy stosować się do zapisów i ostrzeżeń zawartych w instrukcji obsługi pojazdu! W kwestii ewentualnych napraw należy skontaktować się z autoryzowanym dystrybutorem. Firma pewag zastrzega sobie prawo do zmian technicznych służących ulepszeniu produktu.
  • Seite 2 Content 21/22 21/22...
  • Seite 3 195/80-13 tire chain element- tire chain element- tire chain elem 205/75-13 dimension size adaption dimension size adaption dimension size adap Prepare A 175/80-14 185/75-14 215/70-14 195/75-15 215/75-14 205/70-14 245/60-14 205/70-15 235/70-14 215/65-14 185/75-15 215/65-15 185/80-15 235/60-14 195/70-15 225/65-15 205/75-15 175/75-15 205/65-15 235/60-15 215/70-15...
  • Seite 4 tire chain element- tire chain element- tire chain element- tire chain element- tire chain element- dimension size adaption dimension size adaption dimension size adaption dimension size adaption dimension size adaption 225/30-20 205/75-14 225/35-20 275/35-19 195/80-13 205/75-13 205/80-13 225/70-14 255/30-20 285/35-19 185/80-14 265/60-14 275/30-20...
  • Seite 5 û Prepare B ü û ü û ü...
  • Seite 6: Verpackungsinhalt

    Kundeninformation Elementen, immer zwei diagonal voneinander liegende Elemente entfernen. Bewahren Sie die entfernten Teile auf – die Kette kann Das Anpassen der Kette vor der Fahrt ist unbedingt notwendig, für andere Reifendimensionen wiederverwendet werden. da dies die Montage der Kette bei winterlichen Verhältnissen Hinweis: Angaben sind allgemein gültig und nicht verbindlich.
  • Seite 7: Montage Für Den Einsatz

    Abb. 4: Vormontiert: kurz ½ Radumdrehung und schieben Sie den noch nicht komplett montierten Teil der Kette auf den Reifen. Abb. 5: Alternative: mittel -> Abstandshalter und Schraube tauschen Abb. 6: Alternative: lang -> Abstandshalter ergänzen und Überprüfen Sie den Sitz der Kette nach ca. 50 m. Schraube tauschen.
  • Seite 8: Customer Information

    Customer Information elements. Keep the removed parts –this chain can be reused for other tire dimension. Note: These instructions are generally valid It is absolutely necessary to adjust the chain before first use. As a and non-binding and are results of tests and our experience. result mounting is easier in the course of winter conditions.
  • Seite 9: Product Description

    Mounting for use Demounting 1. Remove the wheel cover and nut caps. Remove any dirt, snow or 1. Stop the vehicle. Do not stand on one of the arms. ice. Open the arms of the adjusted chain and place them over the 2.
  • Seite 10: Informations Client

    Informations client diamétralement opposés. Conservez les pièces enlevées – cette chaîne peut être réutilisée pour d’autres dimensions de pneus. Indication : Ces indications sont à caractère général et non contractuelles ; elles Il est impératif de régler la chaîne avant sa première utilisation. Cela en sont le résultat de tests et de notre expérience.
  • Seite 11: Description Du Produit

    Montage pour utilisation Démontage 1. Enlevez l’enjoliveur et les capuchons des écrous. Enlevez 1. Arrêtez le véhicule. Vérifiez que vous n’êtes pas arrêté l’un des bras. éventuellement la saleté, la neige ou la glace. Ouvrez les bras 2. Mettez bouton à glissière du cliquet en position « open ». Pour ce de la chaîne ajustée et placez-les sur le pneu.
  • Seite 12: Verpakkingsinhoud

    Klantinformatie Wanneer je twee elementen moet verwijderen, verwijder dan twee diagonale elementen. Bewaar de verwijderde onderdelen – de Het is absoluut noodzakelijk dat de ketting vóór het eerste gebruik wordt ketting kan opnieuw gebruikt worden voor andere bandenmaten. aangepast. Op die wijze is de montage in winterse omstandigheden Opmerking: deze instructies zijn algemeen geldig en niet bindend en eenvoudiger.
  • Seite 13 Montage voor gebruik Demontage 1. Verwijder de wieldop en de evt. aanwezige kunststof wiel- 1. Stop het voertuig. Sta niet op een van de armen. boutdoppen. Verwijder al het vuil, sneeuw en ijs. Open de armen 2. Zet de schuif in de ‘open’ stand. Hiervoor beweegt u de schuif van de aangepaste ketting en plaats deze over de band.
  • Seite 14: Informazioni Per Il Cliente

    Informazioni per il cliente di elementi (gialli) di regolazione specificato con gli strumenti in dotazione, come mostrato nella figura. Legenda: ok = nessuna regolazione necessaria, -1 = rimuovere 1 È assolutamente necessario regolare la catena prima del primo elemento, -2 = rimuovere 2 elementi ecc. utilizzo.
  • Seite 15: Descrizione Del Prodotto

    Fig. 3b: La pinza deve essere posizionata dritta e interamente sulla sistema automaticamente sul pneumatico, procedere in avanti per testa esagonale del dado della ruota per un fissaggio sicuro. completare circa ½ giro della ruota. Sistemare poi sul pneumatico Fig. 4: Premontato: corto le parti della catena che non si sono completamente montate.
  • Seite 16 Informace pro zákazníka uschovejte, abyste tento řetěz mohli použít i pro jiný rozměr pneumatiky. Poznámka: Tyto pokyny mají obecnou platnost, nejsou Před prvním použitím je nutné přizpůsobit sněhový řetěz rozměru závazné a jsou založeny na našich testech a zkušenostech. pneumatiky. Díky tomu bude montáž v zimních podmínkách Důrazně...
  • Seite 17: Popis Výrobku

    Montáž k použití Demontáž 1. Demontujte kryt kola a krytky matic. Odstraňte nečistoty, sníh 1. Zastavte vozidlo. Vozidlo nesmí stát na některém ramenu. nebo led. Otevřete ramena seřizovaného řetězu a vložte ho na 2. Přestavte posuvný přepínač ráčny do polohy „open“. Přitom pneumatiku.
  • Seite 18: Obsah Balenia

    Informácia pre zákazníka Odstránené nastavovacie prvky si odložte – reťaz budete môcť neskôr použiť aj na iné kolesá. Poznámka: Tieto pokyny sú len Pred prvým použitím je absolútne nevyhnutné prispôsobiť rozmery všeobecné a nie sú záväzné. Sú výsledkom našich testov a reťaze kolesám.
  • Seite 19: Opis Produktu

    Obr. 6: Alternatíva: dlhá skrutka -> pridajte dištančnú vložku a vymeňte nenavinie na pneumatiku, tak uveďte vozidlo do pohybu smerom skrutku. dopredu približne o polovicu otáčky kolesa. Tie časti reťaze, ktoré nie sú úplne osadené, natiahnite na pneumatiku. Osadenie reťaze Po približne 50 metroch skontrolujte osadenie reťaze.
  • Seite 20: Informacje Dla Użytkownika

    Informacje dla użytkownika W przypadku, kiedy musisz usunąć dwa żółte elementy zrób to w sposób symetryczny; zmodyfikuj długość dwóch przeciwległych Dopasowanie łańcuchów przed pierwszym ich użyciem jest siatek jezdnych łańcuchów rozdzielonych ramionami. Zachowaj bezwzględnie konieczne. Ułatwi to ich szybsze zakładanie w warunkach niepotrzebne elementy po to, aby w przyszłości można było zimowych.

Inhaltsverzeichnis