Rimage AutoEverest AutoPrinter Einrichtungs- Und Installationshandbuch
Vorschau ausblenden
Andere Handbücher für AutoEverest AutoPrinter:
- Einrichtungs- und installationshandbuch (2 Seiten)
Inhaltsverzeichnis
Verfügbare Sprachen
Verfügbare Sprachen
Quicklinks
AutoEverest AutoPrinter ™ Setup and
Installation Guide
Before you begin:
This document describes how to set up your Rimage AutoEverest AutoPrinter.
The instructions in this document are intended for people who are familiar
with hardware setup, software installation, and Windows operating systems.
If you do not understand the procedures in this document, ask your computer
technician for help.
Documents referenced in this procedure are found on the Rimage AutoPrinter
User Guide disc included with your system and are also available online at
www.rimage.com/support. From the Support menu select: Printer Series >
AutoPrinter > User Manuals tab.
Important!
This guide provides the information needed to set up a AutoEverest
•
AutoPrinter. If you are using the Everest printer as a standalone printer,
refer to the printer's setup and installation guide for instructions. If your
Everest printer is part of an autoloader, refer to the autoloader's setup
and installation guide for instructions.
Read all setup instructions thoroughly before you begin.
•
•
Save all packing boxes and packing materials.
Notes:
Your product may not look exactly like the product pictured.
•
The term "AutoPrinter" is used throughout this document to refer to the
•
Rimage AutoEverest AutoPrinter. The term "printer" is used throughout
this document to refer to the Everest printer.
•
Unless otherwise indicated, all Windows navigation statements are
Microsoft Windows 7 paths. Other operating systems' navigation paths
may differ slightly.
# Required tools: Scissors or side cutters.
110660_G
All manuals and user guides at all-guides.com
1
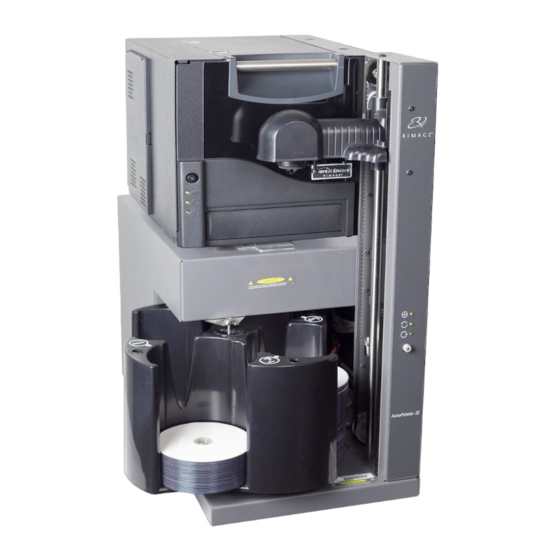
Prepare the AutoPrinter
a. Cut the plastic tie wraps (Qty. 2) from the lift arm.
n
Caution! Do not cut the belt or the cable!
b. Remove the shipping foam inserted above the carousel.
Shipping
Foam
2
Prepare the Everest Printer
a. Unpack the Everest printer. Refer to the label on the Everest
printer box.
b. Follow the instructions on the
instruction card on the back of
the printer.
i.
Set the AC voltage switch.
ii. Move the shipping screw
to the storage position.
c. Open the Everest printer.
i.
Press the two side cover latches.
ii. Lower the side cover.
Copyright © 2012 Rimage Corporation
2
Tie
Wraps
Voltage Switch
Instruction Card
Shipping Screw
Shipping Screw
Storage Position
Side Cover Latches
Prepare the Everest Printer (continued)
d. Open latches 1, 2, and 3 as indicated by the arrows.
Latch 1
Latch 2
Latch 3
e. Remove the plastic packing pieces (Qty. 2) from inside the printer.
Packing Piece
Packing Piece
f.
Install the print ribbon.
i.
Grasp the handle and pull to remove the print ribbon carrier
all the way out of the printer.
ii. Lay the print ribbon carrier on its back on a clean, flat surface.
Print Ribbon Carrier
iii. Wrap the print ribbon around the guide rollers, as shown.
Guide Rollers
Supply Roll
Take-up Roll
iv. Snap the supply roll and take-up roll into the print ribbon
carrier.
v. Tighten the print ribbon by turning the take-up roll clockwise.
vi. Insert the print ribbon carrier into the printer.
P
Retransfer Ribbo
Carrier
Inhaltsverzeichnis

Verwandte Anleitungen für Rimage AutoEverest AutoPrinter


Inhaltszusammenfassung für Rimage AutoEverest AutoPrinter
-
Seite 3: Vorbereiten Des Autoprinter
Entfernen Sie die Kunststoff-Transportsicherungen (2 Teile) im Drucker. Voraussetzungen: Transportsicherung Transportsicherung Dieses Dokument beschreibt die Einrichtung des Rimage Auto Everest AutoPrinter. Die Anweisungen in diesem Dokument sind für Personen vorgesehen, die mit Legen Sie das Druckband ein. Hardwareeinrichtung, Softwareinstallation und Windows-Betriebssystemen vertraut Ziehen Sie den Druckbandträger am Griff vollständig aus dem Dru-... -
Seite 4: Weitere Informationen
Prism-Drucker an den Everest- mit dem externen Drucker an. Control Center (PC). Registrieren Sie Ihr Rimage Auto-Drucker, um für 1 Jahr Garantie für Komponenten und Arbeitsstunden sowie telefonischen Prioritätssupport Bemerkung: Der Transferbandträger bleibt beim Herausziehen mit zu erhalten. dem Drucker verbunden.