Star LC-4511 Bedienungshandbuch
Punkt-matrix-drucker

Verwandte Anleitungen für Star LC-4511


Inhaltszusammenfassung für Star LC-4511
- Seite 1 USER’S MANUAL GUIDE D’UTILISATION BEDIENUNGSHANDBUCH MANUALE OPERATIVO LC-4511 LC-4521 DOT MATRIX PRINTERS IMPRIMANTES MATRICIELLES PUNKT-MATRIX-DRUCKER STAMPANTI AD AGHI HBA15 80825362-A...
- Seite 2 All efforts have been made to ensure the accuracy of the contents of this manual précision de son contenu. Cependant, en cas d’erreur dans ce manuel, STAR at the time of printing. However, should any errors be found, STAR would apprécierait grandement d’en être informé.
-
Seite 3: Betriebsgeräusch
• Die Firma STAR kann nicht für Fehler in diesem Handbuch und eventuell daraus entstehende Folgen verantwortlich gemacht werden. • Nonostante quanto citato sopra, la STAR non si assume nessuna responsabilità... -
Seite 4: A Propos De Ce Manuel
About this manual A propos de ce manuel This manual describes how to set up, use, and care for the Star LC-4511 and LC- Ce manuel décrit l’installation, le fonctionnement et l’entretien des imprimantes 4521 printers. The following is a list of what you can expect to find in each chapter. -
Seite 5: Informazioni Sul Manuale
In diesem Handbuch wird die Vorbereitung, Verwendung und Pflege der Drucker Questo manuale descrive come installare, usare e mantenere le stampanti Star Star LC-4511 und LC-4521 beschrieben. Es folgt ein kurzer Umriß der Inhalte der LC-4511e LC-4521. Segue una lista del contenuto di ciascun capitolo. -
Seite 6: Inhaltsverzeichnis
Contents Table des matières Chapter 1: Printer Setup Chapitre 1: Installation de l’imprimante ................ 1 ........1 Choosing a place for the printer ..............1 Choix d’un emplacement pour l’imprimante ..........1 Unpacking the printer ................. 3 Déballage de l’imprimante ................. 4 General guide ..................... - Seite 7 Inhaltsverzeichnis Indice Kapitel 1: Drucker-Setup Capitolo 1: Installazione della stampante ............... 2 ........2 Wahl eines Aufstellungsorts für den Drucker ..........2 Scelta del luogo dove installare la stampante ..........2 Auspacken des Druckers ................4 Disimballaggio della stampante ..............4 Allgemeine Anleitung ................
- Seite 8 Chapter 3: Using the EDS Mode Chapitre 3: Utilisation du mode EDS ............41 ..........41 About EDS Mode settings ................ 41 Au sujet des réglages en mode EDS ............41 Entering the EDS Mode ................41 Entrée en mode EDS ................41 Selecting a bank ..................
- Seite 9 Kapitel 3: Verwendung des EDS-Modus Capitolo 3: Uso del modo EDS ........42 ............42 Einstellungen des EDS-Modus ..............42 Le impostazioni del modo EDS ............... 42 Einschalten des EDS-Modus ..............42 Attivazione del modo EDS ............... 42 Wahl einer Gruppe ................... 44 Selezione di un gruppo ................
- Seite 10 Chapter 7: Using the Printer with OS/2 Warp Chapitre 7: Utiliser l’imprimante avec le logiciel OS/2 Warp ......111 ... 111 Setting up for printing with OS/2 Warp ..........111 Configurer l’impression avec le logiciel OS/2 Warp IBM ..... 111 Getting ready to print ................
- Seite 11 Kapitel 7: Der Einsatz des Druckers unter OS/2 Warp Capitolo 7: Utilizzo della stampante con OS/2 Warp ..112 .... 112 Einrichtung für den Druck unter IBM OS/2 Warp ......... 112 Installazione della stampante sotto OS/2 Warp ........112 Druckvorbereitungen ................114 Impostazione della stampante ..............
-
Seite 12: Chapter 1: Printer Setup
Chapter 1: Printer Setup Chapitre 1: Installation de l’imprimante This chapter contains important information on setting up your printer. Be sure to Ce chapitre contient des informations importantes concernant l’installation de read this chapter carefully before using the printer for the first time. In this chapter l’imprimante. -
Seite 13: Kapitel 1: Drucker-Setup
Kapitel 1: Drucker-Setup Capitolo 1: Installazione della stampante Dieses Kapitel enthält wichtige Informationen zur Vorbereitung Ihres Druckers. Questo capitolo contiene informazioni importanti su come installare la stampante. Bitte lesen Sie dieses Kapitel sorgfältig durch, bevor Sie den Drucker zum ersten Leggere attentamente questo capitolo prima di usare la stampante per la prima volta. -
Seite 14: Unpacking The Printer
Unpacking the printer Check to make sure that the carton contains each of the items shown in the following illustration. Ribbon cassette If anything is missing, contact the store where you Cartouche de ruban bought the printer and ask them to supply the missing Farbbandkassette part. -
Seite 15: Déballage De L'imprimante
Déballage de l’imprimante Auspacken des Druckers Disimballaggio della stampante Vérifiez que tous les accessoires illustrés ci-dessous Überprüfen Sie den Kartoninhalt, und vergewissern Verificare che la confezione contenga tutti i se trouvent dans le carton. Sie sich, daß alle neben abgebildeten Teile vorhanden componenti illustrati nella seguente figura. -
Seite 16: Opening The Front Cover
Opening the front cover Lift up on the front cover and swing it open until Tear assist edge it stops. Bord de découpe Abrißkante To close the front cover, simply lower it back into Bordo guida di strappo place. Caution! The tear assist edge is rather sharp. -
Seite 17: Ouverture Du Capot Avant
Ouverture du capot avant Öffnen der Frontabdeckung Apertura del coperchio anteriore Ouvrez le capot avant au maximum. Heben Sie die Frontabdeckung an, und ziehen Sie Sollevare il coperchio anteriore e aprirlo sie bis zum Anschlag hoch. facendolo ruotare fino al suo arresto. Abaissez simplement le capot avant pour le Zum Schließen der Frontabdeckung drücken Sie fermer. -
Seite 18: Installing The Platen Knob
Installing the platen knob The platen knob is packed into a recess in the packaging material. Install the knob on the shaft located inside the large hole on the left side of the printer. Make sure that the two splines of the platen shaft inside the printer fit into the slots inside the knob’s spindle. -
Seite 19: Montage De La Molette Du Cylindre
Montage de la molette du cylindre Befestigung des Walzendrehknopfes Montaggio della manopola del rullo La molette du cylindre se trouve dans un creux du Der Walzendrehknopf befindet sich in einer La manopola del rullo è imballata in un incavo del matériel d’emballage. -
Seite 20: Removing The Ribbon Cassette
While guiding the ribbon between the print head and print head shield, press down gently but firmly on the cartridge until the side tabs snap securely into place. Rotate the knob on the cassette again to take up any slack. Print head shield Replace the front cover of the printer. -
Seite 21: Retrait De La Cartouche De Ruban
Tout en guidant le ruban entre la tête Führen Sie das Farbband zwischen Druckkopf Guidando il nastro fra la testina di stampa e la d’impression et le protecteur de la tête und Druckkopfblende ein, und drücken Sie die piastrina di protezione della testina di stampa, d’impression, appuyez doucement mais Kassette sanft aber fest auf, bis sie einrastet. -
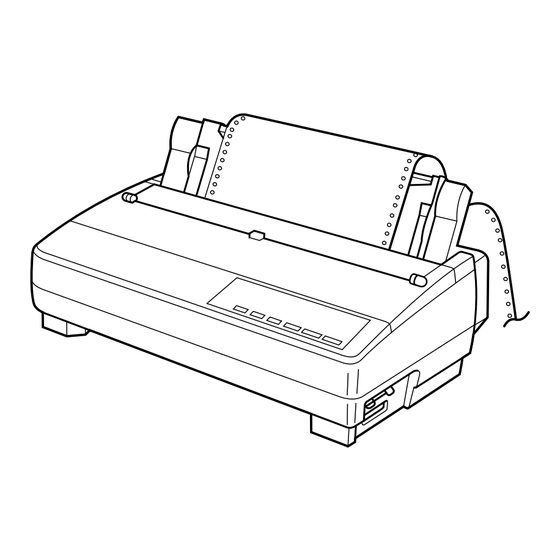
Seite 22: Installing The Paper Guide
Installing the paper guide Insert the two tabs on the rear cover of the printer into the holes in the bottom of the paper guide. To remove the paper guide from the printer, simply pull the tabs out of the holes. Paper guide Standing up the paper guide Paper guide... -
Seite 23: Mise En Place Du Guide-Papier
Mise en place du guide-papier Einsetzen der Papierführung Installazione del guida carta Insérez les deux ergots du capot arrière de Führen Sie die beiden Zapfen an der Inserire i due perni sul coperchio posteriore della l’imprimante dans les trous de la partie inférieure Traktorabdeckung in die Löcher an beiden Seiten stampante nei fori in fondo al guida carta. -
Seite 24: Connecting To A Power Outlet And Turning Power On And Off
Connecting to a power outlet and turning power on and off Plug the power cord of the printer into a standard power outlet whose voltage matches the power rating noted on the label affixed to the bottom of your printer. Caution! If the voltage marked on the bottom of your printer does not match the voltage from the outlet you are... -
Seite 25: Connexion À Une Prise Secteur Et Mise Sous Et Hors Tension
Connexion à une prise secteur et mise Anschluß an eine Steckdose und Ein-/ Collegamento ad una presa elettrica sous et hors tension Ausschalten der Netzversorgung ed accensione e spegnimento Branchez le cordon d’alimentation de Schließen Sie das Netzkabel des Druckers an Inserire il cavo di alimentazione della stampante l’imprimante à... - Seite 26 Grasping the two back corners of the printer with the palms of your hands, press back on the two raised areas on the top of the rear cover until it opens. Swing the rear cover back and down until it stops. Note: Metal edge You can also completely remove the rear cover by...
- Seite 27 Tout en saisissant les deux coins arrière de Halten Sie die beiden hinteren Ecken des Afferrando i due angoli posteriori della l’imprimante avec les paumes de la main, Druckers mit den Handflächen, und drücken Sie stampante con il palmo delle mani, spingere appuyez sur les deux parties soulevées du haut du die beiden angehobenen Stellen oben auf der indietro le due zone sollevate in cima al...
- Seite 28 Close the tractor covers. At this point you can make final adjustments to the paper position by releasing the gray levers and moving the tractors. The paper should lie flat with no buckling or bulging (tractors too close) or no stretching or elongation of the holes (tractors too far apart).
- Seite 29 Fermez les volets des tracteurs. Le cas échéant, Schließen Sie die Stachelwalzenhalter, und Chiudere i coperchi dei trattori. A questo punto è actionnez les leviers gris et déplacez les tracteurs richten Sie das Papier, falls notwendig, zusätzlich possibile eseguire le regolazioni finali per il pour que le papier soit bien aligné.
-
Seite 30: Printing On Fanfold Paper
Printing on fanfold paper When printing on fanfold paper, take care not to print too close to the perforations that separate each sheet. The following shows the recommended print area for Fanfold paper Cut-sheet paper Labels fanfold paper, cut-sheet paper and label paper. Papier continu Feuilles séparées Etiquettes... -
Seite 31: Impression Sur Papier Continu
Impression sur papier continu Drucken auf Endlospapier Stampa su carta a modulo continuo Lorsque vous imprimez sur papier continu, prenez Achten Sie beim Drucken auf Endlospapier darauf, Quando si stampa su carta a modulo continuo, fare soin de ne pas imprimer trop près des perforations nicht zu dicht an der Perforation am Blattende attenzione a non stampare troppo vicino alle qui séparent chaque feuille. -
Seite 32: Unparking Fanfold Paper
Unparking fanfold paper Nouvelle utilisation du papier continu After you are finished printing on cut-sheet paper, use the following procedure to Lorsque vous avez fini d’imprimer sur des feuilles séparées, effectuez les démarches unpark fanfold paper and make it available for printing. suivantes pour imprimer de nouveau sur le papier continu. -
Seite 33: Fortsetzung Des Endlospapier-Druckbetriebs
Fortsetzung des Endlospapier-Druckbetriebs Ripristino del modulo continuo parcheggiato Nach beendetem Einzelblattdruck kann wie folgt mit Endlospapier weitergedruckt Terminata la stampa sui fogli singoli, utilizzare il seguente procedimento per werden. ricaricare il modulo continuo parcheggiato e renderlo disponibile per la stampa. Nehmen Sie das Einzelblatt aus dem Drucker heraus. - Seite 34 For an IBM-compatible personal computer: Use a standard 36-pin Centronics parallel cable. The parallel cable should be no longer than six feet (two meters). Longer cables can result in poor transfer of information. Important! Make sure that the printer and the computer are turned off before connecting them.
- Seite 35 Dans le cas d’un ordinateur individuel compatible Für IBM-kompatible Personalcomputer: Per collegare la stampante ad un personal computer IBM: IBM compatibile: Verwenden Sie ein normales 36poliges Utilisez un câble parallèle Centronics standard à Centronics-Parallelkabel. Utilizzare un cavo parallelo Centronics standard 36 broches.
-
Seite 36: Chapter 2: Control Panel Operations
Chapter 2: Control Panel Operations Chapitre 2: Utilisation du panneau de commande The control panel gives you push-button control over the printer’s operations. It Les touches du panneau de commande permettent de contrôler les fonctions de includes indicator lights, which tell you the current status of the printer at a glance. l’imprimante. -
Seite 37: Kapitel 2: Bedienfeld
Kapitel 2: Bedienfeld Capitolo 2: Funzioni del pannello di controllo Sämtliche Druckerbetriebsabläufe sind über das Bedienfeld steuerbar. Il pannello di controllo consente di gestire per mezzo di tasti le varie funzioni della Leuchtanzeigen sorgen dafür, daß der jeweilige Betriebsstatus des Druckers stets auf stampante. -
Seite 38: Selecting A Font
Selecting a font Sélection d’une police de caractères Make sure the printer is off-line (ON LINE indicator is not lit). Assurez-vous que l’imprimante est hors ligne (voyant ON LINE éteint). Press FONT to change the font selection. An indicator lights to the left of the Appuyez sur la touche FONT pour changer de police de caractères. -
Seite 39: Wahl Einer Schriftart
Wahl einer Schriftart Selezione di un font di caratteri Vergewissern Sie sich, daß der Drucker auf Offline-Betrieb gestellt ist (ON Accertarsi che la stampante sia off-line (l’indicatore ON LINE non è LINE-Anzeige leuchtet nicht). illuminato). Drücken Sie die Schriftarttaste FONT zum Einstellen einer anderen Schriftart. Premere FONT per cambiare la selezione del font. -
Seite 40: Setting The Character Pitch
Setting the character pitch Réglage du pas de caractère The character pitch setting controls how many characters are printed per inch. Use Le réglage de pas de caractère contrôle le nombre de caractères qui sont imprimés the following procedure to select the pitch you want. par pouce. -
Seite 41: Einstellung Des Zeichenabstands
Einstellung des Zeichenabstands Impostazione del passo del carattere Die Einstellung des Zeichenabstands bestimmt, wie viele Zeichen pro Zoll gedruckt L’impostazione del passo del carattere determina il numero di caratteri che saranno werden. Stellen Sie den gewünschten Zeichenabstand auf folgende Weise ein. stampati in un pollice. -
Seite 42: Line Feed
Line feed Saut de ligne Make sure the printer is off-line (ON LINE indicator is not lit). Assurez-vous que l’imprimante est hors ligne (voyant ON LINE éteint). Press LINE FEED once to feed paper one line. Holding down LINE FEED Appuyez une fois sur LINE FEED pour avancer le papier d’une ligne. -
Seite 43: Zeilenvorschub
Zeilenvorschub Avanzamento riga Stellen Sie sicher, daß der Drucker auf Offline gestellt ist (Anzeige ON LINE Accertarsi che la stampante sia off-line (l’indicatore ON LINE non è leuchtet nicht). illuminato). Drücken Sie die Taste LINE FEED einmal für eine Zeile. Durch anhaltendes Premere LINE FEED una volta per far avanzare la carta di una riga. -
Seite 44: Setting The Top Of Form Position
Setting the top of form position Réglage du début de page The current position of paper loaded in the printer is automatically set as the top of A l’allumage, la position courante du papier chargé dans l’imprimante est the page whenever you turn power on. You can also use the following procedure at automatiquement considérée comme la position de début de page. -
Seite 45: Einstellen Des Blattanfangs
Einstellen des Blattanfangs Impostazione della posizione di inizio pagina Die derzeitige Position des im Drucker eingelegten Papiers wird beim Einschalten La posizione in cui si trova in quel momento la carta inserita nella stampante viene des Druckers automatisch als Blattanfang eingestellt. Andere Blattanfangpositionen automaticamente impostata come posizione di inizio pagina ogni volta che si können jedoch jederzeit wie folgt eingestellt werden. -
Seite 46: Changing The Auto Load Position
Make sure the printer is on-line (ON LINE indicator is lit). Assurez-vous que l’imprimante est en ligne (voyant ON LINE allumé). Press SET/EJECT/PARK, to toggle between the Quiet Print Mode and normal Appuyez sur SET/EJECT/PARK pour alterner entre le mode silencieux printing. -
Seite 47: Änderung Der Automatischen Papiereinzugposition
Vergewissern Sie sich, daß der Drucker auf Online-Betrieb gestellt ist (ON Accertarsi che la stampante sia on-line (l’indicatore ON LINE è illuminato). LINE-Anzeige leuchtet). Premere SET/EJECT/PARK per passare dalla stampa normale al modo di Drücken Sie die SET/EJECT/PARK, um zwischen Leisedruck und normalem stampa silenziosa e viceversa. -
Seite 48: Saving A Macro
Saving a macro Sauvegarde de macro-commandes Normally, any settings you make on the control panel are cleared when you turn the Normalement, les réglages effectués sur le panneau de commande sont annulés printer off. Use the following procedure to save the current control panel settings so lorsque vous éteignez l’imprimante. -
Seite 49: Speichern Der Bedienfeldeinstellungen
Speichern der Bedienfeldeinstellungen Memorizzazione delle impostazioni del pannello di controllo Die am Bedienfeld vorgenommenen Einstellungen werden normalerweise beim Ausschalten des Druckers gelöscht. Die Einstellungen können jedoch auch Normalmente, le impostazioni eseguite sul pannello di controllo vengono cancellate gespeichert werden, so daß sie bei jedem Einschalten des Druckers wieder aktiv quando si spegne la stampante. -
Seite 50: Initializing The Printer
Initializing the printer Réinitialisation de l’imprimante The following procedure initializes the printer to its power-on settings. If you have Effectuez les démarches suivantes pour réinitialiser l’imprimante aux réglages de la control panel settings stored in memory, this procedure sets up the printer using mise sous tension. -
Seite 51: Initialisierung Des Druckers
Initialisierung des Druckers Inizializzazione della stampante Der folgende Vorgang initialisiert den Drucker auf seinen Einschaltstatus. Falls Il seguente procedimento inizializza la stampante ripristinando le impostazioni bestimmte Bedienfeldeinstellungen gespeichert wurden, sind diese beim Einschalten attive al momento dell’accensione. Se si sono memorizzate delle impostazioni del des Druckers wieder aktiv. -
Seite 52: Chapter 3: Using The Eds Mode
Chapter 3: Using the EDS Mode Chapitre 3: Utilisation du mode EDS The letters “EDS” stand for “Electronic DIP Switches.” Just like the small DIP Les lettres “EDS” sont l’abréviation de “Electronic DIP Switches” (commutateurs switches that are used by many computers, printers, and other devices, the EDS électroniques). -
Seite 53: Kapitel 3: Verwendung Des Eds-Modus
Kapitel 3: Verwendung des EDS-Modus Capitolo 3: Uso del modo EDS Die Abkürzung “EDS” steht für “Elektronische DIP-Schalter”. Genau wie die La sigla “EDS” sta per “Electronic DIP Switches” (interruttori DIP elettronici). kleinen DIP-Schalter, die an vielen Computern, Druckern und anderen Geräten Nello stesso modo dei piccoli interruttori DIP usati da molti computer, stampanti ed vorhanden sind, dienen die EDS zur Konfiguration des Druckers gemäß... -
Seite 54: Selecting A Bank
Selecting a bank Sélection de groupe While in the EDS Mode, use the control panel’s BANK button to select a bank. En mode EDS, utilisez la touche BANK du panneau de commande pour When the BANK indicator flashes it indicates the current bank selected. sélectionner un groupe. -
Seite 55: Wahl Einer Gruppe
Wahl einer Gruppe Selezione di un gruppo Wählen Sie nach dem Einschalten des EDS-Modus eine Gruppe, indem Sie am Nel modo EDS, usare il tasto BANK del pannello di controllo per selezionare un Bedienfeld die BANK-Taste drücken. Wenn die BANK-Anzeige blinkt, heißt gruppo. -
Seite 56: Changing A Switch Setting
Changing a switch setting Changement de réglage d’un commutateur After selecting a bank and switch, press the control panel’s ON/OFF button to Après avoir sélectionné un groupe et un commutateur, appuyez sur la touche ON/OFF du panneau de commande pour activer ou désactiver le commutateur. turn the switch on and off. - Seite 57 Änderung der Schaltereinstellung Modifica dell’impostazione di un interruttore Drücken Sie nach der Wahl einer Gruppe und eines Schalters die Taste ON/ Dopo aver selezionato il gruppo e l’interruttore, premere il tasto ON/OFF del OFF, um den gewählten Schalter auf ON oder OFF zu stellen. Die ON LINE- pannello di controllo per impostare l’interruttore su ON o su OFF.
-
Seite 58: Eds Mode Settings
EDS Mode Settings Réglages en mode EDS The following details all of the settings you can program in the EDS Mode. You can Les paragraphes suivants décrivent tous les réglages que vous pouvez effectuer en print out a detailed overview of all the settings by performing a test of the printer mode EDS. -
Seite 59: Eds-Modus-Einstellungen
EDS-Modus-Einstellungen Impostazioni del modo EDS Nachfolgend sind alle im EDS-Modus möglichen Einstellungen beschrieben. Eine Di seguito sono illustrate tutte le impostazioni programmabili nel modo EDS. È tabellarische Übersicht kann mit dem kurzen Selbsttest ausgedruckt werden (Seite possibile ottenere una stampa dettagliata di tutte le impostazioni eseguendo un test 134). - Seite 60 Switch 6: Multi-Part Mode Commutateur 6: Mode multi-feuilles Specifies whether the printer’s Multi-Part Mode is enabled (OFF) or disabled (ON). Il spécifie si le mode multi-feuilles de l’imprimante est activé (OFF) ou désactivé When the Multi-Part Mode is enabled (OFF), the impact of the print head is (ON).
- Seite 61 Schalter 6: Mehrlagen-Modus Interruttore 6: Modo multi-copia Die Einstellung dieses Schalters bestimmt, ob der Mehrlagen-Modus aktiv (ON) Specifica se il modo multi-copia della stampante è abilitato (OFF) o disabilitato oder inaktiv (OFF) ist. Wenn der Drucker im Mehrlagen-Druckmodus ist, schlagen (ON).
- Seite 62 Draft Draft HS-Draft* HS-Draft* * LC-4521 only. Not used with LC-4511. * LC-4521 uniquement. Non utilisé avec LC-4511. Switches 3, 4, 5: Print Pitch Commutateurs 3, 4, 5: Pas d’impression Turn these switches on or off to form the pattern that matches the print pitch setting you want to make.
- Seite 63 HS-Draft* HS-Draft* * Nur für LC-4521. Nicht für LC-4511. * Solo modello LC-4521. Non utilizzato con il modello LC-4511. Schalter 3, 4, 5: Druckabstand Interruttori 3, 4, 5: Passo di stampa Stellen Sie diese Schalter je nach dem gewünschten Zeichenabstand auf ON oder Impostare questi interruttori su ON o su OFF per selezionare la combinazione OFF.
- Seite 64 BANK D GROUPE D Switches 1, 2, 3, 4: Page Length Commutateurs 1, 2, 3, 4: Longueur de page Turn these switches on or off to form the pattern that matches the Page Length Activez ou désactivez ces microrupteurs pour régler la longueur de page souhaitée. setting you want to use.
- Seite 65 GRUPPE D GRUPPO D Schalter 1, 2, 3, 4: Seitenlänge Interruttori 1, 2, 3, 4: Lunghezza pagina Stellen Sie diese Schalter je nach der gewünschten Seitenlänge auf ON oder OFF. Impostare questi interruttori su ON o su OFF per selezionare la combinazione corrispondente alla lunghezza pagina stampa che si vuole utilizzare.
- Seite 66 BANK E GROUPE E Switches 1, 2, 3, 4, 5: Code Page/International Character Set Commutateurs 1,2,3,4,5: Page de code/jeu de caractères international If your EDS settings specify IBM emulation (Bank A, Switch 1 OFF) with either Si vous avez sélectionné l’émulation IBM (banque A, commutateur 1 sur OFF) et character table (Bank A, Switch 2), or Standard emulation (Bank A, Switch 1 ON) une table de caractères (banque A, commutateur 2) ou l’émulation standard (banque with the graphics character table (Bank A, Switch 2 ON), use the Bank E switches to...
- Seite 67 GRUPPE E GRUPPO E Schalter 1, 2, 3, 4, 5: Codepage/Internationaler Zeichensatz Interruttori 1, 2, 3, 4, 5: Codice pagina/Gruppo caratteri internazionali Wenn Ihre EDS auf IBM-Emulation (Gruppe A, Schalter 1 OFF) und eine der Se si è specificata l’emulazione IBM con le regolazioni EDS (Gruppo A, interruttore beiden Zeichentabellen (Gruppe A, Schalter 2) oder auf Standardemulation (Gruppe 1 OFF) con una delle tabelle caratteri (Gruppo A, interruttore 2) o l’emulazione A, Schalter 1 ON) und die Grafikzeichentabelle (Gruppe A, Schalter 2 ON) gestellt...
- Seite 68 Code Page Page de code #928 Greek 928 Grec #2001 Lithuanian-KBL 2001 Lithuanien-KBL #772 Lithuanian 772 Lithuanien #774 Lithuanian 774 Lithuanien #3001 Estonian-1 3001 Estonien-1 #3002 Estonian-2 3002 Estonien-2 #3011 Latvian-1 3011 Lettonien-1 #3012 Latvian-2 3012 Lettonien-2 #3021 Bulgarian 3021 Bulgare #3031 Hebrew 3031 Hebreux #3041 Maltese...
- Seite 69 Interruttore Interruttore Interruttore Interruttore Interruttore Code-Page Schalter 1 Schalter 2 Schalter 3 Schalter 4 Schalter 5 Pagina codici # 928 Griechisch #928 Greco #2001 Litauisch-KBL #2001 Lituanico-KBL #772 Litauisch #772 Lituanico #774 Litauisch #3001 Estnisch - 1 #774 Lituanico #3002 Estnisch - 2 #3001 Estone-1 #3011 Lettisch - 1 #3002 Estone-2...
- Seite 70 A code page is the set of symbols and characters taht your printer can print. Your Une page de code est un ensemble de symboles et de caractères que votre printer converts ASCII hexadecimal data according to a code page to print symbols imprimante peut imprimer.
- Seite 71 Eine Codepage ist der Satz von Zeichen und Buchstaben, die Ihr Drucker Una pagina codici è il gruppo di simboli e caratteri che la stampante può stampare. ausdrucken kann. Ihr Drucker wandelt hexadezimale ASCII-Daten entsprechend der La stampante converte i dati esadecimali ASCII in base ad una pagina codici per verwendeten Codepage, in Zeichen und Buchstaben um.
- Seite 72 Code Page Name Country Remarks Page de code Appellation Pays Remarque Page de code 928 Grec Grèce Pour Unix #928 Greek Greece For UNIX Page de code 2001 Lituanien-KBL Lituanie Généralement utilisé #2001 Lithuanian-KBL Lithuania Commonly used for DOS sous DOS #772 Lithuanian Lithuania...
- Seite 73 Codepage Nr. Bezeichnung Land Anmerkung Pagina codici Nome Paese Note #928 Griechisch Griechenland Für Unix CP#928 Greca Grecia per Unix #2001 Litauisch - KBL Litauen Allgemein für DOS CP#2001 Lituana-KBL Lituania Usata comunemente benutzt per il DOS #772 LitauischLitauen Litauen Neuer Standard CP#772 Lituana...
- Seite 74 If your EDS settings specify Standard emulation (Bank A, Switch 1 ON) with the Si vous avez sélectionné l’émulation standard (groupe A, commutateur 1 sur ON) et italic character table (Bank A, Switch 2 OFF), use the Bank E switches to select the le tableau de caractères italiques (groupe A, Commutateur 2 sur OFF), utilisez les international character set you want to use.
- Seite 75 Wenn Ihre EDS auf Standardemulation (Gruppe A, Schalter 1 ON) und die Se si è specificata l’emulazione Standard tramite le impostazioni EDS (Gruppo A, Kursivschriftzeichentabelle (Gruppe A, Schalter 2 OFF) gestellt sind, wählen Sie interruttore 1 su ON) con la tabella caratteri corsivi (Gruppo A, interruttore 2 su den gewünschten internationalen Zeichensatz mit den Schaltern der Gruppe E.
- Seite 76 BANK F GROUPE F Switches 1, 2, 3, 4, 5: LQ Font Selection Commutateurs 1, 2, 3, 4, 5: Sélection de la police d’impression Quasi- courrier. Turn these switches on or off to form the pattern that identifies the font you want to use for LQ printing.
- Seite 77 GRUPPE F GRUPPO F Schalter 1, 2, 3, 4, 5: LQ-Schriftartwahl Interruttori 1, 2, 3, 4, 5: Selezione font LQ Betätigen Sie diese Schalter, um die Standardschriftart für den Schönschrift- Impostare questi interruttori su ON o su OFF per selezionare la combinazione Druckmodus (LQ) zu wählen.
-
Seite 78: Chapter 4: User Setup Utility
Chapter 4: User Setup Utility Chapitre 4: Utilitaire d’impression The User Setup Utility is included on the floppy disk that comes with the printer. It Un utilitaire d’impression se trouve sur la disquette fournie avec l’imprimante. Il allows you to change the EDS settings of the printer from your computer. permet de modifier les réglages EDS de l’imprimante à... -
Seite 79: Kapitel 4: Drucker-Installationsprogramm
Kapitel 4: Drucker-Installationsprogramm Capitolo 4: User Setup Utility Das Drucker-Installationsprogramm befindet sich auf der Diskette, die dem Drucker Questo permette di modifcare le regolazioni EDS della stampante dal computer. beiliegt. Es erlaubt es Ihnen, die EDS-Einstellungen des Druckers vom Computer Per usare l’User Setup Utility è... - Seite 80 Pull down the list of available printers under Printer Type: and double-click on Faites apparaître la liste des imprimantes disponibles à Type d’imprimante: et the one you want to use. For this printer you should select LC-4511 or LC-4521. cliquez deux fois sur l’imprimante à utiliser. Dans ce cas de cette imprimante.
- Seite 81 Sie den gewünschten Drucker doppelt an. Für diesen Drucker sollten Sie LC- doppio clic sulla stampante desiderata. Per installare questa stampante, 4511 oder LC-4521 wählen. selezionare LC-4511 o LC-4521. Cliccare sul riquadro Poni SET-UP UTILITY in per trasformarlo in un Klicken Sie das “Zielverzeichnis:”-Feld an, um dieses in ein Eingabefeld umzuwandeln.
-
Seite 82: Starting Up The User Setup Utility
Starting up the User Setup Utility Exploitation de l’utilitaire d’impression After you install the User Setup Utility, you can start it up any time by moving to Une fois que vous avez installé l’utilitaire d’impression, vous pouvez l’utiliser the directory you specified under “Installing the User Setup Utility” on page 67 quand vous voulez en allant dans le répertoire choisi dans “Installation de and inputting the following: l’utilitaire d’impression”... - Seite 83 Starten des Drucker-Installationsprogramms Lancio di User Setup Utility Nach der Installierung des Drucker-Installationsprogramms können Sie das Dopo aver installato User Setup Utility è possibile lanciarlo in qualsiasi Programm jederzeit starten, indem Sie in das Verzeichnis (Directory) wechseln, momento passando alla directory specificata in “Installazione di User Setup daß...
-
Seite 84: To Select A Setting Box
To select a setting box Sélection d’une case de réglage Click on the box you want to select or move to it by using your keyboard’s Tab Cliquez sur la case que vous voulez sélectionner ou positionnez le curseur or arrow keys. The currently selected setting box is highlighted on the screen. dessus à... -
Seite 85: Änderung Des Bidirektionalen Druckertests
Wahl eines Feldes Selezione di un riquadro di impostazione Klicken Sie das gewünschte Feld an, oder führen Sie den Cursor mit der Tab- Cliccare sul riquadro che si vuole selezionare o spostarsi ad esso usando i tasti di Taste oder den Pfeiltasten auf das Feld. tabulazione e del cursore del computer. -
Seite 86: Changing The Printer Port
Changing the printer port Changement du port de l’imprimante Click on Port or press the F8 function key. Cliquez sur Port ou appuyez sur la touche de fonction F8. Port Port Lpt1: Lpt1: Com1: Com1: Com2: Com2: Select the port you want to use by double-clicking on it, or by moving to it with Sélectionnez le port que vous voulez utiliser en cliquant deux fois dessus ou en the arrow keys and pressing Enter. -
Seite 87: Änderung Der Schnittstelle
Änderung der Schnittstelle Cambiamento della porta stampante Klicken Sie “Port” an, oder drücken Sie die Funktionstaste F8. Cliccare su Port o premere il tasto di funzione F8. Porta Port Lpt1: Lpt1: Com1: Com1: Com2: Com2: Wählen Sie die gewünschte Schnittstelle, indem Sie diese doppelt anklicken, Selezionare la porta che si vuole usare con un doppio clic o spostandosi su di oder den Cursor mit den Pfeiltasten darauf führen und die ENTER-Taste essa con i tasti del cursore e premendo Enter. -
Seite 88: Importing Setup Data From A Configuration File
Enter. positionnant le curseur dessus avec les touches fléchées et en appuyant sur Enter. Load file Charger fichier File C:\STAR\*.cfg Fichier C:\STAR\*.cfg <DIR> 1995-06-15 DEFAULT .CFG 1995-06-15 <DIR> 1995-06-15 PREVIOUS.CFG 1995-06-22... - Seite 89 Dal menu che appare selezionare Load con un doppio clic o spostando ENTER-Taste drücken. l’evidenziatura su di esso con i tasti del cursore e premendo Enter. Datei Laden Carica File Datei File C:\STAR\*.cfg C:\STAR\*.cfg <DIR> 1995-06-15 <DIR> 1995-06-15 DEFAULT .CFG 1995-06-15 DEFAULT .CFG 1995-06-15 PREVIOUS.CFG 1995-06-22 PREVIOUS.CFG 1995-06-22...
-
Seite 90: Chapter 5: Using The Printer With Windows 3.1
Chapter 5: Using the Printer with Windows 3.1 Chapitre 5: Utilisation de l’imprimante sous Windows 3.1 This chapter contains specific information you need to know when using the printer with Microsoft Windows 3.1. It also tells you how to install the printer driver on Ce chapitre contient les informations dont vous pourrez avoir besoin pour utiliser your computer so that it can control the printer correctly. -
Seite 91: Kapitel 5: Einsatz Des Druckers Unter Windows 3
Kapitel 5: Einsatz des Druckers unter Windows 3.1 Capitolo 5: Utilizzo della stampante con Windows 3.1 Dieses Kapitel enthält genaue Informationen, die Sie kennen müssen, wenn Sie den Questo capitolo contiene informazioni specifiche su come utilizzare la stampante Drucker unter Microsoft Windows 3.1 verwenden. Es sagt Ihnen auch, wie Sie den con Microsoft Windows 3.1. - Seite 92 In the List of Printers: box of the Add Unlisted or Updated Printer dialog box, select the Star printer driver and then click OK. This causes the Printers dialog box to appear. The Star Printer is now listed in Dans la boite de dialogue Liste des imprimantes et Imprimante non listée ou the Installed Printers: list.
- Seite 93 Wählen Sie im Druckerliste-Feld des Dialogfensters Drucker hinzufügen oder aktualisierter Drucker den Star-Druckertreiber, und klicken Sie anschließend OK an. Questo fa apparire il riquadro di dialogo Printers. La stampante Star è ora elencata nella lista Stampanti installate. Hiernach erscheint das Drucker-Dialogfenster. Der Star-Drucker ist jetzt in der...
- Seite 94 Double click on the name of the printer model you selected above to select it as Cliquez deux fois sur le nom du modèle d’imprimante que vous avez installé the default printer. pour le sélectionner comme imprimante par défaut. Click Close to close the Printers dialog box. Note: Windows applications automatically print on the currently selected default printer.
- Seite 95 Klicken Sie den Namen des soeben installierten Druckermodells doppelt an, um Fare un doppio clic sul nome del modello di stampante appena installato per es als Standard-Druckermodell zu übernehmen. selezionarlo come stampante default. Cliccare Chiudi per chiudere il riquadro di dialogo Stampanti. Klicken Sie Schließen an, um das Druckerfenster zu entfernen.
-
Seite 96: Getting Ready To Print
Getting ready to print Préparation à l’impression Before printing, there are a number of things you must first do to set up the printer. Avant de pouvoir imprimer, vous devez configurer l’imprimante en définissant You must select the printer driver, and the paper source, size, and orientation. Use certaines informations. -
Seite 97: Vorbereitung Für Den Druck
Vorbereitung für den Druck Impostazione della stampante Bevor Sie mit dem Druckvorgang beginnen, müssen Sie zunächst einige Dinge zur Prima di stampare un documento, vi sono alcune operazioni da compiere per Grundeinstellung (Setup) Ihres Druckers vornehmen. Sie müssen den configurare la stampante, ossia: specificare il driver della stampante, e inoltre il tipo Druckertreiber wählen und die Papierzufuhr sowie die Papiergröße einstellen. -
Seite 98: Printing A Document
Printing a document Impression d’un document The following Print window appears when you select the Print command of the La fenêtre Imprimer ci-dessous apparaît lorsque vous sélectionner la commande File menu of your Windows application. Imprimer du menu Fichier dans l’application Windows. Note: Remarque: The actual appearance of the Print window may differ somewhat depending on the... -
Seite 99: Drucken Eines Schriftstücks
Drucken eines Schriftstücks Stampa di un documento Das nachstehende Dialogfeld Drucken erscheint, wenn Sie den Befehl Drucken im Selezionando il comando Stampa dal menu File della vostra applicazione Datei-Menü Ihrer Windows-Anwendung, in diesem Falle Windows Write, benutzen. Windows, apparirà la finestra di dialogo Stampa come quella illustrata sotto. Hinweis: Nota: Das tatsächliche Aussehen des Dialogfeldes Drucken, das angezeigt wird, kann sich... -
Seite 100: Installing Truetype Fonts
Installing TrueType fonts Installation des polices TrueType The TrueType fonts that are supplied on the 3.5” floppy disk that comes with the Les polices TrueType fournies sur la disquette 3,5 pouces qui accompagne printer can be used only when you are running Windows 3.1 or later. Use the l’imprimante ne peuvent être utilisées que sous Windows 3.1 ou une version following procedure to install the fonts. -
Seite 101: Installieren Von Truetype-Schriftarten
Installieren von TrueType-Schriftarten Installazione dei caratteri TrueType Die TrueType-Schriftarten, die sich auf der mitgelieferten 3,5” Diskette befinden, Potete utilizzare i caratteri TrueType contenuti sul dischetto da 3,5” fornito con la können nur verwendet werden, wenn Sie mit Windows 3.1 oder einer späteren stampante solo se lavorate con Windows 3.1 o successivo. -
Seite 102: Selecting Fonts In Windows Applications
Click OK. The Fonts dialog box appears and installation is performed. The Cliquez sur OK. La boite de dialogue Polices apparaît et l’installation est names of the newly installed fonts are automatically added to the Installed effectuée automatiquement. Le nom des nouvelles polices installées est ajouté Fonts list. -
Seite 103: Wahl Von Schriftarten In Windows-Anwendungen
Klicken auf das Schaltfeld OK. Das Dialogfeld Schriftarten erscheint und die Scegliete OK. Riapparirà la finestra di dialogo Caratteri e verrà eseguita la Installation ist abgeschlossen. Die Bezeichnungen der neu installierten procedura di installazione. I nuovi caratteri installati verranno automaticamente Schriftarten werden automatisch der Liste der installierten Schriftarten aggiunti all’elenco dei Tipi di carattere installati. -
Seite 104: Chapter 6: Using The Printer With Windows 95
Chapter 6: Using the Printer with Windows 95 Chapitre 6: Utilisation de l’imprimante sous Windows 95 This chapter describes how to use the printer with Microsoft Windows 95. The following topics are covered: Ce chapitre décrit la manière d’utiliser l’imprimante sous Windows 95 de Microsoft. Setting up the printer in Windows 95 Il traite des sujets suivants: Preparing for printing... -
Seite 105: Kapitel 6: Drucker Mit Windows 95 Anwenden
Kapitel 6: Drucker mit Windows 95 anwenden Capitolo 6: Utilizzo della stampante con Windows 95 Dieses Kapitel beschreibt die Anwendung des Druckers mit Windows 95. Folgende Questo capitolo illustra come utilizzare la stampante con Microsoft Windows 95. Einzelheiten werden hier beschreiben: Sono trattati i seguenti argomenti: Einstellung des Druckers für Windows 95 Installazione della stampante sotto Windows 95... - Seite 106 When the above window is displayed, make sure the Local printer radio Lorsque la fenêtre ci-dessus est affichée, vérifiez que le bouton rond button is checked. Then click on the Next button twice, and click on the Back Imprimante locale est validé. Cliquez ensuite deux fois sur le bouton button.
- Seite 107 Wird das oben dargestellte Fenster angezeigt, stellen Sie sicher, daß das Quando appare la finestra di dialogo mostrata sopra, accertarsi che il pulsante Schaltfeld “Lokaler Drucker” aktiv ist. Klicken Sie dann doppelt auf das d'opzione Stampante locale sia selezionato. Quindi, fare clic due volte sul pulsante Avanti e una volta sul pulsante Indietro.
- Seite 108 Select the language or language group you want to use by clicking on it. Sélectionnez la langue ou le groupe de langues à utiliser en cliquant dessus. Select the printer model name (“Star LC-4511” or “Star LC-4521”) by clicking Sélectionnez le nom du modèle d’imprimante (“Star LC-4511” ou “Star LC- on it and then click on the Next button.
- Seite 109 Wählen Sie den Namen des Druckermodells („Star LC-4511“ oder „Star LC- Selezionare il nome del modello della stampante (“Star LC-4511” o “Star LC- 4521“), indem Sie zuerst auf ihn und dann auf das Schaltfeld Weiter klicken. 4521”) facendo clic su di esso, quindi fare clic sul pulsante Avanti.
- Seite 110 Change the printer name if you want. If you have previously installed another Le cas échéant, changez le nom de l’imprimante. Si vous avez déjà installé une printer, you must select whether you want the new printer to be the default autre imprimante, sélectionnez l’imprimante que vous désirez être l’imprimante printer.
- Seite 111 Sollte es notwendig sein den Druckernamen zu ändern, ist das möglich. Sollten Cambiare il nome della stampante, se lo si desidera. Se precedentemente si è Sie vorher einen anderen Drucker installiert haben, müssen Sie entscheiden, ob installata un’altra stampante, bisogna stabilire se si vuole impostare la nuova der neue oder alte Drucker als Standarddrucker gewählt werden soll.
-
Seite 112: Preparing To Print
Star LC-4521) in the Printers window. A window appears listing any documents that are currently being printed on the printer. Cliquez deux fois sur l’icône qui porte le nom de l’imprimante (Star LC-4511 ou Star LC-4521) dans la fenêtre Imprimantes. Une fenêtre indiquant tous les Click on the Printer menu. -
Seite 113: Ausdruck Vorbereiten
Rilasciare il pulsante del mouse su Stampanti. Lassen Sie die Maustaste auf dem Schaltfeld Drucker los. Fare doppio clic sull’icona avente il nome della stampante (Star LC-4511 o Star Doppelklick auf das Icon mit dem Namen der Drucker („Star LC-4511“ oder LC4521) nella finestra Stampanti. - Seite 114 Click on any of the five index-card type buttons and change the parameter Cliquez sur un bouton parmi les cinq boutons de type fiche, puis changez les settings as you require. For a detailed explanation of any of the settings, click on paramètres selon les impératifs requis.
- Seite 115 Klicken Sie auf jede der fünf Indexkarten, die am Bildschirm erscheinen und Fare clic su uno dei cinque pulsanti a linguetta e modificare le impostazioni del ändern Sie die Parameter entsprechend Ihren Voraussetzungen. Benötigen Sie parametro nel modo desiderato. Per ottenere una spiegazione dettagliata su una weitere Erklärungen zu den Einstellungen, klicken Sie auf das „?“, auch Hilfe delle impostazioni, fare clic sul pulsante “?”...
-
Seite 116: Printing A Document
Printing a document Impression de document Windows 95 applications always print to the currently selected default printer. If you Les applications de Windows 95 impriment toujours sur l’imprimante par défaut want to change the default printer, refer to the previous section, Preparing to print. sélectionnée. -
Seite 117: Ausdruck Eines Dokumentes
Ausdruck eines Dokumentes Stampa di un documento Windows 95 Anwendungen drucken immer auf dem aktuell als Standarddrucker Le applicazioni Windows 95 stampano sempre sulla stampante predefinita gewählten Drucker. Wollen Sie einen anderen Drucker als Standarddrucker selezionata in quel momento. Se si desidera cambiare la stampante predefinita, auswählen, lesen Sie das vorige Kapitel, Ausdruck vorbereiten. -
Seite 118: Installing Truetype Fonts
If you want the output to be collated (each copy automatically sorted into page Validez le bouton rond approprié pour interclasser la sortie (c.-à-d. pour trier order) or if you want to print to file (instead of a print-out, a graphic file of the chaque copie automatiquement selon l’ordre des pages) ou pour imprimer sur print-out is saved on disk), check the appropriate radio button. -
Seite 119: Truetype Fonts Installieren
Sollten Sie wünschen, daß die Druckausgabe sortiert (jede Kopie wird Se si vuole che la stampa sia fascicolata (ogni copia ordinata automaticamente automatisch in einem Seitenordner abgelegt), oder sollten Sie einen Ausdruck secondo l’ordine delle pagine) o se si vuole stampare su file (al posto di una auf die (Fest)-Platte (an Stelle auf Papier - ein Grafikausdruck wird auf der stampa, viene memorizzato su disco un file contenente i dati grafici della Festplatte gespeichert) wollen, prüfen Sie die entsprechenden Schaltfelder. - Seite 120 Select the fonts you wish to install by clicking on them. If you want to install all Sélectionnez les polices à installer en cliquant dessus. Cliquez sur le bouton of them, click on the Select All button. Toutes pour installer toutes les polices. Click on the OK button.
- Seite 121 Wählen Sie den gewünschten Font aus der Liste, indem Sie ihn anklicken. Selezionare i tipi di carattere che si desidera installare facendo clic su di essi. Se Wollen Sie alle Fonts laden, klicken Sie auf das Schaltfeld Alle markieren. si desidera installarli tutti, fare clic sul pulsante Seleziona tutto. Klicken Sie auf das OK Schaltfeld.
-
Seite 122: Chapter 7: Using The Printer With Os/2 Warp
Chapter 7: Using the Printer with OS/2 Warp Chapitre 7: Utiliser l’imprimante avec le logiciel OS/2 Warp These instructions contain specific information about using the printer with IBM OS/2 Warp. They also tell you how to install the printer driver on your computer so Les instructions suivantes vous fourniront les informations spécifiques nécessaires à... -
Seite 123: Kapitel 7: Der Einsatz Des Druckers Unter Os/2 Warp
Kapitel 7: Der Einsatz des Druckers unter OS/2 Capitolo 7: Utilizzo della stampante con OS/2 Warp Warp Queste istruzioni contengono informazioni specifiche sull’uso della stampante con il sistema operativo IBM OS/2 Warp, e illustrano inoltre la procedura di installazione Diese Anweisungen enthalten die notwendigen Informationen über den Einsatz des del driver della stampante sul vostro computer che vi consentirà... -
Seite 124: Getting Ready To Print
Getting ready to print Préparer l’impression There are several steps to set up the printer before using it. You must select the Il vous faudra effectuer différentes étapes afin de configurer l’imprimante avant printer driver, and specify the source, size, and orientation of the paper. Use the de pouvoir l’utiliser: sélectionner le gestionnaire d’imprimante, définir la source, following procedure to make these selections. -
Seite 125: Druck Eines Dokumentes
Druckvorbereitungen Impostazione della stampante Vor der Benutzung des Druckers sollten noch einige Bedienschritte befolgt werden. Prima di poter utilizzare la stampante vi sono alcune operazioni da compiere per Sie müssen den Druckertreiber auswählen und den Papierschacht, die Papiergröße configurarla. Dovete innanzitutto selezionare il driver della stampante e specificare il und -orientierung angeben. -
Seite 126: Chapter 8: Using The Printer With Ms-Dos
être utilisées. Si votre programme d’application contient plusieurs de ces imprimantes, sélectionnez celle qui est la plus proche de la tête de liste. Pour ces imprimantes, utilisez le mode EDS ou l’utilitaire Star LC-4511/4521 d’impression pour sélectionner l’émulation standard (page 47). Star LC24-300/NX-2480... -
Seite 127: Kapitel 8: Verwendung Des Druckers Mit Ms-Dos
Usare inoltre il modo EDS o l’User Setup Utility per weitesten oben in dieser Liste steht. Sie sollten auch den EDS-Modus oder das selezionare l’emulazione Standard (pagina 48). Drucker-Installationsprogramm verwenden, um die Standardemulation zu wählen (Seite 48). Star LC-4511/4521 Star LC-4511/4521 Star LC24-300/NX-2480 Star LC24-300/NX-2480 Star LC24-30/NX-2450... - Seite 128 If none of the printers listed above are available in the application, choose one of the Si le programme d’application ne contient aucune des imprimantes indiquées ci- printers listed below. Once again, you should choose the printer that is nearest to the dessus, sélectionnez une des imprimantes de la liste suivante.
- Seite 129 Wenn keiner der oben aufgeführten Drucker in Ihrer Applikation aufgeführt wird, Se nessuna delle stampanti sopra elencate è disponibile nell’applicazione, scegliere wählen Sie einen der hier aufgeführten. una delle stampanti sotto elencate. Anche in questo caso scegliere la stampante più vicina alla cima della lista.
-
Seite 130: Chapter 9: Paper Handling
Chapter 9: Paper Handling Chapitre 9: Manipulation du papier Your printer is designed to print on a variety of paper types. This chapter tells you Votre imprimante est prévue pour imprimer sur différents types de papier. Ce everything you need to know about paper, and how to set the printer up for manual chapitre contient tout ce que vous devez savoir sur le papier et sur le réglage de paper feed. -
Seite 131: Kapitel 9: Papierhandhabung
Kapitel 9: Papierhandhabung Capitolo 9: Uso della carta Ihr Drucker ist darauf ausgelegt, auf den verschiedensten Papiersorten zu drucken. Questa stampante è in grado di stampare su diversi tipi di carta. Questo capitolo In diesem Kapitel erfahren Sie alles, was Sie im Hinblick auf Papier wissen müssen, fornisce tutte le informazioni che è... -
Seite 132: Labels
Labels Backing sheet: 4.5″ to 16.5″ / 114 to 419mm Thickness Backing sheet: 0.00276″ to 0.0035″ / 0.07 to 0.09mm Total: 0.0075″ / 0.19mm • Use labels under normal temperature and humidity conditions only. Adjusting for paper thickness Paper comes in different weights, normally expressed as gsm (grams per square meter) or lbs (pounds). -
Seite 133: Etiquettes
Etiquettes Etiketten Etichette Feuille de support: 4,5″ à 16,5″ / 114 à 419 mm Trägerblatt: 114 bis 419 mm Foglio di protezione: Da 4,5″ a 16,5″ / da 114 a 419 mm Epaisseur Dicke des Trägerblatts: 0,07 bis 0,09 mm Spessore Feuille de support: 0,00276″... -
Seite 134: Automatic Fanfold Feeding
The following table provides a general guide for setting the adjustment lever. Le tableau suivant sert de référence pour le réglage du levier. Essayez les différentes Experiment with different settings until you find the one that gives you the print positions pour choisir celle qui convient à... -
Seite 135: Automatische Endlospapierzufuhr
Die folgende Tabelle bietet eine allgemeine Übersicht zur Einstellung des La seguente tabella fornisce una guida generale per stabilire la posizione della leva di Einstellhebels. Probieren Sie verschiedene Einstellungen aus und finden Sie regolazione. Eseguire alcune prove usando posizioni diverse finché non si trova quella diejenige heraus, die in Ihrer Situation die besten Ergebnisse bringt. -
Seite 136: Clearing Paper Jams
Align the left paper guide with the scale mark that matches the size of the paper you are using. For any paper size other than A3 landscape (horizontal), align the paper guide with scale 0 Paper guide (zero). For A3 landscape paper, align the paper Release lever guide with the s mark. -
Seite 137: Décoinçage Du Papier
Alignez le guide-papier gauche avec la marque Richten Sie die Papierführung mit der Allineare il guida carta sinistro rispetto de repère qui correspond à la taille du papier que Skalenmarkierung aus, die zum verwendeten all’indicatore di regolazione corrispondente al vous utilisez. Papierformat paßt. -
Seite 138: Chapter 10: Optional Accessories
Chapter 10: Optional Accessories This chapter introduces the following optional accessories that are available for this printer: Automatic Sheet Feeder (SF-15HA) Pull Tractor Unit (PT-15HA) Serial Interface Unit (IS-8H192 and IS-32H768) Serial-to-Parallel Converter (SPC-8K) Important! Always make sure that printer power is turned off whenever installing or removing optional accessories. -
Seite 139: Chapitre 10: Accessoires En Option
Chapitre 10: Accessoires en option Kapitel 10: Optionales Zubehör Capitolo 10: Accessori opzionali für Ihren Drucker Ce chapitre indique les accessoires en option que Questo capitolo presenta i seguenti accessori vous pouvez vous procurer pour cette imprimante: opzionali disponibili per questa stampante: Dieses Kapitel enthält die Beschreibung der Alimentation introducteur automatique de Alimentatore caricatore automatico fogli singoli... - Seite 140 Specifications (IS-8H192) Spécifications (IS-8H192) Interface RS-232C-level only Interface Niveau RS-232C uniquement Synchronization Asynchronous Synchronisation Asynchrone Baud rate 150, 300, 600, 1200, 2400, 4800, 9600, 19200 BPS (selectable) Vitesse de transmission 150, 300, 600, 1200, 2400, 4800, 9600, 19200 Baud (bits/s) (à sélectionner) Word length Longueur de mot Start bit...
- Seite 141 Technische Daten: (IS-8H192) Specifiche tecniche (IS-8H192) Interface Nur RS-232C Pegel Interfaccia Solo RS-232C Synchronisation Asynchron Sincronizzazione Asincrona Daten Übertragungsgeschwindigkeit 150, 300, 600, 1200, 2400, 4800, 9600, 19200 Baud Velocità di trasmissione 150, 300, 600, 1200, 2400, 4800, 9600, 19200 BPS (selezionabile) (einstellbar) Lunghezza parola Wortlänge...
-
Seite 142: Serial-To-Parallel Converter (Spc-8K)
Serial-to-Parallel Converter (SPC-8K) Serial connector Connecting the serial-to-parallel converter to the Connecteur série printer’s parallel connector provides serial data Dip switch Serieller Stecker communications capabilities between the printer and Microrupteur Connettore seriale your computer. DIP Schalter Interruttore DIP Specifications Clear button Interface RS-232C-level Bouton dánnulation... -
Seite 143: Convertisseur Interface Série - Parallèle (Spc-8K)
Convertisseur interface série - parallèle Seriell-Parallel-Konverter (SPC-8K) Convertitore d’interfaccia seriale- (SPC-8K) parallelo (SPC-8K) Dieser Seriell-parallel-konverter wandelt die Daten eines seriellen Computerausgangs in die parallelen Le raccordement du convertisseur interface série- Il collegamento del convertitore d’interfaccia seriale- Daten für den Drucker um. Sie haben damit die parallèle au connecteur parallèle de l’imprimante parallelo consente di effettuare un collegamento Möglichkeit der Kommunikation zwischen Ihrem... -
Seite 144: Appendix A: Troubleshooting
Appendix A: Troubleshooting Annexe A: Dépannage This appendix will help you if you experience problems with your printer. It tells Si vous avez des problèmes lors de l’utilisation de l’imprimante, consultez cette you how to test the printer, how to check system software settings, and how to adjust annexe qui indique la manière de tester l’imprimante, de vérifier les réglages du the vertical alignment. -
Seite 145: Testen Des Druckers
Anhang A: Fehlersuche Appendice A: Soluzione dei problemi In diesem Anhang erfahren Sie, wie sie vorgehen, wenn Probleme am Drucker Questa appendice fornisce informazioni utili in caso di problemi con la stampante. auftreten. Sie erfahren, wie der Drucker getestet wird, die Systemeinstellungen Spiega come eseguire i test di stampa, come controllare le impostazioni del software geprüft werden und die vertikale Ausrichtung justiert wird. -
Seite 146: Hexadecimal Dump
Note: Remarque: The short test prints across the entire width of the carriage. Make sure that the Etant donné que l’impression du test court occupe toute la largeur du chariot, printer is loaded with the widest paper available in order to avoid damage to the prévoyez du papier de largeur suffisante pour éviter d’endommager la tête print head and platen. -
Seite 147: Hexadezimaler Datenausdruck
Hinweis: Nota: Der Testdruck wird über die gesamte Druckbreite ausgedruckt. Sorgen Sie dafür, Il test breve stampa per tutta la larghezza del carrello. Accertarsi che nella daß das breiteste vorhandene Papier eingelegt ist, um Schäden an Druckkopf und stampante sia caricata carta della maggiore larghezza possibile per evitare di Druckwalze zu vermeiden. - Seite 148 Adjusting the dot alignment Réglage de l’alignement des points You may never have to use the procedure described in this section, but after you have La procédure suivante est rarement utilisée, cependant, après une certaine période been using your printer for some time you may find that the dots of some graphics d’utilisation, les points risquent de ne plus être parfaitement alignés sur certains do not align correctly.
-
Seite 149: Der Bidirektionale Druckertest
Der Bidirektionale Druckertest Regolazione dell’allineamento dei punti Das hier beschriebene Verfahren werden Sie zwar wahrscheinlich nie einsetzen Il procedimento descritto in questa sezione potrebbe non rendersi mai necessario, müssen, aber Sie sollten es kennen. Bei längerem Nichtbetrieb des Druckers kann es tuttavia, dopo che si è... -
Seite 150: Troubleshooting Guide
Troubleshooting guide Guide de dépannage Use the following table to help track down the causes of problems and to determine Servez-vous du tableau suivant pour déterminer les causes des problèmes et pour the best solution to deal with them. essayer de les résoudre. Problème Cause éventuelle Action recommandée... -
Seite 151: Guida Alla Soluzione Dei Problemi
Fehlersuchtabelle Guida alla soluzione dei problemi Richten Sie sich nach der folgenden Tabelle, um die Ursache von Betriebsstörungen Usare la seguente tabella per individuare le cause dei problemi e per stabilire la zu identifizieren und die beste Gegenmaßnahme zu bestimmen. soluzione migliore da adottare. - Seite 152 Problème Cause éventuelle Action recommandée Problem Possible Cause Recommended Action Le papier n’est pas Papier coincé. Enlevez tout le papier de Printer does not feed paper Jamming paper. Remove all paper from the correctement alimenté. l’imprimante puis chargez-le properly. printer and then reload it. de nouveau.
- Seite 153 Problema Causa possibile Azione consigliata Problem Mögliche Ursache Empfohlene Maßnahme La stampante non fa Inceppamento della carta. Togliere tutta la carta dalla Der Drucker zieht Papier Das Papier staut. Alles Papier aus dem Druk- avanzare la carta in modo stampante e ricaricarla. nicht richtig ein.
- Seite 154 Problème Cause éventuelle Action recommandée Problem Possible Cause Recommended Action Le nombre de lignes Le saut de ligne avec retour Utilisez le mode EDS ou Incorrect number of lines Auto line feed with carriage Use the EDS Mode or User imprimées sur une page de chariot est activé.
- Seite 155 Problema Causa possibile Azione consigliata Problem Mögliche Ursache Empfohlene Maßnahme Sulla pagina viene stampato L’avanzamento riga Usare il modo EDS o il Falsche Zeilenzahl auf jeder Automatischer Zeilenvor- Den EDS-Modus verwen- un numero errato di righe. automatico con ritorno programma User Setup Seite.
- Seite 156 Problème Cause éventuelle Action recommandée Problem Possible Cause Recommended Action Le boîtier de l’imprimante est Les fentes d’aération de Eteignez l’imprimante et Printer case is hot. The printer’s air vents are Switch off the printer and let chaud. l’imprimante sont bloquées ou laissez-la refroidir.
- Seite 157 Problema Causa possibile Azione consigliata Problem Mögliche Ursache Empfohlene Maßnahme La copertura esterna della Le aperture di ventilazione Spegnere la stampante e Das Druckergehäuse ist Die Lüftungsschlitze des Den Drucker ausschalten stampante si surriscalda. della stampante sono lasciarla raffreddare. heiß Druckers sind ganz oder und abkühlen lassen.
- Seite 158 Problème Cause éventuelle Action recommandée Problem Possible Cause Recommended Action La marge gauche s’élargit au Le papier n’est pas chargé Enlevez tout le papier de Left margin moves to the The paper is not loaded Remove all paper from the cours de l’impression.
- Seite 159 Problema Causa possibile Azione consigliata Problem Mögliche Ursache Empfohlene Maßnahme Durante la stampa il margine La carta non è caricata Togliere tutta la carta dalla Der linke Rand wird beim Das Papier ist nicht richtig Alles Papier aus dem Druk- di sinistra si sposta verso correttamente, causando un stampante e ricaricarla.
- Seite 160 Problème Cause éventuelle Action recommandée Problem Possible Cause Recommended Action Le fonctionnement de Le câble interface n’est pas Vérifiez que le câble Printer behaves erratically. The interface cable is Check to make sure that the l’imprimante est irrégulier. correctement raccordé, ou il d’interface de l’imprimante est connected incorrectly or printer interface cable is...
- Seite 161 Problema Causa possibile Azione consigliata Problem Mögliche Ursache Empfohlene Maßnahme La stampante si comporta in Il cavo di interfaccia non è Controllare che il cavo di Der Drucker weist wech- Das Schnittstellenkabel ist Prüfen, ob das Schnittstel- maniera anomala. collegato correttamente o è interfaccia della stampante selnde Störungssymptome falsch angeschlossen oder...
- Seite 162 Double-click the Printers icon. Cliquez deux fois sur l’icône Imprimantes. Check to see that the name of your Star printer is the default printer. If it is not, Vérifiez que le nom de votre imprimante Star est l’imprimante par défaut. Sinon, double-click on the name of your printer in the list of installed printers.
- Seite 163 Druckern erscheint. Controllo della selezione della stampante nell’applicazione Prüfen, ob der Name Ihres Star-Druckers gewählt ist, Wenn nicht, diesen wählen Selezionando il comando Stampa dal menu File dell’applicazione, apparirà una und erneut den Druck aus der Applikation heraus versuchen.
-
Seite 164: Checking System Software Settings In Ms-Dos
Double-click the Printers icon. Cliquez deux fois sur l’icône Imprimantes. Double-click on the name of your Star printer in the list of installed printers. Cliquez deux fois sur le nom de votre imprimante dans la liste des imprimantes Click on Connect. -
Seite 165: Prüfen Der Schnittstellenbuchse
Fare doppio clic sull’icona del Pannello di controllo nel gruppo Principale. Das Drucker-Symbol doppelklicken. Fare doppio clic sull’icona Stampanti. Den Namen Ihres Star-Druckers in der Liste der installierten Drucker Fare doppio clic sul modello della propria stampante Star nell’elenco delle doppelklicken. stampanti installate. Fare clic sul pulsante Collega. -
Seite 166: Appendix B: Specifications
Condensed elite (20 cpi) 300/240H 198/360H Elite condensé (20 car/pouce) 300/240H 198/360H 24 cpi (I) 360/240H 238/360H 240 car/pouce (I) 360/240H 238/360H LC-4511 Pica (10 cpi) 225/120H 75/360H LC-4511 Pica (10 car/pouce) 225/120H 75/360H Elite (12 cpi) 270/120H 90/360H Elite (12 car/pouce) -
Seite 167: Anhang B: Technische Daten
Compresso elite (20 cpi) 300/240H 198/360H Schmaldruck Pica (20 cpi) 300/240H 198/360H 24 cpi (I) 360/240H 238/360H 24 cpi (I) 360/240H 238/360H LC-4511 Pica (10 cpi) 225/120H 75/360H LC-4511 Pica (10 cpi) 225/120H 75/360H Elite (12 cpi) 270/120H 90/360H Elite (12 cpi) - Seite 168 24 × 9H 24 × 31H 24 × 9H 24 × 31H LC-4511 Pica (10 cpi) LC-4511 Pica (10 car/pouce) 24 × 27H 24 × 9H 24 × 27H Elite (12 cpi) 24× 9H Elite (12 car/pouce) 16 ×7H 16 × 21H 16 ×...
- Seite 169 24 × 9H 24 × 31H 24 × 31H LC-4511 Pica (10 cpi) LC-4511 Pica (10 cpi) 24× 9H 24 × 9H 24 × 27H 24 × 9H 24 × 27H Elite (12 cpi) Elite (12 cpi) 16 × 7H 16 ×...
- Seite 170 14W during standby / 63W during ASCII draft printing LC-4521 14 W en mode de veille / 63 W en mode d'impression brouillon ASCII LC-4511 9W during standby / 45W during ASCII draft printing LC-4511 9 W en mode de veille / 45 W en mode d'impression brouillon ASCII...
- Seite 171 14 W im Bereitschaftsbetrieb / 63 W bei ASCII Draftdruck LC-4521 14W in modo di attesa / 63W durante la stampa di testo in draft ASCII LC-4511 9 W im Bereitschaftsbetrieb / 45 W bei ASCII Draftdruck LC-4511 9W in modo di attesa / 45W durante la stampa di testo in draft ASCII...
-
Seite 172: Appendix C: Interface Pin Outs
Appendix C: Interface Pin Outs / Annexe C: Broches du connecteur interface Anhang C: Schnittstelleninformationen / Appendice C: Uscite terminali interfaccia Parallel Interface Optional Serial Interface (IS-8H192 and SPC-8K) Name Function Name Function Goes low for ≥0.5µs when active. STROBE Printer chassis ground DATA0 These signals represent information for the 1st through 8th bit of parallel... -
Seite 173: Appendix D: Character Sets
Appendix D: Character Sets / Annexe D: Jeux de caractères Anhang D: Zeichensätze / Appendice D: Gruppi di caratteri Standard Character Set #2 IBM Character Set #2, Code Page #437 (IBM-PC) Character Set #1 International Character Set Other characters are the same as those for Character Set #2. The character codes shown in the table are hexadecimal. - Seite 174 IBM Special Character Set Code Page #850 Code Page #863 Code Page #865 Multi-lingual Canadian French Nordic The following characters can be printed using the <ESC> ^ command. Other characters are the same as those Other characters are the same as those for Other characters are the same as those for for Code Page #437.
- Seite 175 Code Page #3841 Code Page #3843 Code Page #3846 Code Page #3847 Gost-Russian Polish Turkish Brazil-ABNT Other characters are the same as those for Other characters are the same as those for Other characters are the same as those for Other characters are the same as those for Code Page #437.
- Seite 176 Code Page #1001 Code Page #869 Code Page #928 Arabic Greek Greek Other characters are the same as those for Other characters are the same as those for Code Page #437. Code Page #437. Code Page #737 Code Page #851 Code Page #2001 Code Page #772 Greek...
- Seite 177 Code Page #774 Code Page #3001 Code Page #3012 Code Page #3021 Lithuanian Estonian1 Latvian2 Bulgarian Other characters are the same as those for Other characters are the same as those for Other characters are the same as those for Other characters are the same as those for Code Page #437.
-
Seite 178: Appendix E: Printer Control Codes
Appendix E: Printer Control Codes / Annexe E: Codes de contrôle de l’imprimante Anhang E: Drucker-Steuercodes / Appendice E: Codici di controllo stampante Print Pitch Control Commands This appendix lists the printer’s control commands. It gives the name of each control command, along with the applicable emulation mode (Standard, IBM, or Both), and the applicable ASCII code. - Seite 179 Special Print Mode Commands Line Spacing Commands Description Mode ASCII Code Description Mode ASCII Code Set master print mode Advance paper one line (line feed) Both ESC! Cancel underlining Both Reverse paper one line ESC-0 ESC LF Select underlining Both Set line spacing to 1/8″...
-
Seite 180: Other Commands
Horizontal Print Position Control Commands Description Mode ASCII Code Description Mode ASCII Code Enable paper out detector ESC 9 Deselect printer ESC Q n Move print head to next horizontal tab position Both Cancel uni-directional printing Both ESC U0 Return print head to left margin (carriage return) Both Select uni-directional printing Both... -
Seite 182: Appendix F: Control Panel Operation Guide
Appendix F: Control Panel Operation Guide / Annexe F: Guide de fonctionnement du panneau de commande POWER POWER HS-DRAFT/DRAFT BANK 10 CPI HS-DRAFT/DRAFT BANK 10 CPI 12 CPI 12 CPI ROMAN 15 CPI ROMAN 15 CPI SANSERIF SANSERIF COURIER COND COURIER COND MICRO FEED... - Seite 183 Anhang F: Steuerung über Bedienfeld / Appendice F: Guida all’uso del pannello comandi HS-DRAFT/DRAFT BANK 10 CPI POWER HS-DRAFT/DRAFT BANK 10 CPI POWER 12 CPI 12 CPI ROMAN 15 CPI ROMAN 15 CPI SANSERIF SANSERIF COURIER COND COURIER COND MICRO FEED MICRO FEED PRESTIGE PRESTIGE...
- Seite 184 Index Index Hebrew 166 détecteur de fin de papier 47 Hungarian 164 direction graphique alignement des points application printer selection IBM-Russian 163 sélection 49 mémoire tampon de téléchargement checking 151 Icelandic 163 dispositif d’alimentation feuille à feuille tampon 47 Auto LF Latin-2 164 automatique 47 réglage 137...
- Seite 185 Stichwortverzeichnis Indice analitico Gost-Russisch 164 stampa su 20 Griechisch 165 cartuccia del nastro Abreißfunktion 22, 34 alimentatore automatico di fogli singoli Hebräisch 166 installazione 8 Anschluß IBM-Russisch 163 rimozione 10 an Computer 22 alimentazione manuale dei fogli singoli Isländisch 163 tensione del nastro 8 an Netz 14 Kanadisches Französisch 163...
- Seite 186 Font Lock Mode Impression bidirectionnelle 49 réglages par défaut 41 entering 27 impression unidirectionnelle 49 saut de ligne automatique avec retour EDS Mode Installation du pilote Vérification 151 de chariot 49 form feed 31 auto LF with CR 49 interligne sélection de groupe 43 front cover auto tear-off 49...
- Seite 187 Speichern der Konfigurationsdatei Spezifikationen 120 impostazioni 48 Einzelrichtungsdruck 50 impostazioni degli interruttori 46 impostazione del driver Standardeinstellungen 78 Elektronische DIP-Schalter 42 impostazioni predefinite 42 controllo 152 Starten 72 Emulation 48 interlinea 50 impostazioni del pannello di controllo Druckerpufferspeicher Endlospapier lunghezza pagina 54 memorizzazione 38 Löschen 38 Abreißfunktion 22, 34...
- Seite 188 port Latin-2 164 international 162 checking 153 Lettonien-1 166 italique standard 162 off-line parallel 23 Lettonien-2 166 tableaux 162 switching to 25 Lithuanien 772 165 print mode Polices TrueType ON-LINE Lithuanien 774 166 selecting 51 installation 89 indicator 25 Lithuanien-KBL 165 print pitch port on-line...
- Seite 189 Probleme Estone-1 166 interruzione improvvisa 150 Drucken über den Rand 146 Estone-2 166 nessuna stampa 140 Manueller Einzelblatteinzug 124 Druckqualität 144 Franco-canadese 163 numero di righe errato 144 Mehrlagenmodus dunkler Druck 144 Gost-Russa 164 pagine macchiate 144 Einschalten des 40 qualità...
- Seite 190 Paper window 71 printer port 75 saut de ligne 31 Serial interface unit 127 Windows 3.1 saving configuration file 75 Saut de ligne automatique imprimante par défaut 83 Setial-to parallel converter 131 starting 71 sélection 49 installation 79 setup sélection d’imprimante de l’application prêt à...
- Seite 191 stampa monodirezionale 50 strappo automatico Technische Daten zero, stile dello selezione 50 Drucker 156 selezione 50 Einzelblattpapier 120 Endlospapier 120 Etiketten 122 tabella caratteri Testdruck 134 selezione 48 TrueType-Schriftarten tensione elettrica 4, 14 Installation 90 test breve 134 esteso 136 test di stampa 134 Walzendrehknopf tipo carta...