Herunterladen Inhalt Inhalt Diese Seite drucken
Grundig MS240 Benutzerhandbuch
Vorschau ausblenden Andere Handbücher für MS240:
Inhaltsverzeichnis

Werbung

Verfügbare Sprachen

Verfügbare Sprachen

Micro HIFI System
User Manual
MS240
DE - EN - CS - FR
01M-GLR5150-4620-04

Werbung

Inhaltsverzeichnis
loading

Inhaltszusammenfassung für Grundig MS240

  • Seite 1 Micro HIFI System User Manual MS240 DE - EN - CS - FR 01M-GLR5150-4620-04...
  • Seite 2: Grundig Kundenberatungszentrum

    GRUNDIG Kundenberatungszentrum Haben Sie Fragen? Montag bis Freitag von 8.00 bis 18.00 Uhr Deutschland:0911 / 59 059 730 Unser Kundenberatungszentrum Österreich:0820 / 220 33 22 * steht Ihnen werktags stets von 8.00 – 18.00 Uhr zur Verfügung. * gebührenpflichtig (0,145 €/Min. aus dem Festnetz,...
  • Seite 3 ----------------------------------------------------------------------------------------------------------------------------------------------------------------------------- SOURCE + PRESET – + VOLUME – SD CARD DISPLAY • FM Antenna AUX In LEFT +/– RIGHT +/– PROG PUSH REPEAT Ü...
  • Seite 4 ----------------------------------------------------------------------------------------------------------------------------------------------------------------------------- DEUTSCH 05-16 ENGLISH 17-27 ČESKY 28-37 FRANÇAIS 38-52...
  • Seite 5: Aufstellen­und­sicherheit

    AUFSTELLEN UND SICHERHEIT --------------------------------------------- Beachten Sie beim Aufstellen bitte folgende Hin- Gewitter stellen eine Gefahr für jedes elektri- weise: sche Gerät dar. Auch wenn die HiFi-Anlage ausgeschaltet ist, kann sie durch einen Blitz- Die HiFi-Anlage ist für die Wiedergabe von schlag in das Stromnetz beschädigt werden.
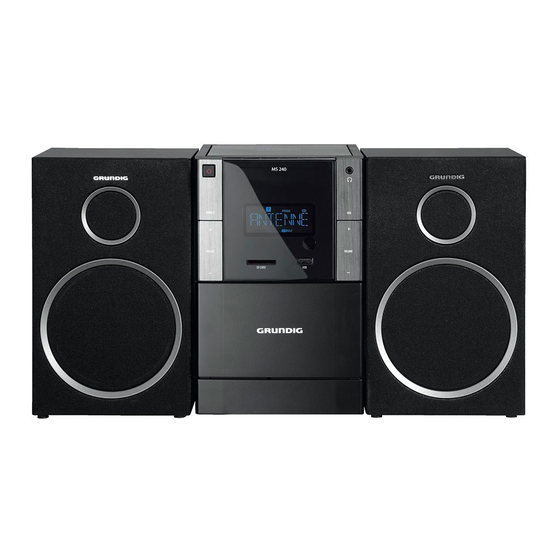
  • Seite 6: Auf Einen Blick

    AUF EINEN BLICK ------------------------------------------------------------------------------------ Die Abbildungen des Gerätes finden Sie auf Unter der Frontklappe Seite 3. Cassetten-Betrieb) ● Startet die Aufnahme. Die Bedienelemente der HiFi- Anlage Startet die Wiedergabe. Spult die Cassette zum Bandan- Die Vorderseite fang. Schaltet das Gerät aus Bereit- schaft (Stand-by) ein und wieder Spult die Cassette zum Banden- in Bereitschaft.
  • Seite 7: Die Oberseite

    AUF EINEN BLICK ------------------------------------------------------------------------------------ Die Oberseite Die Rückseite PROG Im Tuner-Betrieb: speichert FM Antenna Wurfantenne für den FM-Emp- Rundfunk-Programme. fang. Im CD-, USB-, SD-Betrieb: akti- AUX In Audiosignal-Eingang (ø 3.5 mm) viert die Funktion Erstellen eines zum Anschließen eines externen Musikprogrammes;...
  • Seite 8: Die Fernbedienung

    AUF EINEN BLICK --------------------------------------------------------------------------------------------------------- Die Fernbedienung Im Tuner-Betrieb: wählen Programm- plätze. Im CD-, USB-, SD-Betrieb: wählen Alben. ‒ + Verändern die Lautstärke. SD CARD TUNER Im CD-, USB-, SD-Betrieb: startet die Wiedergabe; CASS schaltet in Wiedergabe-Pause. SLEEP Aktiviert den Sleep-Timer-Betrieb, stellt die Sleep-Timer-Zeit ein.
  • Seite 9: Lautsprecher Anschließen

    ANSCHLIESSEN/VORBEREITEN ------------------------------------------------------- Lautsprecher anschließen Batterien in die Fernbedienung einlegen Litzen der Lautsprecherkabel in die Klemmen »RIGHT+/–« und »LEFT+/–« der HiFi-Anla- ge stecken. – Hierbei linken und rechten Kanal beachten (L = linker Kanal, R = rechter Kanal). – Die rot markierten Kabel an die rot markier- ten Klemmen anschließen Netzkabel anschließen Hinweise:...
  • Seite 10: Uhrzeit Einstellen

    EINSTELLUNGEN ------------------------------------------------------------------------------------------------------------ Uhrzeit einstellen – Anzeige: die Frequenz ändert sich in 50 kHz-Schritten; Nach dem erstmaligen Anschließen der Hi-Fi- Anlage an das Stromnetz schaltet sich diese in oder Bereitschaft (Stand-by). » « oder » « drücken und gedrückt Die Uhrzeit kann nur in Bereitschaft (Stand-by) halten, bis die Frequenz in den Schnelldurch- eingestellt werden.
  • Seite 11: Allgemeine Funktionen

    ALLGEMEINE FUNKTIONEN ------------------------------------------------------------------- Ein- und Ausschalten Klangeffekte wählen Nur durch Ziehen des Netzsteckers ist die HiFi- Sie können zwischen den voreingestellten Klang- Anlage vom Stromnetz getrennt! effekten wählen. HiFi-Anlage mit » « am Gerät oder »SOUR- Gewünschten Klangeffekt mit »EQ« der Fern- CE«...
  • Seite 12: Programmquelle Cd Wählen

    CD-BETRIEB --------------------------------------------------------------------------------------------------------------------------------- Programmquelle CD wählen Aktuellen Titel wiederholen Programmquelle CD mit »SOURCE« am Ge- Während der Wiedergabe » « am Gerät rät oder »CD« der Fernbedienung wählen. oder » « der Fernbedienung kurz drücken. – Der Titel wird wieder vom Anfang abgespielt. CD einlegen und Wiedergabe Anderen Titel wählen starten...
  • Seite 13: Usb Und Sd/Sdhc/Mmc-Betrieb

    USB UND SD/SDHC/MMC-BETRIEB ---------------------------------------- Für den MP3/WMA-Betrieb mit MP3-Player, Inhalt einer SD/SDHC/MMC- USB-Memory Stick oder SD/SDHC/MMC-Spei- Speicherkarte wiedergeben cherkarte gelten die gleichen Wiedergabe- und HiFi-Anlage mit » « in Bereitschaft (Stand-by) Suchfunktionen wie im CD-Betrieb (siehe Kapitel schalten. „CD-BETRIEB“). Die Speicherkarte mit den Kontakten nach un- Inhalt eines MP3-Players oder ten vorsichtig in den Kartenschacht »SD«...
  • Seite 14: Cassetten-Betrieb

    CASSETTEN-BETRIEB ------------------------------------------------------------------------------------------------- Programmquelle Cassette wählen Schneller Vor- und Rücklauf Programmquelle Cassette mit »SOURCE« am In Stellung Stopp » « oder » « drücken. Gerät oder »CASS« der Fernbedienung wählen. – » « spult zum Bandanfang, » « spult zum Bandende. Wiedergabe Auf Cassette aufnehmen Abdeckung der Tasten für den Cassetten-Be-...
  • Seite 15: Informationen Zur Verpackung

    Dateisystem/Ordnerverwaltung: Dieses Gerät ist funkentstört entsprechend den ISO 9660 Level 1 kompatibel geltenden EU-Richtlinien. Dieses Produkt erfüllt die europäischen Richtlinien 2014/53/EU, 2009/125/EC und 2011/65/EU. Den genauen Wortlaut der Konformitätserklä- rung (DOC) finden Sie auf der GRUNDIG Home- page www.grundig.com/downloads/doc. DEUTSCH...
  • Seite 16: Abmessungen Und Gewicht

    INFORMATIONEN ------------------------------------------------------------------------------------------------------- USB 2.0 für Format FAT 32/16 Cassetten-Teil Frequenzbereich: 125Hz ... 8 kHz Geräuschspannungsabstand: 45 dBA Abmessungen und Gewicht Abmessungen Gerät: B x H x T 150 x 235 x 203 mm Gewicht Gerät: 2,4 kg Abmessungen Lautsprecher: B x H x T 140 x 235 x 136 mm Gewicht Lautsprecher: 1,05 kg Technische und optische Änderungen vorbehal- ten!
  • Seite 17: Set-Up­and­safety

    SET-UP­AND­SAFETY ­----------------------------------------------------------------------------------------------- Please note the following instructions when set- Thunderstorms are a danger to all electrical ting up the system: devices. Even if the hi-fi system is switched off, it can be damaged by a lightning strike to the The hi-fi system is designed for the playback mains.
  • Seite 18 OVERVIEW ­ - --------------------------------------------------------------------------------------------------------------------------------- On­the­top See the figure on page 3. PROG In tuner mode: stores radio sta- The­hi-fi­system­controls tions. In CD/USB/SD mode: pro- The­front­of­the­device­ grammes tracks and reviews the Switches the hi-fi system to and playlist. from standby mode. The only way to fully disconnect In tuner mode: tunes radio sta- the hi-fi system from the mains is...
  • Seite 19: The Remote Control

    OVERVIEW ­ - --------------------------------------------------------------------------------------------------------------------------------- The­remote­control­ CASS­ ­ S elects the sound source for Cass mode. Selects the preset sound settings ROCK, POP, JAZZ and CLASSIC. SD CARD TUNER Switches the ultra bass system on and off. CASS ­­ In tuner mode: selects a preset radio station.
  • Seite 20: Connection­and­preparation

    CONNECTION­AND­PREPARATION ­--------------------------------------- Connecting­the­loudspeakers Putting­ batteries­ in­ the­ remote­ control Insert the wires of the loudspeaker cable into the terminals »RIGHT+/–« and »LEFT+/–«. – Connect the cables marked in red to the red Open the battery compartment by pressing terminals. down on the catch and then remove the lid. Observe the polarity marked on the base of Connecting­to­the­mains­supply the battery compartment when inserting the...
  • Seite 21: Setting The Clock

    SETTINGS ­ - -------------------------------------------------------------------------------------------------------------------------------------- Setting­the­clock To store the radio station, press »PROG«, select preset by pressing »+­PRESET­-« on the The first time you connect the hi-fi system to the hi-fi system or by pressing » « or » « on the mains, it switches to standby.
  • Seite 22: General Functions

    GENERAL­FUNCTIONS ­--------------------------------------------------------------------------------------- Switching­on­and­off Selecting­sound­settings The only way to disconnect the hi-fi system from You can choose between the preset sound set- the mains supply is to pull out the plug from the tings FLAT, CLASSIC, ROCK, POP and JAZZ. wall socket. Select the sound setting using »EQ«...
  • Seite 23: Selecting­another­track

    CD­MODE ­--------------------------------------------------------------------------------------------------------------------------------------- Selecting­the­CD­input­source Selecting­another­track Press »SOURCE« on the hi-fi system repeat- During playback, press » « or » « on edly or press »CD« on the remote control. the hi-fi system or » « or » « on the remote control once or repeatedly until the number of Inserting­and­playing­CDs the desired track appears in the display.
  • Seite 24 USB­AND­SD/SDHC/MMC­MODE ­---------------------------------------------- For MP3/WMA mode with MP3 player, USB Playing­the­contents­of­an­SD/ memory stick or SD/SDHC/MMC memory SDHC/MMC­memory­card card, the same playback and search functions Switch off the hi-fi system with » «. are available as for CD mode (see CD Mode section).
  • Seite 25: Cassette­mode

    CASSETTE­MODE­ ­----------------------------------------------------------------------------------------------------------- Selecting­the­cassette­input­ Fast­forward­and­reverse­search source In stop mode, press » « or » «. – » « rewinds to the beginning, » « Select the cassette input source with »SOURCE« fast forwards to the end. on the hi-fi system or »CASS« on the remote con- trol.
  • Seite 26: Package Information

    EU directives. This product fulfils the USB­ European directives 2014/53/EU, 2009/125/ USB 2.0 compatible FAT 32/16 EC and 2011/65/EU. You can find the CE declaration of conformity for the device in the form of a pdf file on the Grundig Homepage www.grundig.com/downloads/doc. 26­ ENGLISH...
  • Seite 27: Dimensions And Weight

    INFORMATION ­ - ----------------------------------------------------------------------------------------------------------------- Tape­unit Frequency response: 125Hz ... 8 kHz Signal to Noise ratio: 45 dBA Dimensions­and­weight Device dimensions: W x H x D 150 x 235 x 203 mm Device weight: 2.4 kg Loudspeaker dimensions: W x H x L 140 x 235 x 136 mm Loudspeaker weight: 1.05 kg Technical and design modifications reserved.
  • Seite 28 BEZPEČNOST­A­NASTAVENÍ ­----------------------------------------------------------------- Při nastavení systému dodržte následující po- Pro všechny elektrické spotřebiče jsou nebez- kyny: pečné bouřky. I v přípdě, že je spotřebič vy- pnutý, ho může údej blesku do napájecí sítě Tento spotřebič je určen pro přehrávání audio poškodit. Během bouřky vždy odpojte zá- signálů.
  • Seite 29 PŘEHLED ­------------------------------------------------------------------------------------------------------------------------------------------ Viz obrázky na straně 3. V­horní­části PROG V režimu rádia: uloží rozhlasové Ovládání­hi-fi­systému stanice. Přední­strana­spotřebiče­ V režimu CD/USB/SD: naprogra- muje stopy a zkontroluje seznam Přepne hi-fi systém do a z přehrávání. pohotovostního režimu. Jediný způsob naprostého V režimu rádia: naladění rozhla- odpojení...
  • Seite 30: Dálkové Ovládání

    PŘEHLED ­------------------------------------------------------------------------------------------------------------------------------------------ Dálkové­ovládání­ Zvolí přednastavené nastavení zvuku ROCK, POP, JAZZ a CLASSIC. Zapne/vypne systém UBS. SD CARD TUNER ­­ V režimu rádia: vyybere přednastavenou rozhlasovou CASS stanici. V režimu CD/USB/SD: vybere album. ‒­­­+ Nastavení hlasitosti. V režimu CD/USB/SD: spustí a přeruší...
  • Seite 31: Zapojení­reproduktorů

    PŘIPOJENÍ­A­PŘÍPRAVA­ ­------------------------------------------------------------------------------ Zapojení­reproduktorů Vložení­ baterií­ do­ dálkového­ ovládání Do »RIGHT+/–« a »LEFT+/–« portu zapojte kabely reproduktorů. Stisknutím pojistky otevřete prostor pro baterie – Kabely s červeným označením zapojte do a sejměte víčko. červených portů. Při vkládání baterií (2 x 1.5 V, R 03 /UM 4/ Připojení­do­sítě...
  • Seite 32: Nastavení Hodin

    NASTAVENÍ ­ - ------------------------------------------------------------------------------------------------------------------------------ Nastavení­hodin Pro uložení rozhlasové stanice stiskněte »PROG«, vyberte nastavení - na hi-fi Po prvním zapojení hi-fi systému do sítě se sysytému stiskněte »+­PRESET­-« nebo na přepne do pohotovostního režimu. dálkovém ovládání vyberte »V« nebo »Λ« a V pohotovostním režimu na dálkovém ovládá- potvrďte pomocí...
  • Seite 33: Obecné­funkce

    OBECNÉ­FUNKCE ­----------------------------------------------------------------------------------------------------------- Zapínání­a­vypínání Volba­nastavení­zvuku Jediný způsob odpojení hi-fi systému od napá- Můžete volit přednastavené zvukové efekty jení je vytažení zástrčky ze zásuvky. FLAT, CLASSIC, ROCK, POP a JAZZ. Hi-fi systém přepněte z pohotovostního režimu Nastavení zvuku zvolte pomocí tlačítka »EQ« stisknutím tlačítek »...
  • Seite 34 REŽIM­CD ­ - -------------------------------------------------------------------------------------------------------------------------------------- Výběr­vstupního­zdroje­CD Zastavení­a­opětovné­spuštění­ přehrávání Na hi-fi systému opakovaně stiskněte »SOURCE« nebo na dálkovém ovlá- Přehrávání přerušíte stiskem » « dání stiskněte »CD«. – Na displeji se rozbliká uplynulá doba pře- hrávání. Vkládání­a­přehrávání­CD V přehrávání pokračujte stisknutím » «.
  • Seite 35 REŽIM­USB­A­SD/SDHC/MMC ----------------------------------------------------------- Pro režim přehrávání MP3/WMA v MP3 pře- Přehrávání­obsahu­paměťové­ hrávači nebo USB paměti nebo na kartě SD/ karty­SD/SDHC/MMC SDHC/MMC jsou k dispozici stejné funkce vy- Přepněte hi-fi systém s pomocí » «. hledávání a přehrávání jako v režimu CD (viz část Režim CD).
  • Seite 36 REŽIM­KAZETA­ ­ - ---------------------------------------------------------------------------------------------------------------- Výběr­vstupního­zdroje­kazety Rychlé­vyhledávání­dopředu­a­ dozadu Na hi-fi systému opakovaně stiskněte »SOURCE« (ZDROJ) nebo na dálkovém ovlá- V režimu zastavení stiskněte » « nebo dání stiskněte »CASS«. » «. – » « převine kazetu na začátek, » « Přehrávání na konec.
  • Seite 37: Technická Data

    45 dBA CE prohlášení o shodě zařízení, můžete najít ve formě pdf dokumentu na stránce společnosti Rozměry­a­hmotnost Grundig www.grundig.com/downloads/doc. Rozměry zařízení: Toto zařízení je zařízení třídy II nebo Š x V x H 150 x 235 x 203 mm dvojité izolace. Bylo navrženo tak, aby Hmotnost spotřebiče: 2,4 kg...
  • Seite 38 INSTALLATION ET SÉCURITÉ ------------------------------------------------------------------- Veuillez tenir compte des consignes ci-après au Évitez d'ouvrir le boîtier de l'appareil en toutes moment d'installer le système : circonstances. Aucune réclamation au titre de la garantie ne sera acceptée pour des dom- Le système hi-fi est conçu pour la restitution de mages occasionnés suite à...
  • Seite 39 INSTALLATION ET SÉCURITÉ ------------------------------------------------------------------- Généralités sur les appareils laser Cet appareil est un PRODUIT LASER DE PRODUIT LASER CLASSE 1. Cela DE CLASSE 1 signifie que le laser est conçu de sorte à garantir que la valeur maximale d'émissions autorisée ne soit dépassée en aucun cas. Attention : Si vous utilisez des appa- reils ou des méthodes diffé-...
  • Seite 40 APERÇU --------------------------------------------------------------------------------------------------------------------------------------------- Fait revenir l'enregistrement au Voir le schéma en page 3. début. Les commandes du système hi-fi Avance rapidement l'enregistre- ment vers la fin. La partie avant de l'appareil Met un terme à la lecture ou Met le système hi-fi en mode à...
  • Seite 41 APERÇU --------------------------------------------------------------------------------------------------------------------------------------------- Télécommande La partie arrière de l'appareil Antenne FM Antenne-câble pour réception AUX In Entrée du signal audio pour la SD CARD TUNER connexion d'une source externe (ø 3,5 mm).. CASS LEFT+/– Sorties de connexion du câble du haut-parleur, chaîne gauche. RIGHT+/–...
  • Seite 42 APERÇU --------------------------------------------------------------------------------------------------------------------------------------------- TIMER SET Règle l'arrêt programmé. En mode CD/USB/SD : Répète une piste/disque/album/toutes les Sélectionne la source sonore pour pistes programmées. les appareils externes. RAND Lit les pistes dans un ordre aléa- CASS Sélectionne la source sonore pour toire. le mode Cassette.
  • Seite 43: Branchement Des Haut-Parleurs

    BRANCHEMENT ET PRÉPARATION ------------------------------------------- Branchement des haut-parleurs la fiche d'alimentation si vous souhaitez déconnecter complètement le système hi-fi du secteur. Assurez-vous que la fiche d'alimentation soit facilement accessible pendant le fonctionne- ment de l'appareil et ne soit entravée par aucun autre objet. Insertion des piles dans la télé- commande Insérez les fils du câble du haut-parleur dans...
  • Seite 44: Réglage De L'horloge

    BRANCHEMENT ET PRÉPARATION ------------------------------------------- Remarque relative à l'environne- ment : Ne jetez pas les piles, y compris celles ne contenant pas des métaux lourds, dans les ordures ménagères. Respectez la protec- tion de l’environnement en déposant par exemple les piles usagées dans un centre de collecte prévu à...
  • Seite 45 RÉGLAGES ----------------------------------------------------------------------------------------------------------------------------------- Pour mémoriser la station radio, appuyez sur le bouton»PROG«, sélectionnez le préré- »+ PRESET glage en appuyant sur le bouton -« du système hi-fi, ou sur la touche » « ou » de la télécommande et confirmez à l'aide du bouton »»PROG«.
  • Seite 46: Arrêt Automatique

    FONCTIONS D'ORDRE GÉNÉRAL ------------------------------------------------- Mise sous tension et hors tension Sélection des paramètres audio Le seul moyen de déconnecter entièrement le Vous pouvez choisir entre différents paramètres système hi-fi du secteur consiste à débrancher sa audio prédéfinis FLAT, CLASSIC, ROCK, POP fiche.
  • Seite 47: Mode Tuner

    MODE TUNER ------------------------------------------------------------------------------------------------------------------------ Sélection de la source d'entrée du tuner Sélectionnez la source d'entrée TUNER à l'aide du bouton »SOURCE« du système hi-fi ou en appuyant sur la touche »TUNER« de la télécommande. – La dernière station sélectionnée est lue (Der- nière station en mémoire).
  • Seite 48 MODE CD --------------------------------------------------------------------------------------------------------------------------------------- Sélection de la source d'entrée Interruption momentanée et du CD reprise de la lecture Appuyez sur » « pendant la lecture pour l'in- Appuyez sans interruption sur le bouton terrompre momentanément. »SOURCE«du système hi-fi ou appuyez sur la –...
  • Seite 49 MODE USB ET SD/SDHC/MMC ------------------------------------------------------- Pour le mode MP3/WMA avec un lecteur MP3, Interrompez la lecture avec » «. une clé USB ou une carte mémoire SD/SDHC/ Remarque : MMC, les fonctions de lecture et de recherche disponibles sont les mêmes qu'en mode CD (Voir Le transfert de données bidirectionnelles la rubrique Mode CD).
  • Seite 50: Mode Cassette

    MODE USB ET SD/SDHC/MMC ------------------------------------------------------- Remarque : Interrompez la lecture avec » «. Pour sélectionner un album, appuyez sur Attention : le bouton +« ou »–« du système hi-fi ou le Evitez d'enlever les cartes mémoires pen- bouton » « or » « de la télécommande, dant le fonctionnement de l'appareil.
  • Seite 51: Mode Aux

    L’appareil que vous avez acheté est conforme à est disponible en format PDF à la page d‘accueil la directive LdSD (2011/65/UE) de l’Union eu- de Grundig ropéenne. Il ne comporte pas les matériels dan- www.grundig.com/downloads/doc. gereux et interdits mentionnés dans la directive.
  • Seite 52 INFORMATIONS ------------------------------------------------------------------------------------------------------------- Système de fichiers/gestion de Cet équipement est un appareil élec- fichiers : trique de classe II ou à double isola- tion. Il a été conçu de manière à ne ISO 9660 Niveau 1 compatible pas nécessiter de connexion de sécu- rité...
  • Seite 53 Beko Grundig Deutschland GmbH Thomas-Edison-Platz 3 D-63263 Neu-Isenburg www.grundig.com...

Inhaltsverzeichnis