Herunterladen Inhalt Inhalt Diese Seite drucken

Werbung

Verfügbare Sprachen
  • DE

Verfügbare Sprachen

  • DEUTSCH, seite 39
Manual usuario -
Manuel d'instructions
Manuale dell'utente -
Instruction manual -
Betriebsanleitung -
GYM-300
Gimnasio multiestación
- Gym multistation
Palestra multifunzione
Multy-station gym
Multistation-Gymnasium
ES
FR
IT
EN
DE

Werbung

Inhaltsverzeichnis
loading

Inhaltszusammenfassung für FITFIU FITNESS GYM-300

  • Seite 1 GYM-300 Manual usuario - Gimnasio multiestación Manuel d’instructions - Gym multistation Manuale dell’utente - Palestra multifunzione Instruction manual - Multy-station gym Betriebsanleitung - Multistation-Gymnasium...
  • Seite 3 GIMNASIO MULTIESTACIÓN GYM-300 ÍNDICE INTRODUCCIÓN PRECAUCIONES DE USO DESCRIPCIÓN DEL PRODUCTO MONTAJE UTILIZACIÓN DEL PRODUCTO MANTENIMIENTO RECICLAJE Y ELIMINACIÓN GARANTÍA INTRODUCCIÓN Gracias por su confianza al haber elegido un producto de la marca FITFIU. Tanto si es principiante como deportista aficionado, FITFIU será su aliado para mantenerse en forma o desarrollar su condición física.
  • Seite 4: Descripción Del Producto

    DESCRIPCIÓN DEL PRODUCTO Características técnicas Modelo GYM-300 Estructura Acero con recubrimiento de polvo Almohadilla del asiento Espuma de alta densidad recubierta de vinilo Pesos incluidos 55Kg Peso del producto 117Kg Dimensiones del producto 204x91x142cm MONTAJE INFORMACIÓN GENERAL DE MONTAJE •...
  • Seite 5 GIMNASIO MULTIESTACIÓN GYM-300 PASO I Acople la estructura trasera (03) al la estructura base (01) y asegúralas utilizando 2 tornillos de cabeza hexagonal (30), 4 arandelas (34) y 2 tuercas de nylon (38). Acople la estructura frontal (04) a la estructura base (01) y asegúrelos utilizando 4 tornillos de...
  • Seite 6 PASO 3 Inserte los tubos guías (05) por el tubo de conexión (08) y asegúrelos utilizando dos arandelas (33) y 2 tornillos (22). Acople el tubo de conexión (08) a la barra de sujeción vertical (02) y asegúrelos utilizando 2 tornillos (30), 4 arandelas (34) y 2 tuercas (38).
  • Seite 7 GIMNASIO MULTIESTACIÓN GYM-300 PASO 5 Acople la estructura para el soporte de la mariposa (18) a la barra de sujeción verical (02) y asegúrelos utilizando 2 tornillos (30), 4 arandelas (34) y 2 tuercas (38). Conecte el brazo izquierdo de la mariposa (10L) al soporte (18) utilizando 2 anillos de metal (31), 1 arandela (35) y 1 tuerca (39).
  • Seite 8 PASO 7 Acople la estructura para la bola de golpeo (71) y la estructura para el saco de golpeo (71A) a la barra de conexión (08) utilizando 2 tornillos (30), 4 arandelas (34) y 2 tuercas de nylon (38). Acople la placa de refuerzo (85) a las estructuras (71 , 71A) utilizando 2 tornillos (81), 4 arandelas (34) y 2 tuercas (38).
  • Seite 9 GIMNASIO MULTIESTACIÓN GYM-300 PASO 9 Acople una extremidad del cable del brazo a mariposa (64) al gancho del brazo derecho de mariposa (10R) y asegúrelos utilizando 1 tornillo (21), 1 arandela (33) y 1 tuerca (37). Saque el cable (64) alrededor de la polea (48),...
  • Seite 10: Utilización Del Producto

    Tire del cable (65) hacia abajo y conéctelo con el soporte E en la estructura base (1) mediante la cadena de 6 eslabones (59) y el gancho X1 (61). Nota: Ajuste el cable (65) para que quede lo suficientemente apretado y bloquéelo en cierta posición de la cadena (59) con el gancho (61).
  • Seite 11: Reciclaje Y Eliminación

    GIMNASIO MULTIESTACIÓN GYM-300 PRESS TRICEP A.B. CRUNCH LOW ROW PECTORAL FLIES MANTENIMIENTO • Se debería llevar a cabo un mantenimiento regular. El usuario es responsable de asegurarse de revisar todas las piezas para que estén fijadas correctamente y para que el desgaste no afecte el rendimiento.
  • Seite 12 INDEX INTRODUCTION PRÉCAUTIONS D’UTILISATION DESCRIPTION DU PRODUIT ASSEMBLAGE UTILISATION DU PRODUIT ENTRETIEN RECYCLAGE ET ÉLIMINATION GARANTIE INTRODUCTION Nous vous remercions de votre confiance dans le choix d’un produit de marque FITFIU. Que vous soyez un débutant ou un athlète amateur, la FITFIU sera votre alliée pour garder la forme ou développer votre condition physique.
  • Seite 13: Description Du Produit

    GYM MULTISTATION GYM-300 DESCRIPTION DU PRODUIT Caractéristiques techniques Modèle GYM-300 Structure Acier peint par poudrage Coussin d'assise Mousse recouverte de vinyle haute densité Poids inclus 55Kg Poids du produit 117Kg Dimensions du produit 204x91x142cm ASSEMBLAGE INFORMATIONS GÉNÉRALES D’INSTALLATION • L’assemblage doit être fait par deux adultes si possible. Lisez attentivement le manuel et relisez le dessin explicatif de la page précédente avant de commencer l’installation de l’appareil.
  • Seite 14 ÉTAPE I Fixez le stabilisateur arrière (3) au châssis de base (1) et serrez à l’aide de la vis à tête hexagonale X2 (30), de la rondelle X4 (34) et des écrous en nylon X2 (38). Fixer le stabilisateur avant (4) au cadre de base (1) et serrer à...
  • Seite 15 GYM MULTISTATION GYM-300 ÉTAPE 3 Placer le tube de guidage (5) dans le tube de bridge (8) et serrer à l’aide de la rondelle plate X2 (33) et de la vis à tête hexagonale X2 (22). Fixer le tube de bridge (8) sur le tube de support montant (2) et serrer à...
  • Seite 16 ÉTAPE 5 Fixer le cadre de support papillon (18) au cadre principal (02) à l’aide du boulon hexagonal X2 (30),et de la rondelle X4 (34) et du nylon X2 (38). Connecter le bras papillon gauche (10L) au cadre de support papillon (18) avec l’anneau métallique en poudre X2 (31), la rondelle X1 (35) et l’écrou en nylon X1 (39).
  • Seite 17 GYM MULTISTATION GYM-300 ÉTAPE 7 Fixer cadre bille perforatrice (71) et le cadre du sac de perforation (71A) au cadre du bridge (08) à l’aide d’un boulon à tête hexagonale X2 (30),d’une rondelle X4 (34) et d’un nu nylon X2 (38).
  • Seite 18 ÉTAPE 9 Fixer une extrémité du câble pour bras papillon (64) au crochet du bras papillon droit (10R), serrer à l’aide d’un boulon à tête hexagonale X1 (21), d’une rondelle plate X1 (33) et d’un écrou de nylon X1 (37). Tirer le câble (64) autour de la poulie (48) puis fixer la poulie (48) au support de poulie.
  • Seite 19: Utilisation Du Produit

    GYM MULTISTATION GYM-300 Tirer le câble (65) vers le bas et autour du dessous de la poulie (48). Fixer la poulie (48) au support D du cadre de base (1) et serrer à l’aide de la vis à tête hexagonale X1 (26) et de l’écrou en nylon X1 (38).
  • Seite 20: Recyclage Et Élimination

    PRESS TRICEP A.B. CRUNCH LOW ROW PECTORAL FLIES ENTRETIEN • Un entretien régulier doit être effectué. Il incombe à l’utilisateur de s’assurer que toutes les pièces sont correctement fixées et que l’usure n’affecte pas les performances. • Pour le nettoyage, n’utilisez pas de produits de nettoyage agressifs, mais essuyez la saleté ou la poussière avec un chiffon doux ou légèrement humide.
  • Seite 21 PALESTRA MULTIFUNZIONE GYM-300 INDICE INTRODUZIONE PRECAUZIONI D’USO DESCRIZIONE DEL PRODOTTO MONTAGGIO USO DEL PRODOTTO MANUTENZIONE SMALTIMENTO / RICICLAGGIO GARANZIA INTRODUZIONE Grazie per la fiducia nella scelta di un prodotto a marchio FITFIU. Che tu sia un principiante o un atleta amatoriale, la FITFIU sarà il tuo alleato nel mantenere o sviluppare la tua condizione fisica.
  • Seite 22: Descrizione Del Prodotto

    DESCRIZIONE DEL PRODOTTO Caratteristiche tecniche Modello GYM-300 Struttura Acciaio verniciato a polvere Cuscino di seduta Schiuma ad alta densità rivestita in vinile Pesi inclusi 55Kg Peso del prodotto 117Kg Dimensioni del prodotto 204x91x91x142cm MONTAGGIO INFORMAZIONI GENERALI DI MONTAGGIO • Il montaggio dovrebbe essere realizzato da due adulti se fosse possibile. Legga attentamente il manuale e controlli il disegno illustrativo nella pagina anteriore prima di iniziare l’installazione del dispositivo.
  • Seite 23 PALESTRA MULTIFUNZIONE GYM-300 PASSO I Agganci lo stabilizzatore posteriore (3) al telaio di base (1) e serrare con il bullone a testa esagonale X2 (30), la rondella X4 (34) e i dadi in nylon X2 (38). Agganci lo stabilizzatore anteriore (4) al telaio di base (1) e serrare con il bullone a testa esagonale X4 (30), la rondella X8 (34) e i dadi in nylon X4 (38).
  • Seite 24 PASSO 3 Inserire il tubo di guida (5) nel tubo del ponte (8) e serrare con la rondella piatta X2 (33) e il bullone a testa esagonale X2 (22). Agganci il tubo del ponte (8) al tubo di supporto verticale (2) e serrare con il bullone a testa esagonale X2 (30), la rondella piatta X4 (34) e i dadi in nylon X2 (38).
  • Seite 25 PALESTRA MULTIFUNZIONE GYM-300 PASSO 5 Agganci il telaio Butterfly Support Frame (18) al Main Frame (02) utilizzando X2 Hex Bolt (30), e rondella X4 (34) e X2 Nylon (38). Collegare il braccio a farfalla sinistro (10L) al telaio di supporto farfalla(18) con l’anello in metallo in polvere X2 (31), la rondella X1(35) e il dado in nylon X1(39).
  • Seite 26 PASSO 7 Agganci il telaio della palla da punzone (71) e il telaio del sacco da punzone (71A) al telaio del ponte (08) serrare con il bullone a testa esagonale X2 (30), la rondella X4 (34) e il nu di nylon X2 (38).
  • Seite 27 PALESTRA MULTIFUNZIONE GYM-300 PASO 9 Collegare un’estremità del cavo per il braccio a farfalla (64) al gancio del braccio a farfalla destro (10R), serrare con il bullone a testa esagonale X1 (21), la rondella piatta X1 (33) e il dado in nylon X1 (37).
  • Seite 28: Uso Del Prodotto

    puleggia (48) alla staffa D sul telaio di base (1) e serrare con il bullone a testa esagonale X1 (26) e il dado in nylon X1 (38). Tirare il cavo (65) verso l’alto e intorno al lato superiore della puleggia (48). Agganci la puleggia (48) al lato inferiore della staffa per la puleggia (20) impostata e serrare con il bullone a testa esagonale X1 (26) e il dado in nylon X1 (38).
  • Seite 29 PALESTRA MULTIFUNZIONE GYM-300 PRESS TRICEP A.B. CRUNCH LOW ROW PECTORAL FLIES MANUTENZIONE • La manutenzione deve essere effettuata regolarmente. È responsabilità dell’utente assicurarsi che tutte le parti siano state controllate per il corretto fissaggio e che l’usura non influisca sulle prestazioni.
  • Seite 30: Important Safety Information

    INDEX INTRODUCTION IMPORTANT SAFETY INFORMATION DESCRIPTION OF THE PRODUCT ASSEMBLY USING THE PRODUCT MAINTENANCE RECYCLING AND DISPOSING GUARANTEE INTRODUCTION Thank you for your confidence in choosing a FITFIU brand product. Whether you are a beginner or an amateur athlete, FITFIU will be your ally in keeping fit or developing your physical condition.
  • Seite 31: Description Of The Product

    MULTY-STATION GYM GYM-300 DESCRIPTION OF THE PRODUCT Technical characteristics Model GYM-300 Structure Powder-coated steel Seat cushion High-density vinyl-coated foam Weights included 55Kg Product weight 117Kg Product Dimensions 204x91x142cm ASSEMBLY GENERAL SET-UP INFORMATION • The assembly should be done by two aduits if possible. Carefully read the manual and look at the explanatory drawing on previous page before starting setting the item up.
  • Seite 32 STEP I Attach the Rear Stabilizer (3) to the Base Frame (1) and tighten by X2 Hex Head Bolt (30), X4 Washer (34) and X2 Nylon Nuts (38). Attach the Front Stabilizer (4) to the Base Frame (1) and tighten by X4 Hex Head Bolt (30), X8 Washer (34) and X4 Nylon Nuts (38).
  • Seite 33 MULTY-STATION GYM GYM-300 STEP 3 Place the Guiding Tube (5) into the Bridge Tube (8) and tighten by X2 Flat Washer (33) and X2 Hex Head Bolt (22). Attach the Bridge Tube (8) to the Upright Support Tube (2) and tighten by X2 Hex Head Bolt (30), X4 Flat Washer (34) and X2 Nylon Nuts (38).
  • Seite 34 STEP 5 Attach the Butterfly Support frame (18) to Main Frame (02) using X2 Hex Bolt (30),And X4 washer (34) and X2 Nylon (38). Connect the Butterfly Arm Left (10L) to the Butterfly Support Frame(18) with X2 Powder Metal Ring (31) ,X1 washer(35) and X1 Nylon Nut(39).
  • Seite 35 MULTY-STATION GYM GYM-300 STEP 7 Attach the Punch ball frame (71) and Punch bag frame(71A) to Bridge Frame(08) tighten by X2 Hex Head Bolt(30),X4 Washer(34) and X2 Nylon nu(38). Attach the Punch strengthen Plate (85) to Punch frame(71,71A) tighten by X2 Hex Head Bolt(81),X4 Washer(34) and X2 Nylon nu(38).
  • Seite 36 STEP 9 Attach one end of the Cable for Butterfly Arm (64) to the hook on the Right Butterfly Arm (10R), tighten by X1 Hex Head Bolt (21), X1 Flat Washer (33) and X1 Nylon Nut (37). Draw the Cable (64) around the Pulley (48) then attach the Pulley (48) to the Pulley Bracket (17) on right side of the Upright Support Tube (2), tighten by X1 Hex Head...
  • Seite 37: Using The Product

    MULTY-STATION GYM GYM-300 Draw the Cable (65) upward and around the upper side of Pulley (48). Attach the Pulley (48) to the under side of Bracket for Pulley (20) set and tighten by X1 Hex Head Bolt (26) and X1 Nylon Nut (38).
  • Seite 38 PRESS TRICEP A.B. CRUNCH LOW ROW PECTORAL FLIES MAINTENANCE • Regular maintenance should be carried out. It is the user’s responsibility to ensure that all parts are checked for proper fastening and that wear does not affect performance. • To clean, do not use any aggressive cleaning agents, but wipe off any dirt or dust with a soft or slightly damp cloth. •...
  • Seite 39: Einleitung

    MULTISTATION-GYMNASIUM GYM-300 INHALT EINLEITUNG VORSICHTSMASSNAHMEN FÜR DEN GEBRAUCH BESCHREIBUNG DES PRODUKTS MONTIEREN PRODUKTNUTZUNG WARTUNG ENTFERNUNG / RECYCLING GARANTIE EINLEITUNG Vielen Dank für Ihr Vertrauen in die Wahl eines FITFIU-Markenprodukts. Ob Anfänger oder Amateursportler, FITFIU ist Ihr Verbündeter, wenn es darum geht, sich fit zu halten oder Ihre körperliche Verfassung zu entwickeln.
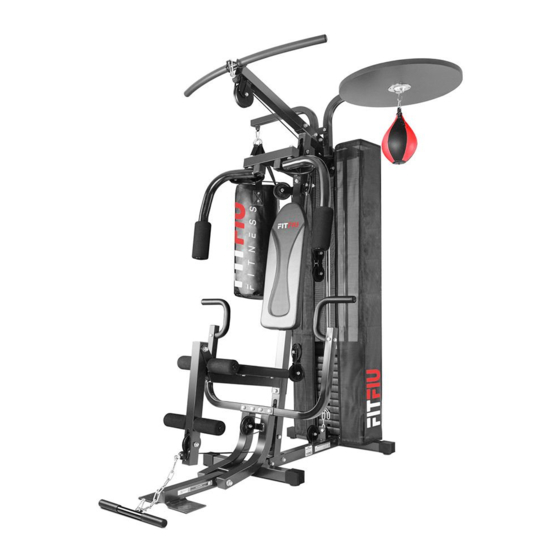
  • Seite 40: Beschreibung Des Produkts

    BESCHREIBUNG DES PRODUKTS Technische Daten Modell GYM-300 Struktur Pulverbeschichteter Stahl Sitzkissen Hochverdichteter vinylbeschichteter Schaumstoff Inklusive Gewichte 55Kg Produktgewicht 117Kg Produktabmessungen 204x91x142cm MONTIEREN ALLGEMEINE INSTALLATIONSHINWEISE • Die Montage sollte nach Möglichkeit von zwei Erwachsenen durchgeführt werden. Lesen Sie das Handbuch sorgfältig durch und lesen Sie die erklärende Zeichnung auf der vorherigen Seite, bevor Sie mit der Installation des Gerätes beginnen.
  • Seite 41 MULTISTATION-GYMNASIUM GYM-300 SCHRITT I Befestigen Sie den hinteren Stabilisator (3) am Grundrahmen (1) und ziehen Sie ihn mit X2 Sechskantschraube (30), X4 Unterlegscheibe (34) und X2 Nylonmuttern (38). Befestigen Sie den vorderen Stabilisator (4) am Grundrahmen (1) und ziehen Sie ihn mit X4 Sechskantschraube (30), X8 Scheibe (34) und X4 Nylonmuttern (38).
  • Seite 42 SCHRITT 3 D Das Führungsrohr (5) in das Brückenrohr (8) einsetzen und mit X2 Unterlegscheibe (33) und X2 Sechskantschraube (22) festziehen. Das Brückenrohr (8) am aufrechten Stützrohr (2) befestigen und mit X2 Sechskantschraube (30), X4 Unterlegscheibe (34) und X2 Nylonmuttern (38) festziehen. SCHRITT 4 Befestigen Sie das Sitzstützrohr (6) am aufrechten Stützrohr (2), anziehen mit X2 Sechskantschraube...
  • Seite 43 MULTISTATION-GYMNASIUM GYM-300 SCHRITT 5 Befestigen Sie den Butterfly-Trägerrahmen (18) mit dem X2 Sechskantschraube (30) und der X4- Scheibe (34) und X2 Nylonmutter (39). Verbinden Sie den Schmetterlingarm links (10L) mit dem Schmetterlingstützrahmen (18) mit dem X2 Pulvermetallring (31) ,X1 Scheibe (35) und X1 Mutter (39).
  • Seite 44 SCHRITT 7 Befestigen Stanzkugelrahmen (71) und den Stanztaschenrahmen (71A) am Brückenrahmen (08), der mit X2 Sechskantschraube (30), X4 Unterlegscheibe (34) und X2 Nylon nu (38) angezogen wird. Befestigen Sie die Stanzverstärkungsplatte (85) am Stanzrahmen (71, 7 1A), der mit X2 Sechskantschraube (81), X4 Unterlegscheibe (34) und X2 Nylon nu (38) angezogen wird.
  • Seite 45 MULTISTATION-GYMNASIUM GYM-300 SCHRITT 9 Befestigen Sie ein Ende des Kabels für die Schmetterlingsarm (64) am Haken rechten Schmetterlingsarm (10R), anziehen mit X1 Sechskantschraube (21), X1 Unterlegscheibe (33) und X1 Mutter (37). Ziehen Kabel (64) Riemenscheibe (48) herum und befestigen Riemenscheibe...
  • Seite 46: Produktnutzung

    Ziehen Sie das Kabel (65) nach unten und um die Unterseite der Riemenscheibe (48) herum. Befestigen Sie die Riemenscheibe (48) an der Halterung D am Grundrahmen (1) und ziehen Sie sie mit X1 Sechskantschraube (26) und X1 Nylonmutter (38) fest. Ziehen Sie das Kabel (65) nach oben und um die Oberseite der Riemenscheibe (48) herum.
  • Seite 47: Wartung

    MULTISTATION-GYMNASIUM GYM-300 PRESS TRICEP A.B. CRUNCH LOW ROW PECTORAL FLIES WARTUNG • Es sollte eine regelmäßige Wartung durchgeführt werden. Es liegt in der Verantwortung des Benutzers, sicherzustellen, dass alle Teile auf korrekte Befestigung überprüft werden und dass Verschleiß die Leistung nicht beeinträchtigt.
  • Seite 48 Manual revisado en agosto de 2019 www.fitfiu.es...

Inhaltsverzeichnis