Inhaltsverzeichnis
Werbung
Verfügbare Sprachen
Verfügbare Sprachen
Quicklinks
Werbung
Inhaltsverzeichnis

Verwandte Anleitungen für FITFIU FITNESS GYM-200


Inhaltszusammenfassung für FITFIU FITNESS GYM-200
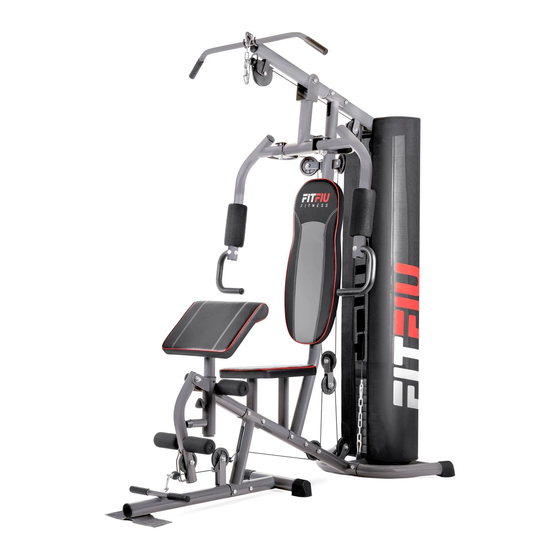
- Seite 1 GYM-200 Manual usuario - Gimnasio multiestación Manuel d’instructions - Gym multistation Manuale dell’utente - Palestra multifunzione Instruction manual - Multy-station gym Betriebsanleitung - Multistation-Gymnasium...
-
Seite 3: Precauciones De Uso
GIMNASIO MULTIESTACIÓN GYM-200 ÍNDICE INTRODUCCIÓN PRECAUCIONES DE USO MONTAJE UTILIZACIÓN DEL PRODUCTO MANTENIMIENTO RECICLAJE Y ELIMINACIÓN GARANTÍA INTRODUCCIÓN Gracias por seleccionar un producto de la marca FITFIU. El gimnasio multiestación de casa está construido por tubos en acero resistente con recubrimiento pulverizado para que se conserve con el tiempo y cuenta con unas grandes patas en goma antideslizantes que impiden movimientos no deseados. - Seite 4 • El equipo no está destinado al uso por personas (incluso niños) con capacidad físicas, sensoriales o mentales reducidas, o con falta de experiencia y de conocimientos, a menos que vengan supervisados o instruidos sobre el uso del equipo por una persona responsable de su seguridad. •...
- Seite 5 GIMNASIO MULTIESTACIÓN GYM-200 PASO I Acople el estabilizador posterior (03) al tubo de soporte del asiento (04) y asegúrelos utilizando 2 tornillos (27), 2 arandelas (34) y 2 tuercas (39). Acople el tubo de soporte vertical (02) a la base de la estructura (01) y asegúrelos utilizando 2...
- Seite 6 PASO 3 Inserte los tubos guías (07) por el tubo de conexión (08) y asegúrelos utilizando dos arandelas (33) y dos tornillos (22). Acople el tubo de conexión (08) al soporte principal (05) y asegúrelos utilizando dos tornillos (30), 4 arandelas (35) y dos tuercas (39).
- Seite 7 GIMNASIO MULTIESTACIÓN GYM-200 PASO 5 Acople la unidad de tracción (09) al tubo de conexión (08), inserte el eje de la unidad de tracción (21) por 2 casquillos de metal (31A) y asegúrelos con 2 arandelas (36) y 2 tuercas (40).
- Seite 8 PASO 7 Acople una extremidad del cable del brazo a mariposa (66) al gancho del brazo a mariposa derecho (10R) y asegúrelos utilizando 1 tornillo (24), 1 arandela (35A) y 1 tuerca (38). Saque el cable (66) alrededor de la polea de arriba (49), luego acople esta polea al soporte de la polea (20) en la parte derecha del tubo de soporte principal (05) y asegúrelos utilizando 1...
-
Seite 9: Utilización Del Producto
GIMNASIO MULTIESTACIÓN GYM-200 PASO 9 Acople la cubierta izquierda del soporte (73L) al tubo de conexión (08) y asegúrelos utilizando dos tornillos (76) y 2 arandelas (77). Haga lo mismo para la cubierta derecha del soporte (73R). Acople la cubierta izquierda (75L) al soporte (73L) y asegúrelos utilizando... -
Seite 10: Reciclaje Y Eliminación
PRESS TRICEP A.B. CRUNCH LOW ROW PECTORAL FLIES MANTENIMIENTO • Después del entrenamiento, debería limpiar el dispositivo y los manillares con un paño seco. De este modo evitará que los componentes estén contaminados por sudor seco. • El uso de su Gimnasio multifunción en casa lleva a su natural desgaste y ruptura. Esto requiere una atención y un mantenimiento regular. - Seite 11 GYM MULTISTATION GYM-200 INDEX INTRODUCTION PRÉCAUTIONS D’UTILISATION ASSEMBLAGE UTILISATION DU PRODUIT ENTRETIEN RECYCLAGE ET ÉLIMINATION GARANTIE INTRODUCTION Merci d’avoir choisi un produit de la marque FITFIU. La gym multistation à domicile est faite en tube d’acier résistant pour la préserver du passage du temps et a de grands pieds en caoutchouc antidérapants qui empêchent des mouvements non désirés.
- Seite 12 • Les enfants ne devraient jamais être autorisés à jouer ou à utiliser l’équipement. • L’équipement n’est pas destiné aux personnes (y compris les enfants) ayant une capacité physique, sensorielle ou mentale réduite, ou manquant d’expérience et de connaissances, à moins d’être supervisés ou instruits par un responsable.
- Seite 13 GYM MULTISTATION GYM-200 ÉTAPE I Accoupler le support stabilisateur arrière (03) au tube de selle (04) et fixer à l’aide de deux vis (27), deux rondelles (34) et deux écrous (39). Accoupler le tube de support vertical (02) à la structure de base (01) et fixer à...
- Seite 14 ÉTAPE 3 Insérer les tubes de guidage (07) dans le tube de raccordement (08) et les fixer avec deux rondelles (33) et deux vis (22). Accouplez le tube de connexion (08) au support principal (05) et fixez-les à l’aide de deux vis (30), 4 rondelles (35) et deux écrous (39).
- Seite 15 GYM MULTISTATION GYM-200 ÉTAPE 5 Fixer l’unité d’entraînement (09) au tube de liaison (08), insérer l’arbre de l’unité d’entraînement (21) à l’aide de deux douilles métalliques (31a) et fixez-les à l’aide de deux rondelles (36) et deux écrous (40 ).
- Seite 16 ÉTAPE 7 Attachez une extrémité du câble (66) au crochet du bras droit (10R) et fixez-le avec 1 vis (24), 1 rondelle (35A) et 1 écrou (38). Tirez le câble (66) autour de la poulie supérieure (49), puis fixez-la sur le support (20) , côté droit du tube de support principal (05);...
-
Seite 17: Utilisation Du Produit
GYM MULTISTATION GYM-200 ÉTAPE 9 Fixez le cache gauche du support (73L) au tube de raccordement (08) et fixez-les à l’aide de deux vis (76) et de 2 rondelles (77). Faites de même pour le cache côté droit du support (73R). -
Seite 18: Recyclage Et Élimination
PRESS TRICEP A.B. CRUNCH LOW ROW PECTORAL FLIES ENTRETIEN • Après l’entraînement, nettoyez l’appareil et le guidon avec un chiffon sec. Cela empêchera les composants d’être souillés. • L’utilisation de votre gymnase multifonctionnel à domicile conduit à une usure naturelle. Cela nécessite une attention et un entretien réguliers. - Seite 19 PALESTRA MULTIFUNZIONE GYM-200 INDICE INTRODUZIONE PRECAUZIONI D’USO MONTAGGIO USO DEL PRODOTTO MANUTENZIONE SMALTIMENTO / RICICLAGGIO GARANZIA INTRODUZIONE Grazie per aver scelto questo prodotto FITFIU. La palestra multifunzione per casa è costruita con tubi in acciaio resistente con rivestimento polverizzato in modo che si conservi con il tempo e conta con dei grandi piedi in gomma antiscivolo che impediscono i movimenti non desiderati.
- Seite 20 • Non lasci i bambini vicino all’impianto senza sorveglianza. • Non si dovrebbe permettere mai che i bambini giochino o utilizzino l’impianto. • L’impianto non è destinato all’uso di persone (incluso bambini) con capacità fisiche, sensoriali o mentali ridotte, o con mancanza di esperienza e di conoscenze, a meno che vengano controllati o istruiti sull’uso dell’impianto da una persona responsabile per la loro sicurezza.
- Seite 21 PALESTRA MULTIFUNZIONE GYM-200 PASSO I Agganci lo stabilizzatore posteriore (03) al tubo di supporto del sedile (04) e fissi con 2 viti (27), 2 guarnizioni (34) e 2 bulloni (39). Agganci il tubo di supporto verticale (02) alla base della struttura (01) e li fissi utilizzando 2 viti (30), 4 guarnizioni (34) e 2 bulloni (39).
- Seite 22 PASSO 3 IInserisca i tubi guida (07) per il tubo di connessione (08) e li assicuri utilizzando due guarnizioni (33) e due viti (22). Agganci il tubo di connessione (08) al supporto principale (05) assicuri utilizzando due viti (30), 4 guarnizioni (35) e due bulloni (39).
- Seite 23 PALESTRA MULTIFUNZIONE GYM-200 PASSO 5 Agganci l’unità di trazione (09) al tubo di connessione (08), inserisca l’asse dell’unità di trazione (21) per 2 attacchi di metallo (31A) e li assicuri con 2 guarnizioni (36) e 2 bulloni (40). Agganci il braccio destro a farfalla (10R) alla parte destra dell’unità...
- Seite 24 PASSO 7 Agganci un’estremità del cavo del braccio a farfalla (66) al gancio del braccio a farfalla destro (10R) e li fissi utilizzando 1 vite (24), 1 guarnizione (35A) e 1 bullone (38). Tiri il cavo (66) intorno alla puleggia superiore (49), dopo agganci questa puleggia al supporto della puleggia (20) alla parte destra del tubo del supporto principale (05) e li fissi utilizzando 1...
-
Seite 25: Uso Del Prodotto
PALESTRA MULTIFUNZIONE GYM-200 PASO 9 Agganci la copertura sinistra del supporto (73L) al tubo di connessione (08) e li fissi utilizzando due viti (76) e 2 guarnizioni (77). Realizzi lo stesso procedimento per la copertura destra del supporto (73R). Agganci la copertura sinistra (75L) al supporto (73L) e li assicuri utilizzando 6 viti (74). - Seite 26 PRESS TRICEP A.B. CRUNCH LOW ROW PECTORAL FLIES MANUTENZIONE • Dopo l’allenamento, deve pulire il dispositivo e i manubri con un panno asciutto. In questo modo eviterà che i componenti si sporchino con il sudore. • L’uso della palestra multifunzione comporta un’usura e rottura naturale. Per questo motivo richiede un’attenzione e una manutenzione regolare.
-
Seite 27: Important Safety Information
MULTY-STATION GYM GYM-200 INDEX INTRODUCTION IMPORTANT SAFETY INFORMATION ASSEMBLY USING THE PRODUCT MAINTENANCE RECYCLING AND DISPOSING GUARANTEE INTRODUCTION Thank you for selecting the FITFIU product. The Multy-station home gym is constructed from heavy-duty, powder-coated tubular steel that is sure to stand the test of time and features large, non-slip rubber feet that will prevent unwanted movement. - Seite 28 • Children should not be allowed to play or operate the equipment at any time. • This equipment is not intended for use by persons (including children) with reduced physical, sensory or mental capabilities, or lack of experience and knowledge, unless they have been given supervision or instruction concerning use of the equipment by a person responsible for their safety.
- Seite 29 MULTY-STATION GYM GYM-200 STEP I Attach the rear stabiliser (03) to the seat support tube (04) and secure using 2 bolts (27), 2 washers (34) and 2 nuts (39). Attach the upright support tube (02) to the base frame (01) and secure using 2 bolts (30), 4 washers (35) and 2 nuts (39).
- Seite 30 STEP 3 Insert the guide tubes (07) through the bridge tube (08) and secure using 2 washers (33) and 2 bolts (22).. Attach the bridge tube (08) to the main support tube (05) and secure using 2 bolts (30), 4 washers (35) and 2 nuts (39). STEP 4 Pass the bolt of each backrest bracket (15) through the main support tube (05) and secure using 1 washer (34) and 1 nut (39).
- Seite 31 MULTY-STATION GYM GYM-200 STEP 5 Attach the pull unit (09) to the bridge tube (08), insert the pull unit axle (21) through 2 metal bushings (31A) and secure using 2 washers (36) and 2 nuts (40). Attach the right-hand butterfly arm (10R)
- Seite 32 STEP 7 Attach one end of the butterfly arm cable (66) to the hook on the right-side butterfly arm (10R) and secure using 1 bolt (24), 1 washer (35A) and 1 nut (38). Pull cable (66) around the upper pulley (49), then attach this pulley to the pulley bracket (20) on the righthand side of the main support tube (05) and secure using 1 bolt...
-
Seite 33: Using The Product
MULTY-STATION GYM GYM-200 STEP 9 Attach the left-hand cover bracket (73L) to the bridge tube (08) and secure using 2 bolts (76) and 2 washers (77). Perform the same for the right-hand cover bracket (73R). Attach the left-hand cover (75L) to bracket (73L) and secure using 6 screws (74). - Seite 34 PRESS TRICEP A.B. CRUNCH LOW ROW PECTORAL FLIES MAINTENANCE • After the training, you should wipe the device and handles with a dry cloth. Thus, you avoid that the components are contaminated by dried sweat. • The use of your Multi-Function Home Gym leads to natural wear and tear. This requires regular care and maintenance. Under normal conditions and use your Multi-Function Home Gym is maintenance free.
-
Seite 35: Einleitung
MULTISTATION-GYMNASIUM GYM-200 INHALT EINLEITUNG VORSICHTSMASSNAHMEN FÜR DEN GEBRAUCH MONTIEREN PRODUKTNUTZUNG WARTUNG ENTFERNUNG / RECYCLING GARANTIE EINLEITUNG Vielen Dank, dass Sie sich für ein Produkt der Marke FITFIU entschieden haben. Das mehrstufige Heimstudio besteht aus robusten, pulverbeschichteten Stahlrohren für eine lange Lebensdauer und verfügt über große, rutschfeste Gummifüße, die unerwünschte Bewegungen verhindern. -
Seite 36: Montieren
Situation verursachen kann. • Lassen Sie Kinder nicht unbeaufsichtigt in der Nähe des Geräts zurück. • Kinder sollten auf keinen Fall das Spielen oder die Benutzung der Geräte erlauben. • Das Gerät ist nicht für die Verwendung durch Personen (einschließlich Kinder) mit eingeschränkter körperlicher, sensorischer oder geistiger Leistungsfähigkeit oder mangelnder Erfahrung und Kenntnis bestimmt, es sei denn, sie werden von einer für ihre Sicherheit verantwortlichen Person beaufsichtigt oder in die Benutzung des Geräts eingewiesen. - Seite 37 MULTISTATION-GYMNASIUM GYM-200 SCHRITT I Den hinteren Stabilisator (03) am Sitzstützrohr (04) befestigen und mit 2 Schrauben (27), 2 Scheiben (34) und 2 Muttern (39) sichern. Das vertikale Stützrohr (02) an der Basis des Rahmens (01) befestigen und mit 2 Schrauben (30), 4 Scheiben (34) und 2 Muttern (39) sichern.
- Seite 38 SCHRITT 3 Führungsrohre (07) durch Verbindungsrohr (08) stecken und mit zwei Unterlegscheiben (33) und zwei Schrauben (22) sichern. Verbindungsschlauch (08) Haupthalterung (05) verbinden und mit zwei Schrauben (30), 4 Scheiben (35) und zwei Muttern (39) sichern. SCHRITT 4 Die Schrauben der einzelnen Rückenlehnenstützen (15) durch das Hauptstützrohr (05) stecken und mit 1 Unterlegscheibe (34) und 1 Mutter (39) sichern.
- Seite 39 MULTISTATION-GYMNASIUM GYM-200 SCHRITT 5 Das Triebfahrzeug (09) mit dem Verbindungsrohr (08) verbinden, die Triebfahrzeugwelle (21) durch 2 Metallbuchsen (31A) stecken und mit 2 Scheiben (36) und 2 Muttern (40) sichern. Befestigen Sie den rechten Flügelarm (10R) an der rechten Seite des Triebfahrzeugs (09) mit 2 Metallbuchsen (31) und sichern Sie ihn mit 2 Unterlegscheiben (36) und 1 Mutter (40).
- Seite 40 SCHRITT 7 Befestigen Sie ein Ende des Tragarmseils (66) am rechten Tragarmhaken (10R) und sichern Sie es mit 1 Schraube (24), 1 Scheibe (35A) und 1 Mutter (38). Das Kabel (66) um die obere Riemenscheibe (49) entfernen, dann diese Riemenscheibe an der Riemenscheibenhalterung (20) auf der rechten Seite des Hauptstützrohres (05) befestigen und mit 1 Schraube (25) und 1 Mutter (39) sichern.
-
Seite 41: Produktnutzung
MULTISTATION-GYMNASIUM GYM-200 SCHRITT 9 Die linke Halterungsabdeckung (73L) am Verbindungsrohr (08) befestigen und mit zwei Schrauben (76) und zwei Unterlegscheiben (77) sichern. Gleiches gilt für die Abdeckung der rechten Halterung (73R). Die linke Abdeckung (75L) an der Halterung (73L) befestigen und mit 6 Schrauben (74) sichern. -
Seite 42: Wartung
PRESS TRICEP A.B. CRUNCH LOW ROW PECTORAL FLIES WARTUNG • Nach dem Training sollten Sie das Gerät und den Lenker mit einem trockenen Tuch reinigen. Dadurch wird verhindert, dass die Komponenten durch trockenen Schweiß verunreinigt werden. • Die Nutzung Ihrer Mehrzweckhalle zu Hause führt zu ihrer natürlichen Abnutzung. Dies erfordert regelmäßige Pflege und Wartung. - Seite 43 MULTISTATION-GYMNASIUM GYM-200 GARANTIE Auf dieses Produkt wird eine Garantie von 2 Jahren gewährt. Diese Garantie deckt Schäden und Fehlfunktionen nur dann ab, wenn das Produkt nicht missbraucht wurde und alle Anweisungen korrekt befolgt wurden. Um Ihre Garantie in Anspruch zu nehmen, müssen Sie Ihre Kaufquittung vorlegen. Das Produkt muss vollständig sein und alle seine Teile enthalten.
- Seite 44 Manual revisado en mayo de 2019 www.fitfiu.es...