Monacor Security TVCCD-120 Anleitung
Tv-ccd-s/w-kamera
Quicklinks
®
TV-CCD-S/W-Kamera
D
A
CH
Bitte lesen Sie diese Anleitung vor dem Betrieb gründ-
lich durch und heben Sie sie für ein späteres Nach -
lesen auf.
1 Einsatzmöglichkeiten
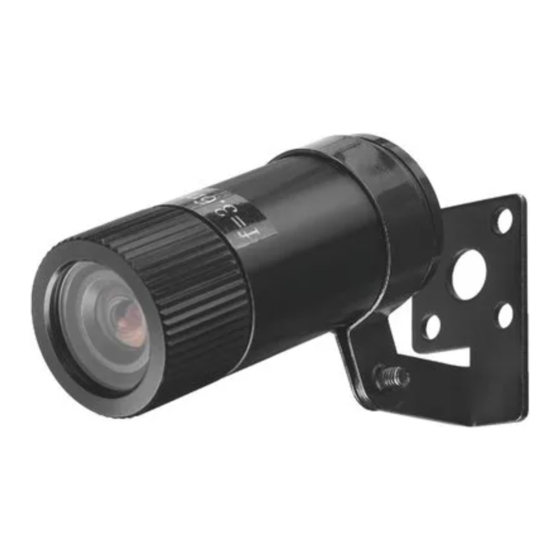
Die Schwarzweißkamera TVCCD-120 ist speziell für
den Einsatz in Überwachungs- und Alarmanlagen kon-
zipiert und lässt sich dank ihrer äußerst geringen
Abmessungen auch optimal als Türspion, Auto-Ein-
parkhilfe oder versteckte Überwachungskamera ver-
wenden. Da die Kamera in einem wetterfesten
Gehäuse (IP 67) untergebracht ist, wird bei einer
Außenmontage kein zusätzliches Kameraschutzge-
häuse benötigt.
2 Hinweise für den sicheren Gebrauch
Die Kamera entspricht allen erforderlichen Richtlinien
der EU und ist deshalb mit
gekennzeichnet.
G
Schützen Sie die Kamera vor Hitze und großer Kälte
(zulässiger Einsatztemperaturbereich 0 – 40 °C).
G
Das Kameragehäuse ist wetterfest, je doch nicht
absolut wasserdicht. Darum die Kamera nicht in
Wasser eintauchen.
G
Für die Reinigung der Kamera keine scharfen Reini-
gungsmittel oder Chemikalien verwenden.
G
Wird die Kamera zweckentfremdet, falsch ange-
schlossen oder nicht fachgerecht repariert, kann
keine Haftung für daraus resultierende Sach- oder
Personenschäden und keine Garantie für die
Kamera übernommen werden.
TV-CCD Black/White Camera
GB
Please read these operating instructions carefully
prior to operation and keep them for later reference.
1 Applications
The black and white camera TVCCD-120 is especially
designed for use in monitoring and alarm systems and
due to its extremely small dimensions it is also very
suit able to be used as a door spy, car parking aid or
concealed monitoring camera. Since the camera is
installed in a weatherproof housing (IP 67), no addi-
tional camera protection housing is necessary for out-
side monitoring.
2 Safety Notes
The camera corresponds to all required directives of
the EU and is therefore marked with
G
Protect the camera against very hot and cold tem-
peratures (permissible operating temperature range
0 – 40 °C).
G
The camera housing is weatherproof, but not com-
pletely waterproof. Therefore, do not immerse the
camera in water.
G
Do not use scouring powder or chemicals for clean-
ing the camera.
G
No guarantee claims for the camera and no liability
for any resulting personal damage or material dam-
age will be accepted if the camera is used for other
purposes than originally intended, if it is not correctly
connected or if it is not repaired in an expert way.
TVCCD -120
Soll die Kamera endgültig aus dem Betrieb
genommen werden, übergeben Sie sie zur
umweltgerechten Entsorgung einem örtlichen
Recyclingbetrieb.
3 Montage der Kamera
Für die Montage liegen der Kamera Befestigungshal-
ter inkl. Montageschrauben bei.
a Montage auf waagerechter Fläche:
Den Montagebügel um die Kamera legen. Den ab -
gewinkelten Kamerahalter mit der M3-Gewinde-
schraube am Bügel festschrauben. Danach den
Kamerahalter mit den vier Blechschrauben an der
gewünschten Stelle befestigen.
b Montage an senkrechter Fläche:
Den geraden Kamerahalter mit der M3-Gewinde-
schraube an der Kamerarückseite befestigen (siehe
Abbildung). Danach den Kamerahalter mit den zwei
Blech schrauben an gewünschter Stelle montieren.
4 Anschluss der Kamera
4.1 Stromversorgung
Den schwarzen Anschlussdraht (Masse) und den roten
Anschlussdraht (+12 V) der Kamera mit einem elek-
tronisch stabilisierten 12-V-Netzgerät (z. B. PSS-600E
von MONACOR) verbinden. Dabei auf die richtige
Polung achten (siehe Abb.). Die Stromaufnahme
beträgt 110 mA.
4.2 Videoausgang mit 75-Ω-Kabel
Zur Übertragung des Videosignals ein 75-Ω-Koaxial -
kabel an die Kamera anschließen: Die Kabelseele mit
dem weißen Anschlussdraht (Videoausgang) verbin-
If the camera is to be put out of operation
definitively, take it to a local recycling plant for
a disposal which will not be harmful to the
environment.
3 Mounting the Camera
The camera is delivered with mounting brackets in -
cluding mounting screws for mounting the camera.
a Mounting on a horizontal surface:
Place the mounting bracket around the camera.
Fasten the angled camera holder to the bracket via
the M3 thread screw. Afterwards, mount the camera
holder with the four self-tapping screws at the de -
sired position.
b Mounting on a vertical surface:
Fasten the straight camera holder to the rear of the
camera via the M3 thread screw (see figure). After-
wards, mount the camera holder with the two self-
.
tapping screws at the desired position.
4 Connection of the Camera
4.1 Power supply
Connect the black connecting cable (ground) and the
red connecting cable (+12 V) of the camera to an elec-
tro nically regulated 12 V power supply (e. g. PSS-600E
from MONACOR). Pay attention to the correct polarity
(see figure). The power consumption is 110 mA.
4.2 Video output with 75 Ω cable
Connect a 75 Ω coaxial cable to the camera for trans-
mitting a video signal: Connect the cable core to the
white connecting cable (video output) and the cable
shield to the black connecting cable (ground). Connect
®
MONACOR INTERNATIONAL GmbH & Co. KG • Zum Falsch 36 • 28307 Bremen • Germany
Copyright
©
by MONACOR INTERNATIONAL. All rights reserved.
Best.-Nr. 19.2490
M3-Gewindebuchse
M3 thread hole
weiß/white
schwarz/black
rot/red
den und die Kabelabschirmung mit dem schwarzen
Anschlussdraht (Masse). Das Koaxialkabel mit einem
oder mehreren Monitoren verbinden. Dabei auf kor-
rekten 75-Ω-Abschluss am Monitor bzw. bei Serien-
schaltung am letzten Monitor achten.
5 Inbetriebnahme
Nach dem Videoanschluss und dem Anlegen der 12-V-
Versorgungsspannung ist die Kamera betriebsbereit.
Wenn ein Objekt in ca. 5 m Entfernung nicht scharf
abgebildet wird, muss das Auflagemaß korrigiert wer-
den. Dazu die Schutzkappe der Kamera abschrauben.
Die kleine Schraube am Objektivhalter lösen. Das
Objektiv vorsichtig so weit drehen, bis das Bild scharf
ist. Anschließend die Schraube wieder festziehen und
die Schutzkappe aufschrauben.
6 Technische Daten
Bildabtaster: . . . . . . . . . 8,5-mm-CCD-Chip (
Synchronisation: . . . . . hor. 15 625 Hz, vert. 50 Hz
Anzahl der Bildpunkte: . hor. 512 × vert. 582
Auflösung: . . . . . . . . . . 380 Linien
Objektiv: . . . . . . . . . . . . 1 : 2,0/3,6 mm (92,5°)
Mindestbeleuchtung: . . 0,4 Lux
Signal/Rauschabstand: > 45 dB
Videoausgang: . . . . . . . 1 Vss, 75 Ω
Einsatztemperatur: . . . 0-40 °C
Stromversorgung: . . . . 12 V , 110 mA
Abmessungen: . . . . . . . ∅ 23 mm × 53 mm
Gewicht: . . . . . . . . . . . . 54 g
Änderungen vorbehalten.
the coaxial cable to one or several monitors. Pay
attention to the correct 75 Ω termination at the monitor
resp. with series connection at the last monitor.
5 Operation
The camera is ready for operation after completing the
video connection and the connection of the 12 V
power supply.
If an object at a distance of approx. 5 m is not repro-
duced clearly, the mechanical focus setting for the lens
must be adjusted. Unscrew the protective cap of the
cam era. Loosen the small screw at the lens holder.
Care fully turn the lens until a clear picture is adjusted.
Afterwards tighten the screw and remount the protective
cap.
6 Specifications
Image sensor: . . . . . . . 8.5 mm CCD chip (
Synchronization: . . . . . hor. 15 625 Hz, vert. 50 Hz
Number of pixels: . . . . . hor. 512 × vert. 582
Resolution: . . . . . . . . . . 380 lines
Lens: . . . . . . . . . . . . . . 1 : 2.0/3.6 mm (92.5°)
Minimum illumination: . 0.4 Lux
S/N ratio: . . . . . . . . . . . > 45 dB
Video output: . . . . . . . . 1 Vpp, 75 Ω
Operating temperature: 0-40 °C
Power supply: . . . . . . . 12 V , 110 mA
Dimensions: . . . . . . . . . ∅ 23 mm × 53 mm
Weight: . . . . . . . . . . . . . 54 g
Subject to technical change.
A-1242.99.03.03.2012
1
⁄
")
3
1
⁄
")
3

Verwandte Anleitungen für Monacor Security TVCCD-120


Inhaltszusammenfassung für Monacor Security TVCCD-120
- Seite 1 (ground). Connect Subject to technical change. M3-Gewindebuchse M3 thread hole weiß/white schwarz/black rot/red ® MONACOR INTERNATIONAL GmbH & Co. KG • Zum Falsch 36 • 28307 Bremen • Germany Copyright © by MONACOR INTERNATIONAL. All rights reserved. A-1242.99.03.03.2012...
- Seite 2 (uscita video), la schermatura con il conduttore Con riserva di modifiche tecniche. M3 filetage M3 filettatura blanc/bianco noir/nero rouge/rosso ® MONACOR INTERNATIONAL GmbH & Co. KG • Zum Falsch 36 • 28307 Bremen • Germany Copyright © by MONACOR INTERNATIONAL. All rights reserved. A-1242.99.03.03.2012...
- Seite 3 (masa). Conectar seguidamente el cable coaxial a Sujeto a modificaciones técnicas. M3 moer M3 filete wit/blanco zwart/negro rood/rojo ® MONACOR INTERNATIONAL GmbH & Co. KG • Zum Falsch 36 • 28307 Bremen • Germany Copyright © by MONACOR INTERNATIONAL. All rights reserved. A-1242.99.03.03.2012...