Inhaltsverzeichnis
Werbung
Verfügbare Sprachen
Verfügbare Sprachen
Quicklinks
Werbung
Kapitel
Inhaltsverzeichnis

Verwandte Anleitungen für Chauvin Arnoux C.A 1310


Inhaltszusammenfassung für Chauvin Arnoux C.A 1310
- Seite 1 FR - Notice de fonctionnement GB - User’s manual DE - Bedienungsanleitung IT - Manuale d’uso ES - Manual de instrucciones C.A 1310 Sonomètre Intégrateur Integrating sound level meter Integrierender Schallpegelmesser Sonometro integratore Sonómetro integrador...
- Seite 2 Deutsch ........................36 Italiano ........................53 Español ........................70 Vous venez d’acquérir un Sonomètre C.A 1310 et nous vous remercions de votre confiance. Pour obtenir le meilleur service de votre appareil : „ lisez attentivement cette notice de fonctionnement, „ respectez les précautions d’emploi.
-
Seite 3: Inhaltsverzeichnis
Le C.A 1310 permet de mesurer des niveaux sonores de 30 à 130 dB et de les enregistrer (capacité mémoire de 64 000 valeurs). Le niveau continu équivalent pourra être utilisé dans le cadre de niveaux acoustiques fluctuants sur des périodes allant de 10 secondes à... -
Seite 4: Précautions D'emploi
2. PRÉCAUTIONS D’EMPLOI 2.1. PRÉCAUTIONS D’EMPLOI DU SONOMÈTRE Il est recommandé de lire ces instructions avant toute utilisation de l’appareil. „ Le sonomètre est un instrument de mesure qui doit être protégé des chocs et des vibrations importantes „ Le microphone en particulier doit être protégé de l’exposition à l’eau et à la poussière et ne doit pas être stocké... -
Seite 5: Description De L'appareil
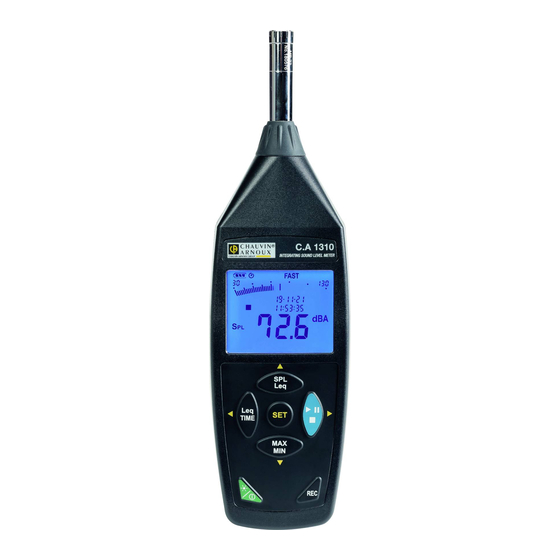
3. DESCRIPTION DE L’APPAREIL 3.1. SONOMÈTRE C.A 1310 INTEGRATING SOUND LEVEL METER CHAUVIN ARNOUX 45, route de Saint Eugène 14130 REUX - France www.chauvin-arnoux.com IEC 61672-1 Class 2 4 x 1.5 V “AA” IEC LR6 - NEDA 15 A POWER-UP OPTIONS... - Seite 6 ① Microphone : Microphone 1/2’’ à électret. ② Affichage : Ecran à cristaux liquides ③ Touche de sélection Leq/SPL : Passage entre les modes SPL (Sound Pressure Level / Niveau de pression sonore) et Leq (niveau continu équivalent) par un appui long > 2 secondes. ④...
-
Seite 7: L'afficheur
⑫ Prise jack du signal de sortie AC/DC : Branchez l’enregistreur de niveau sonore sur la sortie AC/DC qui se trouve sous l’appareil. AC : 1 Vrms correspond à 130 dB (avec pondération fréquentielle) DC : Sortie 10 mV/dB ⑬ Interface USB : Pour connexion à... -
Seite 8: Fonctionnement De L'appareil
Deux courbes de correction A et C sont disponibles sur le C.A 1310. La plus connue est la courbe de pondération A correspondant à “l’oreille moyenne internationale”. Elle est utilisée généralement pour la mesure des niveaux de nuisances dans les locaux industriels. -
Seite 9: Réglage De L'intervalle D'enregistrement
Tous les autres réglages doivent être effectués avant le lancement de l’enregistrement. L’écran affiche le symbole FULL lorsque la mémoire est pleine. 4.4. RÉGLAGE DE L'INTERVALLE D'ENREGISTREMENT (1) Appuyez sur la touche pour entrer en mode réglage, puis sur la touche ou pour sélectionner l’intervalle. -
Seite 10: Réglage De La Date Et De L'heure
4.6.2. MESURE DU NIVEAU SONORE ÉQUIVALENT CONTINU (LEQ) (1) Passez du mode SPL (Sound Pressure Level / Niveau de Pression Sonore) au mode Leq en appuyant 2 secondes sur la touche (2) Appuyez sur la touche pour commencer la mesure. Le symbole s’affiche avec le temps de mesure écoulé. -
Seite 11: Procédure De Calibration
(3) Appuyez sur ▲ ou ▼ pour augmenter ou réduire la valeur. (4) Appuyez sur la touche pour valider. Si vous souhaitez abandonner le réglage en cours, appuyez sur la touche pour annuler. Utilisez un calibrateur acoustique (94 dB, fréquence sinusoïdale de 1 KHz) C.A 1310 INTEGRATING SOUND LEVEL METER... -
Seite 12: Alimentation
5. ALIMENTATION (1) Installation des piles : (a) Retirez la vis qui se trouve sur le couvercle des piles et soulevez ce dernier pour le retirer. (b) Introduisez les quatre piles AA, en respectant la polarité indiquée au fond du compartiment. -
Seite 13: Caractéristiques Techniques
6. CARACTÉRISTIQUES TECHNIQUES Normes applicables : IEC 61672-1 Classe 2, ANSI S1.4 Type 2. Gamme de fréquences : 20 Hz~8 KHz Gamme de niveaux de mesure : 30~130 dB Pondérations fréquentielles : Microphone : microphone ½" à électret Affichage : Écran à... -
Seite 14: Maintenance
- Des dommages dus à des chocs, chutes ou inondations 8. POUR COMMANDER Le C.A 1310 est fourni avec une mallette de transport, une boule “protège-vent”, un cordon USB, le logiciel SL-Software, une prise mâle jack, piles et cette notice de fonctionnement. -
Seite 15: Le Logiciel Sl-Software
9. LE LOGICIEL SL-SOFTWARE 9.1. DÉMARRAGE RAPIDE (1) Enregistrement des données en temps réel sous forme d’ondes. 1. Commencez par allumer le sonomètre et branchez-le sur le port USB du PC à l’aide du câble. 2. Lancez le logiciel SL-Software 3. -
Seite 16: Menu Principal
(3) Comment charger les données stockées dans la mémoire du sonomètre pour les enregistrer dans un fichier ? 1. Allumez le sonomètre. 2. Appuyez sur la touche REC de l’appareil pour lancer l’enregistrement des données. 3. Appuyez de nouveau sur la touche REC lorsque vous voulez arrêter l’enregistrement. 4. -
Seite 17: Fenêtre Data Logger
9.3. FENÊTRE DATA LOGGER Lorsque le sonomètre intégrateur est branché sur le PC et que vous sélectionnez “DataLogger” dans le menu principal ou cliquez sur dans la barre d’outils pour charger des données enregistrées sur le sonomètre, une barre de progression s’affiche pour indiquer l’état du téléchargement. En cas d’erreur, cliquez simplement une nouvelle fois sur “DataLogger”. -
Seite 18: Graphique
9.4. GRAPHIQUE Barre d'outils - Afficher ou masquer Statistiques 1 - Afficher ou masquer Statistiques 2 - Curseur normal - Lorsque ce curseur est sélectionné, il se transforme en croix lorsqu'il survole le graphique et y marque une croix si vous cliquez. - Lorsque ce curseur est sélectionné, il se transforme en une ligne verticale lorsqu'il survole le graphique, sur lequel vous pouvez cliquer pour saisir une annotation. - Seite 19 Français ........................2 Deutsch ........................36 Italiano ........................53 Español ........................70 Thank you for purchasing this C.A 1310 sound level meter. For best results from your instrument: „ read these operating instructions carefully, „ comply with the precautions for use.
-
Seite 20: Presentation
It has many professional and home applications: measuring sound levels in factories, schools, offices, airports, studios, auditoriums, etc. The C.A 1310 is a compact portable instrument that can be held in one hand or, for long-term measurements, mounted on a tripod. -
Seite 21: Precautions For Use
2. PRECAUTIONS FOR USE 2.1. PRECAUTIONS FOR USE OF THE SOUND LEVEL METER We recommend reading these instructions before any use of the instrument. „ The sound level meter is a measuring instrument that must be protected from impacts and severe vibrations „... -
Seite 22: Description Of The Instrument
3. DESCRIPTION OF THE INSTRUMENT 3.1. SOUND LEVEL METER C.A 1310 INTEGRATING SOUND LEVEL METER CHAUVIN ARNOUX 45, route de Saint Eugène 14130 REUX - France www.chauvin-arnoux.com IEC 61672-1 Class 2 4 x 1.5 V “AA” IEC LR6 - NEDA 15 A... - Seite 23 ① Microphone: 1/2" electret microphone. ② Display: Liquid-crystal screen ③ Leq/SPL selection key: To toggle between the SPL (Sound Pressure Level) and Leq (equivalent continuous sound level) modes by a long press (>2 seconds). ④ LeqTime key: To set the integration time associated with the Leq measurement. ⑤...
-
Seite 24: The Display Unit
⑫ AC/DC output signal jack: Connect the sound level recorder to the AC/DC output on the bottom of the instrument. AC: 1 Vrms represents 130dB (with frequency weighting) DC: 10mV/dB output DC signal Ground AC signal ⑬ USB interface: For connection to a computer or to an external power supply. ⑭... -
Seite 25: Operation Of The Instrument
The human ear is not equally sensitive to all frequencies, so filters are used to weight or correct the measured levels according to frequency. The C.A 1310 provides two correction curves, A and C. The more widely used is weighting curve A, representing "the international average ear". It is the curve generally used to measure noise levels in an industrial context. -
Seite 26: Adjusting The Recording Interval
4.4. ADJUSTING THE RECORDING INTERVAL (1) Press the key to enter the settings mode, then the or key to select the interval. The "Int" symbol then appears and the seconds display blinks. (2) Set the desired recording interval, displayed in minutes and seconds. Increase or decrease the interval by pressing the ... -
Seite 27: Setting The Date And Time
4.6.2. MEASURING THE EQUIVALENT CONTINUOUS SOUND LEVEL (LEQ) (1) Change from the SPL (Sound Pressure Level) mode to the Leq mode by pressing the key for 2 seconds. (2) Press the key to start the measurement. The symbol is displayed with the elapsed measurement time. -
Seite 28: Calibration Procedure
(3) Press ▲ or ▼ to increase or decrease the value. (4) Press the key to confirm. If you want to abort the setting in progress, press the key to cancel. Use an acoustic calibrator (94dB, 1KHz sine wave) C.A 1310 INTEGRATING SOUND LEVEL METER... -
Seite 29: Power Supply
5. POWER SUPPLY (1) Installing the batteries: (a) Remove the screw on the battery compartment cover and lift the cover off. (b) Insert the four AA batteries, with the polarities as indicated on the bottom of the compartment. (c) Put the cover back in place and insert and tighten the screw. Remark: The instrument is powered by four 1.5V LR6 or AA alkaline batteries. -
Seite 30: Technical Characteristics
6. TECHNICAL CHARACTERISTICS Applicable standards: IEC61672-1 Class 2, ANSI S1.4 Type 2. Frequency range: 20Hz~8KHz Measurement levels range: 30~130dB Frequency weightings: Microphone: ½" electret microphone Display: Liquid-crystal screen Display of numbers: 4 digits Resolution: 0.1dB Screen refresh: 0.5s Analog display: 50-segment bargraph Resolution: Screen refresh:... -
Seite 31: Maintenance
- Damage caused by shocks, falls, or floods. 8. TO ORDER The C.A 1310 is delivered with a carrying case, a windscreen ball, a USB cable, the SL software, a jack, batteries, and these operating instructions. Accessories & spares: C.A 833 Sound level meter calibrator... -
Seite 32: The Sl Software
9. THE SL SOFTWARE 9.1. GETTING STARTED (1) Recording data in real time, in wave form. 1. Start by switching on the sound level meter and connecting it to the USB port of the PC using the cable. 2. Start the SL software 3. -
Seite 33: Main Menu
Save - Saves the data of the active window (the one with the highlighted title bar) to a file. Print - Prints the curve of the active window. File | Exit: Exits from the C.A 1310 program. Real time | Run - Starts the real-time acquisition of data. -
Seite 34: Data Logger Window
9.3. DATA LOGGER WINDOW When the data logging integrating sound level meter is connected to the PC and you select "DataLogger" in the main menu or click in the toolbar to download data recorded in the sound level meter, a progress bar is displayed to indicate the status of the download. -
Seite 35: Graph
9.4. GRAPH Toolbar - Display or hide Statistics 1 - Display or hide Statistics 2 - Normal cursor - When this cursor is selected, it turns into a cross when it is moved over the graph and marks a cross on it if you click. - When this cursor is selected, it turns into a vertical line when it is moved over the graph, on which you can click to enter an annotation. - Seite 36 English ........................19 Italiano ........................53 Español ........................70 Sie haben gerade einen Schallpegelmesser C.A 1310 erworben und wir danken Ihnen für Ihr Vertrauen. Um die optimale Benutzung Ihres Gerätes zu gewährleisten, bitten wir Sie: „ Lesen Sie diese Bedienungsanleitung sorgfältig durch, „...
-
Seite 37: Gerätevorstellung
Der professionelle und private Anwendungsbereich ist vielfältig: Messung von Schallpegeln in Fabriken, in Schulen, in Büros, an Flughäfen, in Studios, in Sendesälen Das C.A 1310 ist ein tragbares, kompaktes Gerät, das mit einer Hand bedient und für die Durchführung von Langzeitmessungen auf einem Fotostativ angebracht werden kann Das C.A 1310 ermöglicht die Messung von Schallpegeln von 30 bis 130 dB und deren Aufzeichnung... -
Seite 38: Sicherheitshinweise
2. SICHERHEITSHINWEISE 2.1. VORSICHTSMASSNAHMEN BEI DER VERWENDUNG DES SCHALLPEGELMESSERS Es wird empfohlen, diese Anleitung vor der Verwendung des Geräts zu lesen. „ Der Schallpegelmesser ist ein Messgerät, das gegen heftige Stöße und Vibrationen geschützt werden muss. „ Insbesondere das Mikrofon muss gegenüber Wasser und Staub geschützt werden und darf nicht anfeuchten und/oder zu warmen Orten gelagert werden. -
Seite 39: Beschreibung Des Geräts
3. BESCHREIBUNG DES GERÄTS 3.1. SCHALLPEGELMESSER C.A 1310 INTEGRATING SOUND LEVEL METER CHAUVIN ARNOUX 45, route de Saint Eugène 14130 REUX - France www.chauvin-arnoux.com IEC 61672-1 Class 2 4 x 1.5 V “AA” IEC LR6 - NEDA 15 A POWER-UP OPTIONS... - Seite 40 ① Mikrofon: 1/2''-Elektretmikrofon. ② Display: Flüssigkristall-Anzeige ③ Leq/SPL-Auswahltaste: Wechseln Sie zwischen den Modi SPL (Schalldruckpegel) und Leq (äquivalenter Dauerpegel) mit einem langen Druck > 2 Sekunden. ④ LeqTime-Tasten: Anpassung der Integrationszeit für die Leq-Messung. ⑤ SET-Tasten: Im Setup-Modus können Sie die Frequenz- und Zeitgewichtung, die 94 dB-Kalibrierung, die Dauer des Aufzeichnungsintervalls sowie Datum und Uhrzeit einstellen.
-
Seite 41: Display
⑫ AC/DC-Klinkenstecker: Schließen Sie den Schallpegelmesser an den AC/DC-Ausgang am Gerät an. AC-Ausgang: 1 Vrms entspricht 130 dB (mit Frequenzbewertung) DC-Ausgang: Ausgang 10 mV/dB DC-Signal Masse AC-Signal ⑬ USB-Schnittstelle: Zum Anschluss an einen Computer oder eine externe Stromquelle. ⑭ Abschraubbares Teil zum Einsetzen der Verlängerung. 3.2. -
Seite 42: Funktionsweise Des Geräts
Pegel in Abhängigkeit von der Frequenz bewerten oder korrigieren. Zwei Korrekturkurven (A und C) stehen beim C.A 1310 zur Verfügung. Am gebräuchlichsten ist die Bewertungskurve A, die dem „mittleren internationalen Ohr“ entspricht. Sie wird allgemein für die Messung von Störschallpegeln in industriellen Anlagen verwendet. -
Seite 43: Einstellung Der Aufzeichnungshäufigkeit
Hinweis: Während der Aufzeichnung sind die meisten Tasten wie z.B oder deaktiviert. Alle anderen Einstellungen müssen daher vor Beginn der Aufzeichnung vorgenommen werden. Das Display zeigt das Symbol FULL wenn der Speicher voll ist. 4.4. EINSTELLUNG DER AUFZEICHNUNGSHÄUFIGKEIT (1) Drücken Sie die Taste , um in den Einstellungsmodus zu gelangen, und wählen Sie dann mit der Taste ... -
Seite 44: Äquivalente Dauerpegelmessung (Leq)
Das Display zeigt in einer Schleife die folgenden Werte an: 10 s → 1 min → 5 min → 10 min → 20 min → 30 min → 1 h → 2 h → 4 h → 8 h → 16 h → 24 h. (3) Dann drücken Sie die Taste zum Abschluss. -
Seite 45: Kalibrierung Des Schallpegelmessers
(4) Halten Sie die Taste , um die Einstellung zu bestätigen. Wenn Sie die Einstellung nicht übernehmen möchten, drücken Sie die Taste zum Abbrechen. Verwenden Sie einen akustischen Kalibrator (94 dB, Sinusfrequenz 1 KHz) C.A 1310 INTEGRATING SOUND LEVEL METER... -
Seite 46: Stromversorgung
5. STROMVERSORGUNG (1) Einlegen der Batterien: (a) Entfernen Sie die Schraube am Batteriefach und heben Sie den Deckel an, um die Batterie zu entfernen. (b) Legen Sie die vier AA-Batterien ein und beachten Sie dabei die auf der Unterseite des Gehäuses angegebene Polarität. (c) Setzen Sie den Deckel wieder ein und ziehen Sie die Schraube an. -
Seite 47: Technische Daten
6. TECHNISCHE DATEN Einhaltung der Normen: IEC 61672-1 Typ 2, ANSI S1.4 Typ 2. Frequenzbereich: 20 Hz~8 KHz Messumfang: 30~130 dB Frequenzbewertungen: Mikrofon: ½" Elektretmikrofon Display: Flüssigkristall-Anzeige Zahlenanzeige: 4 Ziffern Auflösung: 0,1 dB Aktualisierung der Anzeige: 0,5 s Analoge Anzeige: 50-Segment-Balkendiagramm Auflösung: 2 dB... -
Seite 48: Wartung
- Anpassung an einen bestimmten, in der Definition des Gerätes nicht vorgesehenen oder in der Bedienungsanleitung nicht angegebenen Verwendungszweck; - Schäden durch Stöße, Stürze oder Überschwemmungen 8. BESTELLANGABEN C.A 1310 wird geliefert mit Transportkoffer, Windschutzkappe, Verbindungskabel USB, Software SL, Klinkenstecker, Batterien und dieser Bedienungsanleitung. Zubehör und Ersatzteile: C.A 833 Kalibrator für Schallpegelmesser Windschutzkappe Verlängerung Mikro-Schallpegelmesser 5 Meter... -
Seite 49: Sl-Software
9. SL-SOFTWARE 9.1. SCHNELLSTART (1) Aufzeichnung von Echtzeitdaten in Wellenform. 1. Beginnen Sie, indem Sie den Schallpegelmesser einschalten und ihn mit dem Kabel an den USB-Anschluss des PCs anschließen. 2. SL-SOFTWARE 3. Wenn der Anschluss funktioniert, zeigt das Programmfenster den gleichen Wert wie der integrierende Schallpegelmesser an. -
Seite 50: Hauptmenü
(3) Wie lade ich die im Speicher des Schallpegelmessers gespeicherten Daten und speichere sie in einer Datei? 1. Schalten Sie den Schallpegelmesser ein. 2. Drücken Sie die REC-Taste am Gerät, um die Datenaufzeichnung zu starten. 3. Drücken Sie die REC-Taste erneut, wenn Sie die Aufzeichnung beenden möchten. 4. -
Seite 51: Datalogger-Fenster
9.3. DATALOGGER-FENSTER Wenn der integrierende Schallpegelmesser an den PC angeschlossen ist und Sie im Hauptmenü „DataLogger“ wählen bzw. wenn Sie in der Symbolleiste auf klicken (zum Laden der vom Schallpegelmesser aufgezeichneten Daten), wird ein Fortschrittsbalken angezeigt, der den Fortschritt des Ladevorgangs anzeigt. Wenn ein Fehler auftreten sollte, klicken Sie einfach erneut auf „DataLogger“. Wenn die Daten geladen sind, wird auf der linken Seite des Bildschirms die Anzahl der Datensätze mit detaillierten Informationen zu jedem einzelnen Datensatz angezeigt (Startdaten, Startzeit, Abtastrate, Anzahl der Datensätze). -
Seite 52: Grafik
9.4. GRAFIK Symbolleiste - Statistik 1 ein- oder ausblenden - Statistik 2 ein- oder ausblenden - Normaler Cursor - Der Cursor verwandelt sich in ein Kreuz, wenn er über dem Diagramm schwebt, und kennzeichnet die Stelle mit einem Kreuz, wenn Sie daraufklicken. - Der Cursor verwandelt sich in eine senkrechte Linie, wenn er über dem Diagramm schwebt, und wenn Sie daraufklicken, können Sie eine Anmerkung eingeben. - Seite 53 English ........................19 Deutsch ........................36 Español ........................70 Avete appena acquistato un Sonometro C.A 1310 e vi ringraziamo della vostra fiducia. Per ottenere le migliori prestazioni dal vostro strumento: „ seguite attentamente il presente manuale d’uso, „ rispettate le precauzioni d’uso.
-
Seite 54: Presentazione
TABLE DES MATIÈRES 1. PRESENTAZIONE ........54 5. ALIMENTAZIONE ........63 2. PRECAUZIONI D’USO ......55 6. CARATTERISTICHE TECNICHE ....64 2.1. Precauzioni d’uso del sonometro ..55 7. MANUTENZIONE ........65 2.2. Osservazioni sulle condizioni di misura .55 8. PER ORDINARE ........65 3. DESCRIZIONE DELLO STRUMENTO ..56 9. -
Seite 55: Precauzioni D'uso
2. PRECAUZIONI D’USO 2.1. PRECAUZIONI D’USO DEL SONOMETRO Si raccomanda di leggere le presenti istruzioni prima di utilizzare lo strumento. „ Il sonometro è uno strumento di misura che va protetto dagli urti e dalle forti vibrazioni. „ Il microfono in particolare va protetto dall’esposizione all’acqua e alla polvere; pertanto non va stoccato in luoghi umidi e/o troppo caldi „... -
Seite 56: Descrizione Dello Strumento
3. DESCRIZIONE DELLO STRUMENTO 3.1. SONOMETRO C.A 1310 INTEGRATING SOUND LEVEL METER CHAUVIN ARNOUX 45, route de Saint Eugène 14130 REUX - France www.chauvin-arnoux.com IEC 61672-1 Class 2 4 x 1.5 V “AA” IEC LR6 - NEDA 15 A POWER-UP OPTIONS... - Seite 57 ① Microfono: Microfono 1/2’’ electret. ② Visualizzazione: Schermo a cristalli liquidi ③ Tasto di selezione Leq/SPL: Passaggio fra le modalità SPL (Sound Pressure Level/Livello di pressione acustica) e Leq (livello continuo equivalente) mediante una pressione lunga >2 secondi. ④ Tasti LeqTime: Impostazione del tempo di integrazione associata alla misura del Leq. ⑤...
-
Seite 58: Il Display
⑫ Presa jack del segnale di uscita AC/DC: Collegate il registratore di livello acustico all’uscita AC/DC che si trova sopra lo strumento. AC: 1 Vrms corrisponde a 130dB (con ponderazione frequenziale) DC: Uscita 10mV/dB Segnale DC Massa Segnale AC ⑬ Interfaccia USB: Per connessione a un PC o a una sorgente di alimentazione esterna. -
Seite 59: Funzionamento Dello Strumento
Due curve di correzione A e C sono disponibili sul C.A 1310. La più conosciuta è la curva di ponderazione A corrispondente all’orecchio medio internazionale. Si utilizza generalmente la curva A per la misura dei livelli di inquinamento nei locali industriali. -
Seite 60: Impostazione Dell'intervallo Di Registrazione
Occorre effettuare tutte le altre regolazioni prima di lanciare la registrazione. Lo schermo visualizza il simbolo FULL quando la memoria è piena. 4.4. IMPOSTAZIONE DELL'INTERVALLO DI REGISTRAZIONE (1) Premete il tasto per entrare in modalità impostazione, poi il tasto o per selezionare l’intervallo. -
Seite 61: Impostazione Della Data E Dell'ora
4.6.2. MISURA DEL LIVELLO ACUSTICO EQUIVALENTE CONTINUO (LEQ) (1) Passate dalla modalità SPL (Sound Pressure Level/Livello di Pressione Acustica) alla modalità Leq Premendo 2 secondi il tasto (2) Premete il tasto per iniziare la misura. Il simbolo si visualizza con il tempo di misura trascorso. -
Seite 62: Procedura Di Calibrazione
(3) Premete ▲ o ▼ per aumentare o ridurre il valore. (4) Premete il tasto per convalidare. Se volete abbandonare l’impostazione in corso, premete il tasto per annullare. Utilizzate un calibratore acustico (94dB, frequenza sinusoidale di 1KHz) C.A 1310 INTEGRATING SOUND LEVEL METER... -
Seite 63: Alimentazione
5. ALIMENTAZIONE (1) Inserimento delle pile: (a) Rimuovete la vite posta sul coperchio delle pile e sollevate quest’ultimo per rimuoverlo. (b) Introducete le quattro pile AA, rispettando la polarità indicata sul fondo dello scomparto. (c) Rimettete il coperchio e stringete la vite. Osservazione: Lo strumento è... -
Seite 64: Caratteristiche Tecniche
6. CARATTERISTICHE TECNICHE Norme applicabili: IEC61672-1 Classe 2, ANSI S1.4 Tipo 2. Portata di frequenza: 20Hz~8KHz Portata dei livelli di misura: 30~130dB Ponderazioni frequenziali: Microfono: microfono ½" a electret Visualizzazione: Schermo a cristalli liquidi Visualizzazione dei numeri: 4 cifre Risoluzione: 0,1dB Refresh dello schermo: 0,5s... -
Seite 65: Manutenzione
- Danni dovuti a urti, cadute, inondazioni. 8. PER ORDINARE Il C.A 1310 è fornito con una valigetta da trasporto, un “antivento” a sfera, un cavo USB, il software SL-Software, una presa maschio jack, pile e il presente manuale d’uso. -
Seite 66: Il Software Sl-Software
9. IL SOFTWARE SL-SOFTWARE 9.1. AVVIO RAPIDO (1) Registrazione dei dati in tempo reale sotto forma di onde. 1. Dapprima accendete il sonometro e collegatelo alla porta USB del PC mediante il cavo. 2. Lanciate il software SL-Software 3. In caso di connessione la finestra del programma visualizza lo stesso valore del sonometro integratore. -
Seite 67: Menu Principale
(3) Come caricare i dati stoccati nella memoria del sonometro per registrarli in un file? 1. Accendete il sonometro. 2. Premete il tasto REC dello strumento per lanciare la registrazione dei dati. 3. Premete di nuovo il tasto REC quando volete fermare la registrazione. 4. -
Seite 68: Finestra Data Logger
9.3. FINESTRA DATA LOGGER Quando il sonometro integratore è collegato al PC e selezionate “DataLogger” nel menu principale oppure cliccate su nella barra degli strumenti per caricare i dati registrati sul sonometro, una barra di progressione si visualizza per indicare lo stato del download. In caso d’errore, cliccate ancora una volta su “DataLogger”. -
Seite 69: Grafico
9.4. GRAFICO Barra degli strumenti - Visualizzare o occultare Statistica 1 - Visualizzare o occultare statistica 2 - Cursore normale - Se è selezionato, questo cursore, si trasforma in croce quando sorvola il grafico e vi lascia una croce se cliccate. - Se è... - Seite 70 English ........................19 Deutsch ........................36 Italiano ........................53 Usted acaba de adquirir un sonómetro C.A 1310 y le agradecemos la confianza que ha depositado en nosotros. Para conseguir las mejores prestaciones de su instrumento: „ lea atentamente este manual de instrucciones, „...
-
Seite 71: Presentación
Las aplicaciones profesionales y domésticas son numerosas: medir niveles de ruido en las fábricas, escuelas, oficinas, aeropuertos, estudios, auditorios, etc. El C.A 1310 es un instrumento portátil compacto, que se puede usar con una sola mano y ser montado en un trípode para medidas de larga duración. -
Seite 72: Precauciones De Uso
2. PRECAUCIONES DE USO 2.1. PRECAUCIONES DE USO DEL SONÓMETRO Se recomienda leer estas instrucciones antes de utilizar el instrumento. „ El sonómetro es un instrumento de medida que debe ser protegido de golpes y fuertes vibraciones. „ El micrófono en particular debe ser protegido de la exposición al agua y al polvo y no debe ser almacenado en ambientes húmedos y/o demasiado calientes. -
Seite 73: Descripción Del Instrumento
3. DESCRIPCIÓN DEL INSTRUMENTO 3.1. SONÓMETRO C.A 1310 INTEGRATING SOUND LEVEL METER CHAUVIN ARNOUX 45, route de Saint Eugène 14130 REUX - France www.chauvin-arnoux.com IEC 61672-1 Class 2 4 x 1.5 V “AA” IEC LR6 - NEDA 15 A POWER-UP OPTIONS... - Seite 74 ① Micrófono: Micrófono 1/2’’ electret. ② Visualización: Display de cristal líquido ③ Tecla de selección Leq/SPL: Cambio entre los modos SPL (Sound Pressure Level/nivel de presión sonora) y Leq (nivel continuo equivalente) con una pulsación larga > 2 segundos. ④ Teclas LeqTime: Configuración del tiempo de integración asociada a la medida del Leq. ⑤...
-
Seite 75: El Display
⑫ Conector jack de la señal de salida CA/CC: Conecte el registrador de nivel de sonido a la salida de CA/CC del instrumento. CA: 1 Vrms corresponde a 130 dB (con ponderación de frecuencia) CC: Salida 10 mV/dB Señal CC Peso Señal CA ⑬... -
Seite 76: Funcionamiento Del Instrumento
Dos curvas de corrección A y C están disponibles en el C.A 1310. La más conocida es la curva de ponderación A que corresponde al «oído medio internacional». Generalmente se utiliza para medir niveles de molestias en los locales industriales. -
Seite 77: Configurar El Intervalo De Registro
Todos los demás ajustes deben realizarse antes de iniciar el registro. Aparecerá el símbolo FULL en pantalla cuando la memoria está llena. 4.4. CONFIGURAR EL INTERVALO DE REGISTRO (1) Pulse la tecla para entrar en el modo configuración, luego la tecla o para seleccionar el intervalo. -
Seite 78: Configurar La Fecha Y La Hora
4.6.2. MEDIR EL NIVEL SONORO CONTINUO EQUIVALENTE (LEQ) (1) Cambie del modo SPL (Sound Pressure Level/nivel de presión sonora) al modo Leq pulsando 2 segundos la tecla (2) Pulse la tecla para iniciar la medida. Aparecerá el símbolo con el tiempo de medida transcurrido. -
Seite 79: Procedimiento De Calibración
(3) Pulse ▲ o ▼ para incrementar o reducir el valor. (4) Pulse la tecla para validar. Si desea interrumpir la configuración actual, pulse la tecla para cancelar. Utilice un calibrador acústico (94 dB, frecuencia sinusoidal de 1 KHz). C.A 1310 INTEGRATING SOUND LEVEL METER... -
Seite 80: Fuente De Alimentación
5. FUENTE DE ALIMENTACIÓN (1) Instalación de las pilas: (a) Quite el tornillo de la tapa de las pilas y levántela para sacarla. (b) Inserte las cuatro pilas AA, respetando la polaridad indicada en el fondo del compartimento. (c) Vuelva a colocar la tapa y apriete el tornillo. Observación: Cuatro pilas 1,5 V alcalinas de tipo LR6 o AA alimentan el instrumento. -
Seite 81: Características Técnicas
6. CARACTERÍSTICAS TÉCNICAS Normas aplicables: IEC 61672-1 Clase 2, ANSI S1.4 Tipo 2. Rango de frecuencias: 20 Hz~8 KHz Rango de niveles de medida: 30~130 dB Ponderaciones de frecuencia: Micrófono: micrófono ½" electret Visualización: display de cristal líquido Visualización de los números: 4 cifras Resolución: 0,1 dB... -
Seite 82: Mantenimiento
– Daños debidos a golpes, caídas o inundaciones. 8. PARA REALIZAR PEDIDOS El C.A 1310 se suministra con un maletín de transporte, una pantalla antiviento, un cable USB, el software SL-Software, un conector macho jack, pilas y este manual de instrucciones. -
Seite 83: El Sl-Software
9. EL SL-SOFTWARE 9.1. INICIO RÁPIDO (1) Registro de datos en tiempo real en forma de ondas. 1. Empiece por encender el sonómetro y conéctelo al puerto USB del PC con el cable. 2. Inicie el SL-Software. 3. Cuando se conecta, la ventana del programa muestra el mismo valor que el sonómetro integrador. -
Seite 84: Menú Principal
(3) ¿Cómo cargar los datos almacenados en la memoria del sonómetro para guardarlos en un archivo? 1. Encienda el sonómetro. 2. Pulse la tecla REC del instrumento para iniciar el registro de datos. 3. Pulse de nuevo la tecla REC cuando quiera detener el registro. 4. -
Seite 85: Ventana Data Logger
9.3. VENTANA DATA LOGGER Cuando el sonómetro integrador está conectado al PC y usted selecciona «DataLogger» en el menú principal o hace clic en en la barra de herramientas para cargar datos registrados en el sonómetro, aparece una barra de progreso para indicar el estado de la descarga. En caso de error, vuelva simplemente a hacer clic en «DataLogger». -
Seite 86: Gráfico
9.4. GRÁFICO Barra de herramientas – Mostrar u ocultar Estadística 1 – Mostrar u ocultar Estadística 2 – Cursor normal – Cuando se selecciona este cursor, se convierte en una cruz cuando pasa por encima del gráfico y deja una cruz si hace clic. –... - Seite 87 FRANCE INTERNATIONAL Chauvin Arnoux Group Chauvin Arnoux Group 190, rue Championnet Tél : +33 1 44 85 44 38 75876 PARIS Cedex 18 Fax : +33 1 46 27 95 69 Tél : +33 1 44 85 44 85 Fax : +33 1 46 27 73 89 Our international contacts info@chauvin-arnoux.com...