Chauvin Arnoux C.A 1110 Schnellstartanleitung
Luxmeter
Vorschau ausblenden
Andere Handbücher für C.A 1110:
- Bedienungsanleitung (26 Seiten) ,
- Bedienungsanleitung (26 Seiten) ,
- Schnellstartanleitung (32 Seiten)
Kapitel
Inhaltsverzeichnis

Verwandte Anleitungen für Chauvin Arnoux C.A 1110


Inhaltszusammenfassung für Chauvin Arnoux C.A 1110
- Seite 1 FR - Guide de démarrage rapide GB - Quick start guide DE - Schnellstart-Anleitung IT - Guida di utilizzo rapido ES - Guía de inicio rápido C.A 1110 Luxmètre Lux meter Luxmeter Luxmetro Luxómetro...
- Seite 2 English ..........8 Deutsch ..........14 Italiano ..........20 Español ..........26 Vous venez d’acquérir un luxmètre C.A 1110 et nous vous remercions de votre confiance. Pour obtenir le meilleur service de votre appareil : „ lisez attentivement la notice de fonctionnement, „...
-
Seite 3: Inhaltsverzeichnis
1. Première mise en service ...........4 1.1. État de livraison ..........4 1.2. Mise en place des piles ........4 2. Présentation de l’appareil ...........5 2.1. C.A 1110 ............5 2.2. Touches ............6 3. Connexion à un PC ............7 3.1. Obtenir le logiciel Data Logger Transfer ...7... -
Seite 4: Première Mise En Service
1. PREMIÈRE MISE EN SERVICE 1.1. ÉTAT DE LIVRAISON Luxmètre C.A 1110 Livré dans une boîte en carton avec : „ trois piles alcaline AA ou LR6, „ un cordon USB-micro USB, „ un guide de démarrage rapide multilingue, „ une fiche de sécurité multilingue, „... -
Seite 5: Présentation De L'appareil
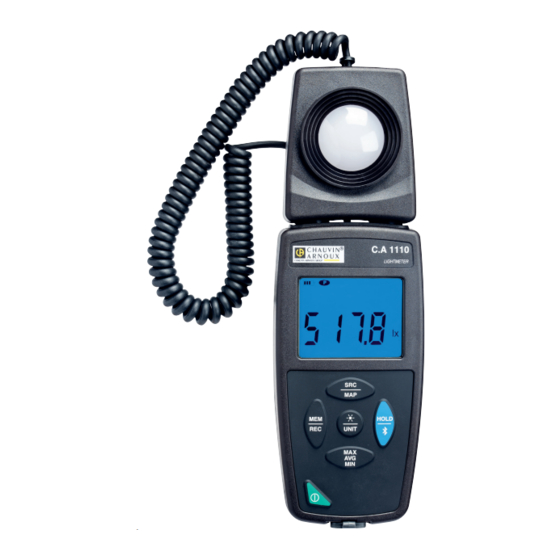
2. PRÉSENTATION DE L’APPAREIL 2.1. C.A 1110 Câble spiralé per- mettant de déporter le capteur d’éclai- rement. Capot de protection du capteur (imper- dable). Capteur d’éclaire- ment. Aimants permettant de fixer le capteur au boîtier de me- sure. Afficheur LCD rétro- éclairé. -
Seite 6: Touches
2.2. TOUCHES Touche Fonction „ Un appui long sur la touche permet d’allumer l’appareil. „ De même, un appui long sur la touche permet d’éteindre l’appareil. Mais il n’est pas possible d’éteindre l’appareil lorsqu’il est en mode enregistreur et qu’il est en cours d’enregistrement. -
Seite 7: Connexion À Un Pc
3. CONNEXION À UN PC 3.1. OBTENIR LE LOGICIEL DATA LOGGER TRANSFER Rendez-vous sur notre site Internet pour télécharger la der- nière version du logiciel d’application : www.chauvin-arnoux.com Allez dans l’onglet Support, puis Télécharger nos logi- ciels. Effectuez ensuite une recherche avec le nom de votre appareil. - Seite 8 ENGLISH Thank you for purchasing this C.A 1110 lux meter. For best results from your instrument: „ read these operating instructions carefully, „ comply with the precautions for use. Information or useful tip. Battery. Magnet. The product is declared recyclable following an analysis of the life cycle in accordance with standard ISO 14040.
-
Seite 9: Precautions For Use
1. First use..............10 1.1. Delivery condition ...........10 1.2. Inserting the batteries ........10 2. Presentation of the instrument ........ 11 2.1. C.A 1110 ............11 2.2. Keys ...............12 3. Connecting to a PC ...........13 3.1. Get Data Logger Transfer software ....13... -
Seite 10: First Use
1. FIRST USE 1.1. DELIVERY CONDITION C.A 1110 lux meter Supplied in a cardboard box with: „ three AA or LR6 alkaline batteries, „ one USB-micro USB cord, „ one multilingual getting started guide, „ one multilingual safety data sheet, „... -
Seite 11: Presentation Of The Instrument
2. PRESENTATION OF THE INSTRUMENT 2.1. C.A 1110 Spiral-wound cable used to remote the illumination sensor. Cover protecting the sensor (captive). Illumination sensor. Magnets used to secure the sensor to the measurement housing. Backlit LCD display unit. C.A 1110 LUXMETER Keypad with 6 keys. -
Seite 12: Keys
2.2. KEYS Function „ A long press on the key switches the instrument on. „ When the instrument is on, a long press on key switches it off. But it is not pos- sible to switch the instrument off when it is in record mode and is recording. -
Seite 13: Connecting To A Pc
3. CONNECTING TO A PC 3.1. GET DATA LOGGER TRANSFER SOFT- WARE Visit our web site to download the latest version of the ap- plication software: www.chauvin-arnoux.com Go to the Support tab, then Download our software. Then search on the name of your instrument. Download the software, then install it on your PC. -
Seite 14: Übereinstimmung Mit Den Europäischen
DEUTSCH Wir danken Ihnen für das Vertrauen, dass Sie uns mit dem Kauf dieses Luxmeters C.A 1110 entgegengebracht haben. Um die optimale Benutzung Ihres Gerätes zu gewährleisten, bitten wir Sie: „ diese Bedienungsanleitung sorgfältig zu lesen, „ die Benutzungshinweise genau zu beachten. -
Seite 15: Sicherheitshinweise
Fachpersonal erfolgen. INHALTSVERZEICHNIS 1. Erste Inbetriebnahme ..........16 1.1. Lieferumfang ..........16 1.2. Batterien einlegen ..........16 2. Gerätevorstellung ............17 2.1. C.A 1110 ............17 2.2. Tasten .............18 3. Verbindung mit einem PC .........19 3.1. Data Logger Transfer Software installieren ..19 3.2. Anschluss ............19... -
Seite 16: Erste Inbetriebnahme
1. ERSTE INBETRIEBNAHME 1.1. LIEFERUMFANG Luxmeter C.A 1110. Lieferung in Karton mit: „ 3 Alkalibatterien AA bzw. LR6 „ 1 USB/Micro-USB-Kabel „ 1 mehrsprachige Schnellstart-Anleitung „ 1 mehrsprachiges Sicherheitsdatenblatt „ 1 Prüfbericht „ 1 Tasche 1.2. BATTERIEN EINLEGEN „ Auf den Clip am Batteriefach drücken und anheben. -
Seite 17: Gerätevorstellung
2. GERÄTEVORSTELLUNG 2.1. C.A 1110 Spiralkabel, mit dem der Messfühler weiter entfernt aufgestellt werden kann. Unverlierbare Schutzkappe für den Fühler. Beleuchtungsstärke- Messfühler. Magnete, mit de- nen der Messfühler am Gehäuse befestigt werden kann. C.A 1110 Beleuchtete LCD- LUXMETER Anzeige. Tastatur mit 6 Tasten. -
Seite 18: Tasten
2.2. TASTEN Taste Funktion „ Drückt man lang auf die Taste , wird das Gerät ein- „ und ebenso auch wieder ausgeschaltet. Allerdings lässt sich das Gerät nicht aus- schalten, wenn es Speichermodus ist und gerade aufzeichnet. „ Mit der Taste SRC (kurz drücken) wird die Lichtquelle eingestellt: Leuchtrohr F11, LED oder andere Quellen (Standard). -
Seite 19: Verbindung Mit Einem Pc
3. VERBINDUNG MIT EINEM PC 3.1. DATA LOGGER TRANSFER SOFTWARE INSTALLIEREN Rufen Sie unsere Website auf, wo die neueste Version der Anwendungssoftware zum Herunterladen bereitsteht: www.chauvin-arnoux.com Gehen Sie zur Registerkarte Support, und dort unter Softwares herunterladen. Führen Sie mit dem Namen des Geräts als Stichwort eine Suche durch. - Seite 20 ITALIANO Avete appena acquistato un luxmetro C.A 1110 e vi ringra- ziamo della vostra fiducia. Per ottenere le migliori prestazioni dal vostro strumento: „ Leggete attentamente il manuale d’uso. „ Rispettate le precauzioni d’uso. Informazione o astuzia utile. Pila. Magnete.
- Seite 21 1. Prima messa in servizio ..........22 1.1. Caratteristiche della consegna .......22 1.2. Inserimento delle pile ........22 2. Presentazione dello strumento ........23 2.1. C.A 1110 ............23 2.2. Tasti ..............24 3. Connessione a un PC..........25 3.1. Ottenere il software Data Logger Transfer ..25...
-
Seite 22: Prima Messa In Servizio
1. PRIMA MESSA IN SERVIZIO 1.1. CARATTERISTICHE DELLA CONSEGNA Luxmetro C.A 1110 Fornita in scatola di cartone con: „ Tre pile alcaline AA o LR6, „ un cavo USB-micro USB, „ una guida di avvio rapido multilingue, „ una scheda di sicurezza multilingue, „... -
Seite 23: Presentazione Dello Strumento
2. PRESENTAZIONE DELLO STRUMENTO 2.1. C.A 1110 Cavo a spirale che permette di sposta- re il sensore d’illumi- nazione. Copertura di prote- zione del sensore (imperdibile). Sensore d’illumina- zione. Magneti che perme- ttono di fissare il sensore al disposi- tivo di misura. -
Seite 24: Tasti
2.2. TASTI Tasto Funzione „ Una pressione lunga sul tasto permette di accendere lo strumento. „ In maniera identica una pressione lunga sul tasto permette di spegnere lo strumen- to. Ma non è possibile spegnere lo strumen- to quando è in modo registratore e in corso di registrazione. -
Seite 25: Connessione A Un Pc
3. CONNESSIONE A UN PC 3.1. O T T E N E R E I L S O F T WA R E D ATA LOGGER TRANSFER Visitate il nostro sito Internet per scaricare l’ultima versione del software applicativo: www.chauvin-arnoux.com Aprite il tab Supporto, poi Download dei nostri software. - Seite 26 ESPAÑOL Usted acaba de adquirir un luxómetro C.A 1110 y le agrade- cemos la confianza que ha depositado en nosotros. Para conseguir las mejores prestaciones de su instrumento: „ lea atentamente el manual de instrucciones, „ respete las precauciones de uso.
-
Seite 27: Precauciones De Uso
1. Primera puesta en marcha........28 1.1. Estado de suministro ........28 1.2. Colocación de las pilas........28 2. Presentación del instrumento ........29 2.1. C.A 1110 ............29 2.2. Teclas .............30 3. Conexión a un pc ............31 3.1. Obtener el software Data Logger Transfer ..31... -
Seite 28: Primera Puesta En Marcha
1. PRIMERA PUESTA EN MARCHA 1.1. ESTADO DE SUMINISTRO Luxómetro C.A 1110 Entregado en una caja de cartón con: „ tres pilas alcalinas AA o LR6, „ un cable USB-micro USB, „ una guía de inicio rápido en varios idiomas, „... -
Seite 29: Presentación Del Instrumento
2. PRESENTACIÓN DEL INSTRUMENTO 2.1. C.A 1110 Cable en espiral que permite mover el sensor de ilumina- ción. Tapa de protección del sensor (cautiva). Sensor de ilumina- ción. Imanes que permi- ten fijar el sensor a la carcasa de me- dida. -
Seite 30: Teclas
2.2. TECLAS Tecla Función „ Mantener pulsada la tecla permite en- cender el instrumento. „ Asimismo, mantener pulsada la tecla permite apagar el instrumento. Pero no se puede apagar el instrumento cuando está en modo registrador y está registrando. „ Pulsar brevemente la tecla SRC permite elegir el tipo de fuente de iluminación: fluorescente F11, LED u otras fuentes (por defecto). -
Seite 31: Conexión A Un Pc
3. CONEXIÓN A UN PC 3.1. O B T E N E R E L S O F T WA R E D ATA LOGGER TRANSFER Visite nuestro sitio web para descargar la última versión del software de aplicación: www.chauvin-arnoux.com Entre en la sección Soporte, y a continuación en Descargar nuestros software. - Seite 32 FRANCE Chauvin Arnoux Group 190, rue Championnet 75876 PARIS Cedex 18 Tél : +33 1 44 85 44 85 Fax : +33 1 46 27 73 89 info@chauvin-arnoux.com www.chauvin-arnoux.com INTERNATIONAL Chauvin Arnoux Group Tél : +33 1 44 85 44 38...