Herunterladen Inhalt Inhalt Diese Seite drucken

Werbung

Verfügbare Sprachen

Verfügbare Sprachen

www.osram.com/ecue
Light is OSRAM
Our Brand
AM255360031
AM305660031
AM305670031
AM305680031
AM305690031
e:cue SYMPL pro Node (e:pix)
e:cue SYMPL essential Node
Setup Manual / Installationsanleitung

Werbung

Inhaltsverzeichnis
loading

Inhaltszusammenfassung für OSRAM e:cue SYMPL pro Node

  • Seite 1 Light is OSRAM Our Brand AM255360031 AM305660031 AM305670031 AM305680031 AM305690031 e:cue SYMPL pro Node (e:pix) e:cue SYMPL essential Node Setup Manual / Installationsanleitung...
  • Seite 2 AM255360031, AM305660031, AM305670031, AM305680031, AM305690031 e:cue SYMPL pro Node (e:pix), e:cue SYMPL essential Node Setup Manual (original issue) e:cue SYMPL pro Node (e:pix), e:cue SYMPL essential Node Installationsanleitung (Originalversion) Edition / Ausgabe: 28.01.20 [EN_DE_SYMPL_proEssentialEpix_Node_Setup_v1p7] Published by / Herausgegeben von: OSRAM GmbH...
  • Seite 3 Read the Setup Manual and Lesen Sie die the Safety instructions carefully. Installationsanleitung und das Subject to modification without Heft "Sicherheitshinweise" prior notice. Typographical and sorgfältig durch. Alle Änderungen other errors do not justify any vorbehalten. Rechtschreibfehler claim for damages. All oder andere Fehler rechtfertigen dimensions should be verified keinen Anspruch bei Schäden.
  • Seite 4: Inhaltsverzeichnis

    Table of Contents / Inhalt Table of Contents / Inhalt English Security instructions Symbols General security instructions General device description Delivery content Connectors and Interfaces User interface: LEDs Identify button: Identification & Reset General remarks Transport Unpacking Warranty regulations Maintenance and Repair Disposal Support Installation...
  • Seite 5 Table of Contents / Inhalt Firmware Update Dismounting Product specifications Certifications Deutsch Sicherheitshinweise 11.1 Symbole 11.2 Sicherheitshinweise Gerätebeschreibung 12.1 Lieferumfang 12.2 Anschlüsse und Schnittstellen 12.3 Benutzeroberfläche: LEDs 12.4 Identify-Taster: Identifizierung & Reset Allgemeine Hinweise 13.1 Transport 13.2 Entpacken 13.3 Garantiebestimmungen 13.4 Wartung und Reparatur 13.5...
  • Seite 6 Table of Contents / Inhalt 15.3 Netzwerkeinstellung über die Webschnittstelle DMX/RDM- Einstellungen Firmware-Update Demontage Produktdaten Zertifizierung Dimensions / Abmessungen...
  • Seite 7: English

    English...
  • Seite 8: Security Instructions

    SYMPL pro Node to Protective Earth when at least one connected cable runs outdoor. The device must be supplied by a separate certified SELV Class 2 power supply. If security instructions are missing, please contact the OSRAM support service to receive a new copy.
  • Seite 9: General Device Description

    General device description General device description e:cue SYMPL Nodes are a system of interfaces for e:cue SYMPHOLIGHT only. They provide various connection types like DMX/RDM, DALI, digital inputs and outputs etc. SYMPL Nodes always operate in online mode, as a device interface for SYMPHOLIGHT.
  • Seite 10: Delivery Content

    SYMPL Nodes. SYMPL Nodes are not supported by the e:cue Lighting Application Suite. e:cue SYMPL Noes are not hot-pluggable. Delivery content Delivery content of the e:cue SYMPL pro Node (e:pix)/ SYMPL essential Node - Product number AM255360031, AM305660031, AM305670031, AM305680031, AM305690031...
  • Seite 11: Connectors And Interfaces

    General device description Connectors and Interfaces View from top: DMX output 1 ... 8 (GND, DMX-, DMX+ left to right) DMX/RDM status LEDs Test / Error LED e:net LED (Ethernet, LAN activity) Status LED (Device status) Identify button Test button Protective Earth Power supply (Vcc+, Vcc- left to right) e:net / Ethernet...
  • Seite 12: User Interface: Leds

    Switch the device off and on. If the error persists, check the wiring or contact OSRAM Service. Status + The Status and Test / Error LED blink simultaneously Test / Error to identify the SYMPL Node (enabled “Identify...
  • Seite 13: Identify Button: Identification & Reset

    General device description Identify button: Identification & Reset The Identify button has three functions: to send an Identify message (A), to reset the Node (B), and to exit the error state (C). For the e:pix version, the Identify button additionally switches protocol during Test mode (D). (A) A short press during operation in online mode sends an Identify message to the server.
  • Seite 14: General Remarks

    This device requires no maintenance. Before dismounting, appropriate measures must be taken to protect the respective components against damage caused by electrostatic discharge (ESD protection). Do not try to repair the device. Return it to your OSRAM distributor for replacement or repair.
  • Seite 15: Disposal

    Support In case of technical problems or questions regarding installation and repair please contact: OSRAM GmbH Customer Service Karl-Schurz-Str. 38 33100 Paderborn, Deutschland +49 (5251) 54648-0 support@ecue.com...
  • Seite 16: Installation Conditions

    Installation Installation conditions Installation position Terminals on top and bottom Horizontal spacing On both sides 18 mm Minimum vertical rail grid spacing 115 mm (90 + 25 mm) (excluding conduit) Recommended vertical rail grid spacing 160 mm (with 40 mm conduit) Mounting process The SYMPL pro Node (e:pix) / SYMPL essential Node is designed to mount onto a 35mm DIN rail (EN 60715) in a vertical position.
  • Seite 17: Dmx Connection

    Ground the DMX connection cable for outdoor installations (optional for indoor only). Ground each cable seperately. Power supply The e:cue SYMPL pro Node (e:pix) / SYMPL essential Node can be powered by an external power supply or via Power-over-Ethernet. PoE: For PoE, simply connect an Ethernet connection from a power sourcing device.
  • Seite 18: Protective Earth

    Installation To connect the device to a power supply unit, use the provided 2-pole terminal and lay the wires as stated on the front label. The voltage assignment is left V+ and right V-. Turn the power on when all cables are connected to the SYMPL pro Node (e:pix) / SYMPL essential Node.
  • Seite 19: Network Configuration

    Network configuration Network configuration The configuration of the e:cue SYMPL pro Node (e:pix) / SYMPL essential Node is completely done via e:cue SYMPHOLIGHT. See the SYMPHOLIGHT System Manual for details on configuration, available at www.ecue.com. The network properties of the device are preconfigured. The successful installation of the power supply is required for changing the network configuration.
  • Seite 20: Network Configuration With The Web Interface

    Network configuration Select “Configure Network”: Define the IP address, the subnet mask and the DHCP settings to your needs: Click “Apply” to submit the changes. The network configuration of the device is completed. Network configuration with the web interface Open a common web browser on a connected PC. Enter the SYMPL pro Node's (e:pix) / SYMPL essential Node’s IP address into the address bar: e.g.
  • Seite 21 Network configuration On the left side, select “Settings” and enter the default password ecue: Click “Apply”. The Settings page is displayed: Define the network settings at “Device Basics” to your needs. You can also change the password for entry to the web interfaces of the device here.
  • Seite 22: Extended Dmx/Rdm Settings

    Network configuration You can change the login password to the SYMPL pro Node's (e:pix) / SYMPL essential Node’s configuration page and its device name at “Settings” page. Do not forget the new password. Extended DMX/RDM settings DMX/RDM settings are configured via SYMPHOLIGHT at the properties of the SYMPL pro Node (e:pix) / SYMPL essential Node in the Setup Tab.
  • Seite 23: Test Mode

    Test mode At Startup Setting and Offline Setting, the setting “send MARK” sends a MARK (a logical one) on the bus: no data are sent to the fixtures and the DMX port awaits further commands. You can also capture content (snapshots) and use it for Startup and Offline Settings: 2.
  • Seite 24 - SYMPHOLIGHT v5.0 or higher needed- after exiting the Test mode. The Test mode is indicated by flickering DMX/RDM LED(s) and the blinking Test / Error LED. Test mode via Test button The Test button allows to test the connected DMX devices directly with the SYMPL pro Node (e:pix) / SYMPL essential Node.
  • Seite 25 - SYMPHOLIGHT v5.0 or higher needed- To access the web interface, open a common web browser on a connected PC. Enter the SYMPL pro Node's (e:pix) / SYMPL essential Node’s IP address into the address bar: e.g. http://192.168.123.1. Open the Test mode page by selecting “TestMode” on the left side of the web interface of the SYMPL pro Node (e:pix) / SYMPL essential Node: Click a button to choose a test pattern.
  • Seite 26: Firmware Update

    Dismounting Disconnect all attached cables. Dismount the e:cue SYMPL pro Node (e:pix) / SYMPL essential Node from the rail by pulling the black DIN rail handle and unhitching the SYMPL Node. The dismounting is completed.
  • Seite 27: Product Specifications

    Product specifications Product specifications Product Product number SYMPL pro Node AM255360031 with CE only AM305660031 SYMPL essential Node AM305670031 with CE only AM305680031 SYMPL pro Node e:pix AM305690031 Dimensions 143 x 92 x 62 mm/ (W x H x D) 5.63 x 3.6 x 2.4 in (excl.
  • Seite 28: Interface Specifications

    70 °C / 158 °F for max. 1 hour/day; continuous operation at max. 60 °C / 140 °F. e:cue SYMPL pro Node e:cue SYMPL pro Node with CE only e:cue SYMPL essential Node e:cue SYMPL essential Node with CE only...
  • Seite 29: Certifications

    Certifications 10 Certifications e:cue SYMPL pro Node (e:pix) / SYMPL essential Node is certified according to EN 55024, EN 55032 Conforms to UL Std. 62368-1 4000805 Certified to CSA Std. C22.2 NO. 62368-1...
  • Seite 30: Deutsch

    Deutsch...
  • Seite 31: Sicherheitshinweise

    Verbinden Sie den SYMPL pro Node mit Schutzerdung, wenn mindestens ein angeschlossenes Kabel im Freien verläuft Das Gerät muss durch ein separates Class 2-Netzteil versorgt werden. Sollte das beigelegte Heft mit den Sicherheitshinweisen fehlen, wenden Sie sich bitte an den OSRAM Support Service für ein zusätzliches Exemplar.
  • Seite 32: Gerätebeschreibung

    Gerätebeschreibung 12 Gerätebeschreibung e:cue SYMPL Nodes sind dedizierte Schnittstellen für e:cue SYMPHOLIGHT. Sie stellen verschiedenste Verbindungen mit Protokollen wie DMX/RDM, DALI, digitale Eingänge oder Ausgänge bereit. e:cue SYMPL Nodes arbeiten immer im Online-Modus als Systemverbindung für SYMPHOLIGHT. Alle Aktivitäten werden von SYMPHOLIGHT gesteuert. Die Verbindung zwischen Servern, Cores und Nodes erfolgen immer über e:net über Ethernet.
  • Seite 33: Lieferumfang

    Lighting Application Suite unterstützen nicht die SYMPL Nodes. e:cue SYMPL Nodes nicht im Betrieb an- und abstecken. 12.1 Lieferumfang Der Lieferumfang vom e:cue SYMPL pro Node (e:pix) / SYMPL essential Node - Produktnummer AM255360031, AM305660031, AM305670031, AM305680031, AM305690031 umfasst: SYMPL pro Node Heft “Sicherheitshinweise”...
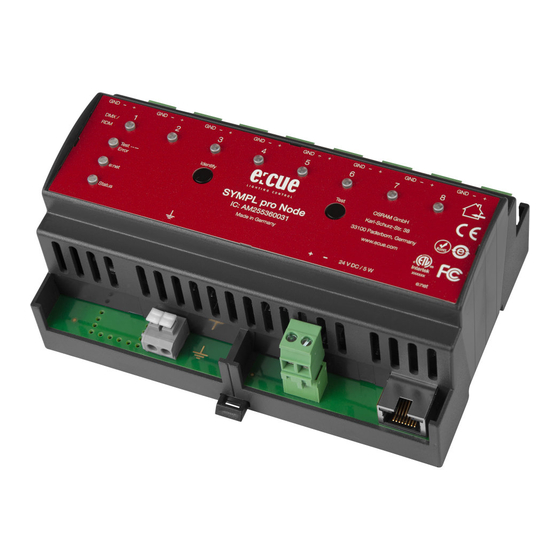
  • Seite 34: Anschlüsse Und Schnittstellen

    Gerätebeschreibung 12.2 Anschlüsse und Schnittstellen Sicht von oben: DMX-Ausgänge 1 ... 8 (GND, DMX-, DMX+ links nach rechts) DMX/RDM Status LEDs LED Test / Error LED e:net (Ethernet, LAN-Aktivität) LED Status (Gerätestatus) Identify-Taster Test-Taster Erdung Spannungsversorgung (Vcc+, Vcc- links nach rechts) e:net-Anschluss (Ethernet) Hutschienen-Griff...
  • Seite 35: Benutzeroberfläche: Leds

    Gerätebeschreibung 12.3 Benutzeroberfläche: LEDs Der e:cue SYMPL pro Node (e:pix) / SYMPL essential Node hat 11 LEDs auf der Frontseite. Die 11 LEDs zeigen die Grundzustände des SYMPL pro Nodes (e:pix) / SYMPL essential Nodes an. LEDs Status An: Im Online-Zustand leuchtet die LED konstant.
  • Seite 36: Identify-Taster: Identifizierung & Reset

    Gerätebeschreibung 12.4 Identify-Taster: Identifizierung & Reset Der Identify-Taster besitzt drei Funktionen: eine Identifizierungsnachricht zu senden (A), das Node zurückzusetzen (B) und einen Fehlerzustand zu verlassen (C). In der e:pix-Version wird mit dem Identify-Taster im Testmodus das Protokoll gewechselt (D). (A) Ein kurzer Tastendruck im Online-Betrieb sendet eine Identifizierungsnachricht an den Server.
  • Seite 37: Allgemeine Hinweise

    Bewahren Sie die Verpackung für einen späteren Transport auf. Überprüfen Sie die Vollständigkeit des Lieferumfanges nach Kapitel “12.1 Lieferumfang” auf Seite 33. Sollten Komponenten beschädigt sein oder fehlen, wenden Sie sich an Ihren OSRAM Support Service. 13.3 Garantiebestimmungen Abhängig vom Produkt können Garantie und Gewährleistung zeitlich...
  • Seite 38: Wartung Und Reparatur

    Allgemeine Hinweise Gewährleistungsbestimmungen finden sich in der Regel im Angebot und in der Auftragsbestätigung. Zusätzlich sind Informationen dazu auf der OSRAM- Website www.osram.de unter “Services”  “OSRAM Garantien” aufgeführt. Gesetzlich geregelte Garantiebedingungen sind davon unberührt. 13.4 Wartung und Reparatur Dieses Gerät erfordert keine Wartung.
  • Seite 39: Technischer Support

    +49 (5251) 54648-0 support@ecue.com 14 Installation Zur Installation vom e:cue SYMPL pro Node (e:pix) / SYMPL essential Node moniteren Sie diesen auf einer Hutschiene und schließen die Spannungsversorgung, eine e:net-Verbindung und DMX (e:pix)-Geräte an. Die Reihenfolge der Kabelanbindung ist beliebig. Schalten Sie die Stromversorgung erst an, wenn alle Kabel angeschlossen sind.
  • Seite 40: Montage

    Installation 14.2 Montage Der e:cue SYMPL pro Node (e:pix) / SYMPL essential Node wird auf einer 35 mm-DIN-Hutschiene (EN 60715) vertikal montiert. 1. Hängen Sie das Gerät oben in die Hutschiene ein. 2. Drücken Sie leicht auf das Gehäuse, so dass die untere Verriegelung auf der Hutschiene einrastet.
  • Seite 41: Dmx-Verbindung

    Schließen Sie bei der Verwendung von PoE nur einen Ethernet-Anschluss von einem PoE-Versorger (Midspan-/Endspan-Device) an. Externes Netzteil: Verbinden Sei den e:cue SYMPL pro Node (e:pix) / SYMPL essential Node mit einem NEC Class 2 24 V DC Netzteil. Das Anliegen von Stromversorgung am Node entspricht einem Anschalten des Gerätes.
  • Seite 42: Erdung

    Installation Schalten Sie die Spannungsversorgung erst an, wenn alle Kabel angeschlossen sind. Liegt Spannung an, beginnt der SYMPL pro Node (e:pix) / SYMPL essential Node sich hochzufahren. Während des Hochfahrens leuchten alle DMX/RDM-LEDs aufeinanderfolgend auf. Das Gerät ist betriebsbereit, wenn die LED Status blinkt. Der SYMPL pro Node (e:pix) / SYMPL essential Node ist nicht für den Betrieb über ein Versorgungsnetz geeignet.
  • Seite 43: Netzwerk-Konfiguration

    Über die Webschnittstelle sind erweiterte DMX/ RDM-Einstellungen konfigurierbar. 15.1 Standardeinstellungen vom Netzwerk Der e:cue SYMPL pro Node (e:pix) / SYMPL essential Node hat als Werkseinstellung die Standard-IP-Adresse 192.168.123.1. DHCP ist standardmäßig aktiviert. Zugangsdaten für die SYMPL pro Node (e:pix) /...
  • Seite 44: Netzwerkeinstellung Über Die Webschnittstelle

    Netzwerk-Konfiguration Wählen Sie “Configure Network” aus: Geben Sie die gewünschte IP-Adresse, die Subnetzmaske und die DHCP-Einstellungen ein: Klicken Sie auf “Apply”, um die Einstellungen zu übernehmen. Die Netzwerk-Konfiguration vom SYMPL Node ist abgeschlossen. 15.3 Netzwerkeinstellung über die Webschnittstelle Öffnen Sie auf einem angeschlossenen Computer einen gewöhnlichen Webbrowser.
  • Seite 45 Netzwerk-Konfiguration Die Webschnittstelle des Geräts wird angezeigt: Wählen Sie auf der linken Seite den Menüeintrag “Settings” aus und geben Sie das voreingestellte Passwort ecue ein: Klicken Sie “Apply” und die Settings-Seite wird angezeigt:...
  • Seite 46: Dmx/Rdm- Einstellungen

    DMX/RDM- Einstellungen Nehmen Sie unter “Device Basics” die gewünschten Netzwerkeinstellungen vor. Hier können Sie ebenfalls das Zugangspasswort für die Webschnittstelle vom Gerät neu vergeben. Klicken Sie auf “Submit”, um die Einstellungen zu übernehmen. Die Netzwerk-Konfiguration vom SYMPL Node ist abgeschlossen. Es wird empfohlen, das System in einem separaten Netzwerk zu führen.
  • Seite 47 DMX/RDM- Einstellungen • DMX und RDM Break time und Mark • RDM Packet Space: Wartezeit bei DMX zu RDM Wechsel • Minimale Frame Distanz • RDM DISC Timeout: RDM-Auffindungszeitsprerre. Diese Einstellungen sind auf der Webschnittstelle nur editierbar, solange der SYMPL Node keiner Show zugewiesen ist. SYMPHOLIGHT muss einmal die Kontrolle über das Node gehabt haben, damit die Einstellungsänderungen in Kraft treten können.
  • Seite 48: Testmodus

    Testmodus Indem Sie mehreren SYMPL pro Nodes (e:pix) / SYMPL essential Nodes eine einheitliche Gruppen-ID (Group ID) zuweisen, erfolgt die Momentaufnahme und deren Verwendung über alle SYMPL pro Nodes (e:pix) / SYMPL essential Nodes dieser Gruppe hinweg. Die Wiedergabe einer Momentaufnahme im Startup Setting wird durch blinkende DMX/RDM LED(s) angezeigt.
  • Seite 49 - ab SYMPHOLIGHT v5.0 - • Drücken Sie den Test-Taster kurz, um vom Blinken zu Lauflicht mit einem Intervall von 96 Kanälen (Testbild 2) zu wechseln. • Drücken Sie den Test-Taster kurz, um alle Kanäle auf 100% zu setzen (Testbild 3). •...
  • Seite 50: Beschreibung

    - ab SYMPHOLIGHT v5.0 - Strobe: Const: schnelles Dauerlicht Aufblinken Fade: Chase: abwechselndes aufeinanderfolgendes Aufleuchten Auf- und Abdimmen in Blöcken Zur Anwahl eines Testmusters klicken Sie auf die entsprechende Schaltfläche. Legen Sie die Einstellungen fest: Eigenschaft Beschreibung Output DMX/RDM-Ausgänge, auf denen der Test läuft. Channel Count Absolute Frame-Länge.
  • Seite 51: Firmware-Update

    Update-Knopf in der oberen Werkzeugleiste. 19 Demontage Um den e:cue SYMPL pro Node (e:pix) / SYMPL essential Node abzubauen, trennen Sie alle verbundenen Kabel und Anschlüsse von dem Gerät. Entfernen Sie den SYMPL pro Node (e:pix) / SYMPL essential Node von der Hutschiene, indem Sie die schwarze Hutschienen-Entriegelung ziehen und das Gerät von der Hutschiene lösen.
  • Seite 52: Produktdaten

    Produktdaten 20 Produktdaten Produkt Produktnummerr SYMPL pro Node AM255360031 mit nur CE AM305660031 SYMPL essential Node AM305670031 mit nur CE AM305680031 SYMPL pro Node e:pix AM305690031 Abmessungen 143 x 92 x 62 mm (B x H x T) (ohne Befestigungsclip) Gewicht 250 g Stromversorgung...
  • Seite 53 1)3)5) 70 °C für max. 1 Std./Tag; Dauerbetrieb bei bis zu 60 °C. e:cue SYMPL pro Node e:cue SYMPL pro Node with CE only e:cue SYMPL essential Node e:cue SYMPL essential Node with CE only e:cue SYMPL pro Node e:pix...
  • Seite 54: Zertifizierung

    21 Zertifizierung e:cue SYMPL pro Node (e:pix) / SYMPL essential Node ist zertifiziert nach EN 55024, EN 55032 Conforms to UL Std. 62368-1 4000805 Certified to CSA Std. C22.2 NO. 62368-1...
  • Seite 55: Dimensions / Abmessungen

    Zertifizierung Dimensions / Abmessungen All dimensions in mm / Alle Abmessungen in mm...
  • Seite 56 OSRAM GmbH Sales Operations Head office / Zentrale: Karl-Schurz-Str. 38 Marcel-Breuer-Strasse 6 33100 Paderborn, Deutschland 80807 Munich, Germany +49 (5251) 54648-0 Phone +49 89 6213-0 support@ecue.com Fax +49 89 6213-2020 www.ecue.com www.osram.com Light is OSRAM Our Brand...

Inhaltsverzeichnis