Herunterladen Inhalt Inhalt Diese Seite drucken

Werbung

Verfügbare Sprachen
  • DE

Verfügbare Sprachen

  • DEUTSCH, seite 27
.
ELECTRONIC VIEWFINDER / VISEUR ÉLECTRONIQUE / VISOR ELECTRÓNICO /
ELEKTRONISCHER SUCHER / MIRINO ELETTRONICO / ЭЛЕКТРОННЫЙ
ВИДОИСКАТЕЛЬ
VF-E900G
INSTRUCTIONS / MANUEL D'INSTRUCTIONS / MANUAL DE INSTRUCCIONES /
BEDIENUNGSANLEITUNG / ISTRUZIONI / ИHСТРУКЦИЯ ПО ЭКСПЛУАТАЦИИ
Please read the following before getting started:
Thank you for purchasing this product. Before operating this unit, please read theinstructions carefully to ensure
the bestpossible performance.
Veuillez lire ce qui suit avant de commencer:
Nous vous remercions d'avoir acheté ce produit. Avant d'utiliser cet appareil, veuillez lire attentivement les
instructions pour obtenir les meilleures performances possibles.
Por favor, lea lo siguiente antes de la puesta en marcha:
Gracias por adquirir este producto. Antes de utilizar la unidad, lea atentamente las instrucciones para garantizar
el mejor rendimiento posible.
Bitte lesen Sie die folgenden Hinweise vor Inbetriebnahme:
Vielen Dank für den Kauf dieses Produkts. Bevor Sie das Gerät in Betrieb nehmen, lesen Sie bitte die
Anweisungen aufmerksam durch, um die bestmögliche Leistung zu gewährleisten.
Leggere quanto segue prima di iniziare:
Grazie per aver acquistato questo prodotto. Prima di mettere in funzione quest'unità, leggere attentamente le
istruzioni per garantire le migliori prestazioni possibili.
Прежде чем начать работу, обязательно прочтите следующую информацию:
Благодарим за приобретение продукции компании. Перед началом эксплуатации данного устройства,
внимательно прочитайте инструкции, чтобы наилучшим образом использовать возможности устройства.
For Customer Use:
Enter below the Serial No. which is located
on the body.
Retain this information for future reference.
Model No.
VF-E900G
Serial No.
.
B5A-3181-00
43450287

Werbung

Inhaltsverzeichnis

Fehlerbehebung

loading

Inhaltszusammenfassung für JVC VF-E900G

  • Seite 1 ELECTRONIC VIEWFINDER / VISEUR ÉLECTRONIQUE / VISOR ELECTRÓNICO / ELEKTRONISCHER SUCHER / MIRINO ELETTRONICO / ЭЛЕКТРОННЫЙ ВИДОИСКАТЕЛЬ VF-E900G INSTRUCTIONS / MANUEL D'INSTRUCTIONS / MANUAL DE INSTRUCCIONES / BEDIENUNGSANLEITUNG / ISTRUZIONI / ИHСТРУКЦИЯ ПО ЭКСПЛУАТАЦИИ Please read the following before getting started: Thank you for purchasing this product.
  • Seite 2 2 EN...
  • Seite 3: Safety Precautions

    Safety Precautions FOR USA These are general Important Safety Instructions and certain items may not apply to all appliances. Important Safety Instructions Read these instructions. Keep these instructions. Heed all warnings. Follow all instructions. Do not use this apparatus near water. Clean only with dry cloth.
  • Seite 4: For Usa And Canada

    Changes or modifications not intended to alert the user to approved by JVC could void the the presence of uninsulated user’s authority to operate the “dangerous voltage” within equipment. This equipment has been the product’s enclosure that...
  • Seite 5 The apparatus shall not be exposed to compatibility and electrical safety. dripping or splashing and that no objects European representative of filled with liquids, such as vases, shall be JVC KENWOOD Corporation is: placed on the apparatus. JVCKENWOOD Deutschland Gmbh Konrad-Adenauer-Allee 1-11 CAUTION: 61118 Bad Vilbel To prevent shock, do not open the cabinet.
  • Seite 6: Inhaltsverzeichnis

    Drip-proof Content of this manual o This camera recorder has a drip-proof structure All rights reserved by JVC KENWOOD equivalent to IPX2 according to our testing Corporation. Unauthorized duplication or method. It is not completely waterproof. And the...
  • Seite 7: Names Of Parts

    Names of Parts J [MIRROR] Switch Flips the image. L/R: Flips horizontally; OFF: Normal display; B/ T: Flips vertically K [B.LIGHT] Switch For configuring the brightness of the viewfinder. H: Bright; N: Normal; L: Dark L [ZEBRA] Switch Displays the zebra pattern. ON: Turns on zebra pattern;...
  • Seite 8: Settings And Adjustments Before Use

    Settings and Adjustments Adjusting the Viewfinder Before Use You can change the brightness and peaking of the viewfinder screen according to your usage conditions. Changing the brightness of the screen will not affect the recorded images. Attaching the Viewfinder 1 Loosen the fastening rings on the left and right sides of the viewfinder to adjust the horizontal position, followed by tightening the rings.
  • Seite 9 o Flipping up the Eyepiece 5 Adjust the brightness, outline and contrast Flipping up the eyepiece provides a better view of the viewfinder screen. of the entire image. Push the lock upward to flip up the eyepiece. Adjusting the Brightness Use the [BRIGHT] knob to adjust the brightness of the viewfinder.
  • Seite 10: Troubleshooting

    Troubleshooting Symptom Action Camera image is not output on Is the CONTRAST knob on the viewfinder set to the minimum? the viewfinder screen. Adjust the [CONTRAST] knob on the viewfinder. Specifications General Accessories Item Description Accessories Power DC 12 V 0.5 A Warranty Card (for USA) * Power supplied from the INSTRUCTIONS...
  • Seite 11: Précautions De Sécurité

    Précautions de sécurité POUR LES ÉTATS-UNIS Ces informations sont des CONSIGNES DE SÉCURITÉ IMPORTANTES et certains points peuvent ne pas s’appliquer à tous les appareils. CONSIGNES DE SÉCURITÉ IMPORTANTES Lire ces instructions. Conserver ces instructions. Tenir compte de tous les avertissements. Respecter toutes les instructions.
  • Seite 12 “tension dangereuse” non isolée dans Des changements ou modifications le boîtier du produit. Cette non approuvés par JVC peuvent tension est suffisante pour annuler le droit de l’utilisateur de faire provoquer l’électrocution de fonctionner l’appareil. Cet appareil a personnes.
  • Seite 13 à des éclaboussures et les électrique. objets remplis de liquide, tels que des Représentant européen de la société vases, ne doivent pas être placés sur JVC KENWOOD Corporation : l’appareil. JVCKENWOOD Deutschland Gmbh Konrad-Adenauer-Allee 1-11 61118 Bad Vilbel PRÉCAUTIONS :...
  • Seite 14: Précautions D'emploi

    Cela pourrait endommager ou briser les écrans. Contenu du présent manuel Anti-goutte Tous droits réservés par JVC KENWOOD o Ce caméscope est doté d’une structure de Corporation. La copie ou la reproduction non protection anti-goutte équivalent au niveau IPX2 autorisées de ce manuel, en tout ou en partie,...
  • Seite 15: Noms Des Pièces

    Noms des pièces J Sélecteur [MIRROR] Retourne l’image. L/R : pivote horizontalement ; OFF : affichage normal ; B/T : pivote verticalement K Sélecteur [B.LIGHT] Permet de configurer la luminosité du viseur. H : clair ; N : normal ; L : sombre L Sélecteur [ZEBRA] Affiche les zébrures.
  • Seite 16: Paramètres Et Réglages Avant Usage

    Paramètres et réglages Ajuster le viseur avant usage Vous pouvez modifier la luminosité et la compensation du viseur en fonction de vos conditions d’utilisation. La modification de la luminosité de l’écran n’affectera pas les images enregistrées. Fixer le viseur 1 Desserrez les bagues de fixation sur les côtés gauche et droit du viseur pour ajuster la position horizontale, puis serrez les 1 Réglez le commutateur [POWER ON/OFF]...
  • Seite 17 o Pivotement de l’oculaire 5 Ajustez la luminosité, le contour et le Pivoter l’oculaire vers le haut offre une meilleure contraste de l’écran du viseur. vue de l’image toute entière. Relevez le bouton de verrouillage pour pivoter Ajuster la luminosité l’oculaire.
  • Seite 18: Dépannage

    Dépannage Symptôme Action L’image caméra n’est pas La molette CONTRAST sur le viseur est-elle réglée sur la valeur émise sur l’écran du viseur. minimum ? Réglez la molette [CONTRAST] du viseur. Spécifications Généralités Accessoires Élément Description Accessoires Alimentation CC 12 V, 0,5 A Carte de garantie (pour les États-Unis) * Alimentation fournie par MANUEL D’INSTRUCTIONS...
  • Seite 19: Precauciones De Seguridad

    Precauciones de seguridad PARA EE. UU. Estas son instrucciones de seguridad importantes generales y es posible que ciertas partes no se apliquen a todos los aparatos. INSTRUCCIONES IMPORTANTES DE SEGURIDAD Lea estas instrucciones. Conserve estas instrucciones. Preste atención a las advertencias. Siga todas las instrucciones.
  • Seite 20 Los cambios o modificaciones no pretende alertar al usuario de aprobados por JVC podrian anular la la presencia de un “voltaje autoridad del usuario para utilizar el peligroso” no aislado dentro de equipo.
  • Seite 21 El representante europeo de No se expondrá el equipo a goteos ni JVC KENWOOD Corporation es: salpicaduras, ni se dejarán sobre él JVCKENWOOD Deutschland Gmbh objetos que contengan líquidos, como Konrad-Adenauer-Allee 1-11 jarrones.
  • Seite 22 SD. Todos los derechos reservados de o No presione la superficie con fuerza ni la someta JVC KENWOOD Corporation. La duplicación o la a impactos fuertes. Si lo hace, las pantallas se reimpresión no autorizadas de este manual, total o podrían dañar o romper.
  • Seite 23: Nombres De Las Piezas

    Nombres de las piezas J Interruptor [MIRROR] Da la vuelta a la imagen. L/R: Gira horizontalmente; OFF: Visualización normal; B/T: Gira verticalmente K Interruptor [B.LIGHT] Para configurar el brillo del visor. H: Brillante; N: Normal; L: Oscuro L Interruptor [ZEBRA] Visualiza el patrón de cebra.
  • Seite 24 Configuraciones y ajustes Ajuste del visor antes de su uso Se puede cambiar el brillo y la carga de pico de la pantalla del visor según sus condiciones de uso. El cambio del brillo de la pantalla no afecta a las imágenes grabadas.
  • Seite 25 o Elevación del ocular 5 Ajuste el brillo, el contorno y el contraste Elevar el ocular proporciona una mejor vista de de la pantalla del visor. toda la imagen. Empuje el bloqueo hacia arriba para levantar el Ajuste del brillo ocular.
  • Seite 26: Resolución De Problemas

    Resolución de problemas Síntoma Acción La imagen de la cámara no se ¿Está el mando CONTRAST en el visor ajustado al mínimo? emite en la pantalla del visor. Ajuste el mando [CONTRAST] en el visor. Especificaciones General Accesorios Opción Descripción Accesorios Alimentación DC 12 V 0,5 A...
  • Seite 27: Sicherheitsmaßnahmen

    Dieses Gerät darf nicht mit tropfenden Sicherheit überein. oder spritzenden Flüssigkeiten in Kontakt Die europäische Vertretung für die kommen und es dürfen keine mit JVC KENWOOD Corporation ist: Flüssigkeiten gefüllte Gegenstände, wie JVCKENWOOD Deutschland Gmbh Vasen, auf dem Gerät platziert werden. Konrad-Adenauer-Allee 1-11...
  • Seite 28: Vorsichtsmaßnahmen Beim Einsatz Des Systems

    Daten nicht gespeichert. o Drücken Sie nicht mit Gewalt gegen die Alle Rechte vorbehalten von der Gehäusewand und setzen Sie das Gerät keinerlei JVC KENWOOD Corporation. Unerlaubte starken Stößen aus. Andernfalls können die Vervielfältigung oder Nachdruck dieses Bildschirme beschädigt oder zerstört werden.
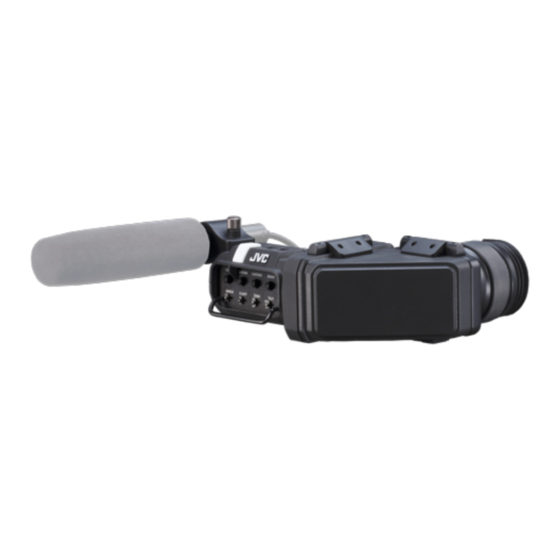
  • Seite 29: Bezeichnungen Der Teile

    Bezeichnungen der Teile J [MIRROR]-Schalter Spiegelt das Bild. L/R: Spiegelt horizontal; OFF: Normale Anzeige; B/T: Spiegelt vertikal K [B.LIGHT]-Schalter Zum Konfigurieren der Helligkeit des Suchers. H: Hell; N: Normal; L: Dunkel L [ZEBRA]-Schalter Zeigt das Zebramuster an. ON: Schaltet das Zebramuster ein; OFF: Schaltet das Zebramuster aus;...
  • Seite 30: Inbetriebnahme

    Inbetriebnahme Einstellung des Suchers Sie können den Helligkeit und Verstärkungsüberhöhung des Suchers je nach Ihren Betriebsbedingungen einstellen. Anbringen des Suchers Eine Änderung der Helligkeit des Bildschirms hat keinerlei Auswirkung auf die aufgezeichneten Bilder. 1 Stellen Sie den [POWER ON/OFF]-Schalter 1 Lösen Sie die Befestigungsringe auf der linken und rechten Seite des Suchers, um des Kamera-Recorders auf „OFF“.
  • Seite 31 o Das Okular hochklappen 5 Stellen Sie Helligkeit, Kontur und Kontrast Das Okular kann hochgeklappt werden, um des Sucherbildschirms ein. einen besseren Blick auf das gesamte Bild zu erhalten. Anpassen der Helligkeit Drücken Sie die Verriegelung nach oben, um das Okular hochzuklappen. Verwenden Sie den [BRIGHT]-Knopf, um die Helligkeit des Suchers einzustellen.
  • Seite 32: Fehlersuche

    Fehlersuche Symptom Maßnahme Das Kamerabild wird nicht auf Ist der CONTRAST-Regler am Sucher auf den Minimalwert dem Sucher ausgegeben. eingestellt? Stellen Sie den [CONTRAST]-Regler am Sucher ein. Technische Daten Allgemein Zubehör Parameter Beschreibung Zubehör Betrieb DC 12 V 0,5 A Garantiekarte (für die USA) * Stromversorgung von der BEDIENUNGSANLEITUNG...
  • Seite 33: Precauzioni Di Sicurezza

    Il rappresentante europeo di L’apparecchio non deve essere esposto JVC KENWOOD Corporation è: a gocciolamenti o schizzi e nessun JVCKENWOOD Deutschland Gmbh oggetto con liquidi al suo interno (ad Konrad-Adenauer-Allee 1-11...
  • Seite 34: Precauzioni Per Un Uso Corretto

    Questo non viene registrato sulla scheda Contenuto di questo manuale o Non premere con forza contro una superficie né Tutti i diritti riservati da JVC KENWOOD sottoporla a forti impatti. In caso contrario, si Corporation. La duplicazione non autorizzata potrebbero danneggiare o rompere gli schermi.
  • Seite 35: Nomi Delle Parti

    Nomi delle parti J Interruttore [MIRROR] Capovolge l’immagine. L/R: capovolge orizzontalmente; OFF: visualizzazione normale; B/T: capovolge verticalmente K Interruttore [B.LIGHT] Per configurare la luminosità del mirino. H: luminoso; N: normale; L: scuro L Interruttore [ZEBRA] Visualizza la forma a zebra. ON: attiva la forma a zebra;...
  • Seite 36: Impostazioni E Regolazioni Prima Dell'uso

    Impostazioni e regolazioni Regolazione del mirino prima dell’uso È possibile cambiare la luminosità e il picco dello schermo del mirino secondo le proprie esigenze di utilizzo. La modifica della luminosità dello schermo non influisce sulle immagini registrate. Montaggio del mirino 1 Allentare gli anelli di fissaggio sui lati destro e sinistro del mirino per regolare la posizione orizzontale, serrando...
  • Seite 37 o Capovolgimento in alto dell’oculare 5 Regolare la luminosità, il contorno e il Il capovolgimento in alto dell’oculare fornisce contrasto dello schermo del mirino. una migliore visibilità dell’intera immagine. Premere il blocco verso l’alto per capovolgere Regolazione della luminosità verso l’alto l’oculare. Usa la manopola [BRIGHT] per regolare la luminosità...
  • Seite 38: Risoluzione Dei Problemi

    Risoluzione dei problemi Sintomo Azione L’immagine della videocamera La manopola CONTRAST del mirino è impostata sul minimo? non viene emessa sullo schermo Regolare la manopola [CONTRAST] del mirino. del mirino. Dati tecnici Generale Accessori Voce Descrizione Accessori Alimentazione CC 12 V 0,5 A Scheda di garanzia (per gli USA) * L’alimentazione fornita dalla ISTRUZIONI...
  • Seite 39: Техника Безопасности

    директивам и стандартам по на месте установки батарейного блока. электромагнитной совместимости и электрической безопасности. Представительство компании Не допускается попадание на JVC KENWOOD Corporation в Европе: устройство капель или брызг, также JVCKENWOOD Deutschland Gmbh запрещается устанавливать на камеру Konrad-Adenauer-Allee 1-11 емкости, заполненные жидкостями, 61118 Bad Vilbel например, вазы.
  • Seite 40 Капленепроницаемость Содержание данной инструкции o Эта видеокамера имеет капленепроницаемую Все права защищены корпорацией конструкцию, эквивалентную IPX2 в соответствии JVC KENWOOD Corporation. с нашим методом тестирования. Она не является Несанкционированное копирование или полностью водонепроницаемой. перепечатка данного руководства, Капленепроницаемость при любых условиях не...
  • Seite 41: Кнопки Управления

    Кнопки управления J Переключатель [MIRROR] Транспонирование изображения. L/R: горизонтальное транспонирование; OFF: обычный вид; B/T: вертикальное транспонирование K Переключатель [B.LIGHT] Для настройки яркости видоискателя. H: яркий; N: обычный; L: темный L Переключатель [ZEBRA] Отображение шаблона в виде зебры. ON: включение шаблона в виде зебры; OFF: выключение...
  • Seite 42: Предварительные Настройки И Параметры

    Предварительные Настройка видоискателя настройки и параметры Яркость и высоту видоискателя можно изменить в соответствии с условиями использования. Изменение яркости экрана не повлияет на записываемые изображения. Установка видоискателя 1 Ослабьте крепежные кольца на левой и правой сторонах видоискателя, чтобы отрегулировать положение по 1 Приведите...
  • Seite 43 o Откидывание окуляра 5 Отрегулируйте яркость, контур и Откинув окуляр, можно улучшить обзор контрастность экрана видоискателя. всего изображения. Нажмите фиксатор вверх, чтобы откинуть Регулировка яркости окуляр. Используйте ручку [BRIGHT] для настройки яркости видоискателя. Регулировка контура Используйте ручку [PEAKING] для Фиксатор настройки...
  • Seite 44: Поиск И Устранение Неисправностей

    Поиск и устранение неисправностей Признак Действие Изображение с камеры не Ручка CONTRAST на видоискателе установлена на минимум? выводится на видоискатель. Отрегулируйте ручку [CONTRAST] на видоискателе. Технические характеристики Общая информация Дополнительные принадлежности Элемент Описание Дополнительные принадлежности Питание 12 В постоянного тока, 0,5 A Гарантийный...
  • Seite 45 Information on Disposal of Old Electrical and Electronic Informazioni sull’eliminazione dei prodotti elettrici ed Equipment and Batteries (applicable for countries that have elettronici e delle batterie (per i Paesi che adottano la adopted separate waste collection systems) raccolta differenziata dei rifiuti) Products and batteries with the symbol (crossed-out I prodotti e le batterie recanti questa icona (bidone wheeled bin) cannot be disposed as household waste.
  • Seite 46 ‫מידע בדבר השלכה לאשפה של ציוד חשמלי ואלקטרוני ישן וכן סוללות‬ Bu ürün 28300 sayılı Resmi Gazete’de yayımlanan Atik .(‫)רלוונטי למדינות שמשתמשות במערכת איסוף אשפה מופרדת‬ Elektrikli ve Elektronik Eşyalarin Kontrolü Yönetmeliğe uygun olarak üretilmiştir. X ‫לא ניתן להשליך מוצרים וסוללות עם הסימון )פח אשפה עם‬ .‫עליו( כאשפה...
  • Seite 47 14 EN...
  • Seite 48 VF-E900G VF-E900G B5A-3181-00 © 2019 JVC KENWOOD Corporation 43450287...

Inhaltsverzeichnis