Inhaltsverzeichnis
Werbung
Verfügbare Sprachen
Verfügbare Sprachen
Quicklinks
Betriebsanleitung Analysenwaage
Operating instruction Analytical balance
Mode d'emploi Balance d'analyse
KERN ABT
Version 1.2
0 /2013
KERN & Sohn GmbH
Ziegelei 1
D-72336 Balingen
E-Mail: info@kern-sohn.com
Tel: +49-[0]7433- 9933-0
Fax: +49-[0]7433-9933-149
Internet: www.kern-sohn.com
ABT-BA-def-1312
Werbung
Kapitel
Inhaltsverzeichnis

Verwandte Anleitungen für KERN ABT-BA-def-1312


Inhaltszusammenfassung für KERN ABT-BA-def-1312
- Seite 1 KERN & Sohn GmbH Ziegelei 1 Tel: +49-[0]7433- 9933-0 D-72336 Balingen Fax: +49-[0]7433-9933-149 E-Mail: info@kern-sohn.com Internet: www.kern-sohn.com Betriebsanleitung Analysenwaage Operating instruction Analytical balance Mode d’emploi Balance d’analyse KERN ABT Version 1.2 0 /2013 ABT-BA-def-1312...
- Seite 2 Vous trouverez d’autres versions de langue online sous www.kern-sohn.com/manuals Further language versions you will find online under www.kern-sohn.com/manuals A használati utasítás egyéb nyelveken a www.kern-sohn.com/manuals címről tölthető le Trovate altre versioni di lingue online inwww.kern-sohn.com/manuals Ytterligere språkversjoner finner du online under www.kern-sohn.com/manuals Bijkomende taalversies vindt u online op www.kern-sohn.com/manuals...
-
Seite 3: Inhaltsverzeichnis
KERN ABT Version 1.2 03/2013 Betriebsanleitung Analysenwaage Inhaltsverzeichnis Technische Daten ..................4 Konformitätserklärung .................. 7 Tastatur- und Anzeigenübersicht ..............8 Tastaturübersicht ........................8 Anzeigenübersicht ......................... 10 Grundlegende Hinweise (Allgemeines) ............11 Bestimmungsgemäße Verwendung ..................11 Sachwidrige Verwendung ...................... 11 Gewährleistung ........................11 Prüfmittelüberwachung ...................... - Seite 4 Basisbetrieb ....................34 11.1 Wägen ............................34 11.2 Tarieren ........................... 34 11.3 Umschalten der Anzeige ......................35 11.4 Ändern der Ablesbarkeit ......................36 11.5 Unterflurwägung ........................37 Das Menü ...................... 38 12.1 Einstellungsänderungen durchführen ................. 38 12.2 Ablauf der Einstellungsänderungen ..................38 12.3 Aufrufen des Menüs .......................
-
Seite 5: Technische Daten
1 Technische Daten KERN ABT 100-5M ABT 120-4M Ablesbarkeit (d) 0,01 mg 0,1 mg Wägebereich (Max) 101 g 120 g Mindestlast (Min) 1 mg 10 mg Eichwert (e) 1 mg 1 mg Eichklasse Reproduzierbarkeit 0,05 mg 0,1 mg Linearität ± 0,15 mg ±... - Seite 6 KERN ABT 220-4M ABT 320-4M Ablesbarkeit (d) 0,1 mg 0,1 mg Wägebereich (Max) 220 g 320 g Mindestlast (Min) 10 mg 10 mg Eichwert (e) 1 mg 1 mg Eichklasse Reproduzierbarkeit 0,1 mg 0,1 mg Linearität ± 0,2 mg ± 0,3 mg...
- Seite 7 KERN ABT 120-5DM ABT 220-5DM Ablesbarkeit (d) 0,01/0,1 mg 0,01/0,1 mg Wägebereich (Max) 42 g/120 g 82 g/220 g Mindestlast (Min) 1 mg 1 mg Eichwert (e) 1 mg 1 mg Eichklasse Reproduzierbarkeit ±0,02 / 0,1 mg ±0,05/ 0,1 mg Linearität...
-
Seite 8: Konformitätserklärung
EN 61010-1: 2010 27.03.2013 Datum Signatur Date Signature 72336 Balingen Albert Sauter Ort der Ausstellung KERN & Sohn GmbH Place of issue Geschäftsführer Managing director KERN & Sohn GmbH, Ziegelei 1, D-72336 Balingen, Tel. +49-[0]7433/9933-0 Fax +49-[0]7433/9933-149, E-Mail: info@kern-sohn.com, Internet: www.kern-sohn.com ABT-BA-d-1312... -
Seite 9: Tastatur- Und Anzeigenübersicht
3 Tastatur- und Anzeigenübersicht 3.1 Tastaturübersicht Im Wägemodus: Einmal drücken und Taste Bezeichnung Ca. 3 Sekunden gedrückt halten wieder freigeben Schaltet zwischen Betriebs- Schaltet die akustische Tastenkontrolle [ON/OFF] und Standby-Modus um. ein/aus. Ruft die Justierung oder die Ruft die Justierung oder die Menü- [CAL] Menü-Auswahl auf. - Seite 10 Im Menü: Bezeich- Taste Einmal drücken und wieder freigeben Ca. 3 Sekunden gedrückt halten nung Zurück ins Menü Zurück in den Wägemodus [ON/OFF] Menüauswahl [CAL] Parameterauswahl [TARE] Speichern von Einstellungen Eingabe numerischer Werte. Erhöht den numerischen Wert der blinkenden [UNIT] Stelle um 1.
-
Seite 11: Anzeigenübersicht
3.2 Anzeigenübersicht Kapazitätsanzeige Einheitenanzeige Display Bezeichnung Beschreibung Zeigt an, dass der Wägewert stabil ist. Kennzeichnet während der Stillstandsanzeige Menüelement-Auswahl die aktuelle Einstellung Erscheint während der Justierung. Blinkt, bevor die automatische Justierung startet. Gewichtssymbol Erscheint während der Parameter-Auswahl zur Justierung. Blinkt, um auf die Notwendigkeit der Justierung hinzuweisen. -
Seite 12: Grundlegende Hinweise (Allgemeines)
Die Waage darf nicht konstruktiv verändert werden. Dies kann zu falschen Wägergebnissen, sicherheitstechnischen Mängeln sowie der Zerstörung der Waage führen. Die Waage darf nur gemäß den beschriebenen Vorgaben eingesetzt werden. Abwei- chende Einsatzbereiche/Anwendungsgebiete sind von KERN schriftlich freizugeben. 4.3 Gewährleistung Gewährleistung erlischt bei • Nichtbeachten unserer Vorgaben in der Betriebsanleitung •... -
Seite 13: Prüfmittelüberwachung
Art und den Umfang dieser Prüfung zu definieren. Informationen bezüglich der Prüfmittelüberwachung von Waagen sowie der hierfür notwendigen Prüfgewichte sind auf der KERN- Hompage (www.kern-sohn.com) verfügbar. In seinem akkredi- tierten DKD- Kalibrierlaboratorium können bei KERN schnell und kostengünstig Prüf- gewichte und Waagen kalibriert werden (Rückführung auf das nationale Normal). -
Seite 14: Verpackung/Rücktransport
6.2 Verpackung/Rücktransport Alle Teile der Originalverpackung für einen eventuell not- wendigen Rücktransport aufbewahren. Für den Rücktransport ist nur die Originalverpackung zu verwenden. Vor dem Versand alle angeschlossenen Kabel und lo- sen/beweglichen Teile trennen. Evt. vorgesehene Transportsicherungen wieder anbringen. ... - Seite 15 ABT-BA-d-1312...
-
Seite 16: Auspacken, Aufstellung Und Inbetriebnahme
7 Auspacken, Aufstellung und Inbetriebnahme 7.1 Aufstellort, Einsatzort Die Waagen sind so konstruiert, dass unter den üblichen Einsatzbedingungen zuver- lässige Wägeergebnisse erzielt werden. Exakt und schnell arbeiten Sie, wenn Sie den richtigen Standort für Ihre Waage wäh- len. Beachten Sie deshalb am Aufstellort folgendes: •... -
Seite 17: Lieferumfang
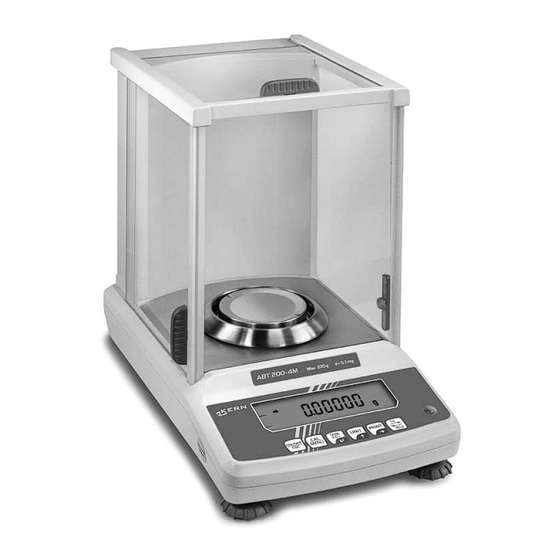
7.2.1 Lieferumfang Serienmäßiges Zubehör: Waage Wägeplatte Träger für Wägeplatte Schirmring Netzadapter Adapterkabelhalter Arbeitsschutzhaube Betriebsanleitung ABT-BA-d-1312... -
Seite 18: Aufstellen
7.2.2 Aufstellen • Bringen Sie den Adapterkabelhalter an. Ziehen Sie die selbstklebende Schutzfolie von dem Adapterkabel- halter ab und kleben Sie den Halter auf die Rückseite der Waage, wie abgebildet. • Träger der Wägeplatte, Wägeplatte und Schirmring der Reihenfolge nach anbringen. -
Seite 19: Netzanschluss
7.3 Netzanschluss Die Stromversorgung erfolgt über das externe Netzgerät. Der aufgedruckte Span- nungswert muss mit der örtlichen Spannung übereinstimmen. Verwenden Sie nur KERN- Originalnetzgeräte. Die Verwendung anderer Fabrikate bedarf der Zustimmung von KERN. 7.4 Anschluss von Peripheriegeräten Vor Anschluss oder Trennen von Zusatzgeräten (Drucker, PC) an die Datenschnitt- stelle muss die Waage unbedingt vom Netz getrennt werden. -
Seite 20: Erstinbetriebnahme
7.5 Erstinbetriebnahme Eine Anwärmzeit von 8 Stunden nach dem Einschalten stabilisiert die Messwerte. Die Genauigkeit der Waage ist abhängig von der örtlichen Fallbeschleunigung. Unbedingt die Hinweise im Kapitel Justierung beachten. 7.5.1 Einschalten der Stromversorgung 1. Waage über den Netzadapter mit Strom versorgen. -
Seite 21: Justierung
8 Justierung Da der Wert der Erdbeschleunigung nicht an jedem Ort der Erde gleich ist, muss je- de Waage – gemäß dem zugrunde liegenden physikalischen Wägeprinzip – am Auf- stellort auf die dort herrschende Erdbeschleunigung abgestimmt werden ( nur wenn die Waage nicht bereits im Werk auf den Aufstellort justiert wurde). -
Seite 22: Ein- Und Ausschalten Der Pcs-Funktion
8.1.1 Ein- und Ausschalten der PSC-Funktion: [CAL]-Taste wiederholt drücken bis „SettinG“ erscheint. [ TARE ]-Taste drücken. Im Display erscheint „CAL dEF“. Betätigen Sie wiederholt die [CAL]-Taste, bis die aktuelle “PSC:∗∗” –Einstellung erscheint: Um die Einstellung umzuschalten, müssen Sie die [TARE]-Taste betätigen, wenn “... -
Seite 23: Automatische Justierung Durch Clock-Cal
8.2 Automatische Justierung durch Clock-CAL (Nur Modelle ABT 100-5M, ABT 120-5DM, ABT 220-5DM) Die Waage kann so eingerichtet werden, dass sie mit Hilfe ihres internen Justierge- wichtes und ihrer eingebauten Uhr zu festgelegten Uhrzeiten (bis zu drei Mal täglich) eine automatische Justierung vornimmt. Clock-CAL ist besonders dann sehr nützlich, wenn Justierberichte über regelmäßige Justierungen gewünscht werden oder Justie- rungen in Pausenzeiten durchgeführt werden sollen, um Unterbrechungen der Mess- tätigkeiten auszuschließen. -
Seite 24: Einstellung Der Uhrzeit Für Clock-Cal
8.2.1 Einstellung der Uhrzeit für Clock-CAL [CAL]-Taste wiederholt drücken bis „SettinG“ erscheint. [ TARE]-Taste drücken. Im Display erscheint „CAL dEF“. Betätigen Sie wiederholt die [CAL]-Taste, bis “tCAL t*” erscheint: (für Einstellung1) Betätigen Sie die [ TARE]-Taste, so dass “t *HH:MM” angezeigt wird. -
Seite 25: Justierung Durch Ein Voreingestelltes Verfahren
8.3 Justierung durch ein voreingestelltes Verfahren Sie können ein voreingestelltes Justierverfahren starten, ohne in das Menü gehen zu müssen. Das eingestellte Justierverfahren kann durch einfache Betätigung der [CAL]-Taste, gefolgt von [ TARE ], aus dem Wägemodus heraus ausgeführt werden 8.3.1 Auswahl des voreingestellte Justierverfahrens [CAL]-Taste wiederholt drücken bis „SettinG“... -
Seite 26: Voreinstellung: Justierung Mit Internem Gewicht
8.3.2 Voreinstellung: Justierung mit internem Gewicht Voraussetzung: Funktion „i tCAL“ aktiviert (siehe Kap. 8.3.1) [CAL]-Taste drücken. Auf dem Display erscheint “i-CAL”. [ TARE ]-Taste drücken. Die Anzeige schaltet automatisch in folgender Reihenfolge um: “CAL 2”, “CAL 1”, “CAL 0” und “CAL End”. -
Seite 27: Voreinstellung: Justiertest Mit Externem Gewicht
8.3.4 Voreinstellung: Justiertest mit externem Gewicht Voraussetzung: Funktion „E tESt“ aktiviert (siehe Kap. 8.3.1) [CAL]-Taste drücken. Auf dem Display erscheint “E-tESt”. [ TARE ]-Taste drücken. Die Überprüfung wird gestartet und die Nullanzeige blinkt (Achten Sie darauf, dass sich keine Gegen- stände auf der Wägeplatte befinden). -
Seite 28: Durchführung Alternativer Justierverfahren
8.4 Durchführung alternativer Justierverfahren Hier starten Sie Ihre Justierung durch die Auswahl einer Einstellung im Menü. 8.4.1 Justierung mit internem Gewicht [CAL]-Taste wiederholt drücken bis „FUnC.SEL“ erscheint. [ TARE ]-Taste drücken. “CAL” wird angezeigt. [ TARE ]-Taste drücken. “E CAL” wird angezeigt. [CAL]-Taste wiederholt drücken, bis “i CAL”... -
Seite 29: Justiertest Mit Internem Gewicht
8.4.2 Justiertest mit internem Gewicht Während des Justiertests vergleicht die Waage den gespeicherten Wert des Justier- gewichtes mit dem tatsächlichen. Es findet nur eine Überprüfung statt, d.h. es wer- den keine Werte verändert. [CAL]-Taste wiederholt drücken bis „FUnC.SEL“ erscheint. [ TARE ]-Taste drücken. “CAL” wird angezeigt. [ TARE ]-Taste drücken. -
Seite 30: Justiertest Mit Externem Gewicht
8.4.3 Justiertest mit externem Gewicht [CAL]-Taste wiederholt drücken bis „FUnC.SEL“ erscheint. [ TARE ]-Taste drücken. “CAL” wird angezeigt. [ TARE ]-Taste drücken. “E CAL” wird angezeigt. [CAL]-Taste wiederholt drücken, bis “i tESt” erscheint. [ TARE ]-Taste drücken. Die Überprüfung wird gestartet und die Nullanzeige blinkt. -
Seite 31: Eichung
9 Eichung Allgemeines: Nach der EU-Richtlinie 90/384/EWG müssen Waagen geeicht sein, wenn sie wie folgt verwendet werden (gesetzlich geregelter Bereich): a) Im geschäftlichen Verkehr, wenn der Preis einer Ware durch Wägung be- stimmt wird. b) Bei der Herstellung von Arzneimitteln in Apotheken sowie bei Analysen im medizinischen und pharmazeutischen Labor. -
Seite 32: Iso/Glp-Protokollierung
Über einen optionalen Drucker können diese Protokolle ausgegeben werden. In Kombination mit der Clock-CAL-Funktion (siehe Kap. 8.2) werden vollautomatische und periodische Justierungen durchgeführt und Protokolle erstellt. Zunächst wie in Kap. 15.4 unter „KERN-YKB-01N beschrieben die Einstellungen vornehmen. Danach kann der Protokollausdruck wie folgt eingestellt werden: [CAL]-Taste wiederholt drücken bis „SettinG“... -
Seite 33: Einstellung Der Waagen-Id-Nummer
10.2 Einstellung der Waagen-ID-Nummer Diese Einstellung bezieht sich auf die ID-Nummer der Waage, die im Justierprotokoll mit ausgegeben wird [CAL]-Taste wiederholt drücken bis „SettinG“ erscheint. [ TARE ]-Taste drücken. Im Display erscheint „CAL dEF“. Betätigen Sie wiederholt die [CAL]-Taste, bis “id:****“ erscheint (die ∗∗... -
Seite 34: Einstellung Des Datumsausdrucks
10.3 Einstellung des Datumsausdrucks Diese Einstellung legt fest, ob Datum und Uhrzeit, die durch die eingebaute Uhr der Waage vorgegeben werden, im Protokoll mit ausgedruckt werden sollen oder nicht. [CAL]-Taste wiederholt drücken bis „SettinG“ erscheint. [ TARE ]-Taste drücken. Im Display erscheint „CAL dEF“. Betätigen Sie wiederholt die [CAL]-Taste, bis “Prtdt:∗∗”... -
Seite 35: Basisbetrieb
11 Basisbetrieb 11.1 Wägen Hinweis: Eine Anwärmzeit von 8 Std. zur Stabilisierung ist erforderlich. Waage mit der [ON/OFF]-Taste einschalten. Die Waage führt einen Selbsttest durch. Sobald die Gewichtsanzeige „0.0000 g" anzeigt, ist Ihre Waage wägebereit. Hinweis: Mit der [ TARE ]-Taste kann die Waage bei Bedarf jederzeit auf Null gestellt werden. -
Seite 36: Umschalten Der Anzeige
11.3 Umschalten der Anzeige Durch Mehrfachdruck der [UNIT]-Taste können Sie die Anzeige zwischen aktivierten Einheiten, Stückzähl-. Prozent- und Dichtebestimmungs-Modus umschalten. Mit der werksseitigen Einstellung haben Sie folgende Möglichkeiten: [g] → [%] → [Pcs] → [ct] → [g] → … Andere Einstellungen müssen im Menü aktiviert werden: [CAL]-Taste wiederholt drücken bis „FUnC.SEL“... -
Seite 37: Ändern Der Ablesbarkeit
11.4 Ändern der Ablesbarkeit (nur Modelle ABT 100-5M, ABT 120-5DM, ABT 220-5DM) Sobald bei den Modellen ABT 120-5DM und ABT 220-5DM die Stromversorgung an- geschlossen und eingeschaltet wird, werden diese Geräte auf den “unteren Bereich” mit einer Ablesbarkeit von 0,01 mg gesetzt. Um auf den “oberen Bereich” mit einer Ablesbarkeit von 0,1 mg umzuschalten, müssen Sie die [1d/10d]-Taste betätigen. -
Seite 38: Unterflurwägung
11.5 Unterflurwägung Mit Hilfe der Unterflurwägung können Gegenstände, welche aufgrund ihrer Größe oder Form nicht auf die Waagschale gestellt werden können, gewogen werden. Gehen Sie wie folgt vor: Schalten Sie die Waage aus. • • Öffnen sie den Verschlussdeckel (1) am Waagenboden. •... -
Seite 39: Das Menü
12 Das Menü Über das Waagenbetriebsmenü kann das Verhalten der Waage an Ihre Anforderun- gen angepasst werden. Werksseitig ist das Waagenbetriebsmenü so eingestellt, dass Sie in aller Regel keine Änderungen vorzunehmen brauchen. Wenn Sie beson- dere Einsatzbedingungen haben, stellen Ihre Waage über Waagenbetriebsmenü... -
Seite 40: Aufrufen Des Menüs
12.3 Aufrufen des Menüs Bitte probieren Sie selbst einmal das Ändern einer Funktion. Ändern Sie die Funktion “Auto-Zero“ auf OFF und danach wieder auf ON. Waage mit der ON/OFF-Taste einschalten CAL-Taste betätigen bis FUnC.SEL erscheint TARE-Taste einmal betätigen bis CAL erscheint ... -
Seite 41: Hauptmenüauswahl
12.4 Hauptmenüauswahl Im Wägemodus die [CAL]-Taste drücken. Die erste Funktion „i-Cal“ (Bsp.) er- scheint. Durch weiteres Drücken der [CAL]-Taste werden die verschiedenen Funktio- nen des Menüs durchlaufen Wägemodus Voreingestelltes Justierverfahren durch (siehe Kap. 8.3) Nicht dokumentiert Einstellungskontroll-Anzeige (sieheKap. 12.6) Standard-Modus Einstellungen für Stabilität und Reaktion P0VR�1nG�... -
Seite 42: Menü-Übersicht
12.5 Menü-Übersicht * = Werkseinstellung ABT-BA-d-1312... - Seite 43 ABT-BA-d-1312...
- Seite 44 ABT-BA-d-1312...
-
Seite 45: Menüsperre
12.6 Menüsperre Um versehentliche Änderungen der Menüeinstellungen zu verhindern, können weite- re Einstellvorgänge gesperrt werden. Diese Funktion wird als Menüsperre bezeich- net. Die Menüsperre wird auf nachfolgend beschriebene Art und Weise aktiviert: Schalten Sie die Stromversorgung der Waage ein und warten Sie bis „oFF“... -
Seite 46: Einstellungskontroll-Anzeige
12.8 Einstellungskontroll-Anzeige Um eine Bestätigung der aktuellen Einstellungen zu erhalten, betätigen Sie im Wägemodus wiederholt die [CAL]-Taste bis „St. b1 t“ (Bsp.) erscheint. Erscheint, wenn die automatische Justierung Erscheint, wenn die Ausgabe der Justier- durch PSC oder Clock-CAL eingeschaltet ist. daten eingeschaltet ist. -
Seite 47: Beschreibung Einzelner Funktionen
13 Beschreibung einzelner Funktionen 13.1 Stabilitätsfilter Grundsätzlich bewirkt eine auf höhere Stabilität ausgerichtete Datenverarbeitung ei- ne Verlangsamung der Reaktionszeiten, während sich eine Beschleunigung der Reaktionszeiten zu Lasten der Stabilität auswirkt. Die Waagen der Serien ABT sind jedoch so konzipiert, dass sie beide Eigenschaften, d. h. schnelle Reaktionszeiten und hohe Stabilität, gewährleisten. -
Seite 48: Antikonvektions-Modus
13.1.2 Antikonvektions-Modus Wenn Messungen unter unvermeidlichen Umgebungsbedingungen (z. B. umschal- tenden Klimaanlagen) durchgeführt werden müssen, kann die im Wägeraum auftre- tende Konvektion zu Fluktuationen in der Anzeige der Waage führen, nachdem die Stabilitätsanzeige erschienen ist. Der kleine Bereich (Ablesbarkeit 0,01 mg) der Serie ABT ist für diesen Effekt besonders anfällig. -
Seite 49: Dosier-Modus
13.1.4 Dosier-Modus Nutzen Sie diese Funktion, wenn Sie die Anzeigegeschwindigkeit erhöhen wollen, z. B. beim Dosieren. Beachten Sie jedoch, dass die Waage sehr empfindlich auf die Umgebungsbedingungen reagiert. Den Empfindlichkeitsgrad können Sie je nach Aufstellort (ruhig/unruhig) einstellen. [CAL]-Taste wiederholt drücken bis „PoUr inG“ erscheint. P0VR�1nG�... -
Seite 50: Stillstandsanzeige
13.2 Stillstandsanzeige Erscheint im Display die Stillstandsanzeige ( ) ist die Waage in einem stabilen Zu- stand. Die Bedingung zur Beurteilung der Stabilität kann durch den Bediener festge- legt werden. Sie können zwischen drei Stufen wählen: 1 Zählung, 5 Zählungen und 10 Zählungen. -
Seite 51: Auto-Zero
13.3 Auto-Zero Mit dieser Funktion werden kleine Gewichtsschwankungen automatisch tariert. Werden kleine Mengen vom Wägegut entnommen oder zugeführt, so können durch die in der Waage vorhandene „Stabilitätskompensation“ falsche Wägeergebnisse angezeigt werden! (z.B. Langsames Herausfließen von Flüssigkeiten aus einem auf der Waage befindlichen Behälter, Verdampfungsprozesse). Bei Dosierungen mit kleinen Gewichtsschwankungen empfiehlt es sich daher, diese Funktion auszuschalten. -
Seite 52: Datumseinstellung
13.4 Datumseinstellung [CAL]-Taste wiederholt drücken bis „SettinG“ erscheint. [ TARE ]-Taste drücken. Betätigen Sie wiederholt die [CAL]-Taste, bis “d-MM.DD“ er- scheint (MM und DD sind jeweils 2 Stellen, die Monat und Tag angeben). Betätigen Sie die [ TARE ]-Taste. Das aktuell eingestellte Datum erscheint. -
Seite 53: Uhrzeiteinstellung
13.5 Uhrzeiteinstellung Die Waagen der Serien ABT sind mit einer eingebauten Uhr ausgestattet. Stellen Sie die Uhr ein, bevor Sie die Funktionen Clock-CAL (Kap. 8.2) oder GLP-Protokollierung (Kap. 10) benutzen. Achten Sie darauf, dass im Standby-Status (Kap. 7.5.1) die ak- tuelle Uhrzeit angezeigt wird. -
Seite 54: Kapazitätsanzeige
13.6 Kapazitätsanzeige Diese Funktion stellt die auf der Wägeplatte befindliche Last in Form eines Balken- diagramms dar. Sie dient dazu, plötzlich auftretende “oL”-Zustände (Überlast) wäh- rend des Messvorgangs zu vermeiden. Die Darstellung der Kapazitätsanzeige kann ein- oder ausgeschaltet werden. [CAL]-Taste wiederholt drücken bis „FUnC.SEL“ erscheint. [ TARE ]-Taste drücken [CAL]-Taste wiederholt drücken bis die aktuelle „AdiSP:**“- Einstellung erscheint. -
Seite 55: Applikationsfunktionen
14 Applikationsfunktionen 14.1 Stückzählen Beim Stückzählen können Sie entweder Teile in einen Behälter einzählen oder Teile aus einem Behälter herauszählen. Um eine größere Menge von Teilen zählen zu können, muss mit einer kleinen Menge (Referenzstückzahl) das durchschnittliche Gewicht pro Teil ermittelt werden. Je größer die Referenzstückzahl, desto höher ist die Zählgenauigkeit. -
Seite 56: Prozentbestimmung
Referenzgewicht abnehmen. Jetzt können Sie die zu zählenden Teile in den Behälter füllen. Die entsprechende Stückzahl wird im Display angezeigt. Durch wiederholtes Drücken der [UNIT]-Taste wird der Anzei- gewert umgeschaltet z. B: [g] → [%] → [Pcs] → [ct] Hinweis: Erscheint die Fehlermeldung “Err 20“... -
Seite 57: Dichtebestimmung
14.3 Dichtebestimmung Nachfolgend wird die Dichtebestimmung mit Hilfe der Einrichtung zur Unterflurwä- gung beschrieben. Noch einfacher ist Durchführung der Dichtebestimmung mit Hilfe eines optionalen Sets zur Dichtebestimmung. Weitere Informationen hierzu entnehmen Sie bitte der Betriebsanleitung, die dem Set zur Dichtebestimmung beiliegt. 1. -
Seite 58: Dichtebestimmung Von Flüssigkeiten
[UNIT]-Taste wiederholt drücken, bis sich die Waage im Dichtebe- stimmungsmodus für Feststoffe “,d” befindet. Beachten Sie, dass während der Gewichtsmessung in Luft auch “g” erscheint [ TARE ]-Taste drücken. Legen Sie den Messgegenstand auf die Waagschale.. Nach erfolgter Stillstandskontrolle die [CAL]-Taste drücken Legen Sie den Messgegenstand in die untergetauchte Hänge- waagschale. - Seite 59 [UNIT]-Taste wiederholt drücken, bis sich die Waage im Dichtebe- stimmungsmodus für Flüssigkeiten “d” befindet. Beachten Sie, dass während der Gewichtsmessung in Luft auch “g” erscheint [ TARE ]-Taste drücken. Legen Sie den Senkkörper auf die Waagschale.. Nach erfolgter Stillstandskontrolle die [CAL]-Taste drücken Senkkörper blasenfrei eintauchen.
-
Seite 60: Automatische Druck-Funktion (Auto Print)
14.4 Automatische Druck-Funktion (Auto Print) Die automatische Druck-Funktion ermöglicht den automatischen Ausdruck von Daten über die RS-232C Schnittstelle, ohne dass für jede einzelne Messung die [PRINT]- Taste betätigt werden muss. Die Ausgabe erfolgt nach erfolgter Stillstandskontrolle ( ). Die nächste Messung kann beginnen, nachdem die Gegenstände von der Wägeplatte entnommen worden sind und die Anzeige auf einen Wert innerhalb des ±... -
Seite 61: Summier-Modus
14.5 Summier-Modus Beliebig viele Einzelwägungen werden automatisch zu einer Gesamtsumme addiert, zum Beispiel alle Einzelwägungen einer Charge oder wenn Sie viele Messungen sehr kleiner Proben durchführen müssen. Nach erfolgter Stillstandskontrolle ( ) wird der Wägewert automatisch an den optio- nalen Drucker ausgegeben. Der Anzeigewert wird in den Summenspeicher addiert. Anschließend erfolgt die automatische Tarierung. - Seite 62 Mit der [ TARE ]-Taste bestätigen Sie Ihre Auswahl. Die Druck- ausgabe “-------- ADDON MODE ---------” erfolgt. Mit der [ON/OFF]-Taste verlassen Sie die Funktion. Kurzes Betätigen der ON/OFF –Taste: Zurück in die das vorhergehende Menü. Langes Betätigen der ON/OFF –Taste: Zurück zum Wägemodus.
-
Seite 63: Rezeptur-Modus
Druckausgabe: ---ADDON Mode--- CMP001= 5,0003 g CMP002= 5,0017 g CMP003= 5,0010 g TOTAL= 15,0030 g Hinweis: Bei den drei Funktionen Auto-Print, Summieren und Rezeptur kann immer nur eine Funktion aktiviert (on) werden. Bei aktivierter Funktion wird die automatische Justierung (PSC/Clock-CAL) nicht durchgeführt. - Seite 64 Weitere Komponenten auflegen 0.4488 g Nach Beendigung der letzten Einzelwägungen erscheint die Gesamtsumme (Total) durch Drücken der [ON/OFF]- 1.5271 g Taste Gewicht von der Wägeplatte entfernen. Die Waage ist für weitere Messungen bereit. Druckausgabe: ---Formulation Mode--- CMP001= 0,5361 g CMP002= 0,5422 g CMP003= 0,4488 g...
-
Seite 65: Datenausgang
15 Datenausgang 15.1 RS 232C Schnittstelle Pinbelegung des Waagenausgangssteckers: PIN-Nr. Signal 15.2 Datenformate Hinweis: ist der Leerzeichen- und DL der Endezeichencode. 1. Eingabedatenformat BEFEHLSCODE + DL (siehe 15.2.3) 2. Ausgabedatenformat Im Wägemodus (ex.) S -200.000gDL Stabilität Polarität Polaritätsdaten Positiv: Leerzeichen () Negativ: Minus (-) Stabilitätsinformation (wenn die Ausgabe Stabilitätsinformationen beinhaltet) -
Seite 66: Fernsteuerbefehle
15.3 Fernsteuerbefehle Achtung: Werden Zeichen und Befehlscodes in die Waage eingegeben, die hier nicht darge- stellt sind, so kann dies nicht nur vorherige Einstellungen der Waage ändern, son- dern auch zu falschen Messungen führen. Wenn Sie versehentlich Zeichen oder Befehle in die Waage eingegeben haben, die hier nicht aufgeführt sind, müssen Sie das Netzkabel sofort von der Waage abziehen und dürfen es erst nach etwa 10 Sekunden wieder anschließen. -
Seite 67: Standardeinstellungen
(siehe 15.5) KERN – iF:USEr 1200 Keine (8) YKB-01N Auswahl einer Standardeinstellung: [CAL]-Taste wiederholt drücken bis „intFACE“ erscheint. [ TARE ]-Taste drücken [CAL]-Taste wiederholt drücken bis die gewünschte Standardein- stellung angezeigt wird. - Seite 68 [CAL]-Taste wiederholt drücken bis „intFACE“ erscheint. [ TARE ]-Taste drücken [CAL]-Taste wiederholt drücken bis „iF:USEr“ erscheint. [ TARE ]-Taste drücken (Beispiel) Mit der [CAL]-Taste können Sie zwischen folgenden Einstellungen wählen ((Die **** geben die aktuelle Einstellung wieder; 2 bis 4 Zeichen): “io.b:****”...
-
Seite 69: Einstellung Der Kommunikationsgeschwindigkeit
15.5.1 Einstellung der Kommunikationsgeschwindigkeit 1. Die Anzeige wechselt von “io.b:****” zu “b-300”. Die Umschaltung der Anzeige er- folgt über die [CAL]-Taste. Das Stillstandsanzeige ( ) markiert die aktuelle Einstel- lung. Anzeige b-300 b-600 b-1200 b-2400 b-4800 während Einstellung 300bps 600bps 1200bps 2400bps 4800bps... -
Seite 70: Stopp-Bit-Einstellungen
15.5.4 Stopp-Bit-Einstellungen 1. Die Anzeige wechselt von “io.S:****” zu “ S-S1”. Die Umschaltung der Anzeige er- folgt über die [CAL]-Taste. Das Stillstandsanzeige ( ) ) markiert die aktuelle Ein- stellung. Anzeige S-S1 S-S2 während Einstellung Stopp-Bit, 1 bit Stopp-Bit, 2 Bits Einstellungsspezifisch 2. -
Seite 71: Wartung, Instandhaltung, Entsorgung
Lose Probenreste/Pulver können vorsichtig mit einem Pinsel oder Handstaubsauger entfernt werden. Verschüttetes Wägegut sofort entfernen. 16.2 Wartung, Instandhaltung Das Gerät darf nur von geschulten und von KERN autorisierten Servicetechnikern geöffnet werden. Vor dem Öffnen vom Netz trennen. 16.3 Entsorgung Die Entsorgung von Verpackung und Gerät ist vom Betreiber nach gültigem nationa- lem oder regionalem Recht des Benutzerortes durchzuführen. -
Seite 72: Kleine Pannenhilfe
17 Kleine Pannenhilfe Bei einer Störung im Programmablauf sollte die Waage kurz ausgeschaltet und vom Netz getrennt werden. Der Wägevorgang muss dann wieder von vorne begonnen werden. Fehlercode-Tabelle: Angezeiter Fehlercode Erläuterung Abhilfe Hohe Nullpunktverschie- Gegenstände aus der CAL E2 bung während der Justie- Waagschale entfernen. - Seite 73 Messung flüchtiger Substanzen. Substanzen mit Deckel abdecken. Wiegegegenstand ist elektrisch In einem Metallbehälter geladen. wiegen. Mit einem Metallob- jekt wiegen, das größer als die Wiegegegenstände ist. Probentemperatur und Temperatur Bei gleicher Temepratur innerhalb des Wägeraumes weichen messen. Gegenstand vor voneinander ab. der Messung in der Wiege- kammer lassen.
- Seite 74 KERN ABT Version 1.2 03/2013 Operating instruction Analytical balance Table of Contents Technical data ....................4 Declaration of conformity ................7 Keyboard and display overview ..............8 Keyboard overview ....................8 Overview of display ....................10 Basic Information (General) ................ 11 Proper use .......................11...
- Seite 75 10.3.1 Printout Date and Time, without weight value ..............33 Basic Operation ................... 34 11.1 Weighing .........................34 11.2 Taring ........................34 11.3 Changing the display ....................35 11.4 Changing readability ....................36 11.5 Underfloor weighing ....................37 The menu ...................... 38 12.1 Changing settings ....................38 12.2 How to change settings ..................38 12.3...
-
Seite 76: Technical Data
1 Technical data KERN ABT 100-5M ABT 120-4M Readability (d) 0.01 mg 0.1 mg Weighing range (max) 101 g 120 g Minimum load (Min) 1 mg 10 mg Verification value (e) 1 mg 1 mg Verification class Reproducibility 0.05 mg 0.1 mg... - Seite 77 KERN ABT 220-4M ABT 320-4M Readability (d) 0.1 mg 0.1 mg Weighing range (max) 220 g 320 g Minimum load (Min) 10 mg 10 mg Verification value (e) 1 mg 1 mg Verification class Reproducibility 0.1 mg 0.1 mg Linearity ±...
- Seite 78 KERN ABT 120-5DM ABT 220-5DM Readability (d) 0.01/0.1 mg 0.01/0.1 mg Weighing range (max) 42 g/120 g 82 g/220 g Minimum load (Min) 1 mg 1 mg Verification value (e) 1 mg 1 mg Verification class Reproducibility ±0.02/ 0.1 mg ±0.05/ 0.1 mg...
-
Seite 79: Declaration Of Conformity
EN 61010-1: 2010 27.03.2013 Datum Signatur Date Signature 72336 Balingen Albert Sauter Ort der Ausstellung KERN & Sohn GmbH Place of issue Geschäftsführer Managing director KERN & Sohn GmbH, Ziegelei 1, D-72336 Balingen, Tel. +49-[0]7433/9933-0 Fax +49-[0]7433/9933-149, E-Mail: info@kern-sohn.com, Internet: www.kern-sohn.com ABT-BA-e-1312... -
Seite 80: Keyboard And Display Overview
3 Keyboard and display overview 3.1 Keyboard overview In weighing mode: Designa- Pressed once and released Keep pressed for about 3 seconds tion Switches between the opera- Switches the key notification buzzer on/off. [ON/OFF] tion and standby modes. Invokes adjustment or menu Invokes adjustment or menu selection. - Seite 81 In menu: Designa- Keep pressed for about 3 se- Pressed once and released tion conds Back to menu Return to weighing mode [ON/OFF] Menu selection [CAL] Parameter selection [TARE] Storing settings Entering numeric values Increases the numeric value of flashing digit by 1. [UNIT] Entering numeric values.
-
Seite 82: Overview Of Display
3.2 Overview of display Capacity display Units display Display Designation Description Indicates that the weighed value is stable. Highlights current set- Standstill display ting during menu item selection Appears during adjustment. Flashes prior to start of automatic adjustment. Weight symbol Appears during parameter selection for adjustment. -
Seite 83: Basic Information (General)
The balance may only be used according to the described conditions. Other areas of use must be released by KERN in writing. 4.3 Warranty Warranty claims shall be voided in case •... -
Seite 84: Monitoring Of Test Resources
Infor- mation is available on KERN’s home page (www.kern-sohn.com with regard to the monitoring of balance test substances and the test weights required for this. In KERN’s accredited DKD calibration laboratory test weights and balances may be... -
Seite 85: Packaging / Return Transport
6.2 Packaging / return transport Keep all parts of the original packaging for a possibly re- quired return. Only use original packaging for returning. Prior to dispatch disconnect all cables and remove loose/mobile parts. Reattach possibly supplied transport securing devices. ... - Seite 86 ABT-BA-e-1312...
-
Seite 87: Unpacking, Setup And Commissioning
7 Unpacking, Setup and Commissioning 7.1 Installation Site, Location of Use The balances are designed in a way that reliable weighing results are achieved in common conditions of use. You will work accurately and fast, if you select the right location for your balance. Therefore, observe the following for the installation site: •... -
Seite 88: Scope Of Delivery
7.2.1 Scope of delivery Serial accessories: Balance Weighing plate Carrier of weighing plate Screening ring Mains adapter Adapter cable holder Protective cover Operating Manual ABT-BA-e-1312... -
Seite 89: Installation
7.2.2 Installation • Attach the adapter cable holder. Peel the protective sheet of adhesive of the adapter cable holder, and stick it on the back of the balance as shown in the figure. • Carrier of weighing plate, attach weighing plate and circular screen in order. -
Seite 90: Mains Connection
7.3 Mains connection Power is supplied via the external mains power supply. The stated voltage value must be the same as the local voltage. Only use original KERN mains power sup- plies. Using other makes requires consent by KERN. 7.4 Connection of peripheral devices Before connecting or disconnecting of additional devices (printer, PC) to the data interface, always disconnect the balance from the power supply. -
Seite 91: Initial Commissioning
7.5 Initial Commissioning A warming up time of 4 hours after switching on stabilizes the measuring values. The accuracy of the balance depends on the local acceleration of gravity. Strictly observe hints in chapter Adjustment. 7.5.1 Turning On the Power 1. -
Seite 92: Adjustment
8 Adjustment As the acceleration value due to gravity is not the same at every location on earth, each balance must be coordinated - in compliance with the underlying physical weighing principle - to the existing acceleration due to gravity at its place of location (only if the balance has not already been adjusted to the location in the factory). -
Seite 93: Pcs Function On/Off
8.1.1 PCS function ON/OFF Press the [CAL] key repeatedly until "SettinG" appears. Press the [TARE] key. The display shows “CAL dEF”. Actuate the [CAL] key repeatedly until the current "PSC:∗∗" set- ting appears: To change the setting, actuate the [TARE] key as soon as "PSC:∗∗"... -
Seite 94: Automatic Adjustment Via Clock-Cal
8.2 Automatic adjustment via Clock-CAL (only models ABT 100-5M, ABT 120-5DM, ABT 220-5DM) With the help of its internal adjusting weight and integrated clock the balance can be set to carry out automatic adjustment at set times (up to three times daily). Clock- CAL is a very convenient function, when calibration reports are desired to be made for regular calibrations, or when wishing span calibrations during break times to avoid interruption of measurement work. -
Seite 95: Setting The Time For Clock-Cal
8.2.1 Setting the time for Clock-CAL Press the [CAL] key repeatedly until "SettinG" appears. Press the [TARE] key. The display shows “CAL dEF”. the [CAL] key repeatedly until “tCAL t*” appears: Press (for setting 1) Actuate the [TARE] key until "t*HH:MM" is displayed. The *- position symbolises a number between 1 and 3 (3 set times for automatic adjustment). -
Seite 96: Adjustment Via Preset Process
8.3 Adjustment via preset process It is possible to start the preset adjustment method without having to access the menu. When in weighing mode, the preset adjustment method can be carried out by simply actuating the [CAL] key, followed by [TARE]. 8.3.1 Selecting default adjustment method Press the [CAL] key repeatedly until "SettinG"... -
Seite 97: Default Setting: Adjustment With Internal Weight
8.3.2 Default setting: Adjustment with internal weight Condition: Function „i tCAL“ activated (see ch. 8.3.1) Press the [CAL] key The display shows “i-CAL” Press the [TARE] key. The display changes automatically in this order: “CAL 2”, “CAL 1”, “CAL 0”, and “CAL End”. After success- ful adjustment the balance automatically returns to weighing mode. -
Seite 98: Default Setting: Adjustment Test With External Weight
8.3.4 Default setting: Adjustment test with external weight Condition: Function „E tESt“ activated (see ch. 8.3.1) Press the [CAL] key The display shows “E-tESt” Press the [TARE] key. Testing will be started and zero display is flashing (Ensure that no items are present on the weighing plate). -
Seite 99: Carrying Out Alternative Adjustment Methods
8.4 Carrying out alternative adjustment methods Here you start adjustment by selecting a setting in the menu. 8.4.1 Adjustment with internal weight Repeatedly press the [CAL] key until "FUnC.SEL" appears. Press the [TARE] key. "CAL" is displayed. Press the [TARE] key. "E CAL" is displayed. Repeatedly press the [CAL] key until "i CAL"... -
Seite 100: Adjustment Test With Internal Weight
8.4.2 Adjustment test with internal weight During adjustment tests the balance automatically compares the saved value of the adjustment weight with the actual value. This is only a check, i.e. no values are changed. Repeatedly press the [CAL] key until "FUnC.SEL" appears. Press the [TARE] key. -
Seite 101: Adjustment Test With External Weight
8.4.3 Adjustment test with external weight Repeatedly press the [CAL] key until "FUnC.SEL" appears. Press the [TARE] key. "CAL" is displayed. Press the [TARE] key. "E CAL" is displayed. Repeatedly press the [CAL] key until "i tESt" appears. Press the [TARE] key. Testing is started and zero display is flashing. -
Seite 102: Verification
9 Verification General introduction: According to EU directive 90/384/EEC balances must be verified if they are used as follows (legally controlled area): a) For commercial transactions if the price of goods is determined by weighing. b) For the production of medicines in pharmacies as well as for analyses in the medical and pharmaceutical laboratory. -
Seite 103: Iso/Glp Log
Fully automatic and periodical adjustments are carried out and logs created in combination with the Clock-CAL function (see ch. 8.2). First make adjustments as specified in chap. 15.4 under „KERN-YKB-01N“. Then set the log printout as follows: Press the [CAL] key repeatedly until "SettinG" appears. -
Seite 104: Balance Id Number Setting
10.2 Balance ID Number Setting This setting is for the balance ID number that is output along with the adjustment re- port. Press the [CAL] key repeatedly until "SettinG" appears. Press the [TARE] key. The display shows “CAL dEF”. Repeatedly actuate the [CAL] key until "id:****" appears (The ∗∗ symbolise the current setting). -
Seite 105: Setting The Date Printout
10.3 Setting the date printout This setting determines whether or not the date and time on the balance’s built-in clock is printed out along with the log. Press the [CAL] key repeatedly until "SettinG" appears. Press the [TARE] key. The display shows “CAL dEF”. Repeatedly actuate the [CAL] key until "Prtdt:∗∗"... -
Seite 106: Basic Operation
11 Basic Operation 11.1 Weighing Note: Stabilisation requires a warm-up period of 1 or 4 hours (for models d = 0.01 mg). Turn on balance by pressing the [ON/OFF] key. The balance will carry out a self-test Your balance is ready to weigh as soon as the “0.0000 g" display ap- pears. -
Seite 107: Changing The Display
11.3 Changing the display You can change the display to activated units, piece counting, percentage and densi- ty determination mode by pressing the [UNIT] key several times. The default setting provides the following options: [g] → [%] → [Pcs] → [ct] → [g] → … Different settings have to be activated in the menu: Repeatedly press the [CAL] key until "FUnC.SEL"... -
Seite 108: Changing Readability
11.4 Changing readability (only models ABT 100-5M, ABT 120-5DM, ABT 220-5DM) Models ABT 120-5DM and ABT 220-5DM are set to “lower range“ with a readability of 0.01 mg as soon as they are connected to power supply and turned on. To switch to the “upper range”... -
Seite 109: Underfloor Weighing
11.5 Underfloor weighing Objects unsuitable for placing on the weighing pan due to size or shape may be weighed with the help of the flush-mounted platform. Proceed as follows: • Switch off balance. • Open the closing lid (1) on the bottom of your balance. •... -
Seite 110: The Menu
12 The menu To adapt the behaviour of the balance to your requirements, go to the balance mode menu. Usually the default setting of the balance mode menu is such that you do not need to make any changes. If you encounter special conditions of use, go to the bal- ance mode menu in order to set your balance according to your individual require- ments. -
Seite 111: Call Up Menu
12.3 Call up menu Please have a go and try to change a function yourself. Change the "Auto-Zero" function to OFF and then again to ON. Turn on balance by pressing the ON/OFF key. Actuate the CAL key until FUnC.SEL appears ... -
Seite 112: Selecting The Menu
12.4 Selecting the menu In weighing mode press the [CAL] key. First function "i-Cal" (ex.) appears. The various functions of the menu are passed through by pressing the [CAL] key again. Weighing mode Preset adjustment method (see ch. 8.3) Not documented Setting control display (see ch. -
Seite 113: Menu Overview
12.5 Menu overview * = default setting ABT-BA-e-1312... - Seite 114 ABT-BA-e-1312...
- Seite 115 ABT-BA-e-1312...
-
Seite 116: Menu Lock
12.6 Menu Lock The menu setting operations can be locked so that the settings cannot be inadvert- ently changed. This is called Menu Lock. The menu lock is activated with the follow- ing procedure. Turn on the power supply for the balance and wait until "oFF" ap- pears. -
Seite 117: Settings Control Display
12.8 Settings control display To receive a confirmation of the current settings, repeatedly actuate the [CAL] key in weighing mode until "St. b1 t" (ex.) appears. Appears when the automatic adjustment has Appears when the issue of the adjustment been switched on by PSC or Clock-CAL. data is switched on. -
Seite 118: Description Of Individual Functions
13 Description of individual functions 13.1 Stability filter Generally, data processing for greater stability slows the response and processing for higher response reduces stability. Balances of the series ABT are designed to ensure both qualities, that is, fast reaction time and high stability. Most measurements can be carried out using default settings, that is, standard mode. -
Seite 119: Anti-Convection Mode
13.1.2 Anti-convection mode If measurements have to be taken under unavoidable ambience conditions, (e. g. changing air condition systems) convection occurring within the weighing space may result in fluctuations in the display on the balance after the stability display has ap- peared. -
Seite 120: Apportioning Mode
13.1.4 Apportioning mode Use this function if you wish to increase display speed, e.g. during apportioning. However, please note that the balance is very susceptible to ambience conditions. You can set the degree of sensitivity according to site (qui- et/unquiet). Repeatedly press the [CAL] key until "PoUr inG"... -
Seite 121: Standstill Display
13.2 Standstill display If the display shows the stability display ( ) the balance is in a stable status. The condition for judging stability is user-selectable. There are three levels to select: 1 count, 5 counts and 10 counts. The default setting is 1 count. The setting of the standstill display can be checked on the setting control display (see ch.12.6). -
Seite 122: Auto Zero
13.3 Auto Zero This function is used to tare small variations in weight automatically. In the event that small quantities are removed or added to the material to be weighed, incorrect weighing results can be displayed due to the “stability compensa- tion“... -
Seite 123: Setting Date
13.4 Setting date Press the [CAL] key repeatedly until "SettinG" appears. Press the [TARE] key. Repeatedly press the [CAL] key until "d-MM.DD" appears (MM and DD provide two digits each, indicating month and day). Press the [TARE] key. The date currently set appears. In the up- per part of the display panel, the symbol and the # symbol 15. -
Seite 124: Setting Time
13.5 Setting time Balances of the series ABT are equipped with an integrated clock. Set the clock be- fore using the functions Clock-CAL (ch. 8.2) or GLP log (ch. 10). Note that the cur- rent time is displayed at the stand by status (ch. 7.5.1). Press the [CAL] key repeatedly until "SettinG"... -
Seite 125: Capacity Display
13.6 Capacity display This function displays a bar graph representation of the load on the weighing plate. This may be used to prevent sudden appearance of “oL” (overload) during measurement. It is possible to turn the display of capacity on or off. Repeatedly press the [CAL] key until "FUnC.SEL"... -
Seite 126: Application Functions
14 Application Functions 14.1 Parts counting With parts counting you can either count parts into a container or remove parts from a container. To count a greater number of parts the average weight per part has to be determined with a small quantity (reference quantity). The larger the reference quantity, the higher the counting exactness. -
Seite 127: Percent Determination
Remove reference weight. Now you can fill the items to be counted into the container. The respective quantity is shown in the display. Repeated pressing of the [UNIT] key changes the display value, e. g.: [g] → [%] → [Pcs] → [ct] Note: Error message "Err 20"... -
Seite 128: Density Determination
14.3 Density determination Density determination with the help of the flush-mounted platform facility is described in the following. Density determination becomes even easier when an optional set for density deter- mination is applied. For further information please refer to the operating instructions enclosed with the set for density determination. -
Seite 129: Determining Density Of Liquids
Repeatedly press the [UNIT] key until the balance is in density determination mode for solids ",d". Note that “g” also appears dur- ing weight measurement in air. Press the [TARE] key. Place the item to be measured on the weighing pan. When standstill control is complete, press the [CAL] key Place the item to be measured on the immersed hanging weighing pan. - Seite 130 Repeatedly press the [UNIT] key until the balance is in density determination mode for liquids "d". Note that “g” also appears dur- ing weight measurement in air. Press the [TARE] key. Place the body to be immersed on the weighing pan. When standstill control is complete, press the [CAL] key Immerse the body to be immersed without bubbles developing.
-
Seite 131: Auto Print
14.4 Auto Print Using Auto Print allows measurement results to be automatically output via the RS- 232C interface without pressing the [PRINT] key individually with every measure- ment. An issue will be made after standstill control ( ) is complete. The next meas- urement is done after removing the items from the weighing plate and the display is returning to a value within the ±3-fold of the zero range. -
Seite 132: Add Up Mode
14.5 Add up mode An optional number of single weighing processes are automatically added up to a total sum, e.g. all single weighing processes of a batch or if you have to carry out a great number of measurements of small samples. When the standstill control ( ) is complete the weighing value is automatically is- sued to the optional printer. - Seite 133 Confirm your selection by pressing the [TARE] key. Printout "---- ---- ADDON MODE ---------" takes place. To exit the function, press the [ON/OFF] key. Brief actuation of ON/OFF key: Back to previous menu. Long actuation of ON/OFF key: Back to weighing mode. Whilst the add-on function is active, the display keeps showing the add-on symbol [ Add up: Operation...
-
Seite 134: Recipe Mode
Printout: ---ADDON Mode--- CMP001= 5,0003 g CMP002= 5,0017 g CMP003= 5,0010 g TOTAL= 15,0030 g Note: Only one function at a time may be activated (on) when working with func- tions auto print, add-on and recipe. Whilst the function is active, automatic adjustment (PSC/Clock-CAL) does not take place. - Seite 135 Place further components 0.4488 g When the last single weighing process is complete press 1.5271 g [ON/OFF] key to receive the total sum (Total). Remove weight from weighing plate. The balance is now ready for further measurements. Printout: ---Formulation Mode--- CMP001= 0,5361 g CMP002=...
-
Seite 136: Data Output
15 Data output 15.1 RS 232C interface Pin allocation of balance output plug: PIN No. Signal 15.2 Data Formats Note: space character and DL the delimiter code. 1. Input Data Format COMMAND CODE + DL (see 15.2.3) 2. Output data format ... -
Seite 137: Remote Control Instructions
15.3 Remote control instructions Attention: Inputting characters and command codes not shown here into the balance may not only alter the previous settings but may also impair proper measurement. If by mistake characters or commands not shown here are entered into the balance, immediately unplug the power supply cable and wait about ten seconds before plug- ging again. -
Seite 138: Standard Settings
(see 15.5) KERN– iF:USEr 1200 None (8) YKB-01N Selecting one of standard Settings: Repeatedly press the [CAL] key until "intFACE" appears. Press [TARE] key Repeatedly press the [CAL] key until the desired standard setting appears. -
Seite 139: User Settings
15.5 User Settings The user setting allows individual setting for each item in communication settings. Repeatedly press the [CAL] key until "intFACE" appears. Press [TARE] key Repeatedly press the [CAL] key until "iF:USEr" appears. Press [TARE] key (Example) Use the [CAL] key to select between the following settings (The **** reflect the current setting, two to four characters): “io.b:****”... -
Seite 140: Communication Speed Settings
15.5.1 Communication speed settings 1. The display changes from “io.b:****” to “b-300”. Pressing the [CAL] key changes the display. The standstill display ( ) marks the current setting. b-300 b-600 b-1200 b-2400 b-4800 Display during setting 300bps 600bps 1200bps 2400bps 4800bps Setting specifics Baud Rate... -
Seite 141: Stop Bit Settings
15.5.4 Stop bit settings 1. The display changes from “io.S:****” to “S-S1”. Pressing the [CAL] key changes the display. The standstill display ( ) marks the current setting. S-S1 S-S2 Display during setting Stop bit, 1 bit Stop bit, 2bit Setting specifics 2. -
Seite 142: Service, Maintenance, Disposal
Spilled weighing goods must be removed immediately. 16.2 Service, maintenance The appliance may only be opened by trained service technicians who are author- ized by KERN. Before opening, disconnect from power supply. 16.3 Disposal Disposal of packaging and appliance must be carried out by operator according to valid national or regional law of the location where the appliance is used. -
Seite 143: Instant Help
17 Instant help In case of an error in the program process, briefly turn off the balance and discon- nect from power supply. The weighing process must then be restarted from the be- ginning. Error code table: Error code display Explication Remedy High zero point shift dur-... - Seite 144 Attempting to measure volatile sub- Measure with a lid on it. stances The weighed item is electrically Measure in a metal contain- charged. er. Measure with a metal object larger than the items. Sample temperature and tempera- Measure at the same tem- ture inside weighing space differ.
- Seite 146 KERN ABT Version 1.2 02/2013 Mode d'emploi Balance d’analyse Sommaire Caractéristiques techniques ................. 4 Déclaration de conformité ................7 Vue d’ensemble du clavier et des affichages ..........8 V ue d’ens emble du c lavier ...................... 8 V ue d’ens emble des affic hages .................... 10 Indications fondamentales (généralités) ...........
- Seite 147 10.3.1 Impression de la date et de l’heure, sans valeur pondérale ..........33 Opérations de base ..................34 11.1 P es age ............................. 34 11.2 T arage ............................34 11.3 C ommutation de l’affic hage ....................35 11.4 C ommutation de la gamme de pes ée ................... 36 11.5 Modific ation de la lis ibilité...
-
Seite 148: Caractéristiques Techniques
1 Caractéristiques techniques KERN ABT 100-5M ABT 120-4M Lisibilité (d) 0,01 mg 0,1 mg Plage de pesée (max) 101 g 120 g Charge minimale (Min) 1 mg 10 mg Echelon de vérification (e) 1 mg 1 mg Classe d’étalonnage Reproductibilité... - Seite 149 KERN ABT 220-4M ABT 320-4M Lisibilité (d) 0,1 mg 0,1 mg Plage de pesée (max) 220 g 320 g Charge minimale (Min) 10 mg 10 mg Echelon de vérification (e) 1 mg 1 mg Classe d’étalonnage Reproductibilité 0,1 mg 0,1 mg Linéarité...
- Seite 150 KERN ABT 120-5DM ABT 220-5DM Lisibilité (d) 0,01/0,1 mg 0,01/0,1 mg Plage de pesée (max) 42 g/120 g 82 g/220 g Charge minimale (Min) 1 mg 1 mg Echelon de vérification (e) 1 mg 1 mg Classe d’étalonnage Reproductibilité ± 0,02/0,1 mg ±...
-
Seite 151: Déclaration De Conformité
EN 61010-1: 2010 27.03.2013 Datum Signatur Date Signature 72336 Balingen Albert Sauter Ort der Ausstellung KERN & Sohn GmbH Place of issue Geschäftsführer Managing director KERN & Sohn GmbH, Ziegelei 1, D-72336 Balingen, Tel. +49-[0]7433/9933-0 Fax +49-[0]7433/9933-149, E-Mail: info@kern-sohn.com, Internet: www.kern-sohn.com ABT-BA-f-1312... -
Seite 152: Vue D'ensemble Du Clavier Et Des Affichages
3 Vue d’ensemble du clavier et des affichages 3.1 Vue d’ensemble du clavier en mode de pesage: Désigna- Touche pressée une fois et Touche maintenue au moins trois se- Touche relâchée tion condes Bascule entre le mode opéra- Allume/éteint le signal sonore des [ON/OFF] tion et le mode standby. - Seite 153 dans le menu: Désigna- Touche maintenue au moins Touche Touche pressée une fois et relâchée tion trois secondes Retour au menu Retour en mode de pesage [ON/OFF] Sélection du menu [CAL] Sélection des paramètres [TARE] Mémorisation des réglages Mémorisation de valeurs numériques. Augmente d’une unité la valeur numéri- [UNIT] que de la décade clignotante.
-
Seite 154: Vue D'ensemble Des Affichages
3.2 Vue d’ensemble des affichages Affichage de capacité Affichage d’unité Ecran Désignation Description Indique que la valeur pesée est stable. Marque le réglage actuel Affichage d’arrêt en cours de sélection de l’élément de menu Apparaît en cours d’ajustage. Clignote avant le départ de l’ajustage automatique. -
Seite 155: Indications Fondamentales (Généralités)
La balance ne doit être utilisée que selon les prescriptions indiquées. Les domaines d´utilisation/d´application dérogeant à ces dernières doivent faire l´objet d´une auto- risation écrite délivrée par KERN. 4.3 Garantie La garantie n´est plus valable en cas •... -
Seite 156: Érific Ation Des Moyens De C Ontrôle
5.1 Observez les indications du mode d´emploi Lisez attentivement la totalité de ce mode d´emploi avant l´installation et la mise en service de la balance, et ce même si vous avez déjà utilisé des balances KERN. 5.2 Formation du personnel L´appareil ne doit être utilisé... -
Seite 157: Emballage / Réexpédition
6.2 Emballage / réexpédition Conservez tous les éléments de l’emballage d’origine en vue d’un éventuel transport en retour. L´appareil ne peut être renvoyé que dans l´emballage d´origine. Avant expédition démontez tous les câbles branchés ainsi que toutes les pièces détachées et mobiles. ... - Seite 158 ABT-BA-f-1312...
-
Seite 159: Déballage, Installation Et Mise En Service
7 Déballage, installation et mise en service 7.1 Lieu d´installation, lieu d´utilisation La balance a été construite de manière à pouvoir obtenir des résultats de pesée fia- bles dans les conditions d´utilisation d´usage. Vous pouvez travailler rapidement et avec précision à condition d´installer votre ba- lance à... -
Seite 160: Fournitures
7.2.1 Fournitures Accessoires série: Balance Plateau de pesée Support du plateau de pesée Ecran statique Adaptateur réseau Housse pour câble de l’adaptateur Capot de protection de travail Mode d'emploi ABT-BA-f-1312... -
Seite 161: Implantation
7.2.2 Implantation • Attachez le support du câble de l’adaptateur. Décollez la feuille adhé- sive de protection du support du câ- ble de l’adaptateur, et collez le sur l’arrière de la balance comme le montre l’illustration. • Monter dans l’ordre le support du pla- teau de la balance, le plateau de la balance et l’écran statique H.T. -
Seite 162: Branchement Secteur
L´alimentation en courant s´effectue au moyen du bloc externe d´alimentation sec- teur. La valeur de tension imprimée sur l´appareil doit concorder avec la tension lo- cale. N´utilisez que des blocs d´alimentation secteur livrés par KERN. L´utilisation d´autres marques n´est possible qu´avec l´autorisation de KERN. 7.4 Raccordement d’appareils périphériques Avant le raccordement ou le débranchement d´appareils supplémentaires (impriman-... -
Seite 163: Première Mise En Service
7.5 Première mise en service Un temps de chauffe de 4 heures intervenant après la mise en marche stabilise les valeurs de mesure. La précision de la balance dépend de l´accélération due à la pesanteur. Il est impératif de tenir compte des indications du chapitre Ajustage. 7.5.1 Mise sous tension 1. -
Seite 164: Ajustage
8 Ajustage Etant donné que la valeur d´accélération de la pesanteur varie d´un lieu à l´autre sur la terre, il est nécessaire d´adapter chaque balance – conformément au principe physique fondamental de pesée – à l´accélération de la pesanteur du lieu d´installation (uniquement si la balance n´a pas déjà... -
Seite 165: Fonction Psc On/Off
8.1.1 Fonction PSC ON/OFF Appuyez à plusieurs reprises sur la touche [CAL] jusqu’à ce que "SettinG" apparaisse. Appuyer sur la touche [TARE]. L’affichage indique “CAL dEF”. Appuyez à plusieurs reprises sur la touche [CAL] jusqu’à ce que le réglage actuel "PSC:∗∗" Pour commuter le réglage, vous devez appuyer sur la touche [TARE], dès que "... -
Seite 166: Ajustage Automatique Par Clock-Cal
8.2 Ajustage automatique par Clock-CAL (uniquement sur les modèles ABT 100-5M, ABT 120-5DM, ABT 220-5DM) La balance peut être réglée de manière à ce qu’elle exécute au moyen de son poids interne et de son horloge incorporée un ajustage automatique à des heures définies (jusqu’à... -
Seite 167: Paramétrer L'heure Du Clock-Cal
8.2.1 Paramétrer l’heure du Clock-CAL Appuyez à plusieurs reprises sur la touche [CAL] jusqu’à ce que "SettinG" apparaisse. Appuyer sur la touche [TARE]. L’affichage indique “CAL dEF”. Pressez la touche [CAL] plusieurs fois jusqu’à ce que “tCAL t*” apparaisse. (pour réglage 1) Appuyez sur la touche [TARE] de sorte que "t*HH:MM"... -
Seite 168: Ajustage Par Procédé Préréglé
8.3 Ajustage par procédé préréglé Vous pouvez faire démarrer une procédure d’ajustage sans passer par le menu. La procédure d’ajustage peut être exécutée par simple appel de la touche [CAL] , suivie de [ TARE ], à partir du mode de pesage 8.3.1 Sélection du procédé... -
Seite 169: Préréglage: Ajustage Avec Un Poids Interne
8.3.2 Préréglage: Ajustage avec un poids interne Condition préliminaire: La fonction "i tCAL" est activée (voir au chap. 8.3.1) Appuyez sur la touche [CAL]. “i-CAL” apparaît. Appuyer sur la touche [TARE]. L’affichage change successive- ment dans cet ordre : “CAL 2”, “CAL 1”, “CAL 0”, et “CAL End”. Une fois l’ajustage correctement réalisé... -
Seite 170: Préréglage: Test D'ajustage Avec Poids Externe
8.3.4 Préréglage: Test d’ajustage avec poids externe Condition préliminaire: La fonction "E tESt" est activée (voir au chap. 8.3.1) Appuyez sur la touche [CAL]. Sur l’affichage apparaît "E-tESt". Appuyer sur la touche [TARE]. Le contrôle démarre et l’affichage du zéro clignote (Veillez à ce qu’il n’y ait aucun objet sur le pla- teau de la balance). -
Seite 171: Exécution De Procédés D'ajustage Alternatifs
8.4 Exécution de procédés d’ajustage alternatifs Ici vous lancez l’ajustage par la sélection d’un réglage dans le menu. 8.4.1 Ajustage avec un poids interne Appuyez à plusieurs reprises sur la touche [CAL] jusqu’à ce que "FUnC.SEL" apparaisse. Appuyer sur la touche [TARE]. "CAL" est affiché. Appuyer sur la touche [TARE]. -
Seite 172: Ajustage Avec Un Poids Interne
8.4.2 Ajustage avec un poids interne Pendant le test d’ajustage, la balance compare la valeur enregistrée du poids d’ajustage avec la valeur réelle. Une seule vérification est effectuée, c’est à dire qu’aucune valeur ne se voit modifiée. Appuyez à plusieurs reprises sur la touche [CAL] jusqu’à ce que "FUnC.SEL"... -
Seite 173: Test D'ajustage Avec Poids Externe
8.4.3 Test d’ajustage avec poids externe Appuyez à plusieurs reprises sur la touche [CAL] jusqu’à ce que "FUnC.SEL" apparaisse. Appuyer sur la touche [TARE]. "CAL" est affiché. Appuyer sur la touche [TARE]. "E CAL" est affiché. Appuyez à plusieurs reprises sur la touche [CAL] jusqu’à ce que "i tESt"... -
Seite 174: Vérification
9 Vérification Généralités: D´après la directive UE 90/384/CEE, les balances doivent faire l´objet d´un vérification lorsqu´elles sont utilisées tel qu´indiqué ci-dessous (domaine régi par la loi): a) Dans le cadre de relations commerciales, lorsque le prix d´une marchandise est déterminé par pesée. b) Dans le cas de la fabrication de médicaments dans les pharmacies ainsi que pour les analyses effectuées dans les laboratoires médicaux et pharmaceutiques. -
Seite 175: Consignation Dans Un Protocole Iso/Glp
Clock-CAL (voir au chap. 8.2) sont réalisés de façon entièrement automatique des ajustages périodiques et établis les protocoles. D’abord faire les réglages comme décrit dans le chap. 15.4 sous „KERN-YKB-01N“. Ensuite l’impression de protocole peut être réglée comme suit: Appuyez à... -
Seite 176: Paramétrage De L'identification De La Balance
10.2 Paramétrage de l’identification de la balance Ce paramétrage permet d’inclure un numéro d’identification de balance au rapport de calibrage. Appuyez à plusieurs reprises sur la touche [CAL] jusqu’à ce que "SettinG" apparaisse. Appuyer sur la touche [TARE]. L’affichage indique “CAL dEF”. Appuyez à... -
Seite 177: Réglage De L'édition De La Date
10.3 Réglage de l’édition de la date Ce paramétrage détermine si la date et l’heure données à la balance par l’horloge incorporé sont imprimés avec le rapport ou non. Appuyez à plusieurs reprises sur la touche [CAL] jusqu’à ce que "SettinG"... -
Seite 178: Opérations De Base
11 Opérations de base 11.1 Pesage Nota: Un temps de préchauffage de 1 heure voire de 4 heures (pour les modèles d = 0,01 mg) est nécessaire pour la stabilisation. Mettez la balance en marche sur la touche [ON/OFF] La balance effectue un contrôle automatique. -
Seite 179: Commutation De L'affichage
11.3 Commutation de l’affichage Appuyez à plusieurs reprises sur la touche [UNIT] pour commuter l’affichage entre mode d’unités activées, pourcentage d’unités comptées et mode de détermination de la densité. Le réglage effectué à l’usine vous donne les possibilités suivantes: [g] → [%] → [Pcs] → [ct] → [g] → … Tous les réglages doivent être activés dans le menu : Appuyez à... -
Seite 180: Commutation De La Gamme De Pesée
11.4 Commutation de la gamme de pesée (uniquement sur les modèles ABT 100-5M, ABT 120-5DM, ABT 220-5DM) Dés que sur les modèles ABT 120-5DM et ABT 220-5DM l’alimentation en courant est branchée et en marche, ces appareils sont commutés sur la "plage inférieure" avec une lisibilité... -
Seite 181: Pesage En Sous-Sol
11.6 Pesage en sous-sol Grâce au pesage en sous-sol il est possible de peser des objets, qui par suite de leurs dimensions ou de leur forme ne peuvent pas être posés sur le plateau de la balance. Procédez de la manière suivante: •... -
Seite 182: Le Menu
12 Le menu Le menu d'exploitation de la balance permet d’adapter les propriétés de la balance à vos besoins. A l’usine le menu d'exploitation de la balance est réglé de sorte à ce que vous n’ayez pas à apporter de modification en règle générale. Si vous avez des conditions de mise en œuvre particulières, vous réglez votre balance individuelle- ment en fonction de vos souhaits sur le menu d'exploitation de la balance. -
Seite 183: Affichage Du Menu
12.3 Affichage du menu Essayez tout d’abord de modifier par vous-même une fonction. Modifiez la fonction "zéro automatique" en passant d’abord en OFF et ensuite de nouveau en ON. mettez la balance en marche sur la touche [ON/OFF] appuyez sur la touche CAL jusqu’à ce que "FUnC.SEL" apparaisse. ... -
Seite 184: Sélection Du Menu Principal
12.4 Sélection du menu principal en mode de pesage appuyez sur la touche [CAL]. La première fonction "i-Cal" (exemple) apparaît. en continuant à enclencher la touche [CAL], on peut faire défiler les différen- tes fonctions du menu. Mode de pesage Procédure d’ajustage préréglée par (voir au chap. -
Seite 185: Aperçu Des Menus
12.5 Aperçu des menus * = réglé en usine ABT-BA-f-1312... - Seite 186 ABT-BA-f-1312...
- Seite 187 ABT-BA-f-1312...
-
Seite 188: Errouillage Du Menu
12.6 Verrouillage du menu Les opérations de paramétrage du menu peuvent être verrouillées afin d’éviter des changements de paramètres non souhaités. Cela est appelé verrouillage de menu. Le verrouillage de menu se configure de la manière suivante. Mettez en marche l’alimentation en courant de la balance et at- tendez l’apparition de "oFF". -
Seite 189: Affichage De Contrôle Des Paramètres
12.8 Affichage de contrôle des paramètres Pour obtenir une confirmation des réglages actuels, appuyez à plusieurs reprises sur la touche [CAL] en mode de pesage jusqu’à ce que "St. b1 t" (exemple) apparaisse. Apparaît lorsque l’ajustage automatique est mis Apparaît lorsque l’édition des données en marche par PSC ou Clock-CAL. -
Seite 190: Description Des Différentes Fonctions
13 Description des différentes fonctions 13.1 Filtre de stabilité En général, le traitement de données pour une stabilité plus élevée réduit le temps de réponse et le traitement de données pour une réponse plus courte réduit la stabi- lité. Les balances de la série ABT sont cependant conçues de telle façon qu’elles assurent les deux propriétés, à... -
Seite 191: Mode Anti-Convection
13.1.2 Mode anti-convection Si des mesures doivent être effectuées dans des conditions ambiantes inévitables (p. ex. air conditionné en commutation), la convection intervenant dans l’espace de pesage peut engendrer des fluctuations dans l’affichage de la balance après l’apparition de l’affichage de stabilité. La petite gamme (affichage minimal de 0.01mg) des séries AUW-D est la plus enclin à... -
Seite 192: Mode Dosage
13.1.4 Mode dosage Recourez à cette fonction si vous voulez accélérer la vitesse d’affichage, p. ex. pour le dosage. Prenez cependant en compte que la balance va réagir de fa- çon très sensible aux conditions environnementales. Le degré de sensibilité peut être réglé... -
Seite 193: Affichage D'arrêt
13.2 Affichage d’arrêt Lorsque l’affichage de la stabilité ( ) apparaît sur l’affichage, la balance se trouve dans un état stable. La condition pour juger la stabilité est choisie par l’utilisateur. Vous avez le choix entre trois degrés: 1 compte, 5 comptes et 10 comptes. à l’usine le réglage est pour un comptage 1. -
Seite 194: Auto-Zero
13.3 Auto-Zero Cette fonction permet d’équilibrer automatiquement de petites fluctuations de poids. Dans le cas où de petites quantités des matières à peser sont retirées ou ajoutées, le dispositif de « compensation de stabilité » intégré dans la balance peut provoquer l´affichage de résultats de pesée erronés. -
Seite 195: Réglage De La Date
13.4 Réglage de la date Appuyez à plusieurs reprises sur la touche [CAL] jusqu’à ce que "SettinG" apparaisse. Appuyer sur la touche [TARE] Appuyez à plusieurs reprises sur la touche [CAL] jusqu’à ce que "d-MM.DD" apparaisse (MM et DD sont respectivement 2 déca- des, qui indiquent le mois et le jours). -
Seite 196: Réglage De L'heure
13.5 Réglage de l’heure Les balances de la série ABT sont équipées d’une horloge intégrée. Mettez l’horloge à l’heure avant d’utiliser les fonctions Clock-CAL (chap. 8.2) ou protocole GLP (chap. 10). Notez que l’heure courante est affichée dans le mode d’attente (chap. 7.5.1). Appuyez à... -
Seite 197: Affichage De Capacité
13.6 Affichage de capacité Cette fonction affiche une représentation graphique en barre de la charge du plateau de pesée. Cela peut être utile pour prévenir l’apparition de “oL” (surcharge) pendant une mesure. La reproduction de l’affichage de la capacité peut être activée ou désactivée. Appuyez à... -
Seite 198: Fonctions D'application
14 Fonctions d’application 14.1 Comptage de pièces Lors du comptage de pièces, il vous est possible, soit d’additionner le nombre de pièces placées dans un récipient, soit de soustraire le nombre de pièces retirées d’un récipient. Afin de pouvoir compter une quantité importante de pièces, le poids moyen par pièce doit être déterminé... -
Seite 199: Détermination Du Pourcentage
Oter le poids de référence. Vous pouvez maintenant poser dans le récipient les pièces à compter. Le nombre de pièces correspondant s’affiche à l’écran de visua- lisation. En appuyant à différentes reprises sur la touche [UNIT] on permute la valeur affichée p. ex. : [g] → [%] → [Pcs] → [ct] Nota: En cas de message d’erreur "Err 20"... -
Seite 200: Détermination De La Densité
14.3 Détermination de la densité Dans ce qui suit est décrite la détermination de la densité au moyen de l’installation de pesage en sous-sol. La détermination de la densité est encore bien plus simple au moyen d’un kit en op- tion pour la détermination de la densité. -
Seite 201: Détermination De La Densité De Liquides
Appuyez à plusieurs reprises sur la touche [UNIT] jusqu’à ce que l’affichage se trouve en mode de détermination de la densité des corps solides ",d" . Notez que “g” apparaît également pendant la mesure du poids dans l’air. Appuyer sur la touche [TARE] Placez l’objet à mesurer sur le pla- teau de pesée. - Seite 202 Appuyez à plusieurs reprises sur la touche [UNIT] jusqu’à ce que la balance se trouve en mode de détermination de la densité des corps liquides ",d" . Notez que “g” apparaît également pendant la mesure du poids dans l’air. Appuyer sur la touche [TARE] Posez le corps plongeant sur le plateau de la balance.
-
Seite 203: Impression Automatique (Auto-Print)
14.4 Impression automatique (Auto-Print) L’utilisation de l’impression automatique permet l’impression automatique de don- nées par l’interface RS-232C sans devoir presser la touche [PRINT] à chaque mesu- re. L’édition s’effectue après le contrôle de la stabilité ( ). La mesure suivante est effectuée après avoir retiré... -
Seite 204: Mode De Totalisation
14.5 Mode de totalisation Un nombre au choix de pesées individuelles est automatiquement additionné en une somme totale, par exemple toutes les pesées d’un lot de fabrication ou si vous devez faire de nombreuses mesures de très petits échantillons. Après contrôle de la stabilité ( ) la valeur pesée est automatiquement éditée sur l’imprimante en option. - Seite 205 Confirmez votre sélection sur la touche [TARE]. l’édition impri- mée "-------- ADDON MODE ---------" a lieu. La touche [ON/OFF] vous permet de quitter la fonction. Bref appel de la touche ON/OFF: Retour dans le menu précédent. Appel prolongé de la touche ON/OFF: Retour en mode de pesage.
-
Seite 206: Mode Recette
Edition imprimée: ---ADDON Mode--- CMP001= 5,0003 g CMP002= 5,0017 g CMP003= 5,0010 g TOTAL= 15,0030 g Nota: pour les trois fonctions Auto-Print, totalisation et recette, une seule fonc- tion est susceptible d’être activée (on) à la fois. dans le cas de l’activation d’une fonction, l’ajustage automatique (PSC/Clock-CAL) n’est pas réalisé. - Seite 207 Ajout d’autres composants 0.4488 g A la fin de la dernière pesée individuelle apparaît la somme totale (TOTAL) sur pression de la touche 1.5271 g [ON/OFF] Oter le poids du plateau de pesée. La balance est prête pour d’autres mesures. Edition imprimée: ---Formulation Mode--- CMP001=...
-
Seite 208: Sortie Des Données
15 Sortie des données 15.1 Interface RS 232C Attribution des broches du connecteur de sortie de la balance: N°- broche Signal 15.2 Formats de données Nota: est le code des espaces et DL le code des délimiteurs de terminaison. 1. -
Seite 209: Commandes À Distance
15.3 Commandes à distance Attention: La saisie dans la balance de caractères et de codes qui ne sont pas indiqués ici peut modifier les paramètres précédents et également causer des mesures erronées. Si des caractères et de codes qui ne sont pas indiqués ici sont saisis par erreur dans la balance, débranchez immédiatement le câble d’alimentation et attendez environ 10 secondes avant de le rebrancher. -
Seite 210: Paramètres Standard
(voir 15.5) l’opérateur l’opérateur l’opérateur l’opérateur l’opérateur l’opérateur KERN – Aucune iF:USEr 1200 YKB-01N Sélection d’un des paramètres standard : Appuyez à plusieurs reprises sur la touche [CAL] jusqu’à ce que "intFACE" apparaisse. Appuyez sur la touche [TARE] . -
Seite 211: Paramètres Utilisateur
Appuyez à plusieurs reprises sur la touche [ON/OFF] . La balance se replace en mode de pesée. 15.5 Paramètres utilisateur Les paramètres utilisateur permettent de paramétrer individuellement chaque objet des paramètres de communication. Appuyez à plusieurs reprises sur la touche [CAL] jusqu’à ce que "intFACE"... -
Seite 212: Paramétrage De La Vitesse De Communication
15.5.1 Paramétrage de la vitesse de communication 1. L’affichage change de “io.b:****” à “b-300”. Presser la touche [CAL] change l’affichage. L’affichage d’arrêt ( ) marque le réglage actuel. Affichage pendant le b-300 b-600 b-1200 b-2400 b-4800 paramétrage 300bps 600bps 1200bps 2400bps 4800bps Spécifications du pa-... -
Seite 213: Paramètres De L'octet D'arrêt
15.5.4 Paramètres de l’octet d’arrêt 1. L’affichage change de “io.S:****” à “S-S1”. Presser la touche [CAL] change l’affichage. L’affichage d’arrêt ( ) marque le réglage actuel. Affichage pendant le S-S1 S-S2 paramétrage Octet d’arrêt, 2 oc- Spécifications du pa- Octet d’arrêt, 1 octet tets ramètre 2. -
Seite 214: Maintenance, Entretien, Élimination
Retirer immédiatement les matières à peser renversées sur la balance. 16.2 Maintenance, entretien L´appareil ne doit être ouvert que par des dépanneurs formés à cette fin et ayant reçu l´autorisation de KERN. Avant d´ouvrir l´appareil, couper ce dernier du secteur. 16.3 Elimination L´élimination de l´emballage et de l´appareil doit être effectuée par l´utilisateur selon... -
Seite 215: Aide Succincte En Cas De Panne
17 Aide succincte en cas de panne En cas d´anomalie dans le déroulement du programme, la balance doit être arrêtée pendant un court laps de temps et coupée du secteur. Le processus de pesée doit alors être recommencé depuis le début. Tableau des codes d'erreurs: Code d’erreur affiché... - Seite 216 Tentative de mesurer des substan- Couvrir les substances avec ces volatiles. un couvercle. L’objet pesé est chargé électrique- Mesurez dans un récipient ment. métallique. Mesurez avec un objet métallique plus grand que l’échantillon. La température de l’échantillon et la Mesurez à la même tempé- température à...