Inhaltsverzeichnis
Werbung
Verfügbare Sprachen
Verfügbare Sprachen
Quicklinks
VDPL3
V
A
LISON I
A
LISON I
A
LISON I
A
LISON I
A
LISON I
US
SER MAN
GE
EBRUIKER
NO
OTICE D'E
MA
ANUAL D
BE
EDIENUN
Downloaded from
www.Manualslib.com
3603
MHW
W11
I - 36 x
3W LED
Ds - DMX
I - 36 x
3W LED
Ds - DMX
I - 36 LE
EDs DE
3W - PI
I - 36 LE
EDs DE
3W - CO
I - 36 x
3W LED
Ds - DMX
UAL
RSHANDL
LEIDING
EMPLOI
EL USUAR
RIO
GSANLEIT
TUNG
manuals search engine
X CONT
ROLLED
D
X GESTU
UURD
ILOTAG
E DMX
ONTROL
L DMX
X-GEST
EUERT
4
4
8
13
18
23
Werbung
Inhaltsverzeichnis

Verwandte Anleitungen für HQ Power ALISON I


Inhaltszusammenfassung für HQ Power ALISON I
- Seite 1 VDPL3 3603 LISON I I - 36 x 3W LED Ds - DMX X CONT ROLLED LISON I I - 36 x 3W LED Ds - DMX X GESTU UURD LISON I I - 36 LE EDs DE 3W - PI ILOTAG E DMX LISON I...
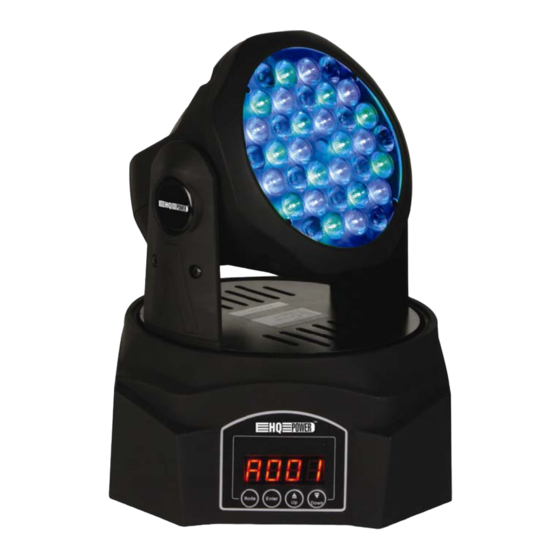
- Seite 2 VDPL3603MHW11 1 moving head 2 yoke 3 carrying handle 4 control buttons 5 display 6 base 1 moving head 2 draagjuk 3 handvat 4 bedieningstoetsen 5 display 6 voet projecteur lyre moving head 1 Moving Head palanche yugo 2 Joch poignée empuñadura 3 Griff...
- Seite 3 VDPL3603MHW11 terminator eindweerstand résistance de terminaison terminación Terminierung How to turn the controller line from 3-pins into 5-pins (plug and socket). Controller line van 3-pin naar 5-pin aanpassen (stekker en contact). Modifier la ligne du contrôleur de 3 broches en 5 broches (fiche et contact). Modificar la línea del controlador de 3 polos y 5 polos (conector y contacto).
- Seite 4 PL3603MHW er man nual . Introdu uction o all residen nts of the E European Un nion mportant en nvironment tal informat tion about t this produc This symbol on th he device or r the packag e indicates t that disposa l of the devi ce after its l...
- Seite 5 PL3603MHW . Genera al Guideli ines fer to the Ve elleman® S Service and d Quality W Warranty on the last pag ges of this m manual. Indoor us e only. Kee p this device e away form m rain, moistu ure, splashin ng and dripp ping liquids.
-
Seite 6: Operation
VDPL3603MHW11 b. DMX-512 connection • When applicable, connect an XLR cable to the female 3-pin XLR output of a controller (not incl.) and the other side to the male 3-pin XLR input [9] of the VDPL3603MHW11. Multiple VDPL3603MHW11’s can be linked through serial linking. - Seite 7 VDPL3603MHW11 function display description play <PLAY> <At01> auto program 1-2 <At02> <Sn01> sound controlled mode 1-2 <Sn02> <dnCo> DMX controlled mode <SLAE> slave mode manual <Man> <CH01> <d000> Select the setting for each channel. control <CH12> <d255> display <dISP> <No> normal display <Yes>...
- Seite 8 PL3603MHW o function function ed LEDs mmer 100% -> 0% reen LEDs mmer 100% -> 0% lue LEDs mmer 100% -> 0% . Cleanin ng and m maintena • The interna al circuit is p protected by y a 250V/500 0mA, 5 x 20 mm fuse [8 8].
-
Seite 9: Algeme Ene Richt
PL3603MHW BELANGRI JKE WAARS SCHUWING einig dit toe estel regelm matig. Verw wijder alle s stof binnen nin het toes stel en houd d de entilatieope eningen sch hoon. eef bovenst aande veili igheidsinst ructies na v voor elk ge ebruik. - Seite 10 VDPL3603MHW11 • De garantie geldt niet voor schade door het negeren van bepaalde richtlijnen in deze handleiding en uw dealer zal de verantwoordelijkheid afwijzen voor defecten of problemen die hier rechtstreeks verband mee houden. • Laat dit toestel installeren en onderhouden door een geschoolde technicus. •...
- Seite 11 VDPL3603MHW11 • Sluit het toestel via de stekker aan op het lichtnet. Alle toestellen moet via een geaard stopcontact gevoed worden en mogen niet via een variabele weerstand of dimcircuit gevoed worden, ook al gebruikt u de variabele weerstand of het dimcircuit als een 0% tot 100% inschakeling. •...
-
Seite 12: Reiniging En Onderhoud
VDPL3603MHW11 c. DMX-sturing Sturing van het toestel via een universele DMX-controller. • Alle DMX-gestuurde toestellen hebben een digitaal startadres nodig, zodat het juiste toestel reageert op de signalen. Dit digitale startadres is het kanaalnummer van waarop het toestel ‘luistert’ naar het signaal van de DMX controller. - Seite 13 PL3603MHW • Verwijder regelmatig h het stof van de behuizing g en de vent tilatieopenin gen met een n vochtige d oek. • U mag gee en onderdele en vervangen n. Raadpleeg g uw erkend de verdeler v voor eventue ele reserveon nderdelen.
- Seite 14 PL3603MHW rder hors de la portée de e personnes non qualifié ées et de jeu unes enfants tention : le boîtier du sp pot chauffe p pendant l’us age. pas regard der directem ment dans la source lu umineuse a afin d’éviter les risques •...
-
Seite 15: Installation
VDPL3603MHW11 • plage de réglage étendue, angle horizontal de 540°, angle vertical de 270°, en mode 8/16 bits • effet stroboscopique 1-10Hz • fonction gradateur maître de 0-100%. 5. Installation a. Montage de l’appareil Risque de blessures. L’installation de cet appareil exige une solide expérience pratique : le calcul de la charge max. - Seite 16 VDPL3603MHW11 6. Emploi Se référer aux illustrations en page 2 de cette notice. a. Navigation dans le menu • Accéder aux fonctions en utilisant les quatre boutons-poussoirs [4] au bas de l’afficheur LED [5]. De gauche à droite : touche fonction <MODE>...
-
Seite 17: Nettoyage Et Entretien
VDPL3603MHW11 d. Valeurs DMX par canal canal fonction à description obturateur fermé obturateur/stroboscope stroboscope lent -> rapide variateur variateur maître, 0-100% blanc rouge orange jaune vert bleu clair couleur bleu magenta rose fonction transition de couleurs 1 rose fonction transition de couleurs 2 vitesse de transition de lent ->... - Seite 18 PL3603MHW N’e employer c cet appareil l qu’avec de es accesso ires d’origi ne. SA Vell eman ne se era aucune ement sponsable d de dommag ges ou lésio ons surven us à un usa age (incorr rect) de cet t appareil.
-
Seite 19: Instalación
PL3603MHW • Este apara ato pertenece e a la clase d de protecció ón I. Por lo ta anto, es ese ncial que el aparato esté é puesto a tierra. La c conexión elé ctrica debe llevarse a ca abo por un té écnico cualif ficado. - Seite 20 VDPL3603MHW11 • Respete la directiva EN 60598-2-17 y toda norma nacional antes de instalar el aparato. La instalación debe ser realizada por un técnico especializado. • El soporte donde irá el aparato, debe ser capaz de sostener 10 veces el peso de éste durante una hora, sin que se produzca una deformación de dicho soporte.
- Seite 21 VDPL3603MHW11 b. Funciones del menú principal función pantalla descripción modo de <Addr> <A001> Introduzca la dirección DMX inicial (entre 1 y 512). control DMX <A512> modo « pan » <PAn> <No> modo « pan » normal <Yes> inversión del movimiento « pan » modo «...
-
Seite 22: Limpieza Y Mantenimiento
VDPL3603MHW11 rosa cambio de color 1 rose cambio de color 2 velocidad de cambio lento -> rápido de color posición horizontal (127 = neutral) tilt posición vertical (127 = neutral) pan fino posición horizontal – ajuste fino tilt fino posición vertical – ajuste fino sin función sin función LEDs rojos... - Seite 23 PL3603MHW DIENUN NGSAN NLEITU . Einführ rung n alle Einwo ohner der E Europäische en Union ichtige Umw weltinform mationen üb ber dieses P Produkt Diese s Symbol au uf dem Produ ukt oder der Verpackung g zeigt an, d ass die Ents sorgung dies es Produkte...
-
Seite 24: Allgem Eine Rich Htlinien
PL3603MHW . Allgem eine Rich htlinien ehe Vellema an® Service e- und Qua alitätsgaran ntie am Ende e dieser Bed dienungsanle eitung. Verwenden n Sie das Ger rät nur im I Innenbereic ch. Schütze n Sie das Ge erät vor Reg en und Feuchte. - Seite 25 VDPL3603MHW11 • Montieren Sie das Gerät an einem Ort, an dem es wenig Vorübergehende gibt und der unzugänglich ist für Unbefugte. • Für Truss-Montage, verwenden Sie die geeignete Klemme (nicht mitgeliefert) und stecken Sie einen M10- Bolzen durch die Mitte der (gefalteten) Halterung. •...
- Seite 26 VDPL3603MHW11 Funktion Display Beschreibung Neigebewegung (tilt) <tilt> <No> Neigebewegung - normal <Yes> Neigebewegung - umgekehrt Abspielen <PLAY> <At01> autonomer Modus 1-2 <At02> <Sn01> musikgesteuerter Modus 1-2 <Sn02> <dnCo> DMX-Steuerung <SLAE> Slave-Modus manuelle Steuerung <Man> <CH01> <d000> Wählen Sie die Einstellung für jeden Kanal <CH12>...
-
Seite 27: Reinigung Und Wartung
VDPL3603MHW11 Farbwechsel- langsam -> schnell Geschwindigkeit Schwenkbewegung horizontale Bewegung (127 = neutral) (pan) Neigebewegung (tilt) vertikale Bewegung (127 = neutral) Schwenkbewegung horizontale Bewegung – kleine Schritte fein Neigebewegung fein vertikale Bewegung – kleine Schritte Ohne Funktion Ohne Funktion rote LEDs Dimmer 100% ->... - Seite 28 - defecten veroorzaakt door opzet, nalatigheid of door een onoordeelkundige behandeling, slecht onderhoud of abnormaal Velleman® Service and Quality Warranty gebruik of gebruik van het toestel strijdig met de voorschriften van Since its foundation in 1972, Velleman® acquired extensive de fabrikant. experience in the electronics world and currently distributes its - schade ten gevolge van een commercieel, professioneel of collectief products in over 85 countries.
- Seite 29 nur aufladbare, sondern auch nicht aufladbare, eingebaute oder ersetzbare), Lampen, Gummiteile, Treibriemen, usw. (unbeschränkte Garantía de servicio y calidad Velleman® Liste). Desde su fundación en 1972 Velleman® ha adquirido una amplia - Schäden verursacht durch Brandschaden, Wasserschaden, Blitz, experiencia como distribuidor en el sector de la electrónica en más de Unfälle, Naturkatastrophen, usw.