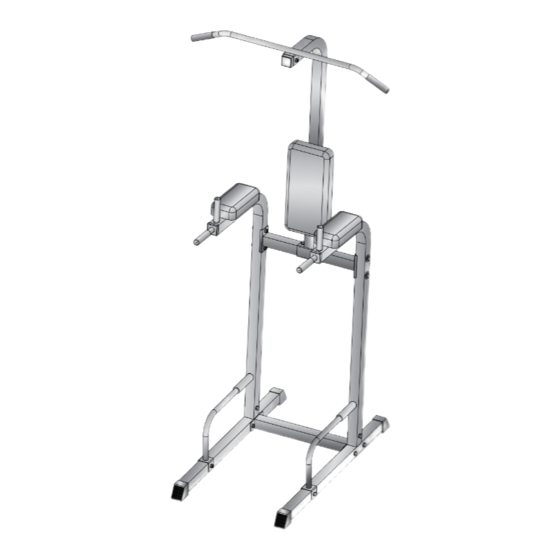
sportplus SP-HG-013 Bedienungsanleitung
Klimmzugstation
Inhaltsverzeichnis
Verfügbare Sprachen
Verfügbare Sprachen
Quicklinks
Kapitel
Inhaltsverzeichnis

Verwandte Anleitungen für sportplus SP-HG-013


Inhaltszusammenfassung für sportplus SP-HG-013
- Seite 1 Bedienungsanleitung Klimmzugstation InstructIon manual Pull-uP station SP-HG-013...
-
Seite 2: Inhaltsverzeichnis
Sehr geehrte Kundin, sehr geehrter Kunde, Wir gratulieren Ihnen zu Ihrem neuen SportPlus Produkt und sind überzeugt, dass Sie mit diesem Produkt zufrieden sein werden. Um eine stets optimale Funktion und Leistungsbereitschaft Ihres Produktes zu gewährleisten, haben wir eine Bitte an Sie: •... -
Seite 3: Vorsicht - Verletzungsgefahr
• Eltern und andere Aufsichtspersonen sollten sich ihrer Verantwortung bewusst sein, da aufgrund des natürlichen Spieltriebes und der Experimentierfreudigkeit der Kinder mit Situationen und Verhaltensweisen zu rechnen ist, für die die Trainingsgeräte nicht gebaut sind. • Wenn Sie das Produkt von einem Kind benutzen lassen, lassen Sie es mit dem Produkt nicht unbeaufsichtigt. -
Seite 4: Explosionszeichnung
3. EXPLOSIONSZEICHNUNG 15 12... -
Seite 5: Teileliste
4. TEILELISTE Beschreibung Anz. Rahmen Klimmzugstange Hauptrahmen (Rechts) Hauptrahmen (Links) Oberes Verbindungsrohr Unteres Verbindungsrohr Bodenstabilisator Liegestützgriffe Klimmzugstange Schaumstoffrolle Griffrohr Sechskantschraube M10x70mm Sechskantschraube M10x75mm Sechskantschraube M10x20mm Sechskantschraube M8x65mm M10 Nylon-Sicherungsmutter M10 Unterlegscheibe M8 Unterlegscheibe 50mm Endkappe 50mm Viereckiger Stopfen Handgriff Viereckiger Lochstopfen Rückenpolster Armpolster Benötigte Werkzeuge... - Seite 6 5. MONTAGEHINWEISE SCHRITT 1 • Befestigen Sie das untere Verbindungsrohr (4) mit den beiden Bodenstabilisatoren (5). Sichern Sie mit 4 Sätzen Sechskantschrauben (10), Nylon-Sicherungsmuttern (14) und 8 Unterlegscheiben (15).
- Seite 7 5. MONTAGEHINWEISE 12 15 10 15 14 15 SCHRITT 2 • Befestigen Sie die Hauptrahmen (2R&2L) an den Bodenstabilisatoren (5). Sichern Sie mit 6 Sätzen Sechskantschrauben (12) und Unterlegscheiben (15). • Befestigen Sie die beiden Liegestützgriffe (6) an den Hauptrahmen (2R&2L). Sichern Sie mit 2 Sätzen Sechskantschrauben (12) und Unterlegscheiben (15).
- Seite 8 5. MONTAGEHINWEISE 14 15 14 15 SCHRITT 3 • Befestigen Sie das obere Verbindungsrohr (3) an den Hauptrahmen (2R, 2L). Sichern Sie mit 4 Sechskantschrauben (10), 8 Unterlegscheiben (15) und 4 Nylon-Sicherungsmuttern (14).
- Seite 9 5. MONTAGEHINWEISE SCHRITT 4 • Befestigen Sie die Klimmzugstange (7) am dazugehörigen Rahmen (1). Sichern Sie mit 1 Sechskantschraube (10), 2Unterlegscheiben (15) und 1 Nylon-Sicherungsmutter (14). • Befestigen Sie den Rahmen der Klimmzugstange (1) einschließlich Anschlussblech (8) am oberen Verbindungsrohr (3). Sichern Sie mit 2 Sätzen Sechskantschrauben (11), Nylon- Sicherungsmuttern (14) und 4 Unterlegscheiben (15).
- Seite 10 5. MONTAGEHINWEISE 12 13 SCHRITT 5 • Befestigen Sie die 2 Griffrohre (9) an den Hauptrahmen (2R&2L). Sichern Sie mit 2 Sätzen Sechskantschrauben (12) undUnterlegscheiben (15). • Befestigen Sie die 2 Armpolster (22) an den Hauptrahmen (2R&2L). Sichern Sie mit 4 Sätzen Sechskantschrauben (13) und Unterlegscheiben (16).
-
Seite 11: Training
6. TRAINING TRAININGSTIPPS Alle Empfehlungen innerhalb dieser Bedienungsanleitung richten sich ausschließlich an gesunde Personen und nicht an Personen mit Herz-/Herz-Kreislauf-Erkrankungen. Bei allen Tipps handelt es sich nur um grobe Vorschläge für ein Trainingsprogramm. Konsultieren Sie, falls notwendig, Ihren Arzt für Ratschläge entsprechend Ihrer persönlichen Bedürfnisse. Die folgenden Seiten erklären detailliert, wie Sie Ihr neues Trainingsgerät benutzen können und dienen der Verdeutlichung der Grundlagen des Fitnesstrainings. - Seite 12 6. TRAINING 3. TRAININGSPHASEN Jede Trainingseinheit sollte aus 3 Trainingsphasen bestehen: • „ Aufwärmphase“, • „ Trainingsphase“, • „ Abkühlphase“ Innerhalb der „ Aufwärmphase“ sollte Ihre Körpertemperatur und Sauerstoffaufnahme langsam gesteigert werden. Dies kann durch gymnastische Übungen oder Stretching für 5 bis 10 Minuten erreicht werden. Eine Liste geeigneter Dehnübungen für die Beinmuskulatur kann unten stehend gefunden wird.
- Seite 13 6. TRAINING ÜBUNG 1: DEHNUNG DES QUADRICEPS (OBERSCHENKEL- VORDERSEITE) Mit einer Hand an der Wand abstützen und mit der anderen einen Fuß wie abgebildet ergreifen und in die Dehnung der Oberschenkelvorderseite führen. Bringen Sie dabei die Ferse des ergriffenen Fußes soweit wie möglich (ohne Schmerzen zu verspüren) in Richtung Po.
- Seite 14 6. TRAINING ÜBUNGEN KLIMMZÜGE MIT OBER- UND UNTERGRIFF/BIZEPS UND RÜCKENMUSKULATUR • Umfassen Sie fest die beiden Handgriffe (19), wobei Ihre Handflächen zur Klimmzugstation gerichtet sein sollten. Falls die Handgriffe für Sie zu hoch sind, steigen Sie bitte auf die Liegestützgriffe (6). TIPP: Wenn Sie Klimmzüge mit Untergriff machen möchten, sollten Ihre Handflächen zum Körper gerichtet sein.
- Seite 15 6. TRAINING TRIZEPS • Steigen Sie mit dem Gesicht zur Klimmzugstation auf die Liegestützgriffe (6). • Umfassen Sie die Griffrohre (9) und drücken Sie sich nach oben, bis Ihre Arme fast vollständig durchgedrückt sind. Hinweis: Sie sollten Ihre Arme nicht ganz „ durchdrücken“. • Senken Sie langsam Ihren Körper, bis Ihr Oberarm und Ihr Vorderarm einen rechten Winkel bilden.
-
Seite 16: Wartung, Reinigung Und Pflege
7. WARTUNG, REINIGUNG UND PFLEGE • Überprüfen Sie nach dem Zusammenbau und vor dem Einsatz des Gerätes, ob alle Bolzen/ Muttern vollständig und korrekt angezogen sind. • Reinigen Sie das Gerät regelmäßig mit einem leicht angefeuchteten Tuch unter Einsatz eines milden Reinigers. •... -
Seite 17: Reklamationen
Im Falle eventueller Mängel am Produkt wenden Sie sich bitte direkt an unser Serviceteam. Zu diesem Zweck empfehlen wir Ihnen, den Kaufbeleg sorgfältig aufzubewahren. Für Fragen zum Aufbau und zur Anwendung Ihres SportPlus Produkts sowie zur Ersatzteil bestellung steht Ihnen unser Serviceteam selbstverständlich auch jederzeit zur Verfügung. -
Seite 18: Gewährleistungen
10. GEWÄHRLEISTUNGEN SportPlus versichert, dass das Produkt, auf das sich die Gewährleistung bezieht, aus qualitativ hochwertigen Materialien hergestellt und mit äußerster Sorgfalt überprüft wurde. Sollten sich dennoch bei normaler Verwendung und Wartung innerhalb der hiernach genannten Gewährleistungsfrist Defekte ergeben, Wenden Sie sich bitte an unser Service... - Seite 36 SportPlus Vertriebsges. mbH Frankenstr. 16 20097 Hamburg Germany...