Kapitel
Inhaltsverzeichnis

Verwandte Anleitungen für C.M.A. GLORIA


Inhaltszusammenfassung für C.M.A. GLORIA
- Seite 1 Istruzioni per il modello GLORIA italiano con selezioni latte Instructions for model GLORIA english with milk selections Anweidungen für das Modell GLORIA deutsch mit Milchwahl...
-
Seite 3: Inhaltsverzeichnis
SOMMARIO 1. DESCRIZIONE GENERALE ................4 2. AUTOSTEAMER ..................... 4 3. PULSANTI EROGAZIONE MANUALE ............4 4. PULSANTIERA SELEZIONI CAFFE' / PROGRAMMAZIONE......5 5. PULSANTIERA SELEZIONI LATTE / AUTOSTEAMER........5 6. ACCENSIONE ....................6 7. EROGAZIONE TE' ..................6 8. SELEZIONI CAFFE' ..................7 Utilizzo ..........................7 Programmazione ........................7 9. -
Seite 4: Descrizione Generale
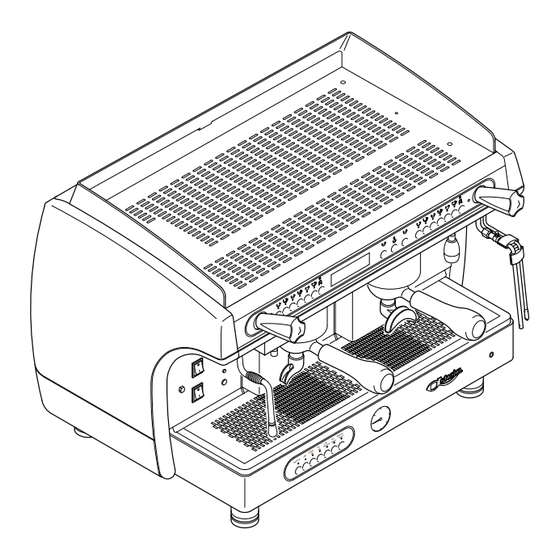
escrizione generale 1. Display 2. Pulsantiera selezioni caffè e programmazione 3. Lancia erogazione acqua calda 4. Manopola acqua calda 5. Autosteamer (optional) 6. Portafiltro 7. Chiave programmazione 8. Griglia appoggia tazzine 9. Manometro 10. Pulsantiera selezioni latte / cappuccini / autosteamer 11. -
Seite 5: Pulsantiera Selezioni Latte / Autosteamer
ulsantiera selezioni caffè / programmazione TASTO TASTO UTILIZZO PROGRAMMAZIONE 1 Caffè espresso MODE 2 Caffè espressi ENTER 1 Caffè medio INCREMENTA 2 Caffè medi DECREMENTA 1 Caffè lungo 2 Caffè lunghi Stop PROGRAMMAZIONE ulsantiera selezioni latte / autosteamer Foamed Latte Auto Additional Cappuccino... -
Seite 6: Accensione
ccensione • Premere l'interruttore generale posto nella parte sinistra del copricaldaia; • Attendere qualche secondo l'esecuzione dell'auto-test; attendere esito test test funzionale - ok - • La macchina risulta pronta per l'utilizzo quando sul diplay appare la seguente scritta: Pressione in caldaia Temperatura in caldaia Programmazione 1,0 atm... -
Seite 7: Selezioni Caffe
elezioni caffè Utilizzo 1) Riempire il filtro con la dose di caffè macinato e pressarlo col pressino; 2) Agganciare il portafiltro al gruppo erogatore; 3) Posizionare una tazza sotto il portafiltro; 4) Selezionare la dose desiderata per esempio 1 Caffè espresso (accensione del relativo led) e attendere il completamento dell'erogazione. -
Seite 8: Selezioni Latte
elezioni latte Utilizzo 1) Inserire i due tubi di aspirazione del contenitore del latte; 2) Nel caso di cappuccino o caffellatte o latte macchiato, riempire il filtro con la dose di caffè macinato e pressarlo col pressino; 3) Agganciare il portafiltro al gruppo erogatore; 4) Posizionare una tazza sotto il cappuccinatore;... -
Seite 9: Programmazione Latte Macchiato "Freddo
Programmazione LATTE MACCHIATO "FREDDO" • Riempire il filtro con la dose di caffè macinato, pressarlo col pressino e agganciare il portafiltro al gruppo erogatore; • Selezionare il tasto latte macchiato; • Attendere l'effettuazione dell'erogazione del latte freddo; • Per confermare la dose del latte freddo premere nuovamente il tasto latte macchiato; •... -
Seite 10: Autosteamer
utosteamer Utilizzo 1) Immergere i terminali dell'autosteamer nella bevanda da riscaldare; 2) Premere il tasto Auto Steamer; 3) Attendere fino al completamento dell'erogazione di vapore. Per bloccare anticipatamente l'erogazione, premere nuovamente il tasto Auto Steamer. Mantenendo premuto il tasto Auto Steamer è possibile prolungare l'erogazione di vapore oltre la temperatura programmata. -
Seite 11: Scaldatazze
caldatazze Utilizzo 1) Posizionare le tazzine da riscaldare sul piano apposito; 2) Posizionare in ON l'interruttore scaldatazze. Per ragioni di sicurezza si consiglia di non mettere panni o altri oggetti sul piano dello scaldatazze per evitare il surriscaldamento della macchina. Regolazione Per attivare, disattivare o regolare lo scaldatazze, posizionare in ON l'interruttore scaldatazze posto sopra l'interruttore di accensione della macchina e procedere nel seguente modo:... -
Seite 12: Lavaggio
avaggio Lavaggio richiesto La macchina propone periodicamente il lavaggio del circuito latte e del cappuccinatore. LAVAGGIO CAPPUCCINATORE Tale segnalazione dipende dal tipo di impostazione della programmazione (vedi cap.15). Per effettuare il lavaggio procedere come segue: PORRE TUBI LATTE 1) Immergere i due tubi del latte in acqua fredda; IN ACQUA Foamed Latte... -
Seite 13: Programmazione Macchina
1,0 atm 120°C P 09:16 09-02-04 1 rogrammazione macchina setup orologio 15.1 Girare la chiave di programmazione in ON e seguire le indicazioni 09:16 18-02-05 1 qui di seguito riportate: auto on/off 15.2 08:50 • Per accedere alla programmazione premere il tasto MODE per almeno 3 secondi. -
Seite 14: Orologio E Data
Programmazione OROLOGIO e DATA 15.1 Modifica dell'ora, della data e del giorno della settimana: 1) Tenere premuto il tasto MODE per 3 secondi; setup orologio 2) modificare il parametro in fase di lampeggio mediante i tasti 09:16 18-02-05 1 3) per passare al parametro successivo premere il tasto ENTER 4) per passare alla programmazione successiva premere il tasto MODE 15.2 Programmazione ACCENSIONE Programmazione dell'accensione automatica della macchina:... -
Seite 15: Pressione Caldaia (Funzione Non Attiva)
15.6 Programmazione PRESSIONE CALDAIA PRESSIONE CALD. 0,0 ATM IS=0,0 Servizio non attivo. 15.7 Programmazione TEMPERATURA AUTOSTEAMER Programmazione della temperatura d'intervento dell'autosteamer: autosteamer 1) impostare la temperaura mediante i tasti 65°C 2) per passare alla programmazione successiva premere il tasto MODE Temperatura autosteamer consigliata 60 - 65 °C. -
Seite 16: 15.11 Programmazione Cappuccinatore
15.11 Programmazione CAPPUCCINATORE Programmazione relativa alle selezioni CAPPUCCINO e CAFFELLATTE della pulsantiera selezioni latte. 1) Mediante i tasti è possibile impostare la sequenza di erogazione del caffè e del latte con la seguente regola: - CAFFE > LATTE erogazione prima del caffè e poi del latte CAPPUCCINO CAFFE >... -
Seite 17: Azzeramento Dati
zzeramento dati 16.1 Azzeramento allarmi dosatori allarme dosatori 1) Posizionare la chiave di programmazione in ON ; 021 007 000 2) con il tasto MODE scorrere il menù fino all'allarme dosatori (vedi cap. 15); azzera conteggi ? premere + 3 sec. 3) per avviare l'azzeramento premere il tasto allarme dosatori 4) per confermare l'azzeramento premere il tasto... - Seite 19 TABLE OF CONTENTS 1. GENERAL DESCRIPTION ................20 2. AUTOSTEAMER ................... 20 3. MANUAL DELIVERY PUSH BUTTONS ............20 4. COFFEE SELECTION / PROGRAMMING PUSH BUTTON PANEL....21 5. MILK SELECTION / AUTOSTEAMER PUSH BUTTON PANEL....21 6. SWITCHING ON ................... 22 7.
-
Seite 20: General Description
achine description 1. Display 2. Push button for coffee selections and programming 3. Hot water nozzle 4. Hot water knob 5. Autosteamer (optional) 6. Filter holder 7. Programming key 8. Cup holding grille 9. Boiler / pump pressure gauge 10. Push button panel for milk / cappuccinos / autosteamer 11. -
Seite 21: Coffee Selection / Programming Push Button Panel
ush button for coffee selections/programming USER PROGRAMMING 1 Espresso coffee MODE 2 Espresso coffees ENTER 1 Medium coffee INCREASE 2 Medium coffees DECREASE 1 Long coffee 2 Long coffees Stop / Prog PROGRAMMING ush button for milk selections / autosteamer Foamed Latte Auto... -
Seite 22: Switching On
witching ON • Press the main switch located on the left-hand part of the boiler cover; • Wait a few seconds for the auto-test to be carried out; please wait for test result functional test - ok - • The machine is ready for use when the following message is displayed: Boiler pressure Boiler temperature Programming... -
Seite 23: Coffee Selection
offee selections 1) Fill the filter with the dose of ground coffee and press it with the coffee press; 2) Attach the filter holder to the dispenser assembly; 3) Place the cup under the filter holder; 4) Select the desired dose, for example, 1 espresso coffee (corresponding LED comes on) and wait for deli- very to be completed. -
Seite 24: Milk Selection
ilk selection 1) Insert the two aspiration tubes into the milk container; 2) For cappuccino, coffee and milk or milk with a shot of coffee, fill the filter with the dose of ground coffee and press it with the coffee press; 3) Attach the filter holder to the dispenser assembly;... -
Seite 25: Programming Of Cold Milk With Shot Of Coffee
Programming of COLD MILK WITH SHOT OF COFFEE • Fill the filter with the desired dose of ground coffee, press it with the coffee presser and attach the filter holder to the delivery group; • Select the button for milk with a shot of coffee; •... -
Seite 26: Autosteamer
utosteamer 1) Immerge the ends of the autosteamer into the beverage to be heated; 2) Press the autosteamer key; 3) Wait for steam delivery to be completed. To stop delivery ahead of time, press the selected key again. By holding down the autosteamer key it is possible to extend steam delivery beyond the set temperature. -
Seite 27: Cup Heater
up heater 1) Place the cups to be heated on the appropriate surface; 2) Place the cup heater switch in the ON position. For safety reasons it is advisable not to place cloths or other objects on the cup heater surface to keep the machine from overheating. -
Seite 28: Washing
ashing Washing requested The machine periodically suggests washing the milk circuit and the cappuccino maker. WASHING of CAPPUCCINO MAKER This signal depends on the type of programming setting (see chapter 15). To carry out washing proceed as follows: Put MILK tubeS 1) Immerge the two milk tubes in cold water;... -
Seite 29: Machine Programming
1.0 atm 120°C P 09:16 09-02-04 1 rogramming the machine clock set-up 15.1 Turn the programming key to the ON position and follow the in- 09:16 18-02-05 1 structions below: auto on/off 15.2 08:50 • Keep the MODE key pressed for at least 3 seconds to have access to programming. -
Seite 30: Clock And Date
15.1 Programming of CLOCK and DATE Change of hour, date and day of : 1) Keep the MODE key pressed for 3 seconds; clock set-up 2) use the key to change the parameter during the flashing phase; 09:16 18-02-05 1 3) Press the ENTER key to move on to the next parameter;... -
Seite 31: Boiler Pressure (Function Not Active)
15.6 BOILER PRESSURE programming BOILER PRESSURE 0.0 atm is=0.0 Service not active. 15.7 AUTOSTEAMER TEMPERATURE programming Programming the activation temperature of the autosteamer: autosteamer 11) set the temperature with the keys 65°C 2) press the MODE key to move on to the next programming. Recommended autosteamer temperature 60 - 65 °C. -
Seite 32: 15.11 Cappuccino Maker Programming
15.11 CAPPUCCINO MAKER programming Programming for the CAPPUCCINO and MILK AND COFFEE selections of the milk selection push button panel. 1) Using the keys it is possible to set the delivery sequence of the coffee and milk as shown below: - COFFEE >... -
Seite 33: Data Reset
esetting data to zero 16.1 Zero setting of dosers alarm dosers alarm 1) Turn the programming switch to ON; 021 007 000 2) Use the MODE key to scroll the menu until (see chapter 15); reset counting ? press + 3 sec. 3) Press the key to reset to zero;... - Seite 35 INHALTSVERZEICHNIS 1. ALLGEMEINE BESCHREIBUNG ..............36 2. AUTOSTEAMER ................... 36 3. MANUELLE ABGABETASTEN ..............36 4. TASTENFELD KAFFEEWAHL / PROGRAMMIERUNG ........ 37 5. TASTENFELD WAHL MILCH / AUTOSTEAMER ......... 37 6. EINSCHALTUNG ..................38 7. TEEABGABE ....................38 8. KAFFEEWAHL ....................39 Gebrauch ..........................39 Programmierung .........................39 9.
-
Seite 36: Allgemeine Beschreibung
llgemeine Beschreibung 1. Display 2. Tastenfeld Kaffeewahl Programmierung 3. Heisswasserabgabe 4. Drehschalter Heisswasser 5. Autosteamer (zusätzlich) 6. Filterhalter 7. Programmierschlüssel 8. Tassenabstellgitter 9. Manometer 10. Tastenfeld der Wahl Milch / Cappuccino / Autosteamer 11. Dampflanze 12. Betriebsschalter der Maschine 13. Schalter Tassenwärmer 14. -
Seite 37: Tastenfeld Kaffeewahl / Programmierung
astenfeld Kaffeewahl / Programmierung TASTE TASTE GEBRAUCH PROGRAMMIERUNG 1 Espresso MODE 2 Espresso ENTER 1 Grosser Brauner VERGRÖSSERN 2 Grosse Braune ABNEHMEN 1 Verlängerter 2 Verlängerte Stop PROGRAMMIERUNG astenfeld Wahl Milch / Autosteamer Autom. Milch Heisse Latte Cappuccino Milchkaffee Milchschaum Dampf Manuell Milch... -
Seite 38: Einschaltung
inschaltung • Den Hauptschalter auf der linken Seite der Heizkesselabdeckung drücken; • Einige Sekunden wegen der Durchführung des Testergebnis WARNTEN Selbsttests warten; - ok - Funktionstest • Die Maschine ist einsatzbereit, wenn auf dem Display die folgende Schrift erscheint: Heizkesseldruck Kesseltemperatur Programmierung 1,0 atm... -
Seite 39: Kaffeewahl
affeewahl Gebrauch 1) Den Filter mit der Menge gemahlenen Kaffees füllen und mit der Presse festdrücken; Den Filterhalter an der Abgabegruppe einhängen; 3) Eine Tasse unter den Filterhalter stellen; 4) Die gewünschte Dosierung für das Beispiel 1 Kaffee Espresso (Einschaltung der entsprechende LED-Anzeige) wählen und die vollständige Abgabe abwarten. -
Seite 40: Milchwahl
ilchwahl Gebrauch 1) Die beiden Ansaugrohre des Milchbehälters einsetzen; 2) Für Cappuccino, Milchkaffee oder Milch mit einem Schuss Kaffee, den Filter mit der gemahlenen Kaffeedosis füllen und mit der Presse festdrücken; Den Filterhalter an der Abgabegruppe einhängen; 4) Eine Tasse unter den Capuccinozubereiter stellen; 5) Die gewünschte Dosierung, zum Beispiel Cappuccino wählen (LED-Anzeige schal- tet sich ein) und die vollständige Abgabe der Milch und des Kaffees abwarten (des letzteren nur bei Cappuccino, Milchkaffee oder Milch mit einem Schuss Kaffee). -
Seite 41: Programmierung "Kalte" Milch Mit Einem Schuss Kaffee
Programmierung "KALTE" MILCH MIT EINEM SCHUSS KAFFEE • Den Filter mit der gemahlenen Kaffeemenge füllen und mit der Presse festdrücken, dann den Filterhalter an der Abgabegruppe einhängen; • Die Taste Milch mit einem Schuss Kaffee wählen; • Die Abgabe der kalten Milch abwarten; •... -
Seite 42: Autosteamer
utosteamer Gebrauch 1) Die Enden des Autosteamers in das zu erwärmende Getränkk tauchen; 2) Die Taste Autosteamer drücken; 3) Die vollständige Dampfabgabe abwarten. Um die Abgabe vorzeitig abzubrechen, erneut die gewählte Taste drücken. Durch das Gedrückthalten der Taste Autosteamer kann die Dampfabgabe über die programmierte Temperatur hinaus, verlängert werden. -
Seite 43: Tassenwärmer
assenwärmer Gebrauch 1) Die aufzuwärmenden Tassen auf der entsprechenden Oberfläche abstellen; 2) Den Schalter Tassenwärmer auf ON stellen. Aus Sicherheitsgründen wird empfohlen, keine Tücher oder andere Gegenstände auf die Fläche des Tassenwärmers zu legen, um eine Überhitzung der Maschine zu vermeiden. Einstellung Für die Aktivierung, Ausschaltung oder Einstellung des Tassenwärmers, den Schalter Tassenwär- mer, der sich über dem Betriebsschalter der Maschine befindet, auf ON stellen und wie folgt... -
Seite 44: Gewünschte Spülung
pülung Angefordete Spülung Die Maschine schlägt in regelmässigen Zeitabständen die Spülung des Milchkreislaufs und waschung CAPPUCCINatore des Cappuccinozubereiters vor. Diese Anzeige hängt von der Eingabe der Programmierung ab (siehe Kap.15). Zur Durchführung der Spülung, wie folgt, vorgehen: MILk RoHR 1) Die zwei Milchröhren in kaltes Wasser tauchen; IN WASSER TAnk Autom. -
Seite 45: Programmierung Der Maschine
1,0 atm 120°C D 09:16 09-02-04 1 aschinenprogrammierung Uhreinstellung 15.1 Den Programmierschlüssel auf ON drehen und den nachstehenden 09:16 18-02-05 1 Anweisungen folgen: Auto ein/aus 15.2 08:50 • Um in die Programmierung einzutreten, die Taste MODE für mindestens 3 Sekunden drücken. Auto ein/aus 15.3 •... -
Seite 46: Uhrzeit Und Datum
15.1 Programmierung UHRZEIT und DATUM Änderung der Uhrzeit, des Datums und des Wochentags: 1) Die Taste MODE für 3 Sekunden gedrückt halten; uhreinstellung 2) den blinkenden Parameter über die Tasten ändern; 09:16 18-02-05 1 3) um den nächsten Parameter aufzurufen, die Taste ENTER drücken;... -
Seite 47: Programmierung Der Sprache
15.6 Programmierung HEIZKESSELDRUCK KESSELDRUCK. 0,0 atm is=0,0 Nicht aktivierte Funktion. 15.7 Programmierung TEMPERATUR AUTOSTEAMER Programmierung der Temperatur der Funktion Autosteamer: Autosteamer 1) die Temperatur über die Tasten einstellen; 65°C 2) um die nächste Programmierung aufzurufen, die Taste MODE drücken. Empfohlene Temperatur Autosteamer 60 - 65 °C. 15.8 Programmierung TASSENWÄRMER Programmierung der Temperatur und die Aktivierung des Tassenwärmers: TASSENWÄRMER... -
Seite 48: 15.11 Programmierung Cappuccinozubereiter
15.11 Programmierung CAPPUCCINOZUBEREITER Programmierung der Wahlen CAPPUCCINO und MILCHKAFFEE des Tastenfeldes Milchwahl. 1) Mit den Tasten kann die Reihenfolge der Abgabe des Kaffees und der Milch mit folgender Regel eingestellt werden: - Kaffee > MILCH erst Abgabe des Kaffees und dann der Milch CAPPUCCINO KAFFEE >... -
Seite 49: Datenlöschung
atenlöschung 16.1 Löschung der Dosierungsalarme alarm dosierer 1) Den Programmierschlüssel auf ON stellen; 021 007 000 2) mit der Taste MODE das Menü bis zu den Dosierungsalarmen abrollen (siehe Abschnitt 15); Zählung nullen ? drücken + 3 Sek. 3) für die Löschung die Taste drücken;... - Seite 52 C.M.A. S.p.A. Via dei Colli, 66 - 31058 SUSEGANA (TV) - ITALY Tel. +39.0438.6615 - Fax +39.0438.60657 www.cmaspa.com - cma@cmaspa.com Cod. 02000280 - Rev. 00 - 03/2005...