Herunterladen Inhalt Inhalt Diese Seite drucken
Inhaltsverzeichnis

Werbung

Verfügbare Sprachen

Verfügbare Sprachen

Het toestel-identifi catieplaatje bevindt zich aan de binnenkant van het toestel.
La plaque d'identifi cation de l'appareil se trouve sur l'intérieur de l'appareil.
Das Gerätetypenschild befi ndet sich an der Innenseite des Gerätes.
The appliance identifi cation card is located on the inside of the appliance.
Houd, wanneer u contact opneemt met de serviceafdeling, het complete typenummer bij de hand.
En cas de contact avec le service après-vente, ayez auprès de vous le numéro de type complet.
Halten Sie die vollständige Typennummer bereit,
wenn Sie mit der Kundendienstabteilung Kontakt aufnehmen.
When contacting the service department, have the complete type number to hand.
Adressen en telefoonnummers van de serviceorganisatie vindt u op de garantiekaart.
Les adresses et les numéros de téléphone du service après-vente se trouvent sur la carte de garantie.
Adressen und Telefonnummern der Kundendienstorganisation fi nden Sie auf der Garantiekarte.
You will fi nd the addresses and phone numbers of the service organisation on the guarantee card.
Handleiding
magnetron
Mode d'emploi
micro-onde
Anleitung
Mikrowelle
Instructions for use
microwave
MAG557RVS

Werbung

Inhaltsverzeichnis
loading

Inhaltszusammenfassung für Pelgrim MAG557RVS

  • Seite 1 La plaque d’identifi cation de l’appareil se trouve sur l’intérieur de l’appareil. Das Gerätetypenschild befi ndet sich an der Innenseite des Gerätes. The appliance identifi cation card is located on the inside of the appliance. MAG557RVS Handleiding Houd, wanneer u contact opneemt met de serviceafdeling, het complete typenummer bij de hand.
  • Seite 2 Handleiding NL 3 - NL 25 Notice d’utilisation FR 3 - FR 25 Anleitung DE 3 - DE 25 Manual EN 3 - EN 25 Gebruikte pictogrammen - Pictogrammes utilisés Benutzte Piktogramme - Pictograms used Belangrijk om te weten - Important à savoir Wissenswertes - Important information Tip - Conseil Tipp - Tip...
  • Seite 3: Inhaltsverzeichnis

    INHOUDSOPGAVE Uw combi-magnetron Inleiding Beschrijving Bedieningspaneel Veiligheid Materialen Gebruik Vóór het eerste gebruik Bediening Klok instellen Kookwekker Magnetronfunctie Snelstart Stop Ovenfunctie met voorverwarmen Ovenfunctie Grillfunctie Combifunctie Ontdooien op gewicht Ontdooien op tijd Koken in fasen Auto cook Kinderslot Kooktips Onderhoud Reinigen Storingen / Technische gegevens Milieuaspecten...
  • Seite 4: Uw Combi-Magnetron

    UW COMBI-MAGNETRON Inleiding U heeft gekozen voor een combi-magnetron van Pelgrim. Optimaal gebruiks comfort en een eenvoudige bediening stonden voorop bij de ontwikkeling van dit product. De combi-magnetron verenigt de eigenschappen van een magnetron met die van een traditionele oven. De uitgebreide instelmogelijkheden maken het mogelijk exact die bereidingswijze te kiezen die u voor ogen staat.
  • Seite 5: Beschrijving

    UW COMBI-MAGNETRON Beschrijving Auto TIMER AUTO - MENU Auto TIMER AUTO - MENU 1. Deurvergrendeling De magnetron mag niet gebruikt worden 2. Deur zonder geleidering en draaiplateau. Het 3. Ruit draaiplateau moet met de uitsparing 4. Glazen draaiplateau voor de aandrijving naar beneden 5.
  • Seite 6: Bedieningspaneel

    UW COMBI-MAGNETRON Bedieningspaneel 1. Display 2. Functietoets (magnetron/oven (hete lucht)/grill/combi) Auto 3. Ontdooitoets 4. Instelknop (om makkelijker aan de knop te kunnen draaien, kunt u de knop eerst indrukken; de knop zal dan verder naar buiten steken) 5. Kookwekkertoets/Timertoets 6. Stoptoets/Kinderslot 7.
  • Seite 7: Veiligheid

    VEILIGHEID Lees voor gebruik eerst de separate veiligheidsinstructies. Indien de veiligheidsinstructies en waarschuwingen niet worden opgevolgd, kan de fabrikant niet aansprakelijk worden gesteld voor de schade die daarvan het gevolg is. Als u besluit het toestel, vanwege een defect, niet langer te gebruiken, adviseren wij u, nadat u de stekker uit het stopcontact heeft verwijderd, het snoer af te knippen.
  • Seite 8: Gebruik

    GEBRUIK Vóór het eerste gebruik Gebruik bij voorkeur het ovenrooster voor het bereiden van gerechten. Plaats koude (diepvries) gerechten nooit direct op het glazen draaiplateau. Door temperatuurverschillen kan deze barsten! • Open de deur, verwijder al het verpakkingsmateriaal en controleer de magnetron op beschadigingen. Installeer de magnetron niet als deze beschadigd is, maar neem contact op met uw leverancier.
  • Seite 9: Bediening

    BEDIENING Klok instellen Wanneer het toestel voor de eerste keer op het elektrici teitsnet wordt aangesloten, moet u eerst de klok instellen. In de display staat ‘0:00’. De klok loopt zolang de combi-magnetron op netspanning is aangesloten. 1. Druk 2 keer op de timertoets. In de display knipperen de uren.
  • Seite 10: Snelstart

    BEDIENING Display Vermogen Gerecht P100 100 % - 1000 W - Water koken, opwarmen - Koken van kip, vis en groenten P 80 80 % - 800 W - Opwarmen - Koken van paddenstoelen en schaaldieren - Koken van gerechten die ei en kaas bevatten P 50 50 % - 500 W - Koken van rijst en soep...
  • Seite 11: Stop

    BEDIENING Stop U kunt een lopend programma stoppen of annuleren door de deur te openen of op de stoptoets te drukken. Om het programma weer te starten, drukt u op de starttoets. • Wanneer u het programma helemaal wilt annuleren, drukt u nogmaals op de stoptoets.
  • Seite 12: Ovenfunctie

    BEDIENING Ovenfunctie 1. Druk 1 keer op de functietoets. In de display knippert ‘P100’. • Druk nogmaals meerdere keren op de functietoets om een temperatuur in te stellen. De eerste temperatuur die in de display verschijnt is ‘140’. U kunt een temperatuur instellen van 140 °C tot 230 °C.
  • Seite 13: Combifunctie

    BEDIENING Combifunctie Combifunctie Er zijn 4 verschillende combifuncties. In de volgende tabel kunt u zien welke functies u kunt kiezen en waar ze voor gebruikt worden. Display Functie Beschrijving Magnetron + hete lucht Gebruik deze functie om snel gerechten te braden. Geschikt voor fruitgebak, brood en gegratineerde schotels (die normaal een lange bereidingstijd nodig hebben).
  • Seite 14: Ontdooien Op Gewicht

    BEDIENING Ontdooien op gewicht Met deze functie hoeft u alleen maar het gewicht van het voedsel in te stellen. De ontdooitijd verschijnt automatisch in de display als de magnetron wordt gestart. 1. Druk 1 keer op de ontdooitoets. In de display knippert ‘d-1’. 2.
  • Seite 15: Koken In Fasen

    BEDIENING Gebruik bij voorkeur het ovenrooster voor het bereiden van gerechten. Plaats koude (diepvries) gerechten nooit direct op het glazen draaiplateau. Door temperatuurverschillen kan deze barsten! Koken in fasen U kunt maximaal twee fasen in een kookprogramma instellen. Indien ontdooien een fase is in het kookprogramma, moet u deze als eerste invoeren.
  • Seite 16: Auto Cook

    BEDIENING Auto cook Met deze functie kunt u heel eenvoudig populaire gerechten bereiden. U stelt het juiste gewicht in en de magnetron kiest automatisch de juiste tijd. Display Beschrijving Gewicht Groenten 150/350/500 g 150/250/350/450/650 g Vlees 150/300/450/600 g Pasta 50/100/150 g Aardappelen 1/2/3 stuks (ongeveer 230 g/460 g/ 690 g)
  • Seite 17: Kinderslot

    BEDIENING Kinderslot U kunt uw combi-magnetron ‘op slot’ zetten, zodat het starten van de combi-magnetron niet meer mogelijk is. Let op: het kinderslot kan alleen ingeschakeld worden als de combi-magnetron niet ingeschakeld is. De huidige tijd is zichtbaar in de display. 1.
  • Seite 18: Kooktips

    KOOKTIPS Opwarmen en koken • De magnetron verwarmt altijd met dezelfde intensiteit. Hoe meer u in de magnetron plaatst, des te langer de kooktijd. • Vlakke en platte gerechten zijn sneller warm dan smalle, hoge gerechten. • Gerechten afdekken met magnetronfolie of een passende deksel voorkomt spetteren, verkort de gaartijd en helpt de vochtigheidsgraad te behouden.
  • Seite 19 KOOKTIPS • Bij het ontdooien van onregelmatig gevormde gerechten kunt u dunne delen na de helft van de ontdooitijd afdekken of omwikkelen met aluminiumfolie. Factoren die van invloed zijn op het kookproces • De temperatuur van ingrediënten is van invloed op de bereidingstijd.
  • Seite 20 KOOKTIPS • Controleren • Gerechten garen snel. Controleer ze daarom regelmatig. Haal gerechten net voordat ze gaar zijn uit de magnetron. • Nagaren • Laat gerechten, nadat u ze uit de magnetron hebt gehaald, over het algemeen 3 tot 10 minuten afgedekt staan. De gerechten garen dan na.
  • Seite 21: Onderhoud

    ONDERHOUD Reinigen • GEBRUIK GEEN schuurmiddelen of metalen schrapers voor het reinigen van de glazen ovendeur. Het oppervlak raakt hierdoor bekrast, waardoor het glas kan barsten. • GEBRUIK GEEN hogedruk- of stoomreiniger om de magnetron schoon te maken. • Maak de binnenzijde direct na gebruik schoon. Gebruik een vochtige doek om condens, overgekookt vocht en voedselresten te verwijderen.
  • Seite 22: Storingen / Technische Gegevens

    • gerecycled papier dat kleine metalen deeltjes bevat. Technische gegevens Op het gegevensplaatje worden de totale aansluitwaarde, de vereiste spanning en de frequentie aangegeven. Dit toestel voldoet aan alle relevante CE richtlijnen. MAG557RVS Aansluiting 230V~50Hz Vermogen magnetron 1,0 kW Vermogen grill...
  • Seite 23: Technische Gegevens

    TECHNISCHE GEGEVENS Elektrische aansluiting Voor dit toestel is een netvoeding vereist van 230V, 50 Hz wissel- stroom. Het toestel heeft een netsnoer voorzien van aardeverbinding. Let op! Voor veilig gebruik is het noodzakelijk dat het toestel correct geaard is. Sluit het toestel nooit aan op gelijkstroomvoeding. Verkeerd gebruik kan elektrische schokken tot gevolg hebben.
  • Seite 24 TECHNISCHE GEGEVENS Inbouwmaten 550-580 min. min. Ventilatieopening aan de achterkant: 240 cm NL 24...
  • Seite 25: Milieuaspecten

    MILIEUASPECTEN Afvoeren toestel en verpakking Bij de vervaardiging van dit toestel is gebruik gemaakt van duurzame materialen. Dit toestel moet aan het eind van zijn levenscyclus op verantwoorde wijze worden afgevoerd. De overheid kan u hierover informatie verschaffen. De verpakking van het toestel is recyclebaar. Gebruikt kunnen zijn: •...
  • Seite 26 NL 26...
  • Seite 27 SOMMAIRE Votre four à micro-ondes combiné Introduction Description Panneau de commande Sécurité Matériaux Utilisation Avant la première utilisation Commande Réglage de l'horloge Minuteur Fonction micro-ondes Démarrage rapide Arrêt Fonction four avec préchauffage Fonction four Fonction grill Fonctions combinées Décongélation selon le poids Décongélation selon le temps Cuisson par phases Auto cook...
  • Seite 28: Votre Four À Micro-Ondes Combiné

    VOTRE FOUR À MICRO-ONDES COMBINÉ Introduction Vous avez choisi un four à micro-ondes combiné Pelgrim. La souplesse et la simplicité de l'utilisation sont les principes qui ont guidé son développement. Le four à micro-ondes combiné réunit les propriétés d'un four à...
  • Seite 29: Description

    VOTRE FOUR À MICRO-ONDES COMBINÉ Description Auto TIMER AUTO - MENU Auto TIMER AUTO - MENU 1. Verrouillage de la porte Le four à micro-ondes ne doit pas être 2. Porte utilisé sans anneau à roulettes et plateau 3. Vitre tournant.
  • Seite 30: Panneau De Commande

    VOTRE FOUR À MICRO-ONDES COMBINÉ Panneau de commande 1. Écran 2. Touche fonctions (micro-ondes/four (air chaud)/grill/combiné) Auto 3. Touche de décongélation 4. Bouton de réglage (en enfonçant le bouton, vous le ferez ressortir et pourrez ainsi le tourner plus facilement) 5.
  • Seite 31: Sécurité

    SÉCURITÉ Veuillez lire les consignes de sécurité fournies séparément avant la première utilisation de l’appareil ! Si les instructions de sécurité et les avertissements ne sont pas respectés, le fabriquant décline toute responsabilité pour les dommages qui peuvent s'ensuivre. Si vous décidez de ne plus utiliser l'appareil parce qu'il est défectueux, nous vous conseillons de couper le cordon après avoir retiré...
  • Seite 32: Utilisation

    UTILISATION Avant la première utilisation Utilisez de préférence la grille du four pour préparer des plats. Ne placez jamais de plats froids (congelés) directement sur le plateau tournant en verre. Des différences de température peuvent provoquer des fissures! • Ouvrez la porte, retirez l'emballage et vérifiez que le four à micro-ondes n'est pas endommagé.
  • Seite 33: Commande

    COMMANDE Réglage de l'horloge Lorsque l'appareil est raccordé au réseau électrique pour la première fois, vous devez régler l'horloge. L'écran affiche « 0:00 ». L'horloge fonctionne tant que le four à micro-ondes combiné est raccordé au secteur. 1. Appuyez 2 fois sur la touche de l'horloge. Les heures clignotent sur l'écran.
  • Seite 34: Démarrage Rapide

    COMMANDE Écran Puissance Plat P100 100 % - 1000 W - Faire bouillir, réchauffer de l'eau - Cuire du poulet, du poisson et des légumes P 80 80 % - 800 W - Réchauffer - Cuire des champignons et des crustacés - Cuire des plats à...
  • Seite 35: Arrêt

    COMMANDE Arrêt Vous pouvez arrêter ou annuler un programme en cours en ouvrant la porte ou en appuyant sur la touche d'arrêt. Pour lancer le programme à nouveau, appuyez sur la touche de démarrage. • Pour annuler le programme, appuyez encore une fois sur la touche d'arrêt.
  • Seite 36: Fonction Four

    COMMANDE Fonction four 1. Appuyez une fois sur la touche fonctions. « P100 » s'affiche sur l'écran. • Appuyez encore une fois (plusieurs fois) sur la touche fonctions pour programmer une température. La première température qui s'affiche sur l'écran est « 140 ». Il est possible de régler une température comprise entre 140 °C et 230 °C.
  • Seite 37: Fonctions Combinées

    COMMANDE Fonctions combinées Fonctions combinées Il y a 4 fonctions combinées différentes. Le tableau suivant détaille les différentes fonctions et indique quand les utiliser. Écran Fonction Description Micro-ondes + Utilisez cette fonction pour faire cuire des plats air chaud rapidement. Convient pour les pâtisseries aux fruits, le pain, les plats gratinés (nécessitant normalement une durée de cuisson longue).
  • Seite 38: Décongélation Selon Le Poids

    COMMANDE Décongélation selon le poids En utilisant cette fonction, vous n'aurez qu'à programmer le poids. La durée de décongélation s'affiche automatiquement sur l'écran lorsque le four à micro-ondes s'enclenche. 1. Appuyez une fois sur la touche de décongélation. « d-1 » s'affiche sur l'écran. 2.
  • Seite 39: Cuisson Par Phases

    COMMANDE Utilisez de préférence la grille du four pour préparer des plats. Ne placez jamais de plats froids (congelés) directement sur le plateau tournant en verre. Des différences de température peuvent provoquer des fissures! Cuisson par phases Il est possible de programmer au maximum deux phases dans un programme de cuisson.
  • Seite 40: Auto Cook

    COMMANDE Auto cook Cette fonction permet de préparer des plats courants en toute facilité. Il vous suffit de programmer le poids. Le four à micro- ondes sélectionne automatiquement la durée correspondante. Écran Description Poids Légumes 150/350/500 g Poisson 150/250/350/450/650 g Viande 150/300/450/600 g Pâtes...
  • Seite 41: Sécurité Enfants

    COMMANDE Sécurité enfants Il est possible de verrouiller le four à micro-ondes combiné pour empêcher sa mise en marche. Attention : la sécurité enfants peut être activée seulement lorsque le four à micro-ondes n'est pas allumé. L'heure actuelle est visible sur l'écran.
  • Seite 42: Conseils De Cuisson

    CONSEILS DE CUISSON Réchauffer et cuire • L'intensité de chauffage du four à micro-ondes est toujours la même. Plus la quantité placée dans le four est importante, plus la durée de cuisson sera longue. • Les produits plats sont plus vite chauds que les produits étroits et hauts.
  • Seite 43 CONSEILS DE CUISSON • En cas de décongélation de produits de forme irrégulière, couvrez ou enveloppez de papier aluminium les parties fines pendant la seconde moitié de la durée de décongélation. Les facteurs qui ont une influence sur le processus de cuisson •...
  • Seite 44 CONSEILS DE CUISSON • Contrôler • Les produits cuisent rapidement. C'est pourquoi il faut les contrôler régulièrement. Sortez les produits du four à micro- ondes avant qu’ils ne soient cuits à point. • Poursuite de la cuisson • Après avoir sorti les produits du four à micro-ondes, laissez- les reposer, à...
  • Seite 45: Entretien

    ENTRETIEN Nettoyage • N'UTILISEZ PAS de produits à récurer ni de grattoirs métalliques pour nettoyer la porte du four en verre. Ceux-ci risquent de rayer la surface et faire éclater le verre. • N'UTILISEZ PAS de jet à haute pression ou de machine à vapeur pour nettoyer le four à...
  • Seite 46: Pannes / Spécifications Techniques

    • papier recyclé contenant des particules métalliques. Spécifications techniques • La plaquette signalétique indique la valeur nominale totale, la tension d’alimentation et la fréquence nécessaires. • Cet appareil est conforme à toutes les directives CE applicables. MAG557RVS Alimentation 230V~50Hz Puissance du micro-ondes 1,0 kW...
  • Seite 47: Spécifications Techniques

    SPÉCIFICATIONS TECHNIQUES Branchement électrique Cet appareil exige une alimentation secteur de 230 V, 50 Hz courant alternatif. Le cordon d'alimentation de l'appareil est équipé d'une prise de terre. Attention ! L’appareil doit être mis à la terre correctement pour assurer la sécurité d'utilisation. Il ne faut en aucun cas le brancher sur une alimentation à...
  • Seite 48: Dimensions D'encastrement

    SPÉCIFICATIONS TECHNIQUES Dimensions d'encastrement 550-580 min. min. Ouverture de ventilation à l'arrière : 240 cm FR 24...
  • Seite 49: Environnement

    ENVIRONNEMENT Élimination de l'appareil et de l'emballage Des matériaux durables ont été utilisés dans la fabrication de cet appareil. Cet appareil doit être éliminé de façon appropriée à la fin de son cycle de vie. Les autorités peuvent vous renseigner à ce sujet.
  • Seite 50 FR 26...
  • Seite 51 INHALTSVERZEICHNIS Ihre Kombi-Mikrowelle Einleitung Beschreibung Bedientafel Sicherheit Materialien Gebrauch Vor der ersten Inbetriebnahme Bedienung Uhr einstellen Kochwecker Mikrowellenfunktion Schnellstart Stopp Ofenfunktion mit Vorwärmen Ofenfunktion Grillfunktion Kombifunktion Auftauen nach Gewicht Auftauen nach Zeit Kochen in Phasen Auto-Cook Kindersicherung Kindersicherung Wartung Reinigung Störungen / Technische Daten Umweltschutz Entsorgung des Geräts und der Verpackung...
  • Seite 52: Ihre Kombi-Mikrowelle

    IHRE KOMBI-MIKROWELLE Einleitung Sie haben sich für eine Kombi-Mikrowelle von Pelgrim entschieden. Ein optimaler Anwendungskomfort und eine einfache Bedienung standen bei der Entwicklung dieses Produkts an erster Stelle. Die Kombi-Mikrowelle verbindet die Eigenschaften einer Mikrowelle mit denen eines herkömmlichen Ofens. Die umfangreichen Einstellungsoptionen ermöglichen es Ihnen, genau die...
  • Seite 53: Beschreibung

    IHRE KOMBI-MIKROWELLE Beschreibung Auto TIMER AUTO - MENU Auto TIMER AUTO - MENU 1. Türverriegelung Die Mikrowelle darf nicht ohne Gleitring 2. Türe und Drehplattform verwendet werden. 3. Scheibe Die Drehplattform muss mit der 4. Gläserne Drehplattform Aussparung für den Antrieb nach unten 5.
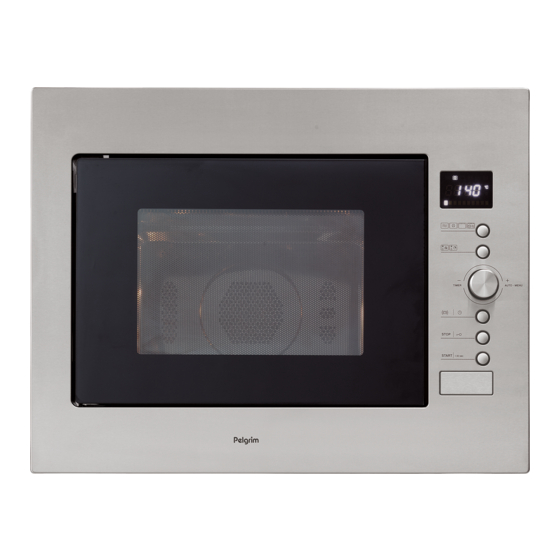
  • Seite 54: Bedientafel

    IHRE KOMBI-MIKROWELLE Bedientafel 1. Display 2. Funktionstaste (Mikrowelle/Ofen (Heißluft)/Grill/Kombi) Auto 3. Auftautaste 4. Einstellschalter (um den Schalter bequemer drehen zu können, drücken Sie ihn zuerst ein; der Schalter ragt danach weiter heraus) 5. Kochweckertaste/Timertaste 6. Stopptaste/Kindersicherung 7. Starttaste/Schnellstart/Bestätigen 8. Türentriegelung TIMER AUTO - MENU DE 6...
  • Seite 55: Sicherheit

    SICHERHEIT Bitte lesen Sie die gesonderten Sicherheitsvorschriften bevor Sie das Gerät in Betrieb nehmen! Wenn die Sicherheitsanweisungen und Warnungen nicht befolgt werden, kann der Hersteller nicht für den dadurch entstandenen Schaden haftbar gemacht werden. Wenn Sie beschließen, das Gerät aufgrund eines Defekts nicht länger zu verwenden, raten wir Ihnen, die Schnur abzutrennen, nachdem Sie den Stecker aus der Steckdose gezogen haben.
  • Seite 56: Gebrauch

    GEBRAUCH Vor der ersten Inbetriebnahme Verwenden Sie vorzugsweise den Herdrost zum Zubereiten von Speisen. Stelllen Sie kalte (Tiefkühl-) Speisen niemals unmittelbar auf den Glasdrehteller. Dieser kann durch Temperaturunterschiede zerspringen! • Öffnen Sie die Tür, entfernen Sie das gesamte Verpackungsmaterial und überprüfen Sie die Mikrowelle auf Beschädigungen.
  • Seite 57: Bedienung

    BEDIENUNG Uhr einstellen Wenn das Gerät zum ersten Mal an das Stromnetz angeschlossen wird, müssen Sie erst die Uhr einstellen. Auf dem Display erscheint ‘0:00’. Die Uhr läuft solange, wie die Kombi-Mikrowelle an das Stromnetz angeschlossen ist. 1. Drücken Sie zweimal auf die Timertaste. Auf dem Display blinken die Stunden.
  • Seite 58: Schnellstart

    BEDIENUNG Display Leistung Gericht P100 100 % - 1000 W - Wasser kochen, aufwärmen - Kochen von Huhn, Fisch und Gemüse P 80 80 % - 800 W - Aufwärmen - Kochen von Pilzen und Schalentieren - Kochen von Gerichten, die Käse und Butter enthalten P 50 50 % - 500 W...
  • Seite 59: Stopp

    BEDIENUNG Stopp Sie können ein laufendes Programm stoppen oder löschen, indem Sie die Tür öffnen oder auf die Stopptaste drücken. Um das Programm wieder zu starten, drücken Sie auf die Starttaste. • Wenn Sie das Programm ganz löschen möchten, drücken Sie nochmals auf die Stopptaste.
  • Seite 60: Ofenfunktion

    BEDIENUNG Ofenfunktion 1. Drücken Sie einmal auf die Funktionstaste. Auf dem Display blinkt ‘P100’. • Drücken Sie nochmals mehrere Male auf die Funktionstaste, um eine Temperatur einzustellen. Die erste Temperatur, die auf dem Display erscheint, ist ‘140’. Sie können eine Temperatur von 140 °C bis 230 °C einstellen.
  • Seite 61: Kombifunktion

    BEDIENUNG • Wenn die eingestellte Zeit abgelaufen ist, erscheint die aktuelle Zeit wieder auf dem Display, und Sie hören 5 Tonsignale. Kombifunktion Kombifunktion Es gibt 4 verschiedene Kombifunktionen. In der folgenden Tabelle können Sie sehen, welche Funktionen Sie wählen können und wozu diese verwendet werden.
  • Seite 62: Auftauen Nach Gewicht

    BEDIENUNG Auftauen nach Gewicht Bei dieser Funktion müssen Sie nur noch das Gewicht des Lebensmittels einstellen. Die Auftauzeit erscheint automatisch auf dem Display, wenn die Mikrowelle gestartet wird. 1. Drücken Sie einmal auf die Auftautaste. Auf dem Display blinkt ‘d-1’. 2.
  • Seite 63: Kochen In Phasen

    BEDIENUNG Verwenden Sie vorzugsweise den Herdrost zum Zubereiten von Speisen. Stelllen Sie kalte (Tiefkühl-) Speisen niemals unmittelbar auf den Glasdrehteller. Dieser kann durch Temperaturunterschiede zerspringen! Kochen in Phasen Sie können maximal zwei Phasen in einem Kochprogramm einstellen. Wenn das Auftauen eine Phase im Kochprogramm ist, müssen Sie diese als erste einführen.
  • Seite 64: Auto-Cook

    BEDIENUNG Auto-Cook Mit dieser Funktion können Sie beliebte Gerichte ganz einfach zubereiten. Sie stellen das richtige Gewicht ein, und die Mikrowelle wählt automatisch die richtige Zeit. Display Beschreibung Gewicht Gemüse 150/350/500 g Fisch 150/250/350/450/650 g Fleisch 150/300/450/600 g Pasta 50/100/150 g Kartoffeln 1/2/3 Stück (ungefähr 230 g/460 g/ 690 g)
  • Seite 65: Kindersicherung

    BEDIENUNG Achtung: wenn Sie A9 wählen (Kuchen), stellen Sie dann nicht gleich den Kuchen in die Mikrowelle. Der Ofen wärmt erst vor auf 180 °C. Wenn das Vorwärmen abgeschlossen ist, ertönt eine zweifaches Tonsignal. Stellen Sie den Kuchen in die Mikrowelle und drücken Sie auf die Starttaste.
  • Seite 66 KOCHTIPPS Aufwärmen und kochen • Die Mikrowelle erhitzt immer mit derselben Intensität. Je mehr Sie in die Mikrowelle stellen, desto länger die Kochzeit. • Flache und breite Gerichte sind schneller warm als schmale, hohe Gerichte. • Das Zudecken der Gerichte mit Mikrowellenfolie oder einem passenden Deckel verhindert Spritzen, verkürzt die Garzeit und hilft, den Feuchtigkeitsgrad beizubehalten.
  • Seite 67 KOCHTIPPS • Beim Auftauen von unregelmäßig geformten Gerichten können Sie dünne Teile nach der Hälfte der Abtauzeit abdecken oder mit Aluminiumfolie umwickeln. Faktoren, die auf den Kochvorgang Einfluss haben • Die Temperatur von Zutaten hat Einfluss auf die Zubereitungszeit. Eine kalte Mahlzeit braucht immer eine längere Kochzeit als eine auf Zimmertemperatur.
  • Seite 68 KOCHTIPPS • Gerichte garen schnell. Kontrollieren Sie sie daher regelmäßig. Holen Sie die Gerichte kurz bevor Sie gar sind, aus der Mikrowelle. • Nachgaren • Lassen Sie Gerichte, nachdem Sie sie aus der Mikrowelle geholt haben, im Allgemeinen 3 bis 10 Minuten zugedeckt stehen.
  • Seite 69: Wartung

    WARTUNG Reinigung • VERWENDEN SIE KEINE Scheuermittel oder Metallschaber zum Reinigen der Glastür des Ofens. Die Oberfläche erhält dadurch Kratzer, wodurch das Glas zerspringen kann. • VERWENDEN SIE KEINEN Hochdruck- oder Dampfreiniger, um die Mikrowelle zu reinigen. • Reinigen Sie das Innere sofort nach Gebrauch. Verwenden Sie ein feuchtes Tuch, um Kondens- oder übergekochtes Wasser und Speisereste zu entfernen.
  • Seite 70: Störungen / Technische Daten

    Zierrand; • recyceltes Papier, das kleine Metallteile enthält. Technische Daten • Auf dem Typenschild stehen der Gesamtanschlusswert, die erforderliche Spannung und die Frequenz. • Dieses Gerät entspricht den CE-Richtlinien. MAG557RVS Anschluss 230V~50Hz Leistung Mikrowelle 1,0 kW Leistung Grill 1,1 kW...
  • Seite 71: Technische Daten

    TECHNISCHE DATEN Stromanschluss Für dieses Gerät ist eine Netzspannung von 230 V, 50 Hz Wechselstrom erforderlich. Das Gerät verfügt über eine Netzschnur mit einer Erdverbindung. Achtung! Für eine sichere Verwendung ist es erforderlich, dass das Gerät korrekt geerdet ist. Schließen Sie das Gerät niemals an eine Gleichstromversorgung an.
  • Seite 72: Einbaumaße

    TECHNISCHE DATEN Einbaumaße 550-580 min. min. Lüftungsöffnungen an der Rückseite: 240 cm DE 24...
  • Seite 73: Umweltschutz

    UMWELTSCHUTZ Entsorgung des Geräts und der Verpackung Bei der Herstellung des Geräts wurden dauerhafte Materialien verwendet. Am Ende seines Lebenszyklus muss das Gerät auf verantwortliche Weise entsorgt werden. Einschlägige Informationen erhalten Sie bei den zuständigen Behörden. Die Verpackung des Geräts kann dem Recycling zugeführt werden. Folgende Materialien können verwendet worden sein: •...
  • Seite 74 DE 26...
  • Seite 75 CONTENTS Your combi-microwave Introduction Description Control panel Safety Materials Prior to first use Controls Set the time Kitchen timer Microwave function Quick start Stop Oven function with pre-heat Oven function Grill function Combi function Defrosting according to weight Defrosting according to time Cooking in phases Auto cook Child lock...
  • Seite 76: Your Combi-Microwave

    YOUR COMBI-MICROWAVE Introduction You have opted to purchase an Pelgrim combi-microwave. Optimum user comfort and easy operation were paramount during the development of this product. The combi-microwave combines the properties of a microwave with those of a traditional oven. The wide range of programming options make it possible to choose your preparation method precisely.
  • Seite 77: Description

    YOUR COMBI-MICROWAVE Description Auto TIMER AUTO - MENU Auto TIMER AUTO - MENU 1. Door lock The microwave may not be used 2. Door without the guiding ring and turntable. 3. Window The turntable should be fitted with 4. Glass turntable the opening for the drive shaft facing 5.
  • Seite 78: Control Panel

    YOUR COMBI-MICROWAVE Control panel 1. Display 2. Function button (microwave/ oven (hot air)/grill/combi) Auto 3. Defrost button 4. Control dial (to turn the dial more easily, you can first depress the dial; the dial will then protrude outwards more) 5. Kitchen timer button/timer button 6.
  • Seite 79: Safety

    SAFETY Read the separate safety instructions before using the device! If the safety functions and warnings are not followed, the manufacturer cannot be held responsible for any resulting damage. If you decide not to use the appliance because of a fault, we advise you to cut off the cable after removing the plug from the plug socket.
  • Seite 80: Use

    Prior to first use Preferably use the oven grid when preparing meals. Never place cold (frozen) meals directly on the glass turntable. The difference in temperature may cause it to crack! • Open the door, remove the packaging and check the microwave for damage.
  • Seite 81: Controls

    CONTROLS Set the time When the appliance is connected to the network for the first time, you need to set the time. The display reads '0:00'. The clock runs as long as the combi-microwave is connected to the network. 1. Press twice on the timer button. The hours flash in the display.
  • Seite 82: Quick Start

    CONTROLS Display Power output Food P100 100 % - 1000 W - Boiling water, warming up - Cooking chicken, fish and vegetables P 80 80 % - 800 W - Warming up - Cooking mushrooms and seafood - Cooking dishes containing egg and cheese P 50 50 % - 500 W - Cooking rice and soup...
  • Seite 83: Stop

    CONTROLS Stop You can stop or cancel a running programme by opening the door or pressing the stop button. In order to start the programme again, press the start button. • If you want to cancel the programme entirely, press the stop button again.
  • Seite 84: Oven Function

    CONTROLS Oven function 1. Press once on the function button. 'P100' flashes in the display. • Press again (a number of times) on the function button if you wish to set another temperature. The first temperature that appears in the display is '140. You can set a temperature from 140 °C to 230 °C.
  • Seite 85: Combi Function

    CONTROLS Combi function Combi function There are four different combi functions. In the following table you can see which functions you can select and for what they should be used. Display Function Description Microwave + hot air Use this function to bake food quickly. Suitable for fruit cake, bread and gratinated dishes (that normally need a longer preparation time).
  • Seite 86: Defrosting According To Weight

    CONTROLS Defrosting according to weight With this function you only need to set the weight of the food. The defrost time appears automatically in the display when the microwave starts. 1. Press once on the defrost button. 'd-1' flashes in the display. 2.
  • Seite 87: Cooking In Phases

    CONTROLS Preferably use the oven grid when preparing meals. Never place cold (frozen) meals directly on the glass turntable. The difference in temperature may cause it to crack! Cooking in phases You can set a maximum of two phases in a cooking programme. If defrost is a phase in a cooking programme, you should input this first.
  • Seite 88: Auto Cook

    CONTROLS Auto cook With this function you can prepare popular dishes very simply. You set the weight and the microwave selects the correct time automatically. Display Description Weight Vegetables 150/350/500 g Fish 150/250/350/450/650 g Meat 150/300/450/600 g Pasta 50/100/150 g Potatoes 1/2/3 potatoes (approximately 230 g/460 g/...
  • Seite 89: Child Lock

    CONTROLS A double-beep signal indicates when the oven is at temperature. Place the cake in the microwave and press the start button. Child lock You can 'lock' your combi-microwave so that starting the combi- microwave is no longer possible. Please note: the child lock can only be switched on if the combi- microwave is not switched on.
  • Seite 90: Cooking Tips

    COOKING TIPS Warming up and cooking • The microwave always heats with the same intensity. The more you place in the microwave, the longer the cooking time. • Flatter dishes heat up more quickly than thin, tall dishes. • Covering dishes with microwave film or a fitting lid prevents spattering, reduces cooking time and helps retain moisture levels.
  • Seite 91 COOKING TIPS Factors that influence the cooking process • The temperature of the ingredients influences the preparation time. A cold meal needs more cooking time than a meal at room temperature. • Lighter dishes cook faster than heavier and solid dishes, such as stews or rolled meats.
  • Seite 92 COOKING TIPS • Freezing • When freezing you should take defrosting in the microwave into account, by not using aluminium foil or trays and by freezing in flat portions. Cooking vegetables • If possible, always use fresh vegetables. If vegetables have become a little limp because they've been left for too long, you can place them in cold water for a while so that they absorb moisture.
  • Seite 93: Maintenance

    MAINTENANCE Cleaning • DON'T USE any abrasive cleaners or metal scrapers to clean the glass door. This will scratch the surface which can break the glass. • DON'T USE high pressure or steam cleaners to clean the microwave. • Clean the interior directly after use. Use a damp cloth to remove condensation, boiled over liquid and food remnants.
  • Seite 94: Faults / Technical Data

    • recycled paper that contains small metal particles. Technical data The data plate indicates the total nominal load, the required voltage and the frequency. This appliance meets all relevant CE guidelines. MAG557RVS Connection 230V~50Hz Microwave power 1.0 kW Grill power output 1.1 kW...
  • Seite 95: Technical Data

    TECHNICAL DATA Electrical connection For this appliance a mains supply of 230V, 50 Hz AC is needed. The appliance has a mains lead with an earthed plug. Please note! For safe use it is necessary that the appliance is correctly earthed. Never connect the appliance to DC. Incorrect use can cause electric shocks.
  • Seite 96: Installation Dimensions

    TECHNICAL DATA Installation dimensions 550-580 min. min. Ventilation opening on rear: 240 cm EN 24...
  • Seite 97: Environmental Aspects

    ENVIRONMENTAL ASPECTS Disposal of the appliance and packaging Sustainable materials have been used during manufacture of this appliance. This appliance must be disposed of responsibly at the end of its service life. The government can provide you with information about this. The appliance packaging is recyclable.
  • Seite 98 EN 26...

Inhaltsverzeichnis