Sony PSS-610 Installationshandbuch Fur Handler
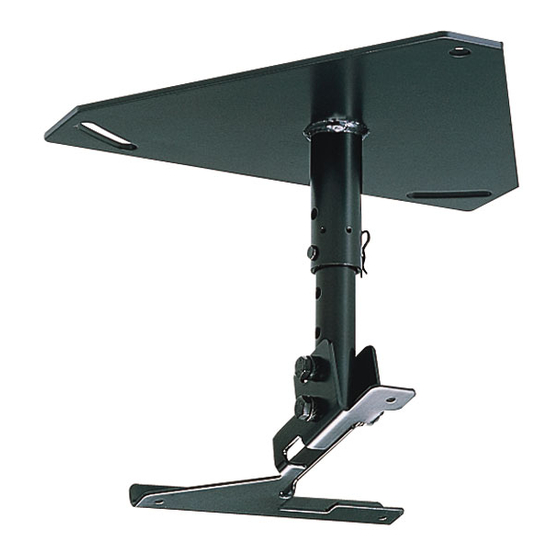
Projector suspension support
Quicklinks
Projector
Suspension Support
プロジェクターサスペンションサポート
特約店様用取付説明書
お買い上げいただきありがとうございます。この取付説明書は、特約店様用に書かれたも
のです。
お客様へ
本製品の取り付けには、確実な作業が必要になります。必ず、販売店や工事店に依頼
して、安全性に充分考慮して確実な取り付けを行ってください。
安全のための注意事項を守らないと、火災や人身事故になることがあります。
この説明書には、事故を防ぐための重要な注意事項と製品の取り扱い
かたを示してあります。この説明書をよくお読みのうえ、製品を安全
にお使いください。お読みになったあとは、いつでも見られるところ
に必ず保管してください。
特約店様へ
本製品の取り付けには特別な技術が必要ですので、設置の際には取付
説明書をよくご覧の上、設置を行ってください。取り付け不備や取り
扱い不備による事故、損傷については、当社では責任を負いません。
なお、この取扱説明書は、取り付け作業後にお客様に渡してくださ
い。
このプロジェクターサスペンションサポートはプロジェクター専用で
す。プロジェクター以外の機器には使わないでください。
Installation manual for Dealers
Manuel d'installation destiné aux revendeurs
Installationshandbuch für Händler
Manual de instalación para proveedores
Manuale d'installazione per i rivenditori
PSS-610
2005 Sony Corporation
4-074-715-11(1)

Verwandte Anleitungen für Sony PSS-610


Inhaltszusammenfassung für Sony PSS-610
- Seite 1 安全のための注意事項を守らないと、火災や人身事故になることがあります。 この説明書には、事故を防ぐための重要な注意事項と製品の取り扱い かたを示してあります。この説明書をよくお読みのうえ、製品を安全 にお使いください。お読みになったあとは、いつでも見られるところ に必ず保管してください。 特約店様へ 本製品の取り付けには特別な技術が必要ですので、設置の際には取付 説明書をよくご覧の上、設置を行ってください。取り付け不備や取り 扱い不備による事故、損傷については、当社では責任を負いません。 なお、この取扱説明書は、取り付け作業後にお客様に渡してくださ い。 このプロジェクターサスペンションサポートはプロジェクター専用で す。プロジェクター以外の機器には使わないでください。 Installation manual for Dealers Manuel d’installation destiné aux revendeurs Installationshandbuch für Händler Manual de instalación para proveedores Manuale d’installazione per i rivenditori PSS-610 2005 Sony Corporation...
- Seite 2 Sony LCD projector. Never use it for another purpose. 製品の落下による死亡、大けがなどの • Use the screws supplied with the PSS-610 to install 事故を避けるため、下記の注意事項を the projector suspension support on the projector. Do not use any other type of screws. To tighten the 強制...
- Seite 3 Maximale Belastbarkeit: 20 kg Carga máxima: 20 kg (44 lb 1 oz) Die Aufhängung PSS-610 ist zur Verwendung mit El soporte de suspensión PSS-610 está diseñado para den LCD-Projektoren von Sony konzipiert. utilizarse con el proyector LCD de Sony. Vorsicht Precaución...
- Seite 4 目次/Table of contents/Table des matières/Inhalt/ Indice/Indice/ 日本語 English 部品表 ................. Parts List ..............5 設置寸法 ................Installation Diagram ..........7 天井への取り付けかた ............Attaching to the ceiling ..........8 天井への取り付け例 ............Installation Examples ..........18 主な仕様 ................Specifications ............22 ..............裏表紙 付録...
- Seite 5 部品表/Parts List/Composants/Teileliste/Lista de componentes/Elenco dei componenti/ 天井用マウントブラケット Upper ceiling mount bracket (1) Support supérieur de montage au plafond (1) Obere Deckenmontagehalterung (1) Soporte superior de montaje en el techo (1) Staffa superiore di montaggio al soffitto (1) アジャストメントパイプ Adjustment pipe (1) Tube de réglage (1) Einstellrohr (1) Tubo de ajuste (1)
-
Seite 6: Elenco Dei Componenti
プロジェクターサスペンションサポートPSS-610をプロジェクターに取り付ける際は本機に付属のネジを使用し、他のネジは使用しな いでください。ネジを締めすぎた場合、プロジェクターの取り付け部分が破損することがあります。 Use the screws supplied with the PSS-610 to install the projector suspension support on the projector. Do not use any other type of screws. To tighten the screws too hard may cause damage. Utilisez les vis fournies avec l'unité PSS-610 pour installer le support de suspension du projecteur sur le projecteur. N’utilisez aucun autre type de vis. - Seite 7 設置寸法/Installation Diagram/Schéma d’installation/ Installationsdiagramm/Diagrama de instalación/ Schema dell’installazione/ スク リ ーンサイ ズと投射距離の寸法および天井からプロジェク ターまでの距離の寸法については、以下の説明書をご覧く ださい。 - プロジェクター本体の取扱説明書 - プロジェクター本体の設置説明書 - レンズの取付説明書 (別売のレンズ使用時) VPL-S900にサスペンシ ョ ンサポー ト を取り付ける場合は、 この取付説明書の14 ページもご覧く ださい。 For details of screen size and installation measurement for projection and the distance between the ceiling and the projector, refer to the following manuals.
- Seite 8 天井への取り付けかた/Attaching to the ceiling/ Montage au plafond/Montage an der Decke/ プロジェクター底面 Bottom of projector (b)/(c) Base du projecteur Unterseite des Projektors Base del proyector Base del proiettore (h) (j) (b)/(c) (h) (j) English 日本語 A: One screw hole for the lens side A レンズ側にネジ穴が1つの場合...
- Seite 9 Montaje en el techo/Montaggio al soffitto/ Français Deutsch Un orifice de vissage du côté de l’objectif Eine Schraubenbohrung auf der Objektivseite Deux orifices de vissage du côté de l’objectif Zwei Schraubenbohrungen auf der Objektivseite La différence entre A et B dans les figures ci-dessus est que le Der Unterschied zwischen der Abbildung A und B oben liegt in sens de montage du support est différent (180°).
- Seite 10 天井への取り付けかた/Attaching to the ceiling/ Montage au plafond/Montage an der Decke/Montaje en el techo/ (h) (j) スクリーン方向 Screen forward Ecran Projektionsschirm Pantalla Direzione dello schermo (h) (j) English 日本語 Attach the adjustment pipe to the projector mount プロジェク ターマウン ト ブラケッ ト(d)にアジャス ト メ ン トパイ bracket (d) using a bolt M8 50 (f), two toothed ×...
- Seite 11 Montaggio al soffitto/ Français Deutsch Montez les tubes de réglage sur le support de Bringen Sie das Einstellrohr mit einer M8 × montage du projecteur (d) à l’aide d’un boulon M8 × Schraube (f), zwei M8-Zahnscheiben (i), zwei M8- 50 (f), de deux rondelles hélice M8 (i), de deux Unterlegscheiben (h) und einer M8-Mutter (j) an die rondelle M8 (h) et d’un écrou M8 (j).
- Seite 12 天井への取り付けかた/Attaching to the ceiling/ Montage au plafond/Montage an der Decke/Montaje en el techo/ 日本語 English アジャス ト メ ン トパイ プを天井用マウ ン ト ブラケ ッ ト(a)に差し Insert the adjustment pipe into the upper ceiling 込み、仮どめする。 mount bracket (a). Attach the pipe with the two 6 mm pins (k) and the two snap pins (l).
- Seite 13 Montaggio al soffitto/ Français Deutsch Setzen Sie das Einstellrohr in die Obere Introduisez le tube de réglage dans le support Deckenmontagehalterung (a) ein. Bringen Sie das supérieur de montage au plafond (a). Fixez le tube à Rohr mit den zwei 6-mm-Stiften (k) und den zwei l’aide de deux goupilles de 6 mm (k) et de deux Klammern (l) an.
- Seite 14 天井への取り付けかた/Attaching to the ceiling/ Montage au plafond/Montage an der Decke/Montaje en el techo/ / Dimensions for attaching the projector VPL-S900 取付時の寸法 suspension support to the VPL-S900 / Dimensions d’installation du support de suspension pour projecteur sur le VPL-S900 / Abmessungen zum Anbringen der Projektoraufhängung am VPL-S900 / Dimensiones para instalar el soporte de suspensión para proyector al VPL-S900 / Dimensioni per l’applicazione del supporto di sospensione del proiettore...
- Seite 15 Montaggio al soffitto/ Français Deutsch Vue du dessus Draufsicht Alignez le centre de l’objectif sur le centre de l’écran. Richten Sie die Mitte des Objektivs an der Mitte des Projektionsschirms aus. a) Distance entre l’écran et le centre de l’objectif 1 Centre de l’écran a) Abstand zwischen dem Projektionsschirm und der Mitte des Objektivs...
- Seite 16 天井への取り付けかた/Attaching to the ceiling/ Montage au plafond/Montage an der Decke/Montaje en el techo/ : mm 単位 Units : mm (inches) Unité : mm (pouces) Einheit : mm Unidades : mm (pulgadas) Unità : mm 日本語 English 前から見た図 Front view レンズの中心は、支柱の中心より右側に49 mmずれ The lens is offset 49 mm (1 inches) to the right from ています。天井に設置するときは、支柱の中心では...
- Seite 17 Montaggio al soffitto/ Français Deutsch Vue frontal Vorderansicht L’objectif est décalé de 49 mm (1 pouces) vers la droite Das Objektiv am Projektor ist 49 mm nach rechts von der du centre du pivot de support. Au moment du montage, veillez Mitte des Ständers versetzt.
- Seite 18 天井への取り付け例/Installation Examples/Exemples d’installation au plafond/Installationsbeispiele/ The following illustrations show the projector 以下はサスペンションサポートが天井に取り付けられたとき suspension support attached to the ceiling. Installation の様子を示します。 天井の材質によって補強方法は多少異な is different depending on the material of ceiling. ります。 Caution ご注意 Before installation, check that the maximum ceiling 取り付ける前に天井の最大耐用荷重が120 kg以上あることを loading is in excess of 120 kg (264 lb 8 oz) .
- Seite 19 Ejemplos de instalación en el techo/Esempi di installazione al soffitto/ /For wooden ceiling/Pour un plancher/Montage an 板天井に取り付ける場合 einer Holzdecke/Para techos de madera/Montaggio ad un soffitto in legno/ 平屋または最上階の場合 /For-one-story house or uppermost floor/Pour maison à un étage ou plafond sous un toit/Decke eines einstöckigen Hauses oder des obersten Stockwerks/ Para casas de una planta o plantas superiores/Montaggio in una casa a piano unico o all’ultimo piano/ キャビネット前面...
- Seite 20 天井への取り付け例/Installation Examples/Exemples d’installation au plafond/Installationsbeispiele/ その他の階の場合 /For other floors/Autres sols/Zwischendecken/Para otros suelos/Per altri piani/ キャビネット前面 Front of the cabinet Avant du meuble Vorderseite des Gehäuses Parte frontal de la caja Parte anteriore dell’apparecchio /Floor line/Niveau du plancher/ 上の階の床 Bodenlinie/Línea de suelo/Livello del pavimento/ 梁...
- Seite 21 Ejemplos de instalación en el techo/Esempi di installazione al soffitto/ /For concrete ceiling/Pour un plafond en コンクリート天井に取り付ける場合 béton/Betondecke/Para techos de hormigón/Montaggio ad un soffitto di cemento/ コンクリート天井 /Concrete ceiling/Plafond en béton/Betondecke/Techo de hormigón/Soffitto di cemento/ (12 mm ) /Anchor for コンクリートアンカー...
- Seite 22 主な仕様/Specifications/Spécifications/Technische Daten/Especificaciones/Caratteristiche tecniche/ /Dimensions/Mesures/Abmessungen/Dimensiones/Dimensioni/ 外形寸法 天井用マウントブラケット Upper ceiling mount bracket Support supérieur de montage au 250 (9 plafond Obere Deckenmontagehalterung Soporte superior de montaje en el techo 12.7( Staffa di montaggio al soffitto 12.7( 250 (9 317.5 (12 94.8 (3 アジャストメントパイプ...
- Seite 23 組み上げ時の寸法/Dimensions of the assembled bracket/Dimensions du support assemblé/ Abmessungen de montierten Halterung/Dimensiones del soporte de monitaje/Dimensioni della staffa montata/ 前から見た図 /Front view/Vue frontale/Vorderansicht/Vista frontal/Vista frontale/ 317.5 (12 317.5 (12 250 (9 250 (9 125(4 125(4 : mm 単位 Units : mm (inches) Unité...
- Seite 24 調整する ことができます。 bracket (d) to between +15° and –15°. This informs in regard to the modification of the Français appendix of PSS-610 Suivant les conditions d’installation, ajustez l’angle CAUTION entre la surface de base du projecteur et le plafond, puis For VPL-HS5x series only serrez les deux boulons (f).