Herunterladen Inhalt Inhalt Diese Seite drucken
Kemper PROFILER Schnellstart
Vorschau ausblenden Andere Handbücher für PROFILER:
Inhaltsverzeichnis

Werbung

Verfügbare Sprachen
  • DE

Verfügbare Sprachen

  • DEUTSCH, seite 30

Werbung

Inhaltsverzeichnis
loading

Inhaltszusammenfassung für Kemper PROFILER

  • Seite 3 PROFILER™ QUICKSTART IN ENGLISH...
  • Seite 4: Legal Notice

    The content of this manual is furnished for informational use only, is subject to change without notice and should not be construed as a commitment by Kemper GmbH. Kemper GmbH assumes no responsibility or liability for any errors or inaccuracies that may appear in this book.
  • Seite 5: Inhaltsverzeichnis

    Volume Pedal ............................14 Wah Pedal ............................14 Morph Pedal ............................15 More Fun with Pedals ........................16 Lock Function ........................... 17 Powered PROFILER with Guitar Cabinet ................17 Keeping your PROFILER Up To Date with Rig Manager ..........20 Documentation and Tutorials Videos ..................23...
  • Seite 6 6 PROFILER QUICKSTART Support and User Forum ......................24 Important Safety Instructions ....................25 Compliance Statement ........................26...
  • Seite 7: Okay, So What Did I Just Buy

    OKAY, SO WHAT DID I JUST BUY? First of all, thank you for choosing the KEMPER™ PROFILER™, or PROFILER for short. We have no doubt that once you realize everything it can do, you will be as thrilled with it as we are. Our ultimate goal is to provide a complete solution for your guitar-playing needs, which is why we choose not to restrict you to a predefined set of digital amp models.
  • Seite 8: Making Connections

    Play your guitar. Control the volume of the PROFILER with the MASTER VOLUME knob in the upper right half of the unit. If you own a PROFILER Remote, then connect it to the NETWORK socket using the Ethernet cable provided.
  • Seite 9: Switching Rigs

    PROFILER QUICKSTART SWITCHING RIGS The PROFILER comes with numerous guitar amp setups, including effects. These are called “Rigs”, and the library of Rigs stored on your PROFILER is called the “Rig pool”. The four buttons that form the RIG navigation cross next to the...
  • Seite 10: Editing And Storing Rigs

    10 PROFILER QUICKSTART EDITING AND STORING RIGS TYPE BROWSE You can tweak the current Rig and store any changes you want to STORE EXIT keep. For instance, if you want to boost Treble, turn the All Rigs Sorted by Name...
  • Seite 11: Noise Gate

    Main Manual. There is also a tutorial video dedicated to the noise gates available on: www.kemper-amps.com/video ADDING EFFECTS The PROFILER features eight effects modules. Four are located DELAY REVERB before the amplifier module (pre), and four are located after it...
  • Seite 12: Toggling Effects On/Off With Profiler Remote

    » Don’t forget to store the edited Rig. TOGGLING EFFECTS ON/OFF WITH PROFILER REMOTE The PROFILER Remote offers four dedicated Effect Buttons (I to IIII) to activate effect modules. Each can toggle a single module or a combination of modules.
  • Seite 13: Tuner

    TUNER You can check the tuning at any time by watching the three TUNER LEDs, either on the PROFILER or the Remote. Switch the chicken-head to the TUNER position or press the TUNER button on your Remote to activate Tuner Mode.
  • Seite 14: Volume Pedal

    So-called “expression pedals”, which are optimized for digital devices like the PROFILER, should be used for all pedal functions. Connect your expression pedal to the PEDAL 1 input socket on the rear side of the PROFILER, or PEDAL 3 input on your Remote. You will be able to control volume right away.
  • Seite 15: Morph Pedal

    PROFILER QUICKSTART MORPH PEDAL Morphing allows you to change any number of continuous parameters like Gain level, Delay Mix or Delay Feedback simultaneously – all with a single expression pedal. Moving the pedal is equivalent to turning all those knobs at the same time to move between one sound and another.
  • Seite 16: More Fun With Pedals

    16 PROFILER QUICKSTART Morphing is explained in detail in the Main Manual plus there are also tutorial videos dedicated to this subject available on: www.kemper-amps.com/video MORE FUN WITH PEDALS Here a few tips related to linking and checking pedal controllers: Press the SYSTEM button to access several pages of global settings.
  • Seite 17: Lock Function

    LOCK button. Any locked modules will remain lit. POWERED PROFILER WITH GUITAR CABINET This paragraph is for those who want to use a powered PROFILER (PowerHead™ or PowerRack™) to drive a guitar cabinet directly. Please be aware that, generally speaking, the sound of a guitar cabinet is different compared to that of a full-range cabinet, PA, or headphones.
  • Seite 18 18 PROFILER QUICKSTART Use the <PAGE> buttons to navigate to the “Output Sources” page TYPE BROWSE and then activate “Monitor Cab Off” with the corresponding soft STORE EXIT button above the display. Main Out -12 dB Monitor Cab O Monitor Stereo...
  • Seite 19 Please refrain from connecting devices with impedances lower than 4 ohms, as the power amp could be damaged. Always ensure adequate ventilation, especially if mounting your PROFILER into a rack. Failure to do so may cause the power amp to shut down to prevent overheating.
  • Seite 20: Keeping Your Profiler Up To Date With Rig Manager

    PROFILER: If a computer and internet connection is in reach, use Rig Manager to keep your amp up to date. In all other cases, copy the updates to an USB memory stick and plug it into your PROFILER.
  • Seite 21 PROFILER QUICKSTART » Shortly after registration, you’ll receive a confirmation e-mail from us. Use the confirmation link in this e-mail to activate your user account. If you should need further assistance, contact our support team here: www.kemper-amps.com/contact » Once the account is activated, you can download updates, additional Rigs and also participate in discussions on our private user forum: www.kemper-amps.com/forum...
  • Seite 22 “Format USB stick”. Once completed, you will be notified. » If the memory stick is not formatted, the PROFILER will show “Are you sure? USB stick needs to be formatted”. Acknowledge the dialog with “Yes” and follow the onscreen instructions.
  • Seite 23: Documentation And Tutorials Videos

    PROFILER QUICKSTART » Plug the memory stick into your PROFILER and an update dialog will appear shortly after. Acknowledge the dialog and follow the onscreen instructions. For any critical application we recommend to use the lastest release version. The Main Manual contains more about the advantages and disadvantages of software beta versions.
  • Seite 24 24 PROFILER QUICKSTART SUPPORT AND USER FORUM Even though we do our best to address everything you need to know in these manuals and videos, we would like to invite you to contact our support team at any time using the contact form on our website: www.kemper-amps.com/contact...
  • Seite 25: Important Safety Instructions

    PROFILER QUICKSTART IMPORTANT SAFETY INSTRUCTIONS Read these instructions. Keep these instructions. Heed all warnings. Follow all instructions. » Do not use this apparatus near water. Clean only with dry cloth. » Do not block any ventilation openings. Install in accordance with the manufacturer’s instructions. Do not install near any heat sources such as radiators, heat registers, stoves, or other apparatus (including amplifiers) that produce heat.
  • Seite 26: Compliance Statement

    Verification procedure – 47CFR §15.101 Other Class B digital devices and peripherals: EN 55022 Class B: 2006+A1:2007 EN 61000-3-2: 2006 + A1:2009 + A2:2009 EN 61000-3-3: 2008 EN55024:1998 (PROFILER Head) + EN55024:2010 (PROFILER Rack) + A1:2001 + A2:2003 RADIO AND TELEVISION INTERFERENCE This equipment has been tested and found to comply with the limits for a Class B digital device, pursuant to Part 15 of the FCC Rules.
  • Seite 27 DECLARATION OF CONFORMITY We Kemper GmbH, Königswall 16-18, 45657 Recklinghausen Germany, Tel: +49 (2361) 9376824, declare under our sole responsibility that the product PROFILER complies with Part 15 of FCC Rules. Operation is subject to the following two conditions: (1) this device may not cause harmful interference.
  • Seite 29 PROFILER™ SCHNELLSTART IN DEUTSCH...
  • Seite 30: Rechtliche Hinweise

    Lizenzvertrag. Diese Vertragsbestimmungen wurden bei der Erstellung dieses Handbuchs eingehalten. Der Inhalt dieses Handbuchs ist rein informell und kann zu jeder Zeit, ohne Vorankündigung von der Kemper GmbH geändert werden. Die Kemper GmbH haftet nicht für inhaltliche Fehler. Ohne schriftliche Genehmigung der Kemper GmbH ist es nicht zulässig, diese Publikation oder Teile davon zu reproduzieren und/oder in schriftlicher- und/oder...
  • Seite 31 Volumenpedal ..........................40 Wah-Pedal ............................41 Morph-Pedal ............................41 Noch mehr Spaß mit Pedalen....................43 Lock-Funktion ..........................44 PROFILER mit eingebauter Endstufe und angeschlossener Gitarrenbox ... 44 Den PROFILER mit Rig Manager auf dem neusten Stand halten ......47 Dokumentation und Video-Tutorials ..................50...
  • Seite 32 32 PROFILER SCHNELLSTART Support und User-Forum ......................51 Wichtige Sicherheitshinweise ....................51 Erklärung zur Einhaltung von Bestimmungen ..........................52...
  • Seite 33: Was Ist Eigentlich Ein Profiler

    Wir sind sicher, dass sie genauso begeistert sein werden wie wir, sobald sie herausfinden, was dieses Gerät leisten kann. Unser Ziel war es, mit dem PROFILER einen Verstärker auf den Markt zu bringen, der sämtliche Bedürfnisse von Gitarristen erfüllt und sie nicht auf einige vordefinierte Modelle von Gitarrenverstärkern beschränkt.
  • Seite 34: Anschließen

    Head“) in die Position BROWSER bewegen. Warten sie bis das Gerät gestartet ist und der Startbildschirm des Browser-Modus erscheint. Spielen sie Gitarre! Die Lautstärke vom PROFILER regeln sie mit dem Regler MASTER VOLUME in der oberen rechten Hälfte des Gerätes.
  • Seite 35: Rigs Wechseln

    Der PROFILER wird mit einer Menge Gitarrenverstärker-Profilen ausgeliefert. Einen Sound bestehend aus einem Verstärkerprofil plus Effekten nennen wir ein „Rig“. Die Gesamtheit aller Rigs, die auf ihrem PROFILER gespeichert sind, bezeichnen wir als den „Rig Pool“. Mit den vier sogenannten RIG-Navigations-Tastern neben dem...
  • Seite 36: Rigs Verändern Und Speichern

    36 PROFILER SCHNELLSTART In der Standardeinstellung sind die Rigs im Pool alphabetisch nach TYPE BROWSE ihren Namen geordnet. Sie können die Rigs aber auch anders sortieren. Mit „By Gain” z. B. sortieren sie die Rigs nach dem Grad STORE EXIT...
  • Seite 37: Noise Gate

    PROFILER SCHNELLSTART » Bei „Save As“ wird ein neues zusätzliches Rig unter einem anderen Namen gespeichert, während das Original-Rig unverändert erhalten bleibt. » Mit „Rename“ wird das geladene Rig überschrieben, man kann aber dabei dessen Namen ändern. NOISE GATE STOM Die Intensität des Noise Gates stellen sie mit dem Regler oben links...
  • Seite 38: Effekte Hinzufügen

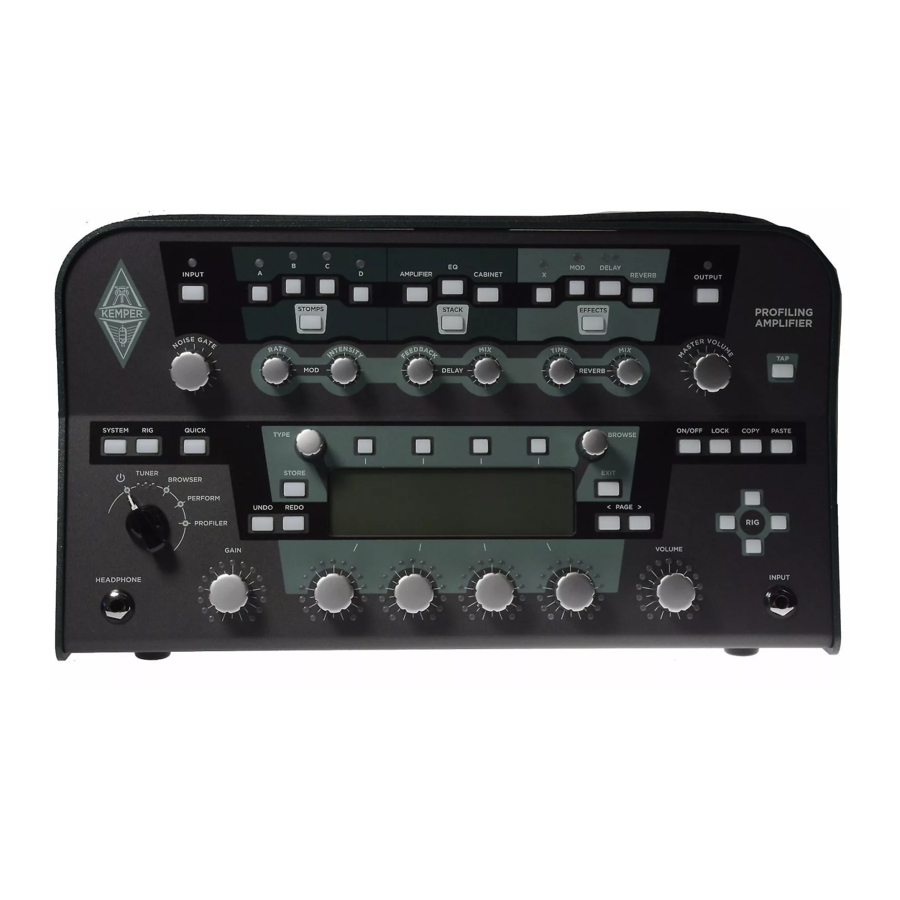
    38 PROFILER SCHNELLSTART EFFEKTE HINZUFÜGEN Der PROFILER verfügt über acht Effektmodule. Vier befinden sich DELAY vor dem Verstärkermodul und vier weitere dahinter. Die Module REVERB OUTPUT EFFECTS vor dem Verstärker werden als A, B, C und D bezeichnet. Die Module hinter dem Verstärker heißen X, MOD, DLY und REV.
  • Seite 39: An- Und Abschalten Von Effekten Mittels Profiler Remote

    PROFILER SCHNELLSTART AN- UND ABSCHALTEN VON EFFEKTEN MITTELS PROFILER REMOTE Die PROFILER Remote besitzt vier spezielle Effekttaster bezeichnet mit „I“ bis „IIII“, um Effektmodule ein- und auszuschalten. Jeder einzelne dieser vier Effekttaster kann gleichzeitig eine Kombination von Effektmodulen schalten Um einem dieser Taster ein Effektmodul zuzuordnen, treten sie bitte auf den Effekttaster, während sie gleichzeitig den Taster des...
  • Seite 40: Tuner

    Mit sogenannten „Expression-Pedalen“, die für die Steuerung digitaler Geräte optimiert sind, lassen sich beim PROFILER Pedalfunktionen fernsteuern. Verbinden sie ihr Expression-Pedal mit der Buchse PEDAL 1 auf der PROFILER-Rückseite bzw. mit der Buchse PEDAL 3 der Remote. Und schon können sie mit dem Pedal die Lautstärke steuern.
  • Seite 41: Wah-Pedal

    PROFILER SCHNELLSTART WAH-PEDAL Verbinden sie das Expression-Pedal mit dem Anschluss PEDAL 2 am PROFILER bzw. PEDAL 4 an der Remote. Ab jetzt steuert das Pedal Effekte, wie z. B. Wah-Effekte, die Tonhöhe von Pedal-Pitch-Effekten sowie Morphing. Was Morphing ist, erklären wir im nächsten Abschnitt.
  • Seite 42 42 PROFILER SCHNELLSTART Nun bewegen sie das Pedal in die Zehenstellung. Anschließend GAIN drehen sie dann den GAIN-Regler auf den gewünschten Grad für den Morph-Sound. Schon können sie den Gain mit dem Morph-Pedal kontinuierlich GAIN zwischen den Werten des Basis-Sounds und des Morph-Sounds verändern.
  • Seite 43: Noch Mehr Spaß Mit Pedalen

    PROFILER SCHNELLSTART NOCH MEHR SPASS MIT PEDALEN Hier noch ein paar Tipps zum Verlinken und der Prüfung der Pedal-Controller: Drücken sie auf die Taste, die mit SYSTEM bezeichnet ist. Es öffnet sich ein Menü mit mehreren Seiten globaler Einstellungen. Mit...
  • Seite 44: Lock-Funktion

    PROFILER MIT EINGEBAUTER ENDSTUFE UND ANGESCHLOSSENER GITARRENBOX Dieser Abschnitt richtet sich an Besitzer der Modelle mit eingebauter Endstufe (PROFILER PowerHead™ oder PROFILER PowerRack™), die eine Gitarrenbox anschließen möchten. Seien sie sich bewusst, dass sich der Klang einer Gitarrenbox prinzipbedingt von dem einer Full-Range-Box, einer PA oder eines Kopfhörers unterscheidet.
  • Seite 45 PROFILER SCHNELLSTART Sie benutzen also eine Gitarrenbox als persönlichen Abhörmonitor. Folglich möchten sie die Simulation der Gitarrenbox im PROFILER speziell in dem Signal ausschalten, welches die interne Endstufe und damit ihre Gitarrenbox ansteuert. Drücken sie dazu den OUTPUT-Taster und öffnen sie die Output-Sektion.
  • Seite 46 Schließen sie auch keinesfalls Lasten von weniger als 4 Ohm an, denn die Endstufe könnte dadurch Schaden nehmen. Sorgen sie stets für angemessene Belüftung. Das gilt insbesondere für PROFILER, die in Racks verbaut sind. Überhitzung könnte eine Schutzschaltung aktivieren, die die Endstufe vorübergehend außer Betrieb setzt.
  • Seite 47: Den Profiler Mit Rig Manager Auf Dem Neusten Stand Halten

    Anschließend gibt es zwei alternative Verfahren, ihren PROFILER zu aktualisieren. Falls ein Computer mit Internetzugang in der Nähe ist, können sie Rig Manager verwenden, um ihren PROFILER auf dem neusten Stand zu halten. In allen anderen Situationen kopieren sie das Update auf einen USB-Stick und stecken diesen dann in die entsprechende USB-Buchse am PROFILER.
  • Seite 48: Herunterladen Von Rig Manager Und Aktualisierungen

    48 PROFILER SCHNELLSTART » Registrieren sie bei der Gelegenheit am besten gleich ihren PROFILER sowie ggf. ihre Remote. Dadurch erhalten sie u. a. Zugriff auf Software-Updates. Zur Registrierung müssen sie die Seriennummer der Geräte eingeben, die sie auf einem Aufkleber auf dem Gehäuseboden finden.
  • Seite 49 Sobald der Vorgang beendet ist, erscheint ein Hinweis. » Falls der USB-Stick noch nicht formatiert ist, erscheint am PROFILER die Frage “Are you sure? USB stick needs to be formatted”. Bestätigen sie bitte mit „Yes“ und folgen sie den Anweisungen auf dem Display.
  • Seite 50: Dokumentation Und Video-Tutorials

    „OS Update“ auf ihrem USB-Stick. Lesen sie bitte die Hinweise in der Datei „ReadMe“ sowie das Addendum- Handbuch, in dem alle wichtigen Neuerungen jeder Betriebssystemversion zusammengefasst sind. » Stecken sie den USB-Stick in den PROFILER. Nach kurzer Zeit erscheint ein Update-Hinweis. Bestätigen sie mit „Yes“ und folgen sie den Anweisungen auf dem Display.
  • Seite 51: Support Und User-Forum

    PROFILER SCHNELLSTART SUPPORT UND USER-FORUM Obwohl wir uns mit diesen Handbüchern und den Video-Tutorials größte Mühe geben, können sie sich jederzeit an unser Support-Team wenden, indem sie das Kontaktformular auf unserer Web-Seite ausfüllen: www.kemper-amps.com/contact Diejenigen, die ihre Fragen und Anregungen gerne mit anderen Anwendern austauschen möchten, sind herzlich eingeladen, sich aktiv an unserem User-Forum zu beteiligen: www.kemper-amps.com/forum...
  • Seite 52: Erklärung Zur Einhaltung Von Bestimmungen

    Kompatibilität: Verfahren für den FCC-Nachweis – 47CFR §15.101 Andere Digital- und Peripheriegeräte der Klasse B: EN 55022 Class B: 2006+A1:2007 EN 61000-3-2: 2006 + A1:2009 + A2:2009 EN 61000-3-3: 2008 EN55024:1998 (PROFILER Head) + EN55024:2010 (PROFILER Rack) + A1:2001 + A2:2003...
  • Seite 53: Störungen Von Radio- Und Fernsehgeräten

    KONFORMITÄTSERKLÄRUNG Hiermit erklärt die Kemper GmbH, Königswall 16-18, 45657 Recklinghausen, Deutschland, Tel: +49 (2361) 9376824, in alleiniger Verantwortung, dass das Produkt PROFILER übereinstimmt mit Teil 15 der amerikanischen FCC- Bestimmungen. Die Bedienung unterliegt folgenden beiden Bedingungen: (1) Dieses Gerät darf keine schädlichen Einstreuungen erzeugen.
  • Seite 54: Erklärung Zur Einhaltung Von Funkkommunikationsstandards

    54 PROFILER SCHNELLSTART ERKLÄRUNG ZUR EINHALTUNG VON FUNKKOMMUNIKATIONSSTANDARDS Anmerkung: Dieses Gerät wurde getestet und entspricht den Grenzwerten ein-Digitalgerät der Klasse B entsprechend Teil 15 der FCC-Vorschriften. Diese Grenzwerte garantieren einen ausreichenden Schutz vor schädlichen Interferenzen bei der Installation in einem Haus bzw. einer Wohnung. Dieses Gerät erzeugt und verwendet Radiofrequenzenergie und kann diese auch abstrahlen und dadurch Funkverbindungen stören, wenn...
  • Seite 55 PROFILER™ INICIO RÁPIDO ESPAÑOL...
  • Seite 56 Kemper GmbH. KEMPER™, PROFILER™, PROFILE™, PROFILING™, PROFILER PowerHead™, PROFILER PowerRack™, PROFILER Remote™, KEMPER Rig Exchange™, KEMPER Rig Manager™...
  • Seite 57 Pedal de volumen ..........................66 Pedal wah ............................66 Pedal Morph .............................67 Más diversión con los pedales ....................68 Función Lock ...........................69 PROFILER autoamplificado con caja de guitarra ............69 Mantener tu PROFILER actualizado con Rig Manager ..........72 Documentación y tutoriales en vídeo ................... 75...
  • Seite 58 58 PROFILER QUICK START Atención al cliente y foro de usuarios ..................76 Instrucciones de seguridad importantes ................76 Declaración de conformidad ....................78...
  • Seite 59: Muy Bien, ¿Qué Me Acabo De Comprar

    MUY BIEN, ¿QUÉ ME ACABO DE COMPRAR? En primer lugar, gracias por elegir el KEMPER™ PROFILER™, o el “PROFILER” para abreviar. No nos cabe duda de que cuando te des cuenta de todo lo que puede hacer, te encantará tanto como a nosotros. Nuestro principal objetivo es ofrecer una solución completa para las necesidades de los guitarristas, y por ello hemos decidido que no...
  • Seite 60: Realizar Las Conexiones

    MAIN OUTPUT de la parte posterior (ya sea XLR o TS) a las entradas del dispositivo receptor. No olvides conectar el cable de alimentación a una toma de corriente. No te preocupes por el voltaje: ¡el PROFILER se adapta automáticamente! Activa el equipo colocando el mando tipo “chicken head” en la posición BROWSER.
  • Seite 61: Conmutar Rigs

    MadRyan Jubilee MadRyan Jubilee El PROFILER Remote opcional es una tercera opción para navegar por la Rig Pool utilizando los botones Rig 1~5 y los botones arriba/abajo. Por defecto, los Rigs en la zona están ordenados alfabéticamente.
  • Seite 62: Editar Y Almacenar Rigs

    62 PROFILER QUICK START EDITAR Y ALMACENAR RIGS TYPE BROWSE Puedes modificar el Rig actual y almacenar los cambios que STORE EXIT deseas conservar. Por ejemplo, si deseas aumentar los Agudos, All Rigs Sorted by Name Store Snapshot Nitro 2015 A...
  • Seite 63: Noise Gate

    Manual Principal. También hay un tutorial en vídeo dedicado a las compuertas de ruido disponible en: www.kemper-amps.com/video AÑADIR EFECTOS El PROFILER cuenta con ocho módulos de efectos. Cuatro de ellos DELAY REVERB están situados antes del módulo amplificador (pre) y cuatro...
  • Seite 64: Activar/ Desactivar Efectos Con Profiler Remote

    » No te olvides de guardar el Rig editado. ACTIVAR/ DESACTIVAR EFECTOS CON PROFILER REMOTE El PROFILER Remote ofrece cuatro botones de efectos específicos (I~IIII) para activar los módulos de efectos. Cada uno de ellos puede alternar un solo módulo o una combinación de módulos.
  • Seite 65: Afinador

    AFINADOR Puedes comprobar la afinación en cualquier momento mirando los tres LED TUNER, ya sea en el PROFILER o en el Remote. Cambia el mando tipo “chicken head” a la posición TUNER o pulsa el botón TUNER en tu Remote para activar el Modo Tuner.
  • Seite 66: Pedal De Volumen

    Los llamados “pedales de expresión”, que están optimizados para dispositivos digitales como el PROFILER, deberían utilizarse para todas las funciones de pedal. Conecta tu pedal de expresión a la entrada PEDAL 1 de la parte posterior del PROFILER o a la entrada PEDAL 3 de tu Remote. Podrás controlar el volumen de inmediato.
  • Seite 67: Pedal Morph

    PROFILER QUICK START PEDAL MORPH El Morphing te permite cambiar simultáneamente cualquier número de parámetros continuos, como el nivel de ganancia, la mezcla de delay o el feedback de delay, con un único pedal de expresión. Mover el pedal equivale a girar todos esos mandos al mismo tiempo para pasar de un sonido a otro.
  • Seite 68: Más Diversión Con Los Pedales

    68 PROFILER QUICK START El Morphing se explica con detalle en el Manual Principal y también hay tutoriales en vídeo dedicados a este tema disponibles en: www.kemper-amps.com/video MÁS DIVERSIÓN CON LOS PEDALES Estos son algunos consejos relacionados con el enlace y la comprobación de los controladores de pedal:...
  • Seite 69: Función Lock

    GUITARRA Este apartado se dirige a aquellos usuarios que desean utilizar un PROFILER autoamplificado (PowerHead™ o PowerRack™) para transmitir la señal directamente a una caja de guitarra. Ten en cuenta que, en general, el sonido de una caja de guitarra es diferente al de una caja de gama completa, un sistema de megafonía o unos auriculares.
  • Seite 70 70 PROFILER QUICK START Estás utilizando una caja física de guitarra como tu monitor personal. Esto significa que debes desactivar la simulación de caja para la señal que se envía al amplificador interno y a tu caja física de guitarra. Puedes hacerlo pulsando OUTPUT.
  • Seite 71 Nunca conectes dispositivos con unas impedancias inferiores a 4Ω, ya que podrías provocar daños en el amplificador. Procura que haya una ventilación adecuada, especialmente si colocas tu PROFILER en un estante. De lo contrario, es posible que el amplificador se desactive para evitar el sobrecalentamiento.
  • Seite 72: Mantener Tu Profiler Actualizado Con Rig Manager

    CON RIG MANAGER Rig Manager™ es un software gratuito que es el complemento ideal de tu PROFILER. La aplicación te ayuda a: » Obtener acceso a más de 12 000 Rigs gratuitos y a docenas de Rig Packs adicionales de alta calidad.
  • Seite 73 DESCARGAR RIG MANAGER Y OTRAS ACTUALIZACIONES » Desde tu navegador, visita www.kemper-amps.com/start. » Inicia sesión en nuestro sitio web. » Selecciona “Updates”, visita la sección de descargas y selecciona la categoría “Rig Manager”. Elige la versión adecuada para tu ordenador y descarga el instalador.
  • Seite 74 » Si el lápiz de memoria no está formateado, el PROFILER mostrará el mensaje “Are you sure? USB stick needs to be formatted”. Selecciona la opción “Yes” en el cuadro de diálogo y sigue las instrucciones en pantalla.
  • Seite 75: Documentación Y Tutoriales En Vídeo

    “ReadMe”, así como el Manual Anexo. » Conecta el lápiz de memoria a tu PROFILER y, al cabo de unos instantes, se mostrará un cuadro de diálogo de actualización. Selecciona la opción deseada en el cuadro de diálogo y sigue las instrucciones en pantalla.
  • Seite 76: Instrucciones De Seguridad Importantes

    76 PROFILER QUICK START ATENCIÓN AL CLIENTE Y FORO DE USUARIOS A pesar de todos nuestros esfuerzos por tratar la mayoría de los temas en estos manuales y en los vídeos, no dudes en ponerte en contacto con nuestro equipo de atención al cliente mediante el formulario de contacto que encon- trarás en nuestro sitio web:...
  • Seite 77 PROFILER QUICK START Si el conector del equipo no encaja en la toma de corriente disponible, deberás acudir a un electricista para que sustituya la toma obsoleta. » Procura evitar que el cable de alimentación quede atrapado o que pueda pisarse, especialmente en la zona de los conectores, las tomas de corriente y el punto de conexión al equipo.
  • Seite 78: Declaración De Conformidad

    78 PROFILER QUICK START DECLARACIÓN DE CONFORMIDAD Este modelo KEMPER PROFILER cumple con las siguientes normativas que regulan las interferencias y EMC: FCC Verification procedure: 47CFR §15.101 Otros periféricos y dispositivos digitales de Clase B: EN 55022 Class B: 2006+A1:2007 EN 61000-3-2: 2006 +...
  • Seite 79 Nosotros, Kemper GmbH, Königswall 16-18, 45657 Recklinghausen Alemania, Tel.: +49 (2361) 9376824, declaramos bajo nuestra exclusiva responsabilidad que el producto PROFILER cumple con el Apartado 15 de las Reglas de la FCC. El funcionamiento está sujeto a las dos condiciones siguientes: (1) este dispositivo no puede ocasionar interferencias perjudiciales.
  • Seite 81 PROFILER™ PRISE EN MAIN FRANÇAIS...
  • Seite 82: Mention Légale

    KEMPER™, PROFILER™, PROFILE™, PROFILING™, PROFILER PowerHead™, PROFILER PowerRack™, PROFILER Remote™, KEMPER Rig Exchange™, KEMPER Rig Manager™ et KEMPER CabDriver™ sont des marques commerciales de Kemper GmbH. Toutes les fonctions et caractéristiques techniques sont susceptibles d’être modifiées sans préa- vis. © Copyright 2019 Kemper GmbH. Tous droits réservés.
  • Seite 83 Pédale de volume ..........................92 Pédale wah ............................92 Pédale Morph ...........................93 Jouer avec les pédales ....................... 94 Fonction Lock ..........................95 PROFILER actif avec enceinte de guitare ................95 Maintenir le PROFILER à jour avec ‘Rig Manager’ ............98 Documentation et tutoriels vidéo..................101...
  • Seite 84 84 PROFILER QUICK START Assistance et forum d’utilisateurs ..................102 Consignes importantes de sécurité ..................102 Déclaration de conformité ....................... 103...
  • Seite 85: Bon, Qu'est-Ce Que Je Viens D'acheter

    à vos besoins de guitariste. C’est pourquoi nous tenions à vous proposer bien plus qu’une simple série de modèles d’amplis numériques prédéfinis. C’est ainsi que KEMPER™ a créé le premier ampli de guitare numérique vous permettant de réaliser le PROFIL de votre propre ampli de guitare. Vous pouvez aussi charger des PROFILS d’amplificateurs d’autres guitaristes –...
  • Seite 86: Connexions

    MAIN OUTPUT situées à l’arrière (XLR ou TS) aux entrées du dispositif d’accueil. N’oubliez pas de brancher le câble d’alimentation à une prise secteur. Ne vous souciez pas de la tension: le PROFILER s’adapte automatiquement! Mettez le dispositif sous tension en réglant le sélecteur à bec en position BROWSER.
  • Seite 87: Changer De Rig

    Le PROFILER propose de nombreuses configurations d’ampli et d’effets de guitare. Elles sont appelées “Rigs” et la bibliothèque des Rigs sauvegardés dans le PROFILER est appelée “Rig Pool”. Les quatre boutons constituant la croix de navigation RIG à côté de...
  • Seite 88: Editer Et Sauvegarder Des Rigs

    88 PROFILER QUICK START EDITER ET SAUVEGARDER DES RIGS TYPE BROWSE Vous pouvez modifier le Rig sélectionné et sauvegarder vos STORE EXIT changements. Si, par exemple, vous souhaitez accentuer l’aigu, All Rigs Sorted by Name Store Snapshot Nitro 2015 A...
  • Seite 89: Noise Gate

    Noise Gate spéciales décrites dans le manuel principal. Vous trouverez aussi un tutoriel vidéo consacré aux noise gates: www.kemper-amps.com/video AJOUTER DES EFFETS Le PROFILER dispose de huit modules d’effets. Quatre sont situés DELAY avant le module d’amplificateur (pre) et quatre après (post). Les REVERB...
  • Seite 90: Activer/Couper Des Effets Avec Profiler Remote

    » N’oubliez pas de sauvegarder le Rig édité. ACTIVER/COUPER DES EFFETS AVEC PROFILER REMOTE Le contrôleur PROFILER Remote propose quatre boutons d’effet dédiés (I~IIII) pour activer/couper les modules d’effet. Chaque bouton peut commuter un module ou une combinaison de modules.
  • Seite 91: Accordeur

    ACCORDEUR Vous pouvez vérifier l’accord de l’instrument à tout instant en regardant les trois LED TUNER sur le PROFILER ou le pédalier Remote. Réglez le sélecteur à bec sur TUNER ou appuyez sur le bouton TUNER de votre Remote pour passer en mode Tuner.
  • Seite 92: Pédale De Volume

    Pour piloter les fonctions avec pédale, utilisez des pédales dites d’“expression” optimisées pour des dispositifs numériques comme le PROFILER. Branchez la pédale d’expression à l’entrée PEDAL 1 en face arrière du PROFILER ou à l’entrée PEDAL 3 de votre Remote. Vous pouvez régler le volume directement.
  • Seite 93: Pédale Morph

    PROFILER QUICK START PÉDALE MORPH Le morphing vous permet de changer simultanément plusieurs paramètres continus comme le gain, le mix du delay ou le feedback du delay – le tout avec une seule pédale d’expression. Actionner la pédale revient à tourner toutes ces commandes simultanément pour passer d’un son à...
  • Seite 94: Jouer Avec Les Pédales

    94 PROFILER QUICK START Le Morphing est expliqué de façon détaillée dans le manuel principal. Vous trouverez également des tutoriels consacrés à ce sujet ici: www.kemper-amps.com/video JOUER AVEC LES PÉDALES Voici quelques astuces concernant les liens et la vérification des pédales:...
  • Seite 95: Fonction Lock

    Pour afficher les modules verrouillés, maintenez le bouton LOCK enfoncé. Les modules verrouillés restent allumés. PROFILER ACTIF AVEC ENCEINTE DE GUITARE Ce paragraphe concerne ceux qui veulent utiliser un PROFILER actif (PowerHead™ ou PowerRack™) pour alimenter directement une enceinte de guitare. Sachez qu’en général le son d’une enceinte de guitare diffère de celui d’une enceinte full range, d’un...
  • Seite 96 96 PROFILER QUICK START Vous utilisez une enceinte de guitare physique comme retour personnel. Cela signifie qu’il faut désactiver la simulation d’enceinte pour le signal envoyé à l’ampli de puissance interne et à votre enceinte physique. Pour cela, appuyez sur OUTPUT.
  • Seite 97 Evitez de brancher des dispositifs d’une impédance inférieure à 4Ω pour éviter d’endommager l’ampli de puissance. Veillez à laisser une ventilation adéquate, surtout si vous installez votre PROFILER dans un rack. Faute de quoi, l’ampli de puissance risque de s’éteindre pour éviter une surchauffe.
  • Seite 98: Maintenir Le Profiler À Jour Avec 'Rig Manager

    » Accéder à plus de 12.000 Rigs gratuits et à des dizaines de Rig Packs supplémentaires d’excellente qualité. » Trier, agencer et obtenir un aperçu des Rigs et Performances. » Mettre le système d’exploitation du PROFILER à jour avec la version la plus récente et les dernières fonctionnalités.
  • Seite 99 PROFILER QUICK START » N’oubliez pas d’enregistrer votre PROFILER par la même occasion pour accéder aux mises à jour etc. Pour l’enregistrement, vous avez besoin du numéro de série qui se trouve sur un autocollant sous le produit. » Après l’enregistrement, vous recevrez un e-mail de confirmation de notre part. Utilisez le lien de confirmation dans cet e-mail pour activer votre compte utilisateur.
  • Seite 100 “Format USB stick”. Quand l’opération est terminée, un message vous prévient. » Si la clé USB n’est pas formatée, le PROFILER affiche “Are you sure? USB stick needs to be formatted”. Confirmez l’opération avec “Yes” et suivez les instructions affichées.
  • Seite 101: Documentation Et Tutoriels Vidéo

    Copiez le fichier “kaos.bin” de l’archive dans le dossier “OS Updates” sur votre clé USB. Veillez à lire le fichier “ReadMe” ainsi que le manuel Addendum. » Branchez la clé USB au PROFILER; une fenêtre de mise à jour apparaît peu après. Confirmez l’opération et suivez les instructions affichées.
  • Seite 102: Consignes Importantes De Sécurité

    102 PROFILER QUICK START ASSISTANCE ET FORUM D’UTILISATEURS Bien que nous fassions de notre mieux pour vous proposer une documentation aussi complète que possible, n’hésitez pas à contacter notre service d’assistance en utilisant le formulaire de contact sur notre site web: www.kemper-amps.com/contact...
  • Seite 103: Déclaration De Conformité

    » Cet appareil n’est pas conçu pour un usage à l’extérieur. DÉCLARATION DE CONFORMITÉ Ce modèle KEMPER PROFILER est conforme aux normes suivantes régissant les interférences et la compatibilité électromagnétique: FCC Verification procedure: 47CFR §15.101 Autres appareils et périphériques numériques de classe B: EN 55022 Class B: 2006+A1:2007 EN 61000-3-2: 2006...
  • Seite 104 Nous, Kemper GmbH, Königswall 16-18, 45657 Recklinghausen, Allemagne, Tél: +49 (2361) 9376824, déclarons sous notre seule responsabilité que le produit PROFILER est conforme à la partie 15 de la réglementation FCC. Le fonc- tionnement de l’appareil est soumis aux deux conditions suivantes: (1) l’appareil ne peut pas causer d’interférences nocives.
  • Seite 105 à une prise dépendant d’un autre circuit que celui auquel le récepteur est branché. Demandez de l’aide au revendeur ou à un technicien radio/TV expérimenté. Toute modification de l’appareil non autorisée expressément par Kemper GmbH peut annuler l’habilitation des utilisateurs à manier ce matériel.
  • Seite 106 106 PROFILER QUICK START...
  • Seite 107 GUIDA VELOCE PROFILER™ ITALIANO...
  • Seite 108 è soggetto a modifiche senza preavviso e non deve essere considerato vincolante per Kemper GmbH. Kemper GmbH non si assume nessuna responsabilità per la presenza di eventuali errori o imprecisioni in questo manuale. Ad eccezione di quanto consentito da questa licenza, nessuna parte di questa pubblicazione può essere riprodotta, archiviata in un sistema di consultazione elettronica o trasmessa in qualsiasi forma o qualsiasi mezzo, elettronico, meccanico, tramite registrazione o di altro genere senza il consenso scritto di Kemper GmbH.
  • Seite 109 Pedale del Volume ........................118 Pedale Wah ............................118 Pedale Morph ..........................119 Divertirsi con i Pedali ........................120 Funzione Lock ..........................121 Profiler Amplificato con Cassa per Chitarra ..............121 Tenere Aggiornato il vostro Profiler con Rig Manager ..........124 Documentazione e Tutorial Video ..................127...
  • Seite 110 110 PROFILER QUICK START Supporto e Forum degli Utenti ....................128 Istruzioni Importanti Per La Sicurezza ................128 Dichiarazione di Conformità ....................129...
  • Seite 111: Okay, Ma Cosa Ho Appena Comperato

    è il motivo per cui non vi limitiamo alla scelta di una serie predefinita di modelli digitali di amplificatori. Ed il risultato è che KEMPER™ ha creato il primo ampli digitale per chitarra che vi permette di creare un PROFILE (Profilo) del vostro amplificatore.
  • Seite 112: I Collegamenti

    (home) della Modalità Browser. Suonate la vostra chitarra. Regolate il volume del PROFILER con il controllo MASTER VOLUME che si trova in alto a destra. Se avete un PROFILER Remote, collegatelo al connettore NETWORK con il cavo Ethernet fornito in dotazione.
  • Seite 113: Cambiare I Rig

    PROFILER QUICK START CAMBIARE I RIG: Il PROFILER dispone di numerosi setup di ampli per chitarra, completi di effetti. Vengono chiamati “Rig” e la libreria di Rig memorizzata nel vostro PROFILER è il “Rig Pool”. I quattro pulsanti che costituiscono la croce di navigazione dei RIG...
  • Seite 114: Modificare E Memorizzare I Rig

    114 PROFILER QUICK START MODIFICARE E MEMORIZZARE I RIG TYPE BROWSE Potete modificare il Rig attuale e memorizzare ciò che volete STORE EXIT conservare. Per esempio, se volete aumentare il Treble, ruotate il All Rigs Sorted by Name Store Snapshot...
  • Seite 115: Noise Gate

    Manuale Principale. C’è anche un tutorial video dedicato ai noise gate disponibili, e lo trovate su: www.kemper-amps.com/video AGGIUNGERE EFFETTI Il PROFILER dispone di otto moduli di effetti. Quattro sono DELAY posizionati prima del modulo dell’amplificatore (pre) e quattro REVERB OUTPUT EFFECTS dopo (post).
  • Seite 116: Attivare/ Disattivare Gli Effetti Con Il Profiler Remote

    » Non dimenticate di memorizzare il Rig modificato. ATTIVARE/ DISATTIVARE GLI EFFETTI CON IL PROFILER REMOTE Il PROFILER Remote dispone di quattro Pulsanti Effetti (I~IIII) dedicati per attivare i moduli degli effetti. Ognuno può commutare un singolo modulo o una combinazione di moduli.
  • Seite 117: Accordatore

    PROFILER QUICK START Per assegnare uno dei moduli effetto (o eliminare l’assegnazione) ad un Pulsante degli Effetti: » Sul vostro PROFILER, premete e tenete premuto il pulsante del modulo effetti desiderato. » Premete il pulsante Effetti sul vostro Remote. » Lasciate entrambi i pulsanti.
  • Seite 118: Pedale Del Volume

    Questa funzione è opzionale è può essere disattivata nella Modalità Tuner. PEDALE WAH Collegate il pedale di espressione a PEDAL 2 del vostro PROFILER oppure a PEDAL 4 del Remote. Questo pedale ora controlla l’espressione di un effetto. Per esempio, la posizione dell’effetto del wah o l’intonazione dell’effetto pedal- pitch o il Morphing, di cui parleremo nei prossimi paragrafi.
  • Seite 119: Pedale Morph

    PROFILER QUICK START PEDALE MORPH Il Morphing vi permette di cambiare simultaneamente tutti i parametri continui che volete, come livello del Gain, Delay Mix o Delay Feedback – tutti con un solo pedale di espressione. Muovere il pedale equivale a ruotare tutti i controlli insieme, per passare da un suono ad un altro.
  • Seite 120: Divertirsi Con I Pedali

    120 PROFILER QUICK START Il Morphing viene spiegato in dettaglio nel Manuale Principale e in più trovate dei tutorial video dedicati a questo soggetto su: www.kemper-amps.com/video DIVERTIRSI CON I PEDALI Ecco alcuni consigli per collegare e verificare i controlli dei pedali: Premete il pulsante SYSTEM per accedere a svariate pagine delle global setting (impostazioni generali).
  • Seite 121: Funzione Lock

    LOCK. I moduli bloccati rimarranno illuminati. PROFILER AMPLIFICATO CON CASSA PER CHITARRA Questo paragrafo è dedicato a chi vuole usare un PROFILER amplificato (PowerHead™ o PowerRack™) per pilotare direttamente una cassa per chitarra. Ricordate che, in genere, il suono di una cassa per chitarra è...
  • Seite 122 122 PROFILER QUICK START State usando una cassa per chitarra reale come vostro monitor personale. Questo significa che dovete disattivare la simulazione della cassa per il segnale inviato all’amplificatore di potenza interno e quindi alla vostra cassa per chitarra reale. Potete farlo premendo OUTPUT.
  • Seite 123 Vi preghiamo di non collegare dispositivi con impedenza inferiore ai 4Ω, perché potreste danneggiare l’amplificatore di potenza. Assicurate sempre una adeguata ventilazione, specialmente se montate il vostro PROFILER in un rack. In caso contrario l’amplificatore di potenza potrebbe spegnersi per proteggersi dal surriscaldamento.
  • Seite 124: Tenere Aggiornato Il Vostro Profiler Con Rig Manager

    Per scaricare l’ultima e migliorata versione, dovete prima creare un vostro account. Una volta fatto, avete due modi per aggiornare il vostro PROFILER: Se avete accesso ad un computer e ad una connessione internet, per tenere aggiornato il vostro ampli usate Rig Manager. In caso contrario, copiate l’aggiornamento su di una chiavetta di memoria USB e infilatela nel vostro PROFILER.
  • Seite 125 PROFILER QUICK START » Intanto assicuratevi di registrare il vostro PROFILER, così potrete avere accesso agli aggiornamenti del software e ad altro ancora. Per registrarlo avete bisogno del numero seriale, che potete trovare su un adesivo sotto al prodotto. » Poco dopo la registrazione, riceverete da noi una e-mail di conferma. Usate il link di conferma di questa e-mail per attivare il vostro account.
  • Seite 126 “Format USB stick”. Un messaggio vi avviserà del termine dell’operazione. » Se la chiavetta di memoria non è formattata, il PROFILER visualizzerà “Are you sure? USB stick needs to be formatted” (Siete sicuri? La chiavetta USB deve essere formattata) Confermate il dialogo premendo “Yes” e seguite le istruzioni sullo schermo.
  • Seite 127: Documentazione E Tutorial Video

    “kaos.bin” dall’archivio alla cartella “OS Updates” della chiavetta di memoria. Assicuratevi di leggere il file “ReadMe” e anche le Addendum Manual. » Infilate la chiavetta di memoria nel vostro PROFILER e subito dopo apparirà un dialogo di aggiornamento. Confermate la finestra di dialogo e seguite le istruzioni sullo schermo.
  • Seite 128: Istruzioni Importanti Per La Sicurezza

    128 PROFILER QUICK START SUPPORTO E FORUM DEGLI UTENTI Anche se facciamo del nostro meglio per spiegare in questi manuali e nei video tutto ciò che dovete sapere, vi invitiamo a contattare in qualsiasi momento il nostro personale di supporto tramite il modulo di contatto che trovate sul nostro sito web: www.kemper-amps.com/contact...
  • Seite 129: Dichiarazione Di Conformità

    » L’apparecchio non è adatto ad un utilizzo all’esterno. DICHIARAZIONE DI CONFORMITÀ Questo modello KEMPER PROFILER è conforme ai seguenti standard di regolamentazione delle interferenze e EMC: FCC Verification procedure: 47CFR §15.101 Altri apparecchi digitali in Classe B e periferiche: EN 55022 Class B: 2006+A1:2007 EN 61000-3-2: 2006 + A1:2009 +...
  • Seite 130 Noi Kemper GmbH, Königswall 16-18, 45657 Recklinghausen Germania, Tel: +49 (2361) 9376824, dichiariamo sotto la nostra unica responsabilità che il prodotto PROFILER è conforme con la sezione 15 del Regolamento FCC. Il suo funzionamento è soggetto alle due condizioni seguenti: (1) questo dispositivo non deve generare interferenze dannose.
  • Seite 131 è collegato il ricevitore. Rivolgetevi al rivenditore o ad un tecnico radio/TV esperto per chiedere assistenza. Qualsiasi modifica allo strumento non espressamente approvata da Kemper GmbH può annullare il diritto dell’utente ad utilizzare questa apparecchiatura.

Inhaltsverzeichnis