Werbung
Verfügbare Sprachen
Verfügbare Sprachen
Quicklinks
R E V I S E D
by the Graphic Development Department
Please review all content carefully.
9:09 am, Nov 22, 2010
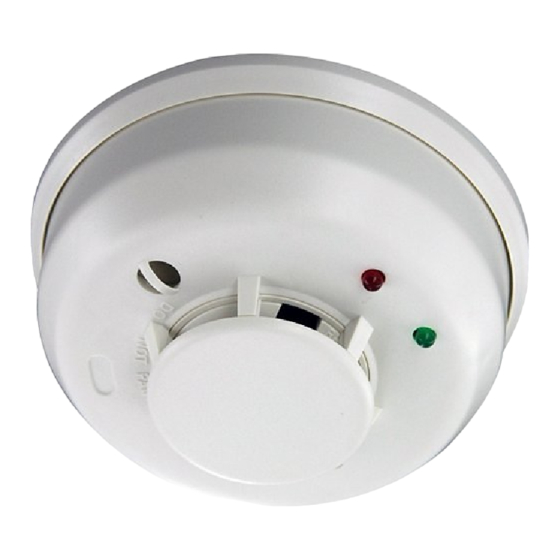
DF8M – Wireless optical smoke detector – Installation instructions
Figure 1:
Bouton de test / Conmutador Test /
Testknopf / Testknop /
Interruttore di test /
Test Switch
LED verte / Diodo
electroluminiscente verde /
Grüne LED / Groene
LED / LED verde /
Green LED
LED rouge / Diodo
electroluminiscente rojo /
Rote LED / Rode LED /
LED rosso / Red LED
Appuyez sur le bouton encastré avec un outil de 4,6 mm de diamètre maximum /
Pulse el conmutador empotrado con una herramienta de 4,6 mm (0,18") de diámetro como máximo. /
Drücken Sie den eingelassenen Knopf mit einem Werkzeug mit einem Durchmesser von maximal 4,6 mm (0,18 Zoll). /
Druk de verzonken knop in. Gebruik hiervoor een gereedschap met een diameter van max. 4,6 mm /
Premere l'interruttore rientrato con un utensile dal diametro massimo di 4,6 mm. /
Push the recessed switch with a 0.18" max. diameter tool
Orifices de montage direct / Orificios de montaje directo /
Figure 4:
Löcher zur Direktmontage / Direct Mount Holes
Klikmontagesleuven / Fori di montaggio diretto /
Direct Mount Holes
Languette d'autoprotection (découpez la languette pour activer la fonction
autoprotection) / Lengüeta de antiforzamiento (corte la pequeña lengüeta
para activar lafunción de antiforzamiento) / Manipulationsschutzlasche
(kleine Lasche abschneiden, um die Manipulations-schutzfunktion
zu aktivieren) / Vals-alarmpreventie (Tabje afsnijden om preventie
van vals alarm te activeren) / Linguetta antimanomissione
(tagliare la linguetta per attivare la funzione antimanomissione) /
Tamper Resistant Tab(Cut off small tab to activate tamper resist feature)
Figure 6:
Battery Flag must be pressed
down before inserting the battery.
When the battery is removed,
the battery flag will prevent the
detector from mounting to the base
HW-500-004
60 cm
Optimal / Óptimo / Optimal / Optimaal / Ottimale / Optimal
Satisfaisant / Satisfactorio / Zufriedenstellend / Voldoende / Sufficiente / Satisfactory
Figure 2:
S0303-00
S0304-02
Figure 7:
Sélection du protocole / Seleccione el protocolo /
Protokoll auswählen / Protocolselectie /
Selezionare il protocollo / Select protocol
S0325-00
1
7.6 m
Figure 3:
S0306-01
Figure 5:
V2GY
10 cm
S0318-02
Couvercle amovible du détecteur /
Tapa extraíble del detector /
Abnehmbare Abdeckung /
Afneembare dekplaat /
Coperchio del rilevatore rimovibile /
Removable Detector Cover
Chambre de détection avec écran
anti-moustique (partie supérieure) /
Pantalla / cámara de detección
(mitad superior) / Schutzgitter/Sensorkammer
(obere Hälfte) / Filter detectiekamer
(bovenste helft) / Camera di rilevamento /
schermatura (metà superiore) /
Screen SensingChamber(top half)
Boîtier du détecteur /
Carcasa del detector /
Gehäuse /
Detectorbehuizing /
Alloggiamento del
rilevatore /
Detector Housing
S0307-00
S0305-00
ALPHA
(par défaut) / (predeterminado) / (Standard) /
(standaard) / (predefinito) / (Default)
S0324-00
I56-3683-001
Werbung

Verwandte Anleitungen für Honeywell DF8M


Inhaltszusammenfassung für Honeywell DF8M
- Seite 1 R E V I S E D by the Graphic Development Department Please review all content carefully. 9:09 am, Nov 22, 2010 DF8M – Wireless optical smoke detector – Installation instructions 10 cm 7.6 m 60 cm S0318-02 Optimal / Óptimo / Optimal / Optimaal / Ottimale / Optimal Satisfaisant / Satisfactorio / Zufriedenstellend / Voldoende / Sufficiente / Satisfactory Couvercle amovible du détecteur /...
- Seite 6 Blinkt alle 5 Blinkt alle 5 Sekunden. 5 REGISTRIERUNG Sekunden Registrierung ist der Vorgang, mit dem der DF8M an der Meldezentrale angemeldet wird. Für diesen Vorgang ist ein Programmierwerkzeug erforderlich. Der vollständige Vorgang wird im Normal Blinkt alle 10 Installationshandbuch der Meldezentrale oder im Handbuch des...
- Seite 8 Fax: +33 (0)4 92 94 29 60 www.honeywell.com © 2010 Honeywell International Inc. Honeywell is a registered of Honeywell International Inc. All other trade-marks are the properties of their respective owners. All rights reserved. HW-500-004 I56-3683-001 © 2010 Honeywell International, Inc.