Herunterladen Inhalt Inhalt Diese Seite drucken
Inhaltsverzeichnis

Werbung

Verfügbare Sprachen
  • DE

Verfügbare Sprachen

  • DEUTSCH, seite 70
Manuale d'Uso
Manual de Empleo
User's Manual
Bedienungsanleitung
Mode d'Emploi
Manual do Utilizador
SL193-007086 Ed00 - 11-2017

Werbung

Inhaltsverzeichnis
loading

Inhaltszusammenfassung für Nordcap 161 GS P

  • Seite 1 Manuale d’Uso Manual de Empleo User’s Manual Bedienungsanleitung Mode d’Emploi Manual do Utilizador SL193-007086 Ed00 - 11-2017...
  • Seite 3 Versione Italiana Versión Española English Version Deutsche Versión Versión Française Versão Português...
  • Seite 4: Inhaltsverzeichnis

    Contenuti 0.Indice 1. PRECAUZIONI DI SICUREZZA 2. SCOPRI LA TUA 161 SOFT ........2.1 Specifiche 2.2 Elenco dei componenti 2.3 Oggetti in dotazione 2.5 Display 3. INSTALLAZIONE ........... 3.1 Luogo di installazione 3.2 Trasporto e disimballaggio 3.3 Messa a punto 4.
  • Seite 5: Precauzioni Di Sicurezza

    1.Sicurezza Sicurezza La tua sicurezza è l’aspetto più importante; prima di cominciare, tieni presente quanto segue: I bambini non devono giocare con la macchina. Questo apparecchio può essere utilizzato da bambini dagli 8 anni in su e da persone con capacità fisiche, sensoriali o mentali ridotte o man- canza di esperienza e conoscenze, a condizione che ricevano la super- visione o le istruzioni appropriate riguardo all’uso sicuro dell’apparec- chio e che comprendano i pericoli che tale uso comporta.
  • Seite 6 Sicurezza 1.Sicurezza Evitare il rischio di scarica elettrica mortale e incendio: • Il collegamento alla rete elettrica deve essere effettuato in base a quanto stabilito dalle norme sicurezza in vigore nel paese di utilizzo. • La presa di corrente alla quale collegare la macchina deve: - Corrispondere al tipo di spina installata sulla macchina;...
  • Seite 7 1.Sicurezza Sicurezza Evitare eventuali danni durante il funzionamento de- lla macchina. Va considerato uso improprio: - Qualsiasi uso diverso da quello previsto e/o con l’applicazione di tecniche diverse da quelle illustrate in questo manuale; - Qualsiasi intervento effettuato sulla macchina in contrasto con le indicazioni esposte in questo manuale.;...
  • Seite 8: Scopri La Tua 161 Soft

    2.Scopri la tua 2.1 Specifiche 161 Soft CAPACITÀ VASCA / 1.3 CAPACITÀ DEI CILINDRO 1.35 / 0.35 PRODUZIONE ORARIA / 33 COSA PUÒ PREPARARE? Gelato Soft Frozen Yogurt PUÒ LAVORARE CON: Base + Concent. liquido Base + Concent. polvere Prodotto base frutta...
  • Seite 9 DIMENSIONI 10.2 63.3 24.9 cm - cm - 11.8 73.6 cm - cm - 31.1 cm - 97kg - 214 lb PESO NETTO TENSIONE Consultare targhetta dei dati WATT FASE <<70dBa PRESSIONE SONORA CLASSE Min.15ºC - Max.40ºC TEMP. FUNZIONAMENTO Min.59ºF - Max.104ºF Ogni macchina contiene sulla targhetta dei dati le seguenti informazioni: Nome del fabbricante e numero...
  • Seite 10: Elenco Dei Componenti

    2.Scopri la tua 2.2 Elenco dei componenti 161 Soft Vasca Pannello di controllo Rubinetto Interruttore generale Vassoio di sgocciolamento Piedi 2.Scopri la tua 2.3 Oggetti in dotazione 161 Soft Tubetto Carpilube 1 Unità Spazzolino in nylon 1 Unità Estrattore di O-Ring 1 Unità...
  • Seite 11: Display

    2.Scopri la tua 2.4 Display 161 Soft CLEANING • (Premere 1 volta) Attivazione della pala di mescolatura. Rac- comandata durante lo svuotamento del cilindro. • (Premere 2 volte) Attivazione Hot Cleaning. • Blocco/sblocco del display: tenere premuto per 5 secondi. STOP STOP •...
  • Seite 12: Installazione

    3.Installazione 3.1 Luogo di installazione Tutte le operazioni illustrate in questo capitolo sono di competenza esclusiva di tecnici specializzati, i quali dovranno organizzare le diverse sequenze operative e l’impiego di mezzi adeguati per agire in ogni mo- mento nel rigoroso rispetto delle norme vigenti in materia. Prima di installare la macchina, devono essere presenti i seguenti requisiti: Che la tensione della rete corrisponda a Superficie solida, piana e stabile.
  • Seite 13: Trasporto E Disimballaggio

    3.Installazione 3.2 Trasporto e disimballaggio Una volta ricevuta la macchina, questa dovrà essere trasportata nella zona di collocazione: Prima del trasporto Elevazione e trasporto Controllare che nessuna persona sia presente all’interno del raggio operativo di elevazione e sposta- Lo spostamento della macchina mento del carico e, in situazioni di deve essere effettuato in posizione particolare difficoltà, utilizzare per-...
  • Seite 14: Funzionamento

    4.1 Quale prodotto utilizzare? 4.Funzionamento Quale prodotto utilizzare? • Base + Concentrato liquido NON INSERIRE LIQUIDI CALDI. INSERIRE LIQUI- DI A UNA TEMPERATURA DI: 3ºC - 4ºC • Base + Concentrato in polvere Il serbatoio non riduce la temperatura del pro- dotto, la sua funzione è...
  • Seite 15: Produzione Di Gelato

    4.Funzionamento 4.3 Produzione di gelato Accensio Preparare il gelato Premere START START Premere l’interrutto- re generale. Macchi- Quando il gelato è pronto, il display mostrerà: na in tensione. PRONTO! DURANTE LA PREPARAZIONE È POSSIBILE VEDERE: (premendo è possibile cambiare le informazioni sul display) SCHERMATA PRINCIPALE: PRONTO! •...
  • Seite 16: Servire Il Prodotto

    4.Funzionamento 4.4 Servire il prodotto Abbassare la leva Sollevare la leva Muovere il recipiente Muovere il recipien- in senso circolare per te verso il basso per dare al gelato una for- completare la por- ma conica. zione a punta. Distribuire il gelato senza superare il ritmo di produzione della macchina come indicato nella tabella del paragrafo Specifiche. Non superando questo ritmo e rifornendo la macchina di prodotto fresco, si avrà...
  • Seite 17: Impostazioni

    5.1 Menu utente 5.Impostazioni ACCESO AL MENU: Premere STOP e RESET contemporaneamente per te 3 secondi. 3” STOP RESET START NAVIGAZIONE NEL MENU UTENTE: Cambiare il Riduzione del valore del STOP parametro parametro RESET Per uscire dal menu, non premere Aumento del nessun tasto per 30 secondi o preme- valore del parametro...
  • Seite 18: Impostazione Overrun

    5.2 Impostazione Overrun 5.Impostazioni (Quantità di aria nel gelato) Esistono 4 livelli di Overrun. Come modificare il livello di Overrun: - Overrun + Overrun Girare la parte superiore del tubo d’ingresso del pro- (meno aria nel gelato) (più aria nel gelato) dotto.
  • Seite 19 ELENCO ALLARMI: ALLARMI Durante la pastorizzazione: > TEV (Temp. Uscita evaporatore vasca) (Temp. evaporatore vasca) Al.Scambio Term (16) La macchina funziona solo in modalità Pastorizzazione. Controllare se la cinghia di trasmissione o il rotore sono nella posizione giusta. Errore nella sonda del cilindro. Allarme critico. All.
  • Seite 20: Pulizia

    7.Pulizia 7.1 Quanto pulire la macchina? Quanto pulire la macchina? lavaggio e l’igienizzazione pulizia Superficia- Si raccomanda la tutti i giorni dopo l’ultimo gelato della vono essere realizzati obbligatoriamen- giornata. te entro 42 giorni. 7.2 Lavaggio e l’igienizzazione 7.Pulizia Il processo di pulizia è 1.
  • Seite 21 Risciacquo Svuotare il cilindro Riempire il serbatoio con 5 litri di acqua tiepida. Premere il tasto Clea- ning 1 volta e attendere 1 minuto. Ripetere il risciacquo finché il getto del rubinetto non viene emesso senza resi- dui di prodotto e premere STOP.
  • Seite 22 ACQUA DETERGENTE Lavare i Disinfettare pezzi i pezzi Lavare tutti i com- Lasciare in ammollo AGUA ponenti smontati tutti i componenti fino a rimuovere smontati (15 minuti) 2% HIPOCLORITO tutti i residui di e sciacquare con DE SODIO prodotto. acqua. Lasciare asciugare Collocare i componenti su una superficie pulita...
  • Seite 23 Montare il Montare il rubinetto rubinetto • Lubrificare e montare i giunti del pistone (X) • Inserire il pistone (X) nel relativo alloggiamento. • Collocare la leva (A) nel corpo del rubinetto e in- serire il perno (D) nel foro. •...
  • Seite 24: Pulizia Superficiale

    7.Pulizia 7.3 Pulizia superficiale pulizia Superficiale Si raccomanda la tutti i giorni dopo l’ultimo gelato della giornata. PROCESSO DI PULIZIA: (Prima di iniziare il processo di pulizia, la macchina deve essere in modalità STOP) Pulire il rubinetto Pulire il pan- nello frontale Soprattutto nell’area di uscita del prodotto e gli orifizi.
  • Seite 25: Manutenzione

    8.1 Mantenutenzione Periodica 8.Manutenzione La macchina deve essere esaminata periodicamente (alme- Non utilizzare la macchina quando uno dei componenti è no una volta all’anno) da un tecnico specializzato. Questa difettoso o consumato. La manutenzione periodica non verifica periodica serve a mantenere alto il livello di sicurez- deve essere eseguita dall’operatore.
  • Seite 26 Contenido 0.Índice 1. PRECAUCIONES DE SEGURIDAD 2. DESCUBRE TU 161 Soft ........2.1 Especificaciones 2.2 Listado de partes 2.3 Objetos en dotación 2.5 Display 3. INSTALACIÓN ............3.1 Lugar de instalación 3.2 Transporte y Desembalaje 3.3 Puesta a punto 4. FUNCIONAMIENTO ..........4.1 ¿Que producto utilizar? 4.2 Llenado 4.3 Producción helado...
  • Seite 27: Seguridad

    1.Seguridad Seguridad Tu seguridad es lo mas importante, antes de comenzar ten en cuenta: Los niños no deben jugar con la máquina. Este aparato puede ser utilizado por niños con edad de 8 años y su- perior y personas con capacidades físicas, sensoriales o mentales reducidas o falta de experiencia y conocimiento, si se les ha dado la supervisión o formación apropiadas respecto al uso del aparato de manera segura y comprenden los peligros de implica.
  • Seite 28 Seguridad 1.Seguridad Evitar riesgo de descarga eléctrica letal e Incendio: • El enlace a la red eléctrica debe efectuarse según lo establecido por las normas de seguridad vigentes en el país de uso. • La toma de corriente a la cual conectar la máquina debe: - Corresponder al tipo de enchufe instalado en la misma;...
  • Seite 29 1.Seguridad Seguridad Evitar daños eventuales durante el funcionamiento de la máquina. Es de considerar como uso impropio: - cualquier uso diferente del previsto y/o con aplicación de técnicas diferentes de aquéllas ilustradas en esta publicación; - cualquier intervención que se efectúe en la máquina en contraste con las indicaciones expuestas en esta publicación; - todo uso después de alteraciones de componentes y/o de dispo- sitivos de seguridad;...
  • Seite 30: Especificaciones

    2.Descubre tu 2.1 Especificaciones 161 Soft CAPACIDAD DEPÓSITO / 1.3 CAPACIDAD CILINDRO 1.35 / 0.35 PRODUCCIÓN HORARIA / 33 ¿QUE PUEDE PREPARAR? Helado Soft Yogurt helado PUEDE TRABAJAR CON: Base + Concent. líquido Base + Concent. polvo Producto base fruta...
  • Seite 31 DIMENSIONES 10.2 63.3 24.9 cm - cm - 11.8 73.6 cm - cm - 31.1 cm - 97kg - 214 lb PESO NETO VOLTAJE Ver placa de datos WATT FASE <<70dBa PRESIÓN SONORA CLASE Min.15ºC - Max.40ºC TEMP. FUNCIONAMIENTO Min.59ºF - Max.104ºF Cada máquina contiene en la placa de datos las siguientes informaciones: Nombre del fabricante y número...
  • Seite 32: Listado De Partes

    2.Descubre tu 2.2 Listado de partes 161 Soft Depósito Panel de mandos Grifo Interruptor general Bandeja de goteo Pies 2.Descubre tu 2.3 Objetos en dotación 161 Soft Tubo Carpilube 1Ud Escobilla de nylon 1Ud Extractor de junta tórica 1Ud...
  • Seite 33 2.Descubre tu 2.4 Display 161 Soft CLEANING • (Pulsar 1 vez) Activar pala mezcladora. Recomendable du- rante el vaciado del cilindro. • (Pulsar 2 veces) Activar Hot Cleaning. • Bloqueo/Desbloqueo Display: Pulsar durante 5 segundos. STOP STOP • Desactivar funciones. (Para cambiar de función es nece- STAND BY sario desactivar funciones).
  • Seite 34: Instalación

    3.Instalación 3.1 Lugar de instalación Todas las operaciones ilustradas en este capítulo son de exclusiva competencia de técnicos especializados, los que deberán organizar las diferentes secuencias operativas y el empleo de medios adecuados para actuar en todo momento con rigurosa aplicación de las normas vigentes en esta materia.
  • Seite 35: Transporte Y Desembalaje

    3.Instalación 3.2 Transporte y Desembalaje Una vez recibida la máquina, se deberá transportar a la zona de emplazamiento: Antes de transportar Elevación y transporte Controlar que ninguna persona esté presente dentro del radio ope- rativo de elevación y desplazamien- El desplazamiento de la máquina to de la carga y, en situaciones de debe ser efectuado al menos por particular dificultad, utilizar perso-...
  • Seite 36: Funcionamiento

    4.1 ¿Que producto utilizar? 4.Funcionamiento ¿Que producto utilizar? • Base + Concentrado líquido NO INTRODUCIR LÍQUIDOS CALIENTES. INTRODUCIR LÍQUIDOS CON TEMPERATURA: 3ºC - 4ºC • Base + Concentrado en polvo El depósito no reduce la temperatura del pro- ducto, únicamente la mantiene. •...
  • Seite 37: Producción Helado

    4.Funcionamiento 4.3 Producción helado Arranque Preparar helado Pulsar START START Pulsar interruptor General. Máquina en Cuando el helado esté listo, la pantalla mostrará: tensión. LISTO! DURANTE LA PREPARACIÓN PODEMOS VER: (Pulsando podemos cambiar pantalla de información) PANTALLA PRINCIPAL: LISTO! • Estado del helado •...
  • Seite 38: Servir Producto

    4.Funcionamiento 4.4 Servir producto Bajar leva Levantar leva Mover el recipiente en Mover el recipiente sentido circular para hacia abajo para ter- conferir al helado una minar la porción en forma cónica. punta. Distribuya el helado sin superar el ritmo de producción de la máquina como se indica en la tabla del apartado Especificacio- nes No superando este ritmo y teniendo cuidado de reabastecer la máquina de producto fresco, podrá estar seguro de no interrumpir nunca la venta ni siquiera en las horas punta.
  • Seite 39: Ajustes

    5.1 Menú usuario 5.Ajustes ACCESO MENÚ: Pulsar STOP y RESET al mismo tiempo durante 3” 3” STOP RESET START NAVEGAR POR MENÚ USUARIO: Cambiar Disminuir STOP parámetro valor parámetro RESET Para salir del menú no pulsar ninguna Aumentar tecla durante 30 segundos o pulsar valor parámetro START o RESET PARÁMETROS EDITABLES:...
  • Seite 40: Ajuste Overrun

    5.2 Ajuste Overrun 5.Ajustes (Cantidad de aire en el helado) Existen 4 niveles de Overrun. Cambiar el nivel de Overrun: - Overrun + Overrun Girar la parte superior del tubo de entrada de pro- (menos aire en el helado) (más aire en el helado) ducto.
  • Seite 41 LISTADO DE ALARMAS: ALARMA Durante Pasteurización: > TEV (Temp. salida evaporador depósito) (Temp. Evaporador depósito) Al.Intcabio Cal. (16) La máquina solo funciona en modo Pasteurización Comprobar si la correa de transmisión o el rotor está en posición correcta. Fallo en la sonda del cilindro. Alarma crítica. Al.
  • Seite 42: Limpieza

    7.Limpieza 7.1 ¿Cuándo limpiar la máquina? ¿Cuándo limpiar la máquina? lavado e higienización limpieza Superfi- Se recomienda la se debe cial todos los días después del último realizar obligatoriamente tras un máxi- helado de la jornada. mo de 42 días. 7.2 Lavado e Higienización 7.Limpieza El proceso de limpieza...
  • Seite 43 Aclarado Vaciar Cilindro Llenar depósito con 5 litros de agua tibia. Pulsar tecla cleaning 1 vez y esperar 1 minuto. Repetir aclarado hasta que el chorro del grifo salga sin restos de pro- ducto y pulsar STOP. Retirar Desmontar grifo grifo Desmontar Retirar Pala Espiral...
  • Seite 44 AGUA DETERGENTE Lavar Desinfectar piezas piezas Lavar todos los Dejar en remojo AGUA componentes todos los compo- desmontados hasta nentes desmonta- 2% HIPOCLORITO retirar todos los dos (15’) y enjuagar DE SODIO restos de producto. con agua. Dejar secar Colocar los componen- tes sobre una superfi- cie limpia y secarlos Lavar Máquina...
  • Seite 45 Montar Montar Grifo Grifo • Lubricar y montar las juntas del pistón (X) • Introducir el pistón (X) en su alojamiento. • Colocar la leva (A) en el cuerpo del grifo e intro- ducir el pasador (D) a través del agujero. •...
  • Seite 46: Limpieza Superficial

    7.Limpieza 7.3 Limpieza superficial limpieza Superficial Se recomienda la todos los días después del último helado de la jornada. PROCESO LIMPIEZA: (Antes de empezar el proceso de limpieza, la máquina debe estar en STOP) Limpiar grifo Limpiar panel frontal Especialmente el área de salida producto y los orificios.
  • Seite 47: Mantenimiento

    8.1 Mantenimiento Periódico 8.Mantenimiento La máquina debe examinarse periódicamente (al menos Se prohíbe utilizar la máquina cuando uno sólo de sus una vez al año) por un técnico especializado. Esta verifica- componentes sea defectuoso o esté gastado. El manteni- ción periódica sirve para mantener alto el nivel de seguri- miento periódico se prohíbe al operador.
  • Seite 48 Content 0.Índex 1. SAFETY PRECAUTIONS 2.DISCOVER YOUR 161 Soft ........2.1 Specifications 2.2 Parts list 2.3 Accessories 2.5 Display 3. INSTALLATION ............. 3.1 Place of installation 3.2 Moving and Unpacking 3.3 Setting up 4. OPERATION ..........4.1 Wich product to use? 4.2 Filling 4.3 Soft-Cream production 4.4 Serving the product...
  • Seite 49 1.Safety Safety Your safety is all important, before starting, take into account: Children must not play with the machine. This appliance can be used by children who are 8 years old or over and by people with reduced physical, sensorial or mental capacities or with lack of experience and know-how if they have been given the appro- priate supervision and training regarding the use of the appliance in a safe way and understand the dangers involved.
  • Seite 50 Safety 1.Safety Prevent risks of lethal electric shocks and Fire: • The connections to the electricity network must be carried out as es- tablished by the current safety standards in the country where the machine is used. • The socket that the machine is connected to must: - Correspond to the type of plug that it is fitted with;...
  • Seite 51 1.Safety Safety Prevent possible damages while the machine is opera- ting. Improper use will be considered as: - any use that is different to what is stated and/or with the applica- tion of techniques that are different to those illustrated in this pu- blication;...
  • Seite 52: Specifications

    2.Discover 2.1 Specifications your 161 BOWL CAPACITY / 1.3 CYLINDER CAPACITY 1.35 / 0.35 HOURLY OUTPUT / 33 WHAT CAN PREPARE? Soft Ice-Cream Frozen Yogurt CAN WORK WITH: Base + Liquid concent. Base + Powder concent. Fruit based product...
  • Seite 53 DIMENSIONS 10.2 63.3 24.9 cm - cm - 11.8 73.6 cm - cm - 31.1 cm - 97kg - 214 lb NET WEIGHT VOLTAGE See data plaque WATT PHASE <<70dBa SOUND PRESSURE CLASS Min.15ºC - Max.40ºC OPERATING TEMP. Min.59ºF - Max.104ºF Each machine has a data plaque with the following infor- mation: Name of the manufacturer and...
  • Seite 54: Parts List

    2.Discover 2.2 Parts list your 161 Bowl Control Panel Main Switch Drip tray Feet 2.Discover 2.3 Accessories your 161 Carpilube Tube 1Unit Nylon brush 1Unit O-ring Extractor 1Unit...
  • Seite 55 2.Discover 2.4 Display your 161 CLEANING • (Push once) Activates mixer. Recommendable when empt- ying the cylinder. • (Push twice) Activates Hot Cleaning. • Block/Unblock Display: Push down for 5 seconds. STOP STOP • Deactivate functions. (To chan- ge a function it is necessary to STAND BY deactivate functions).
  • Seite 56: Installation

    3.Installation 3.1 Place of installation All of the operations illustrated in this section are to be exclusively ca- rried out by specialised technicians, those who have to organise the different operative sequences and the use of suitable means to act at all times within the rigorous application of current standards regarding this matter The following requirements must be met before installing the machine in the establishment:...
  • Seite 57: Moving And Unpacking

    3.Installation 3.2 Moving and Unpacking Once the machine has been received, it must be moved to the place where it will be installed: Before moving Lifting and moving Make sure that nobody is within the lifting and load movement ope- Moving the machine must be done ration radius and, in particularly by at least two people in a vertical...
  • Seite 58: Operation

    4.1 Wich product to use? 4.Operation Which product to use? • Base + Liquid concentrate DO NOT USE HOT LIQUIDS. USE LIQUIDS WITH TEMPERATURE: 3ºC - 4ºC • Base + Powder concentrate The deposit does not reduce the temperature of the product, it only maintains it. •...
  • Seite 59: Soft-Cream Production

    4.Operation 4.3 Soft-Cream Production Start-up Prepare soft-cream Push START START Push main Switch. When the Soft-Cream is ready, the screen will show: Machine charged. READY! DURING PREPARATION WE CAN SEE: (Pushing we can change the information screen) MAIN SCREEN: READY! •...
  • Seite 60: Serving The Product

    4.Operating 4.4 Serving the product Lower handle Lift handle Move the cup Move the cup in a circu- downwards to finish lar way to give the Soft- the portion in a cream a conical shape. point. Distribute the ice-cream without surpassing the machine’s production rate as indicated in the table in Specifications section and being careful to refill the machine with fresh product, you can be sure not to interrupt sales even at the busiest times.
  • Seite 61: Settings

    5.1 User’s menu 5.Settings MENU ACCESS: Push STOP and RESET at the same time for 3” 3” STOP RESET START BROWSE THROUGH THE USER’S MENU: Change Reduce parameter STOP parameter value RESET To leave the menu, do not push any Increase button for 30 seconds or push START parameter value...
  • Seite 62: Overrun Settings

    5.2 Overrun Setting 5.Settings (Amount of air in the Soft-Cream) There are 4 Overrun levels. Change the Overrun level: - Overrun + Overrun Turn the upper part of the product input tube (less air in the Soft-cream) (more air in the Soft-cream) Overrun 6.Warnings and 6.1 Alarms...
  • Seite 63 LIST OF ALARMS: ALARM During Pasteurisation: > TEV (Bowl Evaporator output Temp.) (Bowl Evaporator Temp.) Al.Heat.Exchange (16) The machine only operates in Pasteurisation mode Check that the transmission belt or the rotor is in the correct position. Cylinder sensor failure. Critical alarm. Al.
  • Seite 64: Cleaning Process

    7.Cleaning 7.1 When to clean the machine? When to clean the machine? cleaning and sanitisation Surface cleaning is recommen- ded every day after making the last ice- must obligatory be carried out after a cream. maximum of 42 days. 7.2 Washing and Sanitisation 7.Cleaning The cleaning process 1.
  • Seite 65 Rinse Empty Cylinder Fill the bowl with 5 litres of warm water. Push cleaning button once and wait 1 minute. Repeat rinsing until the water from the tap is clear and push STOP. Remove Dismantle tap Remove Cylinder Mixer Dismantle Cylinder Mixer Remove Dismantle input tube...
  • Seite 66 WATER DETERGENT Disinfect Wash parts parts WATER Wash all the dis- Steep all the mantled compo- dismantled parts 2% SODIUM nents and remove (15’) and rinse with HYPOCHLORITE all product remains. water. Leave to dry Place the components on a clean surface and dry them.
  • Seite 67 Assembly assembly • Lubricate and assemble piston joints (X) • Insert the piston (X) in its slot. • Place the handle (A) in the body of the tap and insert the bolt (D) through the hole. • Place the seal (C) of the bolt (D). •...
  • Seite 68: Surface Cleaning

    7.Cleaning 7.3 Surface cleaning Surface cleaning is recommended every day after making the last ice-cream. CLEANING PROCESS: (Before starting the cleaning process, the machine must be in STOP) Clean tap Clean front panel Especially the area of product output and the orifices. WET BRUSH WITH DISINFECTANT CLOTH WET WITH...
  • Seite 69: Maintenance

    8.1 Periodic Maintenance 8.Maintenance The machine must be periodically examined (at least once It is prohibited to use the machine when just one of its a year) by a specialist technician. This periodic verification components is defective or worn. The operator is prohibi- is to maintain the high safety levels of the installed com- ted from carrying out the periodic maintenance.
  • Seite 70 Inhalt 0.Inhaltsverzeichnis 1. SICHERHEITSVORKEHRUNGEN 2. LERNEN SIE IHREN 161 Soft KENNEN ....2.1 Spezifikationen 2.2 Auflistung der Teile 2.3 Im Lieferumfang enthalten 2.5 Display 3. INSTALLATION ............ 3.1 Standort 3.2 Transport und Auspacken 3.3 Feinabstimmung 4. BETRIEB ..............4.1 Welche Produkte lassen sich verwenden? 4.2 Befüllen 4.3 Eisherstellung 4.4 Produkt servieren...
  • Seite 71 1.Sicherheit Sicherheit Ihre Sicherheit ist das Wichtigste. Bevor Sie beginnen, achten Sie darauf: Kinder dürfen nicht mit der Maschine spielen. Diese Maschine kann von Kindern ab 8 Jahren, von Menschen mit ein- geschränkten physischen, sensorischen oder mentalen Fähigkeiten und von unerfahrenen Menschen benutzt werden, sofern sie vorher über die sichere Bedienung informiert wurden und die möglichen Ri- siken verstanden haben.
  • Seite 72: Sicherheit

    Sicherheit 1.Sicherheit Vermeiden Sie das Risiko von tödlicher Entladung und Brand • Der Anschluss an das Stromnetz muss gemäß den im Nutzungs- land geltenden Sicherheitsregeln erfolgen. • Der Stromanschluss, an den die Maschine angeschlossen werden soll, muss: - dem Steckertyp der Maschine entsprechen; - den Angaben der Größenordnung auf der Datenplakette entsprechen;...
  • Seite 73 1.Sicherheit Sicherheit Vermeidung möglicher Schäden während des Betriebs der Maschine. Als unsachgemäße Nutzung gilt: - jede nicht vorgesehene Nutzung sowie jede Nutzung mit anderen Techniken als in diesem Dokument abgebildet; - jeder Eingriff an der Maschine, der von den in diesem Dokument Beschriebenen abweicht;...
  • Seite 74: Basis + Flüssiges Konzentrat Basis + Konzentrat In Pulverform Produkt Auf Fruchtbasis

    2.Lernen Sie Ihren 2.1 Spezifizierungen 161 Soft FASSUNGSVERMÖGEN DES BEHÄLTERS / 1.3 FASSUNGSVERMÖGEN DES ZYLINDERS 1.35 / 0.35 PRODUKTION PRO STUNDE / 33 WAS KANN MAN DAMIT ZUBEREITEN? Softeis Joghurteis PRODUKTION MIT: Basis + flüssiges Konzentrat Basis + Konzentrat in Pulverform Produkt auf Fruchtbasis...
  • Seite 75: Jede Maschine Enthält Folgende Informationen Auf Der Datenplakette

    DIMENSIONEN 10.2 63.3 24.9 cm - cm - 11.8 73.6 cm - cm - 31.1 cm - 97kg - 214 lb NETTOGEWICHT STROMSPANNUNG Siehe Datenplakette WATT PHASE <<70dBa SCHALL KLASSE Min.15ºC - Max.40ºC BETRIEBSTEMPERATUR Min.59ºF - Max.104ºF Jede Maschine enthält folgende Informationen auf der Datenplakette: Name und Steuernummer des xxxxxxxxxx...
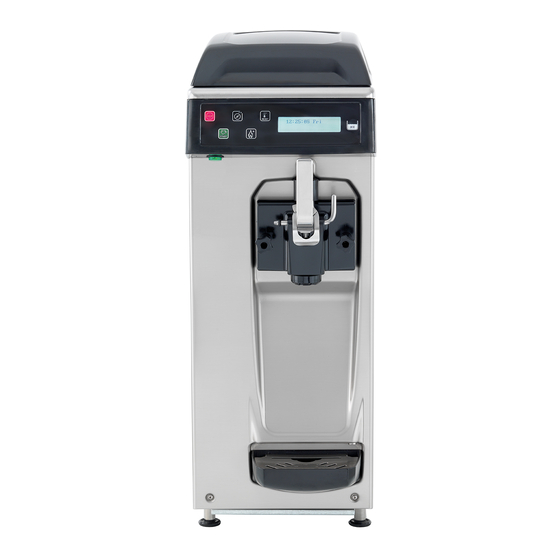
  • Seite 76: Auflistung Der Teile

    2.Lernen Sie Ihren 2.2 Auflistung der Teile 161 Soft Behälter Bedienfeld Zapfhahn Generals- chalter Abtropftablett Füße 2.Lernen Sie Ihren 2.3 Im Lieferumgang enthalten 161 Soft Tube Carpilube 1 Stck Nylonbürste 1 Stck Abzieher 1 Stck...
  • Seite 77 2.Lernen Sie Ihren 2.4 Display 161 Soft CLEANING • (1x drücken) Mischstab aktivieren. Empfohlen beim Leeren des Zylinders • (2 x drücken) Hot Cleaning aktivieren. • Blockieren/Deblockieren des Displays: 5 Sekunden lang gedrückt halten. STOP STOP • Funktionen deaktivieren. (Um eine Funktion zu ändern, STAND BY muss man zunächst die Funk-...
  • Seite 78: Installation

    3.Installation 3.1 Standort Alle in diesem Kapitel dargestellten Arbeitsschritte dürfen nur von qua- lifizierten Fachtechnikern ausgeführt werden, die bei der Organisation der verschiedenen Arbeitssequenzen und der Verwendung von ange- messenen Mitteln stets die in diesem Bereich geltenden Vorschriften einhalten müssen. Vor der Installation der Maschine müssen folgende Hilfsmittel bereitgestellt sein: Die Stromspannung muss der auf der Ebene, stabile Fläche.
  • Seite 79: Transport Und Auspacken

    3.Installation 3.2 Transport und Auspacken Nach Anlieferung der Maschine wird diese an ihren Standort gebracht: Vor dem Transport Anheben und Transport Achten Sie darauf, dass sich auf dem Transport und -Hebeweg nie- Die Maschine muss in senkrechter mand aufhält; lassen Sie schwierige Position von mindestens zwei Per- Situationen von Mitarbeitern beau- sonen getragen werden.
  • Seite 80: Betrieb

    4.1 Welche Produkte lassen 4.Betrieb sich verwenden? Welche Produkte lassen sich verwenden? KEINE HEISSEN FLÜSSIGKEITEN EINFÜLLEN. • Basis + flüssiges Konzentrat NUR FLÜSSIGKEITEN EINFÜLLEN MIT EINER TEMPERATUR VON 3ºC - 4ºC • Basis + Konzentrat in Pulverform Der Behälter kühlt die Produkte nicht herun- ter, er behält lediglich die aktuelle Temperatur •...
  • Seite 81: Eisherstellung

    4.Betrieb 4.3 Eisherstellung Start Eis zubereiten STARTdrücken START Generalschalter drücken. Maschine Wenn das Eis fertig ist, zeigt das Display: hat Strom. Eis Fertig! WÄHREND DER ZUBEREITUNG SIEHT MAN: (Pulsando podemos cambiar pantalla de información) START-DISPLAY: Eis Fertig! • Zustand des Eises •...
  • Seite 82: Produkt Servieren

    4.Betrieb 4.4 Produkt servieren Hebel nach unten Hebel anheben drücken Eisbehälter kreisförmig Eisbehälter nach un- bewegen, um der Eis- ten bewegen, um die portion eine konische Portionierung in einer Form zu verleihen. Spitze zu beenden. Wenn Sie das Eis portionieren, ohne den Produktionsrhythmus der Maschine (wie in der Tabelle im Abschnitt Spezifikationen aufgeführt) zu überschreiten, und die Maschine stets mit frischem Produkt auffüllen, können Sie gewährleisten, die Produk- tion auch in Stoßzeiten nicht unterbrechen zu müssen.
  • Seite 83: Einstellungen

    5.1 Nutzermenü 5.Einstellungen ZUGANG MENÜ: STOP un RESET gleichzeitig 3 Sek. lang gedrückt halten 3” STOP RESET START DURCH DAS NUTZERMENÜ NAVIGIEREN: Parameter Parameterwert STOP ändern verringern RESET Um das Menü zu verlassen, drücken Parameterwert Sie 30 Sek. lang keine Taste oder erhöhen START oder RESET EINSTELLBARE PARAMETER:...
  • Seite 84: Overrun-Einstellung

    5.2 Overrun-Einstellung 5.Einstellungen (Luftmenge im Eis) Es gibt 4 Overrun-Nivaus Overrun-Niveau ändern: - Overrun + Overrun Drehen Sie den oberen Teil des Rohrs im Produk- (weniger Luft im Eis) (mehr Luft im Eis) teinfüllbereich. Overrun 6.1 Alarme 6.Hinweise und Alarme Display Zeigt anhand von Alarmhinweisen mögliche STOP...
  • Seite 85 ALARMLISTE: ALARM Bei der Pasteurisierung: > TEV (Temp. Ausgang Verdampfer Behälter) (Temp. Verdampfer Behälter) Unkon.Erwaermung Die Maschine funktioniert nur im Pasteurisierungsmodus Überprüfen Sie, ob sich die Übertragunskette und der Motor in ihrer korrekten Position befinden. Fehler bei der Sonde im Zylinder. Schwerwiegender Alarm. Al.Zylind.Fuhler Die Maschine geht vom Standby- und Pasteurisierungsmodus in Stopp.
  • Seite 86: Die Oberflächliche Reinigung

    7.1 Wann soll die Maschine 7.Reinigung gereinigt werden? Wann soll die Maschine gereinigt werden? Säuberung und Hy- oberflächliche Reinigung Die gründliche gienisierung wird für jeden Tag nach dem letzten Eis muss spätestens nach des Tages empfohlen. 42 Tagen erfolgen. 7.2 Säuberung und Hygienisierung 7.Reinigung Der Reinigungsvorgang 1.
  • Seite 87 Klarspülen Zylinder leeren Behälter mit 5 Liter lauwarmem Wasser füllen. Taste Cleaning 1 x drücken und 1 Minute warten. Klarspülvorgang solange wiederholen, bis das Was- ser sauber und ohne Pro- duktreste aus dem Hahn läuft, dann STOP drücken. Hahn auseinan- Hahn der nehmen abnehmen...
  • Seite 88 WASSER REINIGUNGSMITTEL Einzelteile Teile desinfizieren abwaschen Alle Einzelteile 15 WASSER Die Einzelteile Min. lang einwei- spülen, bis alle Pro- chen lassen und NATRIUM- duktreste entfernt mit klarem Wasser THIOSULFAT (2%) sind. abspülen. Trocknen lassen Legen Sie die Einzelteile auf eine saubere Fläche und lassen Sie sie trocknen.
  • Seite 89 Hahn zusam- Hahn men-setzen zusammen-setzen • Kolbendichtungen (X) schmieren und zusammen- setzen • Kolben (X) einsetzen. • Hebel (A) in das Gehäuse des Hahns einsetzen und Griff (D) durch die Öffnung führen. • Dichtung (C) des Griffs (D) befestigen. • Dichtung des hinteren Teils des Hahns schmieren.
  • Seite 90: Oberflächliche Reinigung

    7.Reinigung 7.3 Oberflächliche Reinigung oberflächliche Reinigung wird für jeden Tag nach dem letzten Eis des Tages empfohlen. REINIGUNGSVORGANG: (Vor Beginn des Reinigungsvorgangs muss die Maschine GESTOPPT sein) Zapfhahn säubern Frontabdeckung säubern Vor allem dort, wo das Produkt herauskommt und an allen Öffnungen.
  • Seite 91: Wartung

    8.1 Regelmäßige Wartung 8.Wartung Die Maschine muss regelmäßig (mindestes einmal im Jahr) Sollte auch nur eine der Komponenten abgenutzt oder von einem Fachtechniker überprüft werden. Dadurch beschädigt sein, darf die Maschine nicht benutzt werden. wird die Sicherheit aller Komponenten und der Maschi- Die regelmäßige Wartung darf nicht vom Maschinenbe- ne gewährleistet.
  • Seite 92 Contenu 0.Index 1. CONSIGNES DE SÉCURITÉ 2. DÉCOUVREZ VOTRE 161 Soft ......2.1 Spécifications 2.2 Liste des pièces 2.3 Objets en dotation 2.5 Display 3. INSTALLATION ............ 3.1 Lieu d’installation 3.2 Transport et Déballage 3.3 Mise au point 4. FONCTIONNEMENT ..........4.1 Quel produit utiliser? 4.2 Remplissage 4.3 Production de glace...
  • Seite 93 1.Sécurité Sécurité Votre sécurité est la priorité. À prendre en compte avant de commencer: Les enfants ne doivent pas jouer avec cette machine. Cet appareil peut être utilisé par des enfants âgés d’au moins 8 ans et par des personnes ayant des capacités physiques, sensorielles ou mentales réduites ou dénuées d’expérience ou de connaissance, s’ils (si elles) sont correctement surveillé(e)s ou si des instructions relatives à...
  • Seite 94 Sécurité 1.Sécurité Éviter tout risque d’électrocution et d’incendie: • La connexion au réseau électrique doit être effectuée conformé- ment aux normes de sécurité en vigueur dans le pays d’utilisation. • La prise de courant pour la connexion de la machine doit : - Être adaptée au type de fiche installée sur la machine ;...
  • Seite 95 1.Seguridad Seguridad Éviter tout dommage éventuel durant le fonctionne- ment de la machine. Voici quelques exemples d’usages inappropriés : - toute utilisation autre que celle prévue et/ou toute application de techniques autres que celles illustrées dans la présente publication; - toute intervention réalisée sur la machine contraire aux indications figurant sur la présente publication;...
  • Seite 96: Découvrez Votre 161 Soft

    2.Découvrez 2.1 Spécifications votre 161 Soft CAPACITÉ DU RÉSERVOIR / 1.3 CAPACITÉ DU CYLINDRE 1.35 / 0.35 PRODUCTION HORAIRE / 33 QUE PEUT-ELLE PRÉPARER? Glace Soft Frozen yogurt ELLE PEUT OPÉRER AVEC: Base + Concent. liquide Base + Concent. Poudre Produit base fruits...
  • Seite 97 DIMENSIONS 10.2 63.3 24.9 cm - cm - 11.8 73.6 cm - cm - 31.1 cm - 97kg - 214 lb POIDS NET TENSION Ver placa de datos WATT PHASE <<70dBa PRESSION SONORE CLASSE Min.15ºC - Max.40ºC TEMP. FONCTIONNEMENT Min.59ºF - Max.104ºF Chaque machine inclut une plaque signalétique avec les données suivantes: Nom du fabricant et numéro...
  • Seite 98: Liste Des Pièces

    2.Découvrez 2.2 Liste des pièces votre 161 Soft Réservoir Panneau de commande Robinet Interrupteur général Plateau d’égouttement Pieds 2.Découvrez 2.3 Objets en dotation votre 161 Soft Tube Carpilube 1Unité Brosse en nylon 1Unité Extracteur de joint torique 1Unité...
  • Seite 99 2.Découvrez 2.4 Display votre 161 Soft CLEANING • (Appuyer 1 fois) Activer la pale mélangeuse. Conseillé durant le vidage du cylindre. • (Appuyer 2 fois) Activer Hot Cleaning. • Verrouillage / Déverrouillage de l’Écran : Maintenir appuyé pendant 5 secondes. STOP STOP •...
  • Seite 100: Installation

    3.Installation 3.1 Lieu d’installation Toutes les opérations illustrées dans ce chapitre sont de la compéten- ce exclusive des techniciens spécialisés, qui seront chargés d’organiser les différentes séquences opérationnelles et l’utilisation des moyens appropriés pour agir à tout moment en conformité avec les normes en vigueur en la matière.
  • Seite 101: Transport Et Déballage

    3.Installation 3.2 Transport et Déballage Après la réception de la machine, celle-ci devra être transportée à son emplacement prévu: Avant le transport Levage et transport Vérifier qu’il n’y ait personne dans le rayon d’action de levage et déplace- Les déplacements de la machine ment de la charge, et dans les cas doivent être effectués au moins par présentant une certaine difficulté,...
  • Seite 102: Fonctionnement

    4.1 Quel produit utiliser? 4.Fonctionnement Quel produit utiliser? • Base + Concentré liquide NE PAS METTRE DE LIQUIDES CHAUDS. METTRE DES LIQUIDES AVEC UNE TEMPÉRA- TURE COMPRISE ENTRE : • Base + Concentré en poudre 3ºC - 4ºC • Produits à base de fruits Le réservoir ne permet pas de baisser la tem- pérature du réservoir mais seulement de la maintenir.
  • Seite 103: Production De Glace

    4.3 Production de glace 4.Fonctionnement Démarrage Préparation de glace Appuyer sur START START Appuyer sur l’interrup- teur Général. Machine Lorsque la glace est prête, l’écran affiche ce message: sous tension. GLACE PRETE! DURANT LA PRÉPARATION, ON PEUT VOIR: (En appuyant sur l’écran d’information peut être affiché) ÉCRAN PRINCIPAL: GLACE PRETE!
  • Seite 104: Servir Le Produit

    4.Fonctionnement 4.4 Servir le produit Descendre la came Lever la came Déplacer le récipient Déplacer le récipient en faisant des cercles vers le bas pour une pour que la glace ait finition de la portion une forme conique. en pointe. Distribuez la glace sans dépasser le rythme de production de la machine, comme indiqué...
  • Seite 105: Réglages

    5.1 Menu utilisateur 5.Réglages ACCÈS MENU: Maintenir STOP et RESET appuyés en même temps pendant 3” 3” STOP RESET START NAVIGUER DANS LE MENU UTILISATEUR: Changer Réduire STOP paramètre valeur paramètre RESET Pour quitter le menu, n’appuyer sur Augmenter aucune touche pendant 30 secondes valeur paramètre ou appuyer sur START ou RESET PARAMÈTRES ÉDITABLES:...
  • Seite 106: Réglage Overrun

    5.2 Réglages Overrun 5.Réglages (Quantité d’air dans la glace) Il y a 4 niveaux d’Overrun. Changement du niveau d’Overrun: - Overrun + Overrun Faire tourner la partie supérieure du tuyau d’en- (moins d’air dans la glace) (plus d’air dans la glace) trée de produit Overrun 6.1 Alarmes...
  • Seite 107 LISTE DES ALARMES: ALARME Durant la Pasteurisation: > TEV (Temp. sortie évaporateur réservoir) (Temp. Evaporador depósito) Al.echange therm. (16) La machine fonctionne seulement sur le mode Pasteurisation Vérifier si la courroie de transmission ou le rotor est à la bonne position. Erreur de la sonde du cylindre.
  • Seite 108: Nettoyage

    7.Nettoyage 7.1 Quand nettoyer la machine? Quand nettoyer la machine? lavage et l’hygiénisation nettoyage superficiel est con- doi- seillé tous les jours après la dernière gla- vent être obligatoirement effectués ce de la journée. après 42 jours au plus. 7.2 Lavage et Hygiénisation 7.Nettoyage Le processus de netto- 1.
  • Seite 109 Rinçage Vider le Cylindre Remplir le réservoir avec 5 litres d’eau tiède. Appuyer sur la touche cleaning une fois et attendre une minute. Répéter le rinçage jusqu’à ce que le jet du robinet n’ait plus de restes de pro- duit et appuyer sur STOP. Démonter le Enlever le robinet...
  • Seite 110 DETERGENT Laver les Désinfecter pièces les pièces Laver tous les com- posants démontés Laisser tremper tous jusqu’à ce qu’il n’y les composants dé- 2% HYPOCHLORI- ait plus de restes montés (15’) et rincer TE DE SODIUM de produit. à l’eau. Laisser sécher Déposer les compo- sants sur une surface...
  • Seite 111: Monter Le Robinet

    Monter le Monter le Robinet Robinet • Lubrifier et monter les joints du piston (X) • Mettre le piston (X) à son emplacement. • Mettre la came (A) sur le corps du robinet et in- sérer la goupille (D) dans l’orifice. •...
  • Seite 112: Nettoyage Superficiel

    7.Nettoyage 7.3 Nettoyage superficiel nettoyage Superficiel est conseillé tous les jours après la dernière glace de la journée. PROCESSUS NETTOYAGE: (Avant de commencer le processus de nettoyage, la machine doit être sur STOP) Nettoyer le robinet Nettoyer le panneau avant En particulier la zone de sortie de produit et les orifices.
  • Seite 113: Entretien

    8.1 Entretien Régulier 8.Entretien La machine doit être examinée régulièrement (au moins Il est interdit d’utiliser la machine en cas de présence de une fois par an) par un technicien spécialisé. Cette véri- composants défectueux ou usés. L’entretien rébulier ne fication régulière permet de préserver le haut niveau de doit pas être réalisé...
  • Seite 114 Conteúdo 0.Índice 1. PRECAUÇÕES DE SEGURANÇA 2. DESCUBRA O SEU 161 Soft ........ 2.1 Especificações 2.2 Lista de partes 2.3 Objetos dotados 2.5 Display 3. INSTALAÇÃO ............3.1 Lugar de instalação 3.2 Transporte e Desempacotamento 3.3 Preparação 4. FUNCIONAMENTO ..........4.1 Que produto utilizar? 4.2 Enchimento 4.3 Produção gelado...
  • Seite 115 1.Segurança Segurança A sua segurança é o mais importante, antes de começar tenha em conta: As crianças não devem brincar com a máquina. Este aparelho pode ser utilizado por crianças com idade equivalente a 8 anos ou mais e por pessoas com capacidades físicas, sensoriais ou mentais reduzidas ou com falta de experiência e conhecimento, sempre e quando lhes possa ser proporcionada supervisão ou for- mação apropriadas relativamente à...
  • Seite 116: Segurança

    Segurança 1.Segurança Evitar risco de descarga elétrica letal e Incêndio: • O enlace à rede elétrica deve ser efetuado segundo as normas de segurança vigentes no país de utilização. • A tomada da corrente à será necessário conectar a máquina deve: - Corresponder ao tipo de ficha instalado na mesma;...
  • Seite 117 1.Segurança Segurança Evitar danos eventuais durante o funcionamento da máquina. Será considerado como utilização imprópria: - qualquer utilização diferente à prevista e/ou com aplicação de téc- nicas diferentes de às ilustradas na presente publicação; - qualquer intervenção efetuada na máquina que contraste com as indicações expostas nesta publicação; - Todas as utilizações posteriores a alterações de componentes e/ ou de dispositivos de segurança; - Todas as utilizações posteriores a reparações efetuadas com uso de componentes não autorizados pelo fabricante;...
  • Seite 118: Especificações

    2.Descubra a 2.1 Especificações sua 161 Soft CAPACIDADE DEPÓSITO / 1.3 CAPACIDADE CILINDRO 1.35 / 0.35 PRODUÇÃO HORÁRIA / 33 O QUE PODE PREPARAR? Gelado Soft Iogurte gelado PODE TRABALHAR COM: Base + Concent. líquido Base + Concent. pó Produto base fruta...
  • Seite 119 DIMENSÕES 10.2 63.3 24.9 cm - cm - 11.8 73.6 cm - cm - 31.1 cm - 97kg - 214 lb PESO LÍQUIDO VOLTAGEM Ver placa de dados WATT FASE <<70dBa PRESSÃO SONORA CLASSE Min.15ºC - Max.40ºC TEMP. FUNCIONAMENTO Min.59ºF - Max.104ºF Cada máquina contém na placa de dados as seguintes informações: Nome do fabricante e número de...
  • Seite 120: Lista De Partes

    2.Descubra a 2.2 Lista de partes sua 161 Soft Depósito Painel de comandos Torneira Interruptor geral Bandeja de gotejamento Pés 2.Descubra a 2.3 Objetos dotados sua 161 Soft Tubo Carpilube 1Ud Escova de nylon 1Ud Extrator de junta tórica 1Ud...
  • Seite 121 2.Descubra a 2.4 Display sua 161 Soft CLEANING • (Premir 1ª vez) Ativar pá de mistura. Recomendável durante o esvaziamento do cilindro. • (Premir 2 vezes) Ativar Hot Cleaning. • Bloqueio/Desbloqueio Display: Premir durante 5 segundos. STOP STOP • Desativar funções. (Para muda de função é neces- STAND BY sário desativar funções).
  • Seite 122: Instalação

    3.Instalação 3.1 Lugar de instalação Todas as operações ilustradas neste capítulo são exclusivamente da competência de técnicos especializados, os quais deverão organizar as diferentes sequências operativas e a utilização de meios adequados para atuar sempre com aplicação rigorosa das normas vigentes nesta matéria.
  • Seite 123: Transporte E Desempacotamento

    3.2 Transporte e Desempacotamento 3.Instalação Uma vez recebida a máquina, será necessário transportá-la para a zona de colocação: Antes de transportar Elevação e transporte Controlar para ver se não está pre- sente nenhuma pessoa dentro do raio operativo de elevação e deslo- O deslocamento da máquina deve camento da carga e, em situações ser efetuado por pelo menos duas...
  • Seite 124: Funcionamento

    4.1 Que produto utilizar? 4.Funcionamento Que produto utilizar? • Base + Concentrado líquido NÃO INTRODUZIR LÍQUIDOS QUENTES. INTRODUZIR LÍQUIDOS COM TEMPERATURA: 3ºC - 4ºC • Base + Concentrado em pó O depósito não reduz a temperatura do pro- duto, apenas a mantém. •...
  • Seite 125: Produção Gelado

    4.Funcionamento 4.3 Produção gelado Arranque Preparar gelado Premir START START Premir interruptor Geral. Máquina em Quando o gelado estiver pronto, o ecrã vai mostrar: tensão. PRONTO! DURANTE A PREPARAÇÃO PODEMOS VER: (Premindo podemos mudar o ecrã de informação) ECRÃ PRINCIPAL: PRONTO! •...
  • Seite 126: Servir Produto

    4.Funcionamento 4.4 Servir produto Baixar Levantar alavanca alavanca Mover o recipiente em Mover o recipiente sentido circular para para baixo para ter- proporcionar uma for- minar a porção em ma cónica ao gelado. ponta. Distribua o gelado sem superar o ritmo de produção da máquina como indicado na tabela da secção Especificações Não superando este ritmo e tendo o cuidado de reabastecer a máquina de produto fresco, poderá ter a certeza de nunca inte- rromper a venda nem sequer nas horas de ponta.
  • Seite 127: Ajustes

    5.1 Menú usuario 5.Ajustes ACCESO MENU: Premir STOP e RESET ao mesmo tempo durante 3” 3” STOP RESET START NAVEGAR PELO MENU USUÁRIO: Alterar Diminuir STOP parâmetro valor parâmetro RESET Para sair do menu não premir nen- Aumentar huma tecla durante 30 segundos ou valor parâmetro premir START ou RESET.
  • Seite 128: Ajuste Overrun

    5.2 Ajuste Overrun 5.Ajustes (Quantidade de ar no gelado) Existem 4 níveis de Overrun Alterar o nível de Overrun: - Overrun + Overrun Girar a parte superior do tubo de entrada do pro- (menos ar no gelado) (Mais ar no gelado) duto.
  • Seite 129 LISTA DE ALARMES: ALARME Durante Pasteurização: > TEV (Temp. Saída evaporador depósito) (Temp. Evaporador depósito) Al.Mudanca Term. (16) A máquina apenas funciona em modo Pasteurização Comprovar se a correia de transmissão ou o rotor estão na posição correta. Avaria na sonda do cilindro. Alarme crítico. Al.Sonda Cilindr (8) A máquina pode ser posta em Stop a partir dos modos Stand by e Pasteurização.
  • Seite 130: Limpeza

    7.Limpeza 7.1 Quando limpar a máquina? Quando limpar a máquina? lavagem e desinfeção limpeza Superfi- Recomendamos a devem cial todos os dias depois do último ge- ser realizadas obrigatoriamente após lado do dia de trabalho. 42 dias no máximo. 7.2 Lavagem e Desinfeção 7.Limpeza O processo de limpeza 1.
  • Seite 131 Enxagua- Esvaziar Cilindro Encher o depósito com 5 litros de água morna. Premir a tecla cleaning mento 1 vez e esperar 1 minuto. Repetir enxaguamento até o jato da torneira sair sem restos de pro- duto e premir STOP. Retirar Desmontar torneira torneira...
  • Seite 132 ÁGUA DETERGENTE Lavar Desinfetar peças peças Lavar todos os Deixar de molho ÁGUA componentes todos os compo- desmontados até nentes desmon- 2% HIPOCLORITO retirar todos os tados (15’) e lavar DE SODIO restos de produto. com água. Deixar secar Colocar os componen- tes sobre uma superfí- cie limpa e deixar secar.
  • Seite 133 Montar Montar torneira torneira • Lubrificar e montar as juntas do pistão (X) • Introduzir o pistão (X) no seu alojamento. • Colocar o came (A) no corpo da torneira e intro- duzir o passador (D) através do orifício. • Colocar a junta (C) do passador (D). •...
  • Seite 134: Limpeza Superficial

    7.Limpeza 7.3 Limpeza superficial limpeza Superficial Recomendamos realizar a todos os dias depois do último gelado do dia de trabalho. PROCESSO LIMPEZA: (Antes de começar o processo de limpeza, a máquina deve estar em modo STOP) Limpar torneira Limpar painel frontal Especialmente a área da saída produto e os orifícios.
  • Seite 135: Manutenção

    8.1 Manutenção Periódica 8.Manutenção A máquina deve ser examinada periodicamente (pelo me- Está proibido utilizar a máquina quando um dos seus nos uma vez por ano) por um técnico especializado. Esta componentes estiver defeituoso ou desgastado. A manu- verificação periódica serve para manter o nível de segu- tenção periódica está proibida para o operador. rança de todos os componentes instalados e da própria máquina elevado.

Inhaltsverzeichnis