Herunterladen Inhalt Inhalt Diese Seite drucken

Werbung

Verfügbare Sprachen
  • DE

Verfügbare Sprachen

  • DEUTSCH, seite 32
ELPMB22
ELPMB23
天吊り金具 ELPMB22/ELPMB23 取扱説明書
Ceiling Mount ELPMB22/ELPMB23 Instruction Manual
Fixation au plafond ELPMB22/ELPMB23 Guide de l'utilisateur
Deckenhalterung ELPMB22/ELPMB23 Bedienungsanleitung
Manuale dell'utente per la staffa di montaggio ELPMB22/ELPMB23
Manual de usuario de la consola para montaje ELPMB22/ELPMB23
1

Werbung

Inhaltsverzeichnis
loading

Inhaltszusammenfassung für Epson ELPMB22

  • Seite 1 ELPMB22 ELPMB23 天吊り金具 ELPMB22/ELPMB23 取扱説明書 Ceiling Mount ELPMB22/ELPMB23 Instruction Manual Fixation au plafond ELPMB22/ELPMB23 Guide de l’utilisateur Deckenhalterung ELPMB22/ELPMB23 Bedienungsanleitung Manuale dell’utente per la staffa di montaggio ELPMB22/ELPMB23 Manual de usuario de la consola para montaje ELPMB22/ELPMB23...
  • Seite 2 はじめに ● 当製品はエプソン製プロジェクターを天井から吊り下げるための金具です。 ● ELPMB22 は中型プロジェクター用、ELPMB23 は小型プロジェクター用で す。それぞれの天吊り金具に取り付け可能なプロジェクターは、当社ホームペー ジまたは製品カタログをご覧ください。 ● プロジェクターの設置高さを調整したい場合は、高さ調整機能がついた延長パイ プを別途お求めください。 ⇒ 詳しくは 11 ページの「4 延長パイプについて」をご覧ください。 ● 当製品を安全にご使用いただくために、必ず取扱説明書をお読みください。 また、取扱説明書は大切に保管してください。 なお、取付不備、組立不良、取扱不備による事故、損傷については、当社は責任 を負いませんのでご了承ください。 ● 組み立て、取り付け説明のイラストは ELPMB22 のものを使用しています。ま た、イラストは実際の製品と形状が異なる場合があります。 ● 仕様は予告なしに変更する場合があります。 安全上のご注意 この取扱説明書では、安全に正しくご使用いただき、お客様や他の人への危害や財 産の損害を未然に防止するため下記のような表示を行っています。内容をよく理解 したうえで、本文をお読みください。 この表示を無視して、誤った取り扱いをすると、人が死亡または重傷を負う 可能性が想定される内容を示します。 製品の特徴 ● ボールジョイント機構による角度調整機構 水平回転、上下あおり / 左右チルト角調整...
  • Seite 3 仕様 質量 ELPMB22:3.5kg ELPMB23:3.4kg 外形サイズ ELPMB22:W342 × D210 × H150 mm ELPMB23:W270 × D139 × H150 mm 1 組み立て、取り付けの前に 1-1 安全上のご注意 ◎ 本製品は、十分な技術、技能を有する取付工事専門業者が施工を行うこ とを前提として販売しております。専門業者以外は施工しないでくださ い。 ◎ それぞれの部品は、強度が十分確保できるように適切な方法で組み込ん でください。 ◎ ネジは完全に締め付けてください。 ◎ 不完全な組立ては、落下事故等の原因となります。 本製品はプロジェクターを含めますと、最大十数 kg の質量となります。取 り付けの際は、許容加重計算等を行い、母体の構造、材料、強度を十分に確 認し、最適な方法で確実に行ってください。...
  • Seite 4 1-2 同梱品の確認 箱を開けたら、不足品がないか確認してください。 ELPMB22 本体 ELPMB23 本体 めがねレンチ プロジェクター取付ネジ (4 本:M4 × 12)/ バネ座金(4 個)/ 取扱説明書(本書) 平座金(4 個) 六角レンチ ・ プロジェクターへの金具の取り付けは、必ず同梱のプロジェクター取付ネジを使 用してください。 ・ 工具は必要に応じてご用意ください。 1-3 各部の名称 ELPMB22 天井取付金具 傾き調整ネジ / 金具固定ネジ(2本) ネジキャップ 傾き固定ネジ(2 本) ボールジョイント部 レンズ位置調整ネジ プロジェクター取付金具 (4本) ELPMB23 天井取付金具...
  • Seite 5 1-4 プロジェクターの設置について ・ プロジェクターを設置する際は、蛍光灯、エアコンなど、他の電気製品から離し てください。蛍光灯の種類によっては、プロジェクターの付属品であるリモコン が誤動作する場合があります。 ・ 外部ノイズの影響を少なくするために、パソコン等と接続するケーブルは 20m 以下になるようにプロジェクターを配置することをお薦めします。 ・ レンズや内部の光学部品に汚れが付着しないように、ホコリや湿気の少ないとこ ろに設置してください。 ・ ご使用のプロジェクター機種の使用温度範囲を超える場所には設置しないでくだ さい。故障の原因となります。 ・ 直射日光等が入る部屋では、カーテンを引くと投写画面が見易くなります。 2 組み立て、取り付けかた 2-1 天井取付金具をプロジェクター取付金具から外す (1)ボールジョイント部が可動状態になっていることを確認する 開梱時にボールジョイント部が可動状態になっているか確認してください。 (出荷時には傾き調整ネジおよび傾き固定ネジは緩めてあります。 ) 可動状態になっていない場合は、次の手順で可動状態にしてください。 傾き調整ネジのネジキャップ(凸型)を外す。 同梱のめがねレンチを使い、傾き調整ネジを緩める。 ・傾き調整ネジは、180 度以上回すと再び締まる構造となっています。 ・傾き調整ネジの反対側のネジは緩める必要はありません。 同梱の六角レンチを使い、傾き固定ネジ(2本)を緩める。 可動 ネジキャップ ボールジョイント部 傾き調整ネジ 傾き固定ネジ(2本)...
  • Seite 6 天井取付金具を約 30 度右に回転させて持ち上げます。 天井取付金具 金具固定ネジ 金具固定ネジ プロジェクター取付金具 プロジェクターレンズ側 2-2 天井取付金具を天井に取り付ける (1) 天井取付金具の長穴部(4 箇所)で、天井にネジ、ナット等で固定する 天井接地面寸法図(単位:mm) 長穴部 プロジェクター 天井取付金具 レンズ側 ・ 図は ELPMB22 を示します。 ELPMB23 も同じ寸法です。 ・ コンクリート構造などの天井に取り付ける場合は、市販品のアンカーおよび ボルトなどを使用して固定してください。 ⇒ 詳しくは 10 ページの「3 コンクリート構造天井への取り付け」をご覧 ください。 ・ プロジェクターの設置高さを調整したい場合は、高さ調整機能がついた延長 パイプを別途お求めください。 ⇒ 詳しくは 11 ページの「4 延長パイプについて」をご覧ください。...
  • Seite 7 2-3 プロジェクター取付金具をプロジェクターに取り付ける (1)プロジェクターを反転させ、操作パネル面が下になるようにする (2)同梱のプロジェクター取付ネジ(4 本)を使って、プロジェクター取付金具 をプロジェクターに固定する プロジェクター取付金具には複数の長穴が開いています。プロジェクターに 合った長穴を使って固定してください。 プロジェクター取付ネジ (4 本)/ バネ座金(4 個)/ 平座金(4 個) プロジェクター取付金具 プロジェクターレンズ側 プロジェクター操作パネル側 ・イラストはプロジェクターの種類によって異なります。 ◎ プロジェクターを固定する際は、必ず同梱のネジを使用してください。 ◎ ネジを締め付けた後、増し締めをしてネジの緩みがないことを十分確認 してください。 ◎ 十分強度のあるワイヤーやベルトを使ってプロジェクターと天吊り金具 をしっかり固定し、落下防止対策を実施してください。 (プロジェクター の取扱説明書を確認し、そこに記載されている取付け部を利用して固定 してください。 ) ◎ プロジェクターの天吊り固定部に、ネジゆるみ止め用接着剤・潤滑剤・ 油などが付着するとケースが割れ、プロジェクターが落下し事故やけが の原因となります。天吊り設置や天吊り金具の調整に際しては、ネジゆ るみ止め用接着剤・潤滑剤・油などを使用しないでください。...
  • Seite 8 2-4 プロジェクター取付金具を天井取付金具に取り付ける (1) プロジェクター取付金具のボールジョイント部を天井取付金具に挿入する ボールジョイント部にある突起部(2ヶ所)を、天井取付金具の溝に通して ください。 ボールジョイント部が図(設置正面図)の向きになるように取り付けてくだ さい。 (2) 同梱の六角レンチで金具固定ネジ(2 本)を締めて固定する 金具固定ネジ 金具固定ネジ ボールジョイント部 突起部(2ヶ所) プロジェクターレンズ側 設置正面図 傾き調整ネジ/ ネジキャップ(左側) 傾き固定ネジ (右側/背面)...
  • Seite 9 2-5 プロジェクターのレンズセンター位置を調整する プロジェクター取付金具を水平移動し、天吊り金具のセンター(ボールジョイント 部)と、プロジェクターのレンズのセンターを合わせることができます。 ● 水平調整範囲:130mm(ELPMB22)/100mm(ELPMB23) ◎ 調整の際、プロジェクターを下から十分保持してください。 ◎ 調整後はすべてのネジを完全に締め直してください。不十分ですと落下 事故の原因となります。 (1)同梱の六角レンチを使ってレンズ位置調整ネジ(4 本)を緩める (2)プロジェクター取付金具を水平移動し、スケールシールの寸法(図内 (A) 部 寸法)を、弊社ホームページに記載されているプロジェクターの指定寸法に 合わせ、レンズの位置を調整する (3)同梱の六角レンチを使ってレンズ位置調整ネジ(4 本)を本締めする スケールシール レンズ位置調整ネジ(4本) 移動 2-6 角度調整をする プロジェクター支持部にボールジョイント機構を採用していることにより、プロ ジェクターを、設置角度範囲内の任意の位置に容易に固定することができます。 ● 水平回転調整範囲:全方向 360 度 ● 上下あおり / 左右チルト調整範囲:± 18 度 ◎ 調整の際、プロジェクターを下から十分保持してください。 ◎ 調整後はすべてのネジを完全に締め直してください。不十分ですと落下...
  • Seite 10 次の手順で調整を行います。 (1)傾き調整ネジのネジキャップ(凸型)を外す (2)同梱のめがねレンチを使って傾き調整ネジを軽く締め、仮止めする (3)プロジェクターの投写位置を調整する (4)同梱のめがねレンチを使って傾き調整ネジを本締めする (5)同梱の六角レンチを使って傾き固定ネジ(2 本)を締める (6)傾き調整ネジのネジキャップ(凸型)を取り付ける (1) (6) ネジキャップ (2) (4)傾き調整ネジ (5)傾き固定ネジ(2本) 回転 回転 (3) 回転 3 コンクリート構造天井への取り付け (1)市販品のアンカーおよびボルトをコンクリートに固定する (2)市販品のナットで天井取付金具を固定する コンクリート アンカー ナット 天井取付金具 ボルト ・ コンクリートの下に別途天井がある場合等、直接天井に取り付けできない場合 は、別売り延長パイプをお求めいただき取り付けてください。 ⇒ 詳しくは 11 ページの「4 延長パイプについて」をご覧ください。 ◎ 天井に取り付ける際は、プロジェクター本体と、天吊り金具の質量およ び、横ゆれにも十分耐えられるように各部品を設定してください。ナッ ト・ボルト等は M12 以上を使用してください。落下事故の原因となり ます。...
  • Seite 11 4 延長パイプについて プロジェクターの設置高さを調整したい場合は別売の延長パイプをお求めください。 延長パイプには二種類の型番(ELPFP13/ELPFP14)があります。高さ調整機能 により、取り付け位置からプロジェクターまでの距離を、下図の範囲で調整できま す。 天井取付金具 ELPFP13: 延長パイプ 668mm ∼ 918mm (ピッチ 50mm) ELPFP14: 918mm ∼ 1168mm (ピッチ 50mm) プロジェクター取付金具 5 安全にご使用いただくために ・ プロジェクターのメンテナンスや修理を行う場合も必ず、工事専門業者で、プロ ジェクターの取り外し、再設置を行ってください。 なお、プロジェクターのメンテナンスおよび修理の方法は、プロジェクター本体 の取扱説明書を参照してください。 ◎ 取付設置後は、決してボルト・ビス・ナットを緩めないでください。ま た、定期的にネジ類の緩みがないことを確認してください。万一緩みが ある場合は、確実に締め直してください。 ◎ 天吊り金具にぶら下がらないでください。落下事故の原因となります。 6 お問い合わせ先 ・ ご不明な点等がありましたら、プロジェクター本体の取扱説明書に記載されてい る問い合わせ先にご連絡ください。...
  • Seite 12: Safety Precautions

    This product is for mounting an Epson Multi-Media Projector on the ceiling. ELPMB22 is for medium-size projectors and ELPMB23 is for small projectors. See our website or product catalog to find out which model can be used to mount your projector.
  • Seite 13: Specifications

    Specifications Weight ELPMB22: 3.5 kg ELPMB23: 3.4 kg Dimensions × × ELPMB22: W 342 D 210 H 150 mm × × ELPMB23: W 270 D 139 H 150 mm 1 Before Assembly and Installation 1-1 Safety Precautions Warning This product is sold on the assumption that the installation work will be performed by a specialist with the required technical know-how and ability.
  • Seite 14: Checking The Package Contents

    1-2 Checking the Package Contents Open the box and check that nothing is missing. ELPMB22 ceiling mount ELPMB23 ceiling mount Offset wrench Projector mounting screws: 4 pcs. (M4 × 12)/ lock washers: 4 pcs./ Instruction manual plain washers: 4 pcs.
  • Seite 15: Assembly And Installation

    1-4 Installing the Projector • Install the projector away from fluorescent lighting, air conditioners and other electrical items. Failure to do so can cause the remote control to malfunction. • To limit the effect of external noise, we recommend that you position the projector so that the cable connecting it to a computer or other device is no longer than 20 meters.
  • Seite 16 Oblong holes Projector lens Ceiling plate side • The illustration shows ELPMB22. ELPMB23 has the same dimensions. • When installing the ceiling mount on a concrete ceiling, use anchors and bolts. → For details, see "3 Installing on a Concrete Ceiling" on page 10.
  • Seite 17 2-3 Fitting the Projector Plate to the Projector (1) Turn over the projector so that the operating panel faces downwards. (2) Use the four projector mounting screws provided to attach the projector plate to the projector. There are several oblong holes in the projector plate. Place the screws through the holes that align with your projector and tighten them.
  • Seite 18 2-4 Fitting the Projector Plate to the Ceiling Plate (1) Insert the ball joint of the projector plate into the ceiling plate. Put the two protrusions on the ball joint into the grooves of the ceiling plate. Fit the plates together so that the ball joint is in the direction illustrated (Front view).
  • Seite 19 Moving the projector plate horizontally enables you to align the center of the ceiling mount (the ball joint) and the center of the projector lens. Horizontal adjustment range: 130 mm (ELPMB22)/100 mm (ELPMB23) Warning Hold the projector carefully from below during adjustment.
  • Seite 20 Use nuts and bolts that are M12 or higher. Failure to do so could cause the projector to fall. Epson accepts no responsibility for the projector falling due to inadequate installation.
  • Seite 21: For Safe Use

    4 Extension Pipe To adjust the height of where the projector is installed, you need to purchase a separate extension pipe. There are two extension pipe model numbers, ELPFP13 and ELPFP14. The illustration below shows the range of distances between ceiling plate and projector to which each model can be adjusted.
  • Seite 22: Précautions De Sécurité

    Cet accessoire est destiné au montage d’un projecteur multimédia Epson au plafond. Le kit de montage ELPMB22 est destiné aux projecteurs de taille moyenne et le kit de montage ELPMB23 convient aux petits projecteurs. Visitez notre site Web ou consultez notre catalogue de produits pour savoir quel modèle utiliser pour votre projecteur.
  • Seite 23: Spécifications

    Spécifications Poids ELPMB22: 3,5 kg ELPMB23: 3,4 kg Dimensions ELPMB22: 342 L 210 P 150 H mm × × ELPMB23: 270 L 139 P 150 H mm × × 1 Avant l’assemblage et l’installation 1-1 Précautions de sécurité Mise en garde Cet accessoire est vendu sur l’hypothèse que l’installation sera...
  • Seite 24: Vérification Du Contenu De L'emballage

    1-2 Vérification du contenu de l’emballage Ouvrez la boîte et assurez-vous qu’il ne manque rien. Kit de fixation au plafond Kit de fixation au plafond ELPMB22 ELPMB23 Clé polygonale Vis de montage du × projecteur: 4. (M4 12)/ Rondelles-frein: 4/ Guide de l’utilisateur...
  • Seite 25: Installation Du Projecteur

    1-4 Installation du projecteur • Installez le projecteur loin de tout éclairage fluorescent, climatiseur et autres appareils électriques. Sinon, cela risque de perturber le fonctionnement de la télécommande. • Pour limiter l’effet de parasites, placez de préférence le projecteur de façon à ce que le câble qui le relie à...
  • Seite 26 Plaque du plafond • L’illustration présente le kit de fixation ELPMB22. Le kit de fixation ELPMB23 a les mêmes dimensions. • Pour installer le kit de fixation sur un plafond en béton, utilisez des pattes de fixation et des boulons.
  • Seite 27 2-3 Fixation de la plaque du projecteur sur le projecteur (1) Retournez le projecteur de façon à ce que le panneau de commande soit orienté vers le bas. (2) Utilisez les quatre vis de montage du projecteur fournies pour fixer la plaque du projecteur sur le projecteur.
  • Seite 28 2-4 Fixation de la plaque du projecteur sur la plaque du plafond (1) Introduisez la rotule de la plaque du projecteur dans la plaque du plafond. Placez les deux protubérances de la rotule dans les rainures de la plaque du plafond.
  • Seite 29 Le déplacement horizontal de la plaque du projecteur vous permet d’aligner le centre du kit de fixation au plafond (la rotule) et le centre de l’objectif du projecteur. Plage de réglage horizontal: 130 mm (ELPMB22)/100 mm (ELPMB23) Mise en garde Tenez bien le projecteur par en dessous pendant le réglage.
  • Seite 30 Utilisez des écrous et des boulons M12 ou plus. Sinon, le projecteur risque de tomber. Epson décline toute responsabilité en cas de chute du projecteur due à une mauvaise installation.
  • Seite 31: Pour Une Utilisation En Toute Sécurité

    4 Tube d’extension Pour régler la hauteur à laquelle est installé le projecteur, vous devez acheter un autre tube d’extension. Il existe deux modèles de tube d’extension, ELPFP13 et ELPFP14. L’illustration ci-dessous indique la plage de distances entre la plaque du plafond et le projecteur pour chaque modèle.
  • Seite 32: Sicherheitshinweise

    Einleitung Dieses Produkt dient zum Anbringen eines Epson Multi-Media-Projektors an der Decke. ELPMB22 ist für mittelgroße Projektoren und ELPMB23 ist für kleine Projektoren. Sehen Sie auf unserer Website oder in dem Produkt-Katalog, welches Modell zur Anbringung Ihres Projektors geeignet ist.
  • Seite 33: Technische Daten

    Technische Daten Gewicht ELPMB22: 3,5 kg ELPMB23: 3,4 kg Abmessungen ELPMB22: B 342 × T 210 × H 150 mm ELPMB23: B 270 × T 139 × H 150 mm 1 Vor Montage und Installation 1-1 Sicherheitshinweise Warnung Dieses Produkt wird unter der Annahme verkauft, dass die Installationsarbeiten von einem qualifizierten Fachmann mit dem erforderlichen technischen Know-how und Fähigkeiten ausgeführt...
  • Seite 34: Überprüfen Des Lieferumfangs

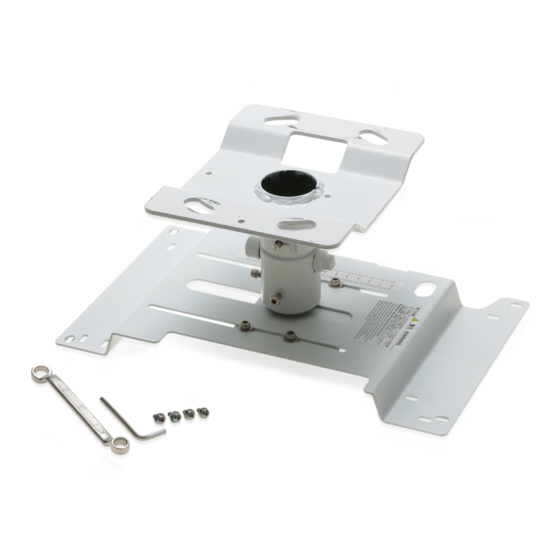
    1-2 Überprüfen des Lieferumfangs Öffnen Sie den Karton und prüfen Sie, ob nichts fehlt. ELPMB22 ELPMB23 Deckenhalterung Deckenhalterung Abgewinkelter Schlüssel Projektor- Montageschrauben: 4 Stck. (M4 × 12)/ Bedienungsanleitung Sicherungsscheiben: 4 (dieses Handbuch) Sechskantschlüssel Stck./U-Scheiben: 4 Stck. • Verwenden Sie nur die mitgelieferten Projektor-Montageschrauben zum Anbringen der Projektorplatte am Projektor.
  • Seite 35: Installation Des Projektors

    1-4 Installation des Projektors • Installieren Sie den Projektor entfernt von Leuchtstofflampen, Klimaanlagen und anderen elektrischen Geräten. Gelingt dies nicht, kann Fehlfunktion der Fernbedienung bewirkt werden. • Um die Wirkung von externen Störungen zu begrenzen, empfohlen wir, den Projektor so aufzustellen, dass das Anschlusskabel zum Computer oder einem anderen Gerät nicht länger als 20 Meter ist.
  • Seite 36: Ansetzen Der Deckenplatte An Der Decke

    Längliche Öffnungen Projektorobjektiv- Deckenplatte Seite • Die Abbildung zeigt ELPMB22. ELPMB23 hat die gleichen Abmessungen. • Bei der Installation der Deckenhalterung an einer Betondecke verwenden Sie Anker und Steckschrauben. Weitere Informationen finden Sie unter "3 Installation auf einer Betondecke" auf →...
  • Seite 37: Anbringen Der Projektorplatte Am Projektor

    2-3 Anbringen der Projektorplatte am Projektor (1) Drehen Sie den Projektor um, so dass das Bedienfeld nach unten zeigt. (2) Verwenden Sie die vier Projektor-Montageschrauben zum Anbringen der Projektorplatte am Projektor. Es gibt mehrere längliche Öffnungen in den Projektorplatte. Setzen Sie die Schrauben durch die Löcher, die mit dem Projektor ausgerichtet sind, ziehen Sie sie fest.
  • Seite 38: Anbringen Der Projektorplatte An Der Deckenplate

    2-4 Anbringen der Projektorplatte an der Deckenplate (1) Setzen Sie das Kugelgelenk der Projektorplatte in die Deckenplatte. Setzen Sie die zwei Vorsprünge auf dem Kugelgelenk in die Nuten an der Deckenplatte. Setzen Sie die Platten so zusammen, dass das Kugelgelenk ist in der dargestellten Richtung ist (Frontansicht).
  • Seite 39: Ausrichten Der Projektorobjektiv-Mitte

    2-5 Ausrichten der Projektorobjektiv-Mitte Wenn Sie die Projektorplatte horizontal bewegen, können Sie die Mitte der Deckenhalterung (das Kugelgelenk) und die Mitte des Projektorobjektivs ausrichten. Horizontaler Einstellbereich: 130 mm (ELPMB22)/100 mm (ELPMB23) Warnung Halten Sie den Projektor während der Einstellung vorsichtig von unten.
  • Seite 40: Installation Auf Einer Betondecke

    Teile so an, dass sie voll dem kombinierten Gewicht und der Querbewegung des Projektorkörpers und der Deckenhalterung widerstehen. Verwenden Sie Schrauben und Muttern, die M12 oder höher sind. Wenn das nicht geschieht, könnte der Projektor herunterfallen. Epson übernimmt keine Verantwortung für das Herunterfallen des Projektors aufgrund von fehlerhafter Installation.
  • Seite 41: Verlängerungsrohr

    4 Verlängerungsrohr Zum Einstellen der Höhe des Projektor-Einbauorts müssen Sie ein separat erhältliches Verlängerungsrohr kaufen. Es gibt zwei Verlängerungsrohr- Modellnummern, ELPFP13 und ELPFP14. Die nachstehende Abbildung zeigt den Bereich der Abstände zwischen Deckenplatte und Projektor, in dem jedes Modell eingestellt werden kann. Deckenplatte Verlängerungsrohr ELPFP13: 668 mm bis 918 mm...
  • Seite 42: Precauzioni Di Sicurezza

    Questa staffa di montaggio permette d’installare a soffitto il proiettore multi-mediale Epson. L’ELPMB22 è adatta ai proiettori di medio formato, mentre l’ELPMB23 a quelli di piccolo formato. Per informazioni sui modelli compatibili con il proiettore in uso vi preghiamo di visitare il nostro sito Internet o di consultare il catalogo dei prodotti.
  • Seite 43: Caratteristiche Tecniche

    Peso ELPMB22: 3,5 kg ELPMB23: 3,4 kg Dimensioni ELPMB22: Largh 342 × prof 210 × alt 150 mm ELPMB23: Largh 270 × prof 139 × alt 150 mm 1 Prima di procedere con l’assemblaggio e l’installazione 1-1 Precauzioni di sicurezza...
  • Seite 44: Nome Delle Parti

    1-2 Controllo delle parti fornite Aprire la confezione e verificare che la fornitura sia completa. Staffa di montaggio a Staffa di montaggio a soffitto ELPMB22 soffitto ELPMB23 Chiave a disallineamento Viti di montaggio del × proiettore: 4 pezzi (M4 12)/rondelle di Manuale dell’utente...
  • Seite 45: Installazione Del Proiettore

    1-4 Installazione del proiettore • Il proiettore deve essere installato lontano dalle lampade fluorescenti, dai condizionatori d’aria e dagli altri apparecchi elettrici. In caso contrario il telecomando potrebbe non operare correttamente. • Per limitare l’effetto dei disturbi esterni si raccomanda di posizionarlo in modo che il cavo di collegamento al computer o a un altro apparecchio non sia più...
  • Seite 46 Lato dell’obiettivo del proiettore Elemento di fissaggio al soffitto • L’illustrazione mostra il modello ELPMB22. Il modello ELPMB23 ha le medesime dimensioni. • Per fissare la staffa di montaggio a un soffitto di cemento armato si devono usare bulloni di ancoraggio.
  • Seite 47 2-3 Fissaggio al proiettore del relativo dell’elemento di sostegno (1) Capovolgere il proiettore in modo che il pannello comandi si trovi rivolto verso il basso. (2) Per fissare l’elemento di sostegno del proiettore al corpo del proiettore stesso si devono usare le quattro viti di montaggio fornite in dotazione. L’elemento di sostegno del proiettore è...
  • Seite 48 2-4 Fissaggio dell’elemento di sostegno del proiettore all’elemento di fissaggio al soffitto (1) Inserire il giunto sferico dell’elemento di sostegno del proiettore nell’elemento di fissaggio al soffitto. Inserire le due sporgenze del giunto sferico nei corrispondenti alloggiamenti dell’elemento di fissaggio al soffitto. Fissare tra loro i due elementi di sostegno in modo che il giunto sferico assuma l’orientamento mostrato in figura (vista anteriore).
  • Seite 49 Lo spostamento orizzontale del proiettore permette di allineare tra di loro il centro della staffa di montaggio a soffitto (giunto sferico) e l’asse dell’obiettivo. Gamma di regolazione orizzontale: 130 mm per il modello ELPMB22 e 100 mm per il modello ELPMB23...
  • Seite 50 Si devono usare dadi e bulloni M12 o di dimensioni superiori. In caso contrario il proiettore potrebbe cadere. Epson non accetta alcuna responsabilità in caso di caduta del proiettore dovuta a un’installazione precaria.
  • Seite 51 4 Tubo di estensione Per regolare l’altezza d’installazione del proiettore è necessario acquistare separatamente l’apposito tubo di estensione. I modelli disponibili sono l’ELPFP13 e l’ELPFP14. L’illustrazione che segue mostra per ciascuno dei due modelli la gamma di distanza tra l’elemento di fissaggio al soffitto e il proiettore. Elemento di fissaggio al soffitto Tubo di estensione...
  • Seite 52: Precauciones De Seguridad

    Introducción Este producto es para montar un proyector multimedia Epson en el techo. El ELPMB22 es para proyectores de tamaño medio y el ELPMB23 es para proyectores de tamaño pequeño. Visite nuestro sitio Web o el catálogo de productos para encontrar que modelo podrá utilizar para montar su proyector.
  • Seite 53: Especificaciones

    Peso ELPMB22: 3,5 kg ELPMB23: 3,4 kg Dimensiones ELPMB22: An 342 × Prf 210 × Al 150 mm ELPMB23: An 270 × Prf 139 × Al 150 mm 1 Antes del ensamblaje y la instalación 1-1 Precauciones de seguridad Advertencia Este producto se vende en el supuesto de que el trabajo de instalación lo realizará...
  • Seite 54: Nombres De Las Partes

    1-2 Confirmación del contenido del paquete Abra la caja y compruebe que no falte nada. Consola para montaje en Consola para montaje en el techo ELPMB22 el techo ELPMB23 Llave acodada Tornillos de montaje del proyector: 4 piezas (M4 ×...
  • Seite 55: Instalación Del Proyector

    1-4 Instalación del proyector • Instale el proyector alejado de lámparas fluorescentes, acondicionadores de aire, y demás dispositivos eléctricos. De lo contrario, podrían causar el mal funcionamiento del mando a distancia. • Para limitar el efecto del ruido externo, le recomendamos que coloque el proyector de forma que el cable que lo conecta a un ordenador u otro dispositivo no tenga una longitud superior a 20 metros.
  • Seite 56 (2) Retire los dos tornillos que aseguran las placas con la llave hexagonal y separe la placa para el techo de la placa para el proyector. Gire la placa para el techo unos 30 grados hacia la derecha y levántela. Placa para el techo Tornillo de sujeción de las placas...
  • Seite 57 2-3 Fijación de la placa para el proyector al proyector (1) Dé la vuelta al proyector de forma que el panel de operación quede encarado hacia abajo. (2) Utilice los cuatro tornillos de montaje del proyector suministrados para fijar la placa para el proyector al proyector. En la placa para el proyector hay varios orificios oblongos.
  • Seite 58 2-4 Fijación de la placa para el proyector a la placa para el techo (1) Inserte la junta esférica de la placa para el proyector en la placa para el techo. Coloque los dos salientes de la junta esférica en las ranuras de la placa para el techo.
  • Seite 59 Moviendo horizontalmente la placa para el proyector podrá alinear el centro del soporte para montaje en techo (la junta esférica) y el centro del objetivo del proyector. Margen de ajuste horizontal: 130 mm (ELPMB22)/100 mm (ELPMB23) Advertencia Durante el ajuste, sujete cuidadosamente el proyector por abajo.
  • Seite 60 Utilice pernos y tuercas M12 o de mayor calibre. De lo contrario, el proyector podría caerse. Epson no aceptará ninguna responsabilidad por la caída del proyector debido a una instalación inadecuada.
  • Seite 61 4 Tubo de extensión Para ajustar la altura a la que desee instalar el proyector, adquiera un tubo de extensión separado. Existen dos números de modelo de tubo de extensión, ELPFP13 y ELPFP14. En la ilustración de abajo se muestra el margen de distancias entre la placa para el techo y la placa para el proyector a las que podrá...

Diese Anleitung auch für:

Elpmb23

Inhaltsverzeichnis