Herunterladen Inhalt Inhalt Diese Seite drucken

Werbung

Verfügbare Sprachen
  • DE

Verfügbare Sprachen

  • DEUTSCH, seite 1
Phantasma Modern
Ethanol-Kamin
Ethanol Fireplace
Cheminée à l'éthanol
Chimenea de etanol
Camino a etanolo
10032145

Werbung

Inhaltsverzeichnis
loading

Inhaltszusammenfassung für Klarstein Phantasma Modern

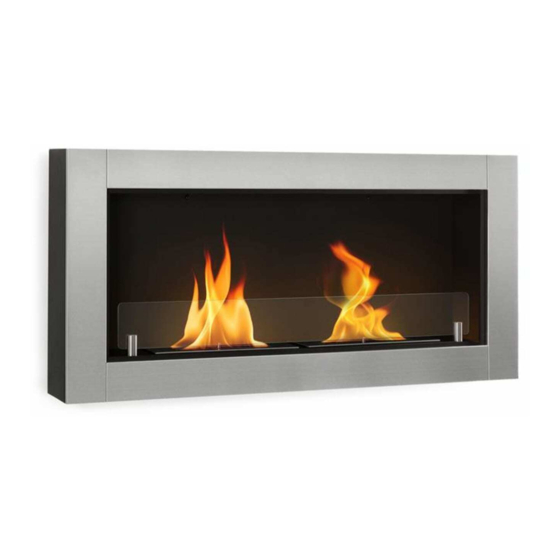
  • Seite 1 Phantasma Modern Ethanol-Kamin Ethanol Fireplace Cheminée à l‘éthanol Chimenea de etanol Camino a etanolo 10032145...
  • Seite 3 Sehr geehrter Kunde, wir gratulieren Ihnen zum Erwerb Ihres Gerätes. Lesen Sie die folgenden Hinweise sorgfältig durch und befolgen Sie diese, um möglichen Schäden vorzubeugen. Für Schäden, die durch Missachtung der Hinweise und unsachgemäßen Gebrauch entstehen, übernehmen wir keine Haftung. Scannen Sie den folgenden QR-Code, um Zugriff auf die aktuellste Bedienungsanleitung und weitere Informationen rund um das Produkt zu erhalten.
  • Seite 4: Technische Daten

    TECHNISCHE DATEN Artikelnummer 10032145 Produktgröße (mm) 175 x 1 100 x 540 Größe der Brenneröffnung (mm) 30 x 180 Nettogewicht (kg) 19,1 Vorgesehener Brennstoff OH (95%) Maximales Brenner-Volumen (ml) 2422 Gesamtkraftstoffkapazität des Gerätes (ml) 2422 Brennstoffverbrauch (kg/h) 0,54 Heizleistung (kW) 4,25 Empfohlenes Mindestraumvolumen 150 m...
  • Seite 5 Besondere Vorsichtsmaßnahmen Geben den Brennstoff Geben Sie den Legen Sie keine niemals direkt ins Feuer. Brennstoff niemals auf Gegenstände auf heiße Oberflächen. die Feuerstelle. Vermeiden Sie Zugluft. Blasen Sie nicht ins Feuer. Fassen Sie nicht ins Feuer. Stellen Sie das Gerät nicht Halten Sie einen Halten Sie sich genau in die Nähe brennbarer...
  • Seite 6 Hinweise zur Bedienung WARNUNG Erstickungsgefahr! Das Feuer verwendet Sauerstoff aus der Luft im Raum, in dem es betrieben wird. Der Raum, in dem dieser Kamin installiert wird muss gut belüftet sein und mit ausreichend Frischluft versorgt werden. Installieren oder betreiben Sie den Kamin niemals in einem unbelüfteten Keller oder in einem luftdicht verschlossenen Raum.
  • Seite 7 • Diese Anleitung ist Teil des Gerätes. Verwenden Sie das Gerät nur für den dekorativen und häuslichen Gebrauch. • Bitte stellen Sie sicher, dass die Wand, der Tisch oder der Boden, auf den Sie dieses Gerät platzieren, das Gewicht tragen kann. •...
  • Seite 8 MONTAGE Teile Teileliste Beschreibung Anzahl Schraubensets ST5.2x35 5 Sets M6x16 Halterungen (vormontiert) Gehäuse Haken Brennkammer Schrauben M6x12 Glasständer Glas...
  • Seite 9: Zusammenbau

    Zusammenbau Abnehmen der Halterungen Auf der Vorderseite des Geräts sehen Sie , dass je eine Schraube die Halterung auf der rechten und der linken Seite der Öffnung hält. Drehen Sie die Schrauben mit einem Kreuzschlitzschraubendreher ab (nicht wegwerfen)! Nehmen Sie dann die vormontierte Halterung ab. Löcher bohren und die Halterung anbringen (horizontale Ausrichtung) Bohren Sie in der Wand 3-5 Löcher (je nach Modell) mit 7 mm.
  • Seite 10 Den Kamin in die Halterung einhängen Hängen Sie die Nut hinter dem Kamin auf die Haken links und rechts der Halterung. Halten Sie den Kamin fest, um ein Herunterfallen vor der Montage zu verhindern. Befestigen Sie den Kamin mit den Schrauben, die Sie in Schritt 1 abgenommen haben.
  • Seite 11 Setzen Sie die Brennkammer ein. Verwenden Sie zum Einfüllen des Ethanols einen Trichter. Verwenden Sie zum Entzünden ein Stabfeuerzeug. Verwenden Sie den Haken, um den Kamin zu öffnen und zu schließen.
  • Seite 12: Bedienungshinweise

    INBETRIEBNAHME UND BEDIENUNG • Dieser Kamin funktioniert mit Alkohol, der flüchtig ist und einen niedrigen Flammpunkt hat. Zur Gewährleistung einer fachgerechten Installation, sollten Sie eine fachkundige Person den Raum, in dem Sie das Gerät aufstellen möchten, überprüfen lassen, so dass diese Ihnen Hinweise geben kann, wo das Gerät am besten platziert werden sollte.
  • Seite 13: Reinigung Und Pflege

    Feuer löschen • Das Feuer geht automatisch aus, wenn der Alkohol vollständig verbrannt ist (nach ca. 1,5 Stunden). • Wenn Sie das Feuer vorher löschen möchten, schließen Sie die Brenneröffnung mit dem Regelstab. REINIGUNG UND PFLEGE Nutzen Sie einen in Alkohol getränkten Lappen zum Polieren des Brenners, wenn dieser nicht mehr glänzen sollte.
  • Seite 15 Dear Customer, Congratulations on purchasing this device. Please read the following instructions carefully and follow them to prevent possible damages. We assume no liability for damage caused by disregard of the instructions and improper use. Scan the QR code to get access to the latest user manual and more product information.
  • Seite 16: Technical Specifications

    TECHNICAL SPECIFICATIONS Item number 10032145 Product size (mm) 175 x 1 100 x 540 Size of the burner opening (mm) 30 x 180 Net weight (kg) 19.1 Intended fuel OH (95 %) Maximum burner volume (L) 2422 Total fuel capacity of the device (L) 2422 Fuel consumption (kg/h) 0.54...
  • Seite 17 Special Precautions Never put fuel straight Never put fuel on Do not place any objects into the fire. hot surfaces. on the fireplace. Avoid drafts. Do not blow into the fire. Do not touch the fire. Do not place the device Have a suitable fire Follow the instructions near flammable objects.
  • Seite 18 Notes on Operation WARNING Risk of suffocation! The fi re uses oxygen from the air in the room in which it is operated. The room in which this fi replace is installed must be well ventilated and supplied with suffi cient fresh air. Never install or operate the fi replace in an unventilated basement or in a hermetically sealed room.
  • Seite 19 • This manual is part of the device. This device is for decorative and domestic use only. • Please make sure that the wall, table or fl oor on which you place this device can support its weight. • The ventilation slots must not be covered or obstructed. •...
  • Seite 20 INSTALLATION Parts Parts list Description Quantity ST5.2X35 Screw sets 5 sets M6X16 Bracket (pre-attached) Housing Hook Burner M6X12 Stander of glass Glass...
  • Seite 21 Assembly Removing the Mounting Bracket In front of the appliance, you can see there is one screw fixing the mounting bracket in each left or right opening. Unscrew the two screws by Phillips screwdriver (Do not discard them), then remove the pre-attached mounting bracket. Drilling the Holes and Attaching the Mounting Bracket Drill 3-5 (according to the model you have bought) 7/25 in (7mm) holes in the wall.
  • Seite 22 Hanging the Fireplace on the Bracket Hang the slotting behind the appliance on the hooks at the left and right sides of the bracket. (Please hold the appliance to avoid dropping down before the installation is fi nished.) Secure the fi replace with the screw removed in Step 1.
  • Seite 23 Put in the Burners and Use a Funnel to Pour the Ethanol Fuel. Use Long Extended Lighter to Light Fuel Use the Hook to Open/Close the Fireplace.
  • Seite 24 OPERATING INSTRUCTIONS • This fireplace is fueled by alcohol which is low-flash-point and volatile, you should let the expert installation person to have a check for the environment, then give a considerable install solution. • Install basing on this instruction. •...
  • Seite 25: Cleaning And Care

    CLEANING AND CARE Please use a mob with alcohol to wipe the burner when it’s not shiny any more. CAUTION Danger of Burns! Product has high temperature under or just fi nishing working. Do not touch it before calm down.
  • Seite 27 Chère cliente, cher client, Toutes nos félicitations pour l’acquisition de ce nouvel appareil. Veuillez lire attentivement et respecter les instructions de ce mode d’emploi afin d’éviter d’éventuels dommages. Nous ne saurions être tenus pour responsables des dommages dus au non-respect des consignes et à...
  • Seite 28: Fiche Technique

    FICHE TECHNIQUE Numéro d'article 10032145 Dimensions du produit (mm) 175 x 1 100 x 540 Dimensions de l'ouverture du brûleur (mm) 30 x 180 Poids net (kg) 19,1 Carburant prévu OH (95%) Capacité maximale du brûleur (ml) 2422 Capacité totale de carburant de l'appareil 2422 (ml) Consommation de carburant (kg/h)
  • Seite 29 Mesures de sécurité particulières Ne versez jamais le Ne versez jamais le Ne posez aucun carburant directement carburant sur une objet sur le foyer. dans le feu. surface chaude. Evitez les courants d'air. Ne soufflez pas Ne touchez pas au feu. sur les flammes.
  • Seite 30 Consignes d'utilisation MISE EN GARDE Risque d‘étouffement ! Le feu utilise l‘oxygène de l‘air dans la pièce dans laquelle il est utilisé. La pièce dans laquelle cette cheminée est installée doit être bien ventilée et alimentée en air frais en quantité suffi sante.
  • Seite 31 • Ce mode d'emploi fait partie de l'appareil. Utilisez l'appareil uniquement pour un usage décoratif et domestique. • Assurez-vous que le mur, la table ou le sol sur lequel vous placez cet appareil peut en supporter le poids. • Les fentes d'aération ne doivent pas être couvertes ou encastrées. •...
  • Seite 32 MONTAGE Pièces Liste des pièces N° Description Quantité Jeu de vis ST5.2x35 5 jeux M6x16 supports (préinstallés) Boîtier Crochets Chambre de combustion Vis M6x12 Support de vitre Vitre...
  • Seite 33 Assemblage Démontage des supports Sur le devant de l'appareil, vous pouvez voir qu'une vis maintient le support sur les côtés droit et gauche de l'ouverture. Utilisez un tournevis cruciforme pour dévisser les vis (ne les jetez pas) ! Retirez ensuite le support préassemblé. Perçage des trous et installation des supports (alignement horizontal) Percez 3-5 trous dans le mur (selon le modèle) avec un foret de 7 mm.
  • Seite 34 Pour accrocher la cheminée sur les supports Accrochez la rainure derrière la cheminée aux crochets gauche et droit du support. Tenez la cheminée pour l'empêcher de tomber avant le montage. Fixez la cheminée avec les vis retirées à l'étape 1.
  • Seite 35 Insérer la chambre de combustion. Utilisez un entonnoir pour verser l'éthanol. Pour l'allumage du feu, utilisez un briquet à long manche. Utilisez le crochet pour ouvrir et fermer la cheminée.
  • Seite 36: Mise En Marche Et Utilisation

    MISE EN MARCHE ET UTILISATION • Cette cheminée fonctionne à l’alcool qui est un produit volatil avec un point d’éclair bas. Pour garantir une installation correcte, demandez à une personne qualifiée de vérifier la pièce dans laquelle vous souhaitez installer l’appareil, afin que celle-ci puisse vous indiquer un emplacement adéquat.
  • Seite 37: Nettoyage Et Entretien

    • Si vous voulez éteindre le feu, fermez l'ouverture du brûleur avec la tige de commande. NETTOYAGE ET ENTRETIEN Utilisez un chiffon imbibé d'alcool pour polir le brûleur s'il ne brille plus. MISE EN GARDE Risque de brûlure ! L'appareil chauffe fortement pendant le fonctionnement.
  • Seite 39 Estimado cliente, Le felicitamos por la adquisición de este producto. Lea atentamente las siguientes instrucciones y sígalas para evitar posibles daños. No asumimos ninguna responsabilidad por los daños causados por el incumplimiento de las instrucciones y el uso inadecuado. Escanee el siguiente código QR para obtener acceso a la última guía del usuario y más información sobre el producto.
  • Seite 40: Datos Técnicos

    DATOS TÉCNICOS Numéro d'article 10032145 Dimensions du produit (mm) 175 x 1 100 x 540 Dimensions de l'ouverture du brûleur (mm) 30 x 180 Poids net (kg) 19,1 Carburant prévu OH (95%) Capacité maximale du brûleur (ml) 2422 Capacité totale de carburant de l'appareil 2422 (ml) Consommation de carburant (kg/h)
  • Seite 41 Medidas de seguridad especiales Nunca introduzca el Nunca coloque el No coloque ningún objeto combustible en el fuego. combustible sobre sobre la chimenea. superficies calientes. Evite las corrientes de aire. No sople al fuego. No toque nada que se encuentre en el fuego. No coloque el aparato Tenga listo un extintor Siga las indicaciones...
  • Seite 42 Indicaciones de utilización ADVERTENCIA ¡Riesgo de asfi xia! La chimenea utiliza oxígeno del aire de la estancia en la que se pone en funcionamiento. El espacio en el que se instale la chimenea debe estar bien ventilado y contar con sufi ciente corriente de aire.
  • Seite 43 • Estas instrucciones son parte del aparato. Utilice el aparato solamente para uso decorativo y doméstico. • Asegúrese de que la pared, la mesa o el suelo sobre el que coloque el aparato puedan soportar el peso. • Las ranuras de ventilación no pueden cubrirse ni transformarse. •...
  • Seite 44 MONTAJE Componentes Lista de piezas Núm. Descripción Cantidad Conjuntos de tornillos 5 jeux ST5.2x35 M6x16 Soportes (premontado) Carcasa Ganchos Cámara de combustión Tornillos M6x12 Soporte de cristal Cristal...
  • Seite 45 Montaje Desmontar los soportes En la parte superior del aparato verá que hay un tornillo al lado derecho e izquierdo de la abertura que sostiene el soporte. Afloje los tornillos con un destornillador de estrella (no los tire) Retire el soporte premontado. Perfore dos orificios y monte el soporte (disposición horizontal) Perfore en la pared 3-5 orificios (en función del modelo) con 7 mm.
  • Seite 46 Cuelgue la chimenea en el soporte Cuelgue la muesca situada en la parte trasera de la chimenea en los ganchos izquierdo y derecho del soporte. Sujete la chimenea para evitar que se caiga antes del montaje. Fije la chimenea con los tornillos que ha retirado en el paso 1.
  • Seite 47 Coloque la cámara de combustión. Para rellenar el etanol, utilice un embudo. Utilice un encendedor para la ignición. Utilice los ganchos para abrir y cerrar la chimenea.
  • Seite 48: Puesta En Marcha Y Uso

    PUESTA EN MARCHA Y USO • Este aparato funciona con alcohol que es volátil y dispone de un punto de ignición bajo. Para garantizar una instalación correcta, debe contactar con una persona especializada para que compruebe la estancia donde desea colocar el aparato y que aconseje sobre la mejor ubicación de este.
  • Seite 49: Limpieza Y Cuidado

    Extinguir el fuego • El fuego se extingue completamente cuando el alcohol se haya quemado por completo (aprox. tras 1,5 horas). • Si desea extinguir el fuego con antelación, cierre el orifi cio del quemador con la varilla. LIMPIEZA Y CUIDADO Utilice un paño empapado en alcohol para encerar el quemador cuando este ya no brille.
  • Seite 51 Gentile cliente, La ringraziamo per aver acquistato il dispositivo. La preghiamo di leggere attentamente le seguenti istruzioni per l’uso e di seguirle per evitare possibili danni. Non ci assumiamo alcuna responsabilità per danni scaturiti da una mancata osservazione delle avvertenze di sicurezza e da un uso improprio del dispositivo.
  • Seite 52: Dati Tecnici

    DATI TECNICI Numero articolo 10032145 Dimensioni del prodotto (mm) 175 x 1 100 x 540 Dimensioni dell’apertura del bruciatore (mm) 30 x 180 Peso netto (kg) 19,1 Combustibile previsto OH (95%) Volume massimo del bruciatore (ml) 2422 Capacità di combustibile totale del 2422 dispositivo (ml) Consumi del bruciatore (kg/h)
  • Seite 53 Misure di sicurezza particolari Non aggiungere mai Non versare mai Non poggiare oggetti combustibile direttamente il combustibile su sul camino. nelle fiamme. superfici bollenti. Evitare correnti d’aria. Non soffiare sul fuoco. Non mettere le mani nel fuoco. Non posizionare il Tenere a portata di mano Rispettare attentamente dispositivo vicino a...
  • Seite 54 Avvertenze sull’utilizzo AVVERTENZA Pericolo di soffocamento! Il fuoco sfrutta l’ossigeno presente nell’aria del locale in cui viene utilizzato il dispositivo. Il locale in cui viene installato il camino deve essere ben ventilato e garantire suffi ciente aria fresca. Non installare mai il camino in cantine non ventilate o in stanze a chiusura ermetica.
  • Seite 55 • Questo manuale è parte integrante del dispositivo. Utilizzare il dispositivo solo per usi casalinghi e decorativi. • Assicurarsi che la parete, il tavolo o il pavimento su cui si posiziona il dispositivo possano sopportarne il peso. • Le fessure di ventilazione non devono essere coperte o modifi cate. •...
  • Seite 56 MONTAGGIO Componenti Lista dei componenti N° Descrizione Quantità Set di viti ST5,2x35 5 jeux M6x16 Supporti (preassemblati) Alloggiamento Gancio Vano di combustione Viti M6x12 Supporto in vetro Vetro...
  • Seite 57 Assemblaggio Rimuovere il supporto Sul lato frontale del dispositivo si vedono due viti che tengono in posizione il supporto sul lato destro e sinistro dell’apertura. Svitare le viti con un cacciavite (non buttarle via!). Procedere ora a rimuovere il supporto preassemblato. Realizzare i fori e montare il supporto (montaggio in orizzontale) Realizzare nella parete 3-5 fori (in base al modello) da 7 mm.
  • Seite 58 Agganciare il camino al supporto Agganciare la fessura sul retro del camino ai ganci a sinistra e a destra del supporto. Tenere saldamente il camino per evitare che cada prima del montaggio. Fissare il camino con le viti che sono state rimosse nel 1° passaggio.
  • Seite 59 Inserire il vano di combustione. Per aggiungere etanolo, utilizzare un imbuto. Utilizzare un accendino lungo per accendere il fuoco. Utilizzare il gancio per aprire e chiudere il camino.
  • Seite 60: Messa In Funzione E Utilizzo

    MESSA IN FUNZIONE E UTILIZZO • Il camino funziona con alcool, che è volatile e presenta un punto di fiamma basso. Per garantire la corretta installazione, è necessario che un tecnico esperto controlli il locale dove si desidera posizionare il dispositivo, in modo che possa fornire indicazioni in relazione al miglior luogo di posizionamento del camino.
  • Seite 61: Pulizia E Manutenzione

    PULIZIA E MANUTENZIONE Utilizzare un panno immerso in alcool per lucidare il bruciatore se non splende più. AVVERTENZA Pericolo di ustione! Il dispositivo è bollente durante l’uso. Non toccarlo prima che si sia raffreddato.

Inhaltsverzeichnis