Herunterladen Inhalt Inhalt Diese Seite drucken

Werbung

Verfügbare Sprachen
  • DE

Verfügbare Sprachen

  • DEUTSCH, seite 15
ARTHUR
© design by dirk wynants
READ INSIDE
ASSEMBLY INSTRUCTIONS,
HOW TO USE, USEFUL TIPS
FOR KEEPING YOUR TOOL FOR
TOGETHERNESS IN SHAPE
PRODUCT
ARTHUR – MAINTENANCE
tools for togetherness
LANGUAGES
EN – NL – DE – FR – IT – ES
MORE
WWW.EXTREMIS.BE

Werbung

Inhaltsverzeichnis
loading

Inhaltszusammenfassung für Extremis ARTHUR

  • Seite 1 © design by dirk wynants READ INSIDE LANGUAGES ASSEMBLY INSTRUCTIONS, EN – NL – DE – FR – IT – ES HOW TO USE, USEFUL TIPS MORE FOR KEEPING YOUR TOOL FOR TOGETHERNESS IN SHAPE WWW.EXTREMIS.BE PRODUCT ARTHUR – MAINTENANCE tools for togetherness...
  • Seite 2: Inhaltsverzeichnis

    LANGUAGES ENGLISH P. 3 contents p. 3 assembly arthur p. 4 assembly torch p. 6 maintenance p. 7 NEDERLANDS P. 9 inhoud p. 9 montage arthur p. 10 montage fakkel p. 12 onderhoud p. 13 DEUTSCH P. 15 inhalt p. 15 montage arthur p.
  • Seite 3: English

    1 x small round disk with rubber 1 x small stainless steel plate with 24/40/48 x stainless steel axe 8/10/12 x rubber feet extremis logo 8/10/12 x aluminium blocks equi- plastic wheel ped with bolts + double nut and a...
  • Seite 4: Assembly Arthur

    5. When all the legs have been inserted in the aluminium : If you experience difficulties in sliding the legs in plinth, you should then screw the second small disk on the grooves, try using silicone spray. top of the plinth using the screws provided. assembly arthur...
  • Seite 5 6. There are 4 axes per table leg. For the table of 8 persons, 7. Slide the first table segment into place horizontally. there are only 3 small axes per leg. The already fitted axes will fit perfectly in the grooves on both sides of the table segment.
  • Seite 6: Assembly Torch

    TORCH FOR AR TH U R 1. Put the plastic container with lid on a solid and even 2. Remove the large round tabletop, and place the plastic surface. Fill the container half full, with lamp oil. container in the middle, on top of the small round disk.
  • Seite 7: Maintenance

    M A I NTE N A N C E MAINTENANCE OF THE REPLACEMENT OF THE TORCH WICK HPL (high pressure laminate) Use detergents you also use to clean Although stainless steel has its own The wick is long enough to last for your kitchen.
  • Seite 8 LANGUAGES ENGLISH P. 3 contents p. 3 assembly arthur p. 4 assembly torch p. 6 maintenance p. 7 NEDERLANDS P. 9 inhoud p. 9 montage arthur p. 10 montage fakkel p. 12 onderhoud p. 13 DEUTSCH P. 15 inhalt p. 15 montage arthur p.
  • Seite 9: Nederlands

    I N H OU D 8/10/12 x tafelsegment 8/10/12 x tafelpoot 1 x aluminium profiel 1 x lazy-susan 1 x kleine schijf 1 x kleine schijf met rubber 1 x afdekschijfje 24/40/48 x asje 8/10/12 x rubber voetje 8/10/12 x aluminium blokje + bout 8/10/12 x schroef + dubbele moer &...
  • Seite 10: Montage Arthur

    5. Wanneer alle tafelpoten werden ingevoegd in de zijn. : wanneer het schuiven stroef verloopt, kunt u aluminium constructie, schroeft u de tweede kleine siliconespray gebruiken om de tafelpoten vlotter in de cirkel bovenop de aluminium constructie. Opnieuw gleuven te glijden. alle schroeven gebruiken. montage arthur...
  • Seite 11 6. Positioneer alle asjes zoals op de tekening. Voor elke 7. Plaats het eerste tafelsegment. De asjes passen perfect tafelpoot zijn 4 asjes voorzien. De tafel van 8 personen in de gleuven aan de beide zijden van het tafelsegment. voorziet slechts 3 asjes per tafelpoot. 8.
  • Seite 12: Montage Fakkel

    FAK K E L VOOR AR TH U R 1. Plaats het plastieken bakje voorzien van deksel op een 2. Verwijder de lazy susan, en plaats het plastieken bakje stabiele ondergrond en vul het bakje tot halverwege op de bovenste schijf van de de aluminiumen sokkel. met lampolie.
  • Seite 13: Onderhoud

    ON D E R H OU D ONDERHOUD VAN DE VERVANGEN VAN DE TORCH LONT (high presure laminate), reinigen standaard Hoewel roestvast staal een eigen De meegeleverde lont is lang genoeg reiniginsmiddelen zoals oxidatielaag heeft die het staal om, bij correct gebruik, jaren mee te gebruikt voor de keuken.
  • Seite 14 LANGUAGES ENGLISH P. 3 contents p. 3 assembly arthur p. 4 assembly torch p. 6 maintenance p. 7 NEDERLANDS P. 9 inhoud p. 9 montage arthur p. 10 montage fakkel p. 12 onderhoud p. 13 DEUTSCH P. 15 inhalt p. 15 montage arthur p.
  • Seite 15: Deutsch

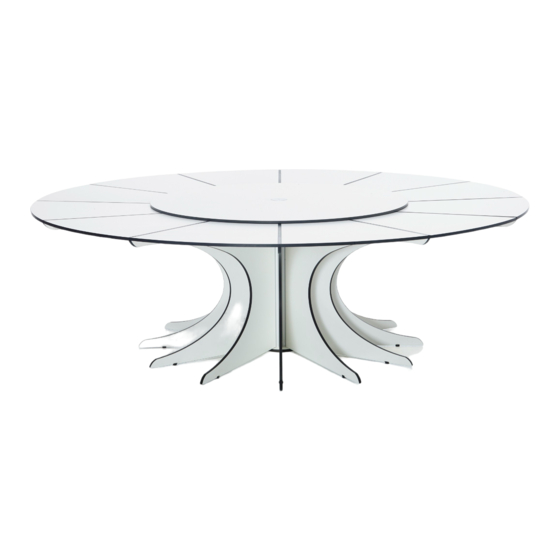
    I N H A LT 8/10/12 x Tischsegmente 8/10/12 x Beine 1 x Aluminiumsockel 1 x lazy-susan 1 x runde Platte 1 x runde Platte mit Gummi 1 x kleine Platte in Edelstahl 24/40/48 x Stäbchen in Edelstahl 8/10/12 x Gummifüßchen 8/10/12 x kleine Aluminiumblöcke 8/10/12 x Schrauben + Bolz + Doppelmutter und kleinem...
  • Seite 16: Montage Arthur

    5. Sobald die Tischbeine in den Aluminiumsockel HINWEIS montiert sind. : Wenn die Beine sich nur montiert sind, schrauben Sie die 2. kleine Scheibe mühsam in die Rillen schieben lassen, verwenden Sie darauf. Bitte aufs Neue die mitgelieferten Schrauben besser ein wenig Silikonspray. verwenden. montage arthur...
  • Seite 17 6. Platzieren Sie die Stäbchen in den Tischbeinen. Für 7. Schieben Sie das erste Tischsegment waagerecht an jedes Tischbein sind 4 Stäbchen vorgesehen. Der seinen Platz. Die vor her montierten Stäbchen passen Tisch für 8 Personen verfügt über nur 3 Stäbchen pro perfekt in die Schlitze beiderseits des Tischsegmentes.
  • Seite 18: Montage Docht

    D OCHT F Ü R AR TH U R 1. Den Plastikbehälter mit Deckel auf eine stabile 2. Die obere große runde Tischplatte entfernen und den Unterlage stellen. Den Behälter bis zur Hälfte mit Plastikbehälter auf die obere Scheibe des Lampenöl füllen.
  • Seite 19: Pflege

    PF LEG E WARTUNG DER TORCH DEN DOCHT ERSETZEN HPL-Pflege (high pressure laminate) Obwohl Edelstahl über eine eigene Der mitgelieferte Docht hält bei Standardreinigungsmittel wie zum Oxidationsschicht verfügt, die den korrekter Anwendung jahrelang. Beispiel Küchenreinigungsmittel Stahl vor dem Verrosten schützt, Sollte der Docht aber nach einiger verwenden.
  • Seite 20 LANGUAGES ENGLISH P. 3 contents p. 3 assembly arthur p. 4 assembly torch p. 6 maintenance p. 7 NEDERLANDS P. 9 inhoud p. 9 montage arthur p. 10 montage fakkel p. 12 onderhoud p. 13 DEUTSCH P. 15 inhalt p. 15 montage arthur p.
  • Seite 21: Français

    CONTE N U 8/10/12 x segments de table 8/10/12 x pieds 1 x socle en aluminium 1 x lazy-susan 1 x petit panneau rond 1 x petit panneau rond avec caoutchouc 1 x petite plaque en l’acier 24/40/48 x axes en l’acier 8/10/12 x pieds en caoutchouc inoxydable inoxydable...
  • Seite 22: Montage Arthur

    5. Une fois que toutes les pattes sont montées dans le CONSEIL la table soient montées. : si vous n’arrivez socle en aluminium, vissez le 2ème petit disque que difficilement à glisser les pattes dans les rainures, pardessus en utilisant les vis fournies. utilisez un spray Silicone. montage arthur...
  • Seite 23 6. Placez tous les petits axes dans les trous de la table. Il 7. Glissez le premier segment de table en position par un y a 4 axes pour chaque patte. Pour le Arthur 8 mouvement hori- zontal. Les petits axes précédement personnes, il n’y a que 3 petits axes pour chaque pieds.
  • Seite 24: Monage Torche

    TORCH E P OU R AR TH U R 1. Déposez le réservoir en plastique avec couvercle sur un 2. Retirez le grand plateau supérieur de la table et support stable. Remplissez le réservoir à moitié avec déposez le réservoir en plastique sur le plateau de l’huile pour lampe.
  • Seite 25: Entretien

    E NTR E TI E N ENTRETIEN DE LA TORCH REMPLACEMENT DE LA MÈCHE (high pressure laminate), Bien que l’acier inoxydable possède Nettoyer avec des produits de sa propre couche d’oxydation qui La mèche fournie est assez longue nettoyage standard tels que ceux protège l’acier contre la rouille, il faut pour durer des années en cas que l’on utilise pour la cuisine.
  • Seite 26 LANGUAGES ENGLISH P. 3 contents p. 3 assembly arthur p. 4 assembly torch p. 6 maintenance p. 7 NEDERLANDS P. 9 inhoud p. 9 montage arthur p. 10 montage fakkel p. 12 onderhoud p. 13 DEUTSCH P. 15 inhalt p. 15 montage arthur p.
  • Seite 27: Italiano

    CONTE N UTO 8/10/12 x segmenti del tavolo 8/10/12 x gambe 1 x basamento di alluminio 1 x lazy-susan 1 x piccoli dischi 1 x piccoli dischi con gomma 1 x piccolo disco di acciaio 24/40/48 x assi di acciaio 8/10/12 x piedini di gomma inossidabile inossidabile...
  • Seite 28: Montaggio Arthur

    5. Quando tutte le gambe sono inserite nel basamento di CONSIGLIO UTILE : In caso di difficoltà ad inserire le alluminio, bisogna avvitare il secondo disco gambe nelle fessure è consigliabile utilizzare uno utilizzando di nuovo tutte le viti fornite a corredo. spray lubrificante al silicone. montaggio arthur...
  • Seite 29 6. Posizionare tutte le assi come mostrato nella foto. Per 7. Mettere il primo segmento del tavolo al posto giusto. ogni gamba ci sono 4 assi. Ogni gamba del tavolo per 8 Le assi si inseriscono perfettamente nelle fessure ad persone è...
  • Seite 30: Montaggio Fiaccola

    F IACCOL A PE R AR TH U R 1. Posizionare il contenitore di plastica con coperchio su 2. Rimuovere il grande piano del tavolo rotondo una superficie stabile. Riempirlo fino a metà con olio superiore e posizionare il contenitore di plastica sul da lampada.
  • Seite 31: Manutenzione

    MAN UTE N Z ION E MANUTENZIONE DELLA SOSTITUZIONE DELLO TORCH STOPPINO (high pressure laminate). pulito detergente Benché l’acciaio inossidabile sia utilizzato correttamente normale utilizzato per la pulitura ricoperto di uno strato di ossidazione stoppino fornito di corredo può della cucina. In caso di macchie che lo protegge dalla corrosione, è...
  • Seite 32 LANGUAGES ENGLISH P. 3 contents p. 3 assembly arthur p. 4 assembly torch p. 6 maintenance p. 7 NEDERLANDS P. 9 inhoud p. 9 montage arthur p. 10 montage fakkel p. 12 onderhoud p. 13 DEUTSCH P. 15 inhalt p. 15 montage arthur p.
  • Seite 33: Español

    CONTE N I D O 8/10/12 x segmentos de mesa 8/10/12 x patas 1 x pie de aluminio 1 x lazy-susan 1 x disco pequeño 1 x disco pequeño con caucho 1 x disco pequeño de acero 24/40/48 x ejes de acero 8/10/12 x soportes de goma inoxidable inoxidable...
  • Seite 34: Monaje Arthur

    5. Cuando todas las patas estén en su lugar en el pie de CONSEJO estén en su lugar. : para empujar con más aluminio, ajuste la segunda arandela pequeña sobre facilidad las patas en las correderas, utilice un spray de éste mediante todos los tornillos entregados. silicona. montaje arthur...
  • Seite 35 6. Ponga todos los ejes como en la foto. Hay previstos 4 7. Encaje el primer segmento de mesa en su lugar. Los ejes para cada pata. La mesa para 8 personas tiene sólo ejes de encajan perfectamente en las correderas por 3 ejes por pata de mesa.
  • Seite 36: Montaje Antorcha

    ANTORCHA PAR A AR TH U R 1. coloque el recipiente de plástico con tapa sobre una 2. quite el tablero grande superior redondo y coloque el base sólida. Póngale aceite para lámpara al recipiente recipiente de plástico sobre el disco superior del hasta la mitad.
  • Seite 37: Mantenimiento

    MANTE N I M I E NTO MANTENIMIENTO DE LA CAMBIAR LA MECHA TORCH HPL (high pressure laminate) Se Usando como se debe la mecha recomienda utilizar para su limpieza suministrada de longitud suficiente Aunque el acero inoxidable tenga su los detergentes habituales que se usen no se consumirá...
  • Seite 38 tools for togetherness...
  • Seite 40 W W W. E X T R E M I S . B E All images, ideas, designs and design content are the intellectual property of Extremis and may not be copied, imitated or used, in whole or in part, without the prior written permission of Extremis.

Inhaltsverzeichnis