Atag CX4311A Bedienungsanleitung
Inhaltsverzeichnis
Verfügbare Sprachen
Verfügbare Sprachen
Inhaltsverzeichnis

Verwandte Anleitungen für Atag CX4311A


Inhaltszusammenfassung für Atag CX4311A
- Seite 1 Bedienungsanleitung Mikrowellenofen Instructions for use Microwave oven...
- Seite 3 INHALTSANGABE DE 3...
-
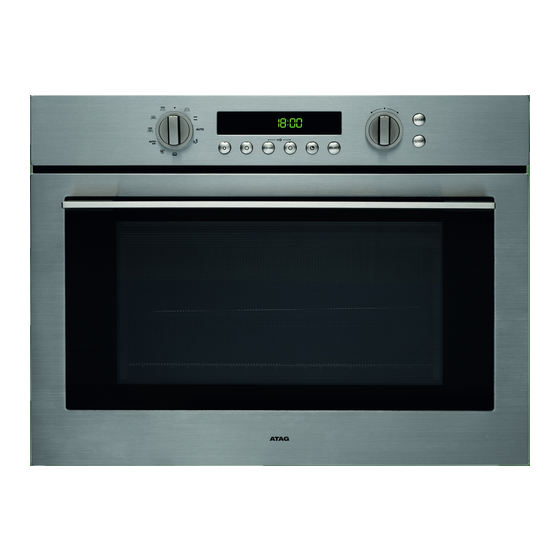
Seite 4: Die Bedienleiste
DIE BEDIENLEISTE 2 3 4 7 6 13 5 15 16 17 18 19 20 DE 4... - Seite 5 DIE OFENMODI Bedienleiste Grill- und Oberelement Stufe 5 Stufe 4 Ofenebenen Stufe 3 Stufe 2 Mikrowellenstufe 1 Türverriegelung Tür Anmerkung DE 5...
-
Seite 6: Die Zubehörteile
Anmerkung DIE VERWENDUNG DIESER ANLEITUNG Vielen Dank, dass Sie sich für einen ATAG-Mikrowellenofen entschieden haben. Die Anleitung enthält wichtige Informationen für den Gebrauch und die Wartung Ihres neuen Mikrowellenofens. Die Installationsanleitung wird separat geliefert. Lesen Sie vor dem Gebrauch des Mikrowellenofens die Separaten Sicherheitshinweise und alle Informationen in dieser Anleitung durch. -
Seite 7: Die Uhr Einstellen
DIE UHR EINSTELLEN Wenn Sie das Gerät das erste Mal an das Stromnetz anschließen leuchtet das Display auf. Nach drei Sekunden beginnen das Uhrensymbol und „12:00“ auf dem Display zu blinken. Stellen Sie die Uhr auf die richtige Zeit ein. Die Uhr einstellen Anmerkung DE 7... -
Seite 8: Den Energiesparmodus Einstellen
DEN ENERGIESPARMODUS EINSTELLEN Stand-by-Modus ECO-Modus DE 8... -
Seite 9: Die Erwärmungsmöglichkeiten
DIE ERWÄRMUNGSMÖGLICHKEITEN In der folgenden Übersicht werden die verschiedenen Erwärmungsmöglichkeiten sowie Ofeneinstellungen aufgeführt. Verwenden Sie die Kochanleitung auf den folgenden Seiten, um den korrekten Modus und die passende Einstellung für Ihr Rezept zu bestimmen. MIKROWELLENMODUS OFENMODI Umluftmodus Grillmodus Großer Grillmodus Grill- + Lüfter-Modus AUTOMATISCHE MODI Auftaumodus... - Seite 10 DIE ERWÄRMUNGSMÖGLICHKEITEN Aqua-Clean Gemüse-Menümodus Wählen Sie aus 10 vorprogrammierten „Gemüse-Menümodi“. Garzeit und Leistung werden automatisch gewählt. Sie müssen nur das Programm und das Gewicht wählen, um den Kochvorgang zu starten. Automatischer Menümodus vorprogrammierten Sie müssen nur das Programm und das Gewicht wählen, um den Kochvorgang zu starten.
-
Seite 11: Die Funktionsweise Eines Mikrowellenofens
DIE FUNKTIONSWEISE EINES MIKROWELLENOFENS Sie können Ihre Mikrowelle folgendermaßen verwenden: Zubereitungsgrundsatz Wichtig DE 11... -
Seite 12: Den Mikrowellenmodus Verwenden
DEN MIKROWELLENMODUS VERWENDEN WICHTIG: Verwenden Sie das Keramikbackblech auf Stufe 1. Mikrowellenmodus DE 12... - Seite 13 DEN MIKROWELLENMODUS VERWENDEN Richtlinien für die Mikrowellenleistung LEISTUNG PROZENTSATZ AUSGANGSLEISTUNG ANMERKUNG DE 13...
- Seite 14 DEN MIKROWELLENMODUS VERWENDEN Richtlinien für das Mikrowellenkochgeschirr KOCHGESCHIRR MIKROWELLE ANMERKUNGEN SICHER DE 14...
- Seite 15 DEN MIKROWELLENMODUS VERWENDEN KOCHGESCHIRR MIKROWELLE ANMERKUNGEN SICHER Anmerkung DE 15...
- Seite 16 DEN MIKROWELLENMODUS VERWENDEN Allgemeine Kochanleitung für den Mikrowellenmodus Für die Zubereitung in der Mikrowelle geeignete Speisen Während der Zubereitung abdecken Ruhezeiten Allgemeine Kochanleitung für Tiefkühlgemüse Speise Portion Leistung Zeit Ruhezeit Zubereitung DE 16...
- Seite 17 DEN MIKROWELLENMODUS VERWENDEN Kochanleitung für frisches Gemüse Tipp: Anmerkung: Speise Portion Zeit Ruhezeit Zubereitung DE 17...
- Seite 18 DEN MIKROWELLENMODUS VERWENDEN Kochanleitungen für Reis und Nudeln Speise Portion Leistung Zeit Ruhezeit Zubereitung AUFWÄRMEN Einteilen und abdecken Einstellungen für die Leistung DE 18...
- Seite 19 DEN MIKROWELLENMODUS VERWENDEN Rühren Aufwärm- und Ruhezeiten Flüssigkeiten aufwärmen Babynahrung aufwärmen Babynahrung Babymilch DE 19...
- Seite 20 DEN MIKROWELLENMODUS VERWENDEN Babynahrung und Milch aufwärmen Speise Portion Leistung Zeit Ruhezeit Zubereitung DE 20...
- Seite 21 DEN MIKROWELLENMODUS VERWENDEN Flüssigkeiten und Speisen aufwärmen Speise Portion Leistung Zeit Ruhezeit Zubereitung DE 21...
- Seite 22 DEN MIKROWELLENMODUS VERWENDEN Auftauen Tipp: Zum Auftauen von gefrorenen Speisen (-18/-20 °C) können Sie sich auf die folgende Tabelle beziehen. Speise Portion Zeit Ruhezeit Zubereitung DE 22...
- Seite 23 DEN MIKROWELLENMODUS VERWENDEN Speise Portion Zeit Ruhezeit Zubereitung DE 23...
-
Seite 24: Die Ofenmodi Verwenden
DIE OFENMODI VERWENDEN Wählen Sie aus 4 Ofenmodi. Konsultieren Sie die Kochanleitung, um den passenden Ofenmodus zu bestimmen. Ofenmodus wählen Umluft Grill Großer Grill Grill + Umluft DE 24... - Seite 25 DIE OFENMODI VERWENDEN Anmerkung DE 25...
- Seite 26 DIE OFENMODI VERWENDEN Umluft Bei dieser Einstellung sind das untere und das obere Heizelement sowie der Lüfter aktiviert. Die Hitze wird dadurch gleichmäßig im Ofen verteilt. Dieser Modus ist für große Mengen von Lebensmitteln geeignet, wie etwa für große Gratins oder Pasteten. Das Backblech oder der Grillrost mit Backblech aus Keramik werden in der Regel in Ebene 2 geschoben.
- Seite 27 DIE OFENMODI VERWENDEN Grill Diese Funktion ist für das Grillen kleinerer Mengen flacher Speisen wie Steaks, Schnitzeln, Fisch und Toast vorgesehen. Platzieren Sie die Speisen in die Mitte des Rosts. Nur das oben angebrachte Heizelement wird eingeschaltet. Verwenden Sie zum Grillen den Grillrost und das Backblech aus Keramik auf Ebene 4 und das Backblech auf Ebene 3.
- Seite 28 DIE OFENMODI VERWENDEN Maxi-Grill Der Maxi-Grill ist für das Grillen größerer Mengen flacher Speisen wie Steaks, Schnitzeln und Fisch vorgesehen. Der Maxi-Grill ist auch gut geeignet, um Toast zu machen. Beide oben angebrachten Heizelemente und das Grillelement werden eingeschaltet, wenn Sie diese Ofenfunktion auswählen. Es wird empfohlen, den Ofen vorzuheizen, wenn Sie den Maxi-Grill verwenden.
- Seite 29 DIE OFENMODI VERWENDEN Grill + Lüfter Das Grillelement und der Lüfter an der Rückseite des Ofens sind eingeschaltet. Der Lüfter rotiert in der heißen Luft. Der Ofen sollte vorgeheizt werden, bevor im Ofen Speisen platziert werden. Garanleitungen Temperatur Speise Ofenrost- Zeit Zubehör (°C)
-
Seite 30: Eine Garzeit Einstellen
EINE GARZEIT EINSTELLEN Durch das Einstellen einer Garzeit können Sie den Ofen automatisch ausgeschaltet lassen, wenn die eingestellte Zeit verstrichen ist. Einstellen Garzeit Anmerkung DE 30... -
Seite 31: Einstellen Einer Endzeit
EINSTELLEN EINER ENDZEIT Durch das Einstellen einer Endzeit können Sie den Ofen automatisch am eingestellten Zeitpunkt ausschalten. Einstellen einer Endzeit Anmerkung DE 31... -
Seite 32: Eine Garzeit Verschieben
EINE GARZEIT VERSCHIEBEN Durch das Einstellen einer Garzeit und einer Endzeit können Sie den Ofen automatisch am eingestellten Zeitpunkt ein- und ausschalten. Anmerkung Achtung! DE 32... -
Seite 33: Die Kombimodi Verwenden
DIE KOMBIMODI VERWENDEN Mikrowelle + Grill Den Modus „Mikrowelle + Grill“ auswählen DE 33... - Seite 34 DIE KOMBIMODI VERWENDEN Garanleitungen Speise Ebene Leistung Temperatur Zeit 1 Zeit 2 Zubehör DE 34...
- Seite 35 DIE KOMBIMODI VERWENDEN Mikrowelle + Umluft Den Modus „Mikrowelle + Umluft“ auswählen DE 35...
- Seite 36 DIE KOMBIMODI VERWENDEN Garanleitungen Speise Ebene Leistung Temperatur Zeit Zeit Zubehör DE 36...
-
Seite 37: Die Automatischen Menümodi Verwenden
DIE AUTOMATISCHEN MENÜMODI VERWENDEN Automatische Zubereitung DE 37... - Seite 38 DIE AUTOMATISCHEN MENÜMODI VERWENDEN Anmerkung Richtlinien für die automatische Zubereitung Speise Gewicht Zubehörteile Stufe Zubereitung DE 38...
- Seite 39 DIE AUTOMATISCHEN MENÜMODI VERWENDEN Speise Gewicht Zubehörteile Stufe Zubereitung DE 39...
- Seite 40 DIE AUTOMATISCHEN MENÜMODI VERWENDEN Gemüse-Menümodus Den Modus „Gemüse-Menümodus“ auswählen Wenn Sie kein Gewicht wählen, wird automatisch nach 5 Sekunden ein Gewicht eingestellt. DE 40...
- Seite 41 DIE AUTOMATISCHEN MENÜMODI VERWENDEN Tabelle Gemüse-Menümodus Speise Portion Stufe Zubereitung Zubehörteile (kg) DE 41...
- Seite 42 DIE AUTOMATISCHEN MENÜMODI VERWENDEN Speise Portion Stufe Zubereitung Zubehörteile (kg) DE 42...
- Seite 43 DIE AUTOMATISCHEN MENÜMODI VERWENDEN Speise Portion Stufe Zubereitung Zubehörteile (kg) DE 43...
- Seite 44 DIE AUTOMATISCHEN MENÜMODI VERWENDEN Auftaumodus Den Auftaumodus auswählen Wenn Sie kein Gewicht wählen, wird automatisch nach 5 Sekunden ein Gewicht eingestellt. DE 44...
- Seite 45 DIE AUTOMATISCHEN MENÜMODI VERWENDEN Richtlinien für den automatischen Auftaumodus Nr. Speise Gewicht Zubehörteile Stufe Ruhezeit Zubereitung DE 45...
-
Seite 46: Den Dampfkorb Verwenden
DEN DAMPFKORB VERWENDEN Wichtig: Der Dampfkorb besteht aus drei Teilen: Schüssel Sieb Deckel Verwendung Wartung Auftauen DE 46... - Seite 47 DEN DAMPFKORB VERWENDEN Tabelle für das Dampfgaren Speise Gewicht Leistung Kochzeit Zubehörteile Empfehlung DE 47...
- Seite 48 DEN DAMPFKORB VERWENDEN Speise Gewicht Leistung Kochzeit Zubehörteile Empfehlung DE 48...
- Seite 49 DEN DAMPFKORB VERWENDEN Speise Gewicht Leistung Kochzeit Zubehörteile Empfehlung Schüssel mit Schüssel mit Sieb und Deckel Deckel Achtung! DE 49...
-
Seite 50: Den Aqua-Clean-Modus Verwenden
DEN AQUA-CLEAN-MODUS VERWENDEN Mit dem Aqua-Clean-Modus reinigen Sie schnell Ihren Ofen (15 Minuten). Wichtig DE 50... -
Seite 51: Den Signalton Ausschalten
DEN SIGNALTON AUSSCHALTEN DE 51... -
Seite 52: Die Kindersicherung
DIE KINDERSICHERUNG Mit der Kindersicherung des Ofens können Sie die Bedienleiste sichern, um eine unbeabsichtigte Nutzung des Ofens zu vermeiden. Den Ofen sichern Den Ofen entriegeln DE 52... -
Seite 53: Den Mikrowellenofen Reinigen
Reparaturen dürfen ausschließlich durch einen qualifizierten Kundendiensttechniker durchgeführt werden. Wenn eine Wartungsmaßnahme durchgeführt werden muss, ziehen Sie den Stecker aus der Steckdose und nehmen Sie bitte Kontakt mit dem Kundendienst von ATAG auf. Halten Sie die folgenden Informationen bei Ihrem Anruf gri bereit: DE 53... -
Seite 54: Probleme Lösen
PROBLEME LÖSEN Falls Sie Probleme mit Ihrem Ofen haben, probieren Sie die nachfolgenden Lösungen aus. Möglicherweise sparen Sie sich so die Zeit und Mühe eines unnötigen Anrufs beim Kundendienst. DE 54... - Seite 55 FEHLERCODES Fehlercode Allgemeine Modi Wenn einer dieser Fehler auftritt, nehmen Sie bitte Kontakt mit dem Kundendienst von ATAG auf. DE 55...
-
Seite 56: Technische Spezifikationen
TECHNISCHE SPEZIFIKATIONEN Modell CX4311A DE 56... -
Seite 57: Entsorgung Von Gerät Und Verpackung
ENTSORGUNG VON GERÄT UND VERPACKUNG Konformitätserklärung DE 57... - Seite 58 DE 58...
- Seite 110 EN 54...
- Seite 111 EN 55...
- Seite 112 *699917* 699917...