Wiseup CK6000 Benutzerhandbuch
Inhaltsverzeichnis
Verfügbare Sprachen
Verfügbare Sprachen
Quicklinks
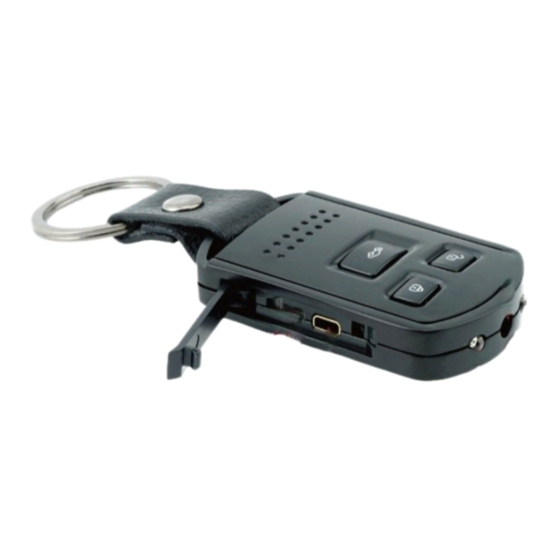
I. Product Overview
1. Camera Lens
2. Blue Indicator Light
3. Yellow Indicator Light
4. Red Indicator Light
5. Mini USB Port
II. What's In the Box
-1×Car Key Camera
-1×USB/AV Cable
-1×DC5V Charging Adapter
III. Operation
>> Before using, make sure that the camera battery is fully recharged.
>> Please make sure the Micro SD card is securely fitted into the SD card slot on
your camera. The camera will not work without a Micro SD card. A SDHC Class 10
Micro SD card is recommended.
CK6000
User Guide
6. Infrared LEDs
7. Mode Button
8. Power On/Off Button
9. Night Vision Button
10. Micro SD Card Slot
Inhaltsverzeichnis

Verwandte Anleitungen für Wiseup CK6000


Inhaltszusammenfassung für Wiseup CK6000
-
Seite 7: Was Ist In Der Box
CK6000 Benutzerhandbuch I. Produktübersicht 1. Kamera-Objektiv 6. Infrarot-LEDs 2. Blau-Anzeigelampe 7. Mode-Taste 3. Yellow Indicator Light 8. Ein / Aus-Taste 4. Red Indicator Light 9. Nachtsicht -Taste 5. Mini USB-Anschluss 10. Micro-SD-Kartensteckplatz II. Was ist in der Box -1×Auto-Schlüssel-Kamera -1×USB / AV-Kabel -1×5 V DC Ladeadapter... -
Seite 8: Einschalten / Ausschalten
platz an der Kamera angebracht ist. Die Kamera funktioniert nicht, ohne eine Micro-SD-Karte. Eine SDHC Class 10 Micro-SD-Karte wird empfohlen. 3.1. EINSCHALTEN / AUSSCHALTEN 3.1.1. Schalten Sie die Kamera durch Betätigung der Taste Power On / Off-Taste für 2 Sekunden. Die Kamera wird einmal vibrieren. Die blauen und roten Kontrollleucht- en für 3 Sekunden zu beleuchten. -
Seite 9: Zur Bewegungserkennung
leuchten für 3 Sekunden zu beleuchten. Dann wird die blaue Anzeigelampe erl- ischt und die rote Leucht wird bleiben, was auf die Kamera hat sich in den Stand- by-Modus. 3.3.2. Drücken Sie einmal Mode-Taste in Foto-Modus zu gelangen. Die Kamera wird einmal vibrieren. -
Seite 10: Ir-Nachtsichtmodus
2 Sekunden. Die Kamera wird einmal vibrieren. Die blauen und roten Kontrollleucht- en für 3 Sekunden zu beleuchten. Dann wird die blaue Anzeigelampe erlischt und die rote beleuchtet wird bleiben. 3.5.2. Drücken Sie die Mode-Taste 3-mal in Folge in die Bewegungserkennung Modus zu gelangen. -
Seite 11: Einstellung Von Uhrzeit / Datum-Stempel
5.2.1. Wenn die Kamera ausgeschaltet ist, entfernen Sie die Micro SD-Karte und in einen Kartenleser ein. 5.2.2. Setzen Sie den Kartenleser in einen PC-Computer. 5.2.3. Wechselplattenlaufwerk Ordner angezeigt wird. 5.2.4. Alle Dateien können im DCIM-Ordner zugegriffen werden. VI. Einstellung von Uhrzeit / Datum-Stempel 6.1. - Seite 12 8.2. Wählen Sie die Kamera Videosignalquelle an Ihrem Fernseher oder Monitor. 8.3. Schalten Sie die Kamera und starten Sie die Aufnahme von Video (siehe 3.2), dann können Sie die Kamera-Live-Videos auf dem TV oder während der Videoauf- zeichnung Prozess überwachen. 8.4.